![]() WONDERSKY
WONDERSKY
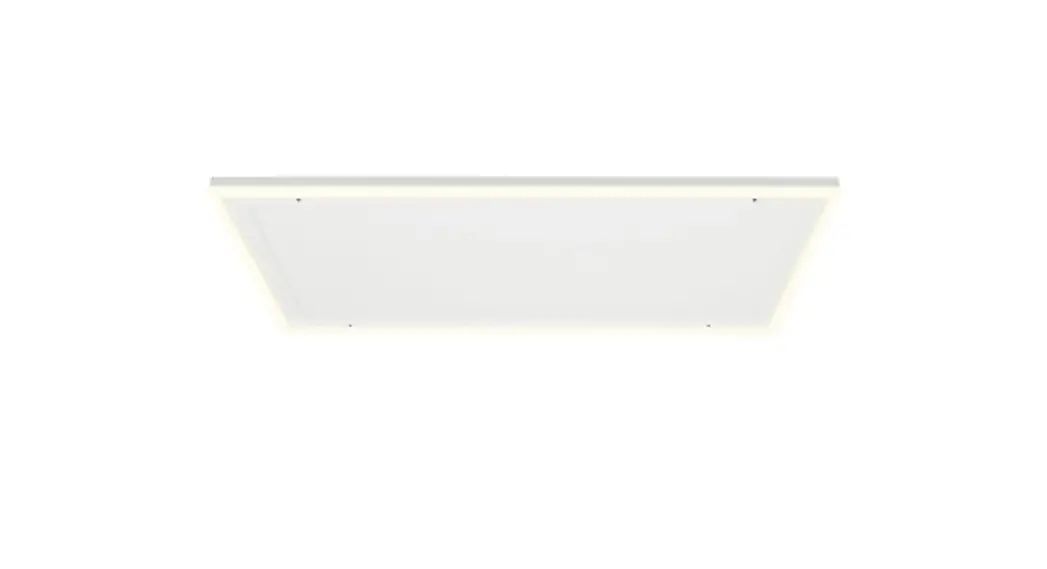
Ceiling Infrared Heate
10038378 10038379
10038380 10038381![]()
Note: This product is only suitable for well-insulated spaces or occasional use.
Dear customer,
Congratulations on purchasing this device. Please read the following instructions carefully and follow them to prevent possible damage. We assume no liability for damage caused by disregard of the instructions and improper use. Scan the QR code to get access to the latest user manual and more product information.

TECHNICAL DATA
| Item number | 10038378, 10038379 | 10038380, 10038381 |
| Power supply | 230 V ~ 50 Hz | |
| Power | 350 W | 700 W |
| Protection class | IP44 | |
PRODUCT DATA SHEET
| Model identifier(s): | 10038378, 10038379 | |||||
| Item | Symbol | Value | Unit | Item | Unit | |
| Heat output | Type of heat input, for electric storage local space heaters only | |||||
| Nominal heat output | Pnom | 0.35 | kW | manual heat charge control, with integrated thermostat | no | |
| Minimum heat output (indicative) | Pmin | 0.0 | kW | manual heat charge control with room and/ or outdoor temperature feedback | no | |
| Maximum continuous heat output | Pmax,c | 0.35 | kW | electronic heat charge control with room and/or outdoor temperature feedback | no | |
| Auxiliary electricity consumption | fan-assisted heat output | no | ||||
| At nominal heat output | elmax | 0.35 | kW | Type of heat output/room temperature control | ||
| At minimum heat output | elmin | 0.0 | kW | single-stage heat output and no room temperature control | no | |
| In standby mode | elSB | 0.001 | W | Two or more manual stages, no room temperature control | no | |
| with mechanic thermostat room temperature control | no | |||||
| with electronic room temperature control | no | |||||
| electronic room temperature control plus day timer | no | |||||
| electronic room temperature control plus week timer | yes | |||||
| Other control options | ||||||
| room temperature control, with presence detection | no | |||||
| room temperature control, with open window detection | yes | |||||
| with distance control option | no | |||||
| with adaptive start control | no | |||||
| with working time limitation | no | |||||
| with black bulb sensor | no | |||||
| Contact details | Chal-Tec GmbH, Wallstraße 16, 10179, Berlin, Germany | |||||
| Model identifier(s): | 10038380, 10038381 | |||||
| Item | Symbol | Value | Unit | Item | Unit | |
| Heat output | Type of heat input, for electric storage local space heaters only | |||||
| Nominal heat output | Pnom | 0.7 | kW | manual heat charge control, with integrated thermostat | no | |
| Minimum heat output (indicative) | Pmin | 0.0 | kW | manual heat charge control with room and/ or outdoor temperature feedback | no | |
| Maximum continuous heat output | Pmax,c | 0.7 | kW | electronic heat charge control with room and/or outdoor temperature feedback | no | |
| Auxiliary electricity consumption | fan-assisted heat output | no | ||||
| At nominal heat output | elmax | 0.7 | kW | Type of heat output/room temperature control | ||
| At minimum heat output | elmin | 0.0 | kW | single-stage heat output and no room temperature control | no | |
| In standby mode | elSB | 0.001 | W | Two or more manual stages, no room temperature control | no | |
| with mechanic thermostat room temperature control | no | |||||
| with electronic room temperature control | no | |||||
| electronic room temperature control plus day timer | no | |||||
| electronic room temperature control plus week timer | yes | |||||
| Other control options | ||||||
| room temperature control, with presence detection | no | |||||
| room temperature control, with open window detection | yes | |||||
| with distance control option | no | |||||
| with adaptive start control | no | |||||
| with working time limitation | no | |||||
| with black bulb sensor | no | |||||
| Contact details | Chal-Tec GmbH, Wallstraße 16, 10179, Berlin, Germany | |||||
SAFETY INSTRUCTIONS
Device-specifi c safety instructions
- The infrared heater runs at a surface temperature of 110-120 °C when mounted on the ceiling. Do not touch the heater when it is switched on.
- Prolonged touching of the switched-on heater can cause injury or burns.
- Never cover the unit when it is in operation. Covering the unit may cause the unit to overheat and result in fi re.
- Do not use the appliance to dry textiles and do not lean any objects against the appliance.
- Keep a minimum distance of 40 cm from the front and 20 cm from the sides of the unit. If the minimum distances are not observed, heat may build up behind the heater and the warranty will be invalidated.
The danger for children and vulnerable persons
- This device may only be used by children from the age of 8 and up or by persons with reduced physical, sensory and mental capabilities or a lack of experience and / or knowledge if they are supervised or have been instructed in the safe use of the device and have understood the resulting dangers.
- Cleaning and user maintenance should not be done by children unless they are 8 years of age or older and are supervised.
- Children must not play with the device.
- Children under 3 years of age should be kept away from the appliance unless they are supervised at all times.
- Children aged 3 to under 8 years may only switch the appliance on and off if it has been placed or installed in the intended normal operating position and they have bee supervised or instructed in the safe use of the appliance and understand the hazards involved. Children from 3 to under 8 years of age must not connect, adjust or clean the appliance or carry out maintenance on the appliance.
![]() CAUTION
CAUTION
Risk of burns! Some parts of this appliance can become very hot and cause burns. Special attention is required when children and vulnerable persons are present.
- If the power cord is damaged, it must be replaced by the manufacturer, customer service or a similarly qualified person in order to avoid a hazard.
- The surface of the heater can reach a surface temperature of up to 110-120 °C. Keep it out of the reach of children and vulnerable persons.
- Keep babies and children away from all packaging materials such as plastic bags to avoid choking hazards.
![]() WARNING
WARNING
Do not use this heater in small rooms if there are people inside who are not able to leave the room independently unless permanent supervision is provided.
Electrical safety
- Before installation, repair or maintenance, the heater must be switched off and disconnected from the power supply. Before installation, check that the heater is undamaged.
- If the heater or the power cord are damaged in any way, do not continue to use the heater. Repairs, maintenance or modifications to the unit must only be
carried out by an authorized specialist company. - Never attempt to repair the heater yourself as this will invalidate the warranty.
- Do not operate the heater if it has been dropped, but rather contact the manufacturer or customer service to ensure that it is not damaged.
- This heater is designed for operation with 230 V, 50 Hz AC. If your mains supply does not match this, you must not use the heater.
- This heater is not suitable for use in the UK or other countries where a mains voltage of 240 V or higher prevails.
- The heater must not be placed directly under a power socket.
INSTALLATION
Installation instructions
- The kit included in the delivery may only be installed on stable ceilings. If you want to install the unit on other types of ceilings, appropriate fixings are required (not included). Make sure that the wall is suitable for the installation.
- It is recommended to have the appliance installed by a qualified electrician or an authorized installer.
- The unit must be placed at a distance of at least 20 cm from all objects, walls, etc. The minimum distance to the ground is 220 cm.
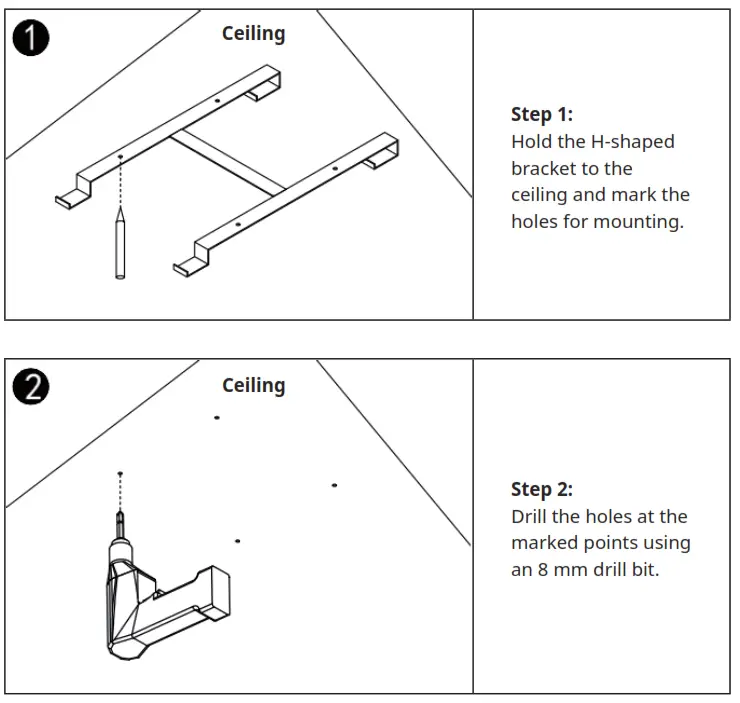
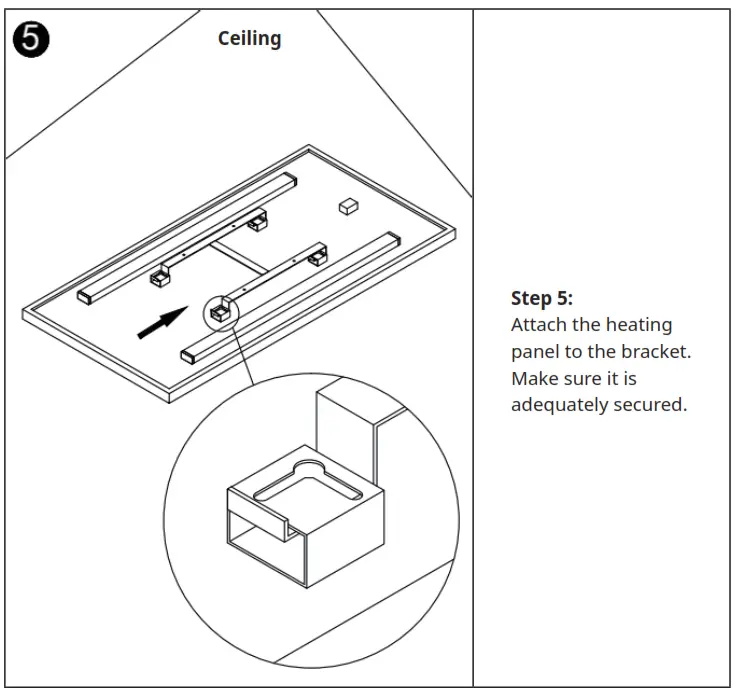
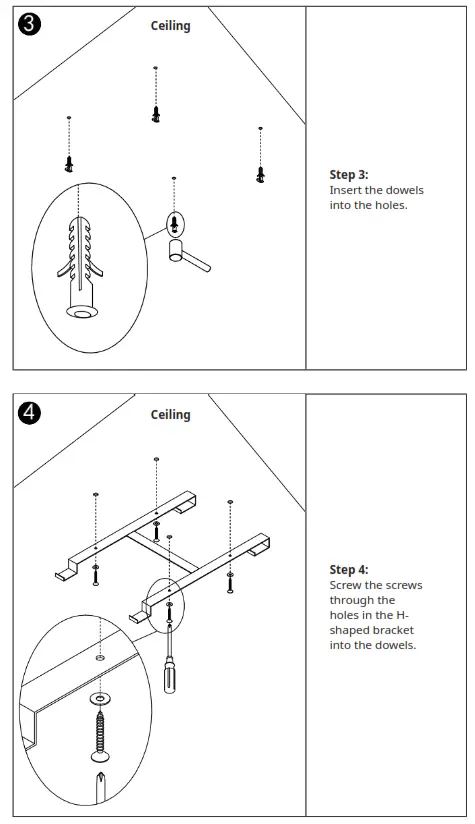
Ceiling mounting
 |  |
 | HEATER |
THERMOSTAT
General notes on the control system
This heater has a built-in thermostat receiver that connects to the thermostat wirelessly via a radio frequency signal. The thermostat can control all heaters within a radius of 10 meters (without obstacles). You can set both the heating function and the lighting via the thermostat.
Thermostat control panel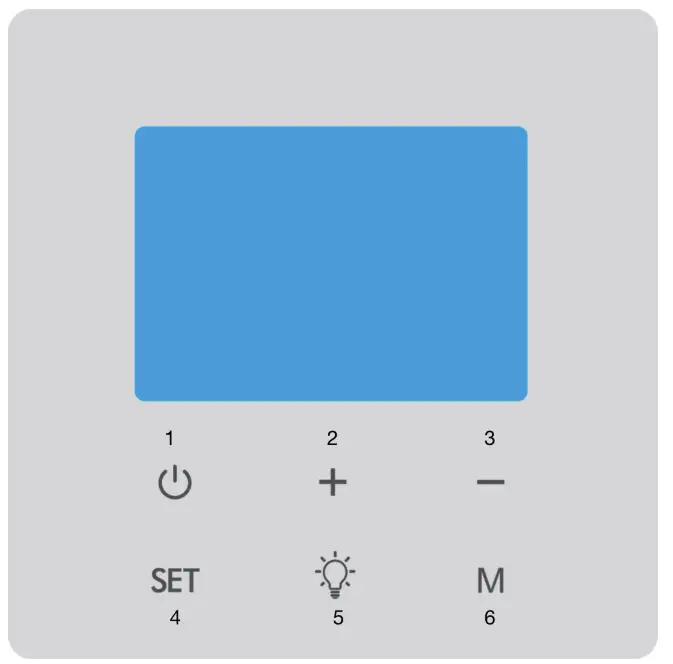
| 1 | On/off button | 4 | Setting button |
| 2 | Increase value | 5 | Light button |
| 3 | Decrease value | 6 | Mode button |
Thermostat screen displays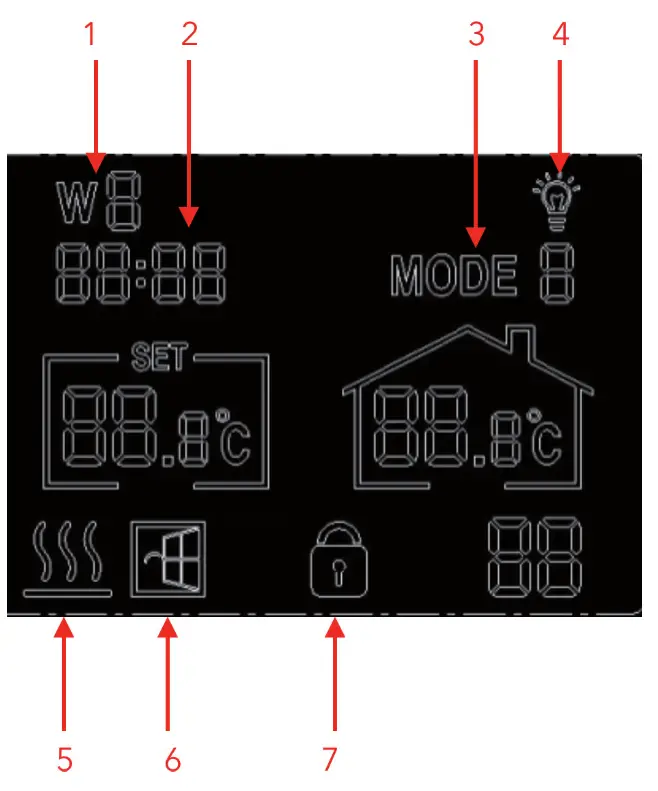
| 1 | Weekday | 5 | Heating display |
| 2 | Time | 6 | Open window detection |
| 3 | Mode | 7 | Child safety lock |
| 4 | Lighting |
OPERATION
Establish a connection between thermostat and heater
- Step 1:
Switch on the heater. Press the P button on the control box on the back of the heater twice. The pairing signal light (green light) will start flashing. - Step 2:
Switch on the thermostat. Press and hold the light button for 5 seconds in heating mode “88” will be displayed on the screen. - Step 3:
At the same time, the pairing signal light on the unit will stop flashing. This means that the connection between the unit and the thermostat has been successfully established. The unit can now be adjusted via the thermostat.
Note: If you are using more than one heater, repeat the above steps for all heaters. After successful pairing, all heaters can be controlled via the thermostat.
Disconnect the connection between thermostat and heater
If you want to disconnect the thermostat from a heater, press the P button on the heater twice. The pairing signal light will again start flashing.
Set day of the week/time and temperature calibration
- Switch on the thermostat. Keep the SET button pressed until the day of the week display (W8) starts flashing. Adjust the day of the week by pressing the + and – buttons. “W1” to “W7” refers to the weekdays from Monday to Sunday.
- Press the SET button again to set the time. Press the + and – buttons to adjust the time setting.
- Press the SET button again to enter the temperature calibration setting (range +5/-5 degrees). Temperature calibration is only necessary if the displayed room temperature deviates from the actual room temperature.
Modes
The thermostat has 2 different operating modes. Press the M button to select between mode 1 and mode 2. Mode 1 is the manual mode and mode 2 is the heating program mode.
- You can set the heating program mode separately for each day. If you want to change the setting, press and hold the M button for 5 seconds until “W1” flashes on the screen.
- Select the date you want to save with the + and – buttons. Press the M button to confirm.
- Then set the start time of the first period. Confirm by pressing the M button.
- Now set the desired room temperature by pressing the + and – buttons. Press the M button again to confirm.
- The setting for the next period can now be made. Repeat steps 2-4 for this. For faster programming, you can create a table similar to the one below, which you can then use to make the desired settings:
| Weekday (W1/W2/W3/W4/W5/W6/W7) | ||||
| Period | 1 | 2 | 3 | 4 |
| Time | 6:30 | 8:00 | 18:00 | 22:30 |
| Temperature | 21 °C | 18 °C | 21 °C | 16 °C |
Lighting
Press the light button to switch on the light at the back of the heater. Press this button again to turn the lighting on/off. Press the light button once more to change the light colour (cold white or warm white).
Child safety lock
Press the M and SET buttons simultaneously to activate or deactivate the child lock.
Open window detection
This thermostat is equipped with a function that detects open windows. If the unit detects that the room temperature has dropped drastically within a short time while the heater is running in heating mode, it will indicate that a window is open. The heater will switch off automatically for 30 minutes and the window symbol will flash on the screen. After 30 minutes, the unit automatically returns to the previous setting.
CLEANING AND CARE
Cleaning
- Before cleaning, always unplug the appliance from the wall outlet and allow it to cool completely.
- Never immerse the unit in water and ensure that the unit does not come into contact with splashing water.
- Clean the device with a soft and damp cloth.
- For glass models, use a soft cloth and glass cleaner. Never use a completely soaked cloth and make sure that the unit is dried with a clean cloth after cleaning.
- Do not use abrasive cleaners, solvents or scouring pads as this may cause scratches or other irreparable damage to the unit.
- The unit must be completely dry before use.
Instructions for use
- The unit may become discolored after some time. This is normal and related to air pollution and does not indicate a fault.
- Do not cover the unit with picture film and do not paint or print on it yourself. This may damage the heating element and invalidate the warranty.
- If you notice any unusual noises, smells, visible changes or extremely high temperatures, stop operating the appliance immediately and contact the manufacturer or customer service.
Repairs
- Repairs may only be carried out by an authorized specialist company or by qualified personnel. Do not attempt to repair or modify the device yourself. Otherwise, the warranty will become void.
DISPOSAL CONSIDERATIONS
![]() If there is a legal regulation for the disposal of electrical and electronic devices in your country, this symbol on the product or on the packaging indicates that this product must not be disposed of with household waste. Instead, it must be taken to a collection point for the recycling of electrical and electronic equipment. By disposing of it in accordance with the rules, you are protecting the environment and the health of your fellow human beings from negative consequences. For information about the recycling and disposal of this product, please contact your local authority or your household waste disposal service.
If there is a legal regulation for the disposal of electrical and electronic devices in your country, this symbol on the product or on the packaging indicates that this product must not be disposed of with household waste. Instead, it must be taken to a collection point for the recycling of electrical and electronic equipment. By disposing of it in accordance with the rules, you are protecting the environment and the health of your fellow human beings from negative consequences. For information about the recycling and disposal of this product, please contact your local authority or your household waste disposal service.
DECLARATION OF CONFORMITY
 Manufacturer:
Chal-Tec GmbH, Wallstrasse 16, 10179 Berlin, Germany.
Importer for Great Britain:
Berlin Brands Group UK Ltd
PO Box 1145
Oxford, OX1 9UW
United Kingdom
Hereby, Chal-Tec GmbH declares that the radio equipment type Wondersky is in compliance with Directive 2014/53/EU. The full text of the EU declaration of conformity is available at the following internet address: use.berlin/10038378
For Great Britain: Hereby, Chal-Tec GmbH declares that the radio equipment type Wondersky is in compliance with the relevant statutory requirements. The full text of the declaration of conformity is available at the following internet address: use.berlin/10038378
COMFORTINT
www.klarstein.com


