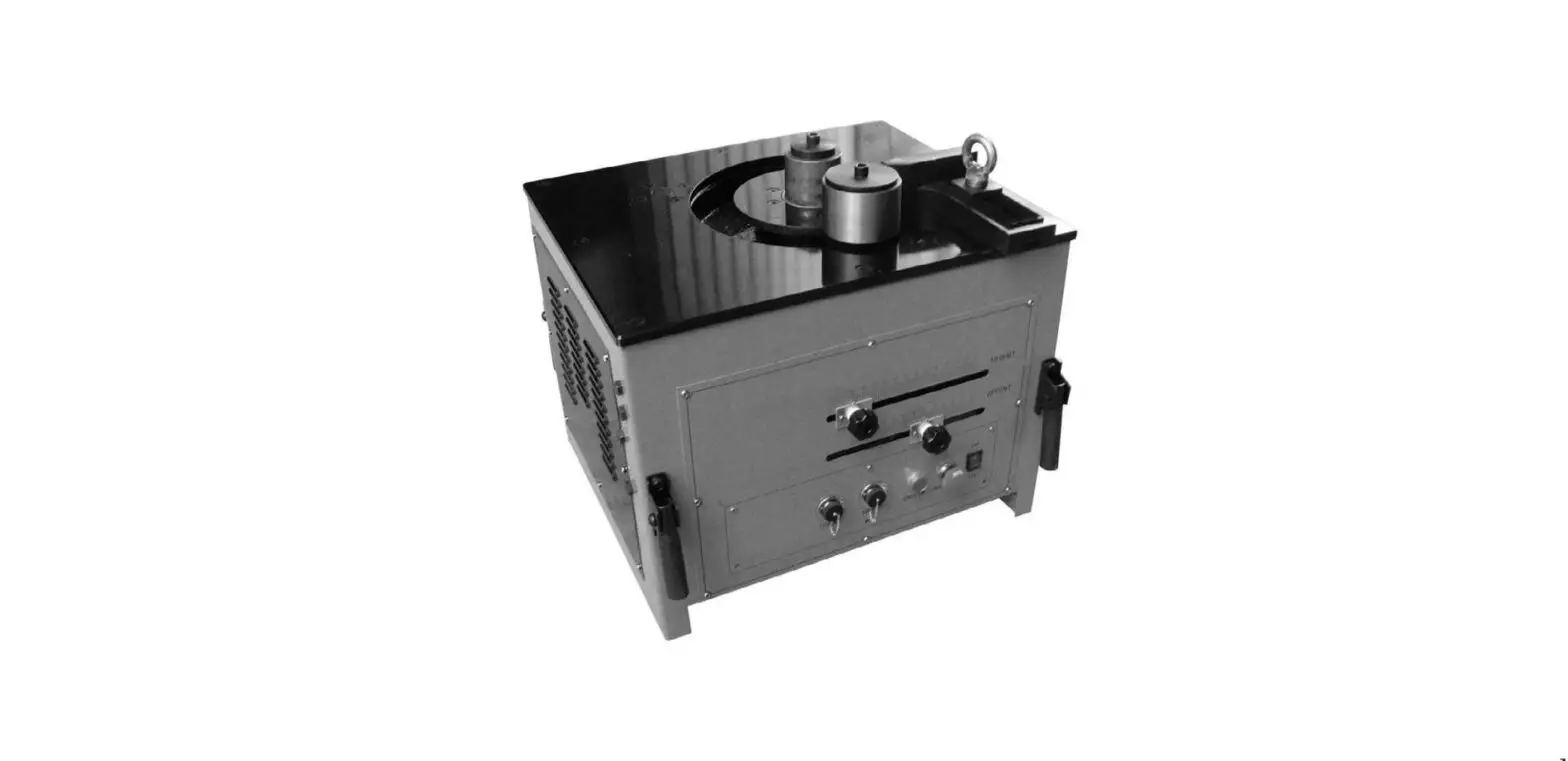
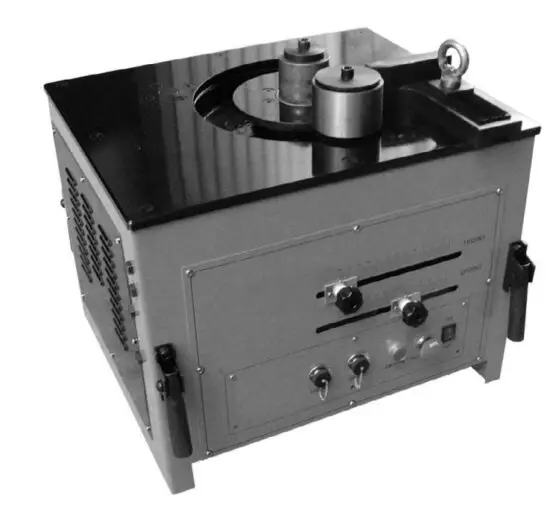
RapidTool CRBC-25 Industrial Rebar Bender and Cutters
Safety
This machine is a high-performance, industrial machine. Failure to follow safety instructions may result in serious injury or death.
- Take note of all warning signs on the machine.
- Keep work area clean and free from obstruction.
- Ensure power supply is properly earthed.
- Keep body parts well clear of moving parts and protected areas when machine is switched on.
- Authorized personal protective equipment must be worn when operating machine (minimum requirement – safety glasses (when operating cutter), protective gloves and class 2 hearing protection).
- Indoor use only – never operate machine in wet or damp conditions.
- Stand well clear of the machine when in use (opposite the direction of bend).
- Use away from others, particularly children.
- Ensure power & pedal switch cords are securely fastened prior to switching on machine.
- Use the emergency stop button immediately if issues arise during operation.
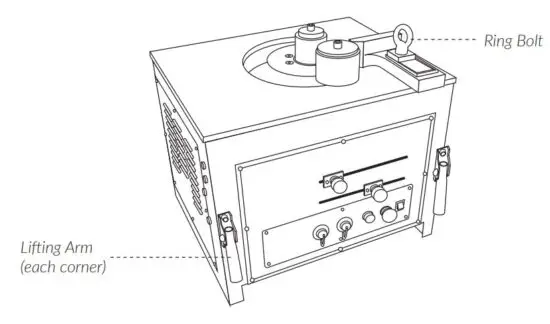
- Ensure lifting chains are fastened securely below lifting arms and through ring bolt when in transit.
- Never attempt to bend rebar outside of model prescribed diameter range (refer to table in Specifications & Parts section).
- Do not bend short lengths.
- Mount machine on even surface capable of carrying the weight of the machine. Machine should not vibrate on surface during operation.
- Clean machine of loose debris after use.
- Never attempt to service a machine (other than general maintenance procedures outlined in the Maintenance section). Contact supplier if issue arises.
- Only use RAPIDTOOL-approved spare parts and accessories with the machine.
- Keep away from sparks and naked flames.
- Always check power cords for damage and safe placement prior to use.
- Disconnect machine from power outlet when not in use.
- Inspect the machine before each use. Do not use when quality has been compromised.
- Do not cover air vents on the machine.
- Store out of reach of children.
Transporting Machine
- Install & tighten ring bolt securely.
- Check lifting arm bolts to ensure bolts are securely fastened.
- Secure lifting chain below lifting arms and through ring bolt to prevent excess movement during transport.
- Ensure all machinery & equipment used to transport the machine are rated for required loads.
Specifications & Parts
Power Supply:
Ensure machine is connected to correct power supply (check machine label to confirm power supply).
Extension Leads:
Where possible, connect machine directly to power outlet. If an extension lead is required, ensure lead is under 50m in length. Minimum extension lead diameters are prescribed below:
| Extension Lead Length (m) | Min Wire ø (mm²) |
| 30m | 2.5 |
| 50m | 4.0 |
| Models | CRB-25 | CRBC-25 | CRB-32 | CRBC-32 | |
| Input Voltage – Single Phase | 220-240V AC ~50Hz or 110-120V AC ~60Hz * | ||||
| Power Consumption 220-240V | Bender | 1050W | 1050W | 1800W | 1800W |
| Cutter | – | 1550W | – | 2400W | |
| Power Consumption 110-120V | Bender | 1150W | 1150W | 1900W | 1900W |
| Cutter | – | 1500W | – | 2150W | |
| Net Weight | 91kg | 136kg | 175kg | 225kg | |
| Dimensions (cm) | 45L x 50W x 44H | 50L x 45W x 79H | 60L x 58W x 47H | 60L x 58W x 98H | |
| Bending Range | 6-25mm** | 6-25mm** | 6-32mm** | 6-32mm** | |
| Cutting Range | – | 4-25mm** | – | 6-32mm** | |
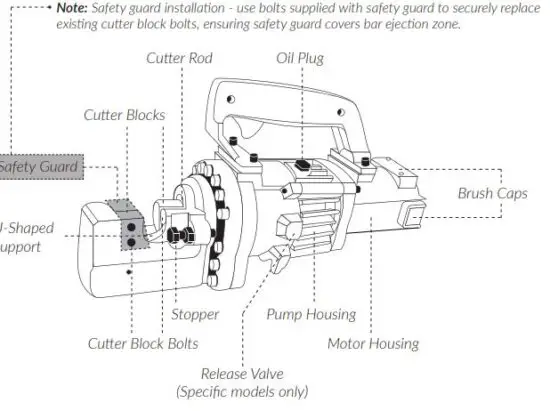
Machine Parts
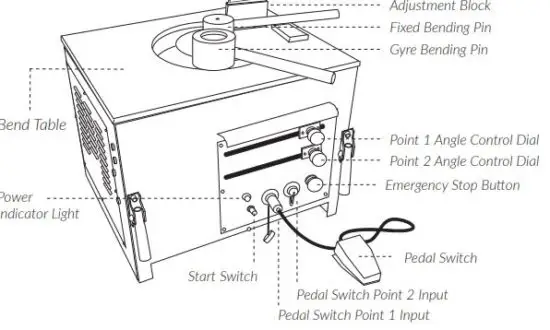
Operating Machine
General notes:
Machine is equipped with an emergency stop button. Ensure pedal switch cords are securely fastened to inputSs (if pedal switch required). Always ensure point 1 angle is set at least 5 degrees higher than point 2 angle. Ensure angle control dials are securely fastened. Wait until bending cycle is completed before starting new cycle. If pedal switches are not required, press the start switch to bend to point 1 angle.
Pre-use Checks
- Check power supply is properly earthed.
- Check that power cord is undamaged and plug is not loose (also applies for extension leads).
Bending Procedure - Secure required fixed bending pin and gyre bending pin combination as per table below.
- Modify adjustment block to suit required bar size.
- Securely fasten pedal switch cords to machine inputs (if required).
- Connect to power source and observe power indicator light on machine face indicating machine is ready for use.
- Adjust point 1 and point 2 angle control dials to required angles ensuring point 1 angle is set at least 5 degrees higher than point 2 angle. Securely fasten angle control dial once required angles are set.
- Stand well clear of machine (opposite direction of bend).
- Press the pedal switch connected to pedal switch point 1 input to bend to point 1 angle.
Note: Pressing the start switch will also bend to point 1 angle.- Press the pedal switch connected to pedal switch point 2 input to bend to point 2 angle.
- Bender/cutter model also has pedal switch point 3 input to operate cutter (see Additional Instructions for Rebar Cutter section).
CRB-25/CRBC-25
| Bar Diameter | Max No. of Bars |
| 12mm | 4 |
| 16mm | 2 |
| 20mm | 1 |
| 24mm | 1 |
CRB-32/CRBC-32
| Bar Diameter | Max No. of Bars |
| 12mm | 5 |
| 16mm | 3 |
| 20mm | 2 |
| 24mm | 1 |
| 28mm | 1 |
| 32mm | 1 |
CRB-25/CRBC-25
| Fixed Bending Pin | Gyre Bending Pin |
| ø80 | ø115 |
| ø105 | ø85 |
CRB-32/CRBC-32
| Fixed Bending Pin | Gyre Bending Pin |
| ø80 | ø165 |
| ø120 | ø110 |
| ø140 | ø75 |
Working Conditions
Do not use or store machine outside of environmental conditions below
| Working Temperature | -10˚C – +45˚C |
| Humidity | <90% RH |
| Storage Temperature | -20˚C – +65˚C |
| Elevation | < 100m |
| Environment | Interior, waterproof, non-corrosive, non-flammable |
Maintenance
Always ensure power is disconnected before performing maintenance.
Cleaning:
Always wear gloves to protect hands from metal splinters when cleaning. Wipe or brush away all dust and metal filings from Bend Table after use to prevent debris entering machine (can use compressed air).
Bend Table Bolts:
Ensure Bend Table bolts are tightened before use.
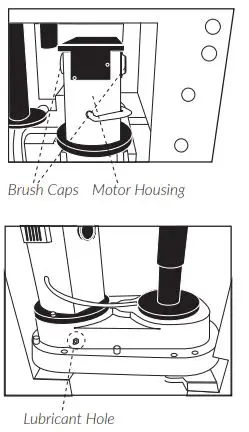
Carbon Brushes:
Inspect carbon brushes monthly. Worn brushes will result in power loss and cause irreparable damage to the armature’s commutator. Check brushes immediately if a loss of power or electrical fault is experienced.
Replacing Carbon Brushes:
- Open the access side panel and locate the motor housing(s) with black lid.
- Locate the brush caps on both sides near the top of the motor housing(s).
- Open the brush caps with a screwdriver and remove carbon brushes from the machine.
- Inspect the carbon brushes and replace where worn or damaged.
- Reinstall new carbon brushes and brush caps securely.
- Replace access side panel.
Lubrication:
Lubricant shall be checked every 2 months for heavy usage or when loss of power is experienced. Always use approved lubricant with high corrosion and friction resistance properties. Apply lubricant via grease gun to lubricant hole to ensure lubricant chamber remains full.
Instructions
Safety
- Keep body parts well clear of cutting blocks when machine is switched on.
- Never attempt to cut rebar outside of models prescribed diameter range (refer to table in
Specifications & Parts section). - Do not cut short lengths.
- Inspect cutter before each use (refer to Maintenance section). Do not use when quality has
been compromised. - Beware of ejected objects during the cutting process. Always wear approved safety glasses.
- Use protective gloves when cleaning machine or handling cutter blocks as edges are very sharp.
- Do not touch pump housing after use as it will be hot. Wait for machine to cool.
- Where available, safety guard should be installed.
- Use Allen Key to loosen and activate the Release Valve function when required.
Cutter Parts
Operating Machine
Pre-use Checks:
Check the condition of cutter blocks and the tightness of cutter block bolts (refer to the Maintenance section).
Warm-Up:
In cold weather, warm up the cutter by repeating cut cycle for 60 seconds to ensure hydraulic oil reaches proper viscosity.
Stopper Adjustment: Adjustable stopper must be set incorrect position dependent on size of rebar.
- Insert rebar into U-shaped support.
- Keeping rebar at 90⁰ to machine, screw-in stopper until it is just touching the rebar. Cutting Procedure:
- Securely fasten pedal switch chord to pedal switch point 3 input.
- Connect to a power source and observe power indicator light on the machine face indicating machine is ready for use.
- Insert rebar between stopper and front cutter block, making sure it is horizontally seated in U-shaped support.
- Press the pedal switch connected to pedal switch point 3 input while the cutter rod advances and fully cuts rebar.
- Release pedal switch only once rebar has been fully cut to allow cutter rod to retract.
Note: Power will be compromised if hydraulic oil exceeds 70˚C. Allow the machine to cool before resuming operation.
Note: Do not cut rebar on an angle. Incorrect placement of rebar may cause damage to cutter blocks and or cutter rod voiding warranty.
Maintenance
Always ensure power is disconnected before performing maintenance. To access Rebar Cutter:
- Open the access side panel and locate the rebar cutter with a black cover.
- Remove the screws to lift the cover and access the rebar cutter.
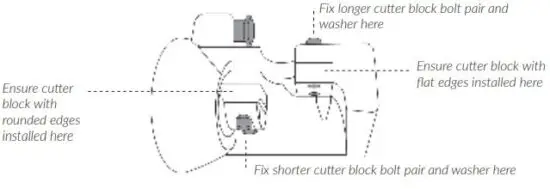
Cutter Blocks:
Check cutter blocks for damage before each use. If cutter block is damaged, replace block before next use as per following diagram:
Cleaning:
Clean machine after each use. Use protective gloves when cleaning to protect hands from metal splinters. Do not use air gun as this may cause dust and metal filings to enter vents.
- Extend cutter rod and disconnect from power source.
- Wipe or brush away all dust and metal filings. Pay particular attention to lower half of cutter rod.
- Connect to power source and press pedal switch to complete cut cycle.
Oil Level Check:
Check oil every 2 months or if loss of power apparent in rebar cutter. Hydraulic oil is highly flammable; keep away from sparks and naked flame. In case of ingestion or eye contact, consult a physician immediately. - Adjust stopper and make 3-4 cuts, noting exactly the point in which rebar is breaking.
- Pinch next bit of rebar, stopping just before it breaks. Unplug machine from power source.
- Turn unit over so oil plug is uppermost (if machine is hot allow to cool down first).
- Remove oil plug and seal washer (never remove when machine is hot).
- Check oil is level with bottom of plug hole. If oil is too low, top up with approved ISO VG46 oil.
- Remove air bubbles – gently tilt cutter lengthways and return to level position. Top up and tilt cutter in opposite direction. Repeat this process until all air has been extracted.
- Replace seal washer and oil plug.
- Connect to power source and completely sever rebar.
Oil Change:
Change oil at least once a year or sooner if it appears dirty. - Unplug the machine from power source.
- Turn unit over so oil plug is uppermost (if the machine is hot allow to cool down first).
- Remove oil plug and seal washer (never remove when the machine is hot).
- Turn cutter over and drain oil into a suitable receptacle. When oil ceases to drain, tilt the machine to rear to allow oil trapped in piston housing to drain out. When housing is empty, tilt unit in the opposite direction to empty the residue in the pump case.
- Once all oil has been drained from the machine, turn unit over so oil plug is uppermost.
- Slowly fill the machine with fresh oil and replace seal washer and oil plug.
- Connect machine to power source and follow procedure for Oil Level Check.
Note: Dispose of hydraulic oil in accordance with local regulations.
Bolt Tightness:
All bolts should be checked for tightness on a weekly basis or after every 500 cuts (whichever comes first).
Carbon Brushes:
Inspect carbon brushes on a monthly basis. Worn brushes will result in power loss and cause irreparable damage to the armature’s commutator. Check brushes immediately if a loss of power or electrical fault is experienced. - Replacing Carbon Brushes:
- Unplug machine from power source.
- Locate the brush caps on both sides near the back of the motor housing.
- Open the brush caps with a screwdriver and remove carbon brushes from the machine.
- Inspect the carbon brushes and replace where worn or damaged.
- Reinstall new carbon brushes and brush caps securely
Documents / Resources
 | RapidTool CRBC-25 Industrial Rebar Bender and Cutters [pdf] User Guide CRBC-25, Industrial Rebar Bender and Cutters |


