![]()
5″ PROJECTION ALARM
CLOCK WITH FM RADIO
SKU:DPWS-IN001-US![]() Manual
Manual
FEATURES
- LED screen display
- Two alarms
- Buzzer or FM radio as the alarm
- Automatic snooze function (OFF or 5~60min)
- FM radio
- FM frequency range: 87.5MHz ~ 108.0MHz
- Searching radio frequency automatically or manually
- LED backlight brightness settings: 3 levels or OFF
- Adjustable time projection
- Projection brightness settings: 2 levels or OFF
- Power supply: USB power cable: DC5V (Input current is more than 500mA) Battery (for saving settings only): 1*3.0V CR2032
Note: Please plug in the clock using the included USB cable to get it to operate.
NOTE
- Please plug in the clock using the USB power cable to turn it on (the clock will not operate on the CR2032 battery.)
- Insert a 3.0V CR2032 battery and make sure it is installed correctly [ “+” and “-” marks].
- To save time settings, please insert a CR2032 battery. Otherwise, the clock will reset and lose all memory including the time settings, FM radio settings when the power is cut off suddenly.
IDENTIFYING PARTS
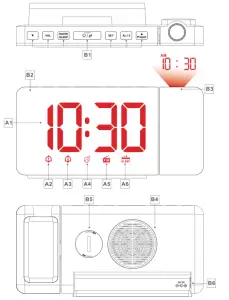
Part A – Clock
A1: Time
A2: ALARM1 icon ![]()
A3: ALARM2 icon ![]()
A4: SNOOZE icon ![]()
A5: RADIO icon 
A6: SLEEP icon “![]() ”
”
Part B – Buttons and switches
B1:![]() Buttons
Buttons
B2: LED screen
B3: Projection
B4: Speaker
B5: The battery compartment
B6: Power supply socket
MANUAL SETTING
- Press and hold the “SET” button for 3 seconds to enter the setting mode.
- Use the button “▲” or “▼” to set the correct hour. Then, press the “SET” button to confirm your setting and move on.
- Use the button “▲” or “▼” button to set the correct minute. Then, press the “SET” button to confirm your setting and move on.
- When “24Hr” starts to flash, use the button “▲” or “▼” button to select 24 Hr mode or 12 Hr mode. Press the “SET” button to confirm your setting and exit settings.
FM RADIO
- In normal time mode, press the “RADIO/SLEEP” button once to turn on the radio.
- If you need to turn off the radio, press the
 button to turn it off.
 - Press the “VOL” button to set the volume when the FM radio is on. Press “▲” or “▼” button to adjust the volume from L00 to L15.
- When the radio is turned on for the first time, the clock will automatically search for frequencies from “FM87.5”. Then, it will stop at a receivable broadcast station and preset it as C:01. The automatic searching and presetting will go on until the frequency is “FM108.0”. Now, the clock will stop at the preset C:01 station to play.
- You can press “SET” to browse the preset stations. If the clock stops at “C:01”, press the “SET” button once to switch to the next frequency “C:02”.
- Press the “▲” or “▼” buttons to select the previous or next frequency. You can also press and hold the “▲” or “▼” buttons to speed up searching.
- Press and hold the “SET” button to save a receivable station. Preset station numbers start to flash (such as C:01). Next, press “▲” or “▼” to select a station number to save the station and press the “SET” button to confirm your setting.
- Press and hold the “▲” and “▼” buttons for more than 3 seconds to automatically search for broadcast stations.
- In FM mode, press the “RADIO/SLEEP” button to turn on the timer. The sleep timer icon
 and “:05 ” value will show up. It means that FM radio will automatically turn off in 5 minutes. You can press the “RADIO/SLEEP” button to choose the desired timer (05 min,10 min, 15 min, 30 min, 45 min, 60min, 75 min, 90 min, and OFF).
SETTING ALARMS
- When time is displayed on the screen (normal time mode), press the “SET” button once to turn on Alarm 1
 and twice to turn on Alarm 2
 .
. - In normal time mode, press and hold the “AL1-2” button for 3 seconds to enter the alarm setting mode. The Hour of Alarm 1 starts to flash. Use the button “▲” or “▼” button to set the desired hour.
- Press the “AL1-2” button to confirm your setting and move on. The Minute of Alarm 1 starts to flash. Use the button “▲” or “▼” button to set the desired minute. Then, press the “AL1-2” button to confirm your setting.
- Now “OFF” icon starts flashing on the screen. Use the button “▲” or “▼” button to choose whether to wake up to the FM radio or not (ON or OFF).
- If you choose “ON”, it means that the FM radio will turn on to wake you up when Alarm 1 is triggered. When “L08” flashes on the screen, use the button “▲” or “▼” button to adjust the volume for Alarm 1. Then, press the “AL1-2” button to confirm your setting.
- If you choose “OFF”, it means that you will wake up to a standard buzzer sound instead when Alarm 1 is triggered. Then, press the “AL1-2” button to confirm your setting.
- When the snooze icon
 starts flashing and “:05” will show up. Use the “▲” or “▼” button to set the snooze time from 05 minutes to 60 minutes or OFF. Press the “AL1-2” button to confirm your setting and start setting Alarm 2.
 - The setting of Alarm 2 is the same as Alarm 1 . When you finish the setting, the clock exits the alarm setting mode and goes back to the time display.
Note:
- You can press and hold the “▲” or “▼” button to speed up the setting.
- The clock will automatically save the settings and exit the setting mode if no button is pressed within 20 seconds.
ACTIVATE OR DEACTIVATE ALARMS
- In normal time mode, short press the “AL1-2” button:
Press x1:shows up and Alarm 1 is activated
Press x2:shows up and Alarm 2 is activated
Press x3:and both show up and alarms are both activated
Press x4: Both alarms are deactivated
TURN OFF ALARM RING
- There are two kinds of alarms: the standard buzzer sound and the FM radio.
- If you choose to wake up to the standard buzzer sound, the
clock will make a “Bi” sound for 1 minute and the icon keeps flashing. Press any button except the “ ” button to stop the alarm from ringing. The icon “ ” or “ ” will automatically stop flashing as well.
 - If you choose to wake up to the FM radio, the clock will automatically turn on the radio for 30 minutes, and the icon keeps flashing. You can press the “AL1-2” button to stop the alarm from ringing or press it to turn off the FM radio. The icon automatically stops flashing as well. Alternatively, you can switch the radio frequency, adjust the volume, or change other FM settings.
SNOOZE FUNCTION
- When the alarm is ringing, press the button to enter the SNOOZE mode. The alarm goes off again as the snooze timer expires.
- if you have disenabled the snooze function in the setting, there will be no snooze timer. Press the button and the alarm stops instantly (and will not go off until the next day).
PROJECTION FUNCTION
- In the normal time mode, short press the “▲/Project” button to adjust brightness: Low, High, and Off.
- Press and hold the “▲/Project” button to rotate the projection image for 90° each time.
- The effective projection range is from 3.3 feet to 9.8 feet.
BACKLIGHT BRIGHTNESS
- Short press to adjust the brightness of the LED screen: Low, Medium, High, and Off.
- When the screen is adjusted to Off, short press any button except the button to light up the screen with Low brightness for 5 seconds.
Note: if the radio is on, the screen will stay on as well. When The radio is off, the screen will turn off accordingly.
WARRANTY
- Dr.Prepare products are covered by a 12-month limited warranty from the original purchase date. If any problems occur, please contact our support team.
- We only provide after-sales services for products that are sold by Dr.Prepare or retailers and distributors authorized by Dr.Prepare. If you have purchased your unit from other channels, please contact your seller for more information about return and warranty.
CUSTOMER SUPPORT
If you have any questions or concerns, please send us an email at [email protected]


