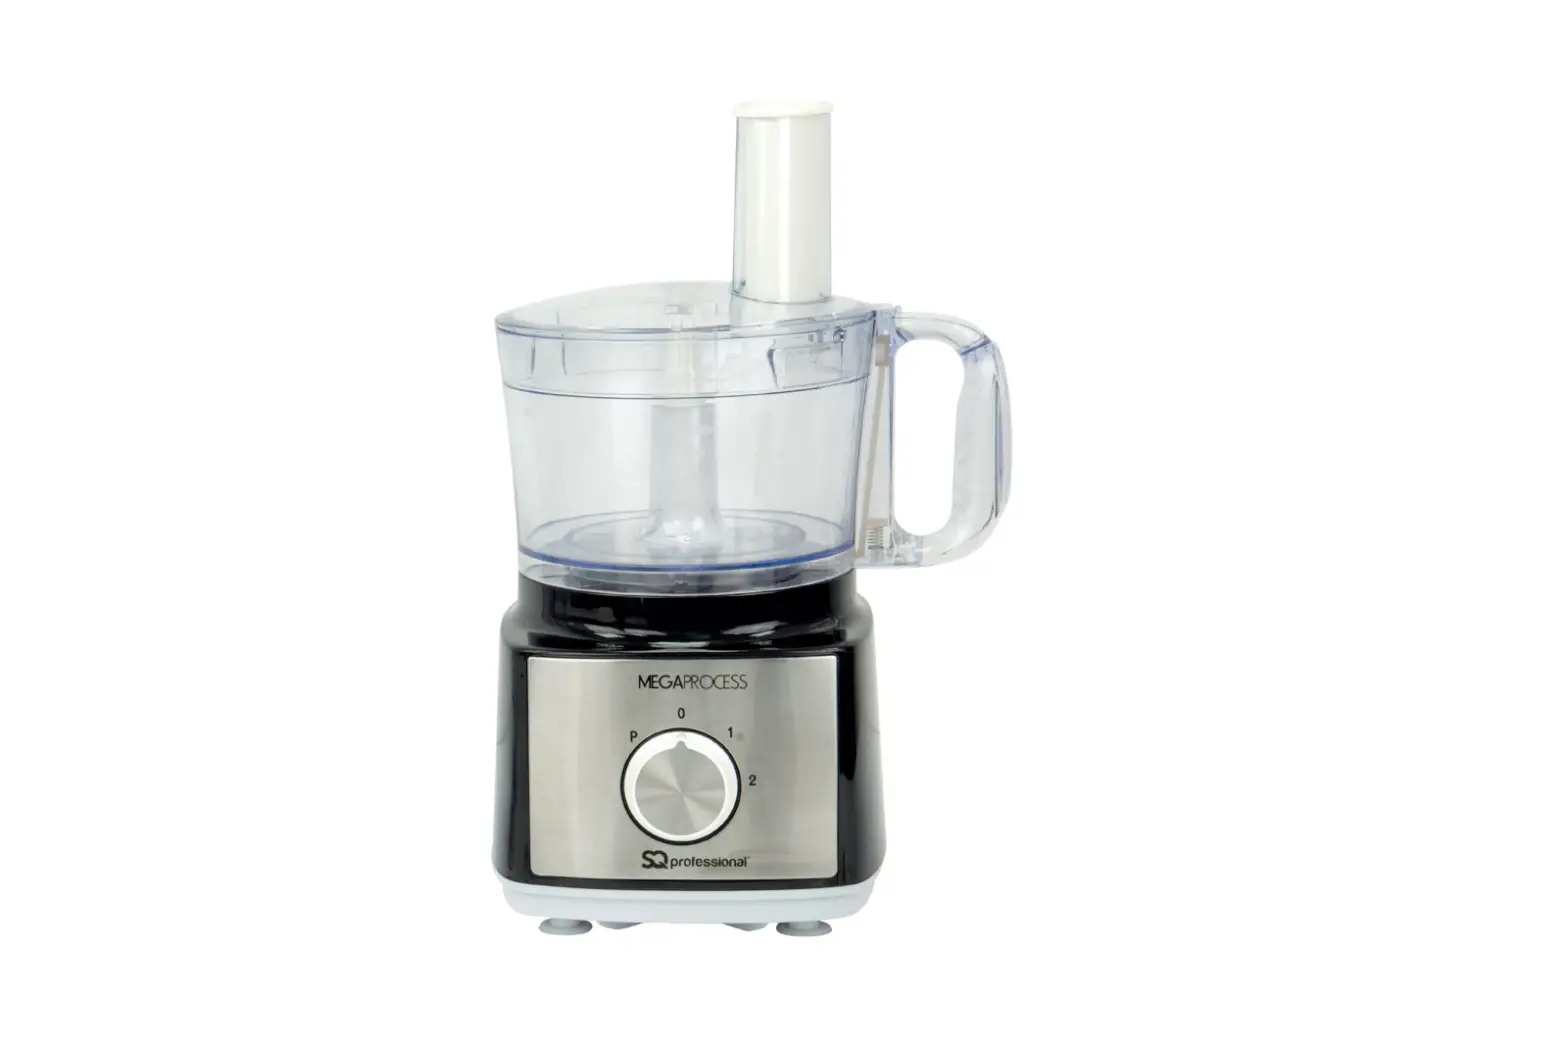
SQ professional 9373-9374 Megaprocess Food Processor Instruction Manual
IMPORTANT!
Due to sharp parts and potential hazards, this appliance is not suitable for the use of children under 16 years old.
Children under the age of 16 must be supervised by an adult at all times if using or cleaning the appliance.
Even when off please keep the appliance and mains cable out of the reach of children. This is not a toy!
The appliance can be used by persons with reduced physical, sensory or mental capabilities if they have been given supervision and instruction and understand the use and hazards involved.
Always disconnect the appliance from the power socket if it is left unattended and before assembling, disassembling or cleaning.
If the mains cable is damaged, it must be replaced by qualified persons in order to avoid any hazards.
FEATURES
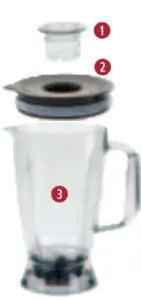
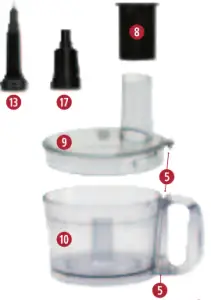
- Measuring cup
- Blending jug lid
- Blending jug

- Connector
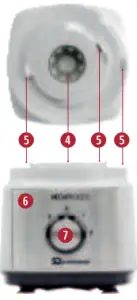
- Safety interlocks
- Motor unit
- Rotary switch

- Pusher
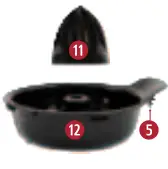
- Mixing bowl cover
- Mixing bowl
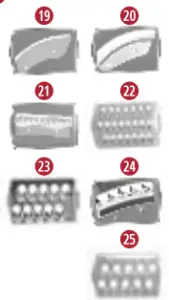
- Citrus juicer cone

- Citrus juicer basket
- Drive shaft

- Chopping blade
- Chopping blade covers
- Kneading blade

- Blade retainer
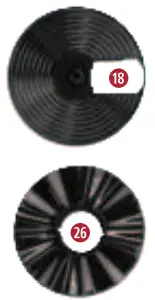
- Blade disc

- Fine slicing blade
- Coarse slicing blade
- Wavy slicing blade
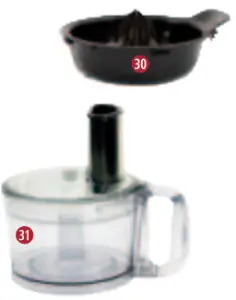
- Fine shredding blade
- Coarse shredding blade
- French fry blade
- Slurry blade

- Emulsifying disc
- Grinding mill cover
- Grinding mill base

- Assembled grinding mill
- Assembled citrus juicer
- Assembled mixing bow


SHARP BLADES!
SPECIFICATIONS
- Rated Voltage: AC 220-240V
Frequency: 50/60Hz
Rated Power: 750W
Processing Bowl Capacity: 2. 0L
Blending jug Capacity: 1. 8L
READ THE INSTRUCTIONS AND KEEP THEM SAFE. REMOVE ALL PACKAGING BEFORE USE.
IMPORTANT SAFEGUARDS
WHEN USING ANY ELECTRICAL APPLIANCE, BASIC SAFETY PRECAUTIONS SHOULD ALWAYS BE FOLLOWED, INCLUDING THE FOLLOWING:
- Read all instructions carefully before using the appliance.
- This appliance is intended for household use only.It is not suitable for commercial use such as staff kitchen areas and other working environments.
- Ensure that the appliance is always placed on a firm and flat surface, away from the edge of the worktop. Do not place the appliance onto a metal tray or metal surface whilst in use. Do not place the appliance on, or near, a hot gas or electric burner or in a heated oven. Do not operate the appliance with wet hands or barefoot.
- Keep the appliance and mains cable away from edges of worktops and out of reach of children.Route the mains cable to avoid overhanging, being caught or tumbling over.
- Do not let the mains cable run across an open space, such as between a low socket and a table, or across any hot area, such as a cooker as heat may damage the mains cable.
- The connections on both sides of the mains cable (the appliance and socket) should never be strained. If the mains cable is damaged it must be replaced by a qualified person or service to avoid any hazards.
- Do not use the appliance in a bathroom, near water, or outdoors. Do not immerse any of the parts (appliance, mains cable, plug) in water or other liquids to protect against fire, electric shock and personal injury.
- Do not use the appliance if it is damaged or
is malfunctioning. Do not leave the appliance unattended whilst in use. Use and store it out of reach from children. - This appliance must not be operated by an
external timer or a remote control system. - SQ Professional Ltd will not be held liable for
eventual damages to persons, animals or objects
caused by incorrect installation or deriving from improper, erroneous or unreasonable use. - The motor unit 6 top should always be kept dry. Before cleaning and drying, disconnect the power supply. Ensure that the motor unit 6 is completely dry before you reconnect the appliance to the
power supply. - To reduce the risk of injury, ensure that blades
are correctly attached. Always handle the blades carefully, as they are extremely sharp. - Ensure the blending jug 3, mixing bowl 10, grinding mill 29 and any attachments are securely in place before operating the appliance.
- Always close the blending jug lid 2 and have the mixing bowl cover 9, citrus juicer 30 or grinding mill 29 securely locked in place before you switch the appliance on. Do not open the blending jug lid 2 or the mixing bowl cover 9 and do not try to remove the citrus juicer 30 or grinding mill 29 whilst the appliance is running.
- Never switch the appliance on when it is empty. Always ensure there is at least the minimum amount of liquid or solid ingredients in the blending jug 3, mixing bowl 31 or grinding mill 29 when operating this appliance.
- This appliance includes a safety interlocks 5 which prevent operation unless the accessories are securely installed.
- This appliance incorporates a protective device against high temperatures. The appliance will automatically switch off if the temperature becomes too high and will resume operation when the motor has sufficiently cooled down.
- Do not operate the appliance for more than 1 minute at a time. After 1 minute let the appliance rest for 10 minutes before the next cycle. After 5 cycles let the appliance cool down for 90 minutes. This may lengthen the lifespan of the machine.
- Keep hands and utensils out of the blending jug 3 or mixing bowl 31 while the appliance is running, to reduce the risk of severe injury to persons or damage to the appliance.
- Always use the pusher 8 to push food down the feeder tube. Never use your fingers or other utensils.
- Never process hot liquids and ingredients, as they may be ejected due to a sudden build-up of steam.
- Always switch off the appliance and unplug the mains cable from the power socket before changing attachments, or approaching parts that move while in use.
- Unplug the appliance when not in use.
- Ensure that the appliance has come to a complete stop before cleaning and storing away. Keep the attachments, motor unit 6, cable, and plug away from sources of heat. Store in a dry place.
- Do not use this appliance for any other purpose, aside from its intended use.
- Use the blending jug 3, mixing bowl 31, citrus juicer 30, grinding mill 29 and the attachments only with the motor unit 6 supplied (and vice versa) and do not tamper with the connector 4 in any way.
SAVE THESE INSTRUCTIONS FOR FUTURE REFERENCE!
BEFORE FIRST USE
BEFORE ATTACHING OR REMOVING ANY PARTS, MAKE SURE THE MAINS CABLE IS UNPLUGGED FROM THE POWER SOCKET AND THE ROTARY SWITCH IS IN THE 0 POSITION.
Before first use, wash all parts that will come into contact with food with warm soapy water and dry thoroughly (see the section on Cleaning).
ALWAYS TAKE CARE WHEN HANDLING THE STAINLESS STEEL BLADES AS THEY ARE VERY SHARP.
OPERATING INSTRUCTIONS
Follow the Important Safeguards and following instructions to achieve the best results and to keep your appliance in good working condition.
- Do not exceed the recommended maximum quantities.
- Do not use this appliance to process ingredients that are hard (e.g. frozen meat, inedible food such as bones and pips), rubbery or sticky (e.g. candied orange peel).
FOOD PROCESSING
- Always remove the blades before removing the ingredients from the mixing bowl 31.
- This appliance will not operate if the mixing bowl cover 9, citrus juicer 30, blending jug lid 2 or grinding mill 29 are not correctly fitted.
- Do not attempt to remove the blending jug lid 2 or mixing bowl cover 9 while the appliance is in operation.
ASSEMBLY OF THE MIXING BOWL
ENSURE THAT THE APPLIANCE IS UNPLUGGED FROM THE POWER SOCKET, THEN PLACE THE DRIVE SHAFT 13 ON THE MOTOR UNIT 6.
A Mount the mixing bowl 10 on the drive shaft 13 with the handle on the right-hand side. Align the triangle ![]() on the bottom edge of the mixing bowl 10 with the open lock symbol
on the bottom edge of the mixing bowl 10 with the open lock symbol ![]() on top of the motor unit 6.
on top of the motor unit 6.
B Turn the mixing bowl 10 clockwise to lock it in place. The triangle on the bottom edge of the mixing bowl 10 should be aligned with the closed lock symbol ![]() on top of the motor unit 6 to operate the appliance.
on top of the motor unit 6 to operate the appliance.
C Install the attachments.
D Place ingredients into the mixing bowl 10. Large pieces of food should be cut into 2cm cubes first.
E Place the mixing bowl cover 9 onto the mixing bowl 10 with the feeder tube on the right-hand side. Align the rectangle ![]() on top of the mixing bowl cover 9 with the open lock symbol
on top of the mixing bowl cover 9 with the open lock symbol ![]() on the upper rim of the mixing bowl 10. Hold the feeder tube with your left hand and the mixing bowl 10 handle with your right hand. Turn the mixing bowl cover 9 clockwise until it clicks into place. This will engage the safety interlocks 5 in the handle and ensure the mixing bowl 10 is securely attached, so that the appliance is safe to operate. Plug the mains cable into the power socket. Rotate the rotary switch 7 to the desired speed to start food processing.
on the upper rim of the mixing bowl 10. Hold the feeder tube with your left hand and the mixing bowl 10 handle with your right hand. Turn the mixing bowl cover 9 clockwise until it clicks into place. This will engage the safety interlocks 5 in the handle and ensure the mixing bowl 10 is securely attached, so that the appliance is safe to operate. Plug the mains cable into the power socket. Rotate the rotary switch 7 to the desired speed to start food processing.
CHOPPING, KNEADING, WHISKING, EMULSIFYING
ATTACHMENT | FOOD TYPE | MAX. QUANTITY | TIME |
14 CHOPPING BLADE
Chopping | Chopping Chocolate | 100g | 30-60sec |
Hard Cheese | 200g | ||
| Meat | 500g | ||
16 KNEADING BLADE | Fruit & Vegetables | 100-300g | |
Onions | 500g | 30-180sec | |
Flour | 300g | ||
| Soft Cheese | 300g | ||
Eggs | 5 | ||
21 EMULSIFYING DISC Creaming / Whisking Creaming / Whisking | Egg whites, whipping cream, oil | 30-60sec | |

 Kneading / Whisking
A Assemble the mixing bowl 10 as described in Assembly Of The Mixing bowl.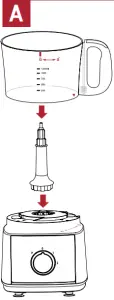
B Place the blade retainer 17 onto the shaft in the middle of the mixing bowl 10.
C Fit the suitable attachment (see the table) onto the blade retainer 17 and ensure that it sits flat at the bottom of the mixing bowl 10.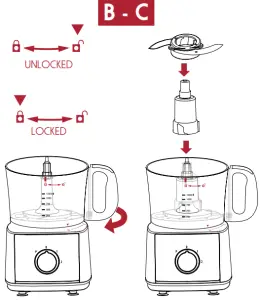
D Place the ingredients into the bowl.
E Fit the mixing bowl cover 9 onto the mixing bowl 10, ensure it is locked, and switch the appliance on as described in Assembly Of The Mixing bowl.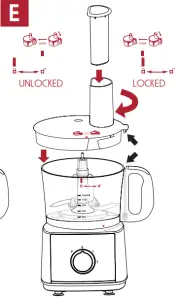
EXERCISE EXTREME CARE WHEN HANDLING THE CHOPPING BLADE 14 AS IT IS VERY SHARP. ONLY HOLD THE PLASTIC PART. ALWAYS ATTACH THE BLADE COVERS 15 WHEN CHOPPING BLADE 14 IS NOT IN USE.
SLICING, GRATING, SHREDDING, CUTTING
Assemble the mixing bowl 10 as described in Assembly Of The Mixing bowl – Steps 1 – 2
F Hold the blade disc 18 with one hand. Insert one of the blades 19 20 21 22 23 24 25 by hooking the protrusion on the flat side under the inner part of the opening on the blade disc 18. Press the rounded side of the blade down with the tab inside the blade disc 18 opening, until it locks in place. To remove or replace the blade see disassembly Of The Mixing bowl, blade disc.
BLADES ARE VERY SHARP. HANDLE CAREFULLY.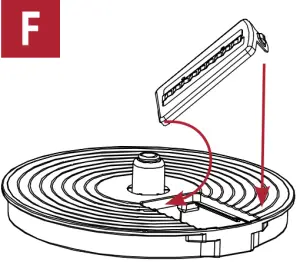
G Attach the assembled blade disc 18 onto the drive shaft 13.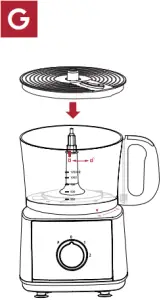
H Place the mixing bowl cover 9 onto the mixing bowl 10 and switch the appliance on as described in Assembly Of The Mixing bowl – Steps 5 – 8. Always use the pusher 8 to push food down the feeder tube. Never use your fingers or other utensils.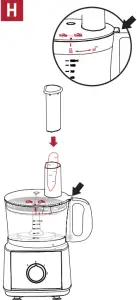
JUICING
ASSEMBLY OF THE CITRUS JUICER
A Assemble the mixing bowl 18 as described in assembly of the mixing bowl.
I Attach the citrus juicer cone 11 to the citrus juicer basket 12.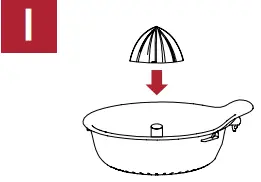
J Mount the assembled citrus juicer 30 onto the drive shaft 12.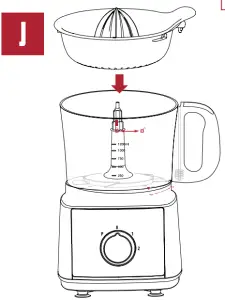
K Ensure that the tab on the side of the citrus juicer 30 is above the mixing bowl 10 handle. Align the rectangle ![]() on the rim of the citrus juicer 30 with the open lock symbol
on the rim of the citrus juicer 30 with the open lock symbol ![]() on the upper rim of the mixing bowl 10. Firmly holding the tab turn the citrus juicer 30 clockwise until it locks into place. The rectangle
on the upper rim of the mixing bowl 10. Firmly holding the tab turn the citrus juicer 30 clockwise until it locks into place. The rectangle ![]() on its rim should be aligned with the closed lock symbol
on its rim should be aligned with the closed lock symbol ![]() on the upper rim of the mixing bowl 10.
on the upper rim of the mixing bowl 10.
L Turn the rotary switch 7 to setting 1. Carefully place half of the citrus fruit on top of the citrus juicer cone 11, hold firmly and slowly press it down to extract the juice.
USEFUL TIPS
- Ensure the chopping blade 14, kneading blade 16 or emulsifying disc 26 are set up inside the mixing bowl 10 before adding ingredients.
- To activate a short, powerful pulse movement, turn the rotary switch 7 to the P setting and hold for the desired time.
- To avoid cutting the ingredients too fine use the pulse function repeatedly a few times.
- When processing chocolate or cheese avoid processing for a prolonged time. The appliance may heat up and the ingredients will start to melt.
- When using the french fry blade 24 insert the potatoes into the feeder tube lengthwise to get longer sticks. If the potato is too large, cut it to the width of the feeder tube.
- Never force the pusher 8 down the feeder tube or overfill it. Feed the food gradually.
- When slicing or shredding soft foods (cucumbers, pears, cheese, and similar) use speed setting 1 to avoid turning the food into a pulp like texture.
- Process large quantities of food in batches up to maximum 1200ml.
- If food gets stuck in the feeder tube switch the appliance off as described in disassembly of the mixing bowl and remove the mixing bowl cover 9. Remove the food from the feeder tube and cut it to smaller pieces before processing.
DISASSEMBLY OF THE MIXING BOWL
When food processing is finished, turn the rotary switch 7 to 0, ensure the appliance has come to a complete stop and then unplug the mains cable from the power socket.
Hold the handle of the mixing bowl 10 with your right hand and the feeder tube on the mixing bowl cover 9 with your left hand, and turn it anti-clockwise to release the safety interlock 5 then remove the mixing bowl cover 9.
Remove the attachments as described below:
- Blade disc – carefully lift the blade disc 18 from the mixing bowl 10 by holding the middle part of the drive shaft 13. To remove the blade 20 21 22 23 24 25 26 turn the blade disc 18 upside down. Firmly hold down the side opposite to the blade, and push the rounded side of the blade down, until it pops out.
- chopping blade – kneading blade – emsulyfing disc – carefully lift the blade retainer 17 from the mixing bowl 10. Carefully remove the chopping blade 14, kneading blade 16 or emulsifying disc 26 from the blade retainer 17.
- citrus juicer – turn the citrus juicer basket 30 anticlockwise to release the safety interlock 5, then lift and remove it from the mixing bowl 10.
Push the handle of the mixing bowl 10 anti-clockwise to unlock it.
Lift the mixing bowl 10 carefully and empty the ingredients.
Remove the drive shaft 13.
EXERCISE EXTREME CARE WHEN HANDLING BLADES AS THEY ARE EXTREMELY SHARP.
BLENDING
ASSEMBLY OF THE BLENDING JUG
ENSURE THAT THE APPLIANCE IS UNPLUGGED FROM THE POWER SOCKET THEN REMOVE THE DRIVE SHAFT 13 FROM THE MOTOR UNIT 6. BLADES ARE EXTREMELY SHARP. HANDLE CAREFULLY.
M Place the blending jug 3 (without the blending jug lid 2 and measuring cup 1) onto the motor unit 6 with the handle on the right-hand side.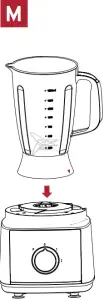
N Align the triangle on the bottom edge of the blending jug 3 with the open lock symbol on top of the motor unit 6. There is no safety interlock 5 sensor on the left-hand side of the motor unit 6 therefore the appliance will not operate if the blending jug 3 handle is on the left-hand side. Once the blending jug 3 has been correctly aligned, turn its handle in a clockwise direction until it clicks and locks in place.
O Place ingredients into the blending jug 3, then place the blending jug lid 2 on top with the protruding tab covering the blending jug 3 spout. Firmly push the blending jug lid 2 onto the rim of the blending jug 3.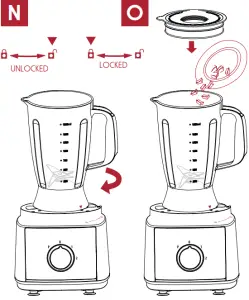
P Align the protrusions on the sides of the measuring cup 1 with grooves in the opening on top of the blending jug lid 2. Push the measuring cup 1 down and turn clockwise to lock it. To add liquids during the blending process, remove the measuring cup 1 by turning it anti-clockwise and slowly pour the liquid into the blending jug 3 through the opening in the blending jug lid 2.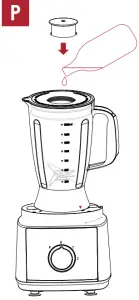
Q Turn the rotary switch 7 to the desired speed setting to start the blending process.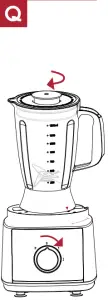
DISASSEMBLY OF THE BLENDING JUG
When blending process is finished, turn the rotary switch 7 to 0, ensure the appliance has come to a complete stop and then unplug the mains cable from the power socket.
Remove the measuring cup 1 by turning it anticlockwise and lifting it from the blending jug lid 2. Firmly holding the handle of the blending jug 3 with one hand, carefully lift and remove the blending jug lid 2 with the other hand.
Turn the blending jug 3 anti-clockwise to disengage the safety interlocks 5 then lift it from the motor unit 6 and pour the contents out.
USEFUL TIPS
- Always stabilize the blending jug 3 by placing your hand on top of the blending jug lid 2 when operating this appliance.
- To achieve the best results when pureeing solid ingredients, cut them into small pieces first (2- 3cm). Place small portions into the blending jug 3 then add gradually. do NOT Over Load.
- When mixing solid ingredients, start off with a small amount of liquid. Gradually add more of the liquid through the opening in the blending jug lid 2.
- For stirring solids or very thick liquid ingredients, we recommend that you use the blender in pulse mode to prevent the blades from becoming stuck during use.
- If blending warm liquids or ingredients, always ensure that they are cooled down before blending. Do not fill the glass jug over 1250ml mark.
GRINDING
ASSEMBLY OF THE GRINDING MILL
ENSURE THAT THE APPLIANCE IS UNPLUGGED FROM THE POWER SOCKET THEN REMOVE THE DRIVE SHAFT 13 FROM THE MOTOR UNIT 6. ALWAYS ENSURE THAT THE SEALING GASKET ON THE GRINDING MILL BASE 28 IS PROPERLY FITTED. BLADES ARE EXTREMELY SHARP. HANDLE CAREFULLY.
R Turn the grinding mill cover 27 upside-down and fill it with the dry ingredients. Do not fill above the Max mark.
S base 28 upside-down and insert it into the grinding mill cover 27, aligning triangle under the Max line with the open lock symbol ![]() under the grinding mill base 28.
under the grinding mill base 28.
T Holding the grinding mill cover 27 firmly, turn the grinding mill base 28 anti-clockwise until it locks into place. Ensure the grinding mill cover 27 is fitted securely.
U Mount the assembled grinding mill 29 on the motor unit 6 aligning the triangle ![]() under the Max mark on the grinding mill cover 27 with the open lock symbol
under the Max mark on the grinding mill cover 27 with the open lock symbol ![]() on top of the motor unit 4.
on top of the motor unit 4.
Turn the grinding mill 29 clockwise until it locks in place and the triangle ![]() under the Max mark is aligned with the closed lock symbol
under the Max mark is aligned with the closed lock symbol ![]() on the motor unit 6. Turn the rotary switch 7 to desired speed.
on the motor unit 6. Turn the rotary switch 7 to desired speed.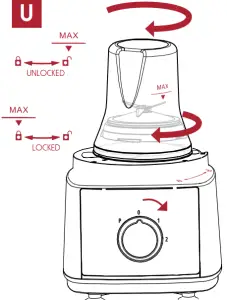
DISASSEMBLY OF THE GRINDING MILL
- When grinding process is finished, turn the rotary switch 7 to 0, ensure the appliance has come to a complete stop and then unplug the mains cable from the power socket.
- Remove the grinding mill 29 from the motor unit 6 by turning it anti-clockwise.
- Turn the grinding mill 29 upside-down and hold firmly with one hand. With the other hand, turn the grinding mill base 28 clockwise, carefully remove it and scoop the ingredients out of the grinding mill cover 27.
USEFUL TIPS
- Always stabilize the grinding mill 29 by placing your hand on top of the grinding mill cover 27 when operating this appliance.
- For best results grind in intervals of 30 seconds with a 1 minute pause in between.Repeat the grinding process until you are happy with the grind consistency.
- Use pulse setting in short intervals for coarse grinds or to crush the ingredients.
- Only grind spice seeds that do not contain moisture or oil such as peppercorn, coriander seeds, mustard seeds and similar.
- Grinding extremely hard, oily, moist or sticky ingredients may damage this appliance.
- Hard grains such as corn, wheat, rye and similar may cause damage to the grinding mill cover 27.
- Nuts contain a lot of oil which will release during the grinding process and may clog the grinding mill base 10.
- Never Add OILS OR Liquid S while grinding.
Experimenting with the length of grinding will enable you to get your preferred grind. To yield the best flavor and aroma always grind fresh ingredients. Freshly ground coffee and spices have more flavor and are best when ground just before use.
SPEED SETTINGS
- Low Speed – for whipping, emulsifying, kneading, folding, light blending of liquid ingredients, grating, slicing, shredding, juicing.
- – High Speed – chopping, whisking, grinding, heavy blending with solid ingredients and thicker liquids.
- P – pulse (Short bursts Of very high Speed) – for p regrinding or coarse grinding, rough blending of solid ingredients and thick liquids, chopping, and short, powerful pulse movements when needed. The rotary switch 7 does not permanently engage in the pulse setting. You have to hold the rotary switch 7 or turn it repeatedly to the pulse setting).
CLEANING
AFTER USING THIS APPLIANCE ALWAYS TURN THE SWITCH TO THE 0 SETTING AND UNPLUG THE APPLIANCE FROM THE MAINS SOCKET.
MOTOR UNIT
NEVER IMMERSE THE MOTOR UNIT IN WATER.
Wipe the motor unit 6 clean with a damp cloth and dry immediately with a soft cloth to avoid scratches and water marks on the surface.
LIGHT CLEANING
MIXING BOWL – BLENDING JUG – fill the empty mixing bowl 10 or blending jug 3 half way with tepid soapy water. Place the mixing bowl 10 or blending jug 3 on the motor unit 6. Insert the blade retainer 17 with one of the attachments (14, 16 or 26) into the mixing bowl 10 and attach the mixing bowl cover 9. Place blending jug lid 2 with measuring cup 1 on the blending jug 3.
Turn the rotary switch 7 to pulse setting several times, each time holding for a few seconds.
Empty the mixing bowl 10 or blending jug 3 and rinse until clean. Dry with a soft, lint free cloth.
GRINDING MILL – wipe the grinding mill base 28 with a damp cloth or sponge, using tepid soapy water, if necessary.
HANDLE VERY CAREFULLY. BLADES ARE EXTREMELY SHARP.
Carefully remove any stuck food remnants from the blades with a small dish-washing brush. Dry immediately with a soft, lint free cloth.
Wash the grinding mill cover 27 with warm soapy water and dry thoroughly. You may keep the grinding harm from sharp blades mill 29 assembled when not in use to prevent any harm from sharp blades.
THOROUGH CLEANING
EXERCISE EXTREME CARE WHEN HANDLING BLADES AS THEY ARE VERY SHARP. KEEP THE CHOPPING BLADE COVERS 15 ATTACHED WHEN CHOPPING BLADE 14 IS NOT IN USE.
- Ensure that the mixing bowl 10, blending jug 3 and grinding mill cover 27 are completely empty.
- Disassemble the blade disc 18 and the citrus juicer 30.
- Use a small dish-washing brush to remove the stuck food from the fine, coarse and wavy slicing blades 19 20 21 / fine and coarse shredding blades 22 23 / french fry 24 and slurry blades 25, around the blades inside the blending jug 3, on the grinding mill base 28 and from the slits on the citrus juicer basket 12.
- Wash the mixing bowl 10 and mixing bowl cover 9, blending jug 3, blending jug lid 2 and measuring cup 1, grinding mill cover 27 and all the attachments with tepid soapy water.
- Dry immediately with a soft, lint free cloth and store in a cool, dry place.
- All parts except the motor unit 6 can be washed by hand or in a dishwasher.
- Do not use harsh scourers and aggressive or abrasive detergents.
ENSURE THAT ALL PARTS ARE COMPLETELY DRY BEFORE ASSEMBLING AND OPERATING THIS APPLIANCE.
TROUBLESHOOTING
| Appliance does not work |
|
| Appliance suddenly stops during operation. |
|
| The appliance is running but the attachments are not working. |
|
WIRING
THE APPLIANCE MUST NOT BE USED WITHOUT A FUSE COVER FITTED
Should the mains cable or the plug become damaged, arrange for these to be replaced by Customer Service or a qualified person before continuing to use the appliance. This appliance is fitted with a 5A BS1362 fuse in a 5A BS1363 plug.
ENVIRONMENTAL PROTECTION
To avoid environmental and health problems due to hazardous substances in electrical and electronic goods, appliances marked with this symbol must not be disposed of with unsorted municipal waste, but recovered, reused or recycled.
SERVICE
The product is not user-serviceable. If it is not working, read the instructions, check the plug fuse and main fuse/circuit breaker. If it is still not working, consult your retailer.
If that does not solve the problem ring Customer Service – they may be able to offer technical advice. Please have the Model Number to hand, as they will not be able to help you without it.
If you are advised to return the product to us, pack it carefully, include a note with your name, address, day phone number, and description of the problem.
If under a guarantee, say where and when it was purchased and include a valid VAT receipt. Send it to SQ Professional Ltd.
GUARANTEE
THE GUARANTEE FOR THIS PRODUCT IS COVERED BY SQ PROFESSIONAL LIMITED. ANY FAULTS WITH THIS PRODUCT ARISING THROUGH A MANUFACTURER DEFECT WILL BE COVERED FOR 1 YEAR FROM THE DATE OF PURCHASE, SUBJECT TO A VALID VAT RECEIPT BEING PRESENTED.
THIS DOES NOT INCLUDE FAULTS OR DAMAGE CAUSED BY MISUSE OF GENERAL WEAR AND TEAR.
PLEASE CONTACT CUSTOMER SERVICES ON 01992 716 070 OR SEND AN E-MAIL TO [email protected], MONDAY TO FRIDAY FROM 09:30 – 17:30.
THIS DOES NOT AFFECT YOUR STATUTORY RIGHTS.


VOLTAGE BUSINESS CENTRE, UNITS 1 – 3 6 MOLLISON AVENUE ENFIELD EN3 7XQ t 01992 716 070 f 01992 700 538 e [email protected]


