User Manual

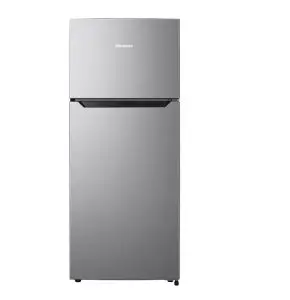
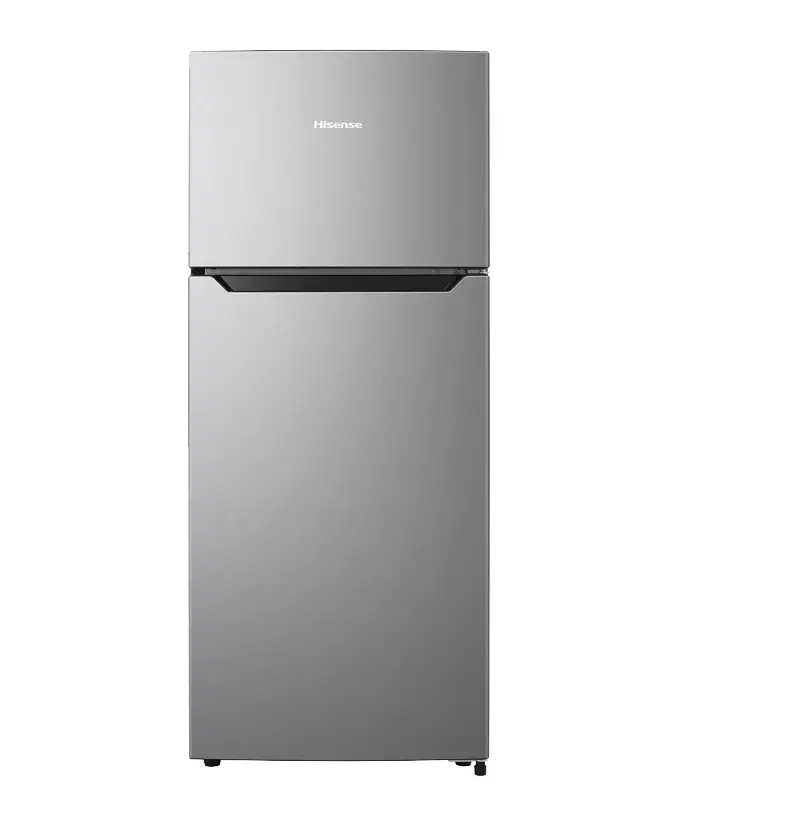
Hisense Compact Double Door Refrigerator LCT43D6ASE, LCT43D6AVE
Before operating this unit, Please read this manual thoroughly, and retain for future reference.
COPYRIGHT STATEMENT
© 2015 Hisense Company Ltd. All Rights Reserved. All material in this Owner’s Manual is the property of Hisense Company Ltd. and its subsidiaries, and is protected under US and International copyright and/or other intellectual property laws. Reproduction or transmission of the materials, in whole or in part, in any manner, electronic, print, or otherwise, without the prior written consent of the Hisense Company Ltd. is a violation of Hisense Company Ltd. rights under the aforementioned laws. No part of this publication may be stored, reproduced, transmitted or distributed, in whole or in part, in any manner, electronic or otherwise, whether or not for a charge or other or no consideration, without the prior written permission of Hisense Company Ltd.
Requests for permission to store, reproduce, transmit or distribute materials may be made to the following address: Hisense USA Corporation PO Box 3289 Suwanee, GA 30024
Hisense, and any and all other Hisense product names, logos, slogans or marks are registered trademarks of Hisense Company Ltd. and its subsidiaries. All other trademarks are the property of their respective holders.
IMPORTANT SAFETY INSTRUCTIONS
This appliance is not intended for use by persons (including children) with reduced physical, sensory or mental capabilities, or lack of experience and knowledge, unless they have been given supervision or instruction concerning use of the appliance by a person responsible for their safety. Children should be supervised to ensure their do not play with the appliance For compression-type appliances which use flammable refrigerants, instructions shall include information pertaining to the installation, handing, servicing
Please follow the precautions below for your new refrigerator:
- This refrigerator must be properly installed and located in accordance with the Installation Instructions before it is used.
- Do not allow children to climb, stand or hang on the shelves in the refrigerator. They could damage the refrigerator and seriously injure themselves.
- Do not store or use gasoline or other flammable vapors and liquids in the vicinity of this or any other appliance.
- Keep fingers out of the clearances between the doors and cabinet. Be careful closing doors when children are in the area.
- Unplug the refrigerator before cleaning and making repairs.
- We strongly recommend that any servicing be performed by a qualified individual.
- Turning the temperature control dial to the “OFF” position stops cooling but does not shut off power to the refrigerator.
- Do not leave refrigerator in extreme cold or warm temperatures.
- Do not place refrigerator near heat sources or open flames.
- Clean the refrigerator with a soft, damp cloth. Remove stains with a mild soap. Do not clean the unit with industrial grade solvents, or abrasive chemicals.
- Do not place heavy items on top of the refrigerator.
- Never install the refrigerator where there is a lot of moisture and water can splash.
- Do not allow children to hang on the doors; the refrigerator may be tipped over and hurt children.
- Never eat spoiled food stored too long in the refrigerator or in an out-of-order refrigerator.
- Do not use sharp tools inside the refrigerator – for example – to remove ice as damage may occur.
- Unplug and remove food from the refrigerator if not used for a long period of time.
- Caution: flammable refrigerant used! When handing, moving and use of the refrigerator, make sure to avoid either damaging the refrigerant tubing, or increasing the risk of a leak.
- The refrigerant isobutene (R600a) is contained within the refrigerant circuit of the appliance, a natural gas with a high level of environmental compatibility, which is nevertheless flammable. During transportation and installation of the appliance, ensure that none of the components of the refrigerant circuit becomes damaged. The refrigerant (R600a) is flammable.
- WARNING: Keep ventilation openings, in the appliance enclosure or in the built-in structure, clear of obstruction.
- WARNING: Do not damage the refrigerant circuit.
- WARNING: Do not use electrical appliances inside the food storage compartments of the appliance, unless they are of the type recommended by the manufacturer.
- WARNING: Do not use electrical appliances inside the food storage compartments of the appliance, unless they are of the type recommended by the manufacturer.
Appliances which use flammable insulation blowing gases instructions shall include information regarding disposal of the appliance.
Instructions shall contain the substance of the following; Do not use extension cords or ungrounded (two prong) adapters.
The method for replacing illuminating lamps included. For appliances with TYPE Y ATTACHMENT, the instructions shall contain the substance of the following.
If the SUPPLY CORD is damaged, it must be replaced by the manufacturer, its service agent or similarly qualified person in order to avoid a hazard.
A child entrapment warning statement shall be included in either the operating instructions or in a use and care manual provided with each refrigerator and shall include the following or equivalent wording:
DANGER: Risk of child entrapment. Before you throw away your old wine chiller:
- Take off the doors
- Leave the shelves in place so that children may not easily climb inside.
PROPER DISPOSAL
This product should not be disposed with other household wastes. To prevent possible harm to the environment or human health from uncontrolled waste disposal recycles it responsibly to promote the sustainable reuse of material resources. To return and collection systems or contact the retailer where the product was purchased. They can take this product for environmental safe recycling.
WARNING! Refrigerators contain refrigerant and gases in the insulation. Refrigerant and gases must be disposed of professionally as they may cause eye injuries or ignition Ensure that tubing of the refrigerant circuit is not damage prior to proper disposal.
An empty refrigerator is an extremely dangerous attraction to children. If you are getting rid of your old refrigerator, please follow the instructions in the Child Entrapment Warning.
CHILD ENTRAPMENT WARNING:
Risk of child entrapment. Before you throw away your old refrigerator or freezer:
- Take off the doors.
- Leave the shelves in place so that children may not easily climb inside.
CAUTION: USE OF AN EXTENSION CORD IS NOT RECOMMENDED.
FOR HOUSEHOLD USE ONLY SAVE THESE INSTRUCTIONS
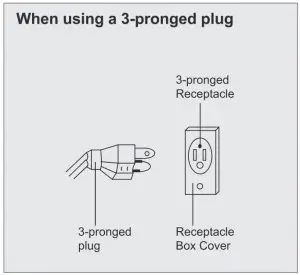
GROUNDING INSTRUCTIONS
This appliance must be grounded. In the event of an electrical short circuit, grounding reduces the risk of electric shock by providing an escape wire for the electric current. This appliance is equipped with a cord having a grounding wire with a grounding plug. The plug must be inserted into an outlet that is properly installed and grounded.
WARNING: Improper use of the grounding plug can result in a risk of electric shock. Consult a qualified: electrician or service person if the grounding instructions are not completely understood, or if doubt exists as to whether the appliance is properly grounded. If it is necessary to use an extension cord, use only a three wire extension cord that has a three blade grounding plug, and a three slot receptacle that will accept the plug on the appliance. The marked rating of the extension cord should be equal to or greater than the electrical rating of the appliance.
INSTALLATION
- Steady, flat location: If the refrigerator is not leveled during installation, the doors may not close or seal properly, causing cooling, frost, or moisture problems. It is very important for the refrigerator to be level in order to function properly. To level your refrigerator, you may either turn the level leg clockwise to raise that side to the refrigerator or turn counter-clockwise to lower that side. Having someone push against the top of the refrigerator will take some weight off the leveling leg. This makes it easier to adjust the leveling leg.
- Ventilation: Place refrigerator approximately 5 inches from the wall to ensure proper airflow to the compressor. Do not place refrigerator near any heat resources such as a heater or stove as it will put a strain on the compressor.
- Power supply: • Check your local power source. This refrigerator requires a 110V-120V, 60Hz power supply. • Use a receptacle that will accept the ground prong. The power cord of this appliance is equipped with a 3-prong (grounding) plug which mates with a standard 3-prong (grounding) wall outlet to minimize the possibility of electric shock hazard from this appliance. Do not use extension cords or ungrounded(two prong) adapters.

LOCATION OF CONTROLS
DOOR CLOSED

- Freezer Door
- The handle
- Refrigerator Door
- Leveling Feet
DOOR OPEN

- Freezer Compartment
- Freezer Shelf
- Light Bulb(Behind Thermostat)
- Thermostat
- Refrigerator Control Knob
- Refrigerator Compartment
- Crisper Drawer
- Freezer Door Gasket
- Refrigerator Door Gasket
- Upper Shelf
- Middle Shelf
- Down Shelf
State of California Proposition 65 Warnings:
WARNING: This product contains one or more chernicals known to the State of California to cause cancer. WARNING: This product contains one or more chernicals known to the State of California to cause birth defects or other reproductive harm.
California (U.S.A.) Residents
 WARNING: Cancer and Reproductive Harm – www.P65Warnings.ca.gov
Operation
USING THE THERMOSTAT
Temp Control

The thermostat control knob for the refrigerator and freezer is located at the upper right hand corner of the refrigerator compartment.
The first time you turn the unit on, adjust the thermostat control knob to “4” and give your refrigerator time to cool down completely before adding food; a full 24 hours is recommended.
After it is fully cooled, test it and adjust towards “1” to make less cool or towards “7” to cool more to best suit your needs. However, the setting of “4” should be appropriate for home or office refrigerator use.
NOTE: Turning the control knob to the “ 0′ position will stop the cooling cycle.
DEFROSTING
Temp Control

Refrigerator compartment: Defrosting process is automatic; melted frost flows into drip tray and automatically evaporates.
Freezer compartment: Defrosting for the freezer must be performed manually.
- Turn the thermostat knob to the” 0 “position and leave the freezer door open.
- Remove all food and ice cube tray or transfer to refrigerator compartment.
- Place towel under compact refrigerator or move refrigerator outdoors where no water damage can occur.
- Clean and wipe out the melted frost with a cloth.
NOTE: To avoid damaging the freezer compartment wall, do not use any sharp objects to remove the frost or to separate the frozen food.
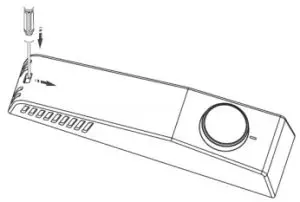
REPLACING THE LIGHT BULB
Warning: The LED light must not be replaced by the user! If the LED light is damaged, contact the customer helpline for assistance. To replace the LED light, the below steps can be followed:
- Unplug your appliance.
- Remove light cover by pushing and prying.
- Remove screw cover and unscrew the controller box.
- Replace LED light and snap it correctly in place.
Changing the door from the right side to the left.
The side at which the door opens can be changed from the right side (as supplied) to the left side, if the installation site requires.
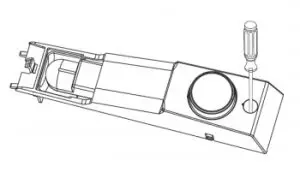
Tools you will need:

Caution:
To avoid to injury yourself and/or property, we recommend someone assist you during the door reversal process.
- Ensure the Appliance is unplugged and empty.
- Following steps are generally recommended
- Stand the refrigerator, open the upper door and remove the things in the door and close it.
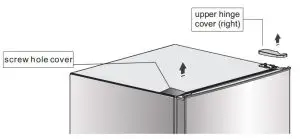
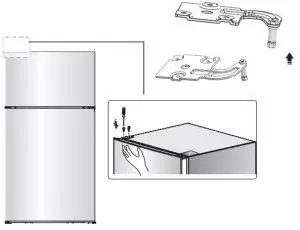
- Open the screw hole cove and the upper hinge cover which is at the top right corner of the refrigerator.

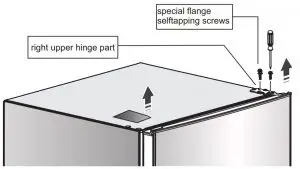
- Unscrew the special flange self-tapping screws which are used for fixing the right upper hinge part by a 8mm socket driver or a spanner(please support the upper door with your hand when doing it ).

- Remove the right upper hinge part and screw hole cover ,place them on the smooth surface.

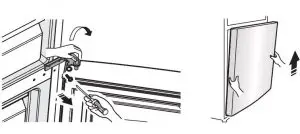
- Remove upper door and place it on smooth surface with panel upwards.
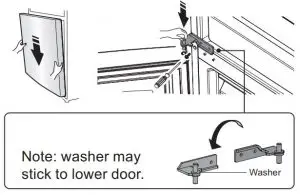
- Loose screws used to fix middle hinge and remove middle hinge. Then turn middle hinge by 180. Take washer on axis and put it on another end. Place it well for use.

- Remove lower door and place panel upwards on smooth surface.
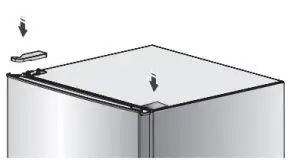
- Change screw hole covers on middle cover plate from left to right (as shown in figure below).

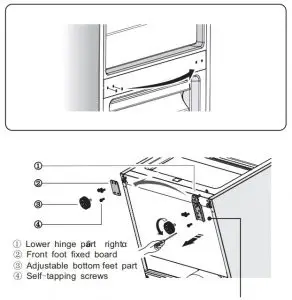
- Use the 8mm socket driver to remove lower hinge part and front foot fixed board. Then Screw out lower hinge axis and change it to the other site and then screw up and mount washer. Note: Before this step, you should lay the refrigerator on it’s back in order to gain access to the base, you should rest it on soft foam packaging or similar material to avoid damaging the cooling pipes at the rear of the refrigerator.
- Change lower hinge part to left and front foot fixed board to right and fix them with screws. Then install adjustable bottom feet parts.

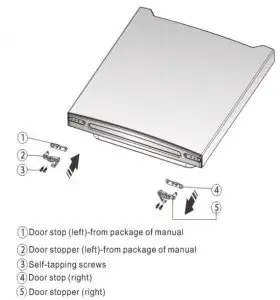
- Remove the door stop (right) and door stopper (right) with Phillips screwdrivers „Install the door stopper(left) and door stop (left) which are from the package of user’s manual
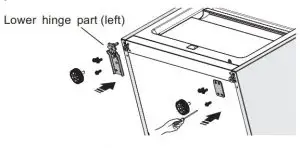
 Stand the refrigerator then move lower door and adjust its position to align lower hole(left) site and lower hinge axis. Then adjust middle hinge and align the middle hinge axis to the higher (left) hole site. Then install the middle hinge.
- Screw out top hinge axis, and change it to the other side, then screw up. Move upper door to appropriate position.

- Replace and Install the right upper hinge cover on the left corner, Replace the screw hole cover on the right corner.

- Stand and level the appliance. NOTE: Before the appliance is powered, We recommend that you should wait for about 2 hours.

Read More About This Manual & Download PDF:
Hisense Compact Double Door Refrigerator LCT43D6ASE, LCT43D6AVE User Manual – Download [optimized]
Hisense Compact Double Door Refrigerator LCT43D6ASE, LCT43D6AVE User Manual – Download
Questions about your Manual? Post in the comments!


