![]() Faith 2S
Faith 2S
User Manual
V1.0
 4K 5120×3840
 http://www.cfly-cn.com/upload/cfly2_qrCode.html
![]() Please Take proper operation and flight safety guidelines in mind as it is very important for all of us.
Please Take proper operation and flight safety guidelines in mind as it is very important for all of us.
Important
- Please read this manual carefully before using this product, and operate strictly in accordance with the manual.
- Please do not try to disassemble, modify or repair the aircraft by yourself, please contact authorized agent if necessary.
- Finding ‘colleague’ ‘ manual’ on Cfly2 APP to download the manual .
- This instruction is updated without prior notice.
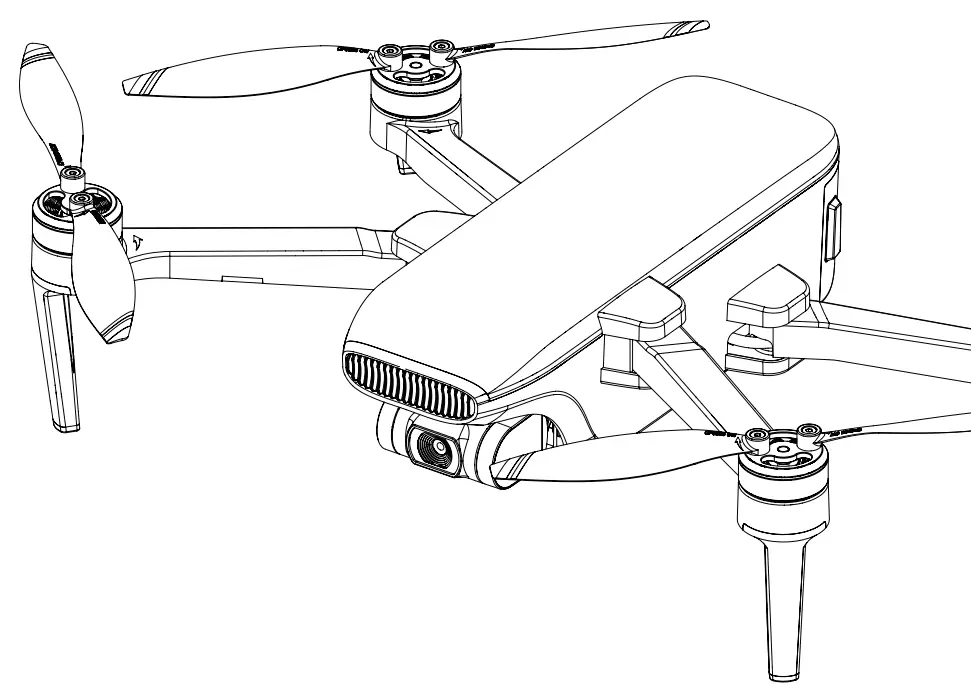
Product Overview
This section describes Faith 2S and lists the components of the aircraft and remote controller.
Introduction
Faith 2S is equipped with a vision positioning and GPS positioning system, which allows it to fly and hover stably indoors and outdoors, and has functions such as one-key RTH, circle mode, follow me, and waypoint flight, etc. Faith 2S is equipped with a 3-axis mechanical stabilization gimbal to capture high-resolution pictures and videos. It can adjust the camera angle during flight to capture unique photos and videos from different angles for better aerial photography experience.
Faith 2S can be used with remote controller and APP to realize various operations and settings of the aircraft and camera. The APP on the phone can display real time high-definition FPV (first-person view) and information like flight parameters at the same time.
Using ‘rocket, dronie, helix, boomerang’ mode to get the small unique video easily.
The maximum speed of the aircraft is 68.4km/h, the maximum transmission distance approach 5000m.the maximum flight time approach 35mins.
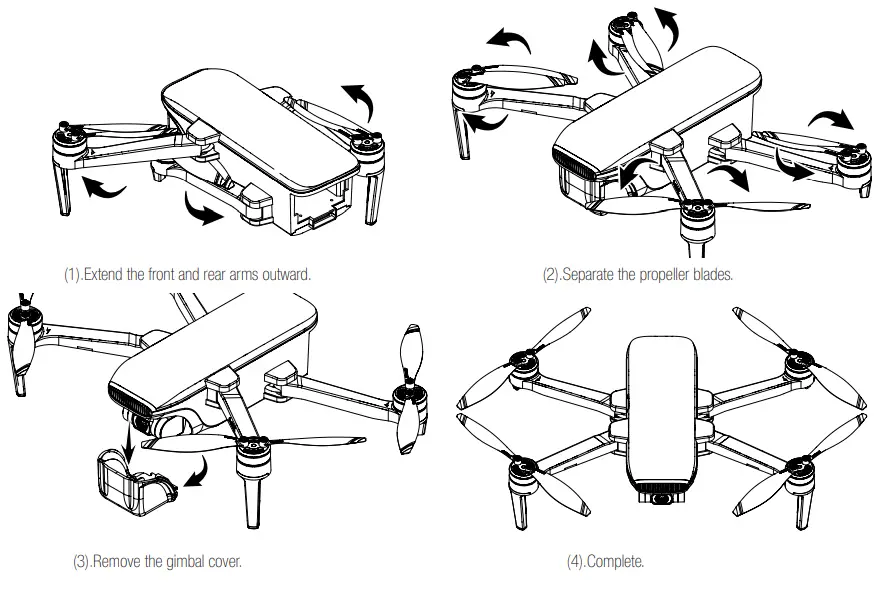
First use
- Prepare the aircraft
(1). Unfold the aircraft, and remove the gimbal cover
The aircraft is folded inside the package. Follow the steps to unfold the aircraft.
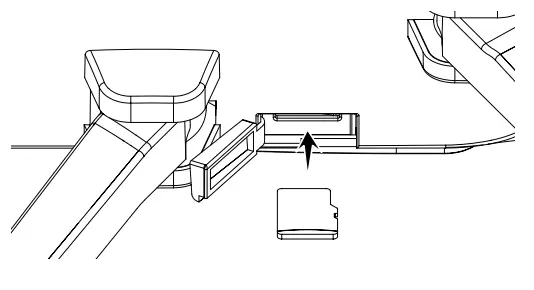
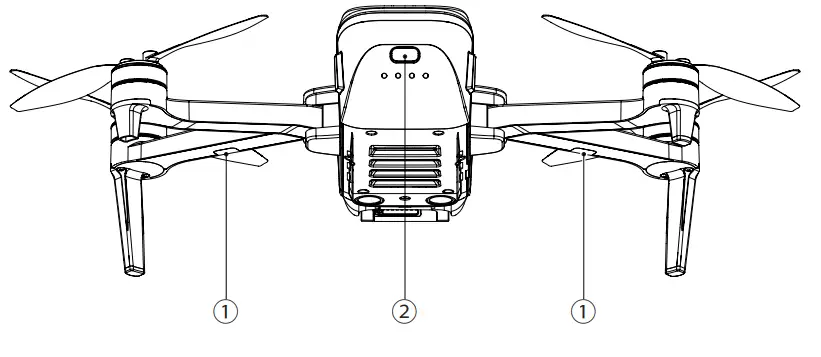
- Micro SD card installation
The micro SD card slot is located on the right side of the aircraft body.
Before installing the micro SD card, open the micro SD card slot cover as shown on the picture, then insert the Micro SD card into the slot, and confirm that the micro SD card is in the right place, then close the micro SD card slot cover. Note: Please use micro SD card with transmission speed of class 10 and above or UHS-1 rating.
Attention: Do not install or remove the micro SD card while the aircraft is powered on. Otherwise, errors will occur for the data stored. - Charge the battery
Be sure to fully charge the aircraft battery each time before flight, please use the charger and wire to charge the battery as follow:
Note:
The aircraft battery must be charged using the officially supplied dedicated charger.
The power of USB power adapter determines the charging time.
With 5V 2A adaptor, the charging time is about 270 minutes. - Battery installation
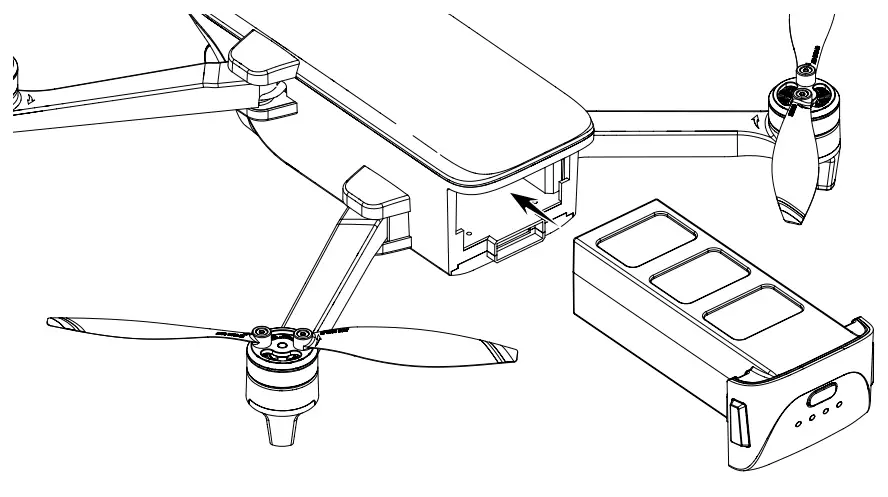
Insert the battery into the battery compartment from the bottom, make sure that the latch on the battery is locked.
Warning: ● Please use both hands to install the battery. Installing the battery with one hand may result in poor battery installation.
● If the battery is not installed properly, the aircraft may crash due to power-cut during flight.
 Note: Please use micro SD card with transmission speed of class 10 and above or UHS-1 rating.
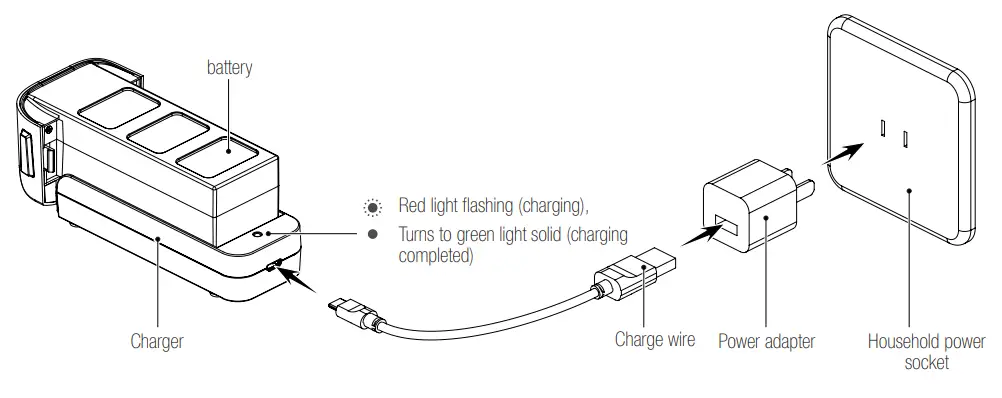
 ● Please use both hands to install the battery. Installing the battery with one hand may result in poor battery installation.
2). Prepare the remote controller
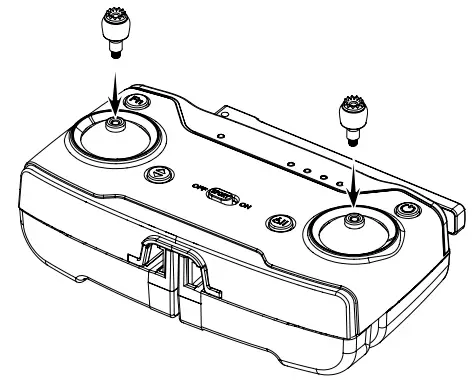
- Install the joystick
Find the sticker on package, and install them both on the remote controller as shown:
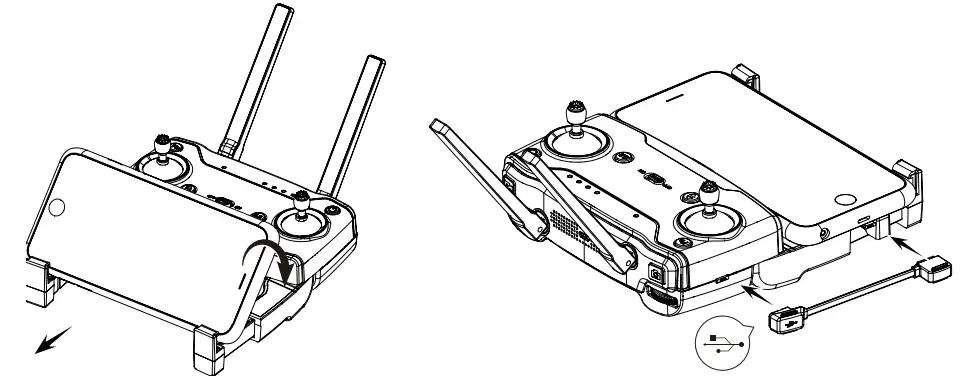
- Unfold the antenna
Please unfold the antenna as shown below.
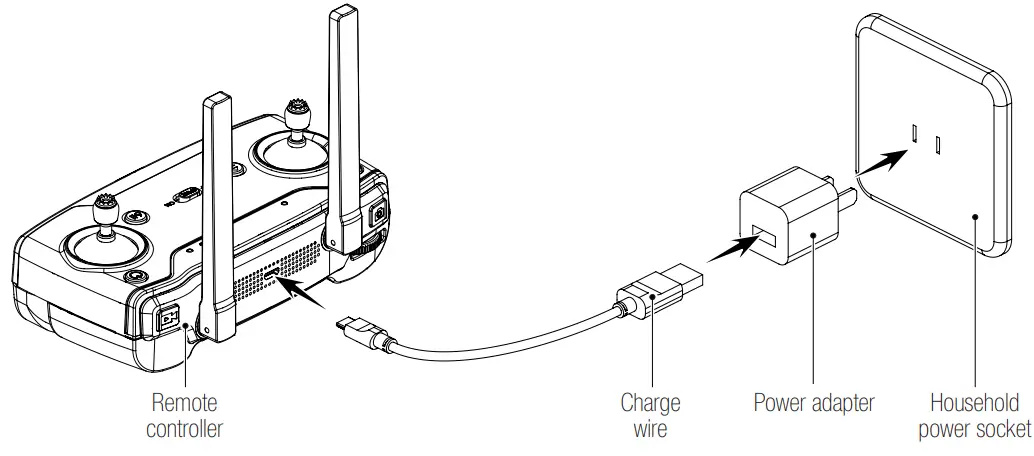
- Charge for remote controller
Please charge the remote controller as shown.

4) Unfold the phone support and insert the phone as shown,Choose correct data wire to connect RC and phone.
Aircraft diagram
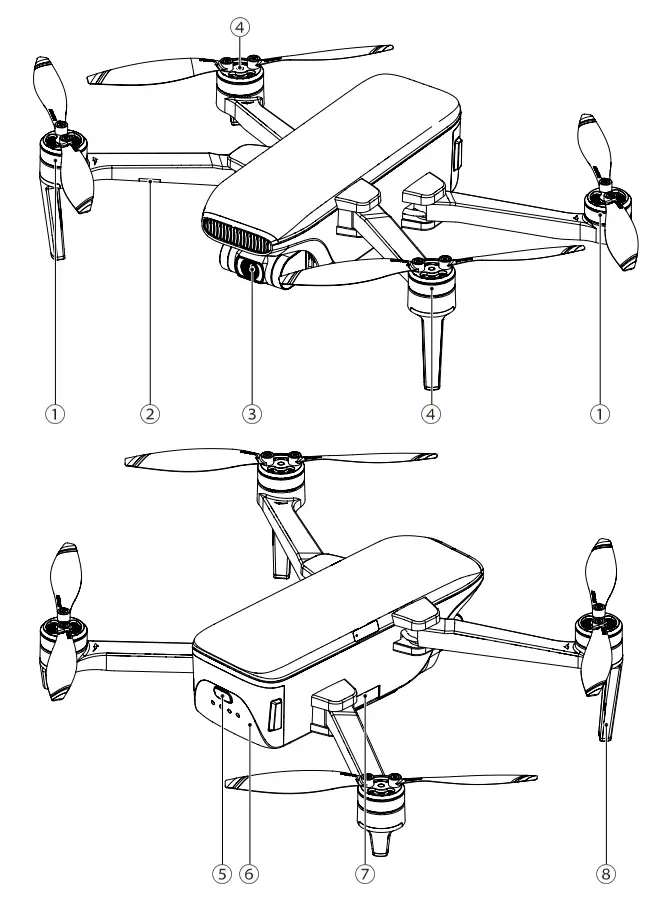
- CCW motor / propeller
- CW motor / propeller
- Micro SD card slot
- Head / optical flow status indicator light
- Flight status indicator light
- Landing gear
- Gimbal & camera
- Aircraft battery
Remote controller diagram
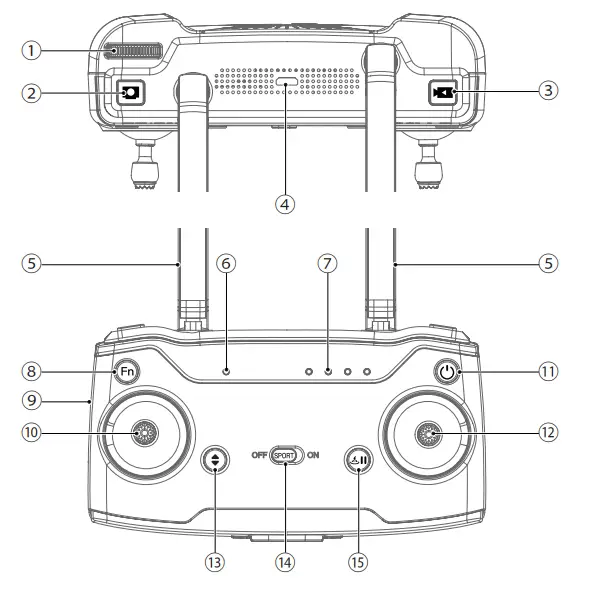
- Gimbal adjustment
Control the angle of the camera. - Photo button
Press to take a picture. - Video button
Press to start/stop recording the video. - USB port
For charging. - Antenna
- Connection status indicator
When the green light is always on, the aircraft is connected, and when the red light is always on, the aircraft is not connected. - Power indicator
- Zoom button
Press and hold this button and pull out a at the same time to adjust the zoom of the camera, and the picture will be enlarged or reduced accordingly.. - Data wire port
Connect the RC and phone. - Left joystick
- Power switch
Short press: check the battery power, Long press: turn on/off the remote controller. - Right joystick
- One key takeoff / landing
Press this button before takeoff, and the aircraft will takeoff automatically;
Press this button after takeoff, and the aircraft will land automatically. - Sport mode switch
When it’s off, aircraft is normal speed mode .
When it’s on, aircraft is high speed mode, please fly carefully. - RTH / Pause button
Long press over 2seconds,aircraft will start RTH mode, long press over 2seconds again, aircraft will stop RTH mode, and hover, short press this button, aircraft will stop intelligent mode, RTH mode and hover.
Aircraft
This section describes system composition, function of Faith 2S.
The aircraft is mainly composed of fiight control system, communication system, optical flow positioning system, power system and intelligent battery system. This chapter will introduce the functions of each part in detail.
1. LEDs and status indicator of aircraft
LED indicator light is installed on the front arm of the aircraft, which is used to indicate the direction of the aircraft. After the aircraft is started, the red light will be on.
The indicator light is also used to indicate the status of the optical flow positioning system.
The indicator light on the rear of the aircraft is used to indicate the status of the current flight control system during flight.
Please refer to the table below for the status of flight control system indicated by different color of lights.
1. Optical flow positioning status indicator‒LED
| No. | Indicator light | Status |
| 1 | Flashing red light | Optical flow positioning failure. |
| 2 | Solid red light | Optical flow positioning works. |
2. Flight status indicator – LED
| No. | Indicator light | Status |
| 1 | Solid blue light on start-up | Self-inspection |
| 2 | Flashing blue light | RC and aircraft is not paired,GPS is not located |
| 3 | Solid blue light | RC and aircraft is not paired,GPS is located |
| 4 | Solid green light | RC and aircraft is paired,GPS is located |
| 5 | Flashing green light | RC and aircraft is paired,GPS is not located |
| 6 | Red and blue light flashing alternately | Horizontal calibration process |
| 7 | Red and green light flashing alternately | Vertical calibration process |
| 8 | Solid red light | Serious error |
| 9 | Flashing red light | Low battery alarm |
| 10 | Red light flashes doubly | Alarm for severe low battery. |
| 11 | Green light flashes doubly | Beginner mode (GPS not positioned) |
| 12 | Blue and green light flashes alternately | Compass data error |
![]() Copyright © C-Fly all rights reserved
Copyright © C-Fly all rights reserved


