
Yale Digital Door Lock User Guide
MUST READ
- This Product can be included and operated in any Z-Wave network with other Z-Wave certified devices from other manufacturers and/or other applications.
All non-battery operated nodes within the network will act as repeaters regardless of vendor to increase reliability of the network. - This product(YDM4109+) is a Security Enabled Z-Wave Plus Product.
- Security Enabled Z-Wave Controller must be used in order to fully utilize this product.
- Network Module Setting : This setting becomes available through the Main Menu and allows the lock to connect with Controllers.
- Reset locally : Z-Wave Module exclusion
Please use this procedure only when the network primary controller is missing or otherwise inoperable.

* You can find the Security 2 DSK information on the product as shown below.
Association Command Class |
* Association Group
|
* S2 Security CCs and security level
| Command Class | Ver. | Note | Command Class | Ver. | Note |
| Alarm | 1 | Secure | Schedule Entry Lock | 3 | Secure |
| Association | 2 | Secure | Security | 1 | Non Secure |
| Association Group Info | 1 | Secure | Security 2 | 1 | Non Secure |
| Battery | 1 | Secure | Supervision | 1 | Secure |
| Configuration | 1 | Secure | Time | 2 | Non Secure |
| Device Reset Locally | 1 | Secure | TIme Parameter | 1 | Secure |
| Door Lock | 2 | Secure | Transport Service | 2 | Non Secure |
| Door Lock Logging | 1 | Secure | User Code | 1 | Secure |
| Manufacturer Specific | 2 | Secure | Vesion | 2 | Secure |
| Power level | 1 | Secure | Z-Wave Plus Info | 2 | Non Secure |
* Configuration Command Class
Set the language of the Door Lock interface | ||||
| Usage | Parameter Number | Size | Value | Description |
| Set Language | 0x05 | 1 byte | 0x01 | Korean |
| 0x02 | English | |||
| 0x03 | Chinese | |||
| 0x06 | Taiwanese | |||
Front body (Front Body, Installation on the outside of the door)
- Fingerprint Operation Lamp
- Keypad(l 0-Key)
- Dead Bolt Jam Lamp
- Lever
- Fingerprint Cover
- Battery Change Lamp
- Reset button
- Emergency Key
- Emergency Power Supply Terminal
- Emergency Cover
Pull down Emergency Cover
9V Emergency battery (Optional)
Main body (Main Body, Installation on the inside of the door)

- Battery Cover
- I Registration button
- Lever
- Manual thumb turn
- Internal Forced Lock Switch
- 1.5V AA Alkaline Batteries(4EA)
- Slot for Remote control module(Option)
- Volume Control Switch
- Auto I Manual Lock button
- Safe handle button
Register Controller

- Enter the Master Code

- Press I Button
- Enter (9), (#) buttons.
- Enter (1), (#) buttons to register controller.
- Register Controller followed by press (#) button to complete after beep sound from digital door lock
- Press (*) button to continue.
OR
Press I button to complete.


Delete Controller

Resetting Lock to Factory Default
When lock is reset to factory defaults all user codes (including the Master Code*) are deleted and all programming features are reset to original default settings (see below).
- Remove the battery cover and batteries.
- Remove the interior escutcheon to access the reset pads.
- The reset pads are located on bottom of the PCB board (See image)
- While pressing the reset pads with tweezer, reinstall batteries and release reset pads with tweezer.
- Replace battery cover.
Upon reset, the Master Code creation is the only option available and must be performed prior to any other programming of the lock.
User Code Registration (4 ~10 digits)
![]()
Press I Button.
Enter New User Code.
Press I button to complete.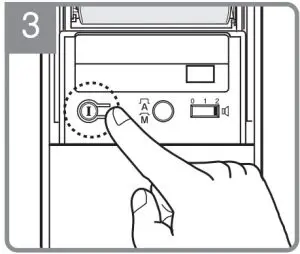
User Fingerprint Registration (Upto 20ea)

Press I button.
After opening the cover, swipe your finger 3 times through the fingerprint sensor followed by the voice guide.
Press (*) button to continue.
OR
Press I button to complete.
Unlocking Door with Code

Touch the keypad of the Front Body with your plam.

Enter the registered Code on the keypad.
OR
Enter the (*) button.
Unlocking Door with Card Key

Contact registered card Key.
Documents / Resources
 | Yale Digital Door Lock [pdf] User Guide Digital Door LockYDM4109Plus |


