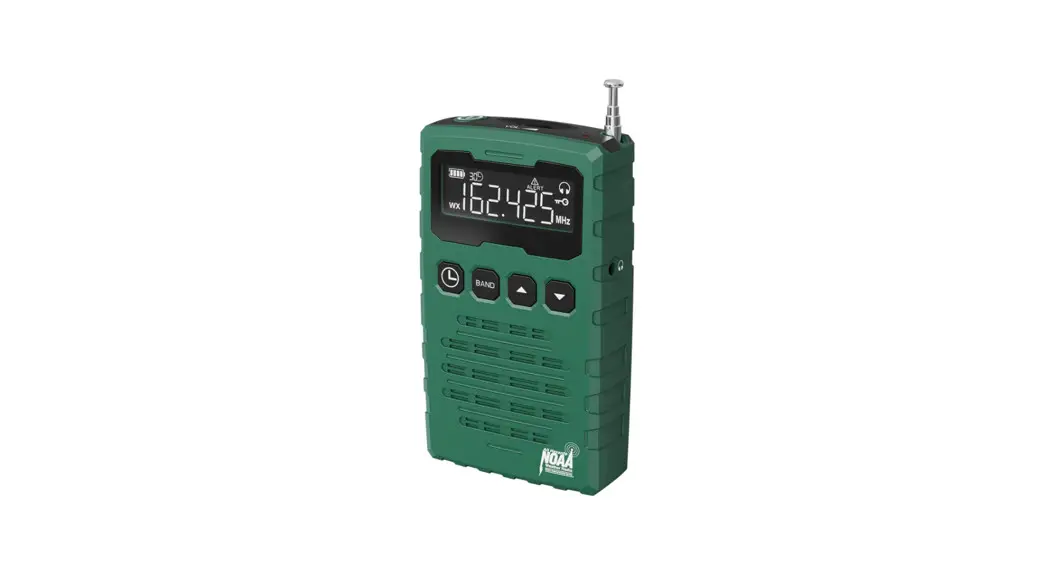
![]() CR1015
CR1015
Emergency Alert Radio
with AM/FM/SW/NOAA weather
Chapter 1 LOCATION OF CONTROLS
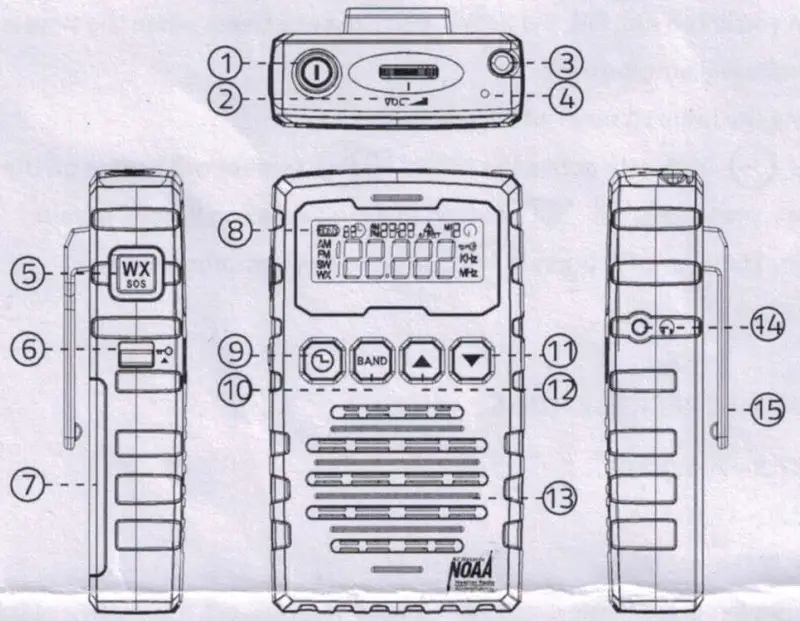
- Power Button
Press Power Button to turn on radio, press it again to turn off radio. - Volume Control Knob
- Telescopic Antenna
To receive clear signal, you may plug telescopic antenna. - Alert Flash Lamp
- WX/SOS Button
- Lock Switch
The lock switch prevents accidental changing of any of the radio settings. Slide the lock switch to the up ‘locked’ position, the symbol will appear in the display. The power and all other buttons will be disabled.
 - Battery Compartment
- LCD Display
- Timer/Clock Set Button
- Band Selection Button
- Tune- Button
- Tune+ Button
- Speaker
- Headphone Jack
- Belt Clip
A removable belt clip is provided on the back of the unit.
Removal:
It can be removed by gently pushing on the center tab of the clip where indicated, and sliding the clip downward towards the bottom of the radio.
Replacement:
You can easily connect the belt clip by inserting the top of the clip into the designated receiver slots and gently pushing the clip in an upwards motion towards the top of the radio.
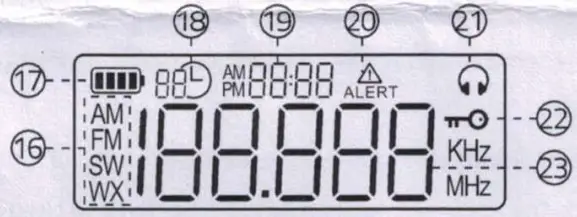
- Band Indicator
- Battery Life Indicator
- Timer Indicator
- Clock Indicator
- Alert Indicator
- Headphone Indicator
- Lock Switch Activated
- Frequence Indicator
Chapter 2 BATTERY INSTALLATION
- Turn radio off.
- Prepare replacement batteries to ensure a quick and easy change. Failure to change batteries within 1 minute will reset presets and clock settings.
- The battery cover is located on the back of the unit. Apply a gentle downward pressure and slide the door to the right side of the unit.
- Place 3 ‘AAA’ batteries inside the unit oriented to the illustration located just below the battery compartment.
NOTE: A flashing ![]() symbol appearing on the LCD display indicates a weak battery and that replacement of batteries is required. And the Weather lert will be deactivated.
symbol appearing on the LCD display indicates a weak battery and that replacement of batteries is required. And the Weather lert will be deactivated.
Chapter 3 SETTING THE CLOCK
Press ![]() button to turn on radio, radio enter standby mode.
button to turn on radio, radio enter standby mode.
At the standby mode, press ![]() button to enter clock setting.
button to enter clock setting.
Press ![]() or
or ![]() button to adjust hours, press
button to adjust hours, press ![]() button to confirm.
button to confirm.
Press ![]() or
or ![]() button to adjust minute, press
button to adjust minute, press ![]() button to confirm.
button to confirm.
Note: Only in standby mode, then you can set the clock. If the radio stay in FM, AM, SW or WB mode, you can press ![]() button to enter standby mode.
button to enter standby mode.
Chapter 4 RADIO OPERATION
- Turn on radio
Press button to turn on radio, radio enter standby mode, press butotn again to turn off radio.
 - Band
Repeatedly press BAND button to choose the band you want to listen to. You can choose from the AM/FM, Shortwave and Weather Band.
To exit Band function, just press button.
Weather Band: Receives all 7 weather band from NOAA, the U.S. National Weather Service which broadcasts in all 50 states, Puerto Rico and the U.S. Virgin Islands. 162.400 /152.425/162.45oti62.475/1€2.50/162.525/162.5SMHz
AM Band: Receives all local AM stations from 520KHz to 1710 Khz.
FM band: Receives all local FM stations from 87.50Mhz — 108.0MHz.
SW Band: Receives all Shortwave bands from 2.3MHz- 23Mhz - Volume Control
Rotate VOL Volume knob to adjust the sound volume.
 - Manual Tuning Channel
Repeatedly press or
or  button to tune into the desired channel.
Each press button, FM frequency will tune up by 0.1.
Each press button, FM frequency will tune down by 0.1. - Auto Scanning Radio Channel
Hold press or button for more than 2 seconds to start auto scanning.
Scanning will stop automatically once it receive an available channel. - Weather Band
Repeatedly press BAND button to select WB band, then Repeatedly press or button to choose one of the WB band which is for your local weather station. - Weather Alert Function
Manual Setting Mode
(1) To enable the NOAA Weather Alert function, press button.
(2) When the function is enabled, the WX symbol on the LCD will flash.
(3) When a weather alert is received, there will be an audible siren comes out, the flashlight, the symbol and the backlight on the LCD will flash.
(4) After a weather alert is received, press any button, the audible siren will be stop, the flashlight and the backlight will be turn off, the symbol on the LCD will disappear. Radio will switch to 1-7 the weather channel which send weather alert automatically.
Standby Mode
In standy mode, Radio also can receive weather alert, when it receive weather alert, the radio will turn on automatically, and then it will sound an audible siren, the flashlight, the ![]() symbol and the backlight on the LCD will flash.
symbol and the backlight on the LCD will flash.
Chapter 5 SOS ALERT
In a emergency, you can turn on the flashing red SOS light and Alert sound.
- Hold press Button more than 3 seconds to turn on SOS alert.
- Press Button again, the SOS alert will be turned off.
Chapter 6 SETTING TIMER
When you listen AM, FM, SW or WB, you can set a timer, when the time is up, Radio will auto turn off.
Setting the radio channel which you desire.
Press ![]() button to active the timer,
button to active the timer, ![]() symbol will appear on the display, press
symbol will appear on the display, press ![]() or
or ![]() button to adjust duration 90min, 45min, 30min, 15min or OFF, press
button to adjust duration 90min, 45min, 30min, 15min or OFF, press ![]() button to confirm your selection.
button to confirm your selection.
Chapter 7 SPECIFICATIONS
FM: 87.5 -108.0MHz
AM: 520-1710 Khz
SW: 2.3MHz- 23Mhz
WB: USA 1-7CH with Alert
![]() Contact our experts
Contact our experts
[email protected]
http://www.mesqool.com![]()
Made in PRC
Version 1.0


