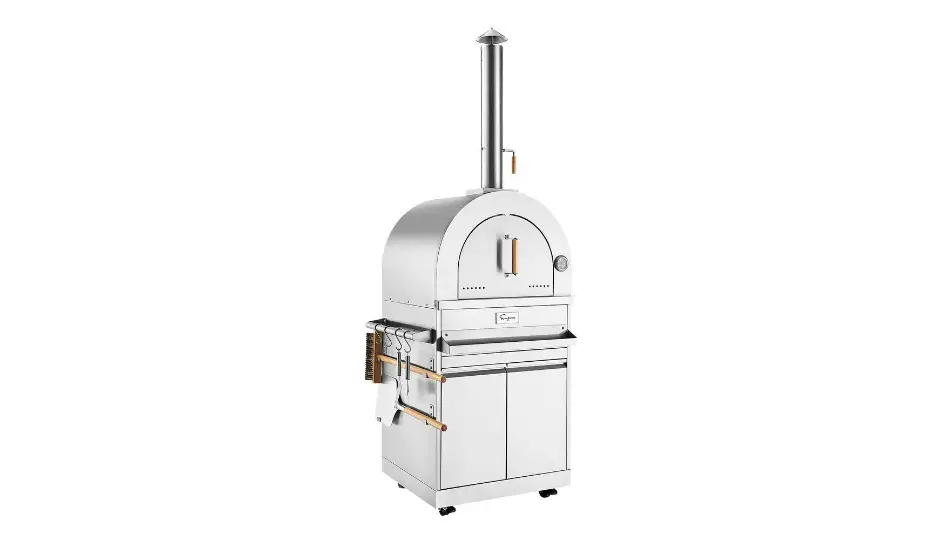
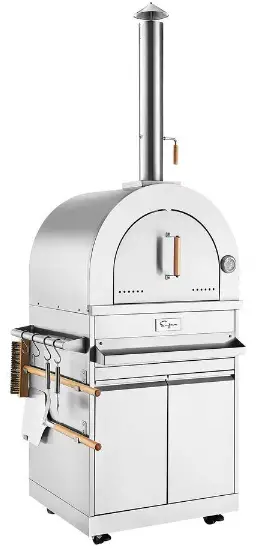
Empava EMPV-PG02 OUTDOOR Pizza Oven Cabinet
IMPORTANT:
Save for electrical inspector’s use.
Installer: Leave installation instructions with the homeowner.
Homeowner: Keep installation instructions for future reference.
Welcome
Thank you for purchasing your Appliance!
We appreciate your business and we recommend that you read this entire User’s Manual before operating your new appliance for the first time.
This manual contains instructions on how to properly install and set up your new range, as well as insights into the unique features that our
product offers. Please keep this manual for future reference, as it contains answers to questions that you might have as you begin to cook.
This manual applies to the following models’ series:
Model # EMPV-PG02 (Outdoor Pizza Oven Cabinet)
Parts Explosive Pictures
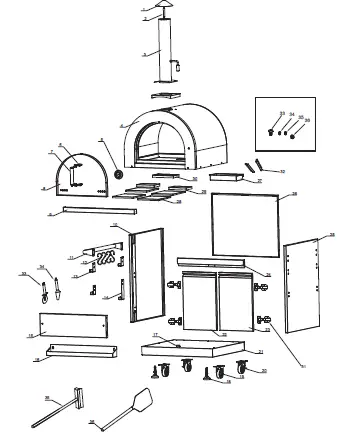
Parts List
| Explosive # | Part # | Part Name | Quantity |
| 1 | 05.99.000119-000-A0 | Chimney coping | 1 |
| 2 | 05.19.008003-000-A0 | Chimney supporting rod | 1 |
| 3 | 22.99.009241-000-A0 | Chimney pipe assemblyg | 1 |
| 4 | 22.99.009239-000-A0 | Pizza oven cavity | 1 |
| 5 | 05.99.008024-000-A0 | Thermometer | 1 |
| 6 | 06.04.000377-000-A0 | Mica plate 1 | 4 |
| 7 | 22.99.009243-000-A0 | Pizza oven door handle assembly | 1 |
| 8 | 20.01.008025-000-A1 | Pizza oven door assembly | 1 |
| 9 | 20.01.008022-000-A1 | Beam w elding assembly | 1 |
| 10 | 20.01.008018-000-A0 | Cabinet left side panel | 1 |
| 11 | 20.99.000287-000-A0 | Left/Right handle w elding assembly | 1 |
| 12 | 05.99.000202-000-A0 | S-shape Pothook | 1 |
| 13 | 04.02.002641-000-A0 | Pothook 1 | 3 |
| 14 | 04.02.002642-000-A0 | Pothook 2 | 1 |
| 15 | 20.01.008023-000-A0 | Cabinet top panel w elding assembly | 1 |
| 16 | 20.01.008035-000-A0 | Condiment storage w elding assembly | 1 |
| 17 | 04.01.002596-000-A1 | Kick panel plate | 1 |
| 18 | 05.01.008004-000-A0 | Supporting leg | 2 |
| 19 | 05.10.000122-000-A0 | Fixed caster | 2 |
| 20 | 05.10.000123-000-A0 | Universal caster w ith brake | 2 |
| 21 | 20.01.008076-000-A0 | Cabinet bottom panel w elding assembly | 1 |
| 22 | 22.99.009235-000-A0 | Left door assembly | 1 |
| 23 | 22.99.009234-000-A0 | Right door assembly | 1 |
| 24 | 20.01.008022-000-A1 | Beam w elding assembly | 1 |
| 25 | 20.01.008019-000-A0 | Cabinet right side panel w elding assembly | 1 |
| 26 | 20.01.008020-000-A0 | back panel w elding assembly | 1 |
| 27 | 20.01.008006-000-A0 | Ash pan w elding assembly | 1 |
| 28 | 15.99.000002-000-A0 | Cordierite firebrick B | 4 |
| 29 | 15.99.000001-000-A0 | Cordierite firebrick A | 2 |
| 30 | 04.01.008019-000-A1 | Net Cover | 1 |
| 31 | 05.03.008001-000-A0 | Door hinge | 4 |
| 32 | 04.01.008021-000-A0 | Ash pan holder | 2 |
| 33 | 05.99.000199-000-A0 | Pizza w heel | 1 |
| 34 | 05.99.000198-000-A0 | Pizza cutter | 1 |
| 35 | 05.99.000200-000-A0 | Pizza oven brush | 1 |
| 36 | 05.99.000201-000-A0 | Large pizza oven shovel | 1 |
| 37 | 06.02.000093-000-A0 | Philips thumbhead screw w ith anti-slip design | 65 |
| 38 | 06.10.000042-000-A0 | Philips thumbhead screw | 2 |
| 39 | 06.11.008056-000-A0 | flat head screw | 24 |
| 40 | 06.09.000099-000-A0 | 1/4″ nut | 4 |
| 41 | 04.01.002580-000-A0 | cabinet back connecting plate | 2 |
| 42 | 04.01.002579-000-A0 | cabinet front connecting plate | 1 |
| 43 | 06.04.000030-000-A0 | 1/4″ flat gasket | 3 |
| 44 | 06.09.000099-000-A0 | 1/4″ spring w asher | 2 |
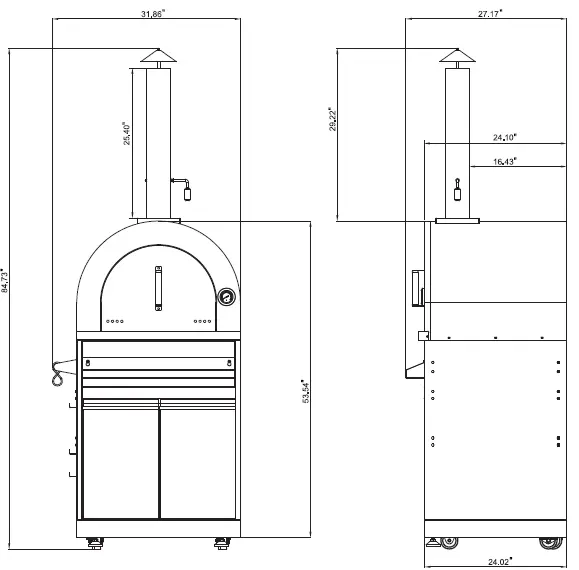
Product Dimension
Cabinet Installation
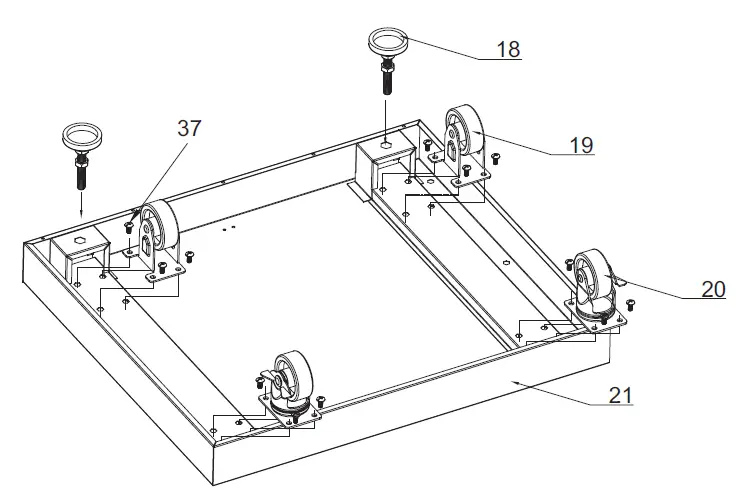
- Step 1
- Install 2 pcs supporting legs (Part # 18) to bottom welding part (Part # 21) and adjust the supporting legs to suitable position;
- Use 16 pcs ¼” flat Philip’s screw head (Part # 37) to connect 2 pcs fixed casters (Part # 19) and 2 pcs universal casters with brake (Part # 20) to Part #21;

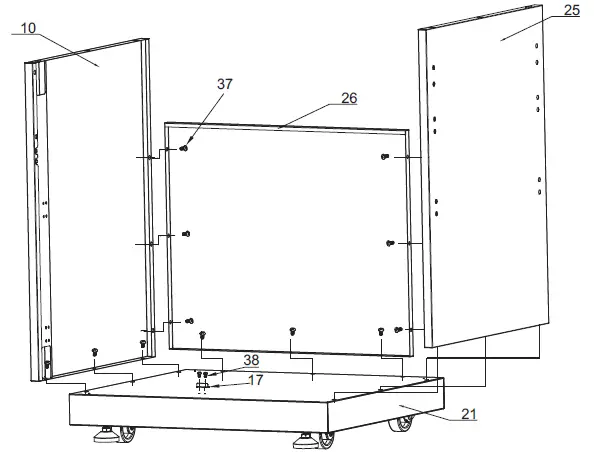
- Step 2
- Use2 pcs Philips thumb head screw (Part # 38) to install Kick panel plate (Part # 17) to Part # 21;
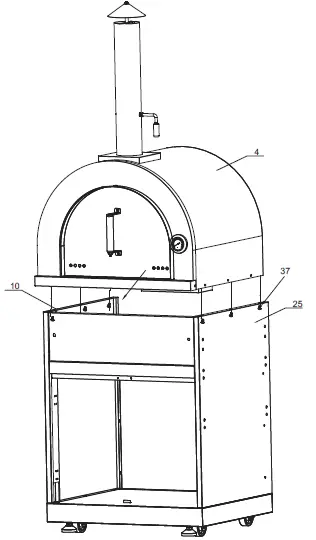
- Use3 pcs ¼” flat Philip’s screw head (Part # 37) to connect left side panel (Part # 10) to Part # 21;
- Use3 pcs Part # 37 to connect right side panel (Part # 25) to Part # 21;
- Use8 pcs Part # 37 to connect back panel (Part # 26) to Part #21, # 10 and #25;
- Make sure all the connections are smooth, Do not over-tighten all the screws until parts are lined up.

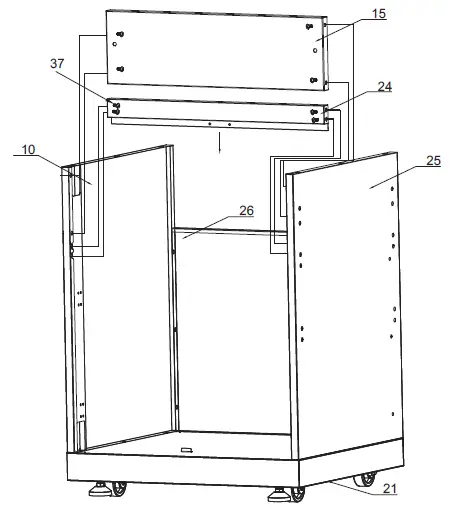
- Step 3
- Use4 pcs Part # 37 to connect beam welding part (Part # 24) to Part # 10 and Part # 25;
- Use4 pcs Part # 37 to connect top cover welding part (Part # 15) to Part # 10 and Part # 25;

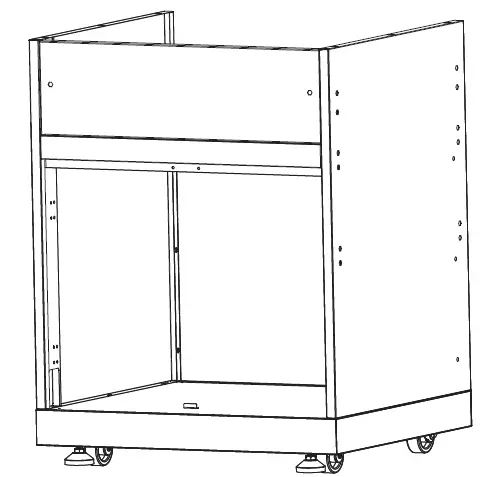
- Step 4
- Make sure all the connections are smooth and the design is looking like below picture.

- Make sure all the connections are smooth and the design is looking like below picture.
- Step 5
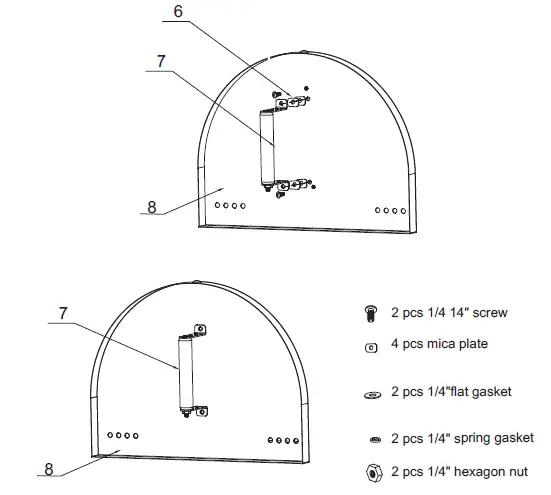
- Use2 pcs ¼” 14” screw (Part # 37) to go through the two holes on Pizza oven door handle assembly (Part # 67), then go through 4 pcs mica plates (Part # 6), 2 pcs ¼” flat gasket (Part # 43), 2 pcs ¼” spring gasket (Part # 44), and 2 pcs ¼” hexagon nut (Part #40) to install Part # 7 to Pizza oven door assembly (Part # 8).

- Use2 pcs ¼” 14” screw (Part # 37) to go through the two holes on Pizza oven door handle assembly (Part # 67), then go through 4 pcs mica plates (Part # 6), 2 pcs ¼” flat gasket (Part # 43), 2 pcs ¼” spring gasket (Part # 44), and 2 pcs ¼” hexagon nut (Part #40) to install Part # 7 to Pizza oven door assembly (Part # 8).
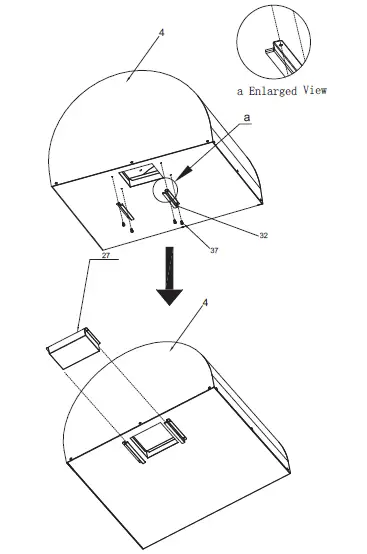
- Step 6
- Use4 pcs ¼” Philips thumb head screw with anti-slip design (Part # 37) to put 2 pcs ash pan holder (Part # 32) to the back of Pizza oven cavity (Part # 4);
- One part # 32 are installed, install ash pan welding assembly (Part # 27).

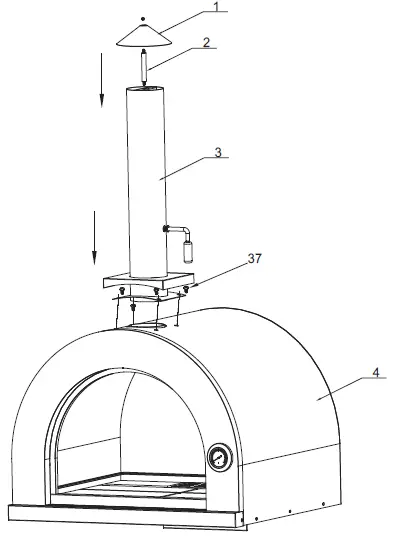
- Step 7
- Use1 pc ¼” nut (Part # 40) and 1 pc ¼” flat gasket (Part # 43) to connect chimney coping (Part # 1) to chimney supporting rod (Part # 2)
- Install Part # 1 and # 2 to the top of Chimney Pipe Assembly (Part # 3);
- Use4 pcs ¼” flat Philip’s screw head (Part # 37) to connect Part # 3 to Pizza Oven Cavity (Part # 4)

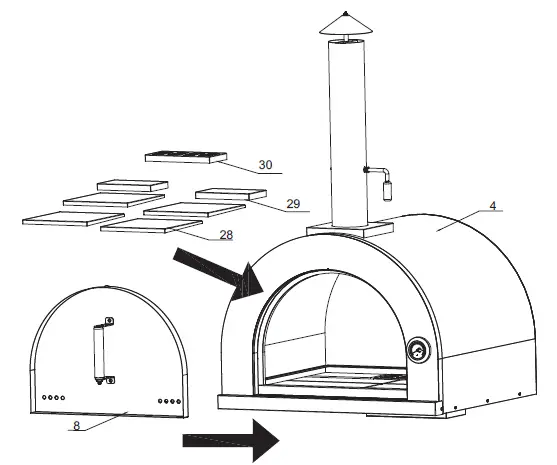
- Step 8
- Put 4 pcs Cordierite Brick B (Part # 28), 2 pcs Cordierite Brick A (Part # 29) and 1 pc net cover (Part # 30) inside Pizza oven Cavity (Part # 4)
- Insert Pizza oven door assembly (Part #8) into designated position on Part # 4.
- Maximum Temperature inside the Pizza Oven Cavity is 800 F.

- Step 9
- Use6 pcs ¼” Philips thumb head screw with anti-slip design (Part # 37) to install Pizza oven cavity (Part # 4) to Cabinet left side panel (Part # 10) and Cabinet right panel (Part # 25). Make sure the connection is smooth;
- Do not over-tighten all the screws until parts are lined up.

- Step 10
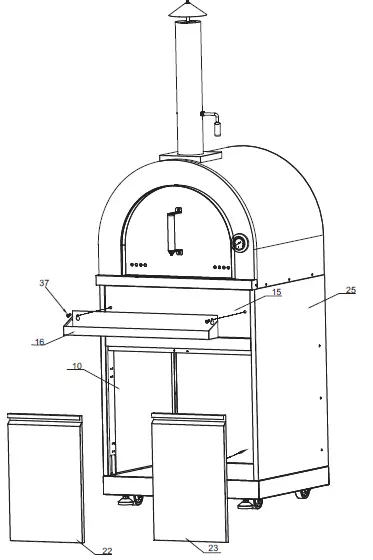
- Use2 pcs Part # 37 to connect condiment storage welding assembly (Part # 16) to front panel assembly (Part # 15);
- Use 24 pcs Parts # 39 to install door hinge (Part # 31) Part # 22 with Part # 10, and Part # 23 with Part # 25;
- Connect Part # 22 with Part # 10 and connect Part # 23 with Part # 25;
- Do not over-tighten all the screws until parts are lined up.
 Detailed Installation Pictures for Door hinge is shown below:
- Step 11
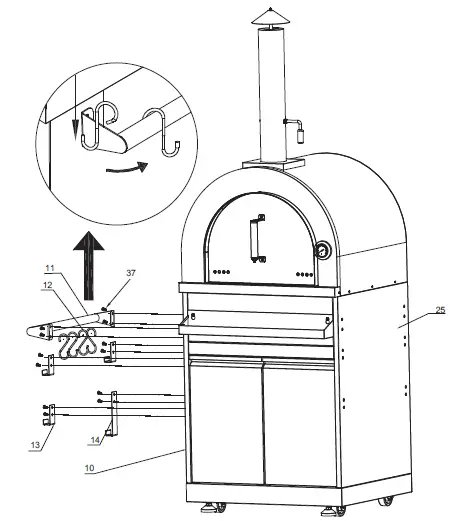
- Use4 pcs Part # 37 to connect Left handle welding assembly (Part # 11) to Left side panel (Part # 10), then put S-shape pothook (Part # 12) on Part # 11;
- Use8 pcs Part # 37 to connect side panel hook 1 (Part # 13) and side panel hook 2 (Part # 14) to the left panel (Part # 10);
- Part # 11, # 12, # 13 and # 14 could be installed on the right panel of pizza oven cabinet (Part #2 5) if needed. Please make sure the connections are smooth.

 Detailed Installation Pictures for Door hinge is shown below:
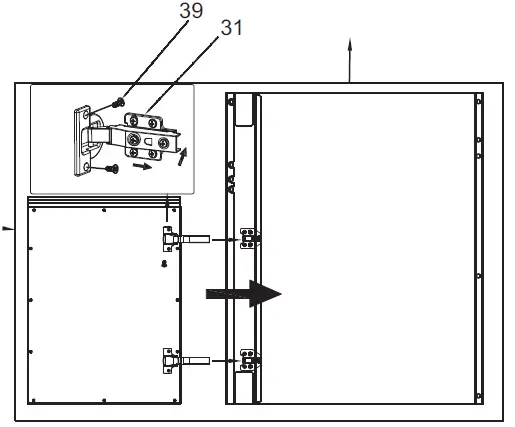
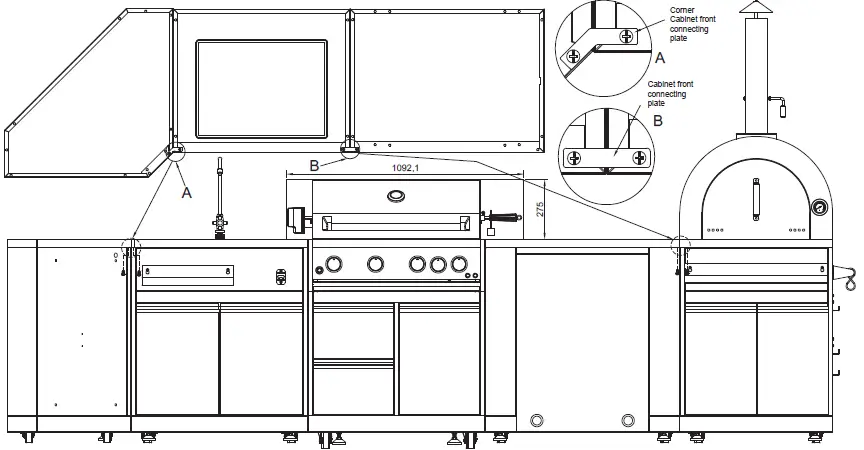
You Outdoor Cabinet could be connected with any other Our Door Cabinet models.
If you are having a Corner Cabinet and you would like to connect it to another cabinet, use corner cabinet connecting plate with 2 pcs¼” screws (Part# 06.02.00093-000-AO) to connect both cabinets;
If you are having a Sink Cabinet, Appliance Cabinet or Pizza oven Cabinet, use cabinet connecting plate with 2 pcs¼” screws to connect both cabinets.
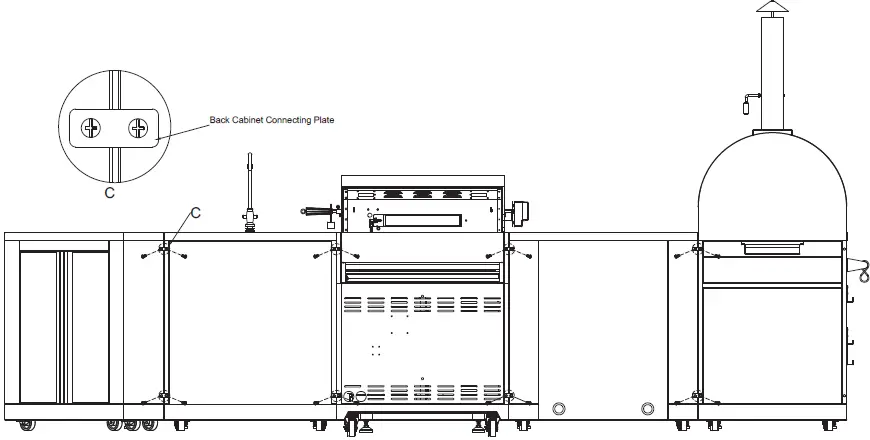
You Outdoor Cabinet could be connected with any other Our Door Cabinet models.
For Back Panel Connections, use Back Cabinet connecting plate with 2 pcs¼” screws (Part# 06.02.00093-000-AO) to connect both Cabinets.
Warranty
This product has been manufactured by Empava, 15253 DON JULIAN RD, CITY OF INDUSTRY, CA, 91745.
Empava disclaims all express warranties except for the following:
This warranty applies to products purchased and located in the United States.Products purchased or located outside this area are excluded.
The warranty does not apply to damage resulting from abuse, accident, natural disaster, loss of electrical power to the prod-uct for any reason, alteration, outdoor use, improper installation, and improper opera-tion, repair or service of the product by anyone other than an authorized Empava, service agency or representative.
Warranties and Duration
warranty for Parts and Labor: first year parts and labor.
Implied warranties terminate upon expiration of the limited warranty.
Some states do not allow limitations on how long implied warranty lasts, so the above limitation may not apply to your implied warranty.
Empava will pay for:
All repair labor and cost of replacement parts found to be defective due to materi-
al and workmanship. Service must be provided by a Empava Authorized Service Agency during normal working hours.
For a Service Agency nearest you, please call 1-888-682-8882.
Empava will pay for:
- Service to repair or replace consumable parts. Consumable parts are not included in the warranty coverage.
- Repairs to parts or systems resulting from unauthorized modifications made to the appliance.
- Expenses for travel and transportation for product service if your cooktop is located in a remote area where service by an authorized Empava servicer is not available.
- Serial number that have been removed, altered or cannot be readily determined;
- Product that has been transferred from its original owner to another party or outside the USA or Canada;
- Rust on the interior or exterior of the unit;
- Products purchased “as-is” are not covered by this warranty;
- Products used in a commercial setting;
- Service calls which do not involve malfunction or defects in materials or workman-ship, or in accordance with the provided instructions;
- Surcharges including, but not limited to, any after-hour, weekend, or holiday service calls, tolls, ferry trip charges, or mileage expense for service calls to remote areas, including Hawaii, Alaska and Canada;
- Damages to the finish of appliance or home incurred during installation, including but not limited to floors, cabinets, walls, etc.;
- Damages caused by: services performed by unauthorized service companies; use of parts other than genuine Empava parts or parts obtained from persons other than authorized service companies; or external causes such as abuse, misuse, inadequate power supply, accidents, fires,or acts of God;
The warranty applies to appliances purchased and used for personal, family or household purposes only. It does not cover appliances used for commercial applica-tions.
Should the appliance be sold by the original purchaser during the warranty period, warranty shall extend to the new owner until the expiration date of the original pur-chaser warranty period.
Warranty and Product Registration
Empava is not responsible for incidental or consequential damages. Under no circum-stances will Empava’s liability exceed the cost that you paid for the product. Some states do not allow the exclusion or limitation of incidental or consequential damages, so the above limitations or exclusion may not apply to you.
This warranty gives you specific legal rights, and you may also have other rights that vary from state to state.
Whenever you call our customer service at 1-888-682-8882
(Empava cooktop) for technical information and parts sales in the United States or to request service for your appliance, please have your complete model number
Note: You must provide proof of purchase and installation date for in-warranty service.
Online Warranty Registration
online can register to activate your product warranty online to receive full benefit of Empava warranty service at www.empava.com
Please rest assured that under no conditions will Empava sell your name or any of the information your provide to us. We are very grateful that you have chosen Empava products for your home.


