![]()
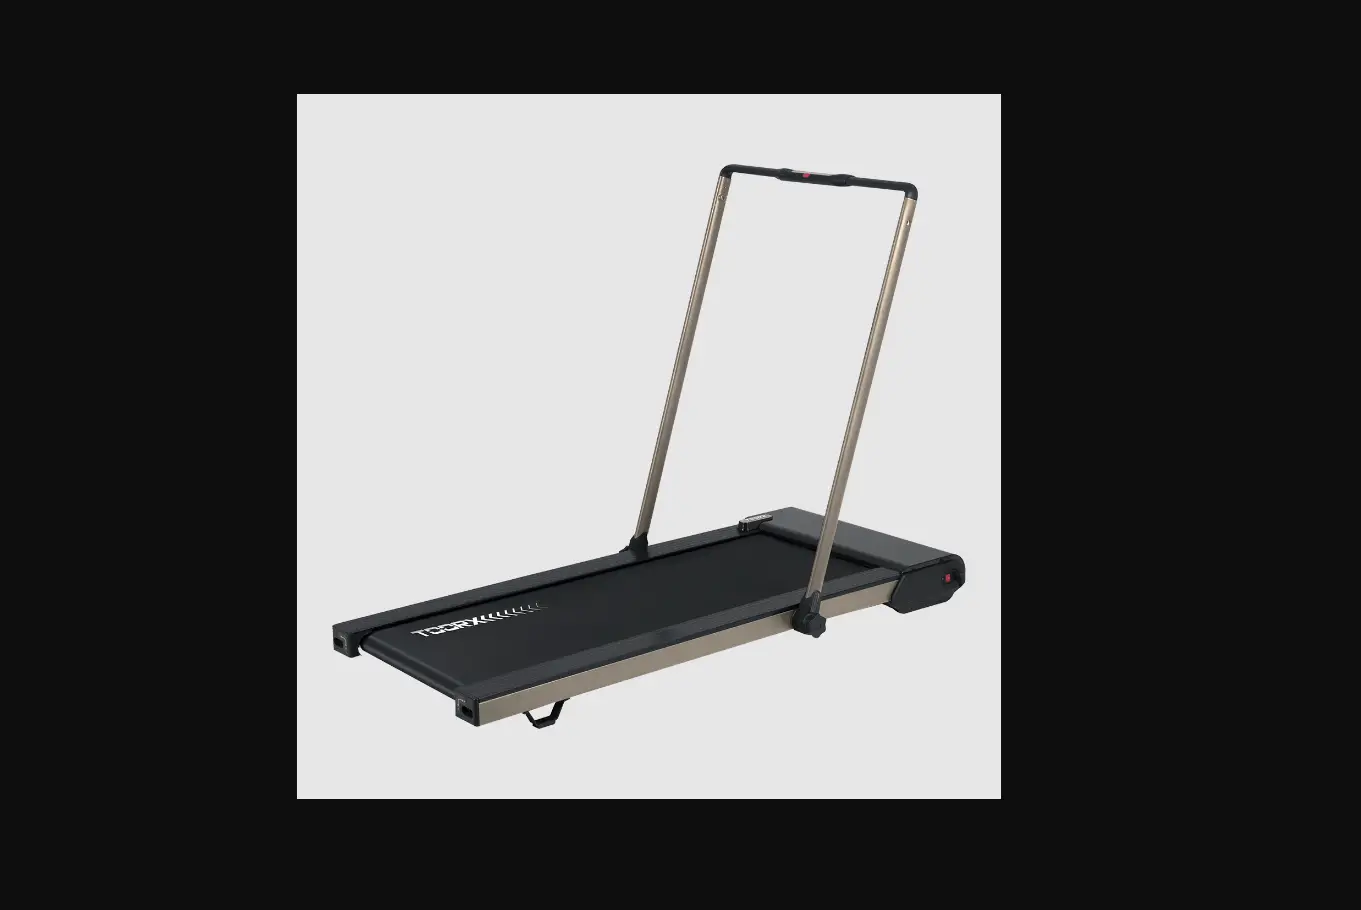
INSTRUCTION


Ed : 08/20 Rev : 00 Cod : GRLDTOORXMOTION

When you open the carton, and you will find the below parts in the carton
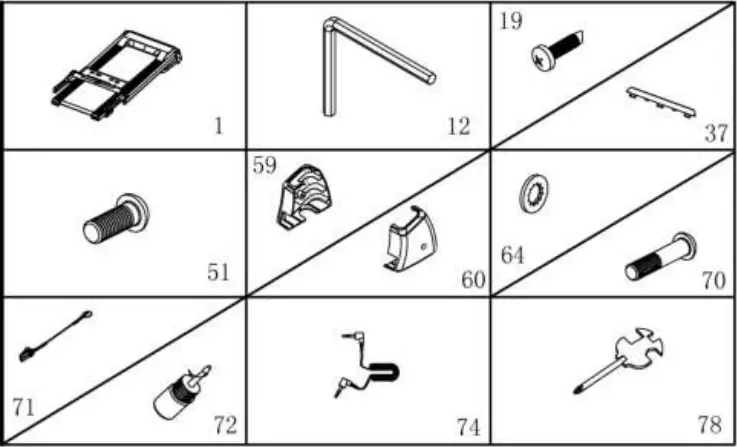
PART LIST:
NO. | DES. | Specification | Nos. |
| 1 | Main frame | 1 | |
12 | 5#Allen wrench | 1 | |
| 19 | Bolt | 4.2*19 | 2 |
37 | IPAD rack | 1 | |
| 51 | Bolt | M8*16 | 4 |
59 | Left base cover | 1 | |
| 60 | Right base cover | 1 | |
64 | Lock washer | 8 | 6 |
| 70 | Bolt | M8*45 | 2 |
71 | Safety key | 1 | |
| 72 | Silicone oil | 1 | |
74 | MP3 wire | option | 1 |
| 78 | Wrench with screw driver | 1 |
FIXING TOOLS:
5# Allen Wrench 5mm 1PC
Wrench with screw driver S=13/14/15 1PC
Notice: Do not get through power before complete assembly
Assembly Instructions
STEP 1:
Open the carton, get out the above spare parts, and put the Main Frame onto the level ground.
STEP 2:
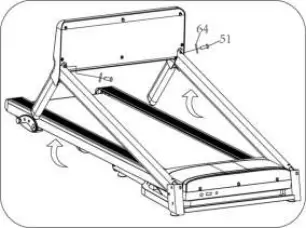
Holding the computer frame and uprights, use the 5# Allen wrench to lock the computer to the upright tube tight by bolt (51) and lock washer (64)
Notice: do not press wires inside the tube and check if wires are connected well. Support the upright with hand to avoid computer & upright falling down.
STEP 3:
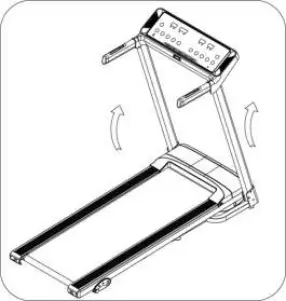
1. Pull up the uprights as left picture.
Notice: Support the upright with hand to avoid falling down to have any hurt.
STEP 4
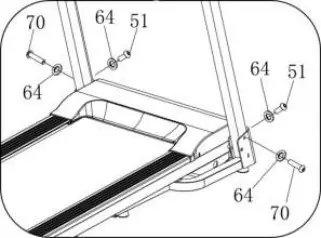
1. Use 5# Allen wrench(12) firstly lock right upright onto base frame by bolt(70) and lock washer (64), then lock right upright onto base by bolt (51) and lock washer (64).
2. The left upright assembly is the same as right upright.
Notice: Please always support the upright with hand during assembly to avoid falling down to have any hurt.
STEP 5
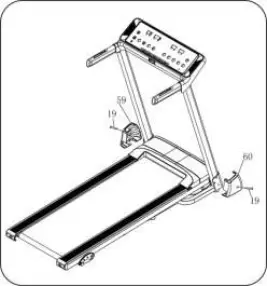
Use wrench with screw driver(78) to lock the left base cover(59) onto the base frame with bolt (19).
The right side can be assembled referring to the left side.
NOTICE: the base cover should buckle into the base frame vigorously.
STEP 6
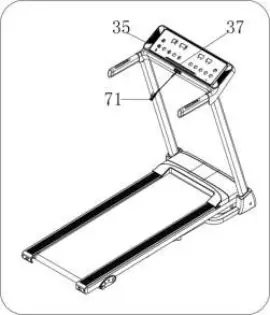
1. Push the IPAD rack(37) into the computer(35).
2. Put the safety key(71) on the computer and start your exercise.
Please make sure all parts have been fixed properly. Before you use the treadmill, please read the instruction carefully
Folding Instruction
Pulling up:
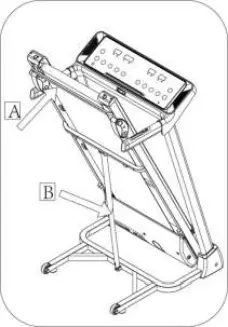
Pull up the base frame at position A, till hearing the sound that the air pressure bar B is locked into the round tube
Pulling down:
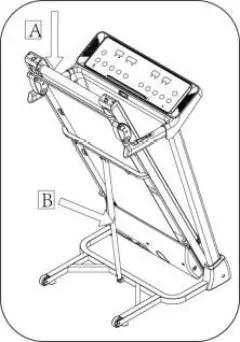
Support place A with hand , kick the place of air pressure bar, then the main frame will fall down automatically (Please keep anybody and any pet away the machine when falling down)
Technical Parameter
BUILT UP SIZE(mm) | 1476*1170*649mm | POWER | As the rating label showing |
| FOLDABLE SIZE(mm) | 760*1300*649mm | Maximum output power | As the rating label showing |
RUNNING BOARD SIZE(mm) | 400*1200 | SPEED RANGE | 0.8-12KM/H |
| NET WEIGHT | 43KG | ||
1 LCD WINDOW WITH BLUE BACKGROUND | Speed, time, distance, Calories, Pulse | ||
Grounding Methods
This product must be grounded. If it should malfunction or breakdown, grounding provides a path of least resistance for electric current to reduce the risk of electric shock. This product is equipped with a cord having an equipment-grounding conductor and a grounding plug. The plug must be plugged into an appropriate outlet that is properly installed and grounded in accordance with all local codes and ordinances.
DANGER – Improper connection of the equipment-grounding conductor can result in a risk of electric shock. Check with a qualified electrician or serviceman if you are in doubt as to whether the product is properly grounded. Do not modify the plug provided with the product if it will not fit the outlet, have a proper outlet installed by a qualified electrician. This product is for use on a nominal 220-240/100-120 volt circuit and has a grounding plug that looks like the plug illustrated in sketch A in following figure. Make that the product is connected to an outlet having the same configuration as the plug. No adapter should be used with this product. (The below picture is just for reference, the actual plug and jack is depends on import country)
Grounding methods
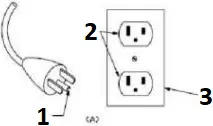
- GROUNDING PIN
- GROUNDED OUTLET
- GROUNDED OUTLET BOX
Operation Guide
OVERVIEW

2. SHOWING
SPEED: Display the speed,
TIME: Display the time
DIST. Display the distance
CAL/PULSE: Display the calories/heart rate
“PROGRAM” button: Press this button to choose program from manual mode—P1—-P15—FAT;
“MODE” button: When machine in ready state, press this button to choose the mode: mode-time count down, mode-distance count down, mode-calories count down; When FAT state, press this button to choose: ” SEX “, ” AGE”, ” HEIGHT”, ” WEIGHT”.
“START” button: Press this button to start the machine, the machine will run at the lowest speed or at the speed of default program after 3 seconds time count down;
“STOP” button: Press this button to stop the machine, the machine will stop smoothly;
SPEED: Adjust the speed. Press the button to adjust the speed when running, and adjust the data when stop;
SPEED (2,4,6,8,10,12): Adjust the speed quickly
SPEED+/-: Adjust the speed quickly.
4. MAIN FUNCTION:
Turn on the power, all the windows lit 2 seconds, and then enter the manual mode.
4. 1. Start-up quickly(Manual):
Get through power attach the safety key. After 3 seconds countdown, the treadmill starting and running from the lowest speed, add and subtract by SPEED button to adjust the speed. Please press the stop button or off the safety key directly to stop.
4. 2. Countdown mode
Press the ‘MODE’ button, it can choose time countdown mode, distance countdown mode, calories countdown mode, and the window will show the default data and glitter. At the same time, press SPEED/ to set the data. Press ‘START’ button, the machine will run at the lowest speed, you can press SPEED / to change the speed. When it counts down to 0, the machine will stop smoothly. Certainly, you can press ‘STOP’ button or take out the safety key from the console to stop the machine.
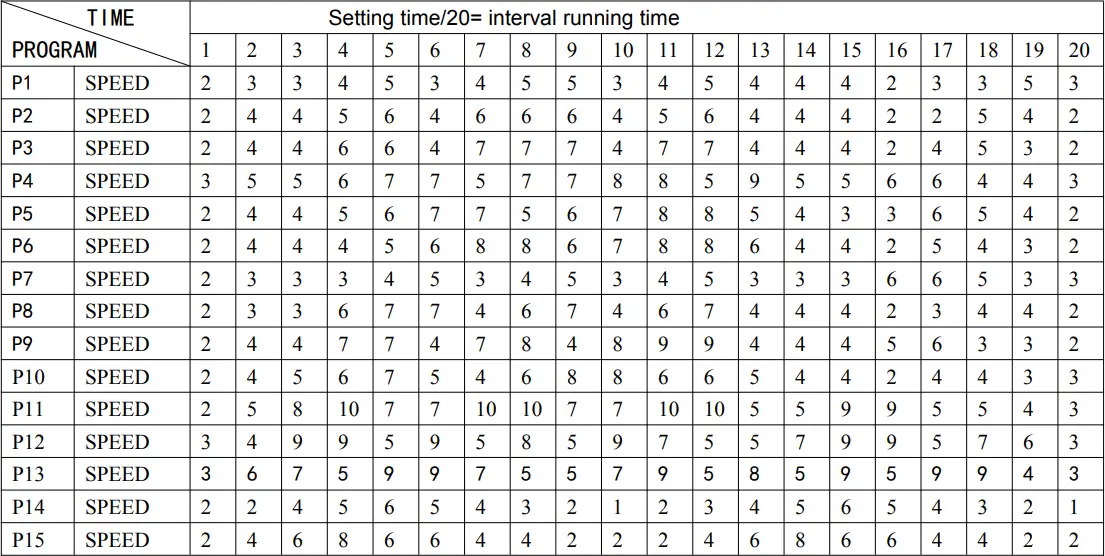
4. 3. Preset programs:
Press ‘PROG’ button to choose the inner install program from P1—-P15. When set the program, the time window will show default data and glitter, press SPEED button to set the running time. Each program has been divided into 20 section, each exercise time=the setting time/20. Press ‘START’, the machine will run at the first section speed. When the section is over, it will enter into next section automatically, the speed will change as next section data. When finish one program, the machine will stop smoothly. During the running, you can change the speed and incline by the SPEED /whenever, when the program enter next sect will come back to the current speed. And you can press ‘STOP’ or take out the safety key to stop the machine whenever.
5. HEART RATE:
When holding the hand pulse by two hands, the pulse window will show your heart rate after 5 seconds. In order to get the heart rate exactly, please do a test when the machine stop and hold the hand pulse more than 30 seconds. The heart rate data is just for reference cannot be as the medical data.
6. BODY FAT TEST
Press ‘PROGRAM’ button under ready condition, till ‘FAT’ show in the speed window. ‘FAT’ is body fat test mode. Press ‘MODE’ to choose parameter ‘SEX / AGE / HEIGHT / WEIGHT’, and TIME/DIST window will show “F1″”F2″”F3″”F4”. When set each parameter, press SPEED / to adjust the data, and CAL/PULSE window will show the data and press ‘MODE’ button to finish, and the window will show”F5″ and “—” enter into ready condition. Hold the handle pulse with two hands, it will show your BMI data after 5 seconds.
6.1 Data display and set range
default | range | mark | |
SEX (F1) | 0 (MALE) | 0—1 | 0= MALE 1= FEMALE |
AGE (F2) | 25 | 10—99 | |
HEIGHT (F3) | 170CM | 100-240CM | |
WEIGHT (F4) | 70KG | 20-160KG |
6.2 Body fat index comparison
Body fat index (BMI) | Obesity level |
| <19 | Too thin |
19–26 | normal |
| 26–30 | overweight |
>30 | Too fat |
7. USB FUNCTION(Option):
When treadmill is power on, you may insert any USB memory stick which contains audio files. The computer will detect the audio files on the memory stick and play the music directly.
8. MP3 FUNCTION(Option):
When the power on, Contacting the external MP3 equipment, the computer will play. The voice is adjustable from operate the external MP3 equipment, the voice should be adjusted on the proper section to protect the computer loudhailer.
9. Bluetooth speaker function(Option):
Connect the mobile phone Bluetooth with the Bluetooth speaker on the treadmill, after success of the connection, you can use the phone to play songs by Bluetooth speaker.
10. SLEEP FUNCTION:
A. Stop for more than 10 minutes without any operation, the system completed all showed off into the body of sleep sate.
B. Press any key to wake up console under sleep status.
11. Safety key function:
Take away the safety key anytime will stop the machine, all data will return to 0, all window will display “—“. All operation will be workable when the safety key is on.
12. Exercise parameter and setting
Display range | Default data | Default | Setting range | |
| Speed (KM/H) | 0.8KM/H-12.0KM/H | ——– | ——– | ————- |
| Time (MIN:SEC) | 0:00—99:59 | 30:00 | 30:00 | 5:00—99:00 |
| Distance (KM) | 0.00—99.9 | 1.0 | ——– | 0.50—99.9 |
| Calories | 0Kcl—999Kcl | 50Kcl | ——– | 10Kcl—990Kcl |
programs table:
Running Belt Adjustment
WARNING: ALWAYS UNPLUG THE TREADMILL FROM THE ELECTRICAL OUTLET BEFORE CLEANING OR SERVICING THE UNIT.
Clean: General cleaning the unit will greatly prolong the treadmill.
Keep treadmill clean by dusting regularly. Be sure to clean the exposed part of the deck on either side of the walking belt and also the side rails. This reduces the build up of foreign material underneath the walking belt by wearing the clean running shoes.
Warning: Always unplug the treadmill from the electrical outlet before removing the motor cover. At least once a year remove the motor cover and vacuum under the motor cover.
RUNNING BELT AND DECK LUBRICATION
This treadmill is equipped with a pre-lubricated, low maintenance deck system. The belt/ deck friction may play a major role in the function and life of your treadmill, thus requiring periodic lubrication. We recommend a periodic inspection of the deck. You need contact with our service center if you find the damage of the deck.
We recommend lubrication of the deck according to the following timetable:
- Light user (less than 3 hours/ week) annually
- Medium user (3-5 hours/ week) every six months
- Heavy user (more than 5 hours/ week) every three months
We recommend that you buy the lubrication from our distributor or directly to our company.
Attention: Any repair need the professional technician.
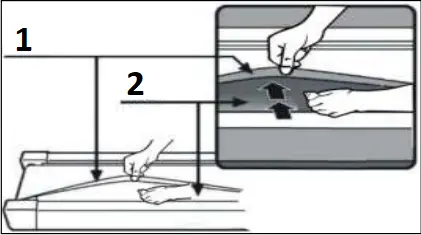
1 Banda Running belt
2 Tabla Board
- We suggest that you should switch off the power for 10 minutes after keep running 2hours, so that it’s good for maintain the treadmill.
- For avoiding the slipping during running , the belt should be not too loose; for avoiding the more abrasion between the roller and belt and maintain the machine’s good running ,the belt should be not too tight. You can adjust the distance between deck and belt , the belt should be away from the deck about 50-75mm on both sides, if the best not too tight and loose.
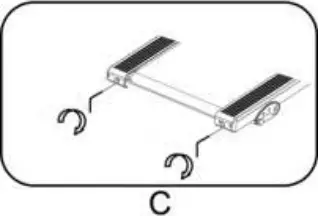
Center The Running Belt
Place treadmill on a level surface. Run Treadmill at approximately 6-8KM/H, checking the running condition.
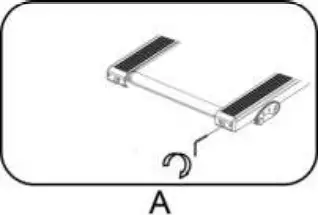
If the belt has drifted to the right, pull out of the save clock and switch, turn the right adjusting bolt 1/4 turn clockwise, then start running until centering the belt. PIC A
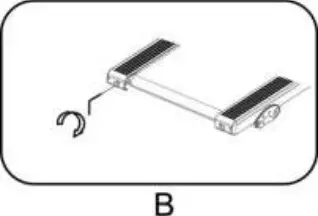
If the belt has drifted to the left ,pull out of the safety clock and switch, turn the left adjusting bolt 1/4 turn clockwise ,then start running until centering the belt. PIC B
Timely adjust the tightness of the belt ,for the looseness after a period of time running. Pull out of the safety clock and switch , turn the left and right adjusting bolt 1/4 turn clockwise ,then re-start running, confirm the belt-tightness until the belt be right tightness. PIC C
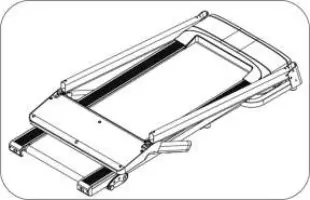
EXPLODED DRAWING
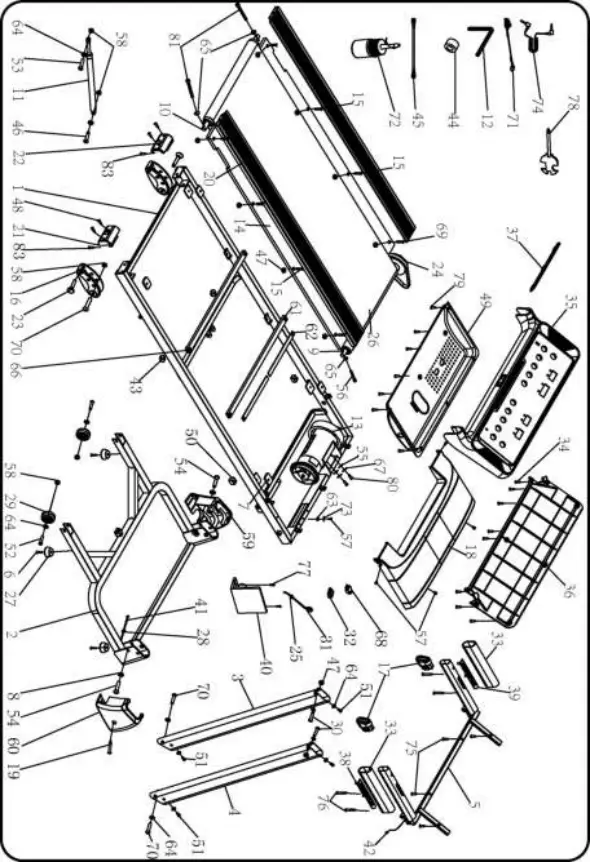
No. | Item | Spec. | Qty. |
| 1 | Main frame | 1 | |
2 | Base frame | 1 | |
| 3 | Left upright tube | 1 | |
4 | Right upright tube | 1 | |
| 5 | Computer bracket | 1 | |
6 | Bolt | ST4.2*25 | 4 |
| 7 | Rubber pad | 4 | |
8 | Lock washer | 10 | 2 |
| 9 | Front roller | 1 | |
10 | Rear roller | 1 | |
| 11 | Cylinder | 1 | |
12 | 5#Allen wrench | 5mm | 1 |
| 13 | DC motor | 1 | |
14 | Running boar | 1 | |
| 15 | Bolt | M6*37 | 4 |
16 | Adjustable pad | 2 | |
| 17 | Inclined tube plug | 2 | |
18 | Motor cover | 1 | |
| 19 | Bolt | ST4.2*19 | 2 |
20 | Side rial | 2 | |
| 21 | Right back end cap | 1 | |
22 | Left back end cap | 1 | |
| 23 | Fixed plug | 2 | |
24 | Motor belt | 1 | |
| 25 | Power wire buckle | 1 | |
26 | Running belt | 1 | |
| 27 | Foot pad | 4 | |
28 | Ring protector plug B | 2 | |
| 29 | Moving wheel | 2 | |
30 | Bolt | M6*37 | 2 |
| 31 | Standard power wire | 1 | |
32 | Switch | 1 | |
| 33 | Foam | 2 | |
34 | Bolt | ST4.2*13 | 11 |
| 35 | Computer top cover | 1 | |
36 | Computer bottom cover | 1 | |
| 37 | IP rack | 1 | |
38 | Speed +/- | 1 | |
| 39 | Start/stop | 1 | |
40 | Control board | 1 | |
| 41 | Computer bottom cover | 1 | |
42 | Computer top wire | 1 | |
| 43 | Barb cushion | 2 | |
44 | Magnetic ring | 1 | |
| 45 | Brown single wire | 1 | |
46 | Bolt | M8*25 | 3 |
| 47 | Lock nut | M6 | 10 |
48 | Bolt | ST4.2*30 | 4 |
| 49 | Motor bottom cover | 1 | |
50 | Barb cushion | 2 | |
| 51 | Bolt | M8*16 | 4 |
52 | Bolt | M8*40 | 2 |
| 53 | Bolt | M8*42 | 3 |
54 | Bolt | M10*55 | 2 |
| 55 | Lock washer C level | 8 | 2 |
56 | Bolt | M6*55 | 1 |
| 57 | Bolt | M5*8 | 5 |
58 | Lock nut | M8 | 6 |
| 59 | Left base cover | 1 | |
60 | Right base cover | 1 | |
| 61 | Running board strengthen tube | 2 | |
62 | strengthen tube cushion | 275*20*3 | 4 |
| 63 | Lock washer | 5 | 2 |
64 | Lock washer | 8 | 12 |
| 65 | Lock washer | 6 | 3 |
66 | Isolation nylon pad | φ23*φ10.5*2 | 4 |
| 67 | Spring washer | 8 | 2 |
68 | Overload protector | 1 | |
| 69 | Bolt | M6*30 | 4 |
70 | Bolt | M8*45 | 4 |
| 71 | Safety key | 1 | |
72 | Silicone oil | 1 | |
| 73 | Spring washer | 5 | 2 |
74 | MP3 washer | option | 1 |
| 75 | Bolt | 4.2*15 | 4 |
76 | Bolt | ST4.2*45 | 4 |
| 77 | Bolt | ST4.2*9.5 | 4 |
78 | Wrench with screw driver | 1 | |
| 79 | Bolt | ST4.2*12 | 8 |
80 | Bolt | M8*12 | 2 |
| 81 | Bolt | M6*65 | 2 |

GARLANDO SPA
Via Regione Piemonte, 32 – Zona Industriale D1
15068 – Pozzolo Formigaro (AL) – Italy
www.toorx.it – [email protected]


