KALORIK 120V~60Hz MAXX AIR FRYER OVEN
IMPORTANT SAFEGUARDS
When using electrical appliances, basic safety precautions should always be followed, including the following:
- READ ALL INSTRUCTIONS.
- Check that your mains voltage corresponds to that stated on the appliance.
- Do not touch hot surfaces. Use handles or knobs.
- To protect against electrical shock, fire or personal injury, do not immerse cord, plugs, or the appliance in water or other liquid.
- Close supervision is necessary when any appliance is used by or near children.
- Unplug from outlet when not in use and before cleaning. Allow to cool before putting on or taking off parts.
- Do not operate any appliance with a damaged cord or plug or after the appliance malfunctions or has been damaged in any manner. Return the appliance to the nearest authorized service facility for examination, repair, or adjustment.
- The use of accessory attachments not recommended by the appliance manufacturer may cause injuries.
- Do not use outdoors. This appliance is for HOUSEHOLD USE ONLY.
- Do not let the cord hang over the edge of a table or counter or touch hot surfaces.
- Do not place on or near a hot gas or electric burner, or where it could touch another heated oven.
- Extreme caution must be used when moving the appliance. Let the appliance cool to room temperature before handling or moving.
- When in operation, hot air is released through the air vents. Keep your hands and face at a safe distance from the air vents and take extreme caution when removing the accessories from the appliance. Failure to do so may lead to burns and/or injury
- When operating the oven keep at least four inches of space on all sides of the oven to allow for adequate air circulation.
- Always operate on a stable, heat-resistant surface. Do not use on a cloth-covered surface, near curtains or other flammable materials.
- Do not place the oven near the edge of a bench or table during operation. Ensure the surface is level, clean and free of water, debris, etc.
- Extreme caution must be used when moving an appliance or parts containing hot oil or other hot liquids.
- Do not use the appliance for other than intended use.
- Oversize foods or metal utensils must not be inserted in the Air Fryer Oven as they may create a fire or risk of electric shock.
- A fire may occur if the Air Fryer Oven is covered or touching flammable material, including curtains, draperies, walls, and the like, when in operation. Do not store any item on top of the appliance when in operation.
- Do not clean with metal scouring pads. Pieces can break off the pad and touch electrical parts involving a risk of electric shock.
- Extreme caution should be exercised when using containers constructed of other than metal or glass.
- Do not store any materials in this oven when not in use.
- Do not place any of the following materials in the oven: paper, cardboard, plastic, and the like.
- Do not cover crumb tray or any part of the oven with metal foil. This causes overheating of the oven.
- Do not leave unit unattended, especially when toasting or broiling.
- Use extreme caution when disposing of hot grease.
- Always wear protective, insulated oven gloves when inserting or removing items from the hot oven.
- To disconnect, press the Start/Stop for 3 seconds to ensure the machine is off, then remove plug from wall outlet.
- Never connect this appliance to an external timer switch or separate remote-control system as this may lead to burns and/or injury
- Do not cover or block the air vents while the appliance is in operation. Doing so will prevent even cooking and may damage the appliance or cause it to overheat may result in fire or burns.
- Do not rest cooking utensils or baking dishes on the appliance’s hot surfaces
SAFETY TIPS
- When in use, always use oven mitts or potholders when touching any outer or inner surface of the oven, or when handling accessories.
- To reduce risk of fire, keep oven interior clean and free of food, oil, grease and any other combustible materials.
- Do not use metal utensils such as knives to remove food residue from the heating elements as this can damage the appliance as well as lead to electrocution.
- Do not store any materials in the oven when not in use.
PARTS DESCRIPTION
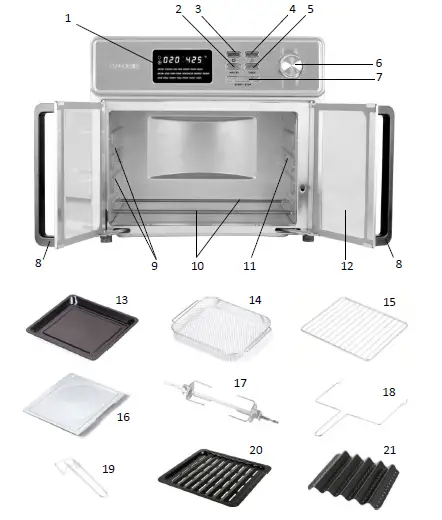
- LED display
- Air Fry function button
- Rotisserie function button
- Inner oven light button
- Oven function button
- Selector dial
- Start / Stop button
- French door handles
- Rails / Racks and basket slots
- Heating elements (top and bottom)
- Rotisserie spit insert
- Glass French door
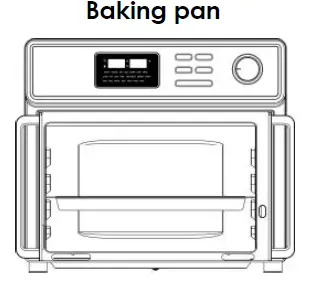
- Baking / Drip pan
- Air fryer basket
- Baking rack
- Crumb tray
- Rotisserie spit and forks
- Rotisserie handle
- Tray handle
- *2-in-1 Dehydrator and steak tray
- *Bacon tray
POLARIZED PLUG INSTRUCTIONS
This appliance is equipped with a polarized plug (one blade is wider than the other). To reduce the risk of electric shock, this plug will fit into the polarized outlet only one way. If the plug does not properly fit into the outlet at first, reverse it. If it still does not fit, contact a competent qualified electrician. Do not attempt to modify the plug in any way.
SHORT CORD INSTRUCTIONS
A short power supply cord is provided to reduce the hazards resulting from becoming entangled in or tripping over a longer cord. Extension cords may be used if care is exercised in their use.
- The electrical rating of the extension cord should be at least that of the appliance. If the electrical rating of the extension cord is too low, it could overheat and burn.
- The resulting extended cord should be arranged so that it will not drape over the countertop or tabletop where it can be pulled on by children or tripped over.
PRODUCT SPECIFICATIONS

KNOW YOUR AIR FRYER OVEN
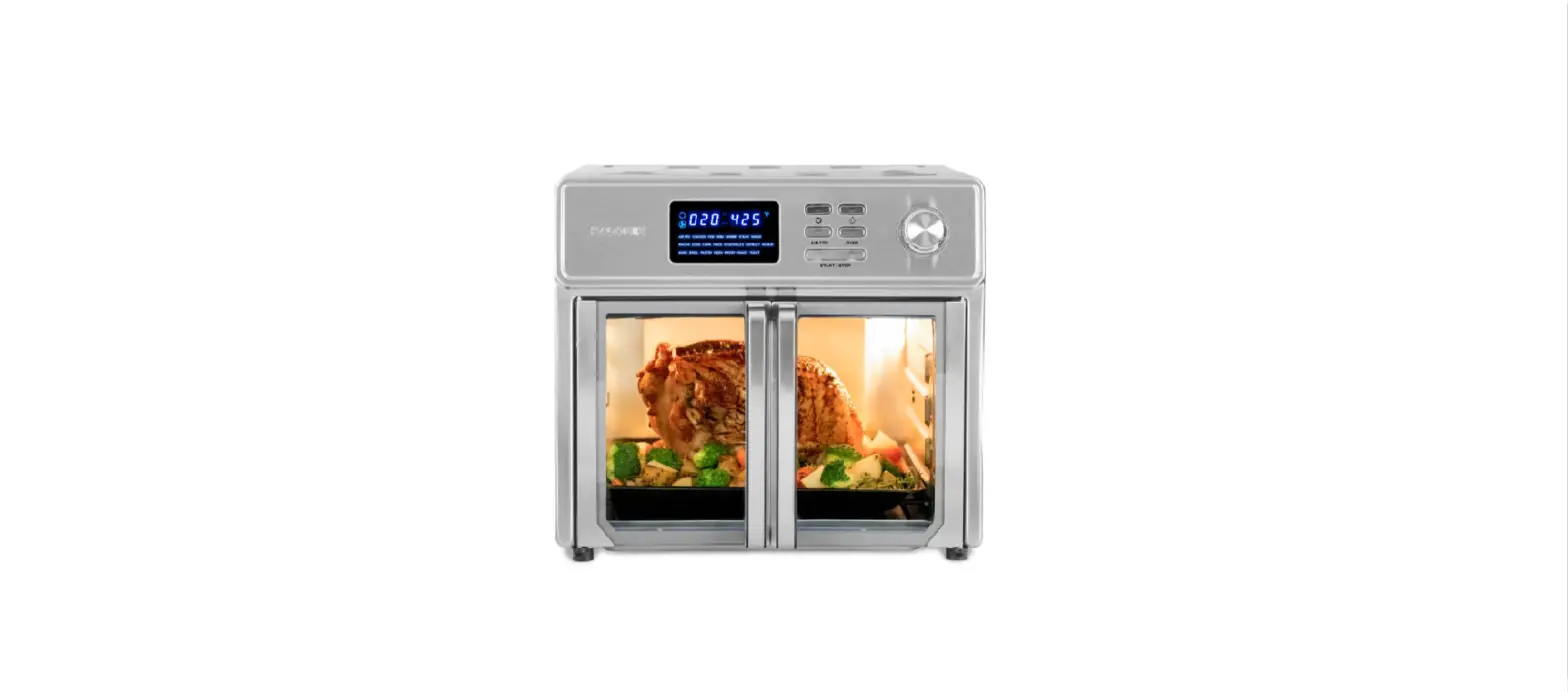
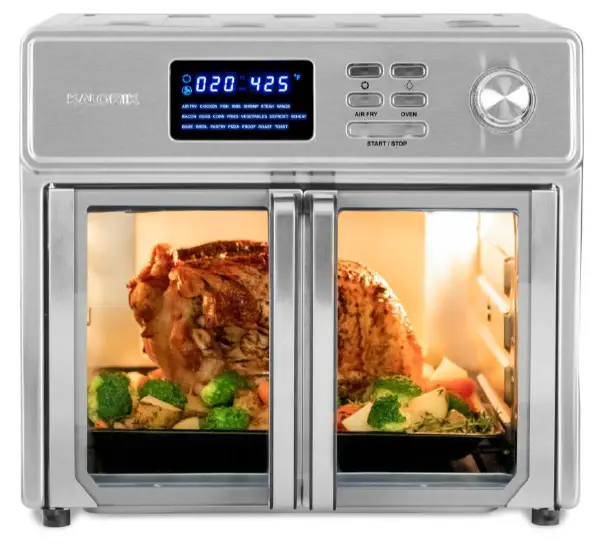
Discover the new generation of air fryer ovens! The Kalorik 26 Quart Digital Maxx Air Fryer Oven combines multiple appliances into one. It functions as an air fryer, roaster, broiler, rotisserie, dehydrator, oven, toaster, pizza oven, and slow cooker.
The Kalorik Digital Maxx Air Fryer Oven uses special Turbo Maxx technology to cook food faster than ever. Customized upper and lower heating elements provide even heat distribution for perfectly cooked results. An optimized airflow system and high-performance turbofan are engineered for maximum air circulation, delivering the same crispy texture and rich flavor of deep-fried food, with little to no oil. This reduces fat and calories for healthier meals.
The rotisserie setting rotates the included spit accessory during cooking, allowing meat to roast evenly in its own juices and develop maximum flavor.
The Kalorik Digital Maxx Air Fryer Oven reaches up to 500°F, perfect for searing meat or vegetables to caramelized perfection. The oven can fit a large chicken, 12” pizza, or up to 9 slices of toast in its cavity.
Modern and multifunctional, the Kalorik Digital Maxx Air Fryer Oven features glass French doors with a single-hand automatic opening to prevent dripping or scalding.
A built-in auto-shutoff safety feature automatically stops operation when the doors are open.
An easy-to-use digital LED display contains 21 presets for foolproof cooking. Accessories include an air frying basket, baking pan, air rack, crumb tray, *bacon tray, *2-in-1 steak and dehydration tray, rotisserie spit, rack handle and rotisserie handle.
BEFORE THE FIRST USE
- Unpack the appliance and accessories and wash and wipe everything down. Wipe the interior of the oven with a damp cloth or sponge. Dry with a paper towel. Make sure the oven is dry before operating the unit.
- Position the oven on a flat and heat-resistant surface so that it is also positioned at least 4 inches (10cm) away from any surrounding object.
- Unwind and plug in the power cord into the wall outlet. Place the
- sliding crumb tray inside on the bottom of the unit, underneath the bottom heating elements. Make sure unit is clean and everything has been taken out of the oven.
- It is normal if some smoke or smell emanates from the appliance when using it for the first time. This is not harmful. To eliminate any packing oil that may remain after production, we recommend operating the appliance for 20 minutes on steak function, putting the thermostat on its maximum temperature setting (500 °F).
CONTROL PANEL
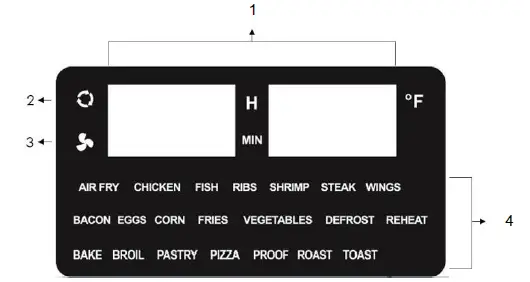
LED Screen
The LED screen displays the Countdown Timer and Temperature (1), Rotisserie signal symbol (2), Air fry signal symbol (3), and Presets (4).
Buttons & Selector Dial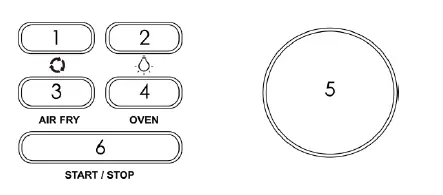
- Rotate: Use when cooking with the rotisserie spit. Press the Rotate button to turn on the rotisserie mode and make the accessory rotate to achieve an evenly crispy outcome. Press again to turn off the rotisserie function.
- Light: Press the Light button to turn the oven light on or off. The light can be turned on at any time to help monitor your food while cooking. The light turns off automatically after one minute.
- Air Fry: Press the Air Fry button to select the air frying function. 14 presets are available for use with this mode. Use the selector dial to select your desired preset.
- Oven: Press the Oven button to use the unit as a conventional oven. 7 cooking modes are available when using the Oven function. Use the selector dial to select your desired cooking mode.
- Selector dial: Use the dial to select your desired preset. Press the dial to adjust the cooking time and temperature.
- Start/Stop: Press Start/Stop to turn the unit on, begin, or end the cooking cycle. Long press 3 seconds to switch off the machine directly.
PRODUCT AND PARTS
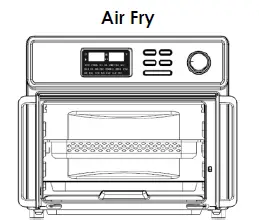
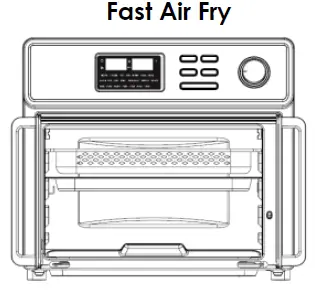
Use the markings on the door for recommended accessory positions. 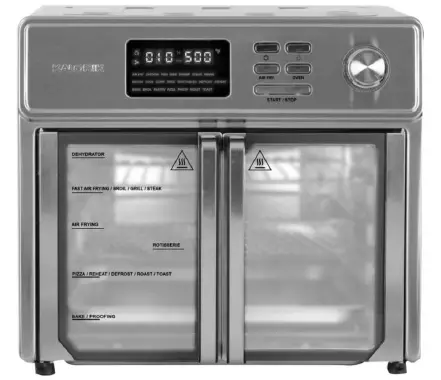
Accessory Positioning Diagrams
Follow the diagrams below to use your oven to the fullest and to achieve consistent and professional results.
- This function is used to air fry meals as a healthy alternative to deep-frying in oil.
- For best results, use the provided air fryer basket.
- Flip or shake food halfway through the cooking process to cook food evenly.
- Air Frying does not require oil. A tablespoon of oil may be added to enhance flavor.

- Cook food even faster by placing the basket on the top rack.
- Reduce your cooking time and shake your food halfway to ensure even results.
- Air Frying does not require oil. A tablespoon of oil may be added to enhance flavor

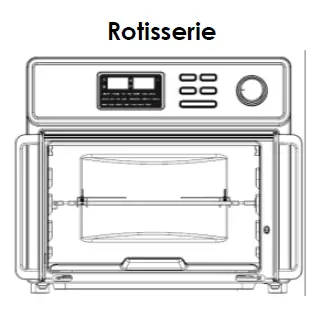
- Use the rotisserie spit and its handle to cook whole chickens and roast all types of food.
- Press the “Rotate” button to allow the rotisserie spit to rotate during cooking, allowing meat to roast evenly in its own juices and develop maximum flavor.
- Rotisserie automatically turns on under the Chicken preset, for all other presets button must be pressed.
- This setting can be turned on and used during the air fry, bake, and roast cooking functions.

- Cook bacon to perfection with the bacon tray.
- Important: Place the accessory on the baking/drip pan.
- The wave design keeps bacon up and away from draining grease.
- Accommodates multiple slices at once.
- Use the bacon air fry function when cooking bacon.

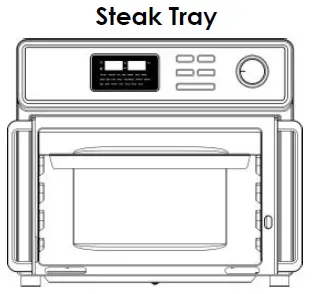
- Use the steak tray to sear and caramelize your foods to perfection.
- Important: Place the accessory on the baking/drip pan.
- The slotted design allows excess fat to drain into the drip pan.
- Place steak tray on the top slot to obtain perfect searing.
- Use the steak air fry function when cooking steaks, chops, chicken, seafood and veggies.

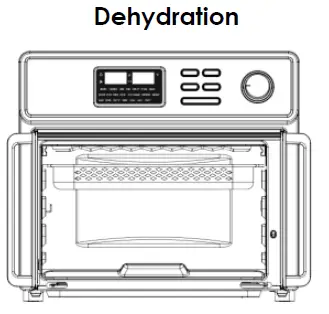
- Dehydrate all types of foods with the dehydration function. Select the Defrost function and set the temperature to 130°F and the time to 1 hour. Add time as needed.
- Use the 2-in-1 steak and dehydrator tray. Flip the steak tray upside down and slide it in the dehydrator slot (top). Place your food in the air fryer basket and slide it in the fast air fry slot. Press the Start/Stop button to begin.
- The built-in fan and low heat are used to create a flow of warm air that reduces the water content found in fresh foods.
- Place food in a single layer with no overlap.
- Lemon juice can be used to pretreat fruits and vegetables and prevent browning.
- Use to dehydrate fruits and vegetables, or to make beef jerky, and more.

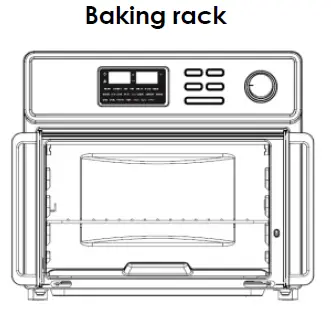
- The baking rack can be used for both air frying and oven functions.
- This accessory can be used for a variety of foods including pizza or used when cooking with cake pans to place on top.

- Used for baking oven function.
- Ideal for smaller food bits.
- Great for catching oil grease during the cooking process
Tips
- When setting up the Maxx Air fryer oven, always make sure the sliding crumb tray is inserted prior to starting your cooking process. Rinse and clean the sliding crumb tray after every use.
- When cooking foods that may drip crumbs or grease during the cooking process, make sure to place the baking/drip pan on the lowest slot. This will help maintain the unit as clean as possible and protect the lower heating elements.
Using the Rotisserie Spit
- Insert the rotisserie spit through the center of the food lengthwise.
- Slide the forks onto each side of the spit and secure them in place by tightening the screws provided. Make sure the forks are securely inserted and food is centered on the spit.
- Use the rotisserie handle to lift the rotisserie rod. The hooks of the rotisserie handle should be placed under the grooves on both sides of the rod. Make sure the long end of the rod is on the right side of the handle, and the short-indented side is on the left side of the handle.
- Open the oven doors. Slide the accessory in the cavity. Insert the right side (long end) of the rod in the rotisserie spit support. Then, place the left side (short indented end of the rod) on the left hook inside the cavity.
CAUTION: Rotisserie accessories are very sharp and will likely get very hot during the cooking process. Be careful and use oven mitts to avoid personal injury.
WARNING: Place all ingredients on the racks, rotisserie spit or basket in a way to prevent any contact with the appliance’s heating elements. Do not overfill.
FUNCTIONS
AIR FRYER
Air frying can be used as a healthy alternative style of cooking, requiring little to no oil and using rapid hot air to cook meals faster.
- Place your food on or inside the appropriate rack, pan, or basket and position it inside the oven.
- Select the Air Fryer function and use the selector dial to scroll through the presets, the presets will flash as you go by each one.
- If you wish to change either the temperature or the time from your preset, press the selector dial once to change the time and once again to change the temperature. Turn it clockwise to increase and counterclockwise to lower.
- Once you have found the preset you desire to use, press the Start/Stop key to begin. The appliance will turn on and the unit will start the cooking process, you will see the timer countdown.
- Tip: Flipping or turning food halfway through the cooking process ensures that the food is evenly cooked.
- When the countdown timer reaches 0:00, the unit will beep 3 times, and the heating elements will turn off. Please note that after the cooking time is done, the fan will remain on for 3 minutes for cooling purposes. “OFF OFF” will start blinking in the display until the cooling process is finished.
- Once the cooling process is done the unit will beep and turn off right after.
- Carefully take out your food with oven mitts and use the tray handle.
- Note: the cooking process can be canceled at any time by pressing the Start/Stop button.
Notes: - Although oil is not necessary, a small portion of oil can be sprayed on or brushed on food before air frying. Make sure to distribute oil evenly on food.
- Some foods release water or oil when cooking. When cooking large quantities for an extended period, condensation may build up, which could leave moisture on your countertop.
- Use the baking pan to catch water or oil when dripping.
Air frying presets:
| Food | Default Temperature (°F) | Default Time (min) | Adjustable Temperature (°F) | Adjustable Time (min) |
| Air Fry | 425°F | 15 mins | 140-450°F | 1-90 |
| Chicken | 435°F | 40 mins | 140-450°F | 1-90 |
| Fish | 375°F | 10 mins | 140-450°F | 1-90 |
| Ribs | 400°F | 25 mins | 140-450°F | 1-90 |
| Shrimp | 375°F | 10 mins | 140-450°F | 1-90 |
| *Steak | 500°F | 13 mins | 140-500°F | 1-90 |
| Wings | 450°F | 15 mins | 140-450°F | 1-90 |
| *Bacon | 425°F | 6 mins | 140-450°F | 1-90 |
| Eggs | 400°F | 5 mins | 140-450°F | 1-90 |
| Corn | 440°F | 15 mins | 140-450°F | 1-90 |
| Fries | 450°F | 15 mins | 140-450°F | 1-90 |
| Vegetables | 400°F | 10 mins | 140-450°F | 1-90 |
| Defrost | 80°F | 40 mins | 80-140°F | 1-90 |
| Reheat | 280°F | 6 mins | 140-450°F | 1-90 |
| Dehydration | See the accessory positioning diagram | |||
Times and temperature are indicative, and results can vary on food or quantity
*Steak (medium rare)
- Insert the steak tray on the baking tray and place it inside the oven.
- Preheat for 5 minutes.
- Using oven mitts and the tray handle, carefully pull out the tray and place your steak on top. Place the steak tray back inside the unit for 4 minutes.
- Flip your steak over and continue to cook for another 4 minutes.
*Bacon - Insert bacon tray on baking pan and place bacon on tray.
OVEN
This mode is for use of the bake, broil, pastry, pizza, proof, roast, and toast functions. Place the baking tray or rack with food inside the oven. Use the selector dial to scroll through the presets, when desired preset is flashing, press the Start/Stop button to confirm the preset and start cooking.
- Place the baking pan/drip tray underneath the baking rack or basket as there is a chance food may drip during the cooking process. The baking pan will help catch any grease or crumbs.
- Press the Oven mode button and use the selector dial to choose the desired preset you wish to use. Press the Start/Stop button for confirmation.
- Temperature and time can be adjusted by pressing the knob when the preset is flashing. Press it once to change time and twice to change temperature. Turn it clockwise to increase and anti-clockwise to lower. When done, press the Start/Stop button to confirm.
- Time can be adjusted from 1 to 90 minutes and temperature from 140°F to 450°F (can vary depending on the selected preset).
- Press the rotisserie function if needed for your cooking operation.
- When the cooking time has elapsed, the unit will beep. The heating elements will turn off and the display panel will show “OFF OFF”. Please note, although the unit has powered off, the fan will take an additional 3 minutes to cool down before coming to a complete stop and beeping one last time.
CAUTION: Carefully take out your food with oven mitts and using the tray handle.
Notes:
- The cooking process can be canceled at any time before the timer finishes counting down by pressing the Start/Stop button.
- Food gets cooked quickly during broil, it is best to watch over food to not overcook it.
| Function | Description | Info |
|
Bake | Recommended for foods that would normally be prepared in a conventional oven. | · Works with prepacked frozen meals. · For best results, preheat the oven at least 10 minutes at the desired temperature. · Recommended accessories: baking rack and/or backing pan. |
|
Broil | Used for meats such as beef, chicken, or pork. Also used for top browning casseroles and gratins. | · Preheat the oven for 10 minutes. · For best results, use the top slot. · This function usually requires shorter cooking time. · Food gets cooked quickly during broil, it is best to watch over food to not overcook. · Do not use glass oven dishes to broil. · Recommended accessories: baking rack in top slot and baking tray in lower slot to catch grease drippings. · CAUTION: Aluminum foil is not recommended for covering the rack. If covered, the foil prevents the fat from dripping into the drip tray. Grease will accumulate on the foil surface and may catch fire. |
| Pastry | Use this function to cook any kind of dough that is used to make baked goods. | · Preheat oven for 10 minutes. · Donuts, cinnamon rolls and pies work great with this function. |
| Pizza | Recommended for fresh or frozen pizza. | · Preheat oven for 10 minutes. · Recommended accessory: baking rack in the middle slot position for even cooking. |
|
Proof | Proofing can be used to prepare bread or pizza dough. | · Dough is usually ready when it appears double in size. Check regularly when cooking. · Allow dough to complete at least one rise at room temperature. · Recommended accessory: baking rack with proofing dish on top. |
|
Roast | Roasting can be used to enhance flavor through caramelization and browning on the surface, leaving food moist and juicy on the inside. | · Preheat oven for 10 minutes. · Roasting can get done quicker so it is suggested to check on food before time has ended. · Used for larger meats and vegetables. · Recommended accessory: baking pan. |
| Mode | Default Temperature (°F) | Default Time (min) | Adjustable Temperature (°F) | Adjustable Time (min) |
| Bake | 375°F | 25 | 140—450°F | 1-90 |
| Broil | 450°F | 15 | 140—450°F | 1-90 |
| Pastry | 400°F | 30 | 140—450°F | 1-90 |
| Pizza | 400°F | 20 | 140—450°F | 1-90 |
| Proof | 100°F | 60 | 80-140°F | 1-90 |
| Roast | 425°F | 35 | 140-450°F | 1-90 |
| Toast | 400°F | 7 | 140—450°F | 1-90 |
GET MORE OUT OF YOUR AIR FRYER
Browse Chef-created recipes specifically made for your Kalorik product. Visit our website www.kalorik.com to see our extensive recipe library and start cooking. Sign up for the Kalorik email mailing list to receive special offers and recipes and connect with us on social media for daily inspiration.
CLEANING AND MAINTENANCE
- Make sure to clean the appliance after each use! Cleaning regularly prevents the accumulation of grease and helps avoid unpleasant smells.
- Unplug the appliance from the outlet and allow it to cool completely.
- Do not immerse the unit in water or wash it under running water.
- All accessories, except the sliding crumb tray, are dishwasher safe. All can be washed in hot soapy water.
- Do not use metal kitchen utensils or abrasive cleaning materials to clean them, as this may damage the non-stick coating. Rinse and dry thoroughly after cleaning.
Inside cleaning
- To remove crumbs, pull out the sliding crumb tray from the Air Fryer Oven. Wipe clean and place back inside before using the appliance.
- Wipe cavity with a damp cloth or sponge. Dry with paper towel. To remove baked on food, pour a little cooking oil on the food and allow to stand for five to ten minutes. This should soften the food and allow it to be removed with absorbent paper toweling or a soft cloth.
- Clean the inside of the glass doors with a damp soapy cloth. If the glass has stubborn stains, open the door and cover the inside of the door with a few damp paper towels.
- Never use abrasive products in the cavity. Never immerse the appliance in water and make sure no water or damp penetrates the appliance except the cavity.
Make sure no water comes on the oven doors when the latter are still hot.
Housing cleaning
- Wipe clean with a damp sponge. Wipe dry
- NEVER use steel wool, metal scouring pads or abrasive cleaners, as they may damage the finish.
DO NOT IMMERSE THE OVEN IN WATER OR ANY OTHER LIQUID.
ANY OTHER SERVICING SHOULD BE PERFORMED BY AN AUTHORIZED SERVICE REPRESENTATIVE.
TROUBLESHOOTING
| Problem | Possible Cause | Solution |
|
The unit does not work | 1. Appliance is not plugged in. 2. You have not pressed the start/stop button. 3. The oven doors are not properly closed. | 1. Plug power cord into wall socket. 2. Make sure you have selected a function and pressed the start button. 3. Make sure both doors are securely shut. |
| Food not cooked | 1. Too much food is placed into the oven. 2. The temperature is set too low. | 1. Use smaller batches for more even frying. 2. Raise the temperature and continue cooking. |
| Food is not fried evenly | Some foods need to be turned or shaken during the cooking process. | Flip or shake your food halfway into the cooking process and continue cooking. |
| White smoke coming from the unit | 1. There is oil residue in the oven. 2. Accessories have excess grease residue from previous cooking. 3. Oil is dripping on heating element. | 1. Wipe down to remove excess oil. 2. Clean the accessories after each use. 3. Place baking pan underneath air rack or basket. |
| French fries are not fried evenly | 1. Wrong type of potato being used. 2. Potatoes not blanched properly during preparation. | 1. Use fresh, firm potatoes. 2. Use cut sticks and pat dry to remove excess starch. |
WARRANTY
We suggest that you complete and return the enclosed Product Registration Card promptly to facilitate verification of the date of original purchase. However, return of the Product Registration Card is not a condition of these warranties. You can also fill out this warranty card online, at the following address: www.KALORIK.com
This KALORIK product is warranted in the U.S.A. and in Canada for 1 year from the date of purchase against defects in material and workmanship. This warranty is not transferable. Keep the original sales receipt. Proof of purchase is required to obtain warranty performance.
During this period, if the KALORIK product, upon inspection by KALORIK, is proven defective, it will be repaired or replaced, at Kalorik’s option, without charge to the customer. If a replacement product is sent, it will carry the remaining warranty of the original product.
This warranty does not apply to any defect arising from a buyer’s or user’s misuse of the product, negligence, failure to follow KALORIK instructions noted in the user’s manual, use on current or voltage other than that stamped on the product, wear and tear, alteration or repair not authorized by KALORIK, or use for commercial purposes. There is no warranty for glass parts, glass containers, filter baskets, blades and agitators, and accessories in general. There is also no warranty for parts lost by the user.
ANY WARRANTY OF MERCHANTABILITY OR FITNESS WITH RESPECT TO THIS PRODUCT IS ALSO LIMITED TO THE ONE-YEAR LIMITED WARRANTY PERIOD.
Some states do not allow limitations on how long an implied warranty lasts or do not allow the exclusion of incidental or consequential damages, so the above limitations may not apply to you. This warranty gives you specific legal rights, and you may also have other rights which vary from state to state.
If the appliance should become defective within the warranty period and more than 30 days after date of purchase, do not return the appliance to the store: often, our Customer Service Representatives can help solve the problem without having the product serviced. If servicing is needed, a Representative can confirm whether the product is under warranty and direct you to the nearest service location.
If this is the case, bring the product, or send it, postage prepaid by the user (all Kalorik customers are responsible for the initial shipment back to the warranty center), along with proof of purchase and a return authorization number indicated on the outer package, given by our Customer Service Representatives. Send to the authorized KALORIK Service Center (please visit our website at www.KALORIK.com or call our Customer Service Department for the address of our authorized KALORIK Service Center).
When sending the product, please include a letter explaining the nature of the claimed defect.
An extended warranty may be available on your product, please contact Customer Service for more information.
If you have additional questions, please call our Customer Service Department (please see below for complete contact information), Monday through Thursday from 9:00 am – 5:00pm (EST) and Friday from
9:00am – 4:00pm (EST). Please note hours are subject to change.
If you would like to write, please send your letter to:
KALORIK Customer Service Department
Team International Group of America Inc.
16175 NW 49th Avenue
Miami Gardens, FL 33014 USA
Or call:
Toll Free: +1 888-521-TEAM / +1 888-KALORIK
Only letters can be accepted at the address above. Shipments and packages that do not have a return authorization number will be refused.
For questions please contact:
KALORIK Customer Service Department Team International Group of America Inc. 16175 NW 49th Avenue
Miami Gardens, FL 33014 USA
Toll Free: +1 888-521-TEAM / +1 888-KALORIK
www.KALORIK.com


 Stainless Steel Air Fryer User Manual")


