![]()
ANBAUANLEITUNG
mounting instructions
BC.SYS.01.400.20000/B
KFT.01.400.30000/B
SYS.00.001.13000
SYS.00.003.10000L/B
SYS.00.003.10000R/B
BC.SYS.00.003.10000
MOUNTING INSTRUCTIONS
Art.-Nr. / Item No.: KFT.01.400.30000/B
Revision: 00 . Datum /Date: 02 – 2020
PRO side carriers
Thank you for choosing this premium product from SW-MOTECH.
Please visit our webshop for additional information, such as application charts and PDF mounting instructions. Any other documents that may be required (e.g. ABE certifications), are also available for download at our webshop.
Installation and/or maintenance of this product require good technical understanding! For your own safety SW-MOTECH recommends having installation and/or servicing carried out by a specialist workshop! SW-MOTECH assumes no liability for damage caused by improper installation and/or maintenance work!
Carefully follow all the directions given in the mounting instructions and pay attention to all relevant information in the vehicle manual during assembly. Nonconformance can lead to vehicle damage or even endanger the driver! These mounting instructions are written based on our current state of knowledge. Legal requirements for accuracy do not exist.
This product was developed for vehicles in their factory setting. Compatibility with original accessory parts or other manufacturers’ accessory parts is not guaranteed. Furthermore, BEFORE installing this product, make sure that all moving parts (e.g. the chain) are in the original state of maintenance. Installed accessories can change the driving behaviour and/or stability of your vehicle.
GENERAL INFORMATION
Observe the country-specific regulations concerning vehicle registration/operation as well as TUV regulations if applicable. If required, register installed parts in the vehicle documents through an appropriate inspection authority.
PREPARATION: Read the mounting instructions carefully and make sure that all items of the parts list are included. Make sure that your vehicle is parked safely and cannot fall over. Turn off the engine and remove the ignition key. Let the motor/exhaust cool off if necessary. Disconnect the vehicle battery when working on the electrical system. Use appropriate tools. Have another person to help you.
MOUNTING: All parts and connections removed from the vehicle must be reinstalled in accordance with the vehicle manufacturers· specifications or replaced by parts delivered by SW-MOTECH. Secure all threads, unless otherwise specified, with medium-strength liquid thread locker.
Torque specifications undefined by SW-MOTECH must be obtained from the vehicle manufacturer or by a specialist workshop!
FUNCTION CHECK: After installation make sure that all parts and connections previously removed are properly replaced. Also make sure that no moving parts are obstructed and no function of the vehicle is hindered in any way. Cables and hoses must not rub and/or be pinched. Before starting to ride, perform a comprehensive check of all functions. After the first 50 km and then at regular intervals, check the tightening torque of all screw connections and the proper fit of the product.
PRODUCT SPECIFIC INFORMATION
| Maximum Load | Maximum Speed |
ATTENTION: The indicated maximum load is inclusive the weight of case/luggage and adapter kit. The maximum vehicle load specified by the manufacturer must not be exceeded!
The side carriers are designed exclusively for the use of SW-MOTECH adapter kits.
Dismount the side carriers when travelling without cases/luggage. Always use the side carriers in pairs.
ATTENTION: Make sure that after attaching the luggage to the vehicle it is NOT in the exhaust flow! Dangers of burns!
| Step | No. | Item No. / Description a | Part | Quantity b | N.Mⅽ |
| 1 | 1 | KFT.01.400.007 | Cover Plate; left / right | 2 /2 | |
| 2 | KFT.01.400.008 | Mounting Plate | 2 /2 | ||
| 3 | M5 x 16; ISO 7380 | Lenshead Screw; black | 4 /4 | 4 | |
| 3 | 4 | KFT.01.400.931 / 932 | Mounting Bracket; left / right | 2 /2 | |
| 5 | M8 x 30; DIN 6912 | Hexagon Socket Screw, short Head | 2 /2 | 23 | |
| 6 | M8 x 20; DIN 6912 | Hexagon Socket Screw, short Head | 2 /2 | 23 | |
| 4 | 7 | KFT.01.400.009 | Mounting Tab | 2 /2 | |
| 8 | M6 x 20; DIN 7991 | Countersunk Screw; black | 4 /2 | 9,6 | |
| 9 | M6; DIN 6927 | Lock Nut with Flange; black | 4/6 | ||
| 10 | KFT.01.400.910L / R | Passenger Grip; left / right | 2 /2 | ||
| l 1 | M8 x 16; ISO 7380 | Lenshead Screw; black | 4 /4 | 18 | |
| 12 | KES.RD.150.0200.02.GL | Plastic Plug | 2 /2 | ||
| 5 | 13 | KFT.01.400.010L / R | Mounting Tab; left / right | 2 /2 | |
| 14 | M8 x 30; DIN 912 | Hexagon Socket Screw | 4/4 | 23 | |
| 15 | 0 8,4; DIN 125 | Washer | 4 /4 |

Note:a All measurements in millimeters. b, The second number indicates the total quantity of the part in the delivery. c No torque specifications: Use the torque defined by vehicle manufacturer! The standard torque in this table can be used as long as it is within the vehicle manufacturer’s specifications.
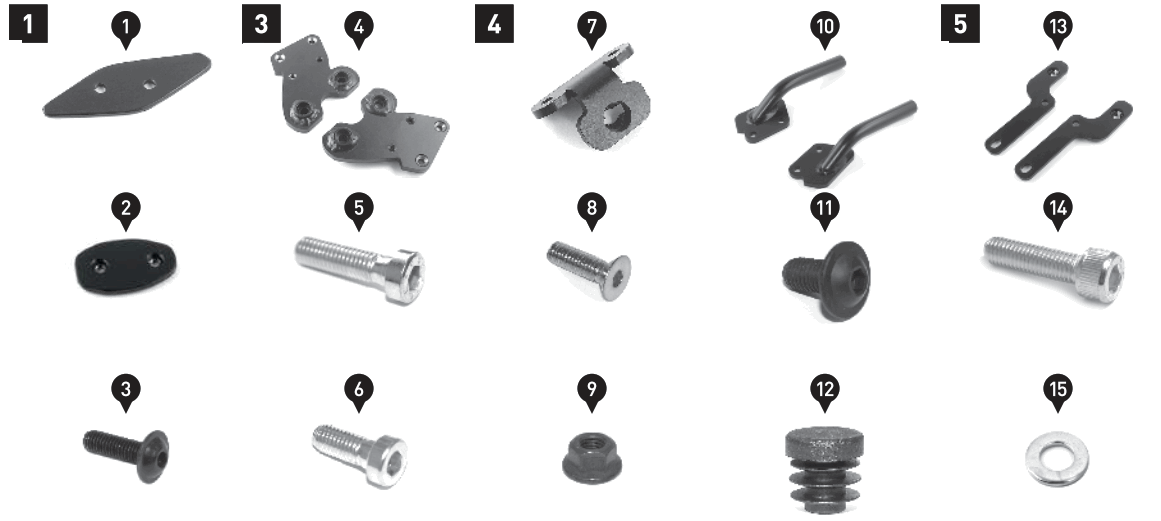
PARTS LIST
| Step | No. | Item No. / Descriptions | Part | Quantityb | N.Mc |
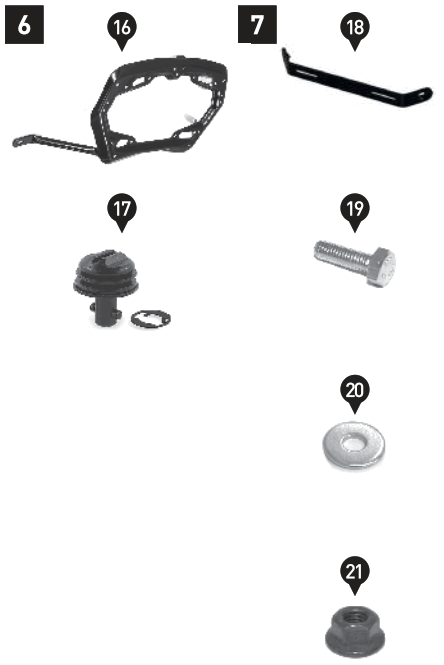
| 6 | 16 | KFT.01.400.971.01 / 972.01 | Side Carrier; left / right | 2 /2 | |
| 17 | SV.ST.095.501.LK.02 | Quick Fastener with Lock Washer | 6 /6 | ||
| 7 | 18 | KFT.01.400.011 | Crossbar | 1 /1 | |
| 19 | M6 x 20; DIN 933 | Hexagon Screw | 2 /2 | 6 | |
| 20 | 0 6,4; DIN 9021 | Washer | 4 /4 | ||
| 21 | M6; DIN 6927 | Lock Nut with Flange; black | 2 /6 |
MOUNTING
Dismounting of the HONDA CB 500 X passenger grips.
Remove the shown screws and plastic dowels; then remove the passenger grips.
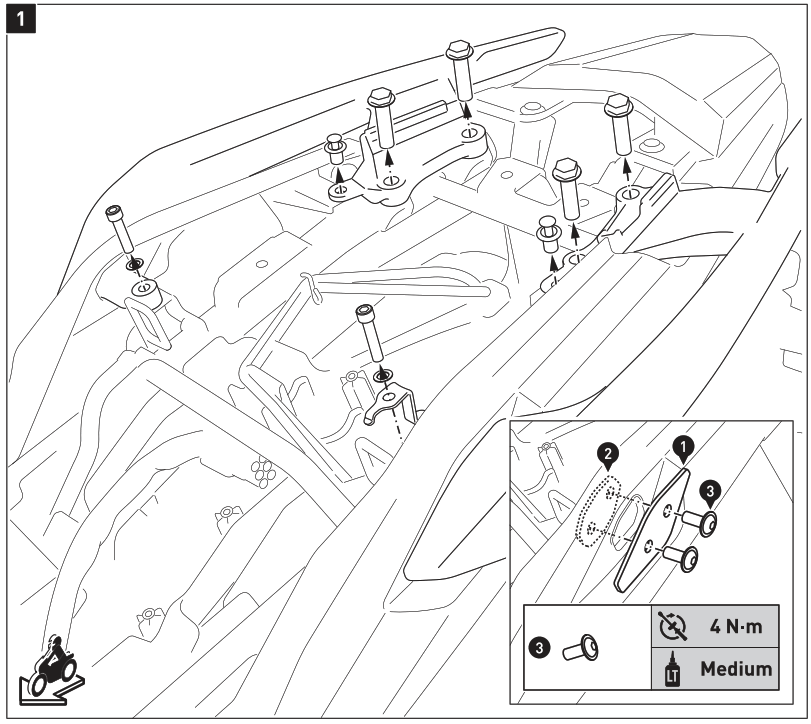
Close on both sides of the vehicle the fairing-openings with the cover plates [1], as shown in the detail drawing.
ATTENTION: Use liquid thread locker!
Tighten the screws as specified.
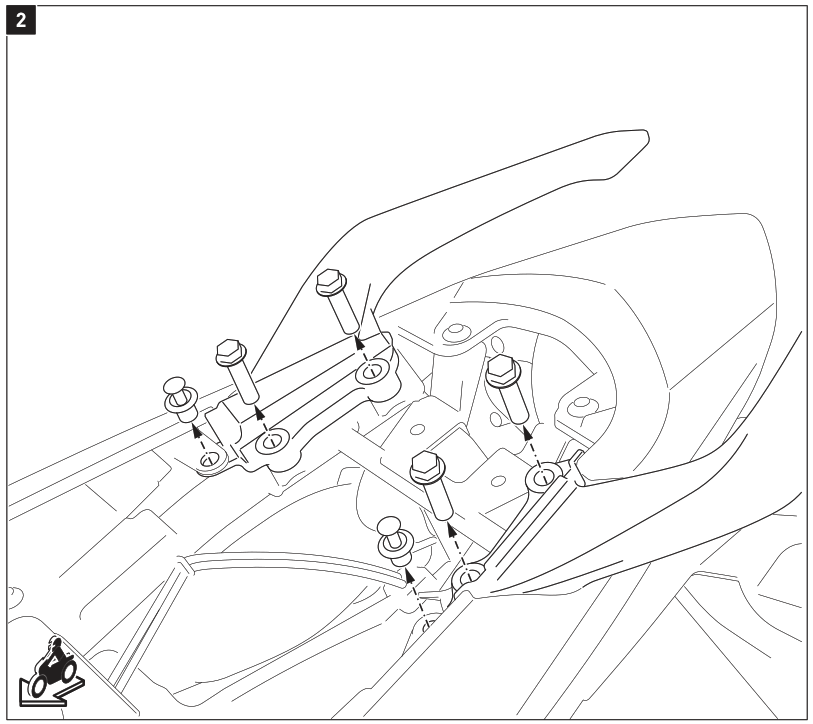
Dismounting of HONDA CB 500 F /CBR 500 R passenger grips.
Remove the shown screws and plastic dowels; then remove the passenger grips. 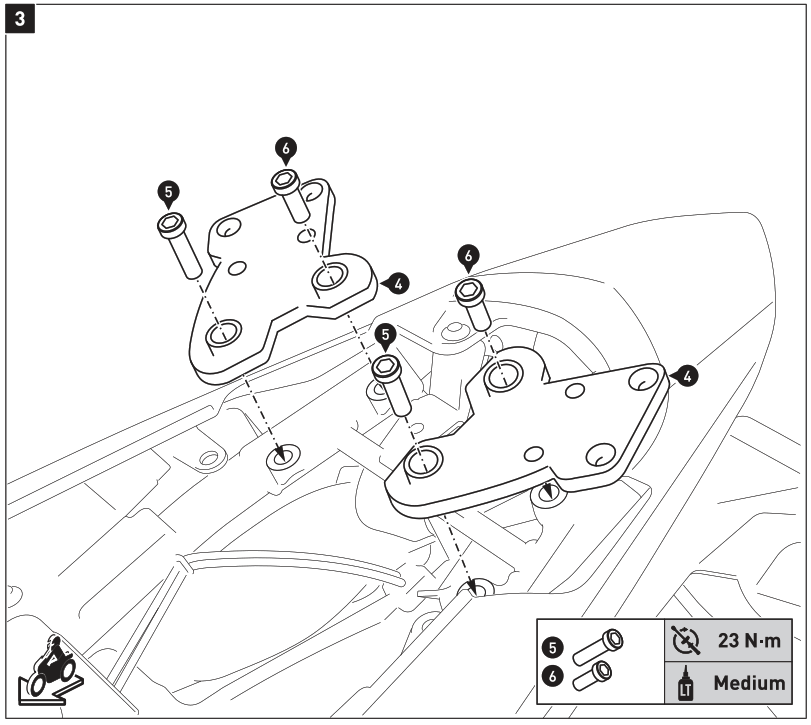
Attach the mounting brackets [4) to the vehicle, as shown in the drawing.
ATTENTION: Use liquid thread locker!
Tighten the screws as specified. 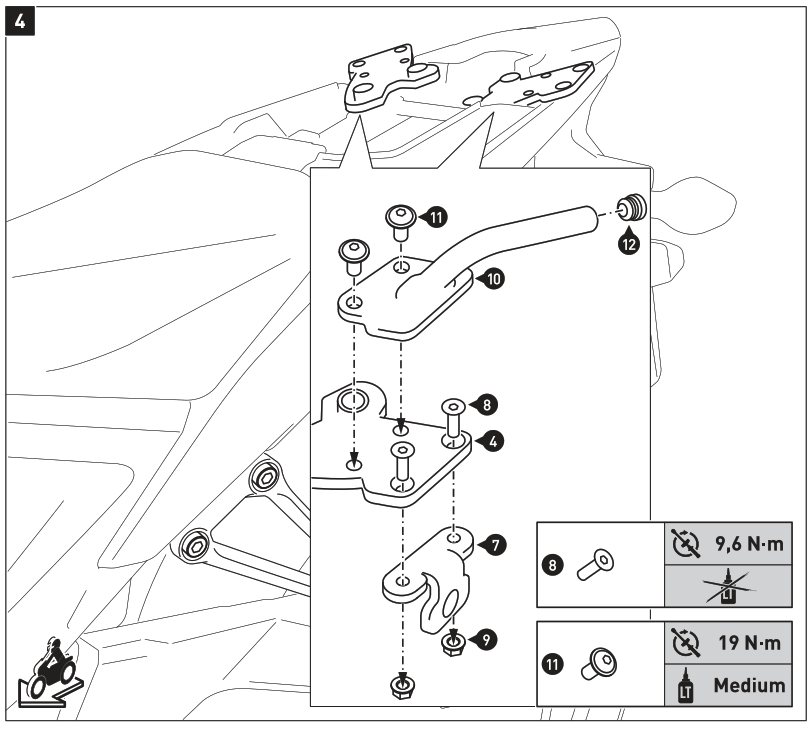
Attach the mounting brackets [7) to the mounting brackets [4), as shown in the detail drawing.
Tighten the screws as specified.
Attach the passenger grips [10) to the mounting brackets [4), as shown in the detail drawing.
ATTENTION: Use liquid thread locker!
Tighten the screws as specified.
NOTE: The passenger gnps /10} are not required with the SW-MOTECH luggage carrier. Mount instead the support arms of the luggage earner.
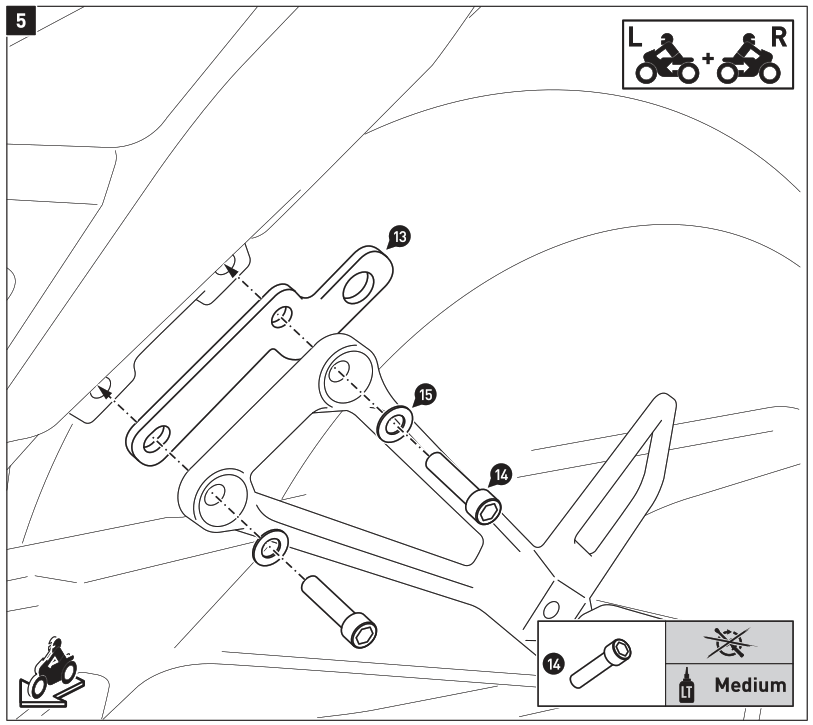
Loosen the screws of the passenger footrests and remove it from the vehicle.
Attach the mounting brackets (13) on both sides to the vehicle, as shown in the drawings.
ATTENTION: Use liquid thread locker!
Do not fully tighten the screws yet. 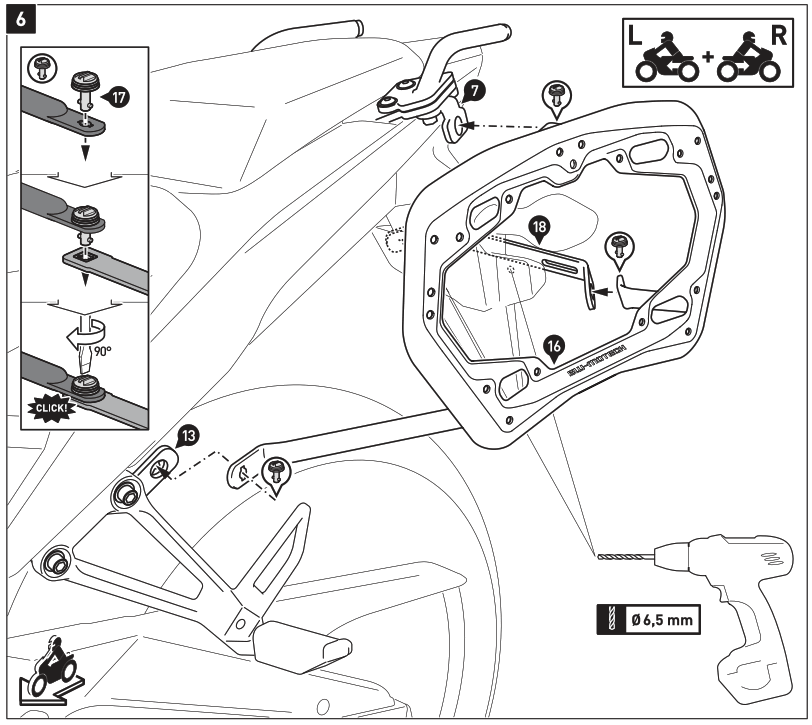
Connect the side carriers [16) to the mounting brackets [7) and [13) by using the fasteners (171. as shown in the detail drawing. Now connect the crossbar I 18) to the side carriers by using the fasteners (17).
Mark with a appropriate pencil the mounting holes of the crossbar (18) on the license plate mount. Then loosen the fasteners and remove the crossbar [18).
Use a6.5-mm drill to drill the mountings holes for the crossbar [18). Deburr the edges of the holes.  Attach the crossbar 18) to the license plate mount, as shown in the drawing.
Do not fully tighten the screws yet.
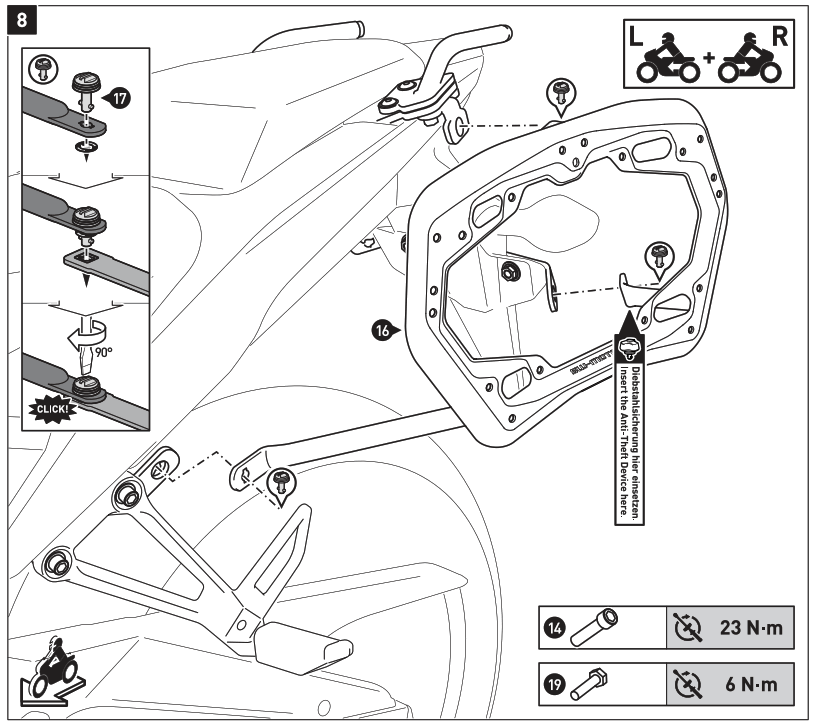
Connect the side carriers [16] to the mounting brackets and the crossbar with the fasteners (17].
Secure the the fasteners [17) with the lock washers.
Once all parts are aligned without excess tension, tighten all screws as specified.
NOTE: The Anti Theft Device is sold separately.
MOUNTING INSTRUCTIONS
Adapter kit for SysBag
Thank you for choosing this premium product from SW-MOTECH.
Please visit our webshop for additional information, such as application charts and PDF mounting instructions. Any other documents that may be required (e.g. ABE certifications), are also available for download at our webshop.
Installation and/or maintenance of this product require good technical understanding! For your own safety SW-MOTECH recommends having installation and/or servicing carried out by a specialist workshop!
SW-MOTECH assumes no liability for damage caused by improper installation and/or maintenance work!
Carefully follow all the directions given in the mounting instructions and pay attention to all relevant information in the vehicle manual during assembly.
Nonconformance can lead to vehicle damage or even endanger the driver!
These mounting instructions are written based on our current state of knowledge. Legal requirements for accuracy do not exist.
This product was developed for vehicles in their factory setting. Compatibility with original accessory parts or other manufacturers’ accessory parts is not guaranteed. Furthermore, BEFORE installing this product, make sure that all moving parts (e.g. the chain) are in the original state of maintenance. Installed accessories can change the driving behaviour and/or stability of your vehicle.
GENERAL INFORMATION
Observe the country-specific regulations concerning vehicle registration/operation as well as TUV regulations if applicable. If required, register installed parts in the vehicle documents through an appropriate inspection authority.
PREPARATION: Read the mounting instructions carefully and make sure that all items of the parts list are included. Make sure that your vehicle is parked safely and cannot fall over. Turn off the engine and remove the ignition key.
Let the motor/exhaust cool off if necessary. Disconnect the vehicle battery when working on the electrical system. Use appropriate tools. Have another person to help you.
MOUNTING: All parts and connections removed from the vehicle must be reinstalled in accordance with the vehicle manufacturers· specifications or replaced by parts delivered by SW-MOTECH. Secure all threads, unless otherwise specified, with medium-strength liquid thread locker.
Torque specifications undefined by SW-MOTECH must be obtained from the vehicle manufacturer or by a specialist workshop!
FUNCTION CHECK: After installation make sure that all parts and connections previously removed are properly replaced. Also make sure that no moving parts are obstructed and no function of the vehicle is hindered in any way. Cables and hoses must not rub and/or be pinched. Before starting to ride, perform a comprehensive check of all functions. After the first 50 km and then at regular intervals, check the tightening torque of all screw connections and the proper fit of the product.
PARTS LIST
| No. | Item No. / Description • | Part | Quantity •• | N.m**** |
| 1 | HTA.00.152.080 | Guide Bolt | 4/4 | |
| 2 | HTA.00.152.081 | Lock Bolt | 1/1 | |
| 3 | M6 x 20; DIN 6912 | Hexagon Socket Screw, short head | 1 /1 | **** |
| 4 | M6 x 25; DIN 6912 | Hexagon Socket Screw, short head | 1 /1 | **** |
| 5 | M6 x 35; DIN 6912 | Hexagon Socket Screw, short head | 1 /1 | **** |
| 6 | M6 x 22; DIN 7991 | Countersunk Screw; black | 3 /3 | **** |
| 7 | M6 x 35; DIN 7991 | Countersunk Screw; black | 3 /3 | **** |
| 8 | M6; DIN 6927 | Lock Nut with Flange; black | 4 /4 | |
| 9 | M6; DIN 985 | Lock Nut | 4/4 | |
| ****Tightening torque see illustration |
*Al!measurements in millimeters.
** The second number indicates the total quantity of the part in the delivery.
*** No torque specifications: Use the torque defined by vehicle manufacturer! The standard torque in this table can be used as long as it is within the vehicle manufacturer s specifications.
MOUNTING
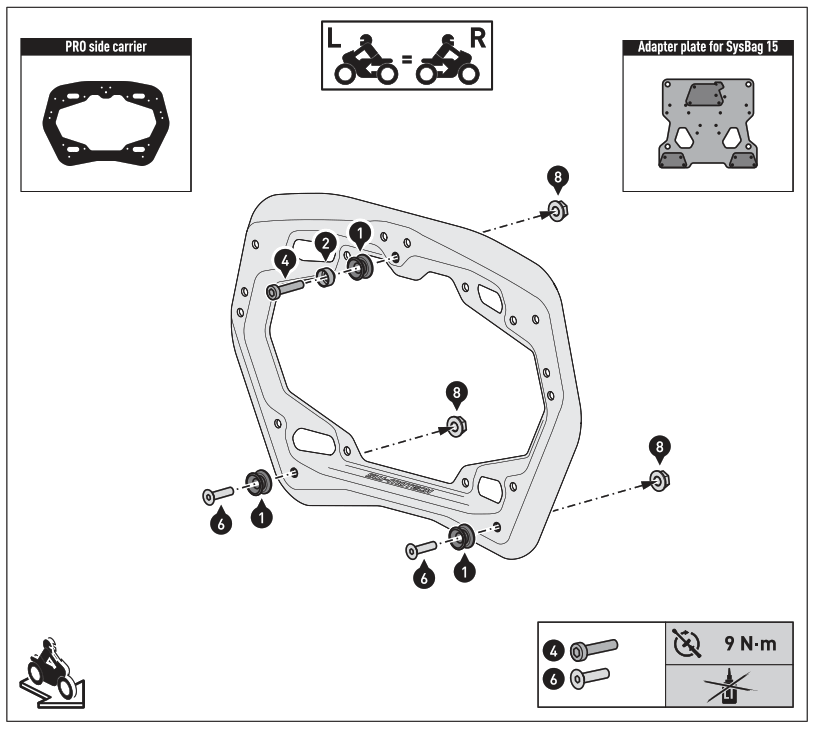
PRO side carrier and adapter plate for SysBag 15
Attach the shown parts to your PRO side carrier [right PRO side carrier shown).
Tighten the screws as specified in the illustration.
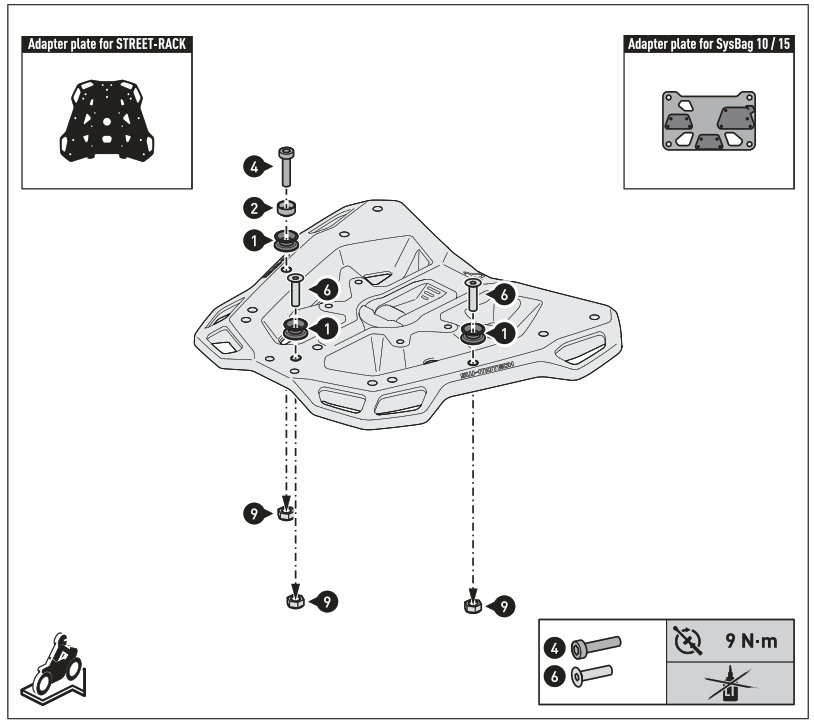
Adapter plate for STREET-RACK and adapter plate for Sys Bag 10 / 15
Attach the shown parts to your Adapter plate for STREET-RACK.
ATTENTION: Make sure that the locking mechanism of the adapter plate for SysBag and the lock bolt (2) are mounted opposite to each other!
Tighten the screws as specified in the illustration. 
STEEL-RACK and adapter plate for SysBag 15
Attach the shown parts to your STEEL-RACK.
ATTENTION: Use liquid thread locker (screws (6) only)!
Tighten the screws as specified in the illustration.

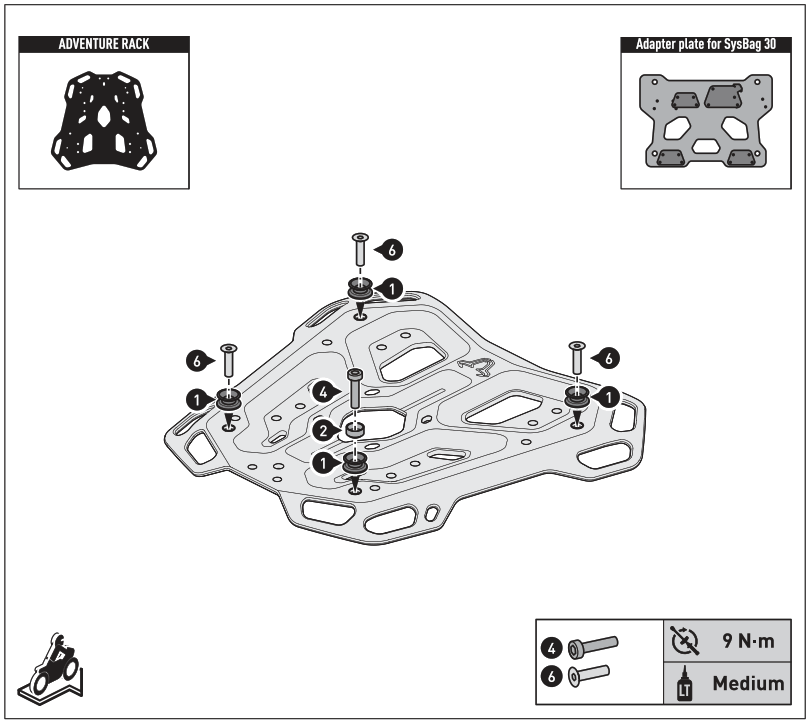
ADVENTURE RACK and adapter plate for SysBag 15
Attach the shown parts to your ADVENTURE RACK.
ATTENTION: Use liquid thread locker (screws (6) only)!
Tighten the screws as specified in the illustration. 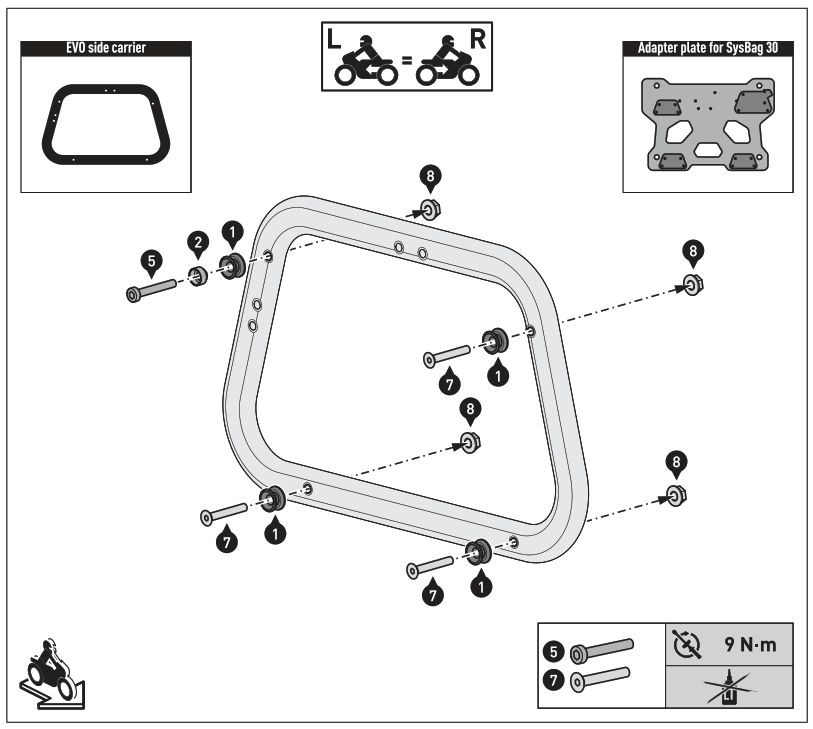
EVO side carrier and adapter plate for SysBag 30
Attach the shown parts to your EVO side carrier [right EVO side carrier shown).
Tighten the screws as specified in the illustration.
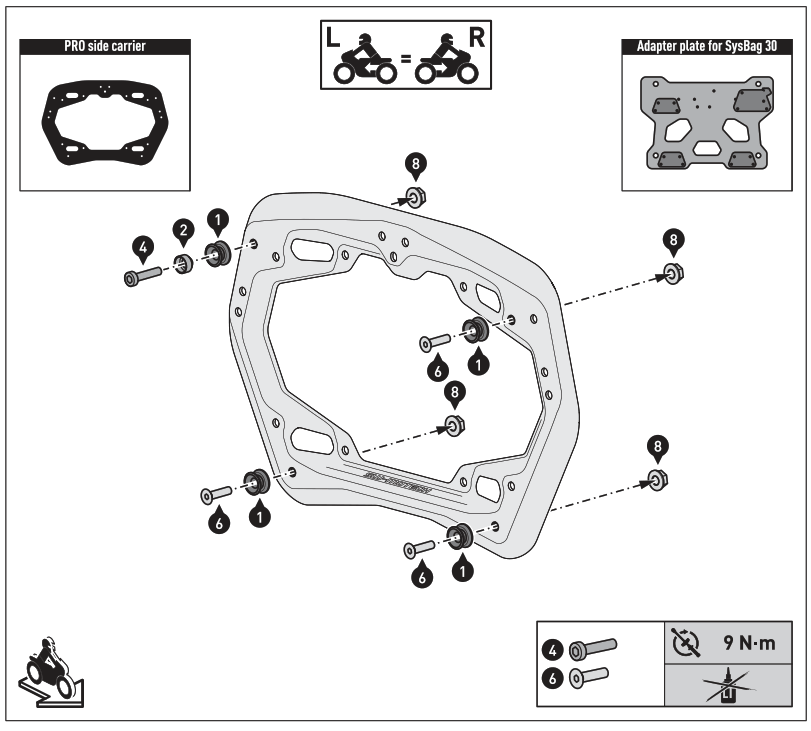
PRO side carrier and adapter plate for SysBag 30
Attach the shown parts to your PRO side carrier (right PRO side carrier shown I.
Tighten the screws as specified in the illustration. 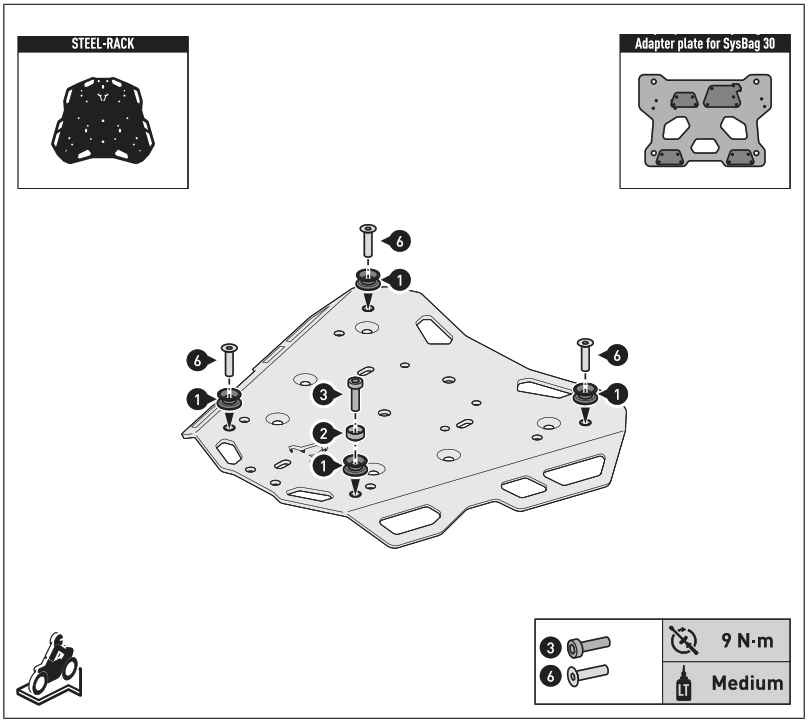
STEEL-RACK and adapter plate for SysBag 30
Attach the shown parts to your STEEL-RACK.
ATTENTION: Make sure that the locking mechanism of the adapter plate for SysBag and the lock bolt (2) are mounted opposite to each other!
ATTENTION: Use liquid thread locker!
Tighten the screws as specified in the illustration.
ADVENTURE RACK and adapter plate for SysBag 30
Attach the shown parts to your ADVENTURE RACK.
ATTENTION: Make sure that the locking mechanism of the adapter plate for SysBag and the lock bolt (2) are mounted opposite to each other!
ATTENTION: Use liquid thread locker!
Tighten the screws as specified in the illustration. 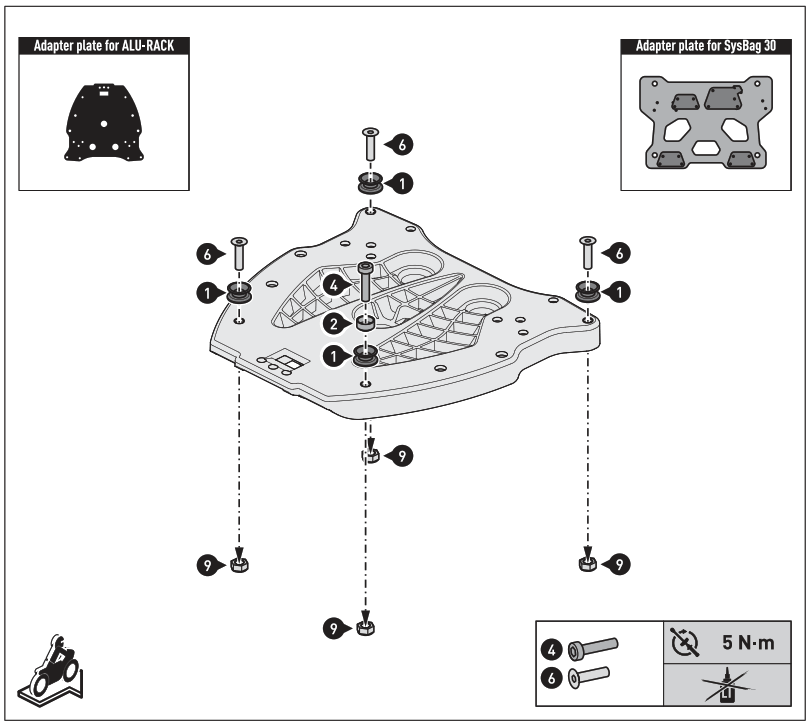
Adapter plate for ALU-RACK and adapter plate for SysBag 30
Attach the shown parts to your Adapter plate for ALU-RACK.
ATTENTION: Make sure that the locking mechanism of the adapter plate for SysBag and the lock bolt (2) are mounted opposite to each other!
Tighten the screws as specified in the illustration. 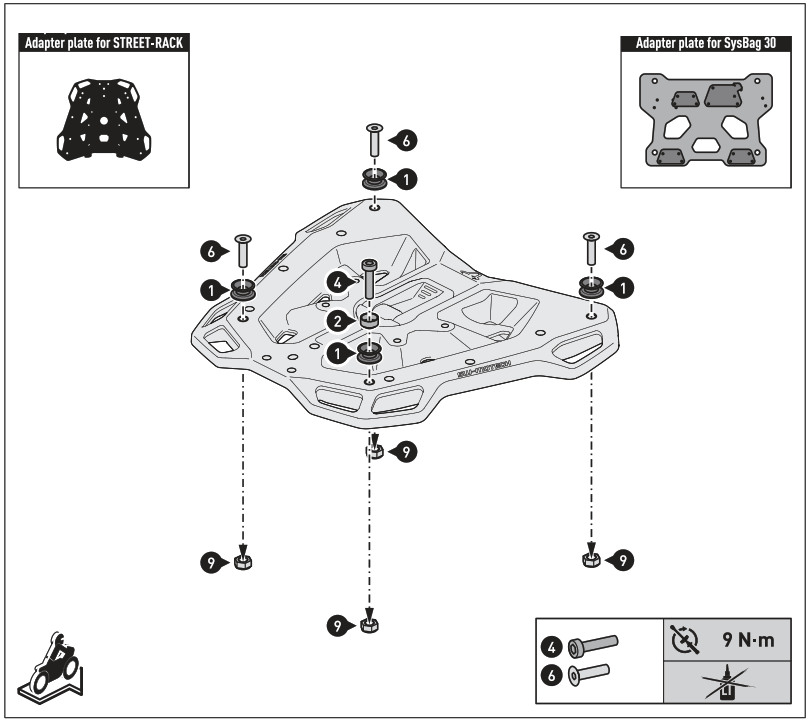
Adapter plate for STREET-RACK and adapter plate for SysBag 30
Attach the shown parts to your Adapter plate for STREET-RACK.
ATTENTION: Make sure that the locking mechanism of the adapter plate for SysBag and the lock bolt (2) are mounted opposite to each other!
Tighten the screws as specified in the illustration.
MOUNTING INSTRUCTIONS
Thank you for choosing this premium product from SW-MOTECH.
Please visit our webshop for additional information, such as application charts and PDF mounting instructions. Any other documents that may be required (e.g. ABE certifications), are also available for download at our webshop.
Installation and/or maintenance of this product require good technical understanding! For your own safety SW-MOTECH recommends having installation and/or servicing carried out by a specialist workshop!
SW-MOTECH assumes no liability for damage caused by improper installation and/or maintenance work!
Carefully follow all the directions given in the mounting instructions and pay attention to all relevant information in the vehicle manual during assembly.
Nonconformance can lead to vehicle damage or even endanger the driver!
These mounting instructions are written based on our current state of knowledge. Legal requirements for accuracy do not exist.
This product was developed for vehicles in their factory setting. Compatibility with original accessory parts or other manufacturers’ accessory parts is not guaranteed. Furthermore, BEFORE installing this product, make sure that all moving parts (e.g. the chain) are in the original state of maintenance.
Installed accessories can change the driving behaviour and/or stability of your vehicle.
GENERAL INFORMATION
Observe the country-specific regulations concerning vehicle registration/operation as well as TUV regulations if applicable. If required, register installed parts in the vehicle documents through an appropriate inspection authority.
PREPARATION: Read the mounting instructions carefully and make sure that all items of the parts list are included. Make sure that your vehicle is parked safely and cannot fall over. Turn off the engine and remove the ignition key.
Let the motor/exhaust cool off if necessary. Disconnect the vehicle battery when working on the electrical system. Use appropriate tools. Have another person to help you.
MOUNTING: All parts and connections removed from the vehicle must be reinstalled in accordance with the vehicle manufacturers· specifications or replaced by parts delivered by SW-MOTECH. Secure all threads, unless otherwise specified, with medium-strength liquid thread locker.
Torque specifications undefined by SW-MOTECH must be obtained from the vehicle manufacturer or by a specialist workshop!
FUNCTION CHECK: After installation make sure that all parts and connections previously removed are properly replaced. Also make sure that no moving parts are obstructed and no function of the vehicle is hindered in any way. Cables and hoses must not rub and/or be pinched. Before starting to ride, perform a comprehensive check of all functions. After the first 50 km and then at regular intervals, check the tightening torque of all screw connections and the proper fit of the product. 
| Step | No | Item No. / Description’ | Part | Quantity | N.m*** |
| SYS.00.003.10000RB | Adapter Plate for SysBag 30 right | ||||
| 1 | 1 | IIIE90.003.10000R/B SYS.00.003.001 | Adapter Plate | 1/1 | |
| 2 | HTA.00.864.500.05 | Locking Mechanism | 1 /1 | ||
| 3 | HTA.00.864.011 | Locking Adapter | 3/3 | ||
| 4 | M5 x 16; ISO 7380 | Lenshead Screws; black | 16/16 | ||
| 5 | M5; DIN 985 | Lock Nut | 16/16 | ||
| 2 | 6 | M8 x 16; DIN 7991 | Countersunk Screw | 4 /4 | 15 |
|
| 7 | SYS.00.001.003 | Countersunk Spacer | 4/4 | |
| 8 | SYS.00.001.002 | Sleeve Nut | 4/4 | ||
| 1 | 1 | SYS.00.003.10000L/B SYS.00.003.001 | Adapter Plate for SysBag 30 left Adapter Plate | 1 /1 | |
|
| 2 | HTA.00.864.500.06 | Locking Mechanism | 1 /1 | |
| 3 | HTA.00.864.014 | Locking Adapter | 3 /3 | ||
| 4 | M5 x 16; ISO 7380 | Lenshead Screws; black | 16 /16 | ||
| 5 | M5; DIN 985 | Lock Nut | 16 /16 | ||
| 2 | 6 | M8 x 16; DIN 7991 | Countersunk Screw | 4/4 | 15 |
| 7 | SYS.00.001.003 | Countersunk Spacer | 4 /4 | ||
| 8 | SYS.00.001.002 | Sleeve Nut | 4/4 |
All measurements in millimeters.
** The second number indicates the total quantity of the part in the delivery.
*** No torque specifications: Use the torque defined by vehicle manufacturer! The standard torque in this table can be used as long as it is within the vehicle manufacturer s specifications. 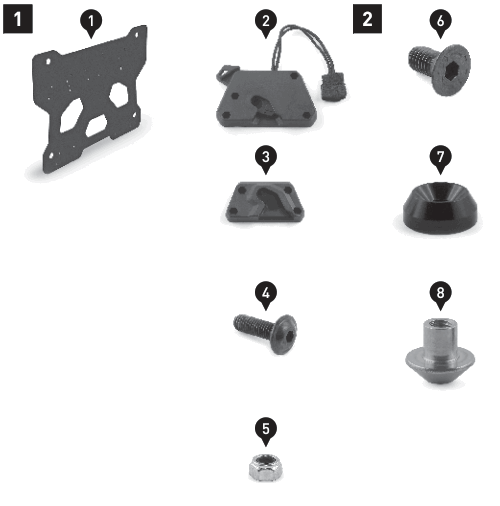
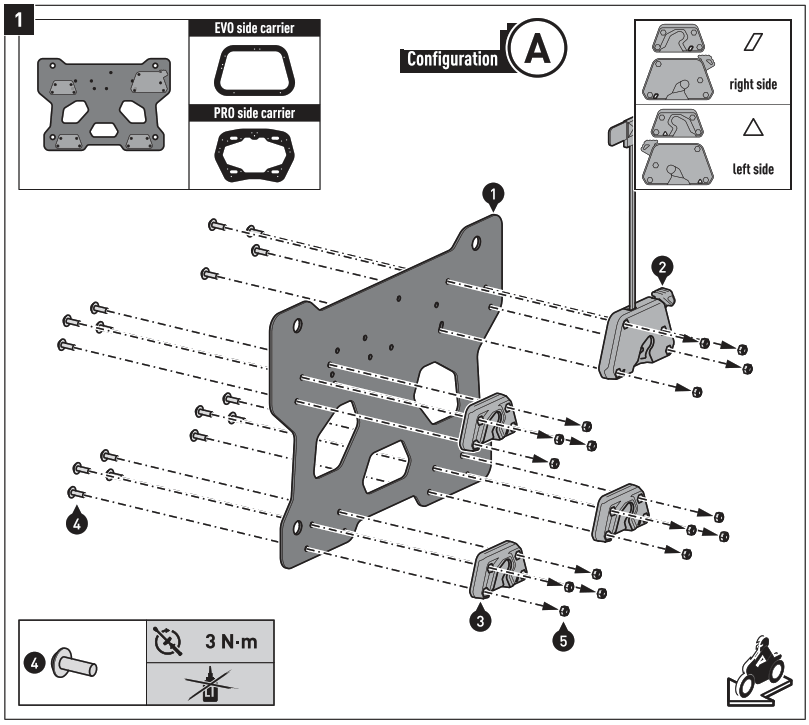
Configuration A for:
EVO side carrier
PRO side carrier
NOTE: The mounting steps [1] to [3] show the mounting of the right adapter plate. Mount the left adapter plate in the same way as on the right side. Mount the shown parts on the other side of the adapter plate.
ATTENTION: Pay attention to the markings (parallelogram or triangle) which define the respective mounting side (see detail drawing on the top right side)!
Attach the parts (2) to [5) to the adapter plate [11. as shown in the drawing.
Tighten the screws as specified in the parts list. 
Configuration B for:
Adapter plate for ALU-RACK Adapter plate for STREET-RACK STEEL-RACK ADVENTURE-RACK
ATTENTION: Make sure that the locking mechanism (2) and the lock bolt of the adapter kit for SysBag 15/30 are mounted opposite to each other! Attach the parts (2) to [5) to the adapter plate [11, as shown in the drawing.
Tighten the screws as specified in the parts list.
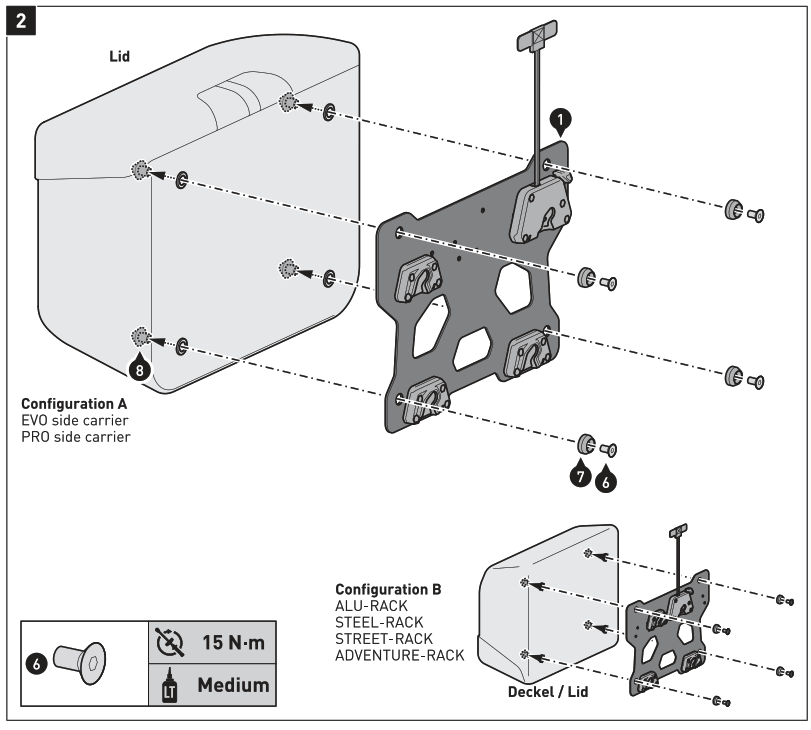
Attach the adapter plate [1) to your SysBag 30, as shown in the drawing.
Pay attention to the alignment of the lid of the SysBag 30.
ATTENTION: Use medium-strength liquid thread locker!
Tighten the screws as specified in the parts list.
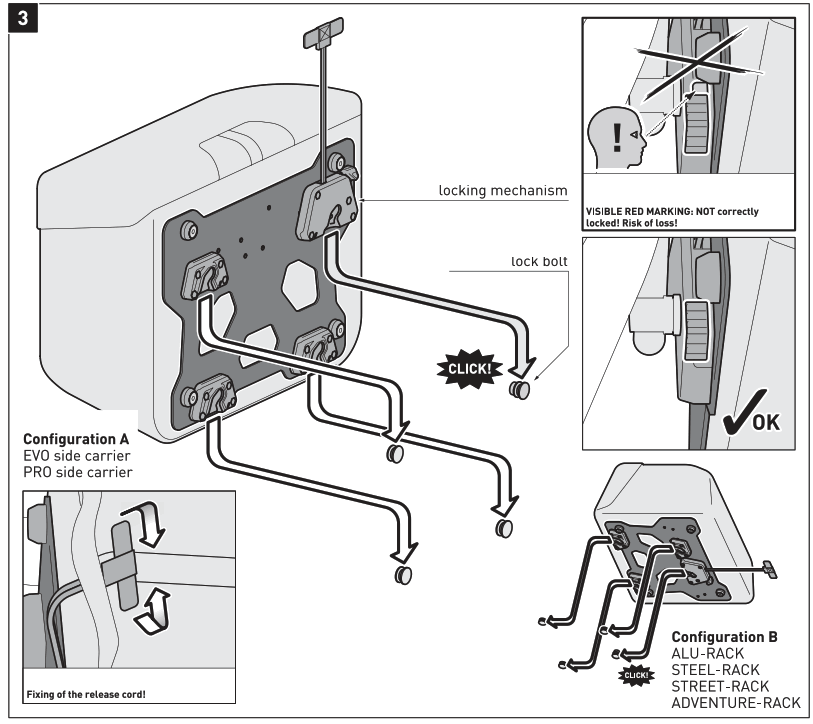
Place the locking openings of the locking mechanism [2) and the locking adapter [3) onto the guide bolts of the adapter kit for SysBag 15/30 [sold separately). Then press the SysBag 30 onto the guide bolts, until it properly rests on your SW-MOTECH carrier system.
- ATTENTION: Make sure that all guide bolts of the adapter kit for SysBag 15/30 engage at the same time! Pay attention to the clearly audible snap sound of the locking mechanism and that the red marking under the slider is not visible!
To release press the slider downward or pull the release cord.
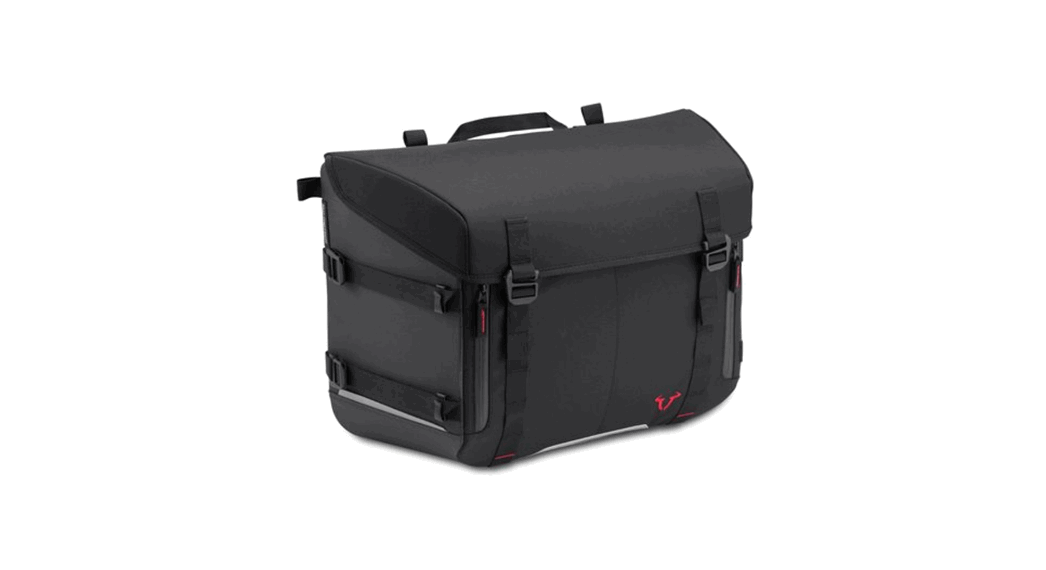
SysBag 10 / 15 / 30
Thank you for choosing this premium product from SW-MOTECH.
Please visit our webshop for additional information, such as application charts and PDF mounting instructions. Any other documents that may be required (e.g. ABE certifications), are also available for download at our webshop. Installation and/or maintenance of this product require good technical understanding! For your own safety SW-MOTECH recommends having installation and/or servicing carried out by a specialist workshop!
SW-MOTECH assumes no liability for damage caused by improper installation and/or maintenance work!
Carefully follow all the directions given in the mounting instructions and pay attention to all relevant information in the vehicle manual during assembly. Nonconformance can lead to vehicle damage or even endanger the driver!
These mounting instructions are written based on our current state of knowledge. Legal requirements for accuracy do not exist.
This product was developed for vehicles in their factory setting. Compatibility with original accessory parts or other manufacturers’ accessory parts is not guaranteed. Furthermore, BEFORE installing this product, make sure that all moving parts (e.g. the chain) are in the original state of maintenance. Installed accessories can change the driving behaviour and/or stability of your vehicle.
GENERAL INFORMATION
Observe the country-specific regulations concerning vehicle registration/operation as well as TUV regulations if applicable. If required, register installed parts in the vehicle documents through an appropriate inspection authority.
PREPARATION: Read the mounting instructions carefully and make sure that all items of the parts list are included. Make sure that your vehicle is parked safely and cannot fall over. Turn off the engine and remove the ignition key.
Let the motor/exhaust cool off if necessary. Disconnect the vehicle battery when working on the electrical system. Use appropriate tools. Have another person to help you.
FUNCTION CHECK: This is a universal product. For this reason make sure BEFORE the first use, that the product can be fixed properly and used without problems with your vehicle type. After fixation also make sure that no moving parts are obstructed and the function of the vehicle is not hindered in any way. Lamps as taillight and turn signals must not be limited in their function. Cables and hoses must not rub and/or be pinched. Before starting to ride, perform a comprehensive check of all functions.
PRODUCT SPECIFIC INFORMATION
ATTENTION: Riding with this product may affect the motorcycles driving and braking performance!
ATTENTION: Depending on the location of fixation, cornering and ground clearance can be reduced by using this product!
ATTENTION: Before riding and at each stop (every 200 km) check proper ixation of the product!
| Maximum Load | Maximum Speed |
ATTENTION: The maximum vehicle load specified by the manufacturer and the maximum load of the SW-MOTECH carrier/rack must not be exceeded!
ATTENTION
NOT FOR OFFROAD-USE!
| Step | No. | Part | Quantity*** | N.m**** |
| BC.SYS.00.001.1 0000 | SysBag 10 | |||
| 1 | 1 | BC.SYS.00.001.1 0000 | Sys Bag 10 | 1 |
| 2 | BC.ZU B.00.004.30000 | Lashing Eye Set 12 pieces) | 1 | |
| 3 | 3 | BC.ZU B.00.094.30000 | Waterproof lnnerbag | I |
| 1 | ||||
| BC.SYS.00.002.10000 | SysBag 15 | |||
| 1 | 1 | BC.SYS.00.002.10000 | SysBag 15 | 1 |
| 2 | BC.ZU B.00.004.30000 | Lashing Eye Set 12 pieces) | 1 | |
| 3 | 3 | BC.ZU B.00.095.30000 | Waterproof lnnerbag | I |
| 1 | ||||
| BC.SYS.00.003.1 0000 | SysBag 30 | |||
| 1 | 1 | BC.SYS.00.003.1 0000 | Sys Bag 30 | 1/1 |
| 3 | 2 | BC.ZU B.00.096.30000 | Waterproof lnnerbag | 1/1 |
| all SysBags | ||||
| 4 | SYS.00.001.004 | Rubber Plug | 4/4 | |
| 5 | LSF.350.250 | Adhesive Protection Foil | 1/1 | |
| 6 | BC.ZU B.00.097.30000 | Loop Strap Set (4 pieces] | 1/1 | |
| 7 | BC.ZU B.00.098.30000 | Shoulder Strap | 1/1 |
Al!measurements in millimeters.
**The second number indicates the total quantity of the part in the delivery.
*** No torque specifications: Use the torque defined by vehicle manufacturer! The standard torque in this table can be used as long as it is within the vehicle manufacturer s specifications.
FASTENING
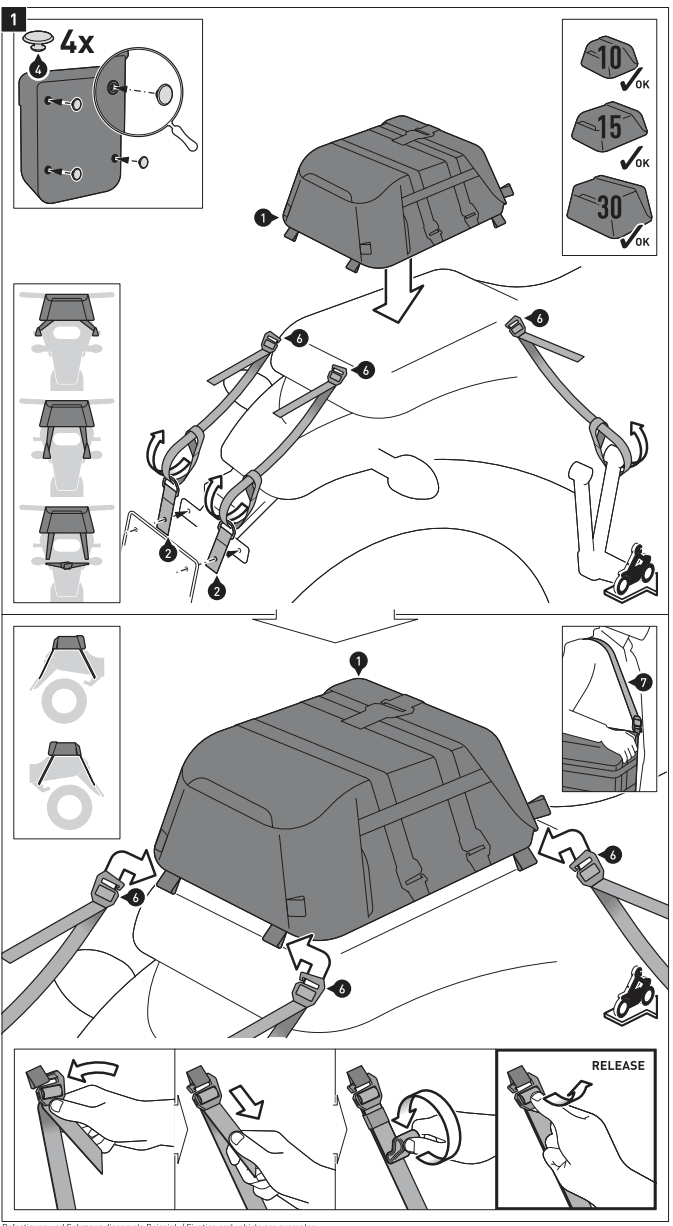
FASTENING TO THE VEHICLE
ATTENTION: Before fastening your SysBag [1 I to the vehicle, the rear eyelets must be closed with the included rubber plugs [4) [shown in the detail drawing at the top)!
ATTENTION: Protect sensitive surfaces in the area of the SysBag [1) and the fastening straps with the adhesive protection foil (5) from scratches!
Place your SysBag [1] in the rear area of your vehicle [e.g. passenger seat, luggage rack etc.I. On both sides entangle TWO loop straps [6) to appropriate and reliable attachment points in the rear area of the vehicle [e.g. luggage hook etc.I.
TIP: SW-MOTECH recommends the mounting with the lashing eyes [2l !only Sys Bag 10 and 15). Attach the lashing eyes [21 with the original screws behind your license plate.
Then entangle on both sides TWO loop straps [6) to appropriate and reliable attachment points of the vehicle le.g. vehicles frame, footrest mounts etc.I.
Attach the hook buckles of the loop straps [6) on both sides to the marked loops of the SysBag (1l, as shown in the lower drawing. Tighten all loop straps until the SysBag (1) is centered and securely fastened to the vehicle. Secure the overlength of the loop straps [6] with the rubber loops. 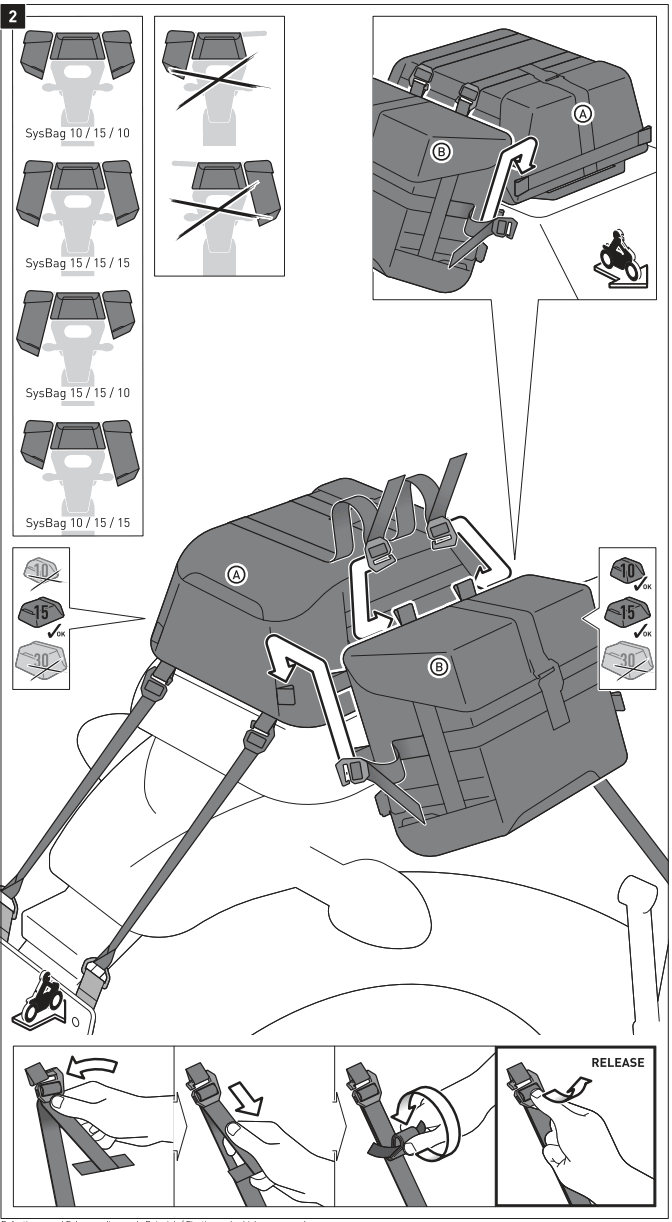
FASTENING TO THE SYSBAG 15 (Optional)
Attach your SysBag 15 [Al to the vehicle as described in step [1]. Loosen the upper two straps of the vehicle-mounted SysBag 15 [Al. Attach the hook buckles of the two straps to the shown loops [behind the lid[ of the Sys Bag 10 or 15 [Bl. On both sides, loosen the upper straps on each side of the SysBag 10/15 [Bl.
Attach the hook buckles of the two straps to the loops shown on the attached SysBag 15 [Al. After ALL FOUR hook buckles are properly hooked, tighten the straps until the SysBag 10/15 [Bl is firmly attached on the SysBag 15 [Al. Secure the overlength of the straps [41 with the velcro loops against flapping.
FUNCTION CHECK (MUST BE OBSERVED)
ATTENTION: All components of the SysBag must not contact any hot or moving parts of the vehicle. All parts should also remain 15 cm away from hot parts of the vehicle and remain clear of the exhaust stream. For this reason compress the suspension fully several times with your vehicle stationary. 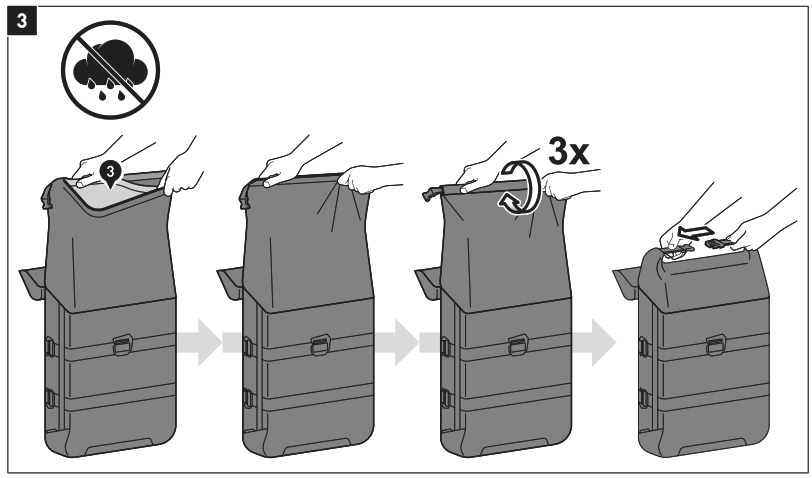
ATTENTION: Always use the included waterproof innerbag (3) to protect your luggage from moisture!
Fasten the waterproof inner bag [3] on the inside of the reinforced opening of the SysBag [1 I. Now roll the reinforced opening three times. Then close the SysBag I 1] with the buckles.
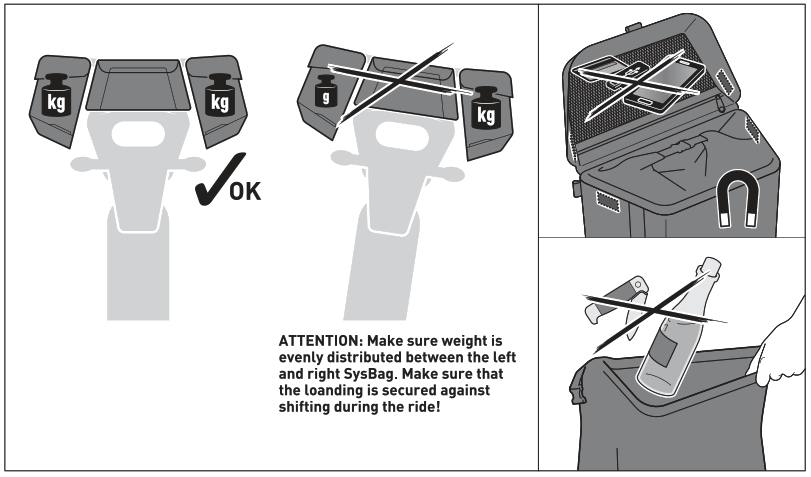
LOADING
ATTENTION: Pay attention to keep items and electronic devices that can be damaged by magnetic fields away from the magnets sewn in the lid of the SysBag (1)!
ATTENTION: Never store pointy or sharp-edged objects, which could cause injury to persons or damage __J to the vehicle/side case!
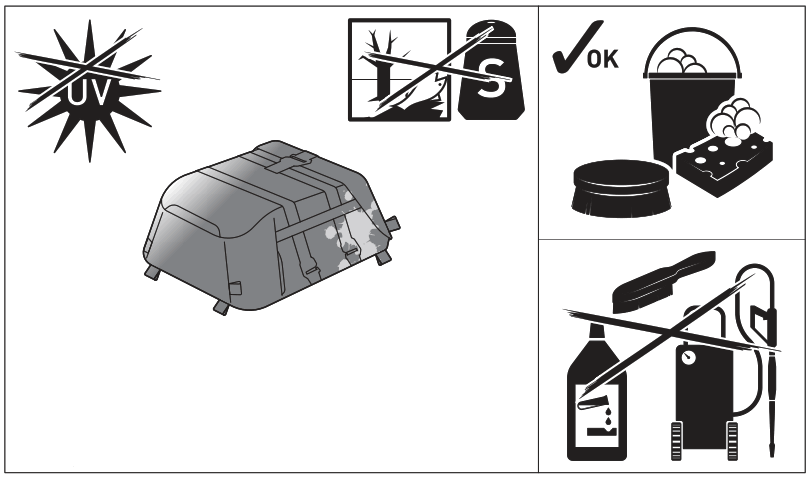
CARE
For cleaning use ONLY a soft textile brush, cloth or sponge and warm soapy water! Rinse with clean water.
Do NOT use strong cleaning agents, rough cleaning tools or high pressure washer I Clean the SysBag after riding in salty conditions, to avoid damage from salt.
COMBINATIONS
The SysBag line has only three bags but offers over 20 mounting options and combination possibilities. The bags can be lashed to the tail end or at the side, as described in the mounting instructions, or mounted to the carrier / rack with a quick-release fastener. On this page you will find some mounting examples. Vehicle-specific solutions, SysBag sets and adapter plates for SW-MOTECH carriers/ racks can be found in our webshop. 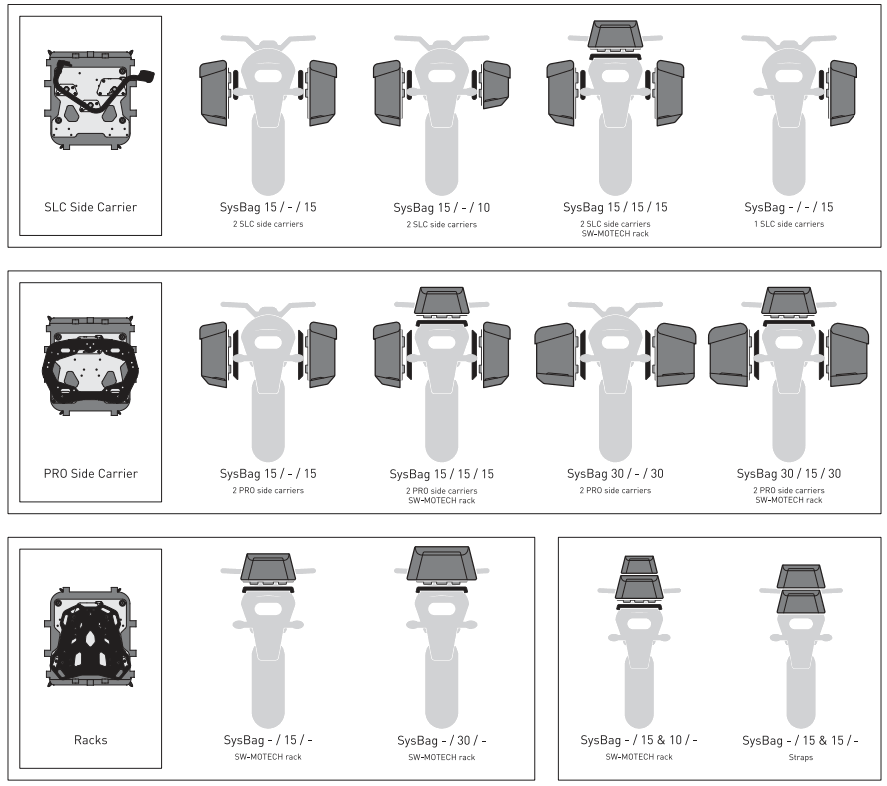
![]()
SW-MOTECH GmbH & Co. KG
Ernteweg 7-10
35282 Rauschenberg
Germany
Tel. I phone+ 49 [0)6425 / 8168 – 050
Fax/ fax+ 49 [0)6425 / 8168- 10
[email protected]
www.sw-motech.com
Errors and omissions excepted. Technical and design
modifications are subject to change.
Copyright by
SW-MOTECH GmbH&Co.kG
Packed by
Date of packaging


