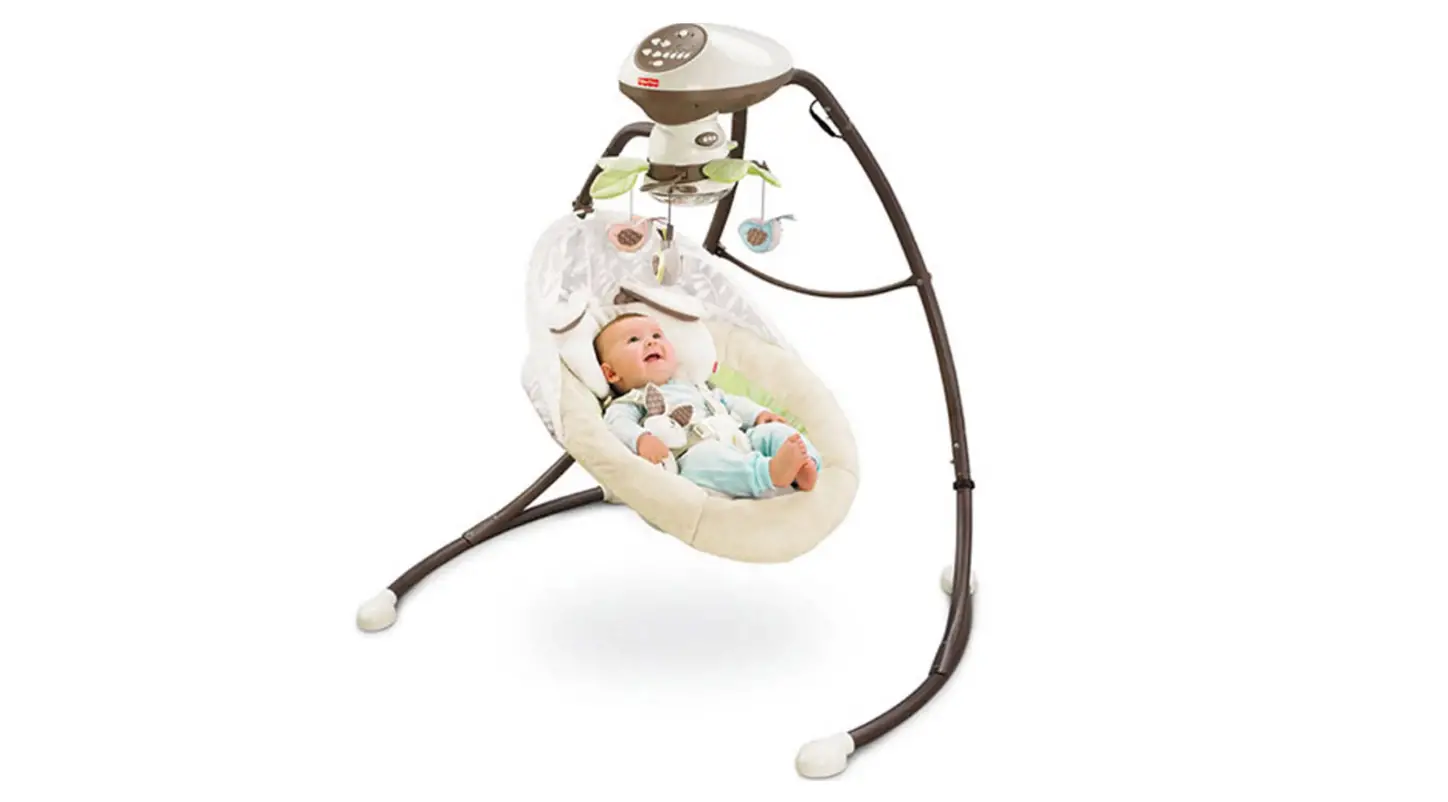
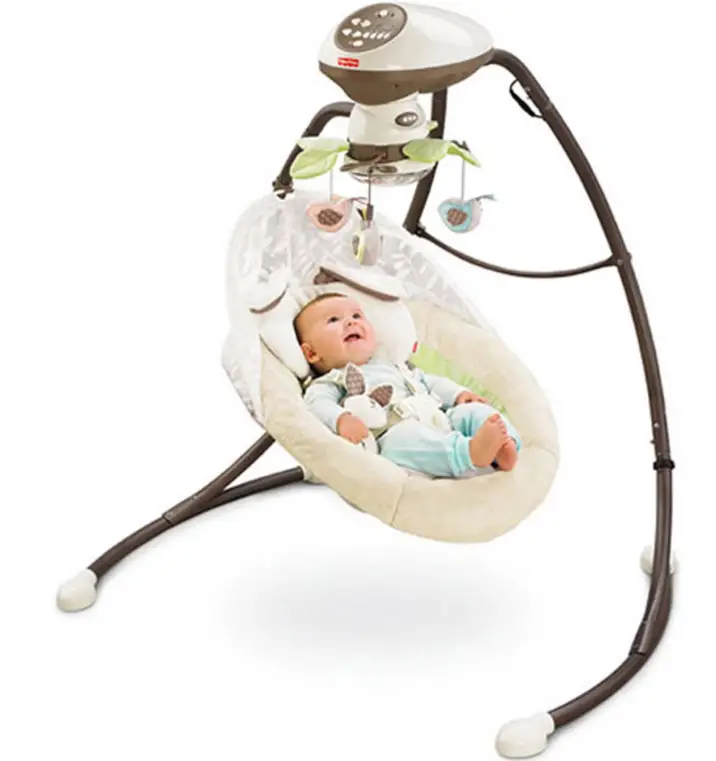
 Fisher price V0099 Snugabunny Cradle swing User Manual
DANGER
To prevent electric shock, do not immerse in water; wipe clean with a damp cloth.
WARNING
- To prevent serious injury or death from falls and being strangled in the restraint system:
- Always use a restraint system.
- Never use it with an active child who may be able to climb out of the seat.
- Never leave a child unattended.
Consumer Information
- Please read these instructions before use of this swing.
- Keep this instruction sheet for future reference, as it contains important information.
- Adult assembly is required.
- Tools needed for assembly: Allen Wrench (included) and Phillips screwdriver (not included).
- Requires four “D” (LR20) alkaline batteries for operation (not included).
- Requires a 6V AC adaptor for operation (included).
- Maximum Weight Limit: 25 lbs (11,3 kg).
- IMPORTANT! If your child weighs less than 25 lbs (11,3 kg), but is really active and appears to be able to climb out of the swing, immediately discontinue its use.
- Always use the swing where there is adequate ventilation. To prevent overheating, keep the swing away from heat sources such as radiators, heat registers, direct sunlight, stoves, amplifiers, or other appliances which produce heat.
- Never use extension cords with the AC adaptor.
- Never use the swing near water (ie.: bathtub, sink, laundry tub or wet basement, etc.).
- Adults Note: If you use this product with the AC adaptor, periodically examine the AC adaptor for damage to the cord, housing or other parts that may result in the risk of fire, electric shock or injury. If the AC adaptor is damaged, do not use the product with the AC adaptor. Use batteries as the power source.
- Do not connect to more than the recommended number of power supplies.
- The product must only be used with the recommended
AC adaptor. - The AC adaptor is not a toy.
- Disconnect the AC adaptor from the swing before cleaning.
- Product features and decorations may vary from photographs.
FCC Statement (United States Only)
This equipment has been tested and found to comply with the limits for a Class B digital device, pursuant to Part 15 of the FCC Rules. These limits are designed to provide reasonable protection against harmful interference in a residential installation. This equipment generates, uses, and can radiate radio frequency energy and, if not installed and used in accordance with the instructions, may cause harmful interference to radio communications. However, there is no guarantee that interference will not occur in a particular installation. If this equipment does cause harmful interference to radio or television reception, which can be determined by turning the equipment off and on, the user is encouraged to try to correct the interference by one or more of the following measures:
- Reorient or relocate the receiving antenna.
- Increase the separation between the equipment and the receiver.
- Connect the equipment to an outlet on a circuit different from that to which the receiver is connected.
- Consult the dealer or an experienced radio/TV technician for help.
Note: Changes or modifications not expressly approved by the manufacturer responsible for compliance could void the user’s authority to operate the equipment. This device complies with Part 15 of the FCC Rules. Operation is subject to the following two conditions: (1) this device may not cause harmful interference and (2) this device must accept any interference received, including interference that may cause undesired operation.
Parts 
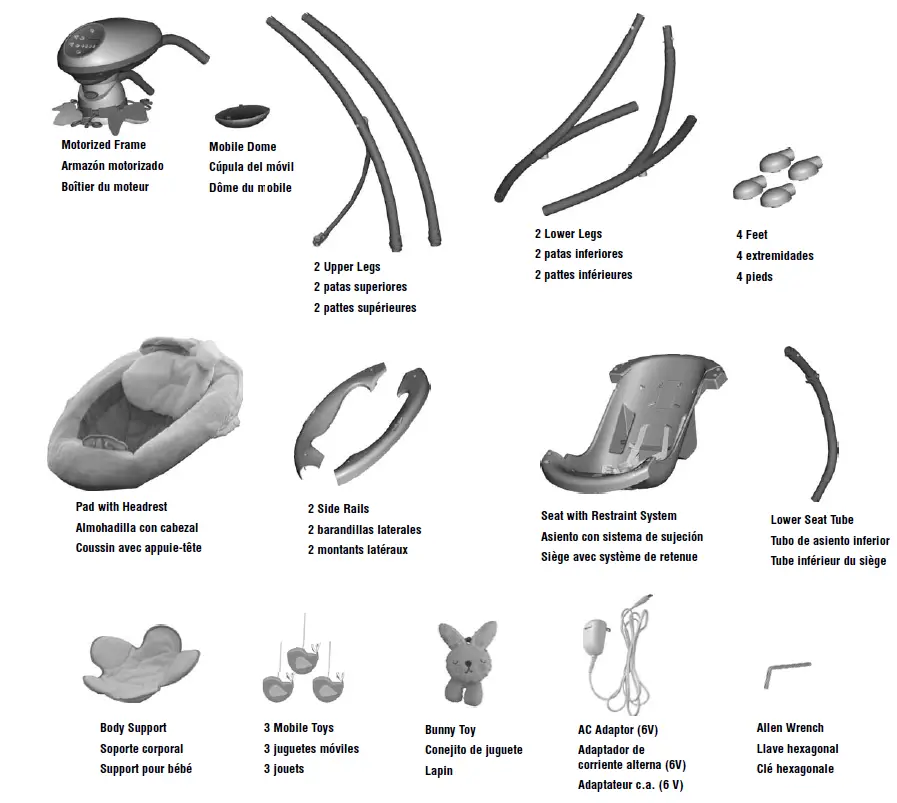
Note: Tighten or loosen all screws with a Phillips screwdriver or Allen wrench. Do not over-tighten the screws.
Assembly 
CAUTION
This package contains small parts in its unassembled state. Adult assembly is required.
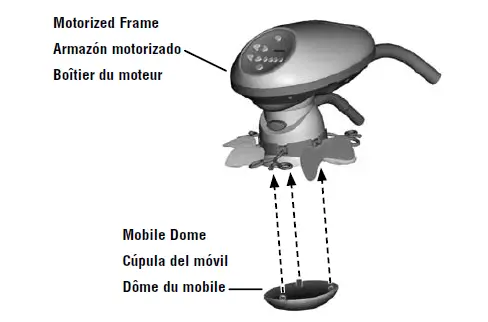
- Fit the tabs on the mobile dome into the slots in the motorized frame.
- Push near each tab to “snap” the mobile dome into place.
IMPORTANT! Before each use or assembly, inspect this product for damaged hardware, loose joints, missing parts or sharp edges. DO NOT use if any parts are missing or broken. Contact Fisher-Price® for replacement parts and instructions if needed. Never substitute parts.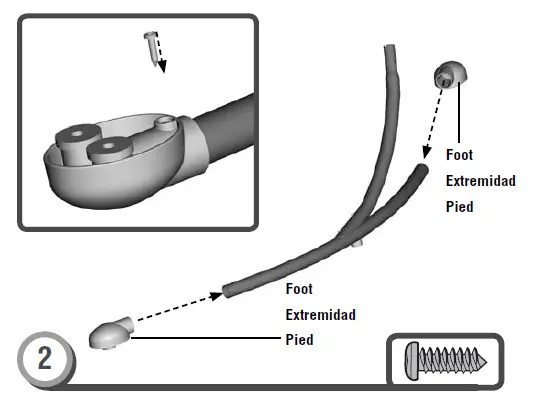
- Fit a foot onto the end of each lower leg.
- Insert two #8 x ½” (1,27 cm) screws through the bottom of each foot and into the lower leg. Fully tighten each screw with a Phillips screwdriver.

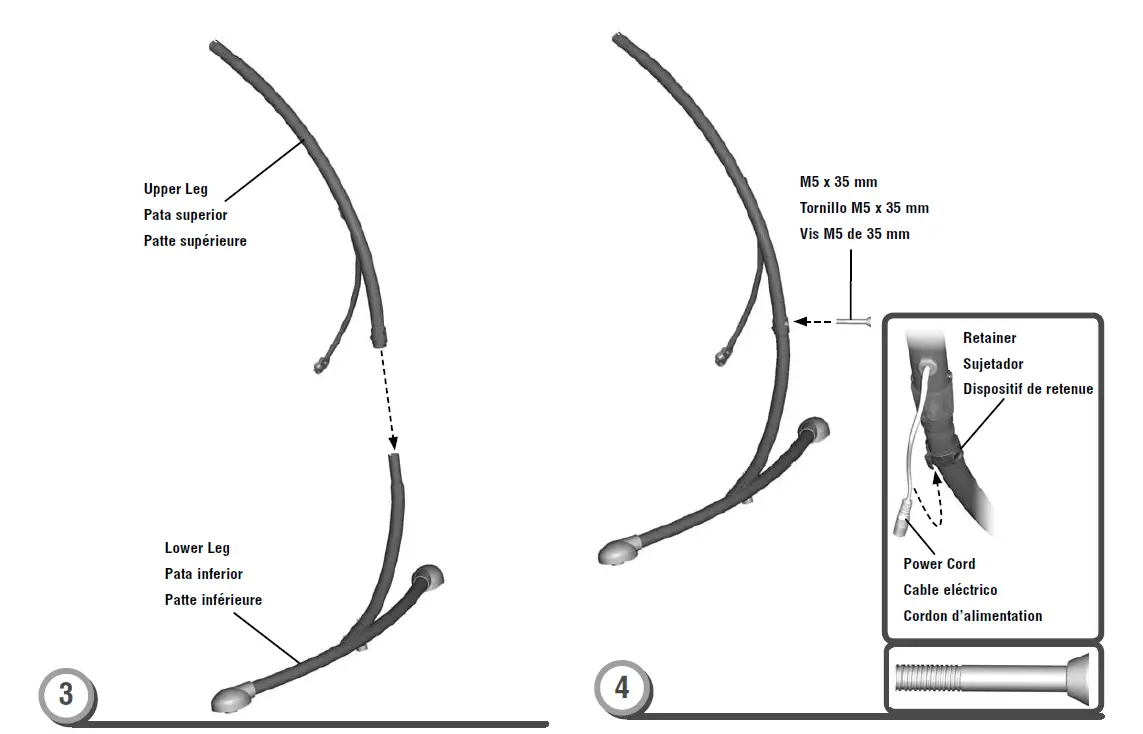
- Fit an upper leg onto a lower leg.
- Hint: The upper legs are designed to fi t the lower legs one way. If it does not seem to fi t, try the other upper leg.
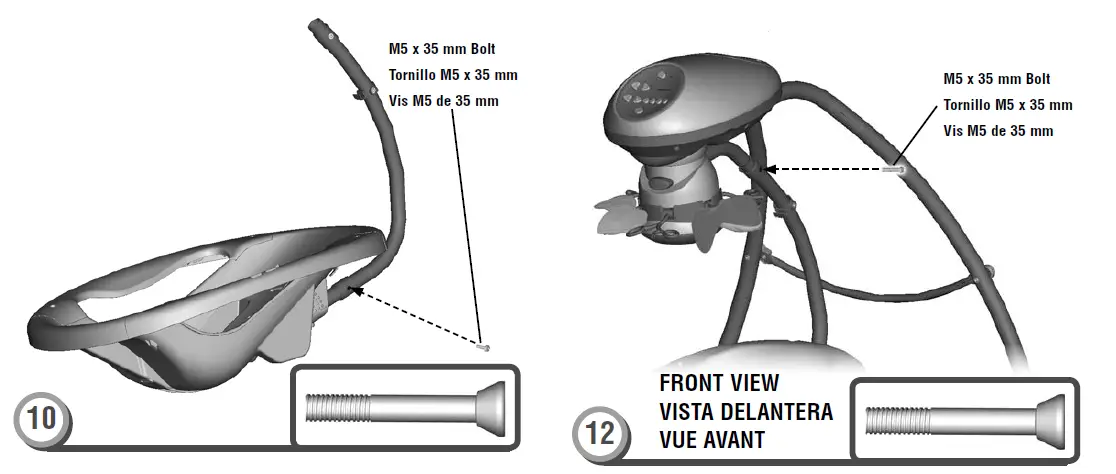
- Insert an M5 x 35 mm bolt through the opening in the upper leg tube. Fully tighten the screw with the Allen wrench.
- Repeat this procedure to assemble the other upper leg to the other lower leg.
- Fit the power cord into the retainer on a lower leg.

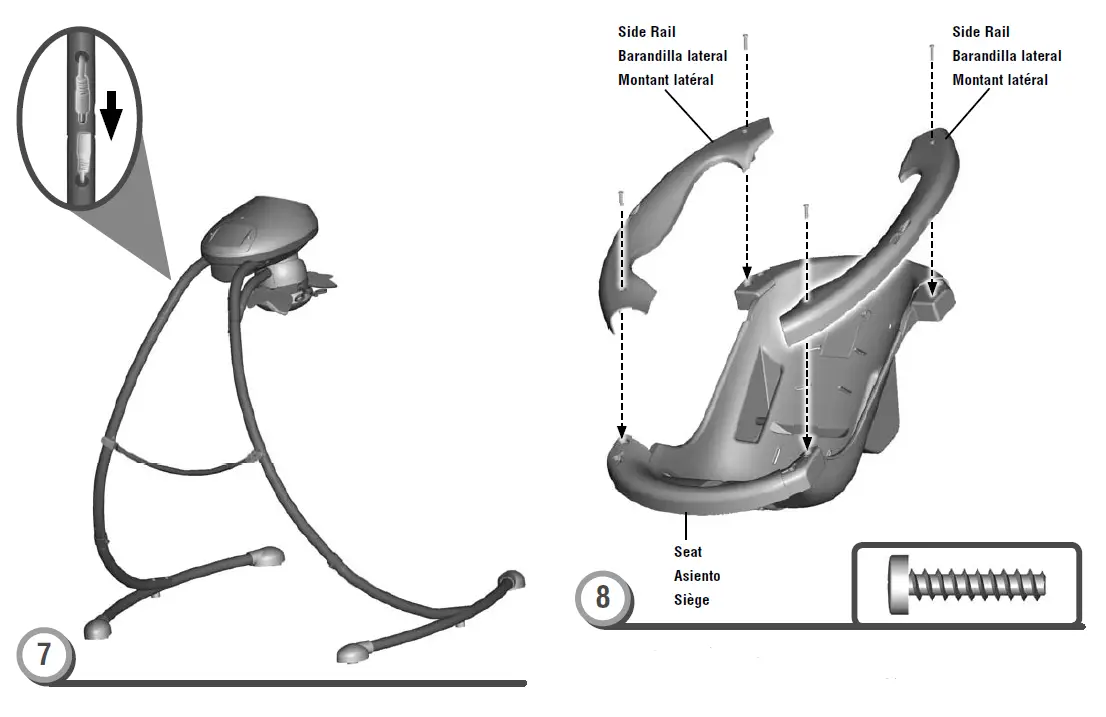
- While pressing the button on a leg assembly, fit it into a tube on the motorized frame. Make sure the button on the leg “snaps” into the hole in the tube.
- Repeat this procedure to assemble the other leg assembly to the motorized frame.
- Pull apart the legs.
- Lift the free end of the frame support bar.
- Fit the hole in the frame support bar over the peg on the opposite leg. Push to “snap” the frame support bar in place.

- Plug the power cord from the motorized frame assembly into the power cord in the frame assembly
- Fit the side rails to the side tabs on the seat.
- Insert four #8 x 1″ (2,54 cm) screws into the side rails.
- Fully tighten the screws with a Philips screwdriver.

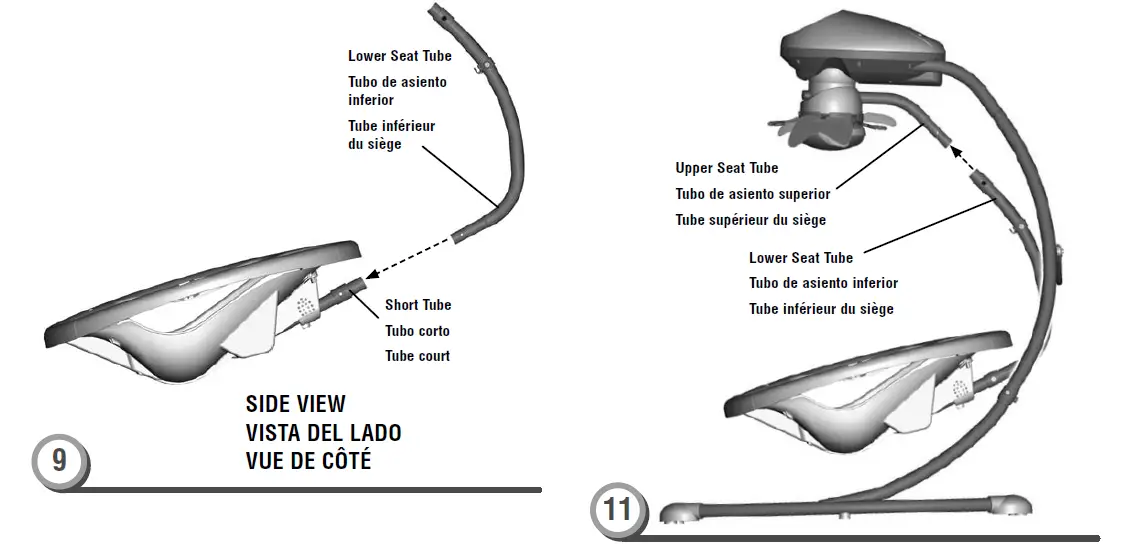
- Fit the lower seat tube into the short tube on the seat back.
- Fit the lower seat tube onto the upper seat tube.
- Insert an M5 x 35 mm bolt into the short tube. Fully tighten the bolt with the Allen wrench
- Insert an M5 x 35 mm bolt into the upper seat tube. Fully tighten the bolt with the Allen wrench

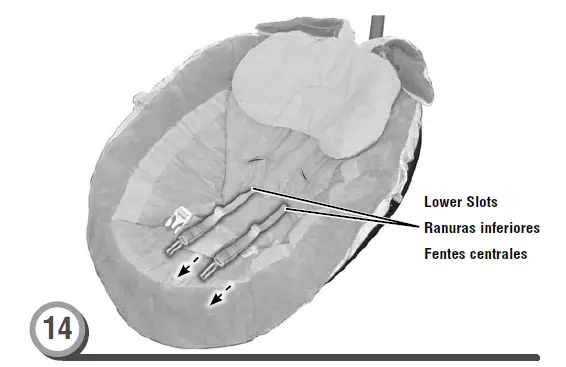
- Insert the waist belts through the lowest slots in the pad. Make sure the waist belts are not twisted.
- Fold the top of the pad down.
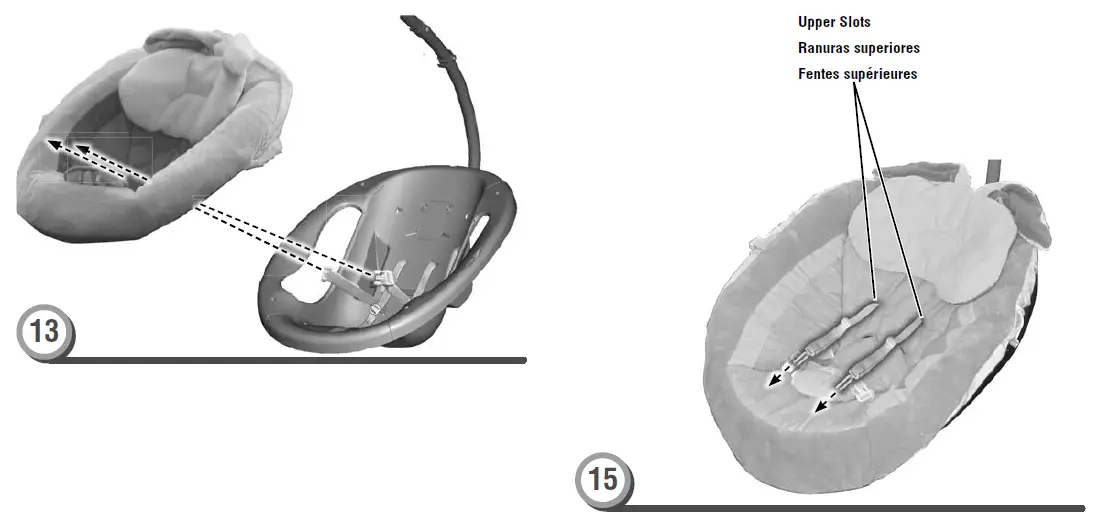
- Insert the shoulder belts through the upper slots in the seat pad back.
- Insert the ends of the shoulder belts through the lower slots in the seat pad back.


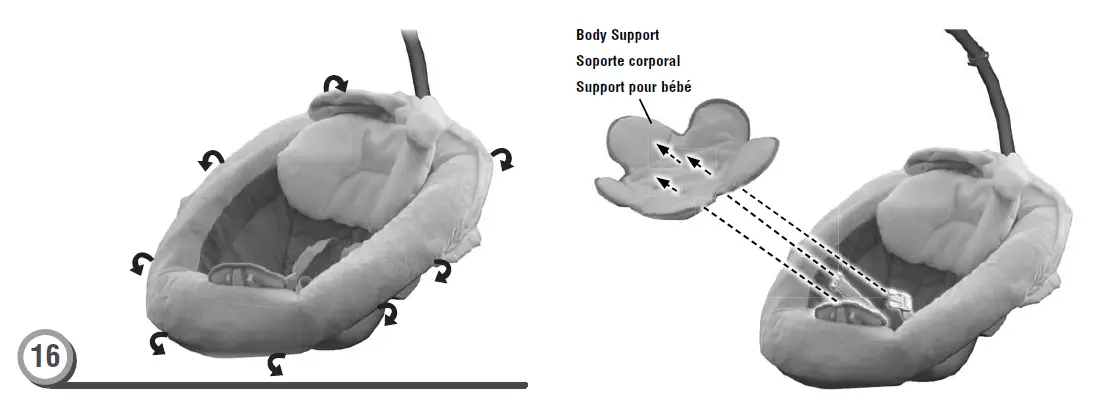
- Fit the pad edges around the rim of the seat.
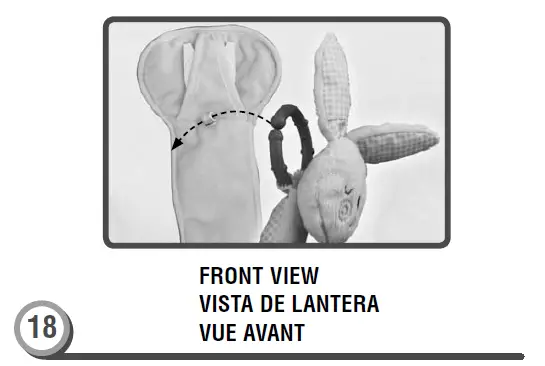
- Insert the restraint pad through the lower slot and the waist restraints through the upper slots in the body support.
- Fit the link on the bunny toy to the restraint pad.

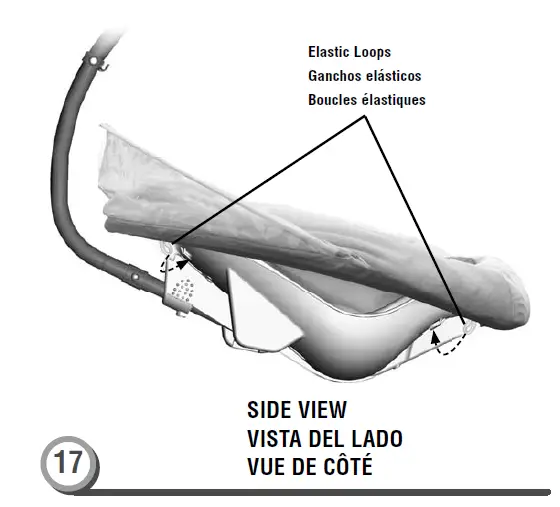
- Hook both elastic loops at the top of the seat pad around the pegs at the top of the seat.

- Hook both elastic loops at the bottom of the seat pad around the pegs at the bottom of the seat.

- Fit the ends of the canopy stay into the pocket on each side of the seat pad.
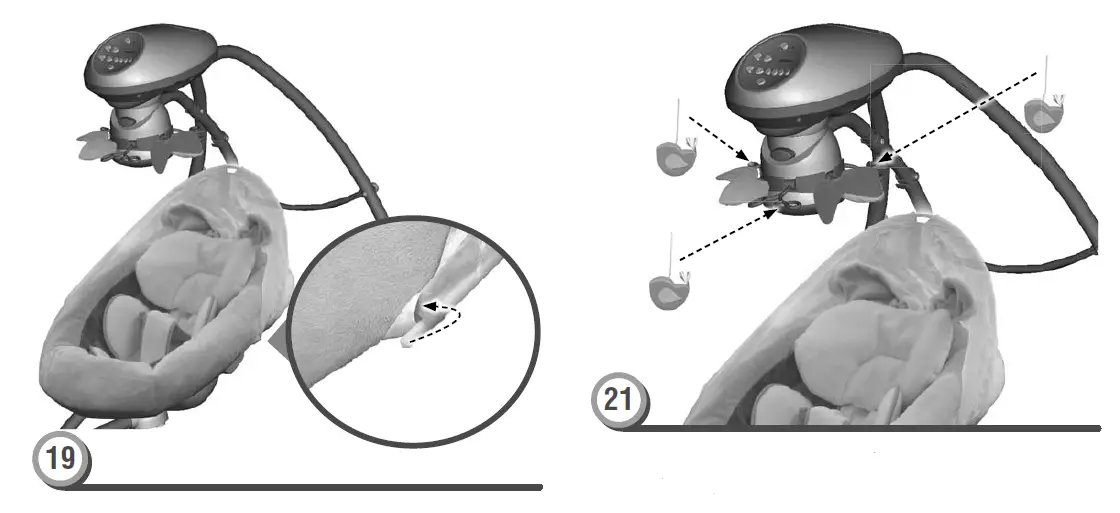
- it the strings on each mobile toy up into the slot in each mobile hanger.
- Pull each toy down to be sure it is secure.

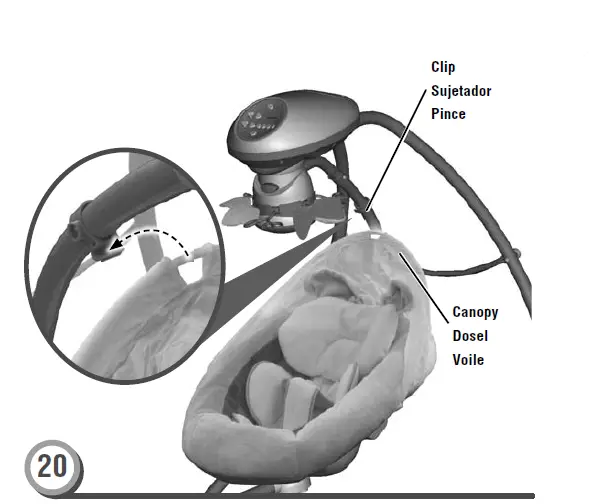
- Lift the top of the canopy and fit it into the clip on the swing tube.
Battery Installation
Hint: Install batteries if you need to use this swing away from an outlet. We recommend using alkaline batteries for longer battery life.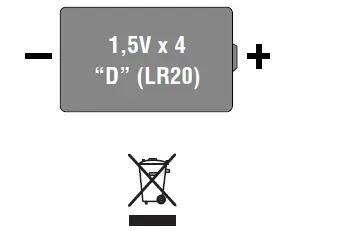
- Protect the environment by not disposing of this product with household waste (2002/96/EC). Check your local authority for recycling advice and facilities (Europe only).

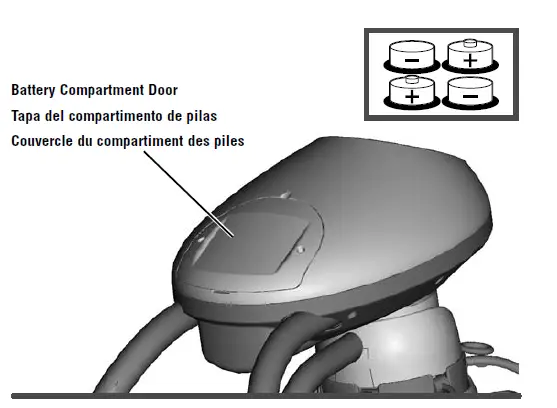
- Loosen the screws in the battery compartment door with a Phillips screwdriver and remove the battery compartment door.
- Insert four “D” (LR20) alkaline batteries into the battery compartment.
- Replace the battery compartment door and tighten the screws. Note: Low battery power may cause product movement to slow, sound and lights to become faint or the product to turn off together. If this should happen, use the AC adaptor as a power source or replace the batteries. Replace the batteries with four alkalines “D” (LR20) batteries.
- If this product begins to operate erratically, you may need to reset the electronics. Turn the power off and then back on.
Battery Safety Information
In exceptional circumstances, batteries may leak fluids that can cause a chemical burn injury or ruin your product. To avoid battery leakage:
- Do not mix old and new batteries or batteries of different types: alkaline, standard (carbon-zinc) or rechargeable (nickel-cadmium).
- Insert batteries as indicated inside the battery compartment.
- Remove batteries during long periods of non-use. Always remove exhausted batteries from the product. Dispose of batteries safely. Do not dispose of this product in a fire. The batteries inside may explode or leak.
- Never short-circuit the battery terminals.
- Use only batteries of the same or equivalent type as recommended.
- Do not charge non-rechargeable batteries.
- Remove rechargeable batteries from the product before charging.
- If removable, rechargeable batteries are used, they are only to be charged under adult supervision.
WARNING
To prevent serious injury or death from falls and being strangled in the restraint system:
- Always use a restraint system.
- Never use it with an active child who may be able to climb out of the seat.
- Never leave a child unattended.
Set-Up and Use
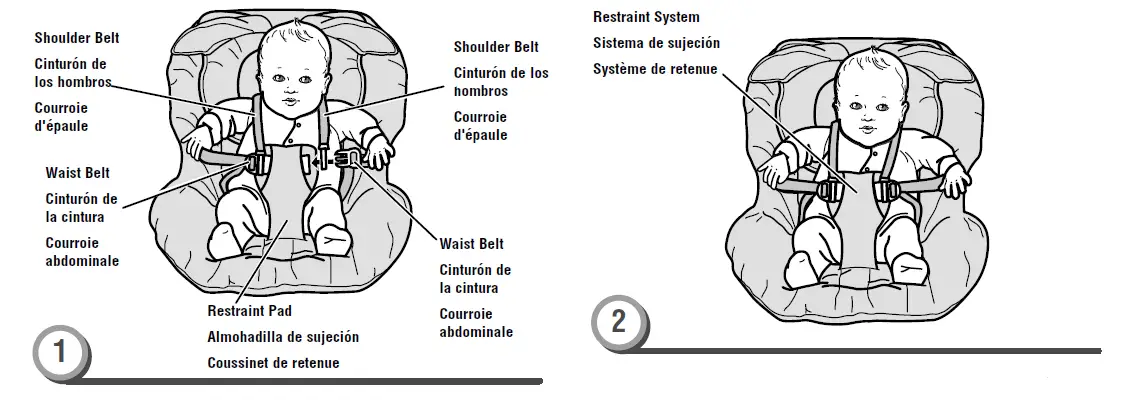
- Place your child in the seat. Position the restraint pad between your child’s legs.
- Fit the end of each waist belt through the end of each shoulder belt.
- Fasten the waist/shoulder belts to the restraint pad. Make sure you hear a “click” on both sides.
- Check to be sure the restraint system is securely attached by pulling it away from your child. The restraint system should remain attached.
- Tighten each waist belt so that the restraint system is snug against your child. Please refer to the next section for instructions to tighten the waist/shoulder belts.
IMPORTANT! The maximum weight for this product is 25 lbs (11,3 kg). If your child weighs less than 25 lbs (11,3 kg) but is really active and appears to be able to climb out of the swing immediately discontinue us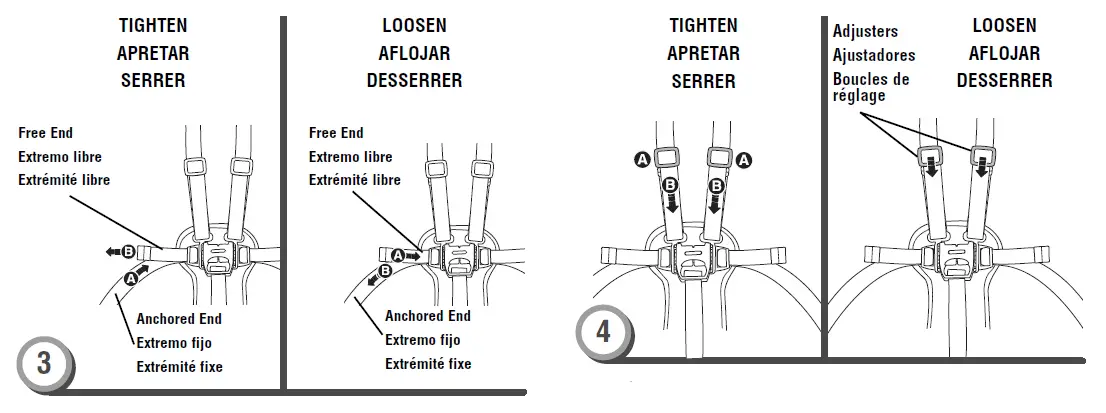
- To tighten the waist belts: Feed the anchored end of the belt up through the buckle to form a loop. Pull the free end of the belt. Repeat this procedure to tighten the other belt.
- To loosen the waist belts: Feed the free end of the belt up through the buckle to form a loop. Enlarge the loop by pulling the end of the loop toward the buckle. Pull the anchored end of the belt to shorten the free end of the belt
- Repeat this procedure to loosen the other belt.
- Note: After adjusting the belts to fit your child, make sure you pull on them to be sure they are securely fastened.
- Hold the adjuster and pull the front shoulder strap down To loosen the shoulder belts:
- Slide the adjuster down.

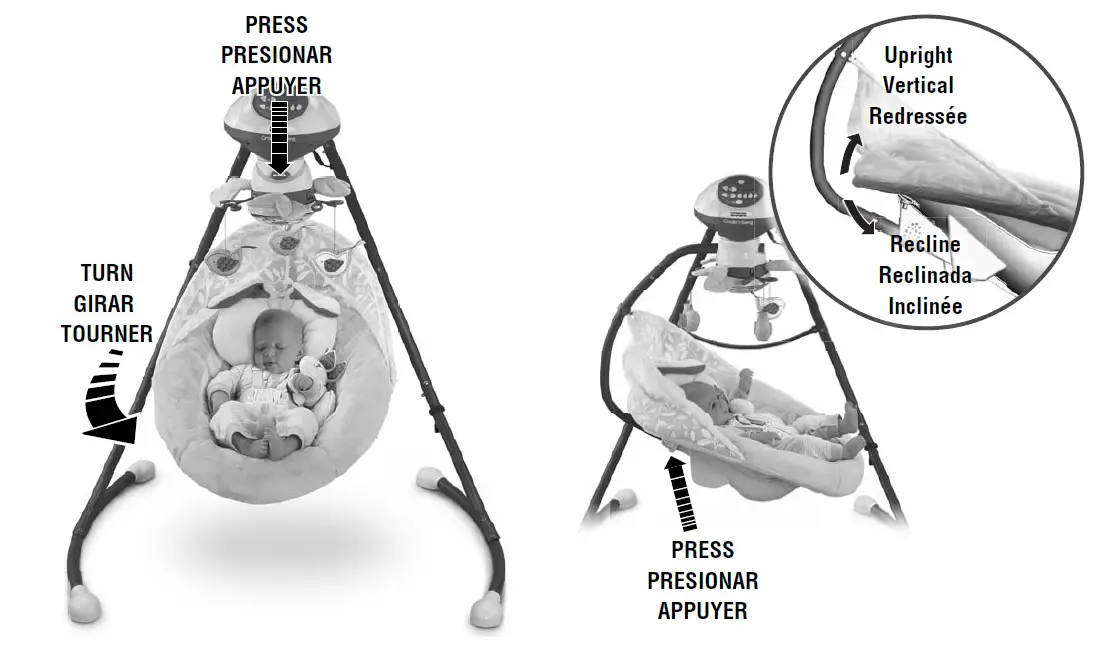
You can adjust the motion of the swing: side to side or front to back.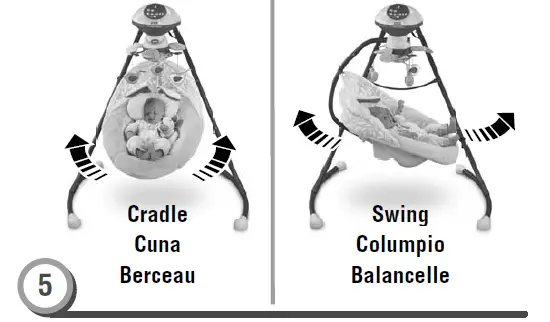
- Press the seat tube button to unlock the seat tube.
- Rotate the seat tube to the desired position.
- From behind the seat, press both seat position buttons.
- Push the seatback up until the buttons “snap” into the upright position.
- Push the seatback down until the buttons “snap” into the recline position.

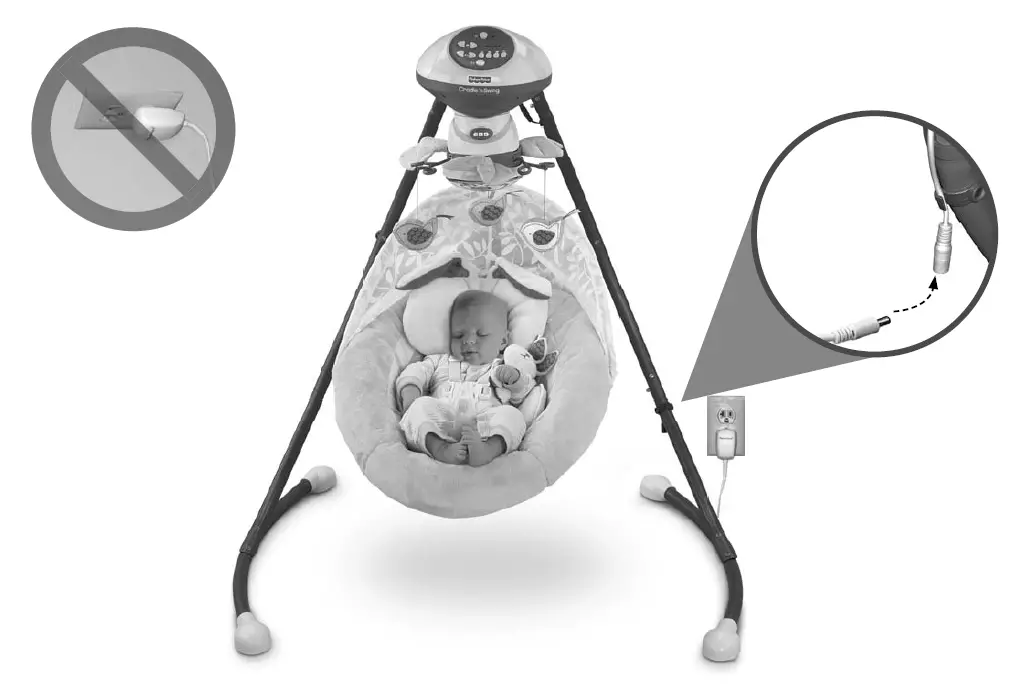
- Place the swing near a standard wall outlet.
- Plug the AC adaptor into the power cord extending from the back of a leg.
- Plug the AC adaptor into the wall outlet.
- Use the AC adaptor only in a wall outlet. Do not plug the adaptor into a ceiling outlet.
- Hint: The power AC adaptor cord is designed to easily disconnect if stepped on accidentally. Simply plug the AC adaptor cord back into the power cord extending from the back of the leg.
- The swing also operates on battery power. To install batteries, please refer to the Battery Installation section on page 14.
Swing Use 
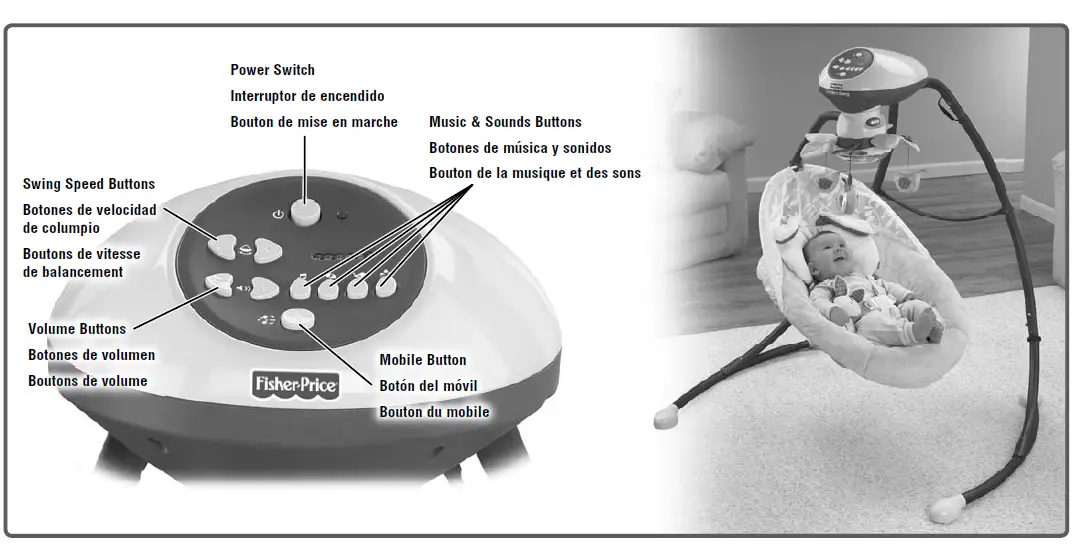
- Press the swing speed buttons to select any of the six-speed settings.
- Be sure to turn the power OFF when not in use.
Hints: - As with most battery-powered swings, a heavier child will reduce the amount of swinging motion on all settings. In most cases, the low setting works best for a smaller child while the high setting works best for a larger child.
- If the low setting provides too much swinging motion for your child, try placing one end of a blanket underneath your child and let the other end of the blanket drape down while swinging.
- Press the music/sound selection buttons music and sounds. Press the same button again to turn the sound off. Press the same button again to turn the sound on again.
- Hint: The mobile, music or sounds with turn off after approximately 20 minutes. Press the mobile, music or sounds button to restart. When you restart the music a different song will play.
- Press the volume buttons to adjust the volume level.
Care
- Unbuckle the restraint system.
- Remove the top of the canopy from the clip on the swing tube. Pull the ends of the canopy stay out of the pockets on the pad. Slide the canopy stay out of the canopy sleeve.
- Remove the pad elastic loops from the pegs and unfasten the pad fasteners from the seat.
- Remove the pad from the restraint system.
- Machine wash the pad in cold water with mild detergent. Do not use bleach. Tumble dry on low heat and remove promptly.
- To clean the seat, restraint system, tray, mobile, and motorized frame, use a mild cleaning agent and damp cloth. Rinse with clean water to remove residue.
- Replace the pad on the seat.
- Periodically check the swing for loose fasteners or broken parts and tighten as needed.
Storage
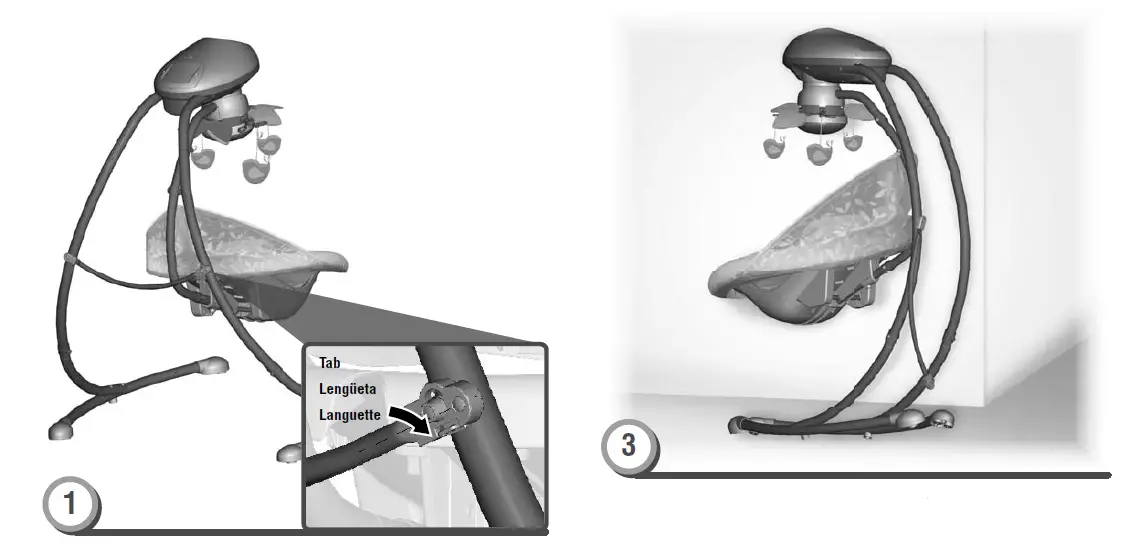
- Push the tab on the frame support bar to release it.
- Lean the swing frame against a wall for storage. IMPORTANT! Remove the batteries for long-term storage.

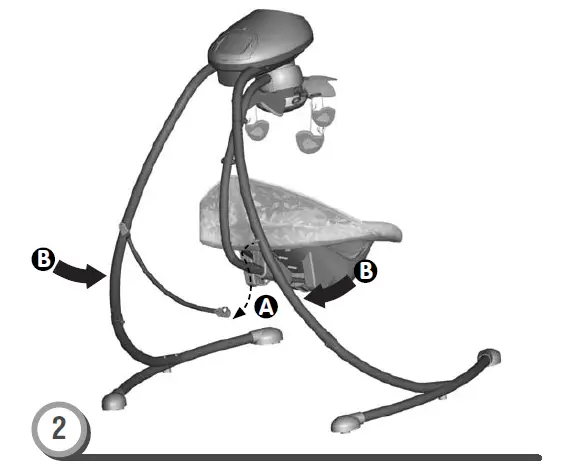
- Pull the end of the frame support bar off the leg and lower it
- Push the legs together


CANADA
Mattel Canada Inc., 6155 Freemont Blvd., Mississauga, Ontario L5R 3W2.


