
GARMIN 010-12719-00 8-Pin Transducer Adapter Box

Important Safety Information
WARNING See the Important Safety and Product Information guide in the device product box for product warnings and other important information.
CAUTION To avoid possible personal injury, always wear safety goggles, ear protection, and a dust mask when drilling, cutting, or sanding.
NOTICE When drilling or cutting, always check what is on the opposite side of the surface to avoid damaging the vessel. This transducer adapter box is not intended for use with a Garmin® differential 8-pin transducer. Do not cut a Garmin differential 8-pin transducer cable. Connect it directly to the 8-pin port on the sonar module. This adapter box connects a non-differential transducer, such as a Garmin or Airmar™ 6-pin transducer, to a Garmin 8-pin sonar module. To adapt a non-differential transducer for use with a Garmin differential sonar module, you must cut the connector from your existing non-differential transducer and connect the wires to the wire block inside this 8-pin adapter box by following these instructions.
Mounting the Transducer Adapter Box
Tools Needed
- Drill and 3.2 mm (1/8 in.) drill bit
- #2 Phillips screwdriver
- 3 mm flat screwdriver
- Cable ties (optional)
- Wire cutter
- Wire stripper
- 21 mm (13/16 in.) wrench
- 15 mm (or adjustable) wrench (optional)
Mounting Location Considerations When selecting a mounting location, observe these considerations.
- The adapter cable from the device should reach the transducer connector on the sonar module easily when the device is mounted. The adapter cable length is 60 cm (24 in.).
- You must not submerge the device in water.
- You must mount the device at least 15.25 cm (6 in.) from a source of electrical interference, such as a motor.
- When a mounting surface is unsuitable for screws, you must secure the device to a structure using cable ties (not included).
Mounting the Adapter Box
- Using the 3.2 mm (1/8 in.) bit, drill the pilot holes.
- Insert the screws into the pilot holes, but do not tighten them flush with the surface.
- Place the adapter box on the screws and slide it into place.
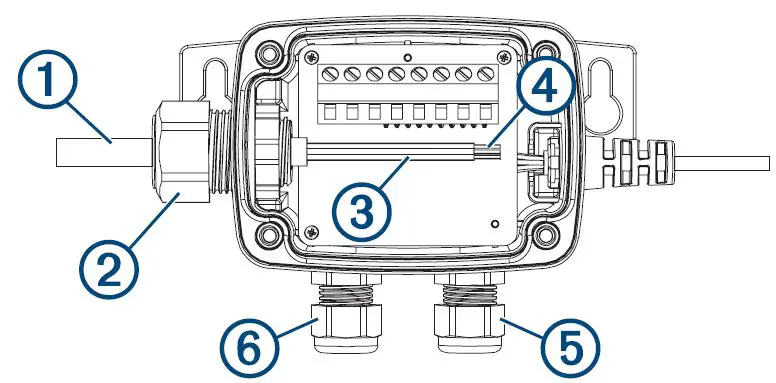
- With the adapter box unmounted, connect the wires.
- Tighten the screws until the adapter box is securely fastened to the surface.
Connecting a Transducer to the Adapter Box
Preparing a Transducer to Connect to the Adapter Box Before you can begin the installation, you must check your transducer compatibility.
NOTICE This transducer adapter box is not intended for use with a Garmin differential 8-pin transducer. Do not cut a Garmin differential 8-pin transducer cable. Connect it directly to the 8-pin port on the sonar module.
- Cut the connector off the non-differential transducer cable, as close to the connector as possible.

- Feed the cut end of the cable through the nut on the side of the housing and pull it out through the other side.
- Use a wire stripper to remove about 90 mm (3 1/2 in.) of the outer cable jacket and foil shield.
- Use a wire stripper to remove about 6 mm (1/4 in.) of the insulation from each internal wire.
NOTE: Tinning the stripped wires is recommended. - For transducers without a temperature sensor, you can use a 15 mm (or adjustable) wrench to connect a separate temperature sensor through the nut on the bottom side of the housing (optional).
- To add a separate water speed wheel sensor, you can use a 15 mm (or adjustable) wrench to connect the speed wheel sensor through the nut on the bottom side of the housing (optional).
Connecting the Transducer Wires to the 8-pin Transducer Adapter Box
- Using a 3 mm flat screwdriver, connect the transducer wires to the wire block in the 8-pin adapter box as shown in the wiring block table.
NOTE: You can consult the wire color tables to identify the wire functions for some Garmin and Airmar transducers (Wire Color Tables, page 3).Wire Block Number Wire Function Description 1 Depth + Transducer depth positive 2 Depth – Transducer depth negative 3 Shield Transducer cable shield 4 Ground Sonar system common ground 5 Temp +1 Water temperature positive 6 XID Airmar Transducer Identification 7 Speed power Speed wheel sensor power positive 8 Speed data Speed wheel sensor data positive - When the wire connections are secure, use a 21 mm (13/16 in.) wrench to tighten the nut around the transducer cable.
- Place the lid on the adapter box and secure it with the four captive Phillips screws.
Wire Color Tables
You can use these tables to help identify wire functions on certain Garmin or Airmar 6-pin non-differential transducers.
Garmin/Airmar 6-pin 50/200 kHz Dual-Frequency Transducers On your chartplotter, you may need to set the transducer type to dual frequency, 50/200 kHz. On your chartplotter, select Transducer Type > Dual Freq (200/50 kHz). If your transducer does not have temperature capability, you must install a jumper between connectors 4 and 5 on the wire block.
| Garmin Part | Description | 1: Depth + | 2: Depth – | 3: Shield | 4: Ground (Temp -) | 5: Temp | 6: XID | 7: Speed Power | 8: Speed Data |
| Garmin Dual | |||||||||
| 010-10272-00 | Frequency 50/200 kHz | Red | Black | Bare | Green | White | N/A | N/A | N/A |
| 010-10182-00 | Airmar B117 depth only | Blue | Black | Bare | N/A | N/A | N/A | N/A | N/A |
| 010-10182-01 | Airmar B117 with temp | Blue | Black | Bare | Brown | White | N/A | N/A | N/A |
| 010-10183-02 | Airmar B744V | Blue | Black | Bare | Brown | White | N/A | Red | Green |
| 010-10192-01 | Airmar P66 | Blue | Black | Bare | Brown | White | N/A | Red | Green |
| 010-10193-02 | Airmar B744VL long stem | Blue | Black | Bare | Brown | N/A | N/A | Red | Green |
| 010-10194-00 | Airmar B117 with temp | Blue | Black | Bare | N/A | N/A | N/A | N/A | N/A |
| 010-10194-01 | Airmar P319 with temp | Blue | Black | Bare | Brown | N/A | N/A | N/A | N/A |
| Airmar P79 | |||||||||
| 010-10327-00 | adjustable in- hull | Blue | Black | Bare | N/A | N/A | N/A | N/A | N/A |
| 010-10445-00 | Airmar M260 for 500W sonar units | Blue | Black | Bare | N/A | N/A | Orange1 | N/A | N/A |
| Airmar B260 | |||||||||
| 010-10451-00 | for 500W sonar units | Blue | Black | Bare | Brown | White | N/A | N/A | N/A |
| 010-10982-00 | Airmar B60 with 20° tilt | Blue | Black | Bare | Brown | White | N/A | N/A | N/A |
| 010-10982-010 | Airmar B60 with 12° tilt | Blue | Black | Bare | Brown | White | N/A | N/A | N/A |
| 010-10983-00 | Airmar B45 narrow stem | Blue | Black | Bare | Brown | White | N/A | N/A | N/A |
Garmin/Airmar 6-pin High-Power Dual-Frequency Transducers If your transducer does not have temperature capability, you must install a jumper between connectors 4 and 5 on the wire block.
| Garmin Part | Description | 1: Depth + | 2: Depth – | 3: Shield | 4: Ground | 5: Temp + | 6: XID | 7: Speed Power | 8: Speed Data |
| 010-10640-00 | Airmar B260 | Blue | Black | Bare | N/A | White | Orange1 | N/A | N/A |
| 010-10641-00 | Airmar M260 | Blue2 | Black2 | Bare2 | N/A | N/A | Orange1 | N/A | N/A |
| 010-10642-00 | Airmar R99 | Blue | Black | Bare | N/A | White | Orange1 | N/A | N/A |
| 010-10643-00 | Airmar R199 | Blue | Black | Bare | N/A | N/A | Orange1 | N/A | N/A |
| 010-10703-00 | Airmar B258 | Blue | Black | Bare | N/A | White | Orange1 | N/A | N/A |
| 010-11010-00 | Airmar B164 with 20° tilt | Blue | Black | Bare | N/A | White | Orange | N/A | N/A |
| 010-11010-01 | Airmar B164 with 12° tilt | Blue | Black | Bare | N/A | White | Orange | N/A | N/A |
| 010-11140-00 | Airmar SS27- W widebeam | Blue | Black | Bare3 | N/A3 | White | Orange | N/A | N/A |
| 010-11395-00 | Airmar TM260 | Blue | Black | Bare | N/A | White | Orange | N/A | N/A |
Specifications
| Dimensions (W x H x L) | 59.1 x 48.97 x 104 mm (2.3 x 1.9 x 4.1 in.) |
| Cable length | 61 cm (24 in.) |
| Water rating | IEC 60529 IPX74 |
© 2022 Garmin Ltd. or its subsidiaries Garmin® and the Garmin logo are trademarks of Garmin Ltd. or its subsidiaries, registered in the USA and other countries. GSD™, Garmin ClearVü™, and Garmin SideVü™ are trademarks of Garmin Ltd. or its subsidiaries. These trademarks may not be used without the express permission of Garmin. Airmar™ is a trademark of Airmar Technology Corporation and its subsidiaries.
- Brown for transducers made before February 1, 2007.
- Wires for terminals 1, 2, 3 are bundled together.
- If there are multiple bare wires, twist them together and connect to terminal 3.
- The device withstands incidental exposure to water of up to 1 m for up to 30 min. For more information, go to www.garmin.com/waterrating.


