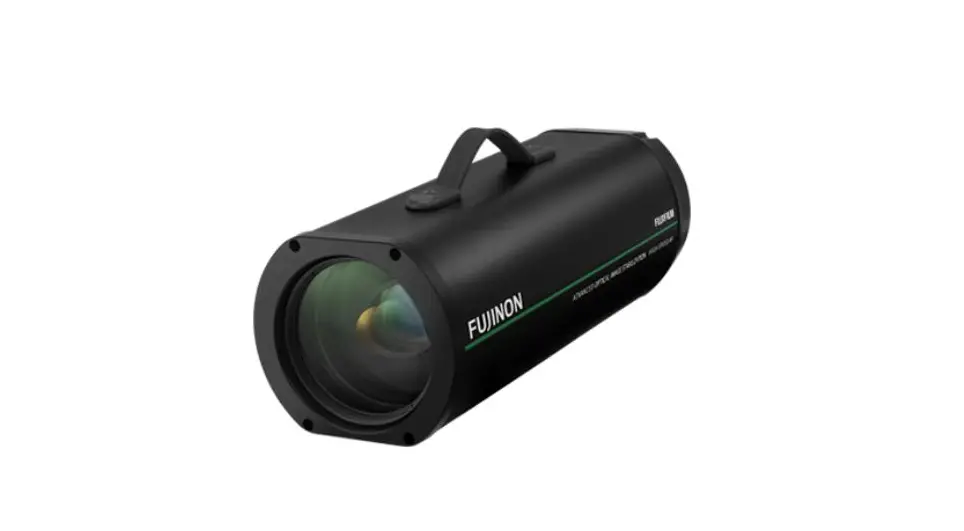
fujifilm sx800 Long Range Surveillance Camera
Safety Precautions
For Your Safety
This section lists important precautions that must be followed to ensure safe and correct use of the product. Read them before using the product and observe them during use.
The 4 WARNING and 4 CAUTION indications in this document indicate the following:
WARNINGS Failure to observe warnings could result in death or serious injury.
CAUTIONS Failure to observe cautions could result in injury or property damage.
WARNINGS
- Take all steps necessary to prevent water entering the product. Failure to observe this precaution could result in fi re or electric shock. Should water fi nd its way in, disconnect the power source immediately.
- Be sure the product is installed securely. Serious accidents could result should the product fall from a height.
- When working in high places, work with a partner or partners, use a safety line, and take all other precautions necessary to ensure safety. Slipping, falling, or loss of balance could result in serious accidents.
- When installing the camera in high places, ensure that people below keep their distance. Falling objects could cause serious accidents.
- Ensure that the surface on which the camera is installed is level. Failure to observe this precaution could cause the camera to fall, potentially causing serious accidents.
CAUTIONS
- Keep the product out of direct sunlight.
- Do not turn the product on without first confirming that the power supply is connected correctly.
- The product could cause injury if dropped during transport. Take all precautions necessary to ensure that the product is not dropped.
- Ensure that the voltage of the power supply matches the product’s rated voltage. Incorrect voltages could damage the product or result in fi re or electric shock.
- When connecting or disconnecting the power cable, hold the plug and not the cable. Damage to the cable could result in fi re or electric shock.
- Should you detect any abnormalities such as smoke, unusual noises or smells, or the presence of foreign matter inside the product, disconnect the power supply immediately and contact the original retailer.
- Do not disassemble or modify. Failure to observe this precaution could result in electric shock or product malfunction. Mal-functions or damage resulting from customers disassembling or modifying the product are not covered under warranty.
- Do not aim the camera at the sun. Direct sunlight focused through the lens could damage the product’s internal parts.
- Install the camera base down. Installing the camera in other orientations could lead to warping that may impair product performance.
GERNEL PERCUATIONS
- Use the product only as described in this manual.
- The camera and its accessories are precision devices. Under no circumstances should they be subjected to excessive force.
- Install the camera in a housing or other location where it will not be exposed to rain, wind, dust, or direct sunlight.
- Bringing the camera abruptly from a cold location to a warm and humid environment could cause the lens to fog. Take measures to allow the camera to adapt to the new environment before subjecting it to changes in temperature and humidity.
- Replace the cap if the camera will not be used for an extended period.
- The camera lens has a special anti-reflective coating. As a result, the back of the lens may appear spotted, but this has no effect on performance.
NOTICES
Verification
Model Number: SX800
Trade Mark: Fujifi lm
FCC RULE
This device complies with Part 15 of the FCC Rules.
Operation is subject to the following two conditions:
- This device may not cause harmful interference, and
- This device must accept any interference received, including interference that may cause undesired operation.
Cautions:
This equipment has been tested and found to comply with the limits for a Class A digital device, pursuant to part 15 of the FCC Rules.
These limits are designed to provide reasonable protection against harmful interference when the equipment is operated in a commercial environment.
This equipment generates, uses, and can radiate radio frequency energy and, if not installed and used in accordance with the instruction manual, may cause harmful interference to radio communications. Operation of this equipment in a residential area is likely to cause harmful interference in which case the user will be required to correct the interference at his own expense.
FCC Warning
To assure continued compliance, follow the attached installation instructions. This includes using the provided power cord and shielded interface cables when connecting to computer or peripheral devices. Also, any unauthorized changes or modifi cations to this equipment could void the user’s authority to operate this device.
For Cor Customers In Comers In Canada
CAN ICES-3(A)/NMB-3(A)
WARNING: This equipment is compliant with Class A of CISPR32. In a residential environment this equipment may cause radio interference.
This product complies with the following EU Directives:
- RoHS Directive 2011/65/EU
- EMC Directive 2014/30/EU
Compliance with these directives implies conformity to applicable harmonized European standards (European Norms) which are listed on the EU Declaration of Conformity issued by FUJIFILM Corporation for this product or product family.
This compliance is indicated by the following conformity marking placed on the product: This marking is valid for non-Telecom products and EU harmonized Telecom products (e.g. Bluetooth).
About the Icons
The symbols on the product represent the following:
| AC | |
| DC |
 | Class II equipment (The construction of the product is double-insulated.) |
Disposal of Elecisposal of Electrical and Electronic ionic Equipment in equipment in Private Households In the e Households In the European Union, Noropean Union, Norway,, Iceland and Liechel and Liechttenstenstein:
This symbol on the product, or in the manual and in the warranty, and/or on its packaging indicates that this product shall not be treated as household waste. Instead it should be taken to an applicable collection point for the recycling of electrical and electronic equipment. By ensuring this product is disposed of correctly, you will help prevent potential negative consequences to the environment and human health, which could otherwise be caused by inappropriate waste handling of this product.
Precautions for Use
Operating Environment
- The camera can be used at temperatures of from −10 to +50 °C (temperatures below freezing are only supported if the power supply is not interrupted) and at humilities of from 10 to 80% (no condensation).
- Prolonged use at high temperatures or humilities could degrade components, shortening product life.
- Do not install the product where it will be exposed to solvents or other chemicals.
Installation
- Do not install LAN or audio cables in close proximity to cables for fluorescent lights or other electrical devices. Failure to observe this precaution could impair sound or image quality. Move the cables if signal quality is affected.
- Using the product in close proximity to powerful electromagnetic fields, such as those produced by television transmitter antennas, electric motors, or transformers, could result in distorted or wavy pictures. Should this occur, use steel cable shielding.
- Use a Category 5 or better shielded twisted pair (STP) LAN cable for LAN connections.
- Plastic cable insulation may sometimes be damaged by crows or other birds. Protect cables using a cable conduit.
- Fix cables in place so that they are not subject to repeated vibration, friction, or tugging. Failure to observe this precaution could cause the cable to break.
- Install the product base down.
Use
- Do not aim the lens directly at the sun or other bright light sources or reflections. Failure to observe this precaution could result in deterioration of the image sensor color filter, affecting picture color.
- Do not subject the product to strong physical shocks or vibration. Failure to observe this precaution could result in product malfunction.
- Clean the product with a soft, dry cloth. Never use chemically-treated cloths or solvents such as benzine (petroleum ether), thinner, or alcohol. Failure to observe this precaution could cause warping or discoloration.
- Do not apply force to the connectors when handling the product. Failure to observe this precaution could result in the product being disconnected or damaged.
Network Settings
- You will need to supply an IP address, subnet mask, and gateway IP address.
- The frame rate may drop if multiple streams are transmitted via unicast.
- When connected to multiple devices, the product will transmit data to all devices at the rate supported by the device with the slowest receiving rate.
Introduction
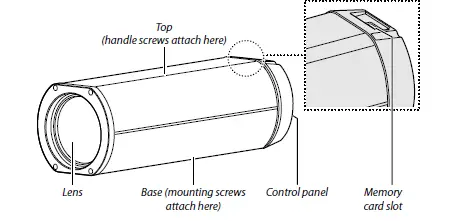
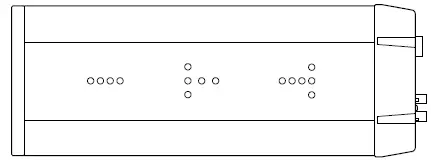
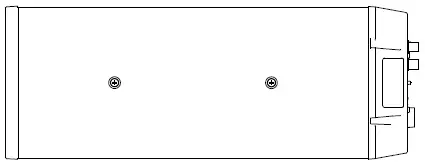
Parts of the Camera
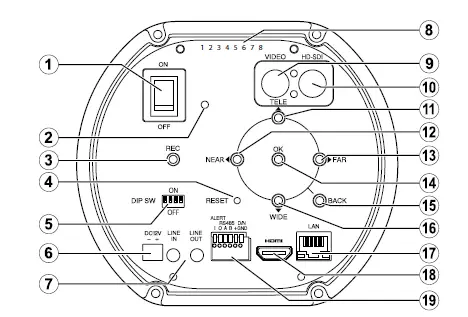
The Control panel
| Item | Name |
| A | Power switch |
| B | Power lamp |
| C | REC (record) button |
| D | RESET button |
| E | DIP switches (4 bits) |
| F | Power connector |
| G | Audio input/output connectors |
| H | Serial number |
| I | Video output connector |
| J | HD-SDI output connector |
| K | TELE button |
| L | NEAR button |
| M | FAR button |
| N | OK/MENU button |
| O | BACK button |
| P | WIDE button |
| Q | LAN connector |
| R | HDMI connector |
| S | Six-pin connector |
Installation and Connection
Installation
Use the screw holes on the base to secure the camera to a mount or other surface.
WARNING: Attach the product securely to a surface that can safely bear the combined weight of the camera and associated hard-ware. Do not mount the camera in unstable locations or locations subject to frequent vibration or attach it to weak materials such as drywall, ALC (autoclaved lightweight concrete), concrete blocks, or plywood. Injury could result should the product fall from its mounting.
CAUTIONS:
- Use ¼ ʺ, UNC 20 thread screws with a thread engagement length of 6.5 to 10 mm.
- Install the camera base down
A handle can be attached using the screws on top of the camera.
CAUTIONS:
- Use M4 screws with a thread engagement length of at least 4 mm and a protrusion of no more than 6 mm.
- Do not use the screw holes on top of the camera for any other purpose.
Screw hole Specification:
The specifications for the screw holes on the top and base of the camera are as follows:
| Top | M4 | 2 | Pass through (threaded depth 4 mm) | 80–100 N•cm |
| Base | ¼ʺ, UNC 20 thread | 15 | 10 mm | 240–300 N•cm |
Connection Schematic
The schematic below illustrates how the camera can be installed for use in IP mode.

When the camera is connected to a computer in IP mode, camera settings can be adjusted using dedicated software. An ONVIF application can be used to view the live feed and control the camera.
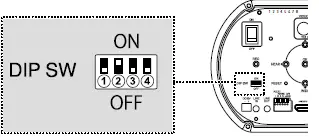
Operating Mode Selection: DIP Switches
Use the DIP switches to select the operating mode.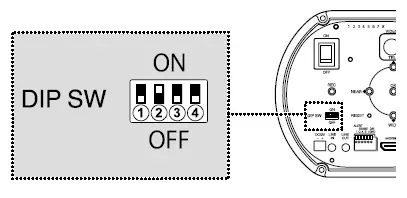
| Operating mode | DIP switch | |||
| A | B | C | D | |
| IP | OFF | ON | OFF | OFF |
| RS485 | ON | OFF | OFF | OFF |
| Stand-alone | ON | ON | OFF | OFF |
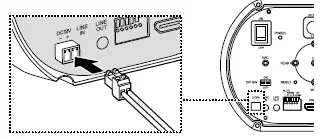
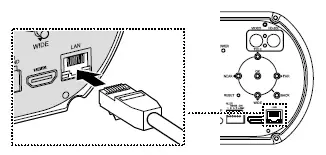
Connecting to a Computer
- Connect the supplied plug to the power cable and plug the cable into the camera power connector.

- Use an Ethernet cable to connect the camera to a computer.

- Select IP mode by setting DIP switch B to “ON” and DIP switches A, C and to off

TIPS: For information on using remote-control mounts or ONVIF-compatible control units, see the documentation provided with the device.
Viewing and Recording the Live Feed
The camera’s live feed can be viewed and recorded using a web browser.
Launching a Web Browser
| Supported operating systems | Windows 10 |
| Supported web browsers | Google Chrome 71 or later |
For information on using the web browser, see the browser’s online help. To connect to the SX800, you will need to assign it an appropriate IP address. The default IP address and subnet mask assigned to the camera at shipment are as follows:
| IP address | 192.168.1.10 |
| Subnet mask | 255.255.255.0 |
- Turn on the camera and computer.
- Launch a web browser.
- Enter the product IP address in the address bar (“http://[IP address]”).
- Enter a user name and password. At shipment, the user name and password fields are blank.
- Click OK.

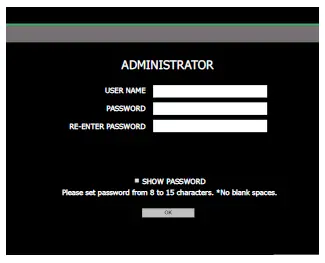
TIPS:
- Enter a user name and password, both of which can be from 8 to 15 characters long. Take all steps necessary to protect the password.
- The camera must then be re-initialized in stand-alone mode as described below.
- Note that this deletes all existing accounts.
- A Turn the camera off .
- B Select stand-alone mode using the DIP switches on the rear control panel (page 7).
- C Turn the camera on.
- D Press and hold the OK/MENU button on the rear control panel for 3 seconds to display the menus.
- E Select IP ADDRESS SETTINGS RESET in the setup menu. F Turn the camera off and return to Step 3 of “Connecting to a Computer” (page 8).
- Note: For more information, see the Owner’s Manual: Stand-Alone Mode.
- Note that this deletes all existing accounts.
Preferences
Adjust camera settings.
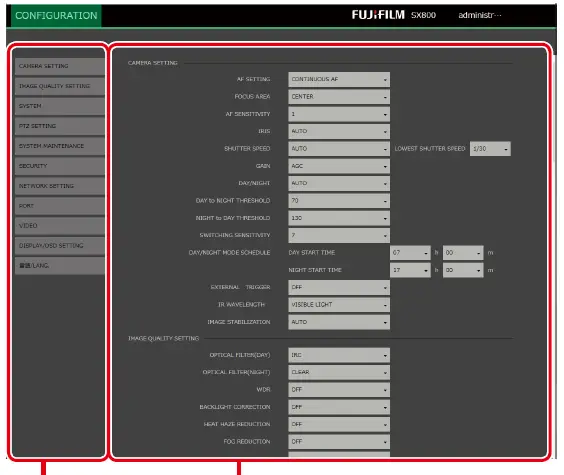
Choosing a category (A) displays the associated settings (B).
| Category | Description |
| CAMERA SETTING | Adjust basic camera settings. |
| IMAGE QUALITY SETTING | Adjust image quality settings. |
| SYSTEM | View the firmware version and other information. You can also set the camera clock and adjust other system-related settings. |
| PTZ SETTING | Adjust settings for remote-control mounts. |
| SYSTEM MAINTENANCE | Restart the camera, update camera firmware, and perform other forms of system maintenance. |
| SECURITY | Adjust network security settings. |
| NETWORK SETTING | Adjust basic network settings. |
| PORT | Choose ports for HTTP or RTSP. |
| VIDEO | Adjust video system and streaming settings. |
| DISPLAY/OSD SETTING | Adjust display settings. |
| 言語/LANG. | Choose a language for camera menus and displays. |
CAUTION: Do not insert or remove memory cards while the camera is on. Failure to observe this precaution could corrupt image damage the memory card.
CAMERA SETTING
Adjust basic camera settings.
AF SETAF SETTINGTING
Choose how the camera focuses when autofocus is enabled via ONVIF.
| Options | ||
| CONTINUOUS AF | QUICK AF | ONE PUSH A |
FOCUS AREA
Choose how the camera selects the focus area when CONTINUOUS AF is selected for AF SETTING .
| Option | Description |
| CENTER | The camera focuses on the subject at the center of the frame. |
| AREA | The frame is divided into a three-by-three grid for focus-area selection. |
AF SENSITIVITYY
Choose how long the focus system will continue to track the current subject after a new subject enters the focus area at a diff er-ent distance from the camera. The higher the value, the longer the camera will wait before switching subjects.
IRISIRIS
Choose the aperture value (iris). See “Specifications” (page 27) for supported values.
SHUTTER SPEEDTER
Choose the shutter speed.
| Option | Description |
| AUTO | The camera adjusts shutter speed automatically. You can choose the minimum shutter speed. |
| MANUAL | Choose the shutter speed manually. |
GAIN
Adjust image brightness.
| Option | Description |
| MANUAL | Choose a value for gain. |
| AGC | The camera adjusts gain automatically to brighten the image when lighting is poor. |
| HYPER-AGC | Choose for automatic gain control adapted to low light conditions. |
DAY/NIGHT
In day/night mode, the camera records in color when the subject is brightly lit and in black-and-white when the subject is poorly lit. This option is available when OFF is selected for EXTERNAL TRIGGER.
| Option | Description |
|
AUTO | The camera selects day or night mode automatically according to lighting conditions. You can choose the lighting conditions that trigger the switch when AUTO is selected:
|
| SCHEDULED | The camera switches to day or night mode at a selected time.
|
|
AUTO & SCHEDULED |
|
| DAY | The camera operates in day mode at all times. |
| NIGHT | The camera operates in night mode at all times. |
EXTERNAL TRIGGER
Choose whether day/night selection is performed in response to an external trigger.
| Option | Description |
| ON(VLC) | Applies a VLC (Visible Light Cut) filter to the external trigger. The optical filters selected for day/night are disabled. |
| ON(CLEAR) | Replaces the filter with clear glass. The optical filters selected for day/night are disabled. |
| OFF | The camera does not respond to the external trigger. |
IR WAVWLENGHT
Match the IR wavelength to the infrared light source used. See “Specifications” (page 27) for supported values.
IMAGE STABILIZABILIZAATION
Choose an image stabilization option adapted to the scene.
| Option | Description |
| AUTO | The camera chooses the type of image stabilization best suited to the scene. |
| OIS | Reduce the effects of camera shake using optical image stabilization. |
| EIS | Reduce the effects of camera shake using electronic image stabilization. |
| OFF | Image stabilization disabled. |
Lighting Triggers
Day/night selection can be configured in any of the following three ways:
| Configuration | Description | Configured using | |
| Menu item | Option | ||
| A Auto | Day/night selection is performed automatically according to a schedule and/or lighting conditions. | CAMERA SETTING > DAY/NIGHT | AUTO, SCHEDULED, |
| B Manual | Day/night selection is performed manually. | DAY or NIGHT | |
| C External trigger | Day/night selection is performed in response to input from an external trigger. | CAMERA SETTING > EXTERNAL TRIGGER | ON(VLC) *, ON(CLEAR) *,or OFF |
The optical filters chosen for day/night do not apply if a signal is received from the external trigger when ON(VLC) or ON(CLEAR) is selected for EXTERNAL TRIGGER. If no signal is received or if OFF is selected, the optical filter will function as shown in the following table.
The following table shows relation between the filter selected for day/night, image color, and wavelength:
|
Option |
Filter |
Image color | CONFIGURATION > CAMERA SETTING > IR WAVELENGTH | |
| Status | Supported wavelengths | |||
| DAY | IRC | Color | Disabled | Visible light only 808 nm only |
| VLC | Black and white | |||
| NIGHT | CLEAR | Enabled | 950 nm, 940 nm, 850 nm, 808 nm, visible light | |
| VLC | ||||
IMAGE QUALITY SETTING
Adjust image quality settings.
OPTICAL FILTER (DAY)
Choose an optical filter for day mode.
| Option | Description |
| IRC | Enable the IRC filter, blocking infrared light and recording only visible-light footage. |
| VLC | Enable the VLC filter, blocking visible light and recording only infrared footage. |
OPTICAL FILTER(NIGHT)
Choose an optical filter for night mode.
| Option | Description |
| CLEAR | Record footage in both infrared and visible light. |
| VLC | Enable the VLC filter, blocking visible light and recording only infrared footage. |
WDR
Use with high-contrast subjects to reveal details “washed out” in the highlights and lost in the shadows. Choose higher values
for high-contrast subjects.
BACKLIGHT CORRECTION
Reduce loss of detail in the shadowed areas of backlit subjects. The higher the value, the greater the effect.
HEAT HAZE REDUCTION
Reduce the wavering effect of heat haze, making the image clearer overall. The higher the value, the greater the effect.
FOG REDUCTION
Make images where the subject is obscured by fog more vivid and easier to see. The higher the value, the greater the effect.
NOISE REDUCTION
Reduce the effects of noise for a smoother picture. The higher the value, the greater the effect.
DIGITAL ZOOM
Choose the zoom factor for digital zoom.
| Options | ||||
| OFF | 1.25× | 1.5× | 1.75× | 2× |
USE SETTING
Choose a shooting preset.
| Option | Description |
| SURVEILLANCE | Emphasize outlines. |
| MOVIE PRODUCTION | Choose for accurate color reproduction when shooting non-surveillance footage at social gatherings or other events. |
BRIGHTNESS
Adjust brightness. The further the slider is to the right, the greater the effect.
CONTRAST
Adjust contrast. The further the slider is to the right, the greater the effect.
SATURATION
Adjust color saturation. The further the slider is to the right, the greater the effect.
Make outlines more or less sharply defined. The further the slider is to the right, the greater the effect.
WHITE BALANCE
Match white balance to the light source (for example, sunlight or artificial lighting).
| Option | Description |
| AUTO | The camera adjusts white balance automatically. |
| AUTO WHITE PRIORITY | The camera sets white balance to a high level. |
| CUSTOM 1/CUSTOM 2 | Measure a value for white balance using a piece of paper or other white reference object. |
| FINE | For subjects lit by direct sunlight. |
| SHADE | For subjects in the shade or under overcast skies. |
| COLOR TEMPERATURE | Choose a color temperature (3000K, 5000K, or 9000K). |
TIP: After choosing an option for white balance, you can adjust white balance shift.
SYSTEM
View the firmware version and other information. You can also set the camera clock and adjust other system-related settings.
MODEL NAME
View the camera model name.
SERIAL NO.
View the product serial number.
FW VER.
View the camera firmware version.
APPLICATION VER.
View the application version.
TIME ZONE
Choose a time zone.
NTP SERVER ADDRESS
Enter the IP address for the NTP (Network Time Protocol) server.
PORT NUMBER
Choose the NTP server port.
CHECKING INTERVAL
Choose how often the camera checks the NTP server port.
PRIORITY OF TIME SETTING
Choose whether the time display matches the camera’s internal clock (DEVICE) or the time reported by the NTP server (NTP).
| Option | Description |
| DEVICE | The display shows the time reported by the camera’s internal clock. |
| NTP | The display shows the time reported by the NTP server. |
IN-CAMERA TIME SETTING
Set the camera clock.
ABOUT DEVICE
View OSS information.
PTZ SETTING
Adjust settings for remote-control mounts.
TIP You will need to turn the camera off and then on again after adjusting settings in this menu.
RS485 BAUD RATE
Choose the baud rate for data transmitted via RS485.
| Options | |||||
| 115200bps | 38400bps | 19200bps | 9600bps | 4800bps | 2400bps |
RS485 ID
Choose the RS485 ID (1–31).
RS485 TERMINATION
Select ON to enable the RS485 termination resistor.
PTZ POSITION INQUIRY
Choose whether the camera queries remote-control mounts for pan and tilt positions.
CAUTION Select ON when using the camera with remote-control mounts that support position queries.
Pelco-P/Pelco-D
Choose a communications protocol.
PELCO CMD INTERVAL
Choose the interval at which the camera sends Pelco commands to remote-control mounts (10–300 msec).
SYSTEM MAINTENANCE
Restart the camera, update camera firmware, and perform other forms of system maintenance.
REBOOT
Select OK to restart the camera.
RESET SETTINGS
Select OK to restore camera settings to their default values. Items in the following menus are not aff ected:
NETWORK SETTING
IMPORT CONFIGURATION FILE
Import settings from a camera settings fi le. Click BROWSE and choose a settings fi le created using EXPORT TO CONFIGURATION FILE.
EXPORT TO CONFIGURATION FILE
Export camera settings. Click OK to download the settings folder.
FW UPDATE
Update the camera firmware. Click BROWSE and select the fi le containing the new firmware version to begin the update.
COPY LOG DATA
Save a copy of camera logs. Click BROWSE, choose a destination, and click OK to save the logs.
CHANGE PASSWORD
Change the camera login password.
SECURITY
Adjust network security settings.
RTSP AUTHENTICATION
Choose an RTSP authentication method (DISABLE, BASIC, or DIGEST).
RTSP AUTHENTICATION ALGORITHM
Choose an algorithm for DIGEST authentication (MD5 or SHA256).
HTTP AUTHENTICATION
Choose an HTTP authentication method (BASIC or DIGEST).
TIP The MD5 authentication algorithm is used for HTTP. Users wishing to switch to SHA256 can do so via CGI commands. This service
can be requested from your retailer.
NETWORK SETTING
Adjust basic network settings.
IPv4 ADDRESS
Enter the camera’s IPv4 address.
IPv4 SUBNET MASK
Enter the camera’s IPv4 subnet mask.
IPv4 DEFAULT GATEWAY
Enter the camera’s default IPv4 gateway.
MAC ADDRESS
View the camera’s MAC address.
IPv4 MTU
Choose the maximum volume of data that can be transmitted per packet (frame).
PRIORITY DNS SERVER
Enter the IP address of the primary DNS server.
SECONDARY DNS SERVER
Enter the IP address of the secondary DNS server.
IPv4 ADDRESS
Choose how the camera’s IPv4 address is assigned.
| Option | Description |
| DISABLE | The camera is not assigned an IPv4 address. |
| MANUAL | Enter the camera’s IPv4 address manually. |
| AUTO (DHCP) | Enable automatic IPv4 address allocation via the Dynamic Host Configuration Protocol (DHCP). |
PORT
Adjust port settings.
HTTP PORT
Choose the HTTP port.
RTSP PORT
Choose the RTSP port.
VIDEO
Adjust video settings.
VIDEO SYSTEM
Choose the standard (NTSC (60 Hz) or PAL (50 Hz)) used for video output from the camera.
VIDEO FORMAT
Choose the frame size for video shot using the camera.
ASPECT FOR VIDEO
Choose how video is displayed on monitors with an aspect ratio that does not match the selected format.
| Option | Description |
| SIDE CUT | The image is cropped to fit the display. |
| LETTERBOX | The image is displayed at its original aspect ratio with black bars above and below. |
| SQUEEZE | Video with an aspect ratio of 16∶9 is reformatted to fit displays with a 4∶3 aspect ratio. |
BIT RATE
Choose whether streaming video is encoded at a FIXED or VARIABLE bit rate. Note that this option is available only when H.264
encoding is selected.
VIDEO QUALITY
Choose the output quality for streaming video (HIGH, STANDARD, or LOW). Note that this option is available only when H.264
encoding is selected.
FRAME RATE
Choose the frame rate for streaming video from values between 1 and 30 fps.
ENCODING
Choose an encoding for streaming video.
I FRAME INTERVAL
Choose the I-Frame interval for streaming video.
DISPLAY/OSD SETTING
Adjust display settings.
DATE DISPLAY
Select ON to show the date in the live feed.
TIME DISPLAY
Choose whether times are displayed using a 12- or 24-hour clock.
DATE DISPLAY FORMAT
Choose the order in which the year, month, and day are displayed.
LANG
Choose a language for camera menus and displays.
Troubleshooting
Should the product fail to function as expected, consult the table below. If you are unable to fi nd a solution here, contact your local Fujifi lm distributor.
| Problem | Solution |
|
No video, or the image in the video is dark. |
|
| The image in the video is “washed out”. |
|
| The image in the video is out of focus. Spots appear in the video. |
|
Defaults
Selecting OK for SYSTEM MAINTENANCE > RESET SETTINGS restores settings to the following default values:
CAMERA SETTING
| Option | Default |
| AF SETTING | QUICK AF |
| FOCUS AREA | CENTER |
| AF SENSITIVITY | 1 |
| IRIS | AUTO |
| SHUTTER SPEED | AUTO (1/30) |
| GAIN | AGC |
| DAY/NIGHT | AUTO
|
| EXTERNAL TRIGGER | OFF |
| IR WAVELENGTH | VISIBLE LIGHT |
| IMAGE STABILIZATION | AUTO |
IMAGE QUALITY SETTING
| Option | Default | ||
| OPTICAL FILTER(DAY) | IRC |
NETWORK SETTING | |
| OPTICAL FILTER(NIGHT) | CLEAR | ||
| WDR | OFF | ||
| BACKLIGHT CORRECTION | OFF | ||
| HEAT HAZE REDUCTION | OFF | ||
| FOG REDUCTION | OFF | ||
| NOISE REDUCTION | 2 | Option | Default |
| DIGITAL ZOOM | OFF IPv4 ADDRESS | 192.168.1.10 | |
| USE SETTING | SURVEILLANCE IPv4 SUBNET MASK | 255.255.255.0 | |
| BRIGHTNESS | 50 IPv4 DEFAULT GATEWAY | 192.168.1.254 | |
| CONTRAST | 50 MAC ADDRESS | — | |
| SATURATION | 50 IPv4 MTU | 1500 | |
| SHARPNESS | 70 PRIORITY DNS SERVER | 192.168.1.254 | |
| WHITE BALANCE | AUTO | SECONDARY DNS SERVER | — |
| IPv4 ADDRESS | MANUAL | ||
SYSTEM
| Option | Default | |||
| MODEL NAME | — | Option | Default | |
| SERIAL NO. | — DATE DISPLAY | ON | ||
| FW VER. | — TIME DISPLAY | 24H | ||
| APPLICATION VER. | — | DATE DISPLAY FORMAT | MM-DD-YYYY | |
| TIME ZONE | — | 言語/LANG | ||
| IN-CAMERA TIME SETTING | — | |||
| ABOUT DEVICE | ||||
PTZ SETTING
| Option | Default |
| RS485 BAUD RATE | 9600bps |
| RS485 ID | 7 |
| RS485 TERMINATION | ON |
| Pelco-P/Pelco-D | Pelco-D |
SYSTEM MAINTENANCE
| Option | Default |
| REBOOT | — |
| RESET SETTINGS | — |
| IMPORT CONFIGURATION FILE | — |
| EXPORT TO CONFIGURATION FILE | — |
| FW UPDATE | — |
| COPY LOG DATA | — |
SECURITY
| Option | Default |
| RTSP AUTHENTICATION | BASIC |
| RTSP AUTHENTICATION ALGORITHM | MD5 |
| HTTP AUTHENTICATION | BASIC |
Specifications
| Model | FUJIFILM SX800 |
| Focal length | 20–800 mm |
| Optical zoom | 40× |
| Digital zoom | 1.25×, 1.5×, 1.75×, 2× |
| Iris range | f/4–f/16 |
| Minimum object distance (M.O.D.)* | 10 m “at focal lengths of 20–400 mm” 20 m “at focal lengths of 401–800 mm” |
| Image sensor | CMOS sensor |
| Video |
|
| Frame size | 1920 × 1080, 1280 × 720, 640 × 480 (NTSC), 768 × 576 (PAL) |
| Metering | Average |
| Focus modes | Continuous AF, quick AF, MF |
| Aperture selection | Auto, f/4–f/16 |
| Shutter speed | Auto (with minimum speed selection of s) |
| Gain adjustment | Manual (ISO 400 – ISO 819200), AGC, HYPER AGC |
| Day/night selection | AUTO, SCHEDULED, AUTO & SCHEDULED, DAY, NIGHT |
| Wavelengths | VISIBLE LIGHT, 950 nm, 940 nm, 850 nm, 808 nm |
| Image stabilization | Available (AUTO, OIS, EIS, OFF) |
| Wide dynamic range | Selectable (2 levels) |
| Back light compensation | Selectable (2 levels) |
| Heat haze reduction | Selectable (3 levels) |
| Fog reduction | Selectable (3 levels) |
| Noise reduction | Selectable (3 levels) |
| Shooting Mode Preset | SURVEILLANCE, MOVIE PRODUCTION |
| Brightness | Selectable (100 levels) |
| Contrast | Selectable (100 levels) |
| Saturation | Selectable (100 levels) |
| Sharpening | Selectable (100 levels) |
| White balance | AUTO, AUTO WHITE PRIORITY, CUSTOM 1, CUSTOM 2, FINE, SHADE, COLOR TEMPERATURE (choose a color temperature in degrees Kelvin from 3000K, 5000K, and 9000K) |
| Image output connectors | HDMI, HD-SDI, composite (BNC) |
| Audio input/output |
|
| Video output |
|
| External interface | 100BASE-T, RS-485, external trigger (DAY/NIGHT) |
| Baud rate | 152000 bps, 38400 bps, 19200 bps, 9600 bps, 4800 bps, 2400 bps |
| Internet protocol | ONVIF (port number 8080) HTTP, RTSP |
| RS-485 protocol | Pelco D, P (includes custom commands) |
| Power source | DC 12 V |
| Power consumption | 9.5 W |
| Dimensions (W × H × D) | 156 mm × 139 mm × 410 mm/6.14 in. × 5.47 in. × 16.14 in. |
| Weight | Approx. 6.4 kg/14.11 lb |
| Operating environment |
|
| Tilt limit |
- From the foremost part of the forward lens.


