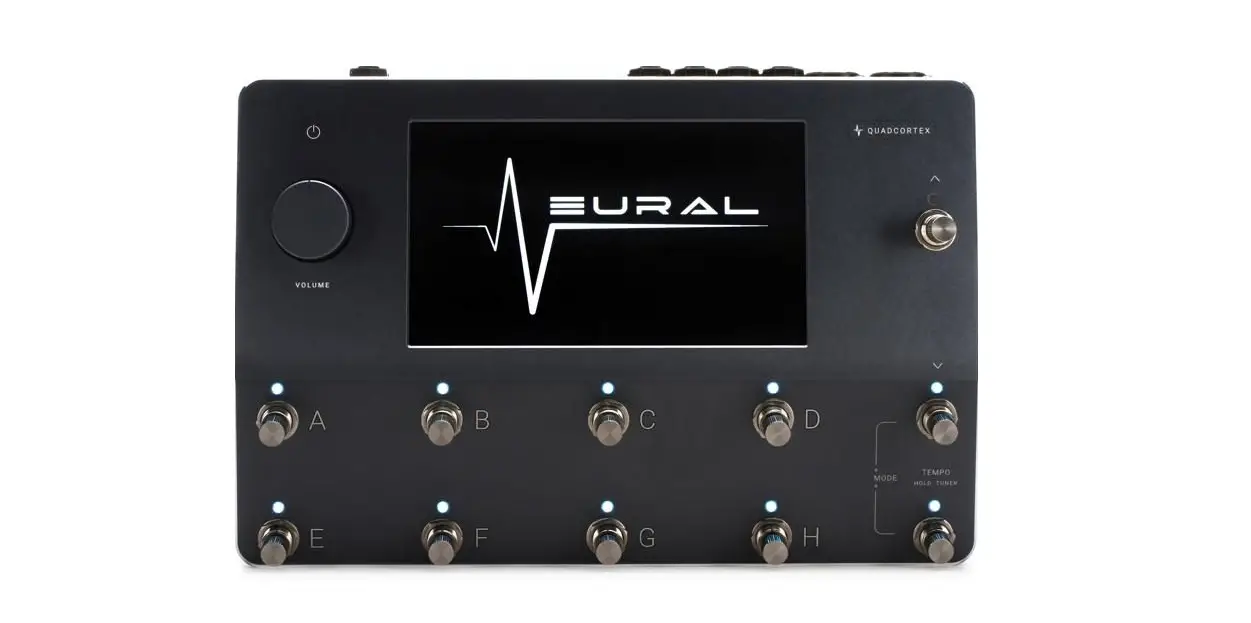
NEURAL QUAD CORTEX Quad-Core Digital Effects Modeler

Turning On/Off
To turn Quad Cortex on, connect the power cable to the input on the back and wait for it to power up. To turn Quad Cortex off, tap and hold the power button for a second and release it. After that, tap the Removing the power cable from the back is also safe!
I/O Settings
The I/O Settings gives you an overview of Quad Cortex’s inputs and outputs. To access it, swipe down from the top of the screen. Inactive inputs are grey; active inputs are white. Plug something in and see a grey input instantly change to white. Tapping any I/O device displays a menu that shows further information and allows you to control its parameters. Adjust parameters by using the multi-touch display or by rotating the corresponding footswitch for rotary controls.
You can independently adjust the gain of inputs & outputs as well as toggle between Instrument and Microphone settings. +48v Phantom Power is available. Input impedance can be set for each input and there is a Ground Lift option available too. Headphone settings allow you to create a separate mix by controlling the levels from the outputs being used on The Grid. You can also calibrate and configure expression pedals via the I/O Settings.
Quad Cortex features:
Dual Combo Inputs: TS, TRS, and XLR. Variable impedance and level controls. Built-in microphone preamps. +48v Phantom Power. Dual Effects Loops: Ideal for embedding external mono or stereo effects into your signal chain. These double-up as additional input/output jacks. 1/4” Output Jacks: Two mono, balanced (TRS) outputs provide pristine sound quality and optimal noise performance. XLR Output Jacks: Two mono, balanced XLR output jacks.
Headphone Output: Ideal for quiet practicing. MIDI In, Out/Thru: Send and receive MIDI messages to automate switching and control of parameters in Quad Cortex and control other units. Dual Expression Inputs: Connect up to two expression pedals. USB: Ultra-low latency audio transmission, firmware updates, MIDI, and more. Capture Out: Used for our biomimetic AI technology, Neural Capture. WiFi: Used for cable-free firmware updates, backups, and Cortex Cloud functionality.
Modes
Quad Cortex features three modes to give ultimate control over virtual devices and footswitch customization:Switch between them by tapping the name of the mode currently active at the top-right of the display or press the furthest-right footswitches on the bottom two rows together.
Stomp Mode allows you to assign any device to a footswitch so that you can toggle it on and off. Use the up & down footswitches to navigate through Presets. Scene Mode allows you to specify a footswitch to activate and control the settings of any number of devices in a rig. Footswitch A could toggle an overdrive pedal through an amp & cabsim for a heavy rhythm tone; Footswitch B could toggle an additional overdrive as well as stereo reverb and delay for a beautifully saturated lead tone. Use the up & down footswitches to navigate through Presets. Preset Mode gives you instant access to eight virtual rigs – one on each footswitch. While Scene Mode allows you tao toggle the parameters of any number of devices in one rig, Preset Mode will enable you to have eight completely different rigs. Use the up & down footswitches to navigate through banks of Presets in your Setlist. Building & editing a rigWe call the screen where you can add devices to build a virtual rig, “The Grid”. The Grid has four rows of eight device blocks.Start by tapping on The Grid to add your first device; this will open the Device Category list. Scroll down by swiping with your finger and tap a device category to display its devices.

Tap a device in the list to add it to The Grid. You can also tap the icons on the left to return to the Device Category list. Build a virtual rig from left to right. While it’s important to remember how you might approach building a signal chain with analog components, dragging and dropping a device after you’ve added it to The Grid is effortless. If you add an amp and cab first but need to add an overdrive pedal in front after, repositioning everything is as simple as dragging and dropping the devices into the order you require.
Once you have added a device to The Grid, tap it to open its menu.From here, several controls are available to you. Footswitches will light up and correspond to any controls on the device you’ve added. Parameters such as gain can be controlled either by rotating the footswitch or interacting with the multi-touch display. When a device menu is open, you can tap the icon to reveal further options. From here, you can tap “Change device” to replace the device with another. “Reset to defaults” to reset the device’s parameters. “Set parameters as defaults” to always use these settings when you add this device to a rig, or “Remove device from the grid” to remove it from The Grid entirely. Expression pedal controls are also available here.
In Stomp Mode, devices get assigned to footswitches in the order they were added to The Grid. You can assign a device to any footswitch by opening its menu and tapping the Assign to switch button.Change the parameters, then press
“Done”. Repeat this for any of the devices in your rig. Now when you press Footswitch A or Footswitch B, Quad Cortex will navigate between these two scenes. To remove a parameter from all Scenes, tap the Scene icon next to the parameter and confirm the changes in the popup in the device having no footswitch assigned to it. In Scene Mode, you can change parameters or bypass settings for any device added to your rig. Open a device’s settings and set the parameters how you’d like them in Scene A. Then move to Scene B by tapping the arrow to the right of “Scene A”.
Saving Presets
To save a rig as a Preset, click the icon at the top-right corner. You can also use the contextual menu at the top-right and tap “Save as…” to save a rig as a new Preset. “Save as…” is helpful if you have modified a Preset and want to save your changes as a new Preset, as tapping the save icon will overwrite the active Preset with your modifications. In the save menu, you can name your Preset as well as assign it tags. You can use tags to filter Presets on Cortex Cloud. You can also choose the Setlist in which the Preset is saved.
Setlists
Setlists are Quad Cortex’s way of making Presets incredibly easy to use and navigate. A Setlist can contain 32 banks of eight Presets. Setlists allow users to categorize their Presets by band, project, album, or anything else!To create a new Setlist, tap the active Preset’s name at the top of The Grid to button at the top-right corner. Give your Setlist a name, then tap “Create” at the bottom-right corner.
By default, Presets will save in the “My Presets” Setlist. To change the active Setlist, open the Directory, navigate to the Setlist you’d like to activate, choose a bank number, then tap one of the Preset names on the right.
Gig View
- Gig View allows you to visualize what the footswitches are assigned to instantly. This visualization utilizes the entire screen.
- Stomp Mode: Gig View shows you the device assigned to each footswitch.
- Scene Mode: Gig View shows you the Scene assigned to each footswitch. You can change the names of your scenes.
- Preset Mode: Gig View shows you the Preset assigned to each footswitch. Tap the active footswitch a second time to show an enlarged view of the current Preset.

Access Gig View by swiping up from the bottom of the screen on The Grid.
Routing inputs & outputs
Quad Cortex gives you complete control over the routing of your inputs & outputs. You can even repurpose the two effects loops as additional inputs/outputs to allow for rigs with four instruments and various output customizations.
By default, The Grid will build a signal chain that processes the instrument connected to In 1 and route it out of Out 1 & Out 2. You can tap “In 1” on the left and “Out 1/2” on the right to change the inputs & outputs used. For example, you might want to switch from using a stereo out on Out 1/2 to a mono out using Out 3.
Splitting & mixing signal chains
You can use splitters and mixers for more advanced routing options. For example, you might want to send a stereo signal with a cabsim to a front of house engineer, but a separate signal without a cabsim to a cabinet on stage.1/2” on The Grid and select Out 3. Then press and hold on The Grid to bring up the Splitter menu. Drag-and-block and press “Done”. Your rig’s signal now splits before the cabsim, and Out 3 will send a mono signal through Output 3.
WiFi updates
Quad Cortex downloads updates wirelessly, negating the need to connect it to a computer with a USB cable. To connect to WiFi, tap the contextual menu at the top-right of The Grid, then tap “Settings”.
From the Settings menu, tap “WiFi”.
Give Quad Cortex a few seconds to scan the available networks, tap the one you want to join, then enter its password using the on-screen keyboard. Once you’re connected to WiFi, tap “Device Options” in the Settings menu, then “Device updates”.
Tap tCHECK FOR UPDATES o search for the most recent version of CorOS. You will need to reboot Quad Cortex to finish applying the updates.
Assigning expression pedals
You can assign an expression pedal to any device, and it can control multiple parameters at once. It’s important to remember to calibrate your expression pedal via the I/O Settings menu.You can assign an expression pedal to any device, and it can control multiple parameters at once. To assign an expression pedal, tap a device on The Grid, tap the contextual menu, then tap Assign Expression Pedal. 
Select the expression pedal you want to use to control the device’s parameters. Use the ASSIGN button to assign parameters to the expression pedal, and use the button to modify the minimum and maximum values accessible in the pedal’s sweep. Assign Expression Pedal Please choose which parameters you wish to control. You can assign more than one at once.
Creating a Neural Capture
Neural Capture is Quad Cortex’s flagship feature. Built using our proprietary biomimetic AI, it can learn and replicate the sonic characteristics of any physical amplifier, cabinet, and overdrive pedal with unprecedented accuracy.
To create a Neural Capture you need to be able to mic up a cabinet or use an amplifier with a load box or D.I. Out. Start by tapping the contextual menu at the top-right corner of The Grid, then tap “New Neural Capture” 
Follow the on-screen instructions regarding how to connect your instrument and your microphone(s)/amplifier D.I. The entire process takes less than five minutes, after which your Capture will be ready to save to your device. Captures that you have created as well as Captures downloaded from Cortex Cloud are available as virtual devices you can add to The Grid under “Neural Capture”. It is possible to Capture overdrive pedals independently, as well as part of a signal chain.Neural Capture Connect Capture Out to the input of the target device

Cortex Cloud
Once you create a Neural DSP account, your Quad Cortex is ready to send and receive Presets, Neural Captures, and Impulse Responses. You can also use Cloud Backups When you upload a Preset or Neural Cortex Cloud Capture to Cortex Cloud its privacy status is made Private by default. To change it so that it is available to the public, edit it in the Cortex Mobile app.
Uploading Impulse Responses
- To add IRs to your Quad Cortex you need to use the IR Library on our website.
- Login to your Neural DSP account.
- Click on Cortex Cloud.
- Click on IR Library.

Drag-and-drop impulse response files from your computer to the upload area. Alternatively, use the “Upload” button. Click on Save to finish.


Importing Impulse Responses
- On your Quad Cortex, open the Directory and navigate to the Impulse Responses folder beneath Cloud Directories.
- Tap the “Download” button on the IRs you’d like to use, or tap the “Download all” button at the top to download all available IRs to your Quad Cortex.
- IRs will be downloaded to the Impulse Responses folder beneath Device Directories and will fill any available slots. You can rearrange them by dragging and dropping.
Using Impulse Responses
- Add a Cabsim block to The Grid and open its settings.
- when the Impulse selector box and tap the “Load IR” button.
- Choose the IR you’d like to use.
Cortex Mobile
Discover Users, Presets, and Neural Captures using Cortex Mobile. The web version of Cortex Cloud is now available at neuraldsp.com/cloud. Adding friends In the Cortex ecosystem, friends can share items with each other even if they are private. To become friends with somebody, you both have to follow each other.
- Use the search function on the Discovery page to search for another user.
- Tap the “Follow” button next to the user you wish to follow. The status will change to “Following”.
- When they follow you back, you will be friends, and will see each other on your friends lists.
- You can share items with each other from Quad Cortex or Cortex Cloud, even if they are private.
- Shared items will be available to download on Quad Cortex in Directory > Shared with me.


Downloading public items from other users
Presets and Neural Captures that are made public can be downloaded by anybody.
- On Cortex Mobile find an item you’d like to download.
- Tap the star icon
- Connect to Wi-Fi on your Quad Cortex
- Go to the Directory
- Navigate to Starred Presets or Starred Neural Captures
- Tap “Download” to store the item(s) you starred.

Documents / Resources
 | NEURAL QUAD CORTEX Quad-Core Digital Effects Modeler [pdf] User Guide QUAD CORTEX Quad-Core Digital Effects Modeler, QUAD CORTEX, Quad-Core Digital Effects Modeler |


