![]() XLP 604/605/606
XLP 604/605/606
Label printer
Edition 5b
USER MANUAL
Please note!
GENERAL NOTES
Validity of this manual and required compliance
Contents
The complete operating manual for the label printers XLP 604, XLP 605 and XLP 606 (also referred to in the following as “XLP 60x”, “machine” or “printer”) consists of the following parts:
| Manual | Target group | Medium | Availability |
| Quick reference guide, Safety notes | Operating personnel | Printed | Comes with machine |
| User manual | PDF file | NOVEXX Solutions web page www.novexx.com | |
| Service manual | Service personnel | NOVEXX Solutions Partner Portal www.partner.novexx.com | |
| Spare parts catalog |
This user manual refers exclusively to the machine types named above. It is used for proper operation and adjustment of the machine.
The machine must be properly installed and configured to allow for operation and settings.
- For information about the required qualification, see chapter Qualifications required on page 8.
- For information about installation and configuration, refer to the service manual.
For technical questions not covered in this user manual:
► Follow the instructions of the service manual for the machine
or
► Request a service technician from our sales partner.
Our sales partner’s customer service department is available especially for configuration settings and malfunctions.
Technical release
Technical release: 7/2022
Software version: BEL-4.1
User manual version: 5 – 8/2022
Liability
Novexx Solutions reserves the right:
- to make changes in design, parts and software and to use equivalent parts instead of those specified for the purpose of technological progress.
- to change information in this manual.
Any obligation to extend these changes to machines previously delivered is excluded.
Copyright
NOVEXX Solutions retains all rights to this manual and its appendices. Reproduction, reprint or any other type of duplication, including parts of the manual, are permitted only with written approval.
Printed in Germany
Manufacturer
Novexx Solutions GmbH
Ohmstrasse 3
D -85386 Eching, Germany
Tel.: +49-8165-925-0
Fax: +49-8165-925-231
www.novexx.com
How information is represented
Explanation of symbols
To enhance readability and make information easier to find, different types of information are identified:
► Instruction with no order of tasks assigned
- Numbered instructions introduced by preceding text
- The specified order must be followed!
Special note for action that must be performed.
- Enumeration of features
- Other feature
EXPERTS
The Experts symbol identifies activities that are reserved exclusively for qualified and specially trained personnel.
Warning Notes
Warning notes are specially highlighted::![]() WARNING!
WARNING!
Warning notes with the signal word WARNING refer to risks that can result in severe or fatal injuries! The note contains safety measures to protect affected persons.
► Instructions must be followed without exception.
CAUTION!
Warning notes with the signal word CAUTION refer to risks that can result in property damage or personal injury (minor injuries). The note contains instructions for preventing damage.
► Instructions must be followed without exception.
Illustrations
Illustrations appear in the text where required. References to the illustrations are shown in brackets, if necessary (see table).
| Reference to illustration | Application |
| none | • Only one illustration • Reference to the illustration is obvious • No position number in the illustration |
| (A) | • Only one illustration • Reference to the illustration is obvious • Position number in the illustration |
| (see fig. above) | • Several illustrations • No position number in the illustration |
| (see fig. above, pos. A) | • Several illustrations • Position number(s) in the illustration |
Table 1: Different references to illustrations.
Parameters
Parameters in the parameter menu are represented in the format Menu name > Parameter name in grey type.
FOR YOUR SAFETY
Intended use
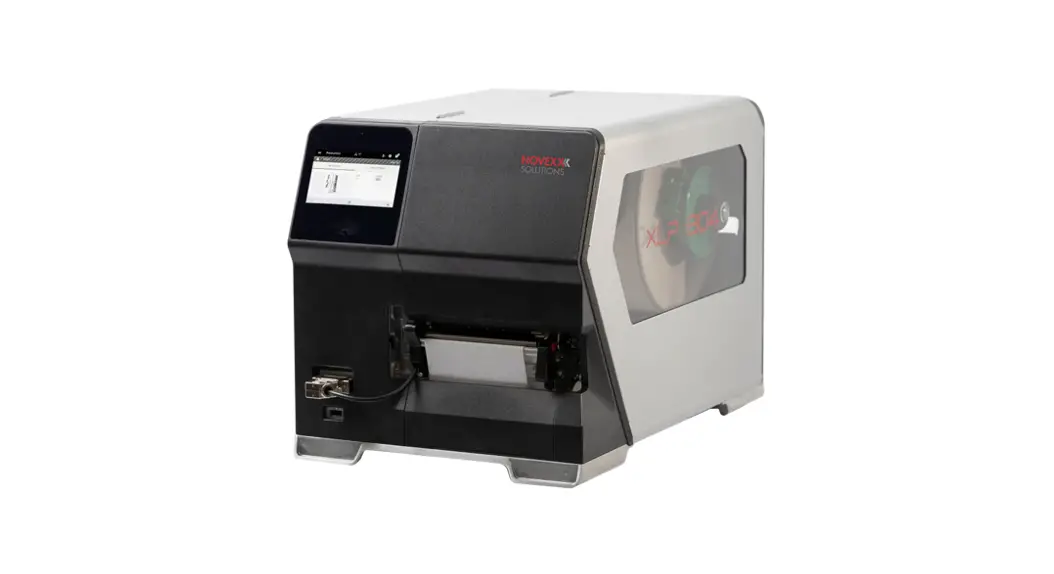
The label printers of the XLP 60x series are designed for printing label material, using the thermal or thermal transfer printing process. In addition, the dispenser version of the printers can dispense selfadhesive labels and can rewind the remaining backing paper (or alternatively the complete label material). It is possible to use a wide range of label materials and thermal transfer ribbons. Label stock must be in roll shape or fan-folded. The label web can optionally be pulled-in from outside the printer through the slots in the rear side or bottom plate.
Observe the technical specifications of the printer, see chapter Technical Data on page 11. Any other type of or more extensive application will be considered abnormal use.
Operating position: The XLP 60x is a desktop printer. The intended use position is as shown standing on a firm, flat, horizontal surface (e.g. on a table).
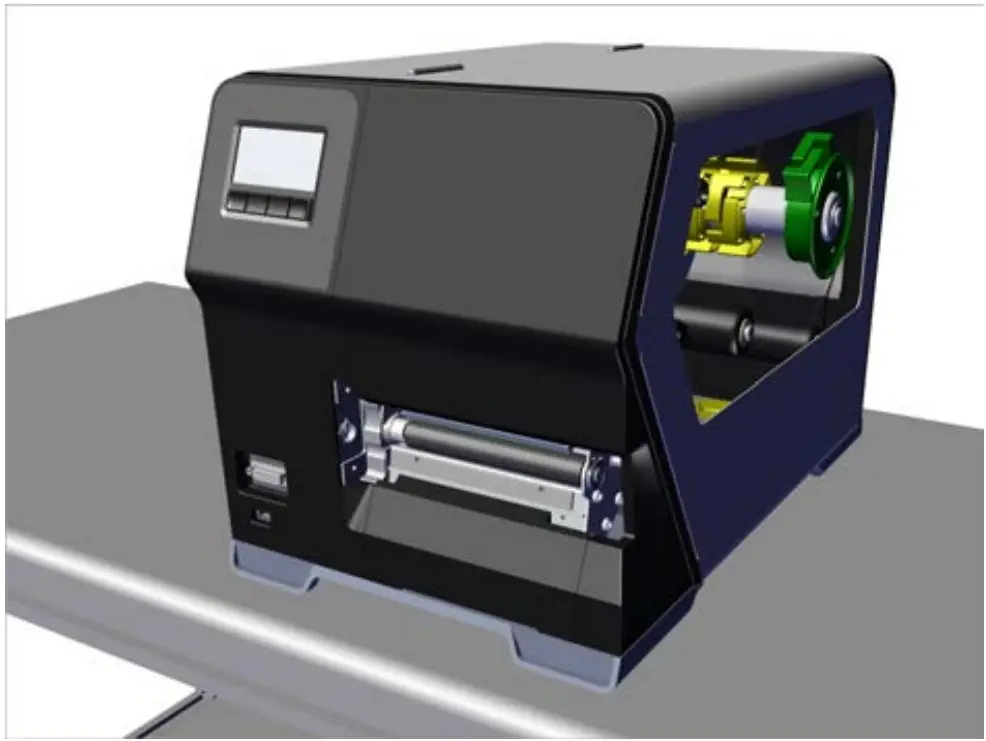 Fig. 1: Operating position of the XLP 60x.
NOVEXX Solutions shall assume no liability for damage resulting from non-intended use of the machine.
Safety notes
Follow the instructions
Safe and efficient operation of the printer can only be guaranteed if you observe all necessary information.
- Before operating the printer, read the operating instructions and all other notes carefully.
- Observe the additional safety and warning notes on the printer.
Qualifications required
- Trained staff is required for inserting and changing foils and material.
- Users need to be instructed in the use of the printer so they can work safely and independently.
- Users should be able to resolve minor operational issues and faults by themselves.
- At least two users should be instructed.
Requirements for safe operation
- Only use the printer in enclosed areas with environmental conditions matching the values given in the technical specifications!
- Only operate the printer on a plane, solid support.
- Make sure that the power supply socket for the printer is readily accessible!
- Only trained and authorized personnel should operate the printer!
- During operation, the print head can become hot! Care should be taken when touching the print head!
- Do not make any modifications or any additional casing for the printer!
- Do not allow any liquids to enter into the printer!
- Repairs to the printer may only be performed by authorized specialists who are aware of the risks involved!
- Lay the power supply cable, data cables and compressed air hoses (if applicable) in a way that nobody can stumble over it.
- In case of emergency, switch off the printer and disconnect the power supply cable!
- Only use original accessories!
Protection against injuries by electrical current
- Only operate the printer using the system voltage indicated on the rating plate!
- Only connect the printer to a grounded power socket fitted to authorized standards!
- Connect only devices to the interfaces at the printer that fulfil ES1 circuit requirements according to EN 62368-1!
Protection against injuries by mechanical action
- Only operate the printer when the cover is closed!
- Don´t wear loose long hair (if necessary, wear a hairnet).
- Keep loose jewellery, long sleeves, etc. away from rotating parts of the printer!
- Be careful when sliding on/removing the ribbon rolls! There are sharp-edged clamping plates on the ribbon mandrels. Danger of cuts!
Warning notes on the machine
CAUTION!
Warning notes on the machine provide important information for the operating personnel.
► Do not remove warning notes.
► Replace missing or illegible warning notes.
 Fig. 2: Warning notes on the XLP 60x.
| Warning note | Meaning | Article no. |
| The “Pinch point” warning note warns of the danger posed by the machine´s rotating parts; they can trap items and draw them in. | A5346 | |
 | The “Hot surface” symbol warns of a burn hazard if the surface is touched. Allow the machine to cool off before touching it. | A5640 |
| The blue label “Read manual” demands that operators read the user manual. | A5331 |
Product Description
TECHNICAL DATA
Dimensions
- Measures:
- XLP 604: 496 x 312 x 330 mm
- XLP 605/606: 496 x 377 x 330 mm
- Weight:
- XLP 604 “Basic”: 18.6 kg (w/o options)
- XLP 605/606 “Basic”: 19.6 kg (w/o options)
|
|
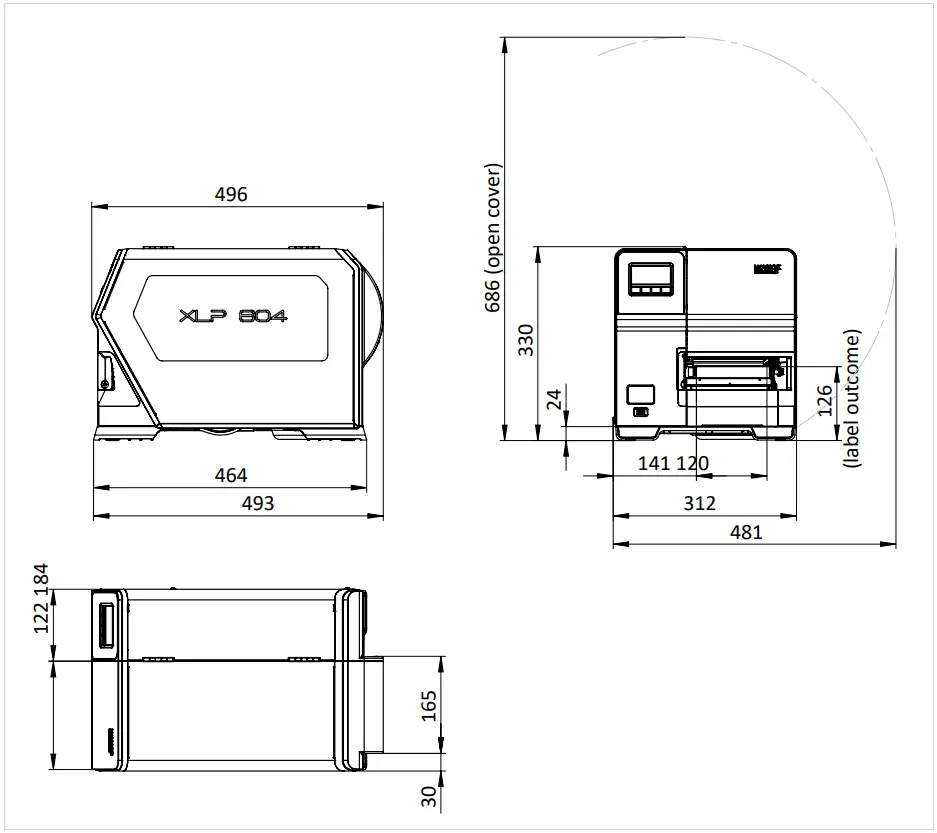 Fig. 3: Measures of the XLP 604.
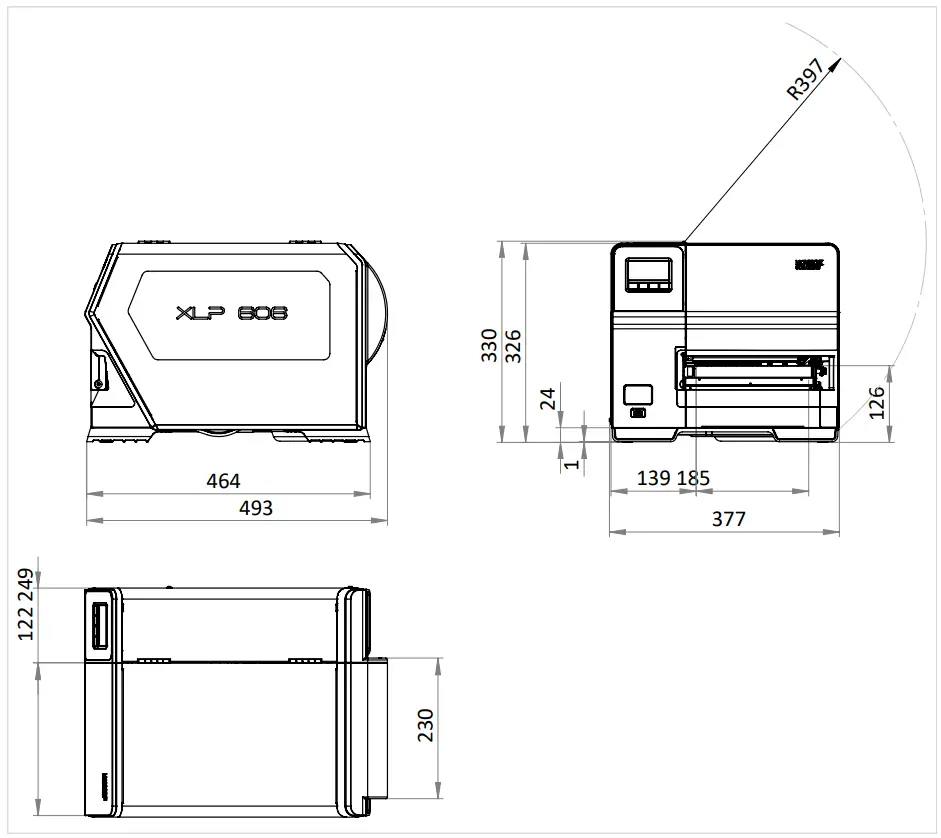 Fig. 4: Measures of the XLP 605/606.
Connection data
| Protection category | I |
| Mains voltage | 100 -240 V (AC) |
| Mains frequency | 60 /50 Hz |
| Input current | max. 3.9 A |
| Power consumption | max. 456 W |
Ambient conditions
| Installation location | • Inside buildings • Protected from wind and spray water • Dry • Not in areas with potentially explosive atmosphere |
| Operating Temperature | +5 to +40°C |
| Storage Temperature | -20 to +70°C |
| Relative Humidity | 20 to 85%, non-condensing |
| Protection category | IP 21 |
| Noise | 70 dB(A) |
| Sea level | Operation to max. 2000 m above sea level Transportation to max. 8000 m above sea level |
Label Material
Material types
Self-adhesive, card and synthetic materials, suitable for printing in thermal direct process and thermal transfer process. Use of roll material or leporello possible.
For details refer to Appendix > “Types of label material”.
Material weight
- Self-adhesive: 60-160 g/m²
- Cardboard: max. 240 g/m²
Material measures
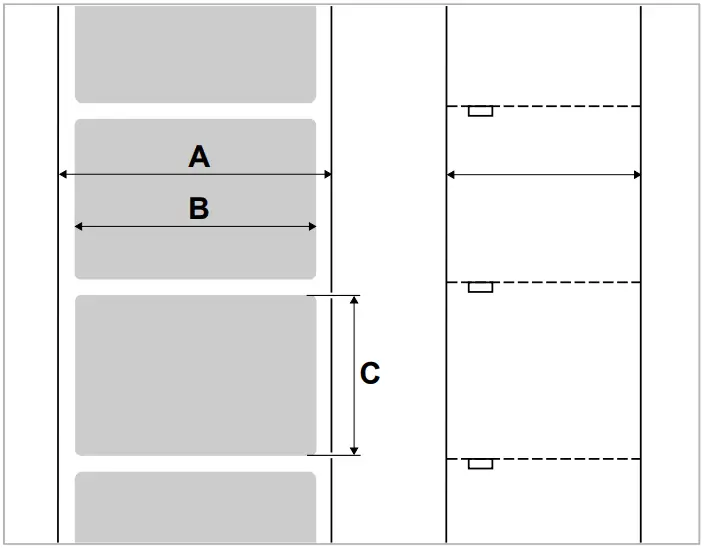 Fig. 5: Material measures (A Material width, B Label width, C Label length)
| Machine | Material width | Label length |
| XLP 604 | 15-120 mm | 5-2000 mm |
| XLP 604 Dispenser | 30-115 mm | 30-500 mm |
| XLP 605/606 | 50-185 mm | 5-2000 mm |
| XLP 605/606 Spender | 50-180 mm | 30-500 mm |
Table 2: Label measures.
Label roll
| Max outer-Ø | 210 mm |
| Inner-Ø | 38.1 / 76.2 / 101.6 mm (1.5 / 3 / 4“) |
Backing paper
Max. roll Ø rewound backing paper: 105 mm
Punch measures
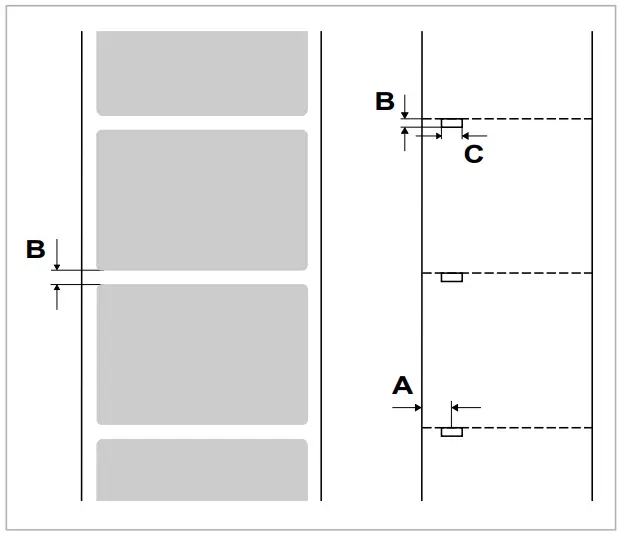 Fig. 6: Punches at different material types (A Punch position, B Punch length, C Punch width).
| Machine | Punch position | Punch length | Punch width |
| XLP 60x | 2-60mm | 0.8-14 mm | min. 4 mm |
Table 3: Punch measures
Related concepts
Label material types on page 122
What to look for when selecting label stock for the XLP 60x.
Thermal transfer ribbon
Specifications of suitable thermal transfer ribbon (“ribbon”).
Ribbon type
Regarding thermal transfer ribbon, the following is recommended:
- the reverse side of the ribbon must have an antistatic, friction-reducing coating (backcoating).
- ribbons must be specified for corner edge type print heads.
- ribbons should be suitable for print speeds of up to 16 inch/sec. (400 mm/s).
Ribbon roll
| Variable | Dimension |
| Outer Ø | max. 105 mm |
| Length | max. 600 m |
| Core inside Ø | 25.4 mm (1“) |
| Width[1] | XLP 604: 25-110 mm XLP 605: 25-132 mm XLP 606: 25-164 mm |
Table 4: Dimensions of usable ribbon rolls.
Perfomance Data
Print head
- Print technology: Thermal direct or thermal transfer printing
- Print head type: Corner Edge
- Print head characteristics:
| Machine | Resolution (Dot/mm) | Resolution (dpi) | Print width(mm) |
| XLP 604 | 12 | 300 | 106 |
| XLP 605 | 128 | ||
| XLP 606 | 160 |
Print speed
| Machine | Print speed (mm/s) | Print speed (inch/s) |
| XLP 604 | 75-400 | 16-Mar |
| XLP 605 | 75 -400 | 16-Mar |
| XLP 606 | 75 -350 | 14-Mar |
Impression accuracy
- In printing (y-) direction:
The impression accuracy depends on the print position. With the printout starting directly at the punch position, the accuracy is ±0.5 mm. A distance between punch (that is label start) and print position will add ±1% of this distance to the accuracy fault (fig. below) - X-direction: ± 0.5 mm
¹As a general rule, the thermal transfer ribbon must overlap the label being printed on both sides by 2 mm.
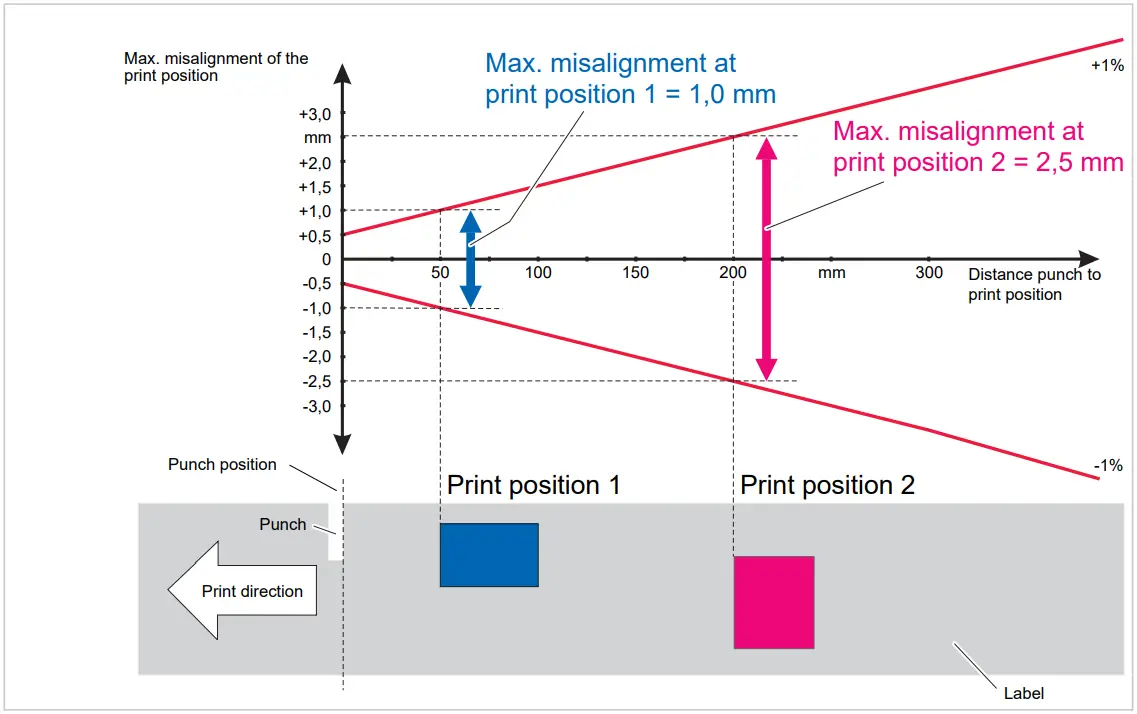 Fig. 7: Impression accuracy in printing direction, depending on the printing position.
Label sensor
- Standard: Light-transmission sensor for punched label material
- Option: Reflex sensor for label material with black marks on the bottom side
- Setting range: 2-60 mm (distance to lay edge)
Punch position and size see chapter “Punch measures” on page 14.
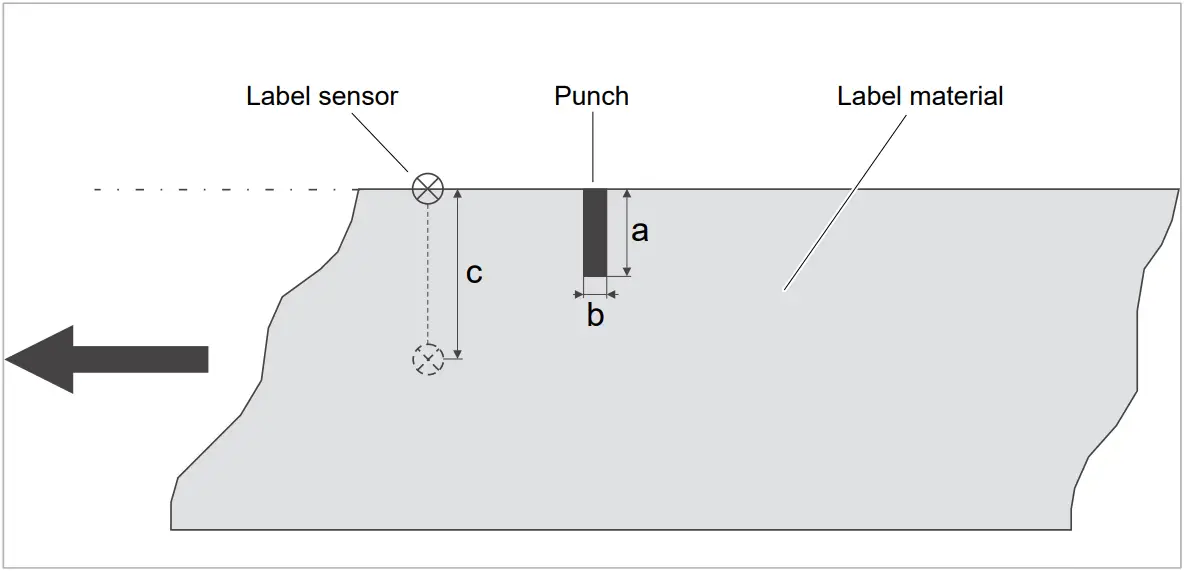 Fig. 8: Adjustment range of the label sensor.
Output modes
1:1 and 100% printable.
Non-printable areas:
- 1 mm from the front label edge (1st edge in feed direction)
- 1 mm from the left band border (right border in feed direction)
Printer language interpreter
Easy Plug, Line Printer, Hex Dump, ZPL
Character sets
- 17 character sets with fixed size (fixedfonts) including OCR-A and OCR-B
- 3 Scalable character set (speedo fonts)
- TrueType character sets are supported (in Unicode as well)
- TrueType, speedo and fixed size fonts can be optionally stored on a memory card.
Character modification
- Scaling in X/Y direction
- Fixfonts up to factor 16
- Speedo fonts up to 6000 pt
- Rotation:
- Resident fonts, bar codes, lines and graphics: 0, 90, 180, 270 degrees
- Truetype fonts: 0 to 359.9 degrees
Bar codes
| Codabar | Code 128 A, B, C |
| Code 128 | Code 128 UPS |
| Code 128 Pharmacy | ITF |
| Code 2/5 Matrix | MSI |
| Code 2/5 Interleaved | EAN 8 |
| Code 2/5 5-line | EAN 13 add-on 2 |
| Code 2/5 Interleaved ratio 1:3 | EAN 13 add-on 5 |
| Code 2/5 Matrix ratio 1:2,5 | EAN 128 |
| Code 2/5 Matrix ratio 1:3 | Postcode (guide and identity code) |
| Code 39 | UPC A |
| Code 39 extended | UPC E |
| Code 39 ratio 2,5:1 | Code 93 |
| Code 39 ratio 3:1 |
All bar codes scalable in 30 different width and in the height
2-dimensional bar code
| Data Matrix Code (code according to ECC200) |
| Maxi Code |
| PDF 417 |
| Codablock F |
| Code 49 |
| QR Matrix Code |
GS1 Databar & CC bar codes
Reduced Space Symbology (GS1 Databar) and Composite Component (CC) bar codes:
| GS1 Databar-14 | UPC-A + CC-A/CC-B |
| GS1 Databar-14 truncated | UPC-E + CC-A/CC-B |
| GS1 Databar-14 stacked | EAN 13 + CC-A/CC-B |
| GS1 Databar-14 stacked omnidirectional | EAN 8 + CC-A/CC-B |
| GS1 Databar limited | UCC/EAN 128 + CC-A/CC-B |
| GS1 Databar expanded | UCC/EAN 128 + CC-C |
Interfaces & Electronics
Interfaces
- Data interfaces:
- Network: Ethernet 10/100/1000
- USB host (Typ A): USB 2.0, 2x rear, 1x front
- USB device (Typ B): USB 2.0
- Serial: RS232, DSub 9
Electronics
| Characteristic | Details |
| Processor | 32-bit ARM Cortex-A9 CPU (NXP) |
| RAM | 1 GB DDR3 |
| eMMC | 2 GB pSLC |
| Realtime clock | Standard |
| Operating panel | • 4 buttons • LC graphics display with 128×64 pixels • RGB illuminated background |
Certificates and Markings
CE, TÜV-Mark, CTÜVUS -Mark, FCC, EAC, CCC
The regulation EN 55032 demands for class A devices the following text to be printed in the manual:
„WARNING: This is a class A product. In a domestic environment this product may cause radio interference in which case the user may be required to take adequate measures.“
DESIGN MODELS
Printer versions
The XLP 60x is available in the following versions:
| Version | Features |
| XLP 60x “Basic” | The printed labels can be torn off at the standard tear-off edge. |
| XLP 60x “Peripheral” | Equipment like version “Basic”. In addition, it is possible to operate the following options for further processing of the printed labels: • External rewinder • Cutter • Applicator LTMA |
| XLP 60x Dispenser | Equipment like version “Peripheral”. In addition, the printer is equipped with an internal rewinder for the backing paper and a dispensing edge. Two different dispensing edges are available: • M type: The dispensed labels are removed by hand • A type: For operation of the applicator LTMA |
In addition, the XLP 60x can be equipped for the respective application by installing various options or retrofit kits (see following chapter).
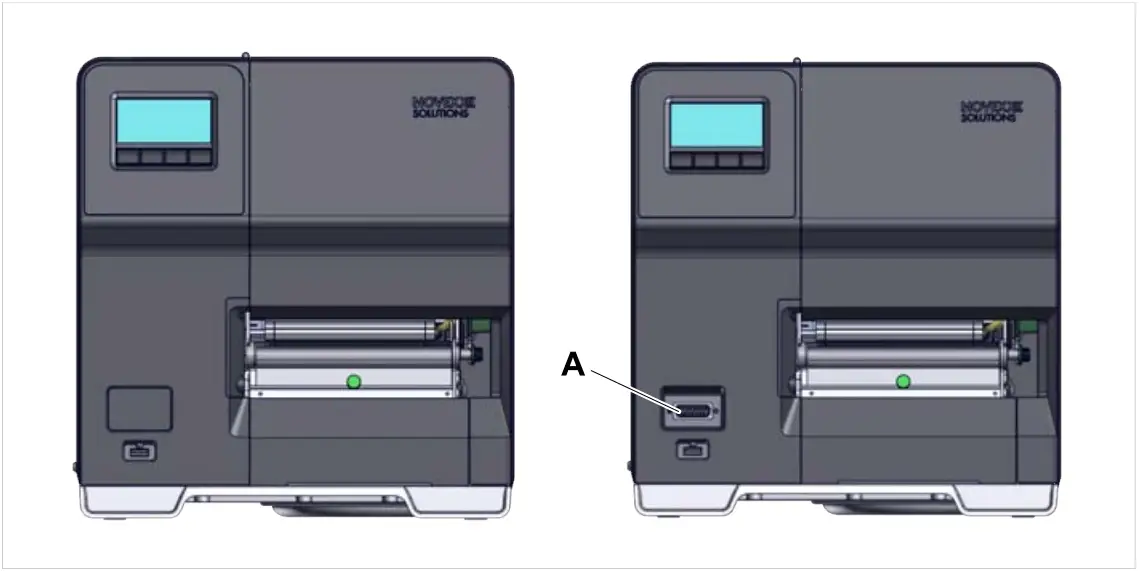 Fig. 9: External distinguishing feature: the “Peripheral” version (right) has a D-Sub connector (A)
on the front, below the control panel (only applies to printers of the corresponding version
without further internal options).
Options and accessories
Internal Options
…should be factory-fitted or installed by a service technician:
- Reflex sensor: Light barrier fork that apart from the transmission sensor, also contains a reflex sensor (detects reflex marks on the material bottom side).
- Ribbon saving function: No ribbon is consumed over unprinted areas of the label layout
- Peripheral preparation: Additional D-Sub connector at the front for external devices
- Internal rewinder: Rewinds the printed label web inside of the printer
External Options
…do not require any special alterations to the printer, provided that the printer fulfils the prerequisites:
| Option | Printer version | Internal rewinder | Peripheral connector | Dispensing edge A | |
| “Basic” | “Peripheral” | ||||
| Cutter | X | ||||
| External rewinder | X | ||||
| Dispensing edge M | X | X | X | ||
| X | X | ||||
| Dispensing edge A | X | X | |||
| Applicator LTMA | X | X | X | ||
Table 5: External options and the prerequisites for their operation.
Accessories
…require no conversion work or are simply plugged into one of the printer’s connections.
- 4“ core adapters for the label unwinder for Label rolls with 4“ inner diameter
- Keyboard for comfortable data input in standalone mode (USB connector)
- Wi-Fi USB dongle for using the web panel via a Wi-Fi connection
FUNCTIONALITY
XLP 60x
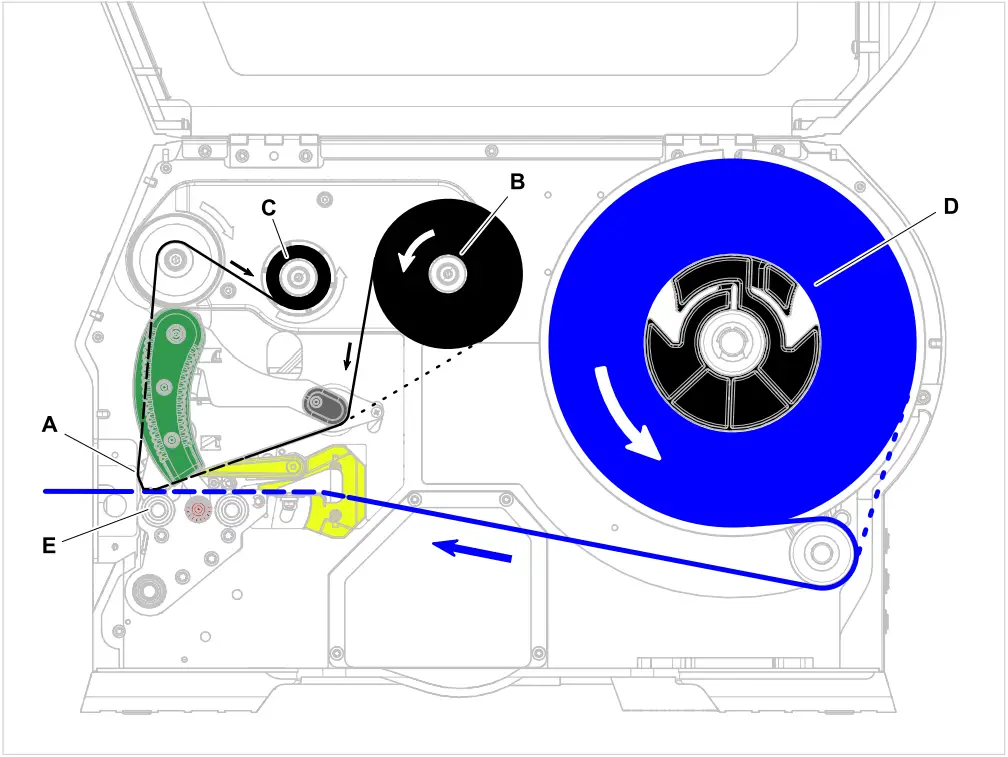 Fig. 10: Material and ribbon path inside the XLP 60x.
A: print head, B: ribbon unwind mandrel, C: ribbon rewind mandrel,
D: material unwinder, E: print roller
The printing principle is based on the thermal print head (A). The core piece of the print head, the thermal edge, consists of a row of dot elements, which can be controlled and heated separately. Each heated dot element leaves a black dot on the label material.
With thermal direct printing, the black dot results from the reaction of the thermosensitive label material. With thermal transfer printing, the black colour is transferred from the thermal transfer ribbon to the label material.
In order to add the dot lines to an image, the label material has to be passed underneath the print head during printing. This material feeding is accomplished by the print roller (E), which is motor driven. By moving the label material, it is unwound from the label roll (C).
When using thermal transfer printing, the thermal transfer ribbon (“ribbon”) is fed together with the label material underneath the print head. The ribbon position is between label material and print head, the colour side facing the label material. The full ribbon roll is plugged on the ribbon unwinder (B). After passing the print head, the used ribbon is wound onto the ribbon rewinder (C), which is motor driven. If the ribbon roll is completely rewound, a new roll has to be inserted.
Material end and ribbon end are detected by sensors and are displayed on the operation panel (optionally by a sound signal).
The label beginning is detected by a light transmission sensor with punched label material and by a reflex sensor (option) with not punched material.
The printed label material can be further processed as follows:
- Tear off the label (standard tear-off edge)
- Cut the label (cutter option)
- Dispense the label (dispenser option)
- Rewind the label web externally (external rewinder option)
- Rewind the label web internally (internal rewinder option)
XLP 60x with internal rewinder and M type dispensing edge
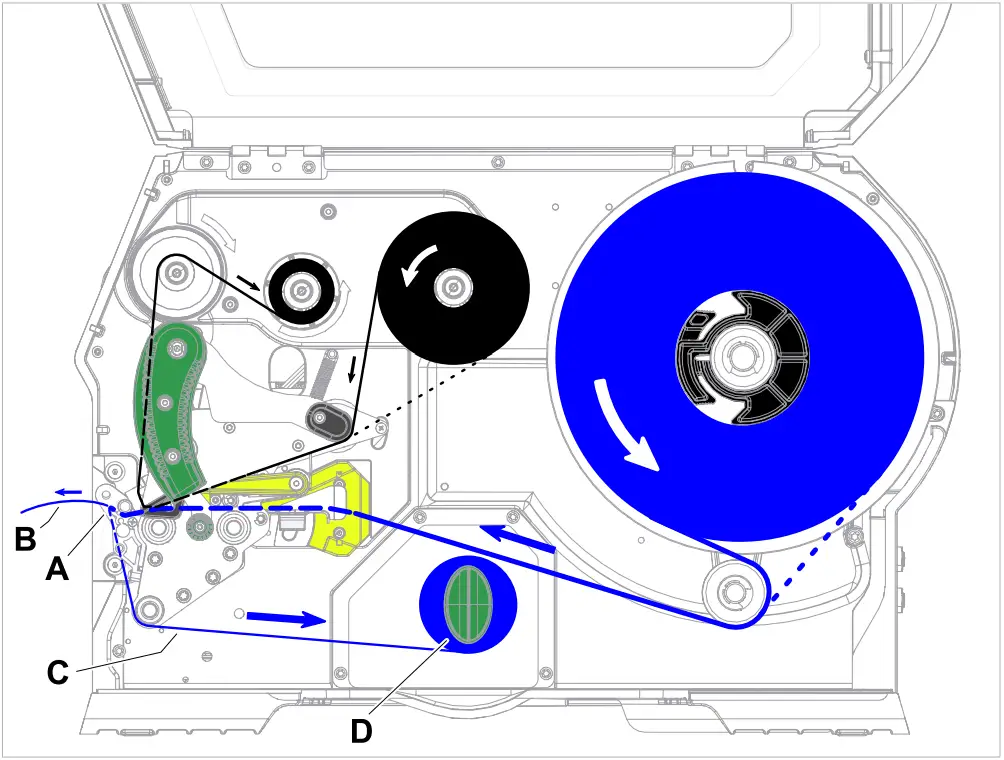 Fig. 11: Material- and ribbon path inside the XLP 60x Dispenser.
When used as a dispenser, the label material is drawn around the dispensing edge (A), causing the label (B) to peel off. Only the backing paper (C) is rewound inside of the housing (D).
The electronic components in the rewinder control the tensile force on the release paper so that the same force is applied for all winding diameters. This is controlled independently of the material width and printing speed.
After switching on the printer, the rewinder is initialised and the backing paper is tightened.
Once a print job is received, the printer searches for the first label start marking at reduced printing speed. To do this, the label material is moved by at least the distance between the label sensor and the printhead (70 mm). This distance is used by the rewinder controller to calculate the diameter of the previously wound backing paper. To allow the controller to calculate the diameter even with endless material, in this case printing also does not start until the material has moved 70 mm. The print job is carried out at the speed that has been set in the parameter menu or as specified by the print job.
If a fault occurs during operation, the rewinder shuts off automatically.
Once the maximum diameter of the backing paper has been reached, a message appears on the display and the rewinder shuts off automatically.
The following operating modes are available for the dispenser:
- Dispenser mode with dispenser sensor:
The material feed ends at the dispensing edge, i.e., the label to be dispensed remains hanging on the dispensing edge (set dispensing position). The printer waits until the label is removed before moving the next empty label beneath the print head and then printing and dispensing it. - Dispenser mode with foot switch:
Pressing the foot switch releases the label for printing and dispensing. Afterwards, the next empty label is positioned beneath the printhead.
OPERATING CONTROLS
Operating controls at the XLP 60x
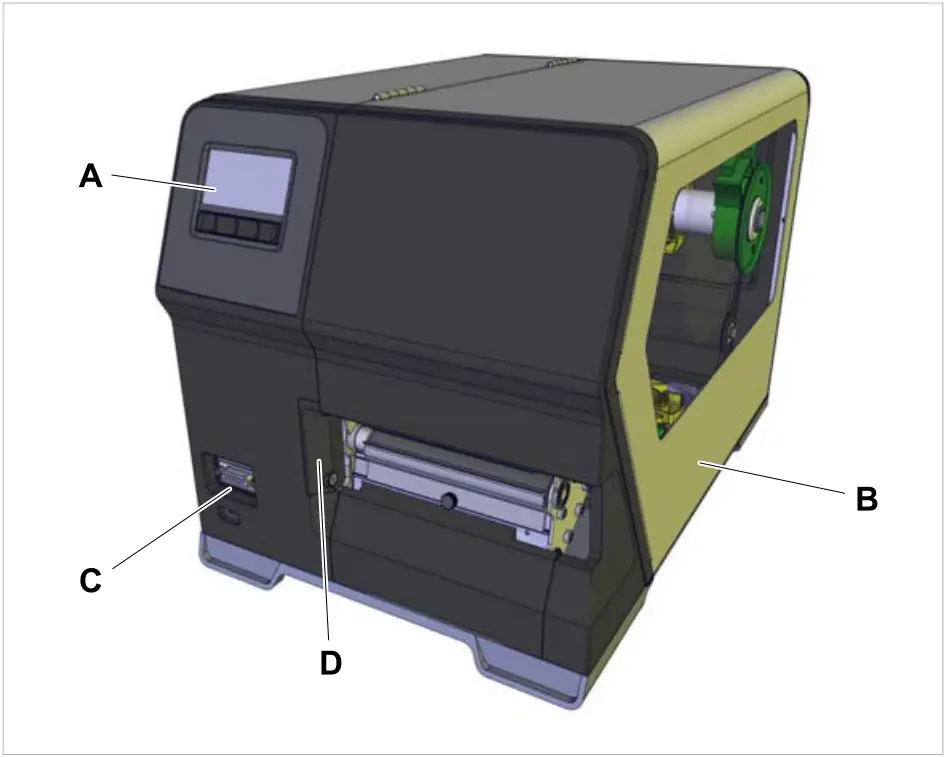 Fig. 12: Operating controls outside at the XLP 604 “Peripheral”.
| A | Operation panel Displays the operating status of the machine; for defining settings in the parameter menu |
| B | Front cover Open this to insert label material and ribbon |
| C | (At version “Peripheral” only) Connector for additional devices (“Options”) |
| D | Mounting flange for options |
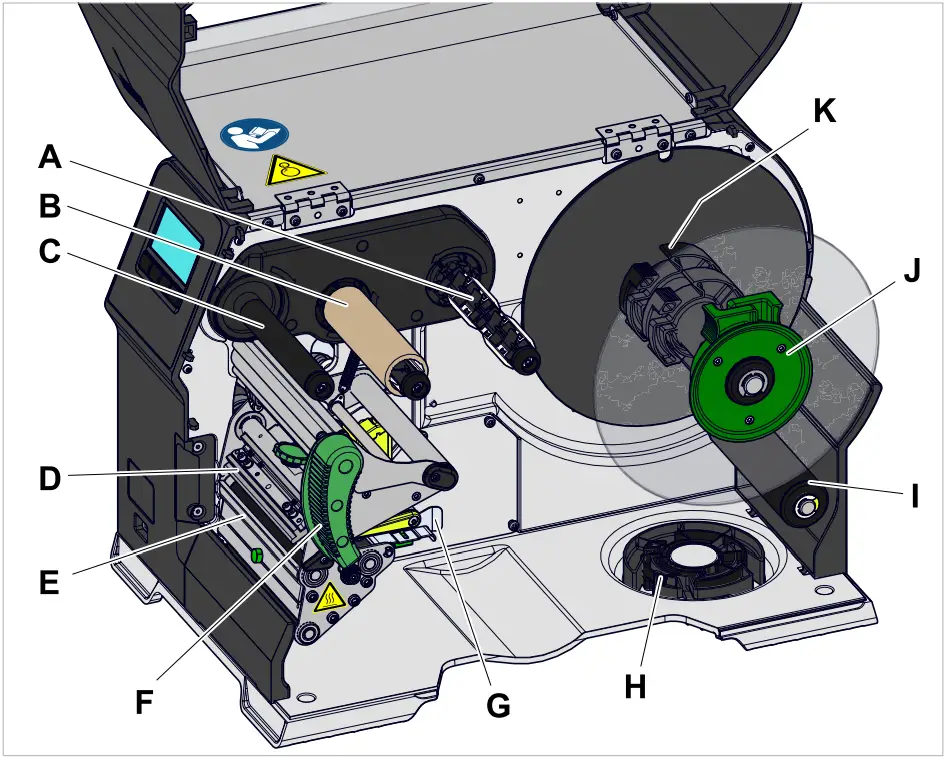 Fig. 13: Operating components at the XLP 604.
| A | Ribbon unwinding mandrel: Holds the ribbon roll |
| B | Ribbon winding mandrel: Winds up the used ribbon |
| C | (With ribbon saving option) Ribbon drive roller: Drives the ribbon (Without ribbon saving option) Ribbon deflection roller |
| D | Print head |
| E | Tear-off edge: The printed label material can be torn off at the edge |
| F | Print head pressure lever: Opening the pressure lever lifts the printhead. You do this to insert material/ribbon or to clean the printhead/print roller |
| G | Material guides: The front material guide must be adjusted to the material width; the material end light barrier is integrated in the rear material guide |
| H | Shelf for unused adapter ring (see K) |
| I | Dancer arm: Provides strain relief and even unwinding of the label material |
| J | Support disc: Prevents material roll from sliding out sideways |
| K | Adapter rings: For adapting unwinder to core diameter of material roll |
Importance of the colours of machine parts:
| Green | Operating component, which may be touched by the machine operator |
| Yellow | Parts that touch the label web |
| Black | Parts that touch the ribbon web |
Operating controls on the XLP 60x with internal rewinder
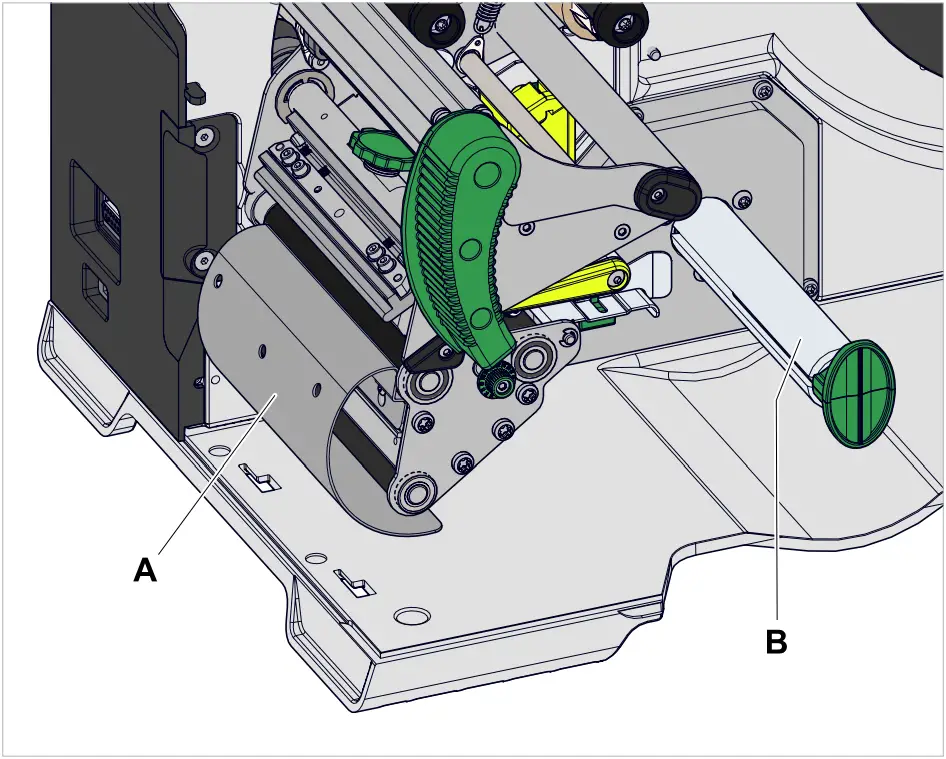 Fig. 14: Additional controls of the XLP 60x with internal rewinder.
| A | Baffle plate: Deflects the printed labels without dispensing any of them |
| B | Rewinder: Rewinds the label web |
Operating controls on the XLP 60x with internal rewinder and dispensing edge M (“Dispenser”)
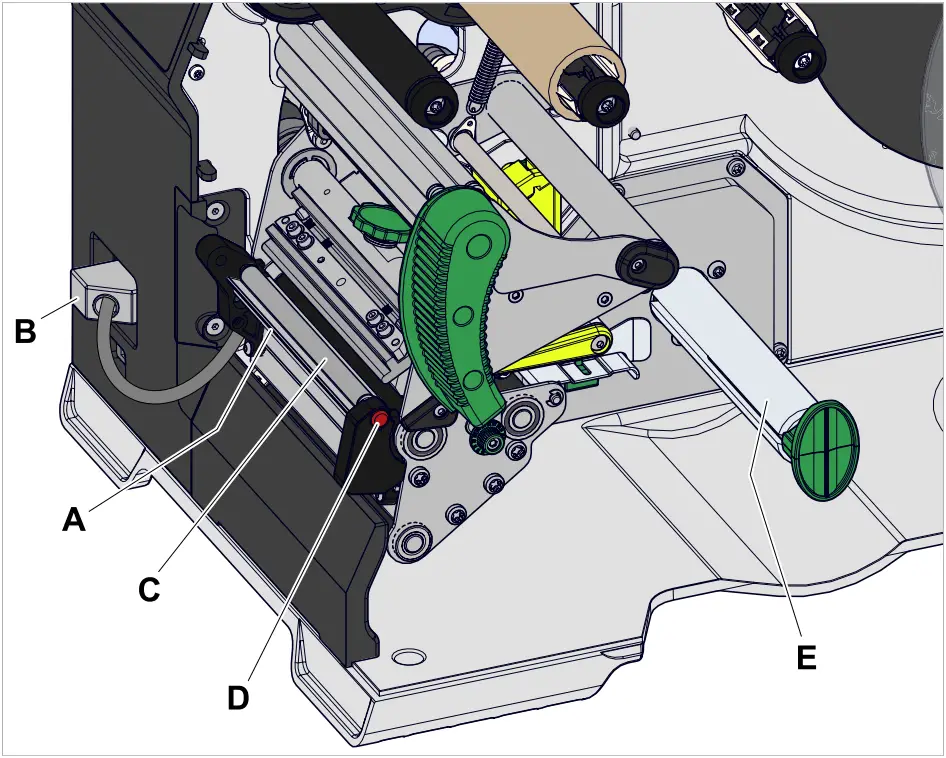 Fig. 15: Additional operating controls of the XLP 60x Dispenser M.
| A | Dispensing edge “M”: Separates the labels from the backing paper |
| B | Plug: Connector for the dispensing edge light barrier |
| C | Dispensing roll: Holds the material web taut over the dispensing edge |
| D | Dispensing roll button: Press the red button to remove the dispensing roll |
| E | (Internal) rewinder: Rewinds the backing paper |
| F | Dispensing edge “A”: Separates the labels from the backing paper (For automatic removal of the labels by the applicator LTMA) |
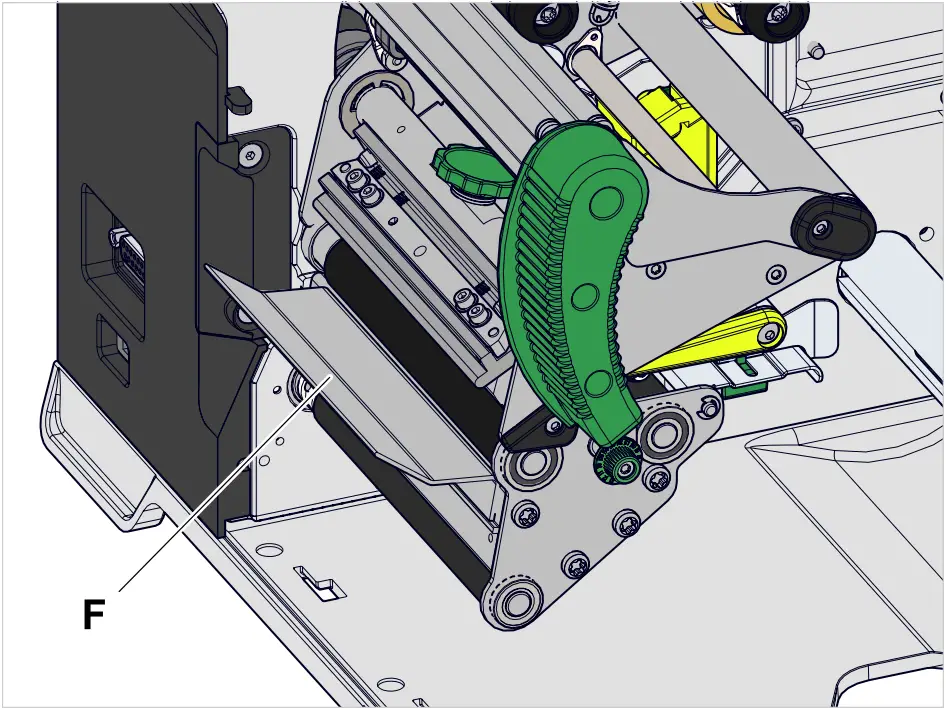 Fig. 16: Additional operating controls of the XLP 60x Dispenser A.
OPERATING PANEL
Operating Controls
The operation panel of the XLP 60x consists of a graphic display and four keys below the display. The current functions of the keys are displayed by icons (B) above the keys.
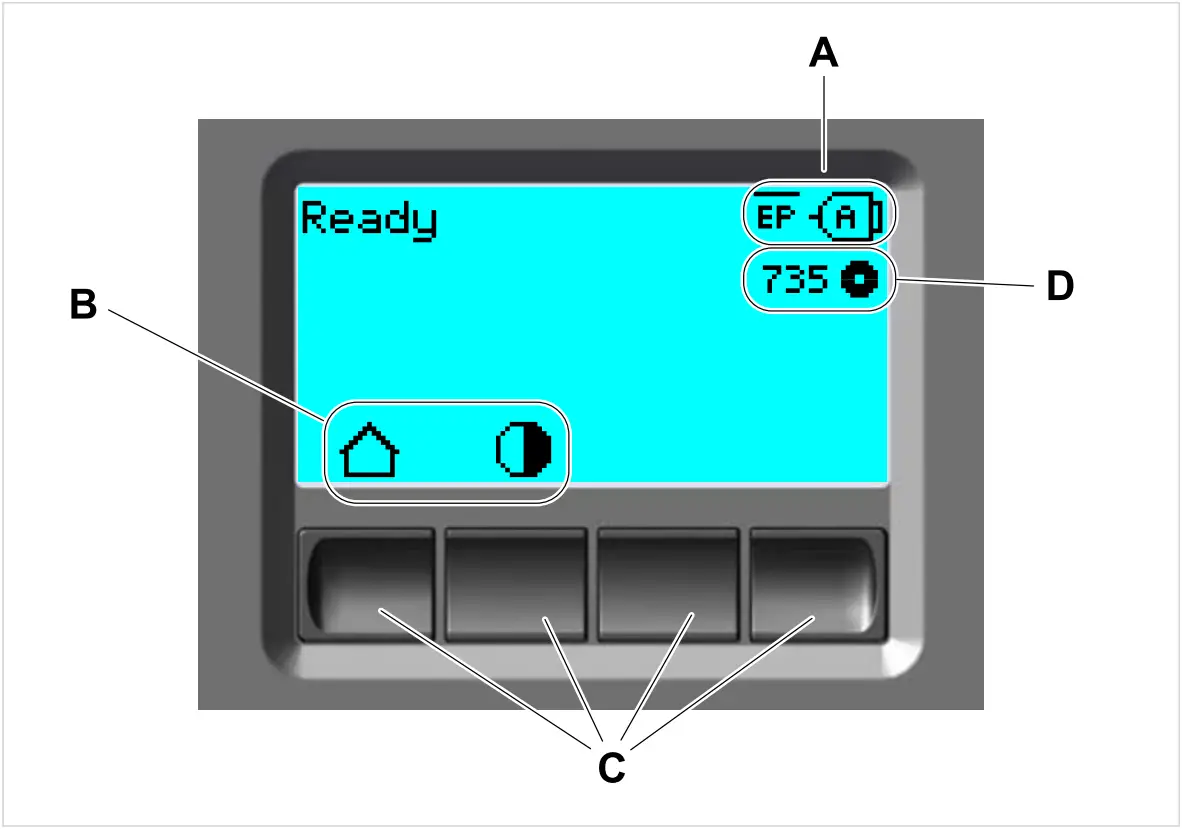 Fig. 17: Operation panel of the XLP 60x: A Icons that inform about the interface assignment,
B Icons that show the key assignment, C Keys, D Remaining ribbon stock.
Operating Principle
The figure shows, how to toggle between the screens:
 Fig. 18: How to toggle between the screens: A “Home” (cyan), B “Setup” (white), C “Ready” (cyan).
The displayed texts and icons are largely selfexplanatory. Based on the different background colors of the display, the state of the printer can be identified quickly:
| Color | State | |
| Green | Printing | Normal operation, labels are being printed and applied |
| Waiting for a start signal | • A print job has been transferred and interpreted or • The current print job was stopped In both cases, the machine is waiting for a start signal | |
| Cyan | Home | Generally counts: Cyan => Need for action by the operator • The printer is not ready to receive print data • The interpreter has stopped • Error messages or warnings can not be displayed |
| Stopped | • The current print job was stopped • The printer is ready to receive print data • The commands in the received print job are processed by the interpreter • Errors or warnings can be displayed | |
| Color | State | |
| Ready | • The printer is ready to receive print data • The commands in the received print job are processed by the interpreter • Errors or warnings can be displayed | |
| White | Standalone | • Selection of a file on a storage medium • The printer works in the background, without updating the dis- play • Selecting an input field and text input into the input field • Start printing; Errors caused by the print job are displayed |
| Setup | • Settings in the parameter menu can be done • The printer is not ready to receive print data • The interpreter has stopped • Error messages or warnings can not be displayed | |
| Red | Error | • An error occured during the printing • The current print job is stopped • A status message is displayed with red background • The status message only dissappears after pressing the ac- knowledgement key • The printer remains ready to receive print data if it was able to do so before the error occurred (exception: errors that prevent data communication) • The commands in the received print job are processed by the interpreter • Further errors can occur and, if so, are queued |
| Yellow | Warning | Same as “Error”, with the following differences: • The current print job is not stopped • The warning is displayed with yellow background • The warning dissappears after some seconds |
Table 6: Display colors and corresponding states
Icons
| Home: Toggle to the “Home” screen | Start: To start an operation, e. g. printing | ||
| Contrast: Setting the print contrast during printing; Hidden, if only operator access rights exist | Halt: To stop an operation, e. g. printing | ||
| Printing: Toggle to the „Ready“ screen |
| Keys 1-4: For typing in of key codes, the keys are numbered from left to right | |
| Out: Jump to the next higher menu level; Hold the button pressed: jump to the high- est menu level |
| ||
| In: Opening a menu |
| ||
| Applicator: Triggers one stroke of the appli- cator, if present |
| ||
| Acknowledgement: Acknowledgement, e. g. of an input or an error message | Cancel: Leaving the dialog without apply- ing the setting | ||
| Left/Right: Move the marker in the text in- put dialog to the left or right | Up/Down: Move the selection bar upwards or downwards | |
| |||
| Reprint: Triggers the reprint of the preced- ing label, if the function is activated | Up to first: Moves the bar in the selection list to the first position | ||
| Delete: Deletes the character left of the marker in the text input dialog | Parameter: Call parameter | ||
| Character selection: Selecting a character in the text input dialog | Feed: Trigger material feeding | ||
| Start signal: Input of a start signal by hand in single start mode | Info: Call a purely informative menu item | ||
| Setting: Toggle to the „Setting“ screen | Plus/Minus: Increase/decrease a value in an input field | ||
| Right: Move one input field further to the right (when typing in values that consist of several fields, e. g. time) | |||
| Setting of the print head pressure | |||
| Jump to the Dispense Settings screen; Hidden, if only operator access rights exist | Dispense position: Quick access to parameter Dispenser > Dispenseposition | ||
| Start Offset: Quick access to parameter Dispenser > Start Signal > Start offset | Bar code: appears for frequently occurring error messages; Press the key to call up the QR code that refers to the quick troubleshooting guide | ||
| Rewinder start: To start the internal or external rewinder | Rewinder halt: To stop the internal or external rewinder |
Table 7: Those icons inform about the function of the key below the icon
| Ethernet active: The network interface is selected for data transfer and a connection could be established [2] | Ethernet inactive: The network interface is selected for data transfer and a connection could not be established | ||
| USB: The USB interface is selected for da- ta transfer [2] | Auto interface: The data interface is selected automatically [2] | ||
| Serial: The serial interface is selected for data transfer [2] |  | Caution: Warning sign which marks error messages | |
| Filter: The filter function for file names is active (standalone mode) | Ribbon stock: Shows together with the number left of it the remaining ribbon length in meters. | ||
| Print interpreter setting: Parameter Printer Language > Print Interpret. is set to “Easy- plug” [3] | Print interpreter setting: Parameter Printer Language > Print Interpret. is set to “Easy- Plug/ZPL Emu” [3] | ||
| Print interpreter setting: Parameter Printer Language > Print Interpret. is set to “ZPL Emulation” [3] | Print interpreter setting: Parameter Print- er Language > Print Interpret. is set to “Lineprinter” [3] | ||
| Print interpreter setting: Parameter Printer Language > Print Interpret. is set to “Hex dump” [3] | USB thumb drive: A USB thumb drive is connected and assigned to drive C: |
Table 8: Those icons inform about printer states
Key Combinations
| Printer state | Key combination | Function |
| “Home” screen | 1+3+4 | Enter access code |
| 3+4 | Measuring the label pitch automatically, see chapter Label pitch on page 81 | |
| 2+3 | Slow material feed | |
| 1+2 | Eject material (backwards) | |
| Always | 1+2+3 | Reset |
| 2+4 | Standalone mode, see chapter “Standalone Operation” on page 93 |
Table 9: Special key combinations.
²Icon flashes during print data transfer
³Icon flashes during print interpreter activity.
WEB PANEL
Web panel – what´s that?
The web panel is a comfortable external control panel, which can be operated on mobile or stationary computing devices. The web panel is supported by the following machines:
- Print & Apply Systems XPA 93x, XDM 94x, XPM 94x
- Label printers XLP 60x, XLP 51x
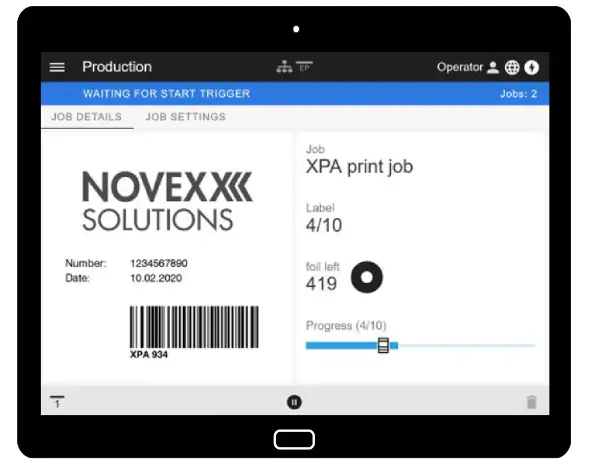 Fig. 19: Display of a print job in process with the web panel on a tablet computer.
Prerequisites
- Display device, e.g. smartphone, tablet computer, PC
- Web browser on the display device
- Connection to the same network to which the machine is connected
- Web server of the machine is activated: Interface > Network > Services > WEB server = “On”
Functions
- Production monitoring: Display of running print jobs (see figure above)
- Machine settings: Settings in the parameter menu
- Administration: Save machine settings; save support data; update firmware; etc.
Starting the web panel
Procedure
- Determine the IP address of the machine.
The IP address is displayed on the operation panel during machine startup. Alternatively, select the following parameter from the menu: Interface > Network > IP address. - Switch on the display device and open the web browser.
- Enter the IP address in the URL input line of the web browser. The following display appears:
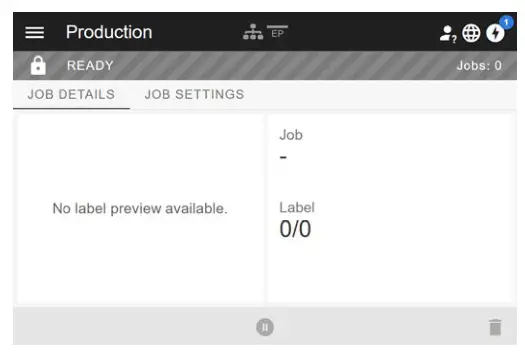
Display after the start
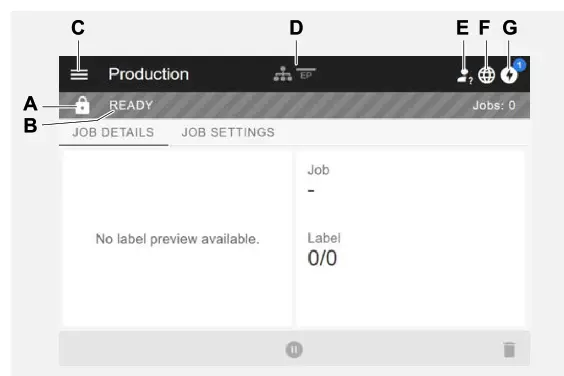
| Pos. no. | Function |
| A | Lock symbol: No one has logged in yet (pos. E), so most functions are locked. Only the print job details display (middle area of the window with light background) and the message display (pos. G) are accessible. |
| B | Infotext: Display of different operating states of the machine with different background colours • READY: Appears when the control panel on the machine displays “Ready”. • USER AT MACHINE: Appears when the control panel on the machine displays “Home”. At the same time the lock symbol (pos. A) appears and the web panel is locked. This prevents the machine from being started from the web panel while some- one is working on the machine (safety function). • ERROR: An unconfirmed error message is present. • WAITING FOR START TRIGGER: The machine is waiting for a start signal . • PRINTING…: The machine is printing |
| C | Menu: Choose here between the views “Production”, “Machine settings” and “Administration”. More details are given in the following chapters. |
| D | Icons that inform about the status of the machine, for more details see link to chapter “Icons” below. The figure above shows, for example, the icons for network connection and Easy Plug emulation. |
| E | Login: In order to use the functions of the web panel, the user must log in – with one of the roles Operator, Supervisor or Service. Depending on the role selected, more or less functions are accessible. Preset key code for the role Operator: 1-1-3-2 |
| F | Language selection: The language set on the machine is preset. By clicking on the icon, another language can be selected for the web panel. |
| G | Notifications: Display notifications, such as error messages and warnings. See the following chapters for more details. |
Related reference
Icons on page 30
Notifications
On the web panel 3 types of notifications are displayed: Error messages, warnings and information.
Error messages
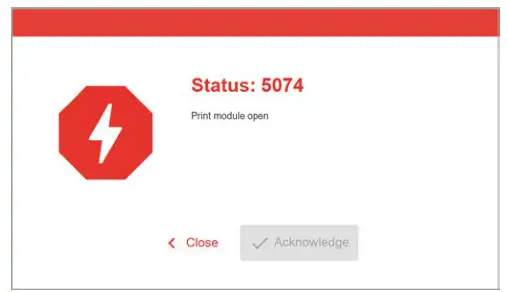
Fig. 20: Error messages that require a reaction from the operator are displayed in full. Status number and status text match the display on the machine operating panel. The essage can be confirmed either on the web panel or the machine operating panel.
The Notification View
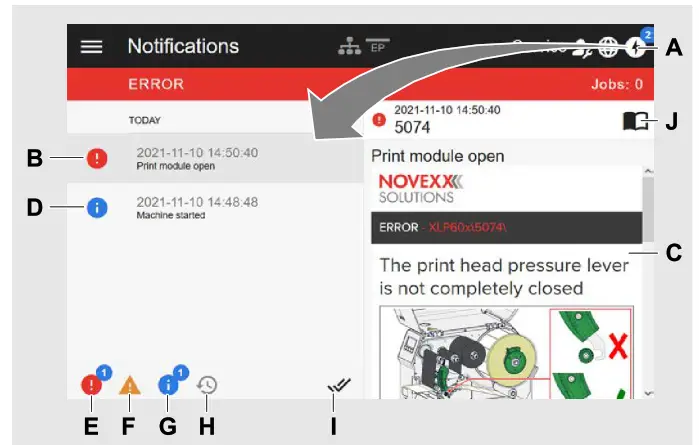
Fig. 21: After clicking on the notification icon (A), the notification view opens. The left half shows the notification history, the right half shows an explanation of the selected ntry in the history.
| Pos. no. | Function |
| A | Notification icon: Click on the icon to open the notification view. The superscript number indicates the number of unconfirmed notifications. |
| B | Error message in the history with timestamp. An explanation of the selected entry appears on the right. If there is a quick guide to correct the error message, it is displayed (C). |
| C | Quick guide to the error message, if available (Corresponds to the quick guide that can be accessed via a QR code from the machine operating panel).. |
| D | Info message in the history with time stamp. |
| E | Filter for error messages: Click on the icon to hide error messages from the list |
| F | Filter for warnings: Click on the icon to hide warnings from the list |
| G | Filter for info messages: Click on the icon to hide info messages from the list |
| H | History: Click on the icon to display the notification history. The history shows all notifications that have already been confirmed. |
| I | Confirm everything: Click on the icon to confirm all unconfirmed notifications. Confirmed notifications only appear in the history. |
| J | Manual symbol: Click on the icon to access the detailed user manual of the machine. |
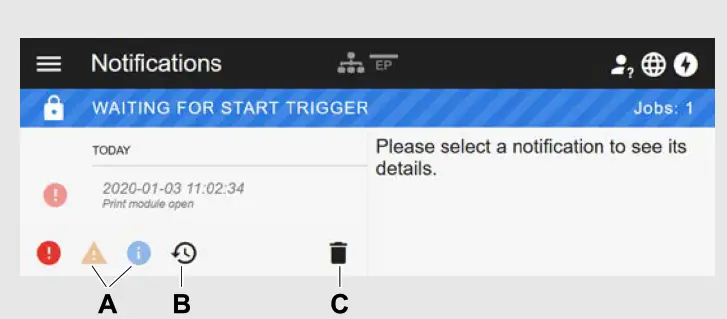 Fig. 22: Notification view with history.
| Pos. no. | Function |
| A | The filters for warnings and info messages are set. The icons are displayed pale and all warnings and info messages are hidden. |
| B | History is displayed (symbol is black, otherwise grey). |
| C | Trashcan icon: Only appears when history is displayed. Clicking on the icon deletes the history. |
Exiting the notification view:
► Click on “Notifications” in the header.
The web panel switches to the production view.
Production View
In the production view, the print job in progress can be monitored and settings can be made for the print job.
“Job details” view
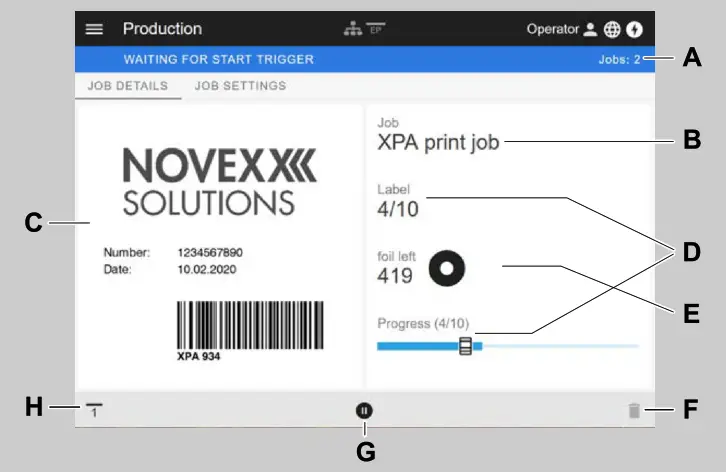 Fig. 23: “Job details” view of a print job in the web panel.
| Pos. no. | Function |
| A | Number of compiled print jobs |
| B | Name of the current print job (defined in the Easy Plug command #ER) |
| C | Label layout of the current print job |
| D | Progress display of the current print job (4 of 10 labels were printed) |
| E | Display of the remaining ribbon in meters |
| F | Trashcan icon: Click to delete the print job (requires at least supervisor role, in the figure the icon is grayed out, i.e. the function is not available with the current role) |
| G | Stop or Start icon: Click to stop or start the print job |
| H | Start signal icon: Click to print and dispense a label |
“Job Settings” view
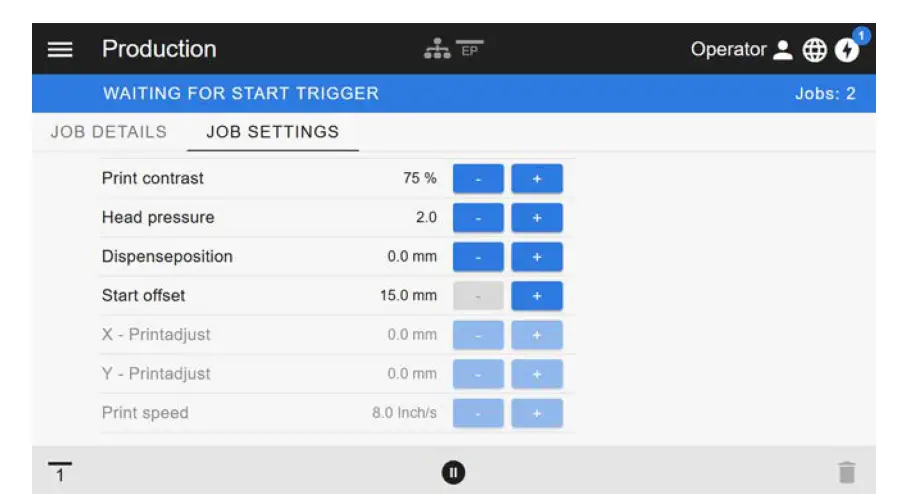
Fig. 24: View “Job Settings” of a print job in the web panel. Settings not accessible with the active role (here: “Operator”) are greyed out. The other settings can be changed by clicking on “+” or “-”.
Machine settings view
Main menu
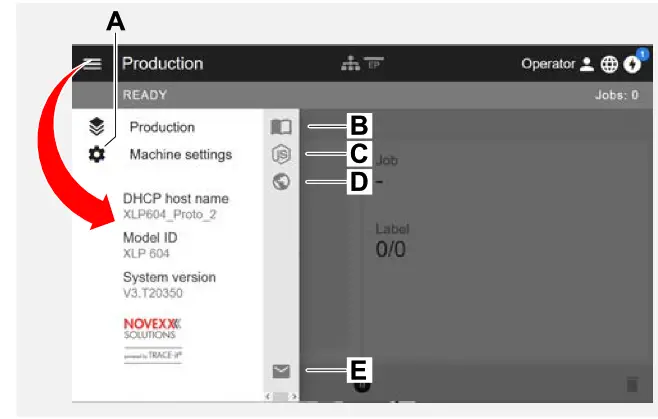 Fig. 25: View after clicking on the menu icon in the upper left corner.
| Pos. no. | Function |
| A | Open machine settings (see following chapter) |
| B | Opens the user manual |
| C | |
| D | Opens the Novexx web page |
| E | Opens an e-mail to the NOVEXX Solutions service hotline |
Machine settings
After clicking on “Machine settings”, the parameter menu familiar from the machine operating panel opens.
More or less parameters are displayed depending on the permissions given by the login role. As “Operator” only the parameters of the Info menu can be accessed.
In order to make machine settings, two conditions must be met:
- Login at least as Supervisor (key sequence 2-2-3-1-2-2)
- The machine must be stopped, otherwise the window will appear “greyed out”
► To stop, click the button at the bottom centre of the window:
|
|
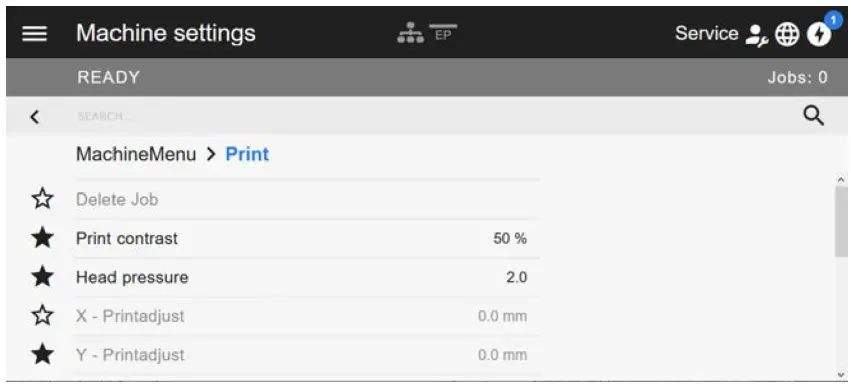
 Fig. 26: Machine settings view with the operator role.
 Fig. 28: Example: setting of Print > Print contrast.
Search function:
If you do not know in which menu the parameter you are looking for can be found, but know at least part of the name, the search function will help you find it quickly:
► Enter the search term in the search field (A) – only parameters containing the search term will appear (B).
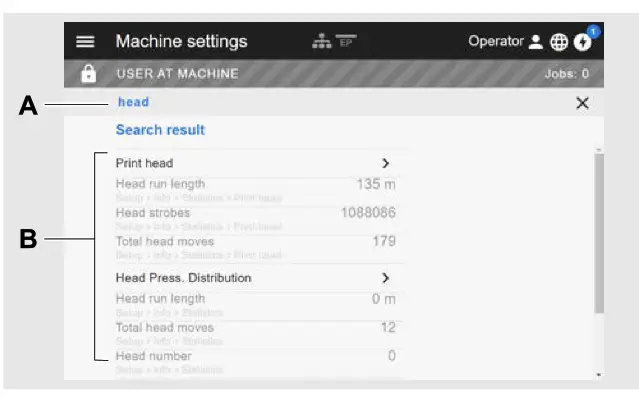 Fig. 29: After entering the search term “head” (A), only parameters containing “head” in the name are displayed (B).
Administration view![]() With the login roles “Supervisor” and “Service”, the administration view appears in the menu ad- Edition 5b – 8/2022. ditionally. This view provides special functions for qualified and authorized personnel. For more information, refer to the service manual.
With the login roles “Supervisor” and “Service”, the administration view appears in the menu ad- Edition 5b – 8/2022. ditionally. This view provides special functions for qualified and authorized personnel. For more information, refer to the service manual.
|
|
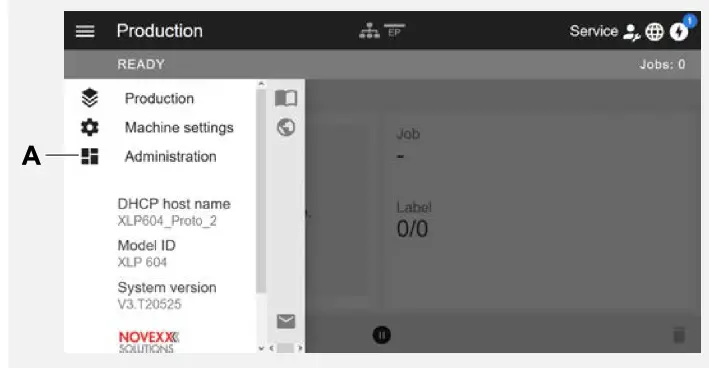 Fig. 30: After logging in as supervisor or service, the “Administration” entry (A) appears in the menu.
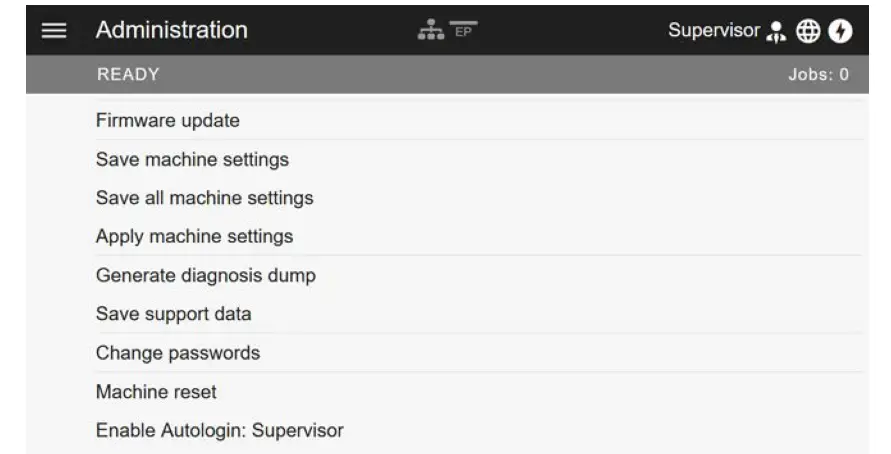 Fig. 31: Administration view (only with “Supervisor” or “Service” rights).
PARAMETER MENU
Overview parameter menu
The table below gives an overview of the structure of the parameter menu and the parameters it contains. Only the parameters printed in red are described here. The parameters printed in black are only relevant for service personnel and are therefore described in the Service Manual.
► Click on the respective link (red text) in the table to get to the parameter description.
| Favorites [4] | Print (continued) | |||||
| Parameter 1 | DeleteJob | └ | Ribbon | |||
| Parameter 2 | Printcontrast | ├ | Ribbonwidth | |||
| … | Headpressure | ├ | RibbonRewTens. | |||
| Parameter n | X – Printadjust | ├ | RibbonUnwTens. | |||
| Y – Printadjust | ├ | Colorside | ||||
| Printspeed | ├ | Ribbonlength | ||||
| DeleteSpooler | ├ | OuterribbonØ | ||||
| Material | ├ | InnerribbonØ | ||||
| ├ | Label | ├ | Ribbonautoecon. | |||
| ├ | Detectlabellength | ├ | Headdownlead [5] | |||
| ├ | Printmethod | ├ | Ribb.eco.limit [5] | |||
| ├ | Materialtype | └ | Feedmode | |||
| ├ | Punchoffset | Format | ||||
| ├ | Materiallength | ├ | Bar codemultip. | |||
| ├ | Materialwidth | ├ | UPC plain-copy | |||
| ├ | Labelsens.type | ├ | EAN Readline | |||
| ├ | Punchmode | ├ | EAN sep.lines | |||
| ├ | Punchlevel [6] | ├ | Rotatedbarcodes | |||
| ├ | Mat.enddetect. | └ | Printdirection | |||
| └ | RewinderTension | Feedspeed | ||||
| (Backfeedspeed) | ||||||
| Voltageoffset | ||||||
| Headliftautom | ||||||
| Options | Options (continued) (continued) | Options | ||||
| Selection | ├ | Dispenseposition | Start Sensor | |||
| ├ | Periph.device | ├ | Dispensingedge | ├ | Startprintmode | |
| └ | Statussignals | ├ | Applymode | ├ | Starterrorstop | |
| Dispenser [7] | ├ | Head disp dist. [8] | └ | Externalsignal | ||
| ├ | DispenseMode | ├ | Displaymode | Rewinder [9] | ||
| ├ | Real 1:1 | ├ | Dispensecounter | ├ | Rewinddirection | |
| ├ | Dispensingmode | └ | Disp.Cnt.Reset | ├ | RewinderValues | |
| └ | Max InitFeedback | Cutter [10] | └ | Rewinderadjust | ||
| ├ | Speed | ├ | Cut mode | Tear-off edge [11] | ||
| ├ | Printspeed | ├ | Cut speed | └ | Dispenseposition | |
| └ | Feedspeed | ├ | Cut width | LTMA [12] | ||
| ├ | Start Signal | ├ | Cut position | ├ | ApplyMode | |
| ├ | Startoffset | ├ | Doublecut | ├ | Strokelength | |
| ├ | Startprintmode | └ | Rest position | ├ | Appl.Waitpos. | |
| ├ | Applicationmode | Material OD Sensor | ├ | Applicatorspeed | ||
| ├ | Start source | ├ Mat.ODSensor1 | └ | Restartdelay | ||
| ├ | Starterrorstop | ├ Mat.ODSensor2 | Keyboard | |||
| ├ | Productlength | ├ Materialenderr [13] | ||||
| ├ | Multilabel mode | ├ Materialendwarn [13] | ||||
| ├ | Label2 offset [14] | └ | Ext.ODsensor [15] | |||
| └ | Label3 offset [16] | |||||
⁸Only with Dispenser > Dispensing edge = “User defined”
⁹Only with Options > Selection > Periph. device = “Rewinder”
¹⁰Only with Options > Selection > Periph. device = “Cutter”
¹¹Only with Options > Selection > Periph. device = “Tear-off edge”
¹²Only with Options > Selection > Periph. device = “LTMA”
¹³Only with Options > Material OD Sensor > Mat. OD Sensor 1 = “Rotation pulse” or Options > Material OD Sensor > Mat. OD Sensor 2 = “Rotation pulse”
¹⁴Only with Dispenser > Start Signal > Multi label mode = “x labels/start”
¹⁵Only with Options > Material OD Sensor > Mat. OD Sensor 1 = “Level high activ” or “Level low active” or Options > Material OD Sensor > Mat. OD Sensor 2 = “Level high activ” or “Level low active”
¹⁶Only with Dispenser > Start Signal > Multi label mode = “x labels/start” with x=3
| System | Printer Language | Interface | |||||
| Language | PrintInterpret. | Print interface | |||||
| Accessauthoriz. | EasyPlug Setting | Network | |||||
| (Operatorpassword) | ├ | Characterfilter | ├ | IP Addressassign | |||
| (Supervisorpassword) | ├ | Charactersets | ├ | IP address | |||
| (Servicepassword) | ├ | EasyPlugerrors | ├ | Net mask | |||
| Factorysettings | ├ | EasyPlugwarning | ├ | Gatewayaddress | |||
| Customdefaults | ├ | Spoolermode | ├ | Portaddress | |||
| SetupWizards | ├ | StandAloneInput | ├ | DHCPhostname | |||
| (Run SetupWizard?) | ├ | #VW/IInterface | └ | Services | |||
| Turn-onmode | ├ | PrinterIDno. | ├ | WEBserver | |||
| Hardware Setup | ├ | Commandsequence | ├ | FTPserver | |||
| ├ | (Printertype) | └ | Ignore#IM cmd. | ├ | WLAN | ||
| ├ | Timezone | ZPL Setting [17] | ├ | (MQTT broker) | |||
| └ | RealtimeClock | ├ | Manualcalibrate | ├ | (MQTT broker IP) | ||
| Print Control | ├ | Darkness | ├ | Timeclient | |||
| ├ | Miss.labeltol. | ├ | Labeltop | ├ | TimeserverIP [18] | ||
| ├ | Gap detect.mode | ├ | LeftPosition | ├ | Timezone [18] | ||
| ├ | Max InitFeedback | ├ | ErrorIndication | └ | Sync.interval [18] | ||
| ├ | Ribb.stretching | ├ | ErrorChecking | Serial Port 1 | |||
| ├ | Singlestartquant | ├ | Resolution | ├ | Baudrate | ||
| ├ | Reprintfunction | ├ | 305 DPIscaling | ├ | No. ofdatabits | ||
| ├ | Ribbonendwarn. | ├ | ImageSavePath | ├ | Parity | ||
| ├ | Ribbonwarnstop | ├ | LabelInvert | ├ | Stopbits | ||
| ├ | Errorreprint | └ | Commands | ├ | Datensynchro. | ||
| ├ | Single-jobmode | ├ | FormatPrefix | └ | Frameerror | ||
| ├ | Temp. reduction | ├ | ControlPrefix | Drives | |||
| └ | Printinfomode | ├ | DelimiterChar | ├ | Drive C | ||
| ├ | Command^PR | ├ | Drive D | ||||
| ├ | Command^MT | ├ | Drive E | ||||
| ├ | Command^JM | └ | Drive F | ||||
| └ | Command^MD/^SD | Homemode | |||||
18. Only visible with Interface > Network > Services > Time client = ““Automatic” or “Time server IP””
| Tools | Tools (continued) | Info | |||||
| Diagnostic | ├ | (Punchycalibr.) | ModelID | ||||
| ├ | (Usermodified) [19] | ├ | (Headidle adjust) | Status Printouts | |||
| ├ | Parameter 1 | └ | (Headpress. adjust) | ├ | PrinterStatus | ||
| ├ | … | Internal Flash | ├ | MemoryStatus | |||
| └ | Parameter n | ├ | Copyfrom USB. | ├ | FontStatus | ||
| ├ | StoreParameters | └ | DeleteDir | ├ | ServiceStatus | ||
| ├ | Gen.SupportData | ├ | Dottestendless | ||||
| ├ | EasyPl.file log [20] | ├ | Dottestpunched | ||||
| ├ | Log filesdelete [20] | └ | Referencelabel | ||||
| ├ | EasyPlugMonitor | Statistics | |||||
| └ | EP MonitorMode | └ | Print head | ||||
| Test | ├ | Headrunlength | |||||
| ├ | Sensortest | ├ | Headstrobes | ||||
| ├ | Printtest | ├ | Totalheadmoves | ||||
| └ | Cutter test [21] | ├ | Operationtime | ||||
| (Service) | ├ | Contrastdistribution | |||||
| ├ | (Servicedone) | ├ | Headpressure distribution | ||||
| ├ | (Headexchange) | ├ | Thermaldistribution | ||||
| ├ | (Rollerexchange) | └ | Printspeeddistribution | ||||
| ├ | (Cutterchange) [21] | ├ | Headrunlength | ||||
| └ | (Serv.datareset) | ├ | Rollrunlength | ||||
| (Adjustment) | ├ | Cutson knife [21] | |||||
| ├ | (SensorAdjust) | ├ | Totalheadmoves | ||||
| ├ | (Matendtolerance) | ├ | Serviceoperations | ||||
| ├ | (Feedadjustlabel) | ├ | Headnumber | ||||
| ├ | (Feedadjust) | ├ | Rollnumber | ||||
| ├ | (Vorwfeed rat.) | ├ | Cutternumber [21] | ||||
| ├ | (Backwfeed rat.) | ├ | Totalcuts [21] | ||||
| ├ | (Ribbon feed adj.) | ├ | Tot.mat.length | ||||
19 Parameters, whose settings differs from the factory setting.
20 Only visible with Interface > Drives > Drive C ≠ “None”
| Info (continued) | Info (continued) | Info (continued) | ||||||
| ├ | Tot.ribb.length | ├ | Max.Labellength | └ | Material rewind | |||
| ├ | Headstrobes | └ | Customdefaults | ├ | Modulename | |||
| ├ | Operationtime | └ | CPU board data | ├ | Modulepartnumb. | |||
| └ | TotalOperation | ├ | CPUidentifier | ├ | Serialnumber | |||
| System | ├ | FPGAversion | ├ | Productiondate | ||||
| └ | Module FW. Vers. | ├ | Modulename | ├ | CANMACaddress | |||
| ├ | Systemversion | ├ | MACAddress | └ | Moduletype | |||
| ├ | Systemrevision | ├ | Modulepartnumb. | └ | TPH power | |||
| ├ | Systemdate | ├ | PCBpartnumber | ├ | Modulename | |||
| ├ | Operatorpanel | ├ | Serialnumber | ├ | Modulepartnumb. | |||
| ├ | Ribbonunwinder | ├ | Productiondate | ├ | Serialnumber | |||
| ├ | Ribbonrewinder | └ | Moduletype | ├ | Productiondate | |||
| ├ | Materialrewind | └ | Operator panel | ├ | CANMACaddress | |||
| ├ | TPHPower | └ | Serialnumber | └ | Moduletype | |||
| ├ | Ribbonfeed [22] | └ | Ribbon unwinder | └ | Ribbon feed [23] | |||
| └ | Cutter [24] | ├ | Modulename | ├ | Modulename | |||
| └ | Memory Data | ├ | Modulepartnumb. | ├ | Modulepartnumb. | |||
| ├ | RAMmemorysize | ├ | Serialnumber | ├ | Serialnumber | |||
| ├ | SpaceforRAM disc | ├ | Productiondate | ├ | Productiondate | |||
| ├ | Storagemedia | ├ | CANMACaddress | ├ | CANMACaddress | |||
| ├ | InternalFlash | └ | Moduletype | └ | Moduletype | |||
| ├ | USB1 [25] | └ | Ribbon rewinder | └ | Cutter [26] | |||
| ├ | USB2 [25] | ├ | Modulename | ├ | Modulename | |||
| ├ | FrontUSB [25] | ├ | Modulepartnumb. | ├ | Modulepart numb. | |||
| ├ | Spoolersize | ├ | Serialnumber | ├ | Serialnumber | |||
| ├ | SpaceforJobs | ├ | Productiondate | ├ | Productiondate | |||
| ├ | CANMACaddress | ├ | CANMAC address | |||||
| └ | Moduletype | └ | Moduletype | |||||
23 Only with Print > Material > Ribbon > Ribbon autoecon. = “On”
24 Only with Options > Selection > Periph. device = “Cutter”
25 If any external flash memory is connected
26 Only with Options > Selection > Periph. device = “Cutter”
| Info (continued) | ||
| └ | Power supply | |
| ├ | Modulename | |
| ├ | Modulepartnumb. | |
| ├ | Serialnumber | |
| ├ | Productiondate | |
| ├ | Moduletype | |
| └ | Version | |
| └ | Print head | |
| ├ | Modulename | |
| ├ | Modulepartnumb. | |
| ├ | Serialnumber | |
| ├ | Productiondate | |
| ├ | Moduletype | |
| ├ | Resolution | |
| ├ | Width | |
| └ | Resistance | |
| Measurements | ||
| ├ | Ribb.rest length | |
| ├ | Ribbondiameter | |
| ├ | Ribb.rewinder Ø | |
| └ | Headtemperature | |
Parameter Reference
| Setting range | Default setting | Step width | Easy Plug |
| [1…110] % | 50% | 1 | #!H, #PC2045 |
CAUTION!
The parameter Print contrast affects directly the life durance of the print head. It counts: „The higher the setting of Print contrast is, the lower is the life durance of the print ead“. This counts even more for settings above 100%. Thereforeind:
► Always choose the lowest possible setting necessary to produce an acceptable print result.
Head pressure
| Setting range | Default setting | Step width | Easy Plug |
| [1.0…3.0] | 2.0 | 0.1 | #PC2045 |
Setting of the pressure that presses the print head at the print roller (1=low pressure, 3=high pressure). The setting corresponds to the adjustment-knob settings “I” to “III” at older machine types.
X – Printadjust
| Setting range | Default setting | Step width | Easy Plug |
| [-15…15] mm | 0.0 mm | 0.1 mm | #PC1020 |
The zero point of the mask is moved in relation to the edge of the label on the X axis, i. e. lengthways to the material.
- Maximum offset away from the edge of the label: +15.0 mm
- No offset: 0.0mm
- Maximum offset towards the edge of the label: -15.0 mm
Caution with graphics, which are generated via one of the Easy Plug commands #YI, #YIR or #YIB!
If the graphics is shifted beyond the label border as a consequence of changing the parameter X Printadjust, the part of the graphics which “juts out” will get lost.
| Setting range | Default setting | Step width | Easy Plug |
| [-15…15] mm | 0.0 mm | 0.1 mm | #PC1021 |
- Maximum offset in feed direction: +15.0 mm
- No offset: 0.0mm
- Maximum offset against feed direction: -15.0 mm
Caution with graphics, which are generated via one of the Easy Plug commands #YI, #YIR or #YIB! If the graphics is shifted beyond the label border as a consequence of changing the parameter X Printadjust, the part of the graphics which “juts out” will get lost.
| Setting range | Default setting | Step width | Easy Plug |
| XLP 604: [3..16] Inch/s XLP 605: [3..16] Inch/s XLP 606: [3..14] Inch/s | 8 Inch/s | 1 Inch/s | #PC1003, #PR |
| Setting range | Default setting | Step width | Easy Plug |
| — | — | — | #!CA |
Delete Spooler
| Setting range | Default setting | Step width | Easy Plug |
| — | — | — | #!CA |
Print method
| Settings | Default setting | Step width | Easy Plug |
| Thermo transfer, Thermal printing | Thermo transfer | — | #PC2018, #ER |
- Thermo transfer: Thermo transfer printing (ribbon end sensor is switched on)
- Thermal printing: Thermo direct printing (ribbon end sensor is switched off)
Detect label length
Only works if label material is inserted.
Measures the label length and writes the value to parameter Material length. During the measurement, the label material is fed approx. 2 label lengths.
Material type
| Settings | Default setting | Step width | Easy Plug |
| Endless, Punched | Punched | — | #PC1005, #IM |
- Endless: If material is to be used without gaps
- Punched: If material is to be used with gaps
| Settings | Default setting | Step width | Easy Plug |
| [5…max. label length][27] | 100 mm | 0.1 mm | #PC1007, #IM |
The value is overwritten by the appropriate Easy Plug command when sending label formats.
Material width
| Settings | Default setting | Step width | Easy Plug |
| 6,0…max. width [28] | 100 mm | 0.1 mm | #PC1007, #IM |
Label sens. type
(Label sensor type)
| Settings | Default setting | Step width | Easy Plug |
| Punched, Reflex, Full size, Reflex (upper) | Punched | — | #PC2015, #IM |
- Punched: Light transmission sensor for labels with transparent or register gaps (self-adhesive labels)
- Reflex: w/o function
- Full size: w/o function
- Reflex (upper): w/o function
28 The max. width depends on several factors, e. g. the memory configuration.
| Settings | Default setting | Step width | Easy Plug |
| [30…107] mm | 107 mm | 1 mm | #PC1033 |
Color Side
| Settings | Default setting | Step width | Easy Plug |
| inside, outside | inside | — | #PC1049 |
- inside: The ribbon roll is wound with the color side inwards.
- outside: The ribbon roll is wound with the color side outwards.
| Setting range | Default setting | Step width | Easy Plug |
| [300.0…600.0] m | 600.0 m | 0.1 m | #PC1038 |
Outer ribbon Ø
(Outer ribbon roll diameter)
| Setting range | Default setting | Step width | Easy Plug |
| [50.0…100.0] mm | 81.3 mm | 0.1 mm | #PC1039 |
Inner ribbon Ø
(Inner ribbon roll diameter)
| Setting range | Default setting | Step width | Easy Plug |
| [28.0…40.0] mm | 33.0 mm | 0.1 mm | #PC1040 |
Inner Ø of the ribbon roll = Outer Ø of the ribbon core!
| Setting range | Default setting | Step width | Easy Plug |
| Off, On | On | — | #PC3306 |
The function reduces the label throughput, since the time required for the head lift per label is about 80 ms.
Temp. reduction
(Reduction in the print head temperature)
| Setting range | Default setting | Step width | Easy Plug |
| [0…100]% | 20% | 5% | #PC2026 |
The following setting alternatives are available:
- 0%: No temperature reduction.
- xx%: Up to xx% temperature reduction with a hot print head.
Ribbon autoecon.
(Ribbon automatic economy)
| Setting range | Default setting | Step width | Easy Plug |
| On, Off | Off | — | #PC2087 |
The ribbon automatic economy mode should only be activated with unprinted areas from at least approx. 10mm in length.
- On: Ribbon automatic economy mode is on
- Off: Ribbon automatic economy mode is off
Only with activated ribbon automatic economy mode (Print > Material > Ribbon > Ribbon autoecon. = “On”).
| Setting range | Default setting | Step width | Easy Plug |
| [0.0..10.0] mm | 0.0 mm | 0.1 mm | #PC2077 |
Ribb. eco. limit
(Ribbon economy limit)
= “On”).
| Setting range | Default setting | Step width | Easy Plug |
| [20..100.0] mm | 10.0 mm | 0.1 mm | #PC2019 |
Feed mode
| Setting range | Default setting | Step width | Easy Plug |
| Head up, Head down | Head up | — | #PC2058 |
- Head up: The printhead is lifted during label material initialization and labelfeeding..
- Head down: The printhead is down during label material initialization and label feeding. For certain critical label materials, this setting can result in a better impression accuracy on the first label compared to the following labels.
Makes it possible to test the cutter function without having to set the parameter Options > Selection > Periph. device to “Cutter”.
Triggers a cut, if a cutter is installed. Without a cutter nothing will happen. Prerequisite: Periph. device is set to “None”.
Selecting favorites in the web panel
mark the favorites. Filled star = parameter selected for favorites menu.
► Click on the star next to the parameter to select it as favorite (see figure above).
Related reference
Machine settings view on page 38
CONNECTIONS![]() WARNING!
WARNING!
This machine operates using mains voltage! Touching live electrical parts may expose you to hazardous electrical currents and may lead to burns.
► Make sure that the machine is switched off before connecting the power cable.
► Only connect the machine to a grounded power socket fitted to authorised standards.
► Only link the machine to devices that fulfil the ES1 circuit requirements specified in EN 62368-1.
CAUTION!
Risk of machine damage due to defective accessories.
► Only connect original accessories.
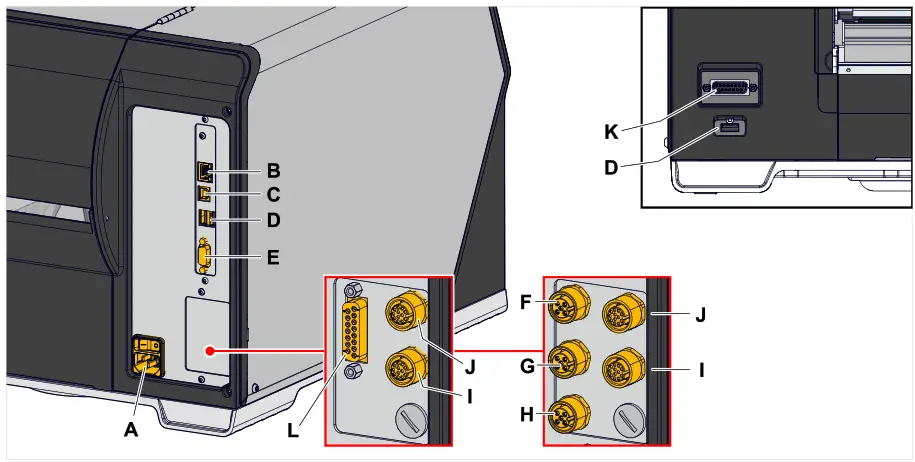 Fig. 33: Connections at a XLP 60x “Peripheral”, optional with “BasicIO” (F-H) and “8IO” (I, J) or with “Basic-USI” (L) and “8IO”
(I, J) interface boards.
| Pos. | Connection | Application |
| A | Connection to the mains power supply | Power supply |
| B | Network connection (Ethernet 10/100/1000) | Used to transfer print jobs from a host (for example a PC); transfer firmware; read service data; operation via web server |
| C | USB device interfaces | Used to transfer print jobs from a host (for example a PC); transfer firmware; read service data |
| D | USB interface type A (host) (2x rear side, 1x front) | Used to connect devices, for example keyboard or scanner or external memory media |
| E | Serial interface (RS232) | Used to transfer print jobs from a host (for example a PC); transfer firmware; read service data |
| F | (Optional) BasicIO board | Connector for a start sensor (standard industrial sensor, e.g. Novexx N102106 or N102109 or foot switch N103110), triggers the printing dispensing cycle. Signal inputs and outputs for controlling the printer or for system integration (4 inputs, 4 outputs) |
| G | ||
| H | ||
| I | (Optional) 8IO board | Signal inputs and outputs for controlling the printer or for system integration (8 inputs, 8 outputs) |
| J | ||
| K | (Optional) Periphery interface | Connector for peripheral devices (e. g. Cutter) |
| L | (Optional) Basic-USI board | Signal inputs and outputs for controlling the printer or for system integration (4 inputs, 7 outputs) |
Related tasks
Connecting to the mains power supply on page 57
Related reference
Connecting to a data host on page 58
Before Operation
ELECTRICAL CONNECTIONS
Connecting to the mains power supply![]() WARNING!
WARNING!
This machine operates at mains voltage! Contacting electrically live components can cause lethal electrical shocks and burns.
► Make sure that the machine is switched off before connecting the power cable.
► Only operate the machine at the mains voltage given on the type plate.
► Only connect the machine to a grounded power socket fitted to authorised standards.
Procedure
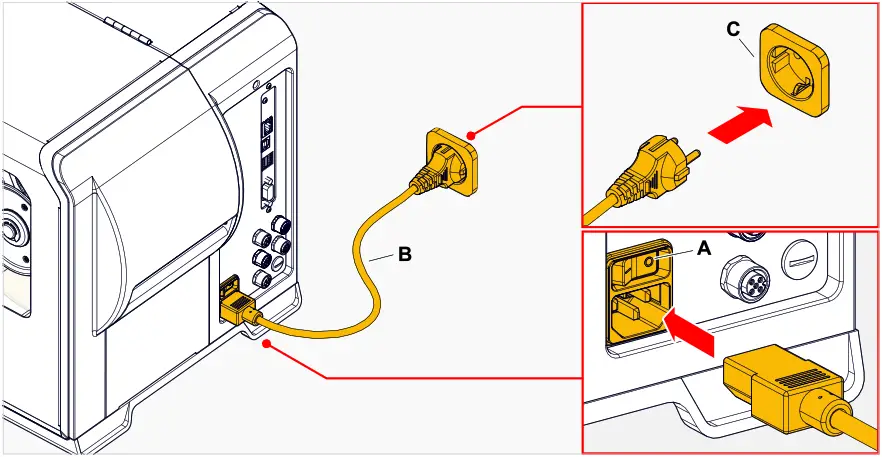
Connecting the mains connection cable:
- Ensure that the machine is switched off (mains power switch (A) in position “O”).

- Connect the machine to a mains power socket (picture above, C) using the provided mains connection cable (picture above, B).
Depending on the country of delivery, the mains connection cable may have a different plug for the public power supply than the one shown.
Disconnecting the mains connection cable: - Pull off the cable at the plug.
Connecting to a data host
The print data can alternatively be transmitted via one of the data interfaces:
- Ethernet
- USB
- Serial interface
The desired data interface is prompted by the setup wizard the first time you switch on the machine.
The default setting is automatic recognition of the data interface.
Without using the setup wizard, the interface type can be selected with the parameter Interface > Print interface.
 Fig. 34: Data interfaces at the XLP 60x (A Ethernet, B USB, C RS 232).
► Connect the data interface to the data host using a commercially available data cable..
You might have to set other parameters as well, depending on the interface chosen:
- Settings for the serial interface: Interface > Serial Port 1
- Settings for the Ethernet interface: Interface > Network
► Call the network setup wizard System > Setup Wizards = “Network” to call all relevant parameters automatically.
As an alternative to transmission via a data line, print jobs can also be stored on an external storage medium and called up from there.
SWITCHING ON/OFF
Switching on
► Set the mains switch (A) of the machine to “I” (On).
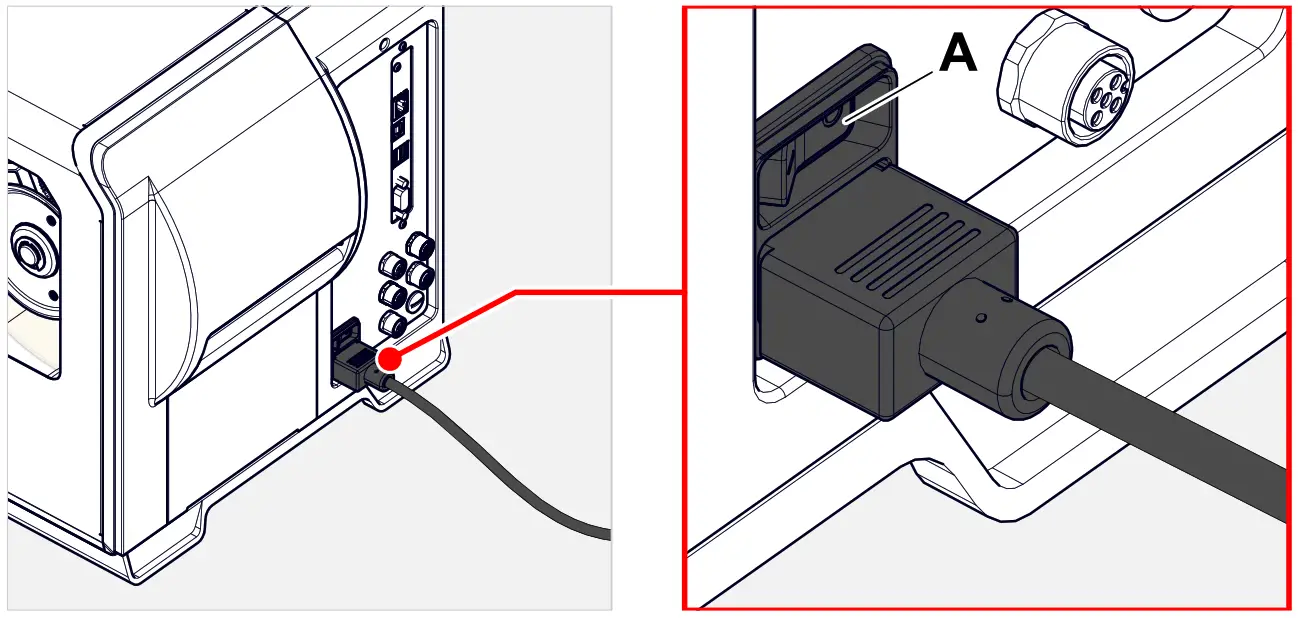 Fig. 35: Mains switch at the XLP 60x.
Shortly after switching on the printer, during startup, the following informations show up on the screen:
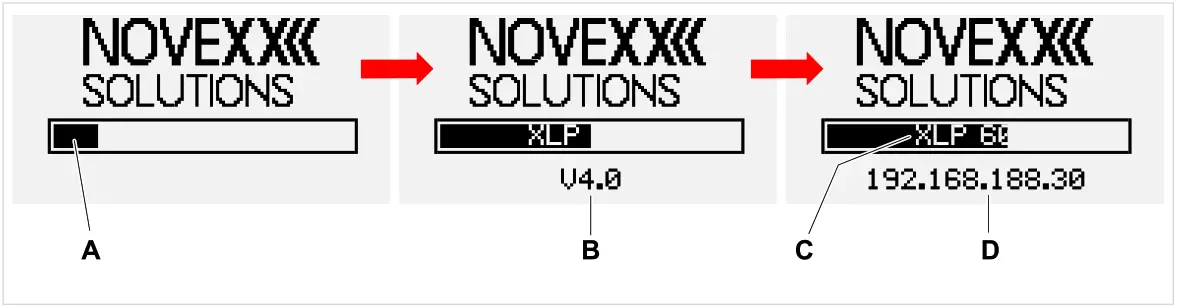 Fig. 36: Changing informations on the screen during startup: A Progress bar, B Firmware version, C Printer type, D
(Optional) IP address (if Ethernet is selected as data interface).
After startup, the “Ready” display appears:
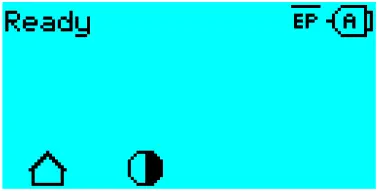 Fig. 37: Display “Ready” on the machine ready for operation.
Switching off
► Set the mains switch (A, figure above) of the machine to “O” (Off).
Restart
A restart is faster than switching the machine on and off completely, as only part of the firmware is restarted.
► Press the keys 1 + 2 + 3 simultaneously. Display:
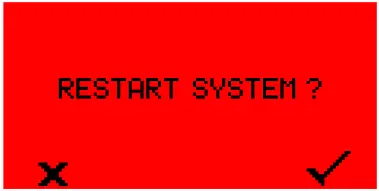 ► Press the
![]() key to confirm and to trigger the restart.
key to confirm and to trigger the restart.
BASIC SETTINGS
Basic settings with the setup wizard
The setup wizard controls the automatic retrieval of basic settings in the parameter menu that are essential for the operation of the printer.
After the first starting-up of the printer, the display shows the query „Run Setup Wizard?“.
After selecting “Yes”, the parameters for the most important basic settings are queried in several groups. The relevant parameters are automatically called up for this purpose. After the basic settings, e.g. for the language or the printer interface, the network and dispense settings are optionally queried (yes/no query in each case).
Which parameters are called also depends on the selection in the preceding parameter. The last step is to display a summary of the settings made (fig. below), which must be confirmed by pressing a key.
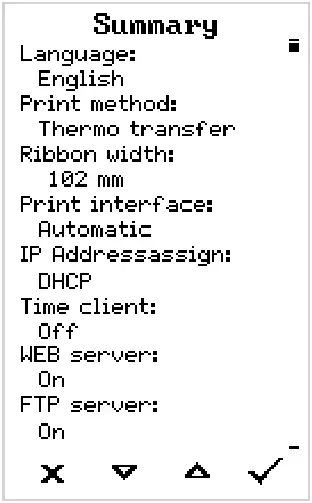 Fig. 38: Summary of the settings done by the wizard (Example, merged by
image processing, in fact it must be scrolled to see all lines).
Execute settings:
► Press the![]() key.
key.
A restart takes place and the settings are made.
Discard settings:
► Press the![]() key.
key.
The setup wizard then starts again until either the settings are made or “Run Setup Wizard?” is answered with “No”.
If “No” is selected in response to the initial question, the setup wizard will not start and the prompt “Run Setup Wizard?” will not appear even after a restart. There are then two possibilities to carry out the basic settings:
 Call up and set the corresponding parameters manually
- Start the setup wizard manually (parameter System > Setup Wizards)
Operation
INSERTION DIAGRAM
XLP 60x
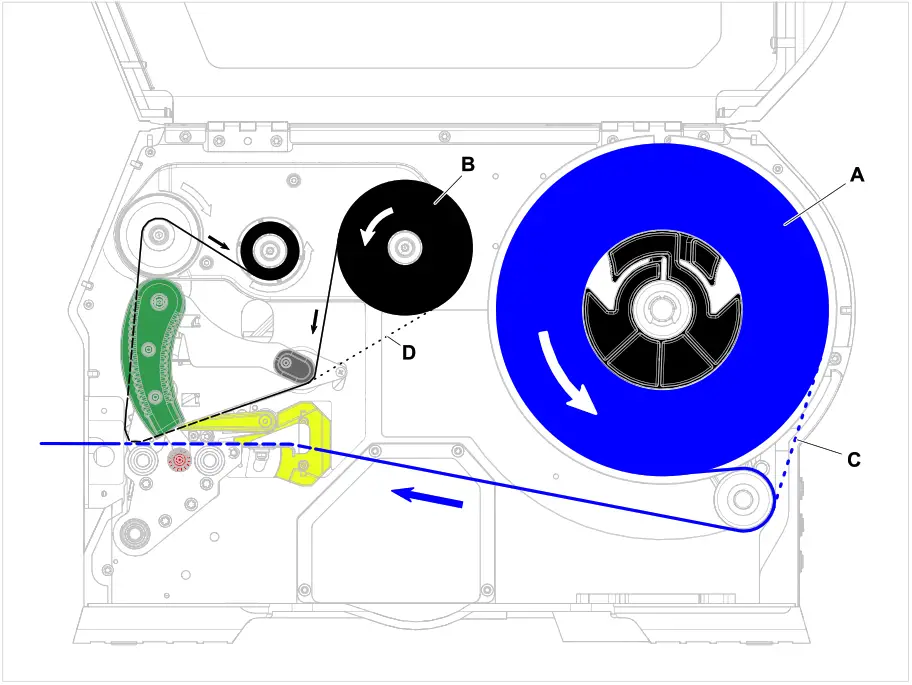 Fig. 39: Insertion diagram for XLP 60x. A: label material, B: thermotransfer ribbon, C: path for inside wound label material,
D: path for thermotransfer ribbon wound with ink outside.
XLP 60x with internal rewinder and dispensing edge M
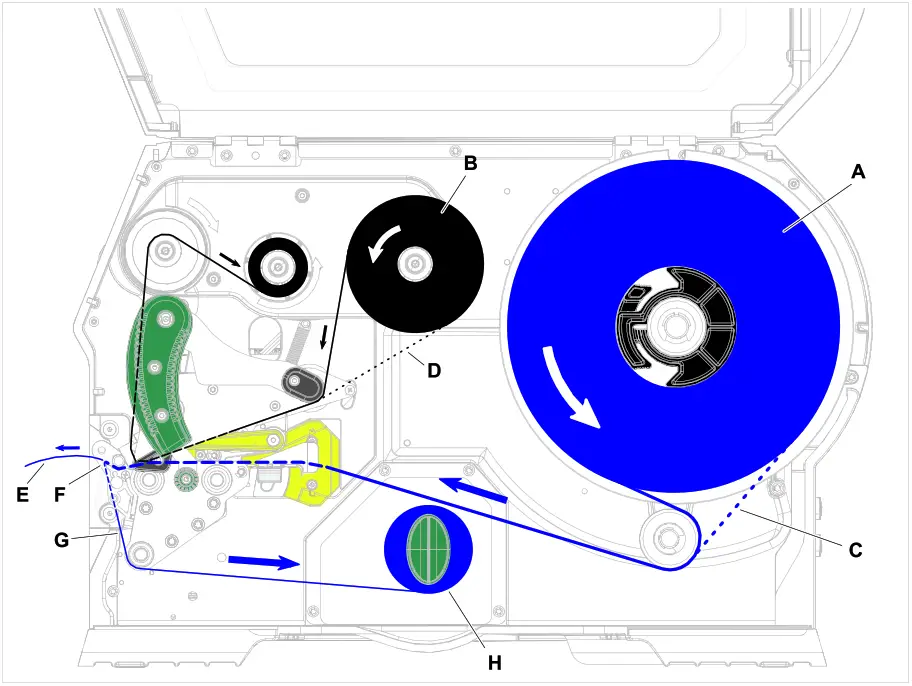 Fig. 40: Insertion diagram for XLP 60x Dispenser. A: label material, B: thermotransfer ribbon,
C: path for inside wound label material, D: path for thermotransfer ribbon wound with ink outside,
E: dispensed label, F: dispensing edge, G: backing paper, H: internal rewinder.
Related tasks
Inserting ribbon on page 64
XLP 60x Standard: Inserting roll material on page 70
XLP 60x Standard: Inserting leporello material on page 73
XLP 60x with internal rewinder: Inserting roll material on page 76
INSERTING AND REMOVING RIBBON![]() WARNING!
WARNING!
Sharp-edged clamping plates on the ribbon mandrels!
Danger of cuts on the hands.
► Be careful when sliding on/removing the ribbon roll.![]() WARNING!
WARNING!
During operation, the print head can become hot!
► Be careful when touching the print head.![]() WARNING!
WARNING!
Danger of injury due to moving and rapidly rotating parts.
► When working on the machine, do not wear loose jewellery, long sleeves, long hair, and similar.
► Before inserting the label roll ensure that the machine is in offline mode ( Home screen).
► Close the devices cover before printing.
Inserting ribbon
Before you begin
- Machine is stopped ( “Home” screen)
- Used ribbon has been removed
- New ribbon roll is at hand (ribbon must match the technical data)
- At first time loading: Empty cardboard sleeve is at hand
- The warning notes about inserting ribbon have been read and understood (see “Inserting and removing ribbon” on page 64)
Procedure
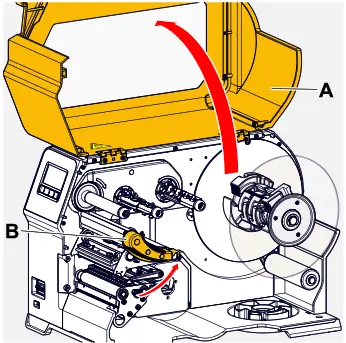
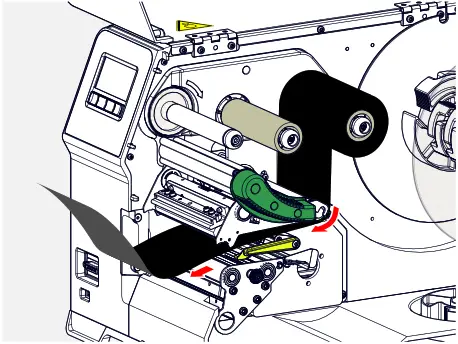
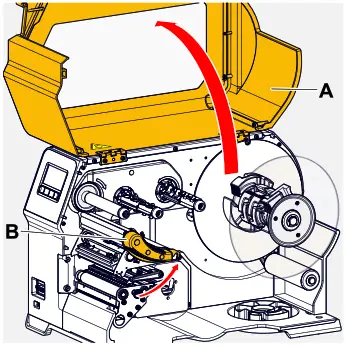
- Open the front hood (A, figure below).

- Open the pressure lever on the print head (B, figure above).
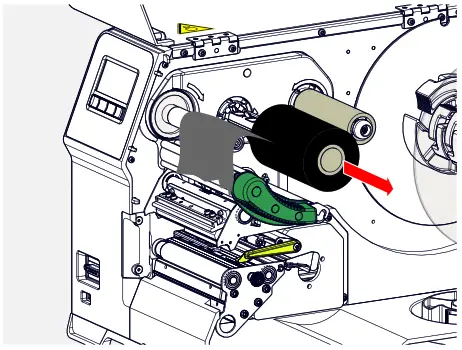
- Push the empty cardboard sleeve onto the rewinding mandrel until it stops (A, figure below).

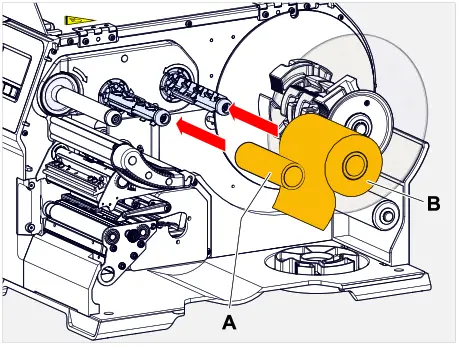
- Push the ribbon roll onto the unwinding mandrel until it stops (B, figure above).
Depending on the winding direction of the ribbon (color side inside or outside), the roll must be inserted differently:
– Colour side inside: counterclockwise rotation (pictures)
– Colour side outside: clockwise rotation - Insert the ribbon under the print head as shown:

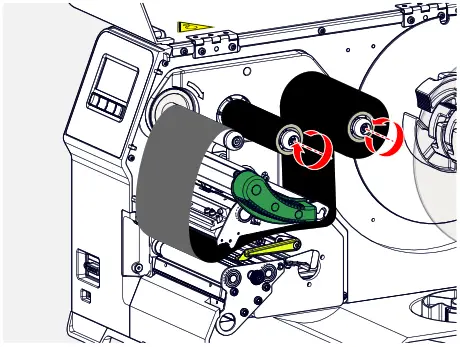
- CAUTION!
Poor printing results due to wrinkling of the ribbon!
► Tape the ribbon to the cardboard core as described (in no case wrap or knot the ribbon end around the cardboard core – the knot would lead to wrinkling!)
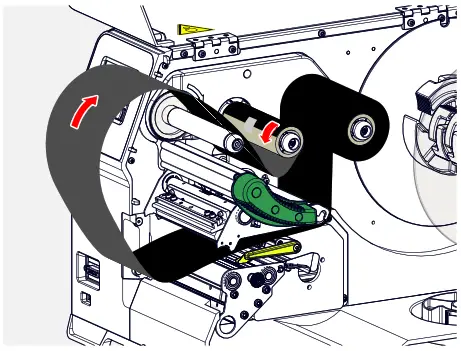
Insert the ribbon into the printer as shown. Fasten the end of the ribbon with adhesive tape to the empty ribbon sleeve (figure below).
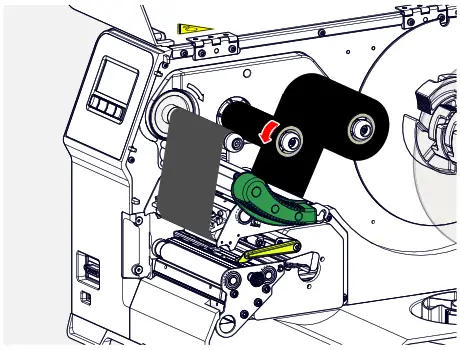
- Rotate the rewinding mandrel a few turns in a counter-clockwise direction until the ribbon is free of folds.

- Close the pressure lever and the front hood.
- (Optional) If the ribbon type is used for the first time: Make the following parameter settings in the menu Print > Material > Ribbon:
– Ribbon width on page 51
– Color Side on page 51
– Ribbon length on page 51
– Outer ribbon Ø on page 51
– Inner ribbon Ø on page 51
Related reference
Insertion Diagram on page 62
Removing the used up ribbon
Before you begin
- Machine ist stopped ( “Home” screen).
- The warning notes about inserting ribbon have been read and understood (see “Inserting and removing ribbon” on page 64)
About this task
If a ribbon roll is used up, the used ribbon is all wound up on the rewinding mandrel and has to be removed from there. The ribbon end is signaled by the appropriate status message or warning on the operation panel of the machine. If a signal beacon is connected, the lamps light up.
Procedure
- Open the front hood (A, figure below).

- Open the pressure lever on the print head (B, figure above).
- Pull the roll of used ribbon from the rewinding mandrel:

- Remove the empty cardboard sleeve from the unwinding mandrel and push it onto the rewinding mandrel.

- Clean the print head.
What to do next
Inserting a new ribbon roll.
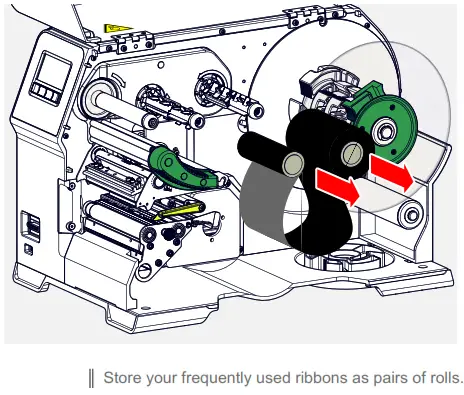
Alternating use of different sorts of ribbon
Before you begin
The warning notes about inserting ribbon have been read and understood (see “Inserting and removing ribbon” on page 64)
About this task
To switch between different types of ribbons, there is no need to cut off the ribbon each time and then insert it and fasten it to the ribbon rewinder.
It’s easier as follows:
Procedure
- Open the pressure lever.
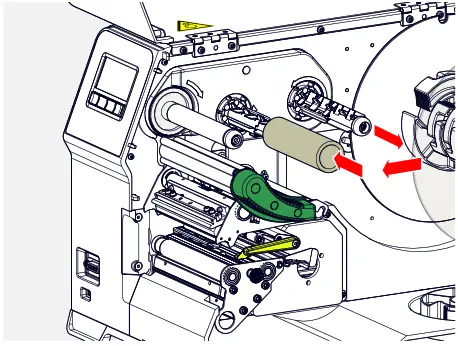
- Loosen the ribbon between the mandrels:

- Remove both rolls of ribbon from the mandrels. Pull away the ribbon sideways from the print head:
 Insert a different pair of rolls as follows:
 - Push the ribbon between the rolls sideways below the print head.
- Push the ribbon rolls onto the mandrels and tighten the ribbon.
 Insert a different pair of rolls as follows:
INSERTING AND REMOVING LABEL MATERIAL
WARNING!
During operation, the print head can become hot!
► Be careful when touching the print head.
WARNING!
Danger of injury due to moving and rapidly rotating parts.
► When working on the machine, do not wear loose jewellery, long sleeves, long hair, and similar.
► Before inserting the label roll ensure that the machine is in offline mode ( Home screen).
► Close the devices cover before printing.
WARNING!
Danger of injury caused by falling label roll.
► Wear safety shoes.
XLP 60x Standard: Inserting roll material
Before you begin
- Machine is stopped ( “Home” screen)
- The label material is available as a roll and is wound with the label side facing outwards (if this is not the case, please note the different threading scheme)
Adapter rings for 100 mm (4“) core diameter: article number N103045 (2 pieces) - The warnings for loading label material have been read and understood (see “Inserting and removing label material” on page 70)
Procedure
- Open the front hood (fig. below, A).

- Open the print head pressure lever (fig. above, B).
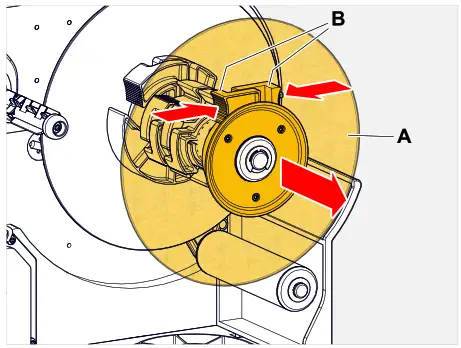
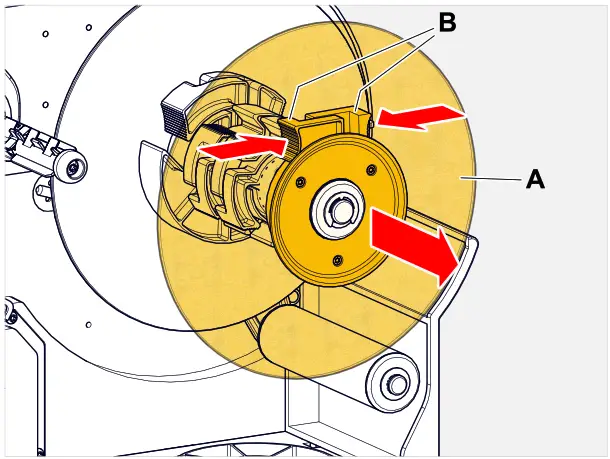
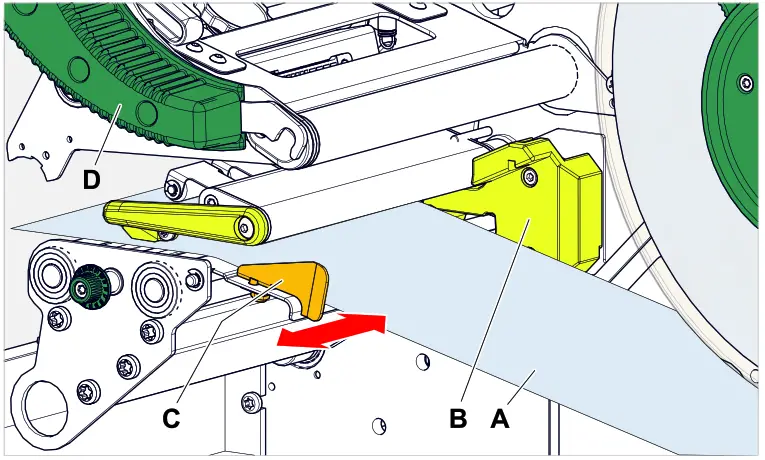
- Press the two handles (B) on the guide disc together to release the clamping; at the same time, pull the guide disc off the unwinder mandrel.

- (Optional) If the inner diameter of the material roll is larger than the diameter of the unwinder mandrel: Attach adapter rings (picture).
To do this, press the adapter rings together at the grip surfaces, push them to the desired position and release the grips again.
The adapter rings must fit into the core of the material roll with as little play as possible (A).
Push the inner adapter ring onto the dispenser as far as it will go. Adjust the outer adapter ring to the width (X) of the material roll.
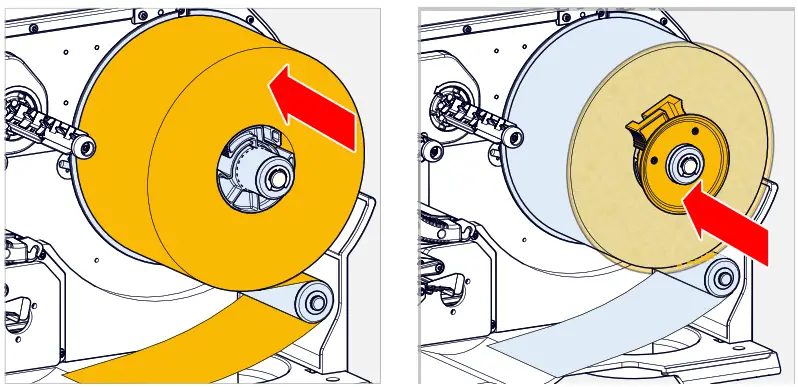
- Push the label roll onto the unwinder as far as it will go (picture left). Place the material web around the dancer arm.

- Push the guide disc against the material roll as far as it will go (picture top right).
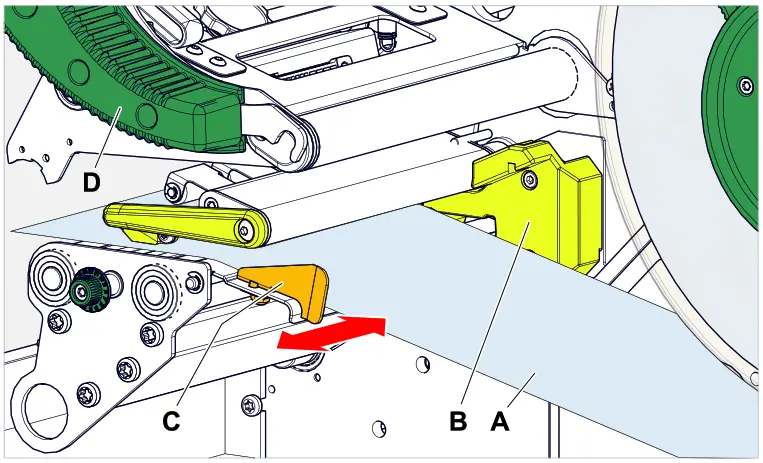
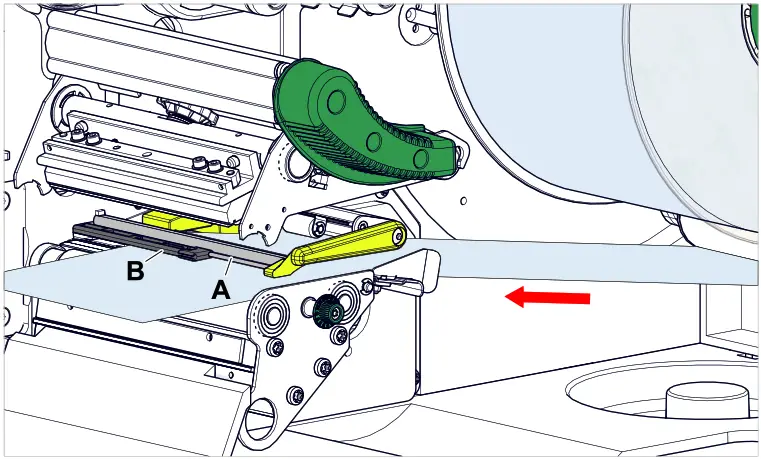
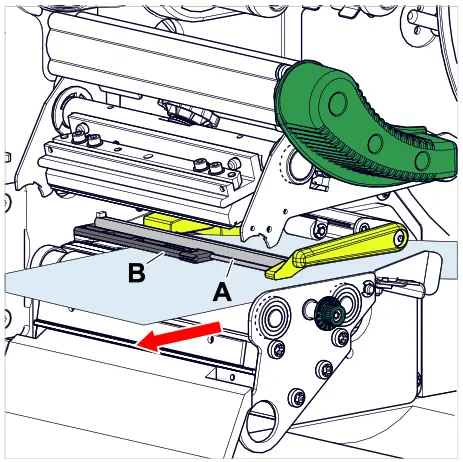
- Push the web through the print module as shown.
The material web must run under the aluminium profile (A) and through the light barrier fork (B).
- Push the material web (A) towards the inner material guide (B). Push the outer material guide (C) close to the edge of the material web without pinching the material.
 9. Close the print head pressure lever (fig. above, D).


 9. Close the print head pressure lever (fig. above, D).
What to do next
If the label stock is different from the one used before: Setting the label sensor.
Related tasks
Positioning the Label Sensor on page 80
Related reference
Insertion Diagram on page 62
Procedure
- Open the front hood (fig. below, A).

- Open the print head pressure lever (fig. above, B).
- Press the two handles (B) on the guide disc together to release the clamping; at the same time, pull the guide disc off the unwinder mandrel.

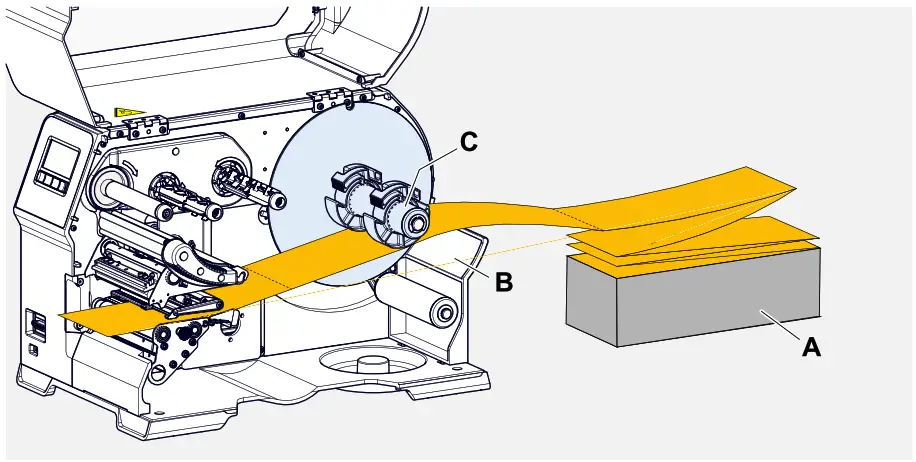
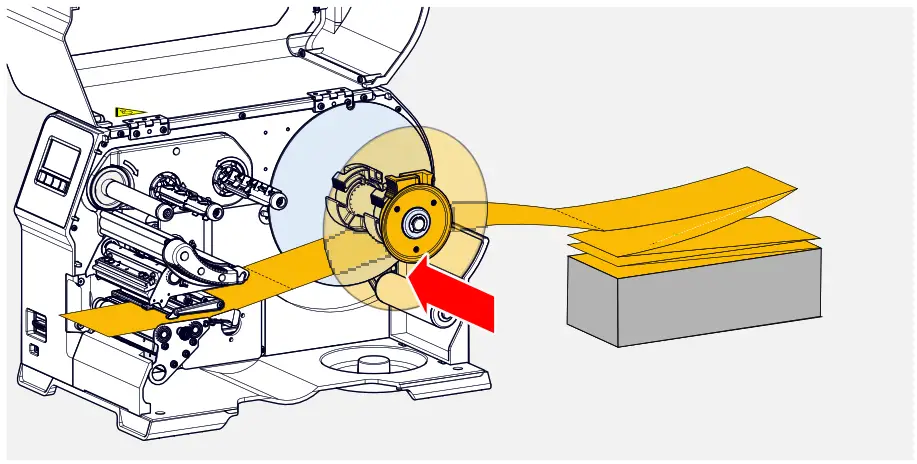
- Place the label material (A) behind the printer. Guide the material web over the lower part of the housing (B) and under the unwinder (C) to the print module.
The side of the label material to be printed faces up.
- Push the web through the print module as shown.
The material web must run under the aluminium profile (A) and through the light barrier fork (B).
- Push the material web (A) towards the inner material guide (B). Push the outer material guide (C) close to the edge of the material web without pinching the material.

- Close the print head pressure lever (fig. above, D).
- Reinstall the unwinder guide disc and push it close to the edge of the material without pinching the material.


What to do next
If the label stock is different from the one used before: Setting the label sensor.
Related tasks
Positioning the Label Sensor on page 80
Related reference
Insertion Diagram on page 62
XLP 60x with internal rewinder: Inserting roll material
Before you begin
- Printer with internal rewinder and baffle plate
- Rewound backing paper was removed
- Internal rewinder is activated (Options > Selection > Periph. device = “Intern. rewinder”)
- Machine is stopped ( “Home” screen)
- The label material is available as a roll and is wound with the label side facing outwards (if this is not the case, please note the different threading scheme)
- The warnings for loading label material have been read and understood (see “Inserting and removing label material” on page 70)
Procedure
- Open the front hood (fig. below, A).

- Open the print head pressure lever (fig. above, B).
- Press the two handles (B) on the guide disc together to release the clamping; at the same time, pull the guide disc off the unwinder mandrel.

- (Optional) If the inner diameter of the material roll is larger than the diameter of the unwinder mandrel: Attach adapter rings (picture).
To do this, press the adapter rings together at the grip surfaces, push them to the desired position and release the grips again.
The adapter rings must fit into the core of the material roll with as little play as possible (A).
Push the inner adapter ring onto the dispenser as far as it will go. Adjust the outer adapter ring to the width (X) of the material roll.
- Push the label roll onto the unwinder as far as it will go (picture left). Place the material web around the dancer arm.

- Push the guide disc against the material roll as far as it will go (picture top right).
- Push the web through the print module as shown, move the end of the label web around the baffle (C) plate towards the rewinder (D) and fasten it with the clamp (E).
The material web must run under the aluminium profile (A) and through the light barrier fork (B).
- Push the material web (A) towards the inner material guide (B). Push the outer material guide (C) close to the edge of the material web without pinching the material.

- Close the print head pressure lever (fig. above, D).
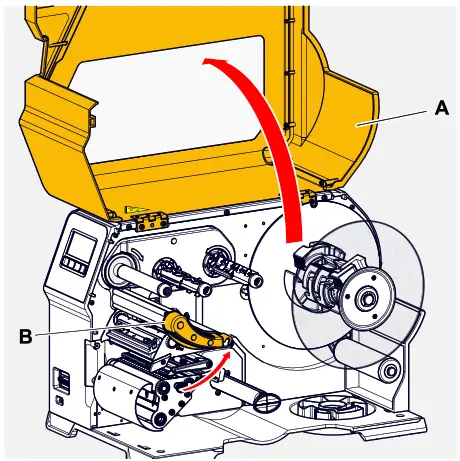

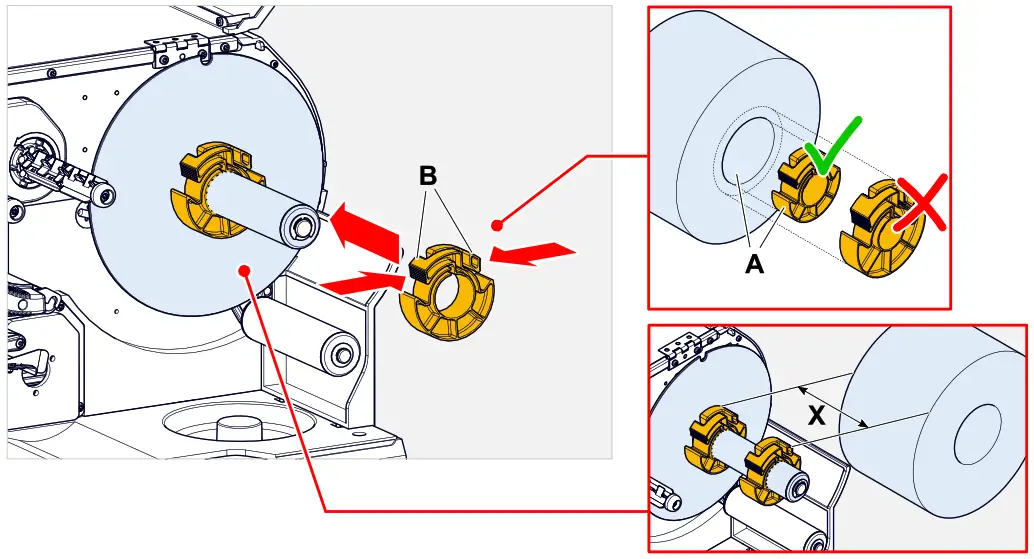
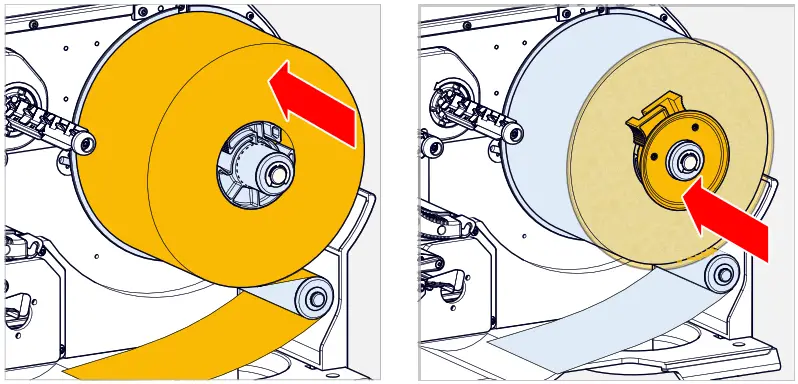
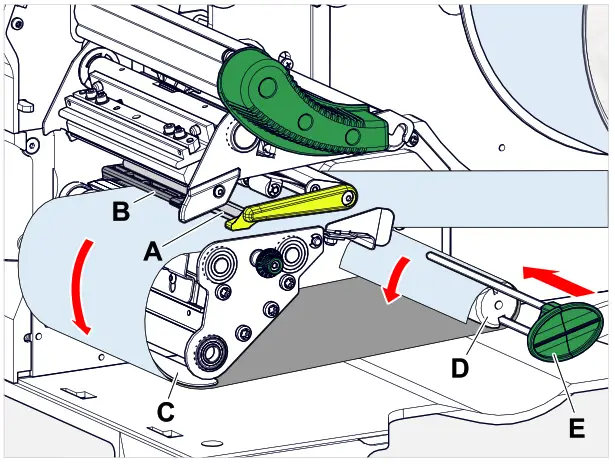
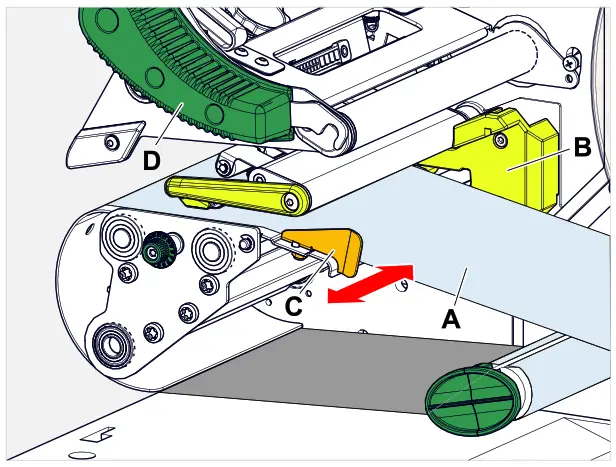
What to do next
If the label stock is different from the one used before: Setting the label sensor.
Related tasks
Positioning the Label Sensor on page 80
Related reference
Insertion Diagram on page 62
SETTING AND MONITORING
Positioning the Label Sensor
About this task
Adjusting the label sensor position is necessary, if
- the machine is put into operation for the first time
- a material change takes place on wider or narrower material or on material with different punching form/type
Procedure
- Open the print head pressure lever.
- Move the label sensor crosswise to the printing direction by turning the rotary knob (A) until the sensor (B) is centered above the gap between the labels or above the punch.
The sensor (B) is somewhat set back at the label sensor holder.
- Close the print head pressure lever.
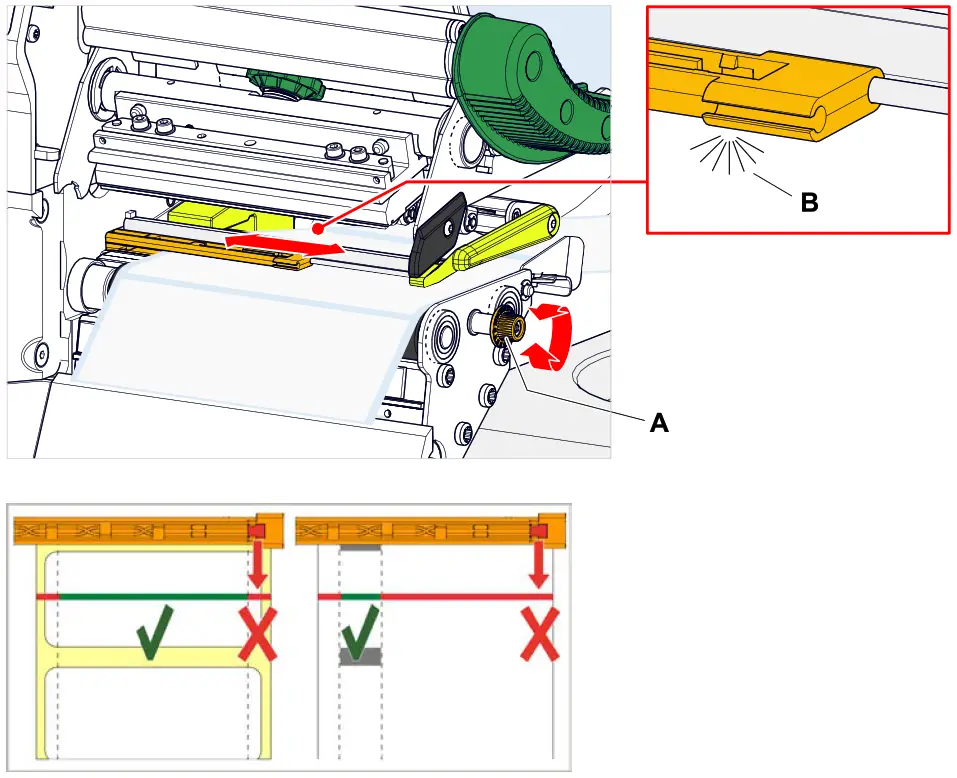
Settings in the Parameter Menu
The settings described below are generally included in the print job, in which case they do not need to be made. Manual settings that were made before a print job was transferred will be overwritten by the settings in the print job.
- Label pitch on page 81
- Material width on page 82
- Material type on page 82
- Print process on page 82
- Temperature Compensation on page 82
Label pitch
► Toggle to the “Home” screen.
A) To measure label pitch automatically:
► Press the keys 3 + 4.
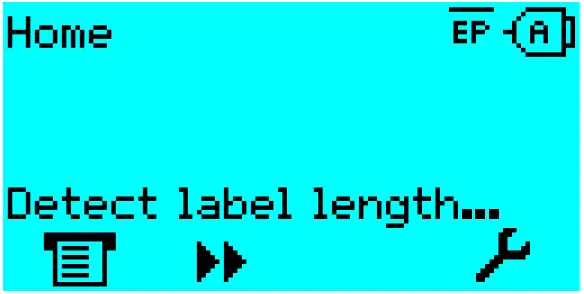 Fig. 41: The label pitch is being measured.
The printer moves the label material forward until the two label starting marks have moved through the label sensor. The label pitch determined in this way is displayed (see fig. below) and transferred to parameter Print > Material > Label > Material length. Parameter Print > Material > Label > Material type is set to “Punched”.
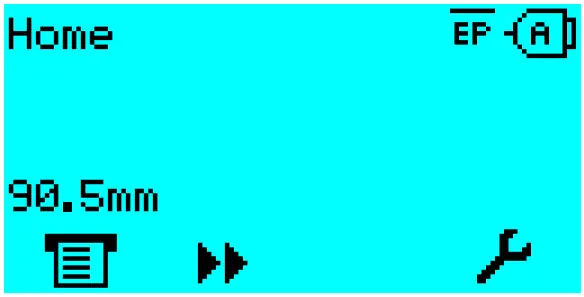 Fig. 42: Dispay of the measured label pitch.
B) To enter the label pitch manually:
- Measure label pitch (C).
- Call Print > Material > Label > Material length and enter the measured value in millimetres.
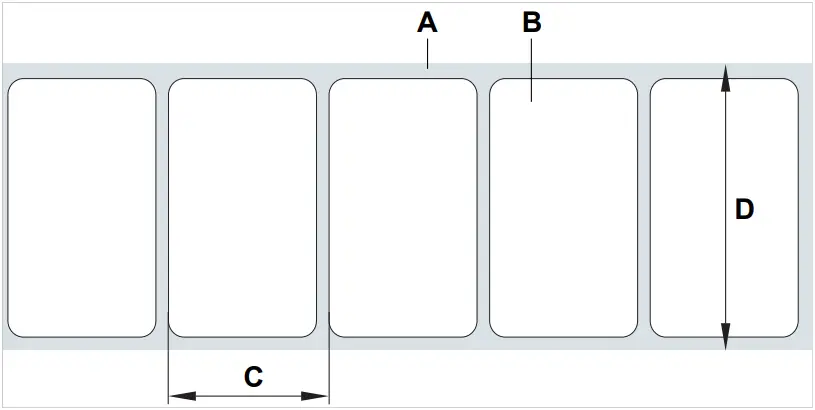 Fig. 43: Label material (self-adhesive labels) (A: Label web (backing paper),
B: Label, C: Label pitch, D: Material width)
Material width
- Measure the width of the material web (D) (including backing paper).
- Call Print > Material > Label > Material width and enter the measured value in millimetres.
Material type
If the automatic material length measurement function is used, the material type is automatically set to “Punched”.
► Set Print > Material > Label > Material type to “Punched” or “Endless”, depending on the used material.
Print process
Printing without ribbon (direct thermal):
► Print > Material > Label > Print method = “Thermal printing”.
Printing with ribbon (thermal transfer):
► Print > Material > Label > Print method = “Thermo transfer”.
Temperature Compensation
The print contrast is heavily dependent on the temperature of the print head. This can be set using the parameter Print > Print contrast or, during printing, after pressing key 2.
When the printer is being used for a big print job, the temperature of the print head and the print contrast increase during printing. This increase is greater, the larger the print job and the larger the amount of black to be printed.
In extreme cases, this rise in temperature can lead to smearing in fine structures when printed, e.g. barcodes arranged crosswise to the printing direction. To avoid this, the firmware constantly checks and corrects the print head temperature. The precondition for this is that the parameter System > Print Control > Temp. reduction is set to a value > 0 (Default: 20%).
The temperature compensation is the greater, the higher the setting of the parameter System > Print Control > Temp. reduction is (see fig. below).
| Parameter | Function |
| Print > Print contrast | Sets the print contrast, i.e. indirectly, the print head temperature (actually adjusts the driving power of the print head). |
| System > Print Control > Temp. reduction | Sets the correction factor for the temperature compensation. The higher the selected setting, the greater the reduction of the driving power when the print head temperature rises. |
Table 16: Parameters for setting the temperature compensation.
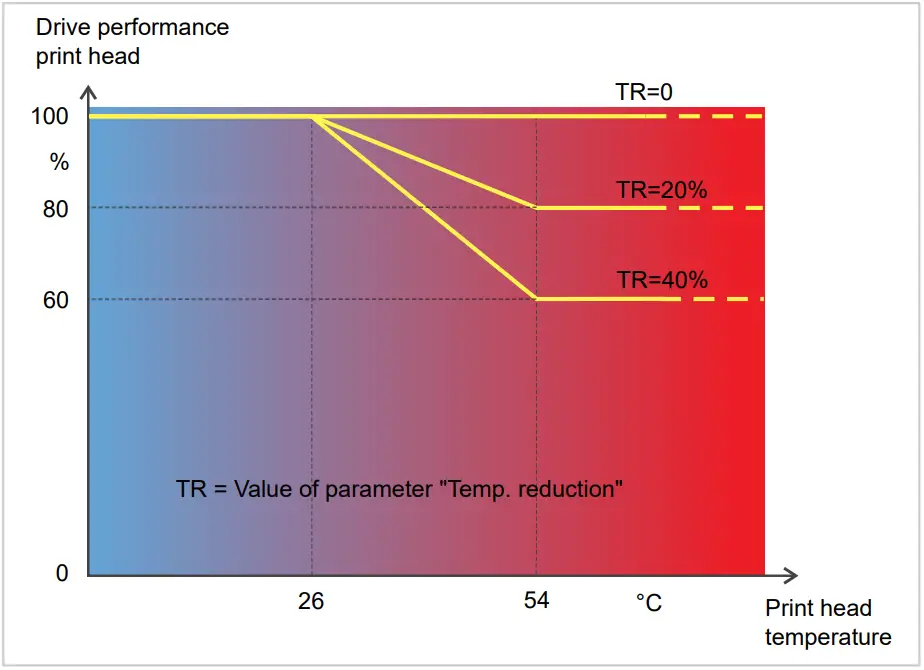 Fig. 44: With the parameter System > Print Control > Temp. reduction activated, the driving power of the print head
– and therefore indirectly the print contrast – are reduced. Reduction starts at a temperature
of 26°C. The maximum value is maintained at 54°C and above.
Readout example:
The printing layout contains a lot of black areas. For this reason, the temperature reduction is activated with 40%.
► System > Print Control > Temp. reduction = 40%.
Now, if the print head temperature rises above 26°C, t e driving power will be reduced automatically.
Reading out the diagram results in: With a given print head temperature of approx. 40 °C, the driving power is reduced to approx. 80%; with a supposed print head temperature of 54 °C or above, it is reduced to 60%.
Monitoring functions
The following functions monitor machine operation:
- Missing labels on page 84
- Ribbon reserve on page 84
- Ribbon end on page 85
- Material end on page 86
Missing labels
Normally a missing label on the label web does not interfere with print operation. Label feed continues running until the start of a label has moved up under the label sensor again. It may be necessary in some cases, however, to report the missing labels. When function System > Print Control > Miss. label tol. is set, an error message can be generated after one, or after several missing labels:
Status num: 5001
No gap found
At the same time the printer stops.
Ribbon reserve
The ribbon reserve is displayed during printing as remaining length in meter (A):
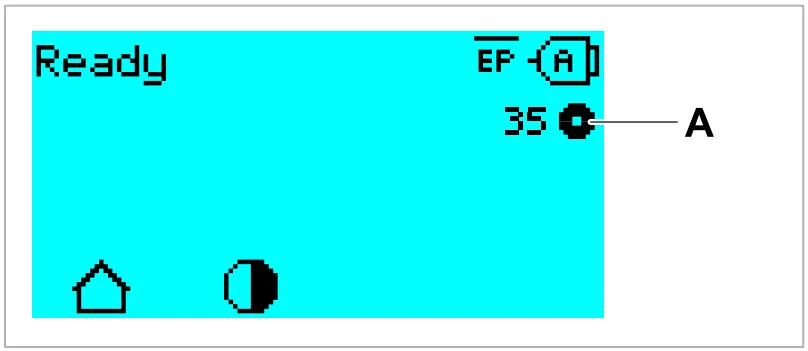 Fig. 45: Display of the remaining ribbon length (A, here: 35 m).
The display of the ribbon reserve only begins after some rotations of the ribbon roll.
To be able to display the value of the remaining ribbon length as exact as possible, some characteristics of the ribbon roll have to be set:
► Set Print > Material > Ribbon > Ribbon length to the ribbon length in meters.
► Set Print > Material > Ribbon > Outer ribbon Ø to the outer-Ø (D) of the ribbon roll in millimeters.
► Set Print > Material > Ribbon > Inner ribbon Ø to the inner-Ø (d) of the ribbon roll in millimeters.
Inner-Ø ribbon roll = Outer-Ø ribbon core!
The default setting matches the NOVEXX Solutions standard ribbon 10287-600-xxx.
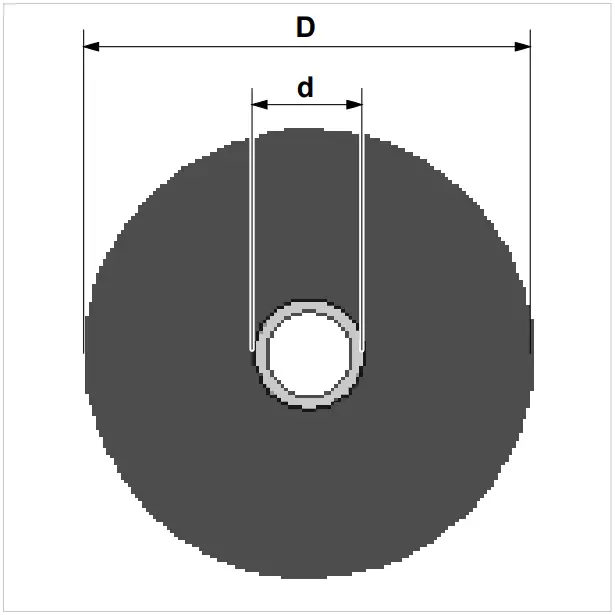 Fig. 46: Outer (D) and inner (d) diameter of the ribbon roll.
To monitor the ribbon reserve, a critical ribbon length can be set. If the remaining length falls below
this level, a warning or an error message appears – depending on the setting.
► Set System > Print Control > Ribbon end warn. to the desired critical ribbon length in millimetres.
► Set System > Print Control > Ribbon warn stop to the desired behavior:
• Off: Printer shows ribbon warning and does not stop:
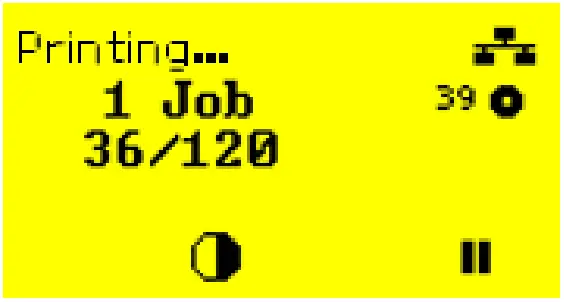 Fig. 47: Ribbon warning during a print job: yellow background, the ribbon icon flashes.
- On: Printer shows ribbon warning and shorty afterwards an error message and stops after the current label:
Status num: 5110
Ribbon low
Ribbon end
Once the end of the ribbon has been wound away and the unwinding mandrel no longer rotates, the following message will appear:
Status num: 5008
Ribbon end
► Proceed as described under .
End-of-ribbon detection can be shut off when required, e.g. for direct thermal printing:
► To do this, set Print > Material > Label > Print method to “Thermal printing”.
Material end
After the end of the material roll passes by the punch sensor, the following status message appears:
Status num: 5002
Material end
► Open the pressure lever and pull the end of the material forwards out of the printer.
PRINTING
Creating Print Jobs
There are two ways to create a print job:
- Using layout software
Layout software may include any type of software that has a print function (for example text processing). Special label layout software is more suitable, for example NiceLabel[29]. Prerequisite is an installed printer driver.
Find the appropriate printer driver and an installation instruction on our web page[30]. The driver supports the following Windows operation systems:
Windows 7 / Windows 8 / Windows 8.1 / Windows 10 / Windows Server 2008 / Windows Server 2008 R2 / Windows Server 2012 / Windows Server 2012 R2 / Windows Server 2016. - Coding print jobs with Easy PlugThe label layout is described by a sequence of Easy Plug commands saved in a text file. This method requires good knowledge of the command language Easy Plug.
Transferring a Print Job from a Host by Means of Layout Software
Describes how to tranfer a print job from a host using a data cable and layout software.
Before you begin
- The data interfaces of host and printer are connected with a suitable data cable
- The data interface is set accordingly in the printer’s parameter menu
- Layout software and a suitable driver are installed on the host
Procedure
- Select a suitable data interface in the layout program.
- Open an stored label layout or create a new layout.
- Start printing in the layout program.
29 www.nicelabel.com
30 www.novexx.com
Transferring a Print Job from a Host by Means of a Command file
Describes how to tranfer a print job from a host using a data cable and a text file containing Easy Plug commands ( “command file”).
Before you begin
- The data interfaces of host and printer are connected with a suitable data cable
- The data interface is set accordingly in the printer’s parameter menu
Procedure
- At the host: open the Windows command prompt window.
- Open the folder that contains the command file.
- (Optional) Serial interface: copy testjob.txt com1
- (Optional) Ethernet/USB interface: copy testjob.txt \\ComputerName\ShareName
– ComputerName: can be found under Windows 10 as follows:
a. Press the key. The start menu opens.
b. Type “System Information” into the search field. The window “System Informations” opens.
c. In the right part of the window, seek the entry “System Name”. The string right of it is the Computer Name.
– ShareName represents the share name for a printer connected to a specific port, such as the USB port or the TCP/IP port. Enter the ShareName as follows:
a. Press the key. The start menu opens.
b. Type “Printers & scanners”. Acknowledge with the Enter key. The window “Settings > Printers & scanners” opens.
c. Click on the desired printer name.
d. Click “Manage”.
e. Click “Printer properties”.
f. Open the “Sharing” tab (fig. below).
g. Enter a name into the field “Share name” and check “Share this printer”.
h. Click “OK”.
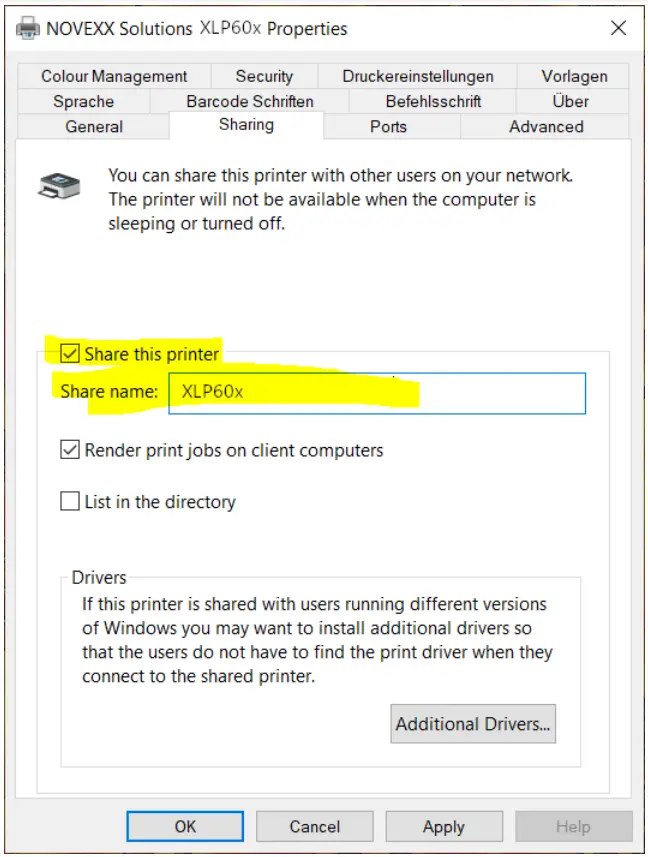 Fig. 48: Entering a share name under Windows 10.
Starting a Print Job from an External Memory Medium
Before you begin
- The print job is stored on an external storage medium (e. g. USB thumb drive) in folder \Formats.
- The name of the print job file ends with .for
- Drive letter C: must be assigned to the storage medium (that is, Interface > Drives > Drive C must be set to that storage medium on which the file with the print job is stored, that is “USB1” or “USB2”)
Procedure
- Switch off the printer.
- Connect the memory medium to the printer.
- Switch on the printer.
The printer shows the “Ready” screen (cyan). - Press the keys 2+4 to switch to standalone mode.
A file selection dialog for memory media appears:
If an external storage medium is not displayed: Press key 1. This updates the list.
- Select a memory medium and confirm the selection.
A file selection dialog appears, which shows the printjobs stored on the selected memory medium:
- Select a print job with the keys 2 and 3. Press key 4 to load the print job.
Another selection dialog appears. It offers to change the print amount, which is initially defined in the print job (fig. left). Depending on the print job, there can be more input fields (fig. right). Fig. 49: File selection in standalone mode (left: standard field for querying the print amount; right: additional data input fields)
 - Press key 2 to start the print job without changing the print amount.
To change the print amount or other input fields, see figure below.
If the printer showed the “Ready” screen before it was toggled into standalone mode, the printing starts immediately. - Press the keys 2+4 to toggle to the “Ready” screen.
 Fig. 50: Changing the print amount in standalone mode.

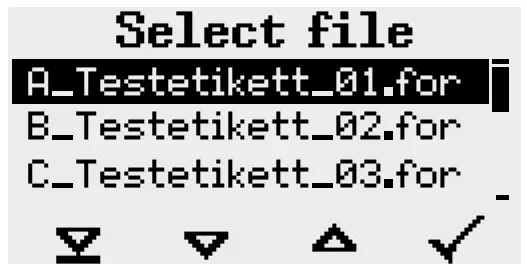
 Fig. 49: File selection in standalone mode (left: standard field for querying the print amount; right: additional data input fields)
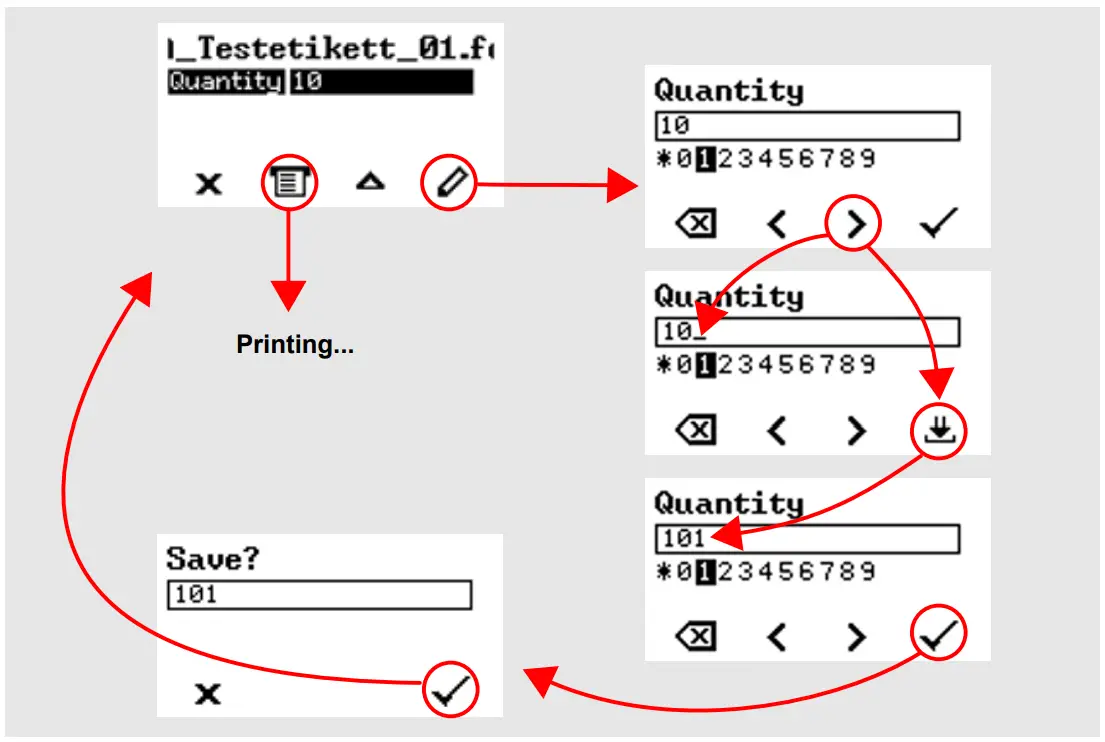 Fig. 50: Changing the print amount in standalone mode.
Starting and Monitoring a Print Job
The printer starts to print, as soon as the following conditions are met:
- The printer is switched on
- The display shows the “Ready” screen
- A print job has been transmitted and interpreted
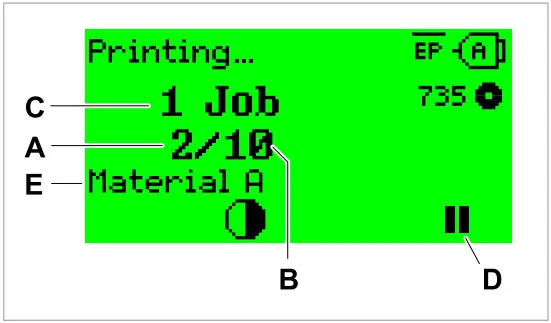 Fig. 51: Display during the printing (A: Already printed labels of the current print job,
B: Labels to be printed of the current print job, C: Amount of queued printjobs,
D: Pause key, stops the printing).
If the printer shows the “Home” screen:
► Press the![]() key, to toggle to the “Ready” screen, to start printing.
key, to toggle to the “Ready” screen, to start printing.
Display examples:
|
|
 Fig. 52: Print job with endless print amount.
 Fig. 53: Stopped print job. Press key 4 to continue printing.
STANDALONE OPERATION
Requirements and Functions
Requirements
- External memory medium (USB thumb drive)
- Computer, to write on the memory medium
- (Optional) Keyboard, simplifies entry of variable data
| Keyboard type | Order no. |
| USB-keyboard without numeric keypad, German layout | A8407 |
| USB-keyboard without numeric keypad, US layout | A8406 |
Table 17: Keyboards available as accessory.
► The matching keyboard layout is set with parameter Options > Keyboard.
Before first use, check if the intended keyboard really works with the printer.
Functional Description
Standalone operation means the printer can be operated without it needing to be connected to a host computer. For this purpose, a computer is used to store the print job on a memory medium. After the memory medium is connected to the printer, the operator can start the print jobs on demand. For this, he uses the printer control panel or a keyboard connected to the printer. Variable data can also be entered via the control panel or the external keyboard.
The standalone mode can always be accessed from the „normal“ printer operation.
► Press the keys 2+4 simultaneously.
It is helpful to imagine two consoles, between which can be switched by pressing the keys 2+4.
| Console „Normal operation“ | Console „Standalone operation“ | |
| „Ready“ screen | Keys 2 + 4 | Selecting print jobs |
| „Home“ screen | Inserting field contents | |
| Message mode | Inserting print amounts | |
| „Settings“ screen | Starting print jobs | |
| Error messages are faded in |
Table 18: Functions and display texts in normal and in standalone operation mode.
Standalone operation in brief:
- Printing without computer connection
- Data entry via control panel or keyboard
- Reading print job from an external memory medium
- Entry or selection of field content
- Updating Firmware from an external memory medium
Selecting Files from an External Memory Medium
Before you begin
- The file is stored on an external memory medium (e. g. USB thumb drive) in folder \FORMATS
- The file has one of the extentions .for (print job or setup file) or .tar (firmware)
- Drive letter C: must be assigned to the storage medium (that is, Print interface > Drives > Drive C must be set to that storage medium on which the file with the print job is stored).
Procedure
- Switch off the printer.
- Connect the memory medium to the printer.
- Switch on the printer.
The printer shows the “Ready” screen (cyan) - Press the keys 2+4 to switch to standalone mode.
A file selection dialog for memory media appears:
- Select a memory medium and confirm the selection.
A file selection dialog appears, which shows the printjobs stored on the selected memory medium:
- Select a print job with key 2 and 3. Press key 4 to load the print job.
Another selection dialog appears. As a standard, the print amount can be changed, which is defined as default in the print job (fig. left). Depending on the print job, there can be more than one input fields (fig. right).
- Press key 2 to start the print job without changing the amount.
For change of the print amount or of other input values, see fig. below.
If the printer showed the “Ready” screen before switching into standalone mode, the printing starts immediately. - Press keys 2+4 to switch to the “Ready” screen.

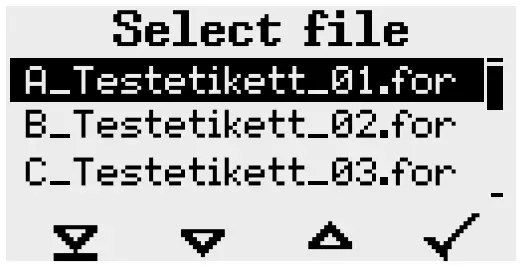
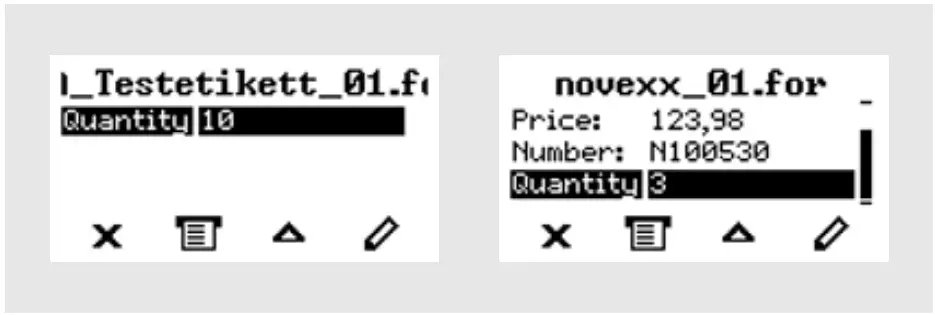
Functions with external keyboard
Key assignment
The keys on the operation panel are assigned to function keys on the external keyboard according to the table below. The function keys and the two additionally listed key combinations work in normal operating mode and in standalone mode.
| Keyboard key(s) | Printer key | Function |
 | 1 | Depends on context |
 | 2 | |
 | 3 | |
 | 4 | |
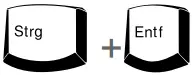 | none | Delete the current print job |
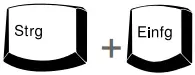 | 2 + 4 | Toggle between normal and standalone mode |
Table 19: Assignment of operation panel keys to keyboard keys
The following keys and key combinations on the external keyboard work only in standalone mode:
| Keyboard key | Function |
| Delete the character left of the cursor | |
 | Confirm a modification |
 | Discard a modification |
 | Move the cursor to the left |
 | Move the cursor to the right |
 | Insert the selected character into the string |
 | Jump to the beginning (e. g. of a selection list) |
 | Jump to the end (e. g. of a selection list) |
Quick selection
If an external keyboard is connected, files can be selected from a list by typing in the first letter of the file name.
Example:
After changing to the standalone mode and selecting the memory medium, the following is displayed:
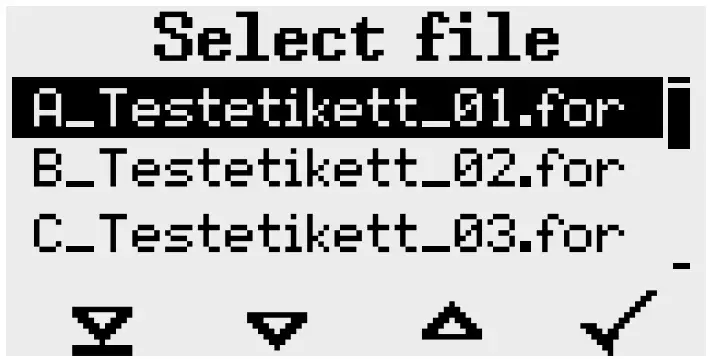
A file named novexx.for. is supposed to be started.
- On the keyboard, press the key for the first letter of the wanted file name , e. g. „n“. Display:
 The filter icon
 stands for the activated filter function. Through the filter appear only those file names that start with „n“ (see fig. above). If another character is typed in, e. g. „o“, only file names that start with „no“ are listed (see fig. below).
 The filter is case sensitive!
Deactivating the filter: press the Esc or Backspace key. - Press the enter key (or F8) to select the file.
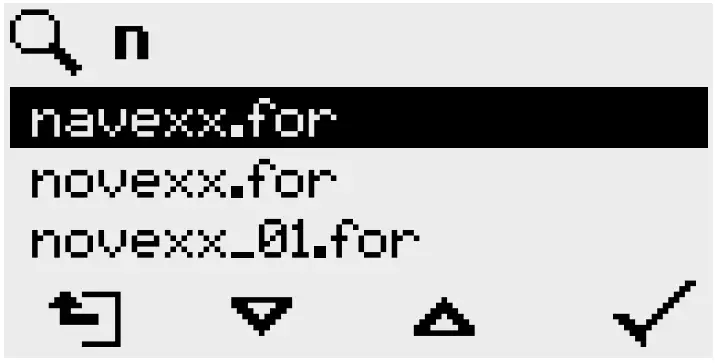 The filter icon
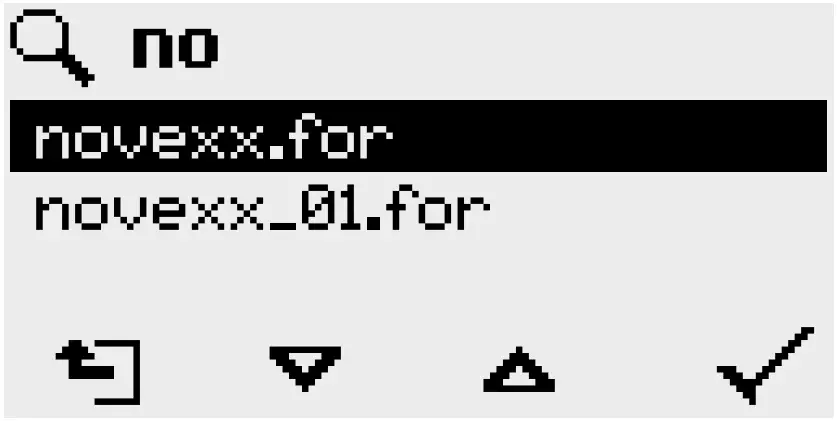 The filter is case sensitive!
Executing Different File Types
Executing print jobs
Files with the extention .FOR are interpreted as print jobs.
All input fields are polled, which are defined as such in the print job. Next, the print quantity is requested. As soon as the print quantity is confirmed, the print job is executed. From now on, all information about the job is displayed in the “Normal operation” console. While the print job is processed, it is started newly in the “Standalone operation” console. The input fields are polled again, with the previous entries as default.
Each print job file may contain only one print job. If any print job file contains more than one printjobs, only the first print job is executed.
The new start of the print job can be avoided by setting the parameter System > Print > Single-job mode = “Off”.
It’s also possible to enter a single “*” for the print quantity. This makes the print quantity “endless”.
Executing firmware files
Files with the extention .tar are interpreted as printjobs.![]() Selecting a firmware file means starting a firmware download. As this is a fundamental intervention to the system, firmware files are not executed immediately.
Selecting a firmware file means starting a firmware download. As this is a fundamental intervention to the system, firmware files are not executed immediately.
Automatic file execution
If a file named DEFAULT.FOR[31] exists on the memory medium in the folder \FORMATS, it is executed automatically at system start.
If a file \AUTOSTRT.FOR[32] is also existing in the root directory, it will be executed first. But be aware that standalone print jobs are only executed properly, if the relevant file is stored in the folder \FORMATS, as described above.
31 All letters lower case or all upper case; „Default.for“ doesn´t work
32 Not case-sensitive
Disturbances
GENERAL INFORMATION ABOUT STATUS REPORTS
Display of status reports
During operation, tests are continually carried out to determine whether a malfunction has occurred. If a malfunction is detected, the corresponding status report appears on the display.
The status report shown on the display is structured as follows:
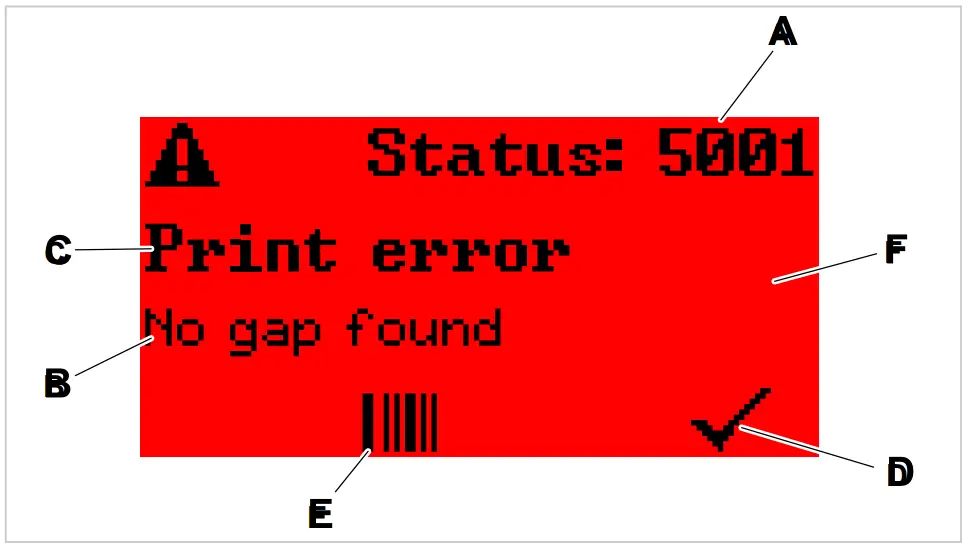 Fig. 54: Example for the appearance of status reports
| A | Status number The status number can be used to find a description of the error that occurred in the chapter Reference of status reports on page 104: In the example it is the message 5001 No gap found on page 104. |
| B | Status text Each status number has a status text in the language of the control panel. |
| C | Category Possible categories include among others “print error” and “format error”. |
| D | Check mark icon Press the key below the symbol to confirm the status message. If this symbol is missing, the machine must be restarted. |
| E | Bar code icon After pressing the key below the symbol, a QR code is displayed that refers to a quick troubleshooting guide (see chapter Access troubleshooting instructions with your smartphone on page 103). |
| F | Background color Possible background colors are: Red (error) and yellow (warning) |
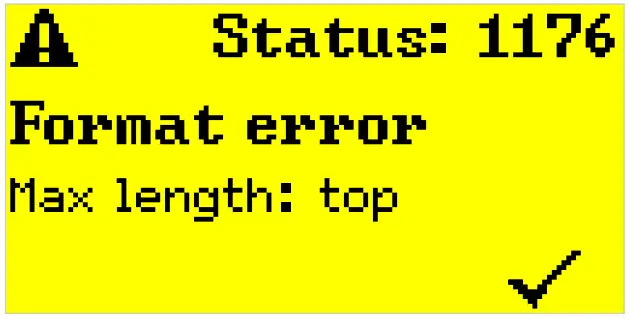 Fig. 55: Example of a warning
USI warnings
There are also warnings that are triggered by the signal interface. These appear as an additional line of text on the display “Ready” (picture).
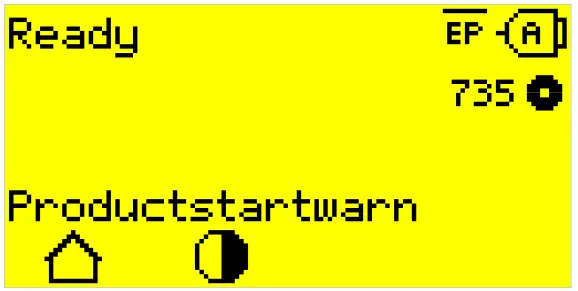 Fig. 56: Example of an USI warning: “Productstartwarn” .
| Warning text | Cause |
| Productstartwarn | A new start signal has arrived during the previous print-dispensing process |
Table 20: Possible warnings triggered by input signals.
USI warnings are only shown in the “Ready” display and can only be acknowledged there.
If several warnings occur simultaneously, they are saved in a queue.
Acknowledging USI warnings:
► Press keys 2+3.
USI status messages
These status messages are triggered by the signal interface. They provide information on whether certain signals are present.
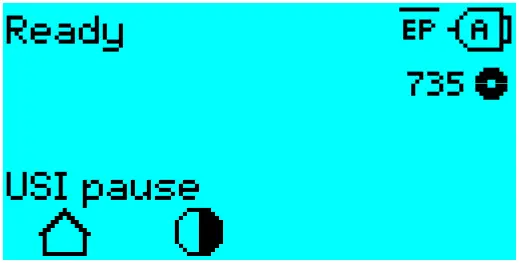 Fig. 57: Example of a USI status message.
| Status message | Cause |
| USI pause | Signal usi.pause is active |
| USI feed | Signal usi.feed is active |
Table 21: These USI status messages may occur.
USI status messages are only shown in the “Ready” display.
USI status messages may occur at the same time as USI status messages (see above). If this happens, warnings are displayed with priority.
Error messages
Background color = red
Error messages must be acknowledged by the operator as the triggering event or fault endangers normal operation. A checkmark symbol can be seen in the bottom right corner of the message window above key 4. The message appears in the display until the fault has been rectified and acknowledged with key 4.
Blocking error messages are messages that occur as a result of serious errors. There is no checkmark symbol in the message window, i.e. the message cannot simply be acknowledged by pressing a key. The error state can only be terminated by a “warm start” (press keys 1+2+3) or by switching off the printer.
General software errors
Errors in the firmware can never be completely ruled out. Such errors are described in the error directory as “General software errors”. They can only be corrected by the manufacturer.
► Switch the printer off and, after 30 seconds, on again. If the fault repeatedly occurs, please contact our technical service.
Easy Plug errors
Errors in the Easy Plug code can be detected much easier with the following setting:
Printer Language > EasyPlug Setting > EasyPlug errors = “Strict handling”
The Easy Plug command, which caused the error, is displayed after approx. 2 seconds in the lower display line. The displayed text is up to 30 characters long and is scrolled automatically.
If a single character caused the error, this character is marked with “>> <<” in the display text, to facilitate the detection.
By pressing the key, the display can be toggled between error message and Easy Plug command text.
Unspecific errors
Some errors can have more than one cause. To be able to find the specific reason for such an error, it is important that it can be reproduced.
► Send the following items of information as complete as possible to the manufacturer – preferably as files:
- Layout and/or print job, which makes the status message appear
- Parameter configuration of the printer, when the error occurs
- Log file of the print job until the error occurs
► Use parameter Tools > Diagnostic > Store Parameters, to save the current parameter configuration.
► Use parameter Tools > Diagnostic > EasyPlug Monitor, to send the received Easy Plug data to a
serial interface. Alternatively, with some printer types, log files of the print job can be saved on an external memory medium (Tools > Diagnostic > EasyPl. file log).
Our Technical Support will try hard to find a solution by reproducing the situation which caused the error.
Not listed status reports![]() The messages not listed in the following reference concern malfunctions that cannot be rectified by the operating personnel.
The messages not listed in the following reference concern malfunctions that cannot be rectified by the operating personnel.
► Call a service technician.
ACCESS TROUBLESHOOTING INSTRUCTIONS WITH YOUR SMARTPHONE
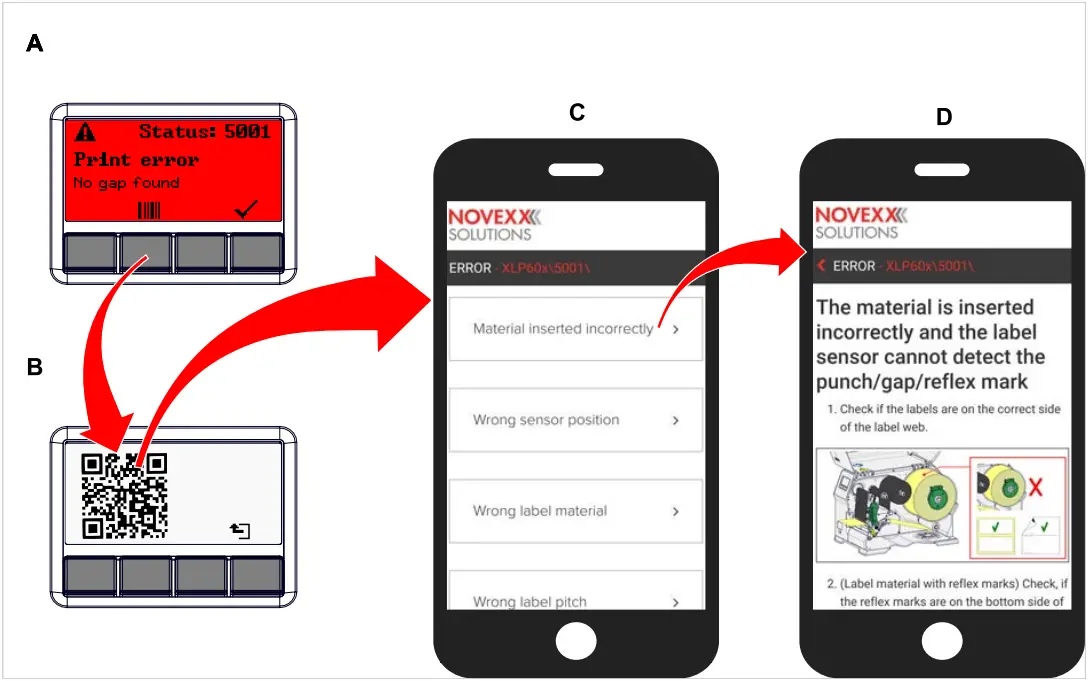 Fig. 58: If the error message has a barcode symbol (A), a QR code (B) can be used
to call up troubleshooting instructions (C) on the smartphone.
This function is currently only available for the most important error messages relevant to the machine operator. Further descriptions will follow with future firmware versions.
Procedure
- Press the key below the barcode symbol. (A).
A QR code is displayed. (B). - Scan the QR code with the smartphone.
A webpage with one or more troubleshooting instructions appears on your phone (C).
If several error solutions are displayed, they are sorted by relevance, i.e. the solution for the most probable error is at the top.
For the time being, only English texts are displayed. Future firmware versions will also support other languages. - Touch one of the fault solutions.
A troubleshooting guide is displayed.
REFERENCE OF STATUS REPORTS
5001 No gap found
No gap found or several blank labels fed.
Illustrated description for troubleshooting:
Click here or scan the QR code:
 http://cmi.novexx.com/doc/err/en/xlp60x/5001/
The error can have several causes:
| Cause | Measure |
| Label sensor at the wrong position. | ► Setting the position of the label light barrier correctly (refer to user manual, chap. „Operation“ > „Setting and Monitoring“ > „Positioning the label sensor“). |
| Unsuitable material inserted. No punch available or recognizable. | ► Use punched or die cut label material. |
| Material incorrectly inserted. Punch on the wrong side. | ► Insert material the right way round. |
| Wrong label length set. | ► Checking the punch definition in the print job (Easy Plug: #IM). ► Checking the label length setting in the parameter menu (Print > Material > Label > Material type) |
| Label sensor is dirty. | ► Cleaning the label sensor. |
| Ribbon inserted incorrectly. Ribbon runs under the label light barrier. | ► Insert ribbon correctly. |
| Label sensor is not sensitive enough. | |
| Label sensor is defective. |
After acknowledgement with key 4, the material is automatically advanced and the next punch is searched for.
5002 Material end
There is no label web in the rear material guide that contains the material end sensor.
Illustrated description for troubleshooting:
Click here or scan the QR code:
 http://cmi.novexx.com/doc/err/en/xlp60x/5002/
| Possible causes | Solution |
| The label material is finished, i.e. the rear end of the material web has reached the yellow material guide in the printing module | ► Load new roll of label stock |
| The label web runs outside of the rear material guide, which contains the material end sensor | ► Insert the label material correctly into the material guide. Check the width adjustment of the material guides. |
5005 Cutter
Fault on the cutter. The knife does not reach its home position.
► Check whether the cutter is soiled. If necessary, clean the knife.![]() ► Check the function of the knife. If necessary, readjust the knife.
► Check the function of the knife. If necessary, readjust the knife.
► Acknowledge by pressing the![]() key.
key.
5008 Ribbon end
The ribbon unwinding mandrel no longer rotates. This can have various causes:
Illustrated description for troubleshooting:
Click here or scan the QR code:
 http://cmi.novexx.com/doc/err/en/xlp60x/5008/
| Possible causes | Solution |
| Ribbon roll is used up. | ► Insert new ribbon roll. |
| Ribbon was inserted incorrectly. | ► Remove the ribbon completely and insert it according to the winding diagram. |
| Ribbon roll is loosely seated on the unwinding mandrel. | ► Check that the core of the ribbon roll has the correct inner diameter. If not, use another ribbon roll with a suitable diameter. |
| Ribbon sticks to the print head. | 1. Remove the ribbon. 2. Clean the print head. 3. Insert the ribbon newly. |
| Ribbon is torn. | ► Insert the ribbon newly. |
5074 Print module open
The print head pressure lever is not (completely) closed.
Illustrated description for troubleshooting:
Click here or scan the QR code:
 http://cmi.novexx.com/doc/err/en/xlp60x/5074/
► Close the print head pressure lever as far as it will go.
A certain resistance must be overcome until the lever snaps in.
5110 Ribbon low
The diameter of the ribbon roll fell below the set warning diameter (see System > Print Control > Ribbon end warn.).
The message is triggered by the occurrence of a ribbon warning if the following setting is active at the same time: System > Print Control > Ribbon warn stop = “On”.
► Acknowledge by pressing the![]() key, then press the► key to continue printing.
key, then press the► key to continue printing.
5140 Rewinder control
The (backing paper) rewinder rotates against expectation.
| Possible cause | Solution |
| • No backing paper attached to the rewinder • End of backing paper not properly attached | ► Insert material correctly |
| Backing paper is sagging in front of the rewinder to such an extent that it cannot be tensioned by the rewinder within 10 seconds | ► Insert material correctly ► Turn the rewinder by hand until the backing paper is taut |
| Backing paper tear during printing | ► Reattach the backing paper to the rewinder |
5145 Rewinder full
The rewound backing paper has reached the maximum admissible diameter.
► Empty the rewinder.
5302 Ribbon movement
Movement error in connection with ribbon winding or ribbon unwinding, i.e. at least one of the ribbon mandrels does not rotate correctly or not at all.
| Possible cause | Solution |
| Ribbon not inserted correctly | ► Check the ribbon run. If necessary, insert ribbon correctly. |
| Parameter for the color side of the ribbon not set correctly | ► Set parameter Print > Material > Ribbon > Color Side correctly |
| Operation of the machine as a dispenser without ribbon inserted. It was forgotten to set the printing process to thermal printing, therefore the foil control tries to tension the foil, which leads to the error. | Set parameter Print > Material > Label > Print method to “Thermal printing”. |
5311 Remove ribbon!
The error occurs when thermal direct printing is set as the printing method but ribbon is inserted.
► Remove the thermal transfer ribbon from the machine.
6033 Print Head not supp.
(Print head is not supported)
The selected or detected print head is not supported for this machine.
► Install the appropriate print head.
6034 Printhead NTC error
Error at the NTC sensor of the print head. The print head is missing or defective.
► Install or replace the print head.
6036 Print Head not authenticated
A foreign, unauthorized print head was detected (print head is not from NOVEXX Solutions).
► Replace print head with a print head from NOVEXX Solutions.
6037 Print Head not programmed
The print head has an unprogrammed crypto chip.
► Have the crypto chip programmed or replace the print head with a print head with programmed crypto chip.
9028 System Exception
General software error
► Please read the notes in section .
Cleaning
CLEANING INSTRUCTIONS![]() WARNING!
WARNING!
Dangerous situations may arise during maintenance and cleaning work. Accidents may occur due to mechanical or electrical effects if the relevant safety instructions are not observed!
► Switch off the machine before cleaning or maintenance and pull out the mains power connecting line!
► Never allow liquid to get into the machine!
► Do not spray the machine with spray bottles or sprays! Use a cloth wetted with cleaning agent!
► Repairs to the machine must only be made by trained service technicians!
Cleaning agents
CAUTION!
Sharp cleaning materials may damage the printer.
► Do not use any cleaning agents or materials that could damage or destroy the paint finish, labelling, display, type plates, electrical component, etc.!
► Do not use any scouring cleaning agents or any cleaning agents that could dissolve plastic!
► Do not use acid or alkaline solutions!
| Part to be cleaned | Cleaning agent | Article number |
| Print head | Cleaning pen | 95327 |
| Methylated spirit, isopropyl alcohol, cleaning gasoline | — | |
| Rubber rollers (print roller, draw roller, …) | Roller cleaner | 98925 |
| Deflection rollers | Methylated spirit, isopropyl alcohol, cleaning gasoline | — |
| Label release spray | A103198 | |
| Housing | Standard commercial neutral cleaning agent, methylated spirit, isopropyl alcohol | — |
Table 22: Recommended cleaning agents
Cleaning interval
► Clean machine regularly.
The frequency depends on the following factors:
- Operating conditions
- Daily operating duration
- Label material/ribbon combination used
General cleaning
Dust particles are especially likely to accumulate in the area of the print mechanics.
► Remove dust particles with a soft brush or a vacuum cleaner.
► Clean the housing with a cloth and a standard commercial neutral cleaner.
CLEANING THE PRINT HEAD
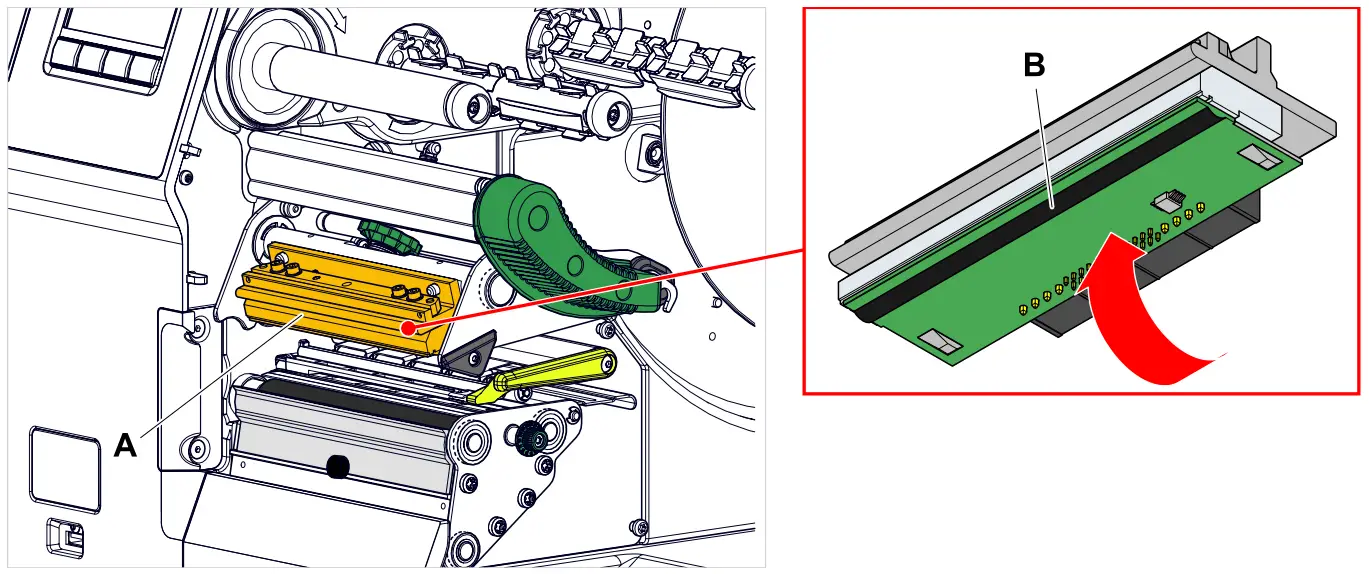 Fig. 59: A: Print head, B: Thermal strip at the print head
![]() WARNING!
WARNING!
Burn hazard. The print head becomes hot during operation.
► Allow print head to cool before touching.
► Be careful whenever touching the print head.
CAUTION!
Possible damage to the print head due to electrostatic discharge or contact with sharp edges.
► Always protect the print head against electrostatic discharge when performing maintenance and cleaning work! Use ESD protective equipment!
► Never touch the thermal strip with bare hands!
► Never contact the thermal strip with sharp objects!
If no professional ESD protective equipment (ESD wristband, ESD shoes, …) is available:
► Discharge your own body before touching the print head, e.g. by touching an earthed object (e.g. radiator) in your vicinity!
Procedure
Removing the print head:
- Switch off the machine.
- Open the front hood (A, figure below).

- Open the print head pressure lever (B, figure above).
- (Optional) Loosen the ribbon web and push it aside at the print head.
- Moisten a lint-free cloth with cleaning agent and wipe off the thermo strip (A, B).
For suitable cleaning agents, see table in chapter “Cleaning Instructions”.
- (Alternative) Wipe the thermo strip with a cleaning pen.

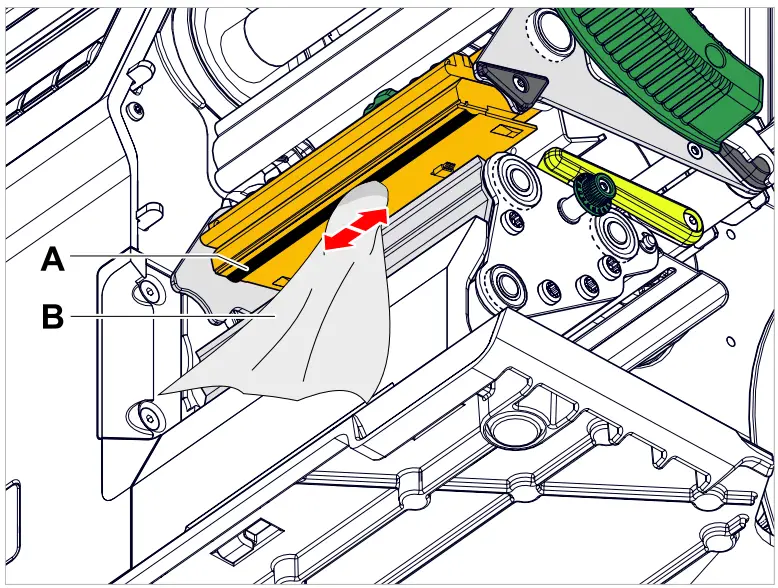
Related reference
Cleaning Instructions on page 108
CLEANING THE RUBBER ROLLERS
CAUTION!
Risk of damaging the roller.
► Never use knives or sharp-edged objects to clean the rollers!
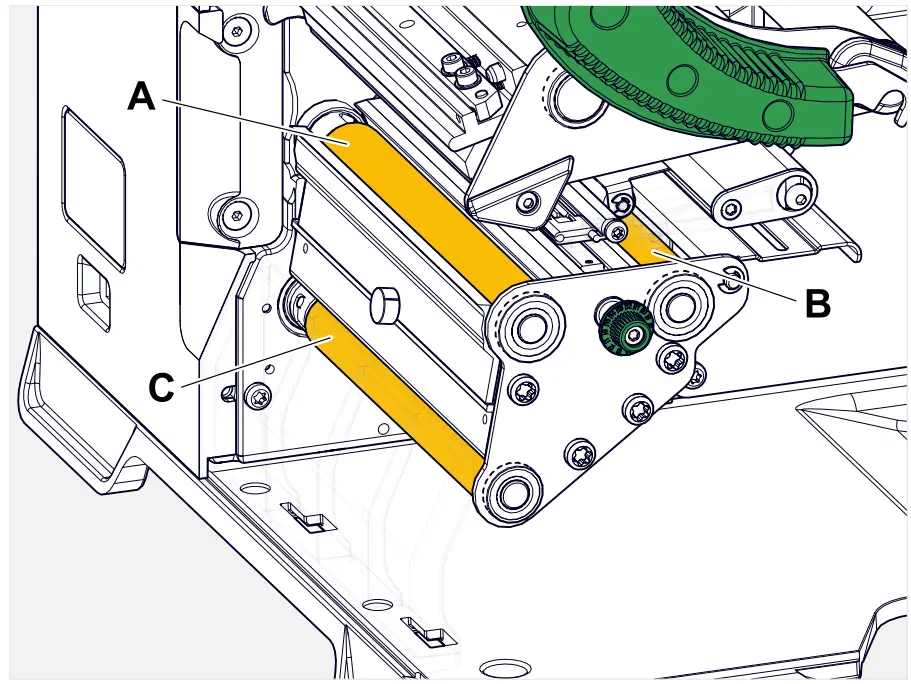 Fig. 60: Position of the rubber rollers: A Print roller, B Feed roller, C Draw roller
It is recommended to remove the rollers completely for cleaning. This can be done easily and without tools using the bayonet couplings.
An alternative is to turn the rollers by hand while they are installed, cleaning them step by step.
Procedure
- Switch off the machine.
- Open the front hood (A, figure below).

- Open the print head pressure lever (B, figure above).
- Remove one roller (see chapter “Maintenance” > “Rubber roller replacement”).
Only remove one roller at a time. As the rollers are connected by toothed belts, the bayonet coupling of the removed roller can be prevented from turning by holding an installed roller. This makes installation easier. - Moisten a dust-free cloth with roller cleaner and wipe the roller.
- Reinstall the roller.
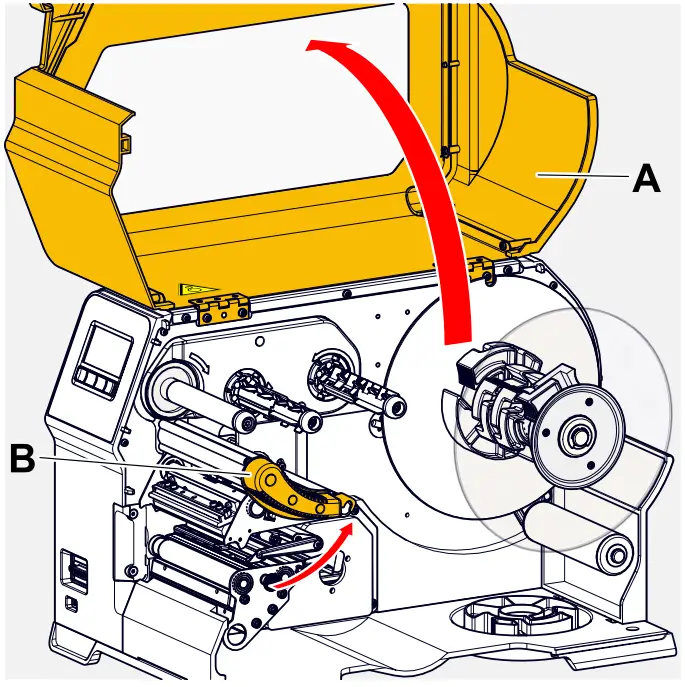
CLEANING THE DANCER ARM ROLLER
On the deflection roller (A) of the dancer arm, glue residues settled over time and must be removed.

Procedure
Moisten a cloth with methylated spirit and wipe the roller with it.
In case of heavy soiling, moisten the cloth with label remover. Follow the manufacturer‘s safety instructions on the label!
CLEANING THE RIBBON PATH
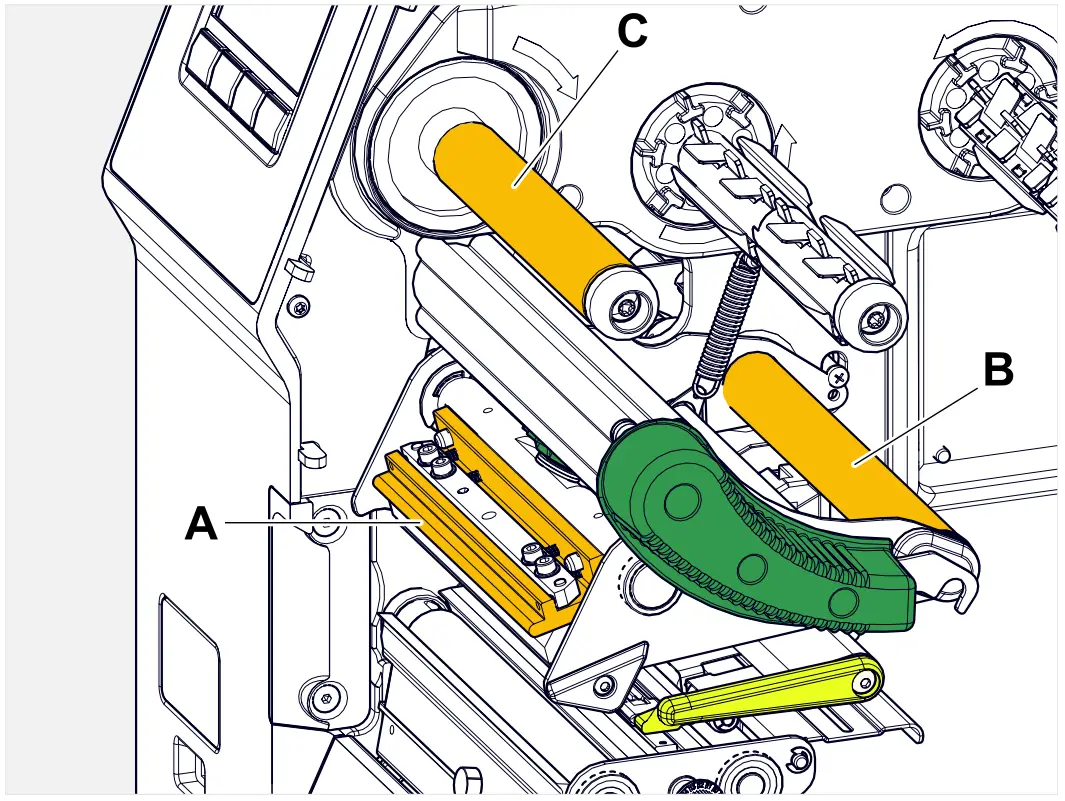 Fig. 61: Ribbon deflections at a XLP 60x (A: Print head nose, B: Axle, C: metal or rubber roller).
Wax/resin residues settle on the thermal transfer ribbon deflectors over time and must be removed.
Procedure
- Moisten a cloth with methylated spirit and wipe the metal deflectors with it.
- If the printer is equipped with the ribbon saving function, the ribbon roller (picture above, C) is made of rubber.
(Optional) Moisten a cloth with roller cleaner and wipe the ribbon roller (C) with it.
CLEANING THE LABEL SENSOR
Procedure
Cleaning for light soiling:
- Open the front hood.
- Open the print head pressure lever.
- Remove the label web from the print module.
- (Optional) Loosen the ribbon web and push it aside at the print head.
- Blow out the gap in the sensor fork (A) with compressed air.
The sensor is located at the end of the sensor fork. For heavy soiling, additionally clean with spirit and dust-free cloth. Cleaning for heavy soiling:
 - Unscrew screw (A).

- Pull out guiding profile (A).

- Move the light barrier fork (B) all the way out by turning the setting knob (A).

- Carefully lift the upper part of the light barrier fork (B).

- Moisten a cloth or cotton swab with methylated spirit (A, figure above) and wipe it over the light barrier at the end of the light barrier fork.
- When assembling, push the guide profile through the guide (A) of the light barrier fork again and push the rear end back onto the bolt (B) in the base plate.

- Screw the plastic part tight again:

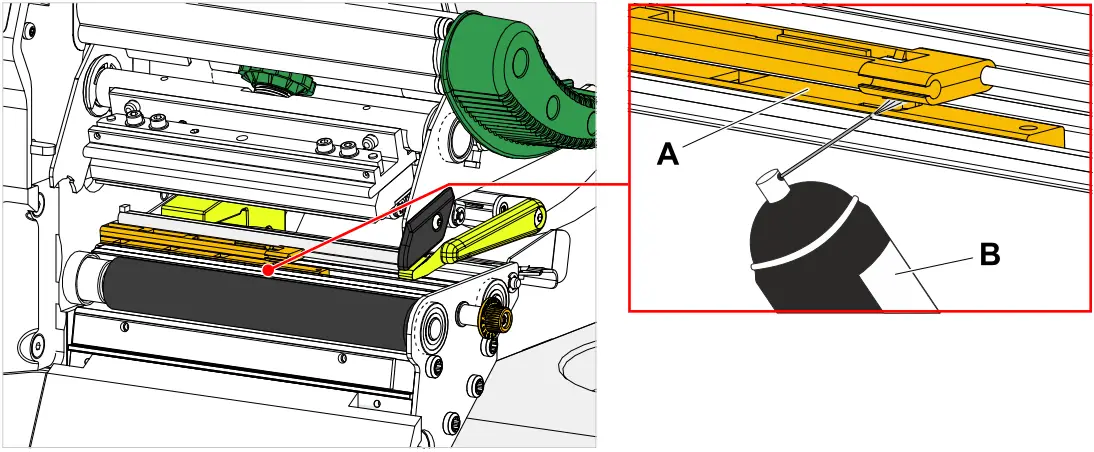 Cleaning for heavy soiling:
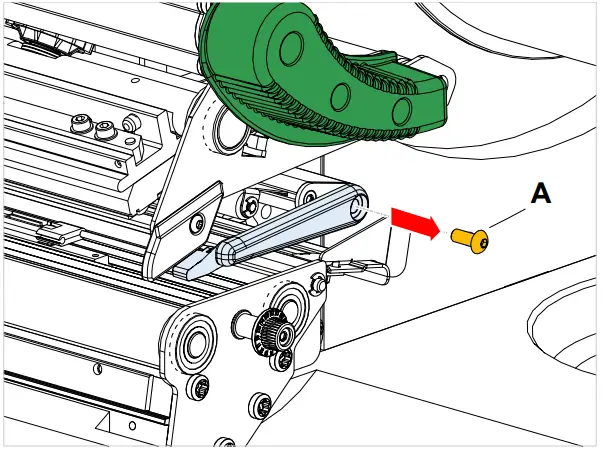
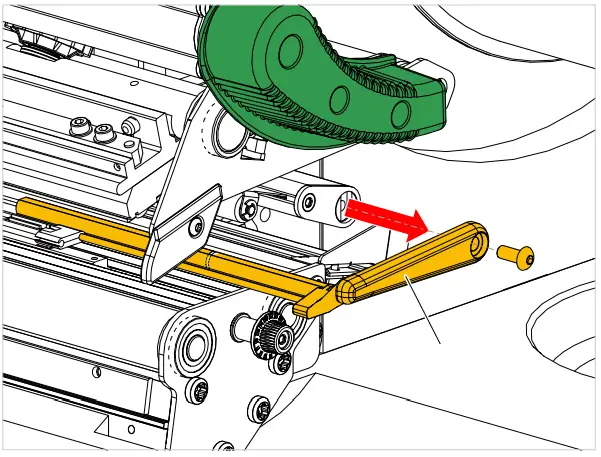
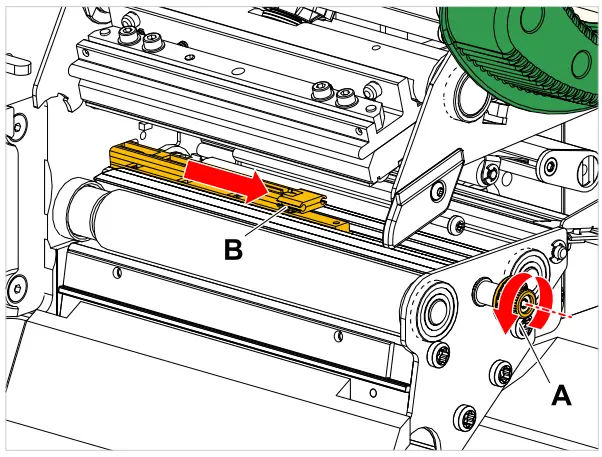
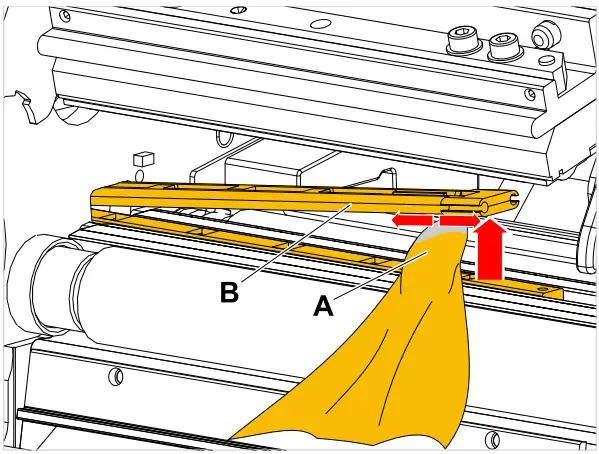

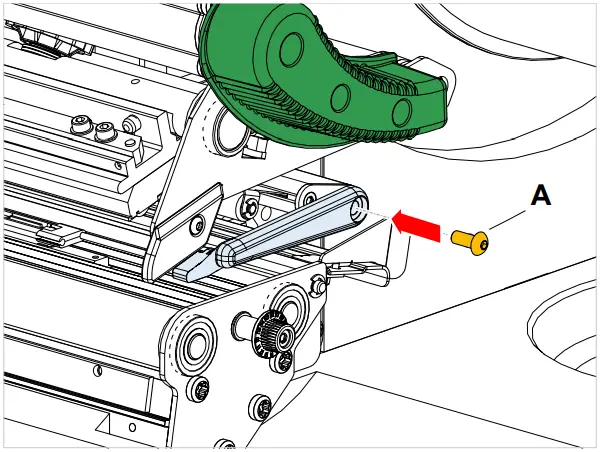
CLEANING THE MATERIAL END SENSOR
The material end sensor (A) is located in the inner material guide. The sensor must be cleaned regularly to remove material and dust residues. The cleaning intervals depend on the material used.
Procedure
- Open the front hood.
- Open the print head pressure lever.
- Remove the label web from the print module.
- Clean the material end sensor (A) with compressed air.

- (If necessary) In case of heavy soiling, additionally clean the sensor with spirit and dust-free cloth.
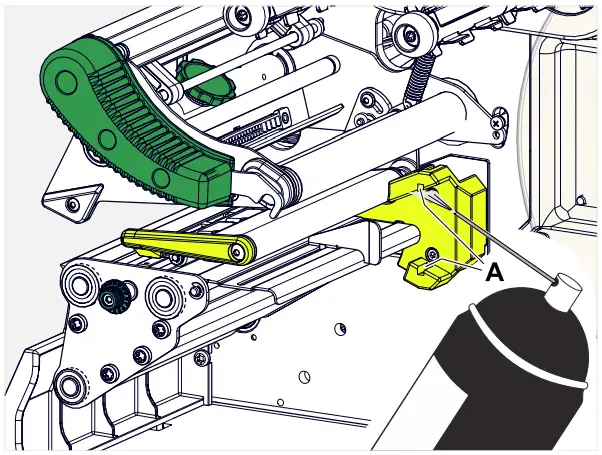
Maintenance
REPLACING RUBBER ROLLERS
The rubber rollers are held in place by a bayonet coupling and can be replaced without any tool. This description counts for the following rollers (see fig.):
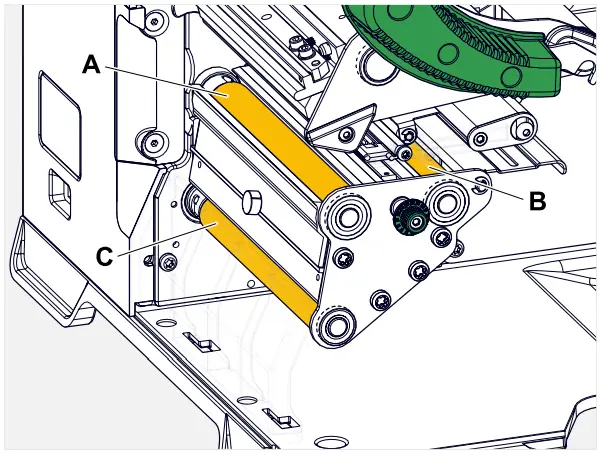 Fig. 62: Positions of the rubber rollers (some parts are faded out for better
visibility of the rollers) A Print roller, B Feed roller, C Draw roller
Procedure
Removing a roller:
- Switch off the machine.
- Open the front hood (A).

- Open the print head pressure lever (B, figure above) and the draw roller lever (C, figure above).
- (Optional) Remove the label web from the print module.
- Press the print roller (A) firmly in up to the stop, then turn it to the left and pull it out.
When the machine is switched off – what it should be – the clutches rotate with it. The print roller can be easily blocked by holding the feed roller and vice versa. Installing:
 - Push the roller (A) through the external bearing plate.

- Turn the roller so that the steel pin (B, figure above) at its end engages in the opening (C) of the bayonet coupling.
- Push the roller firmly in up to the stop, then turn it to the right up to the stop.
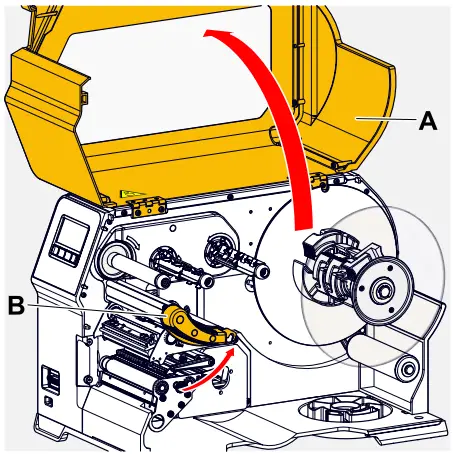
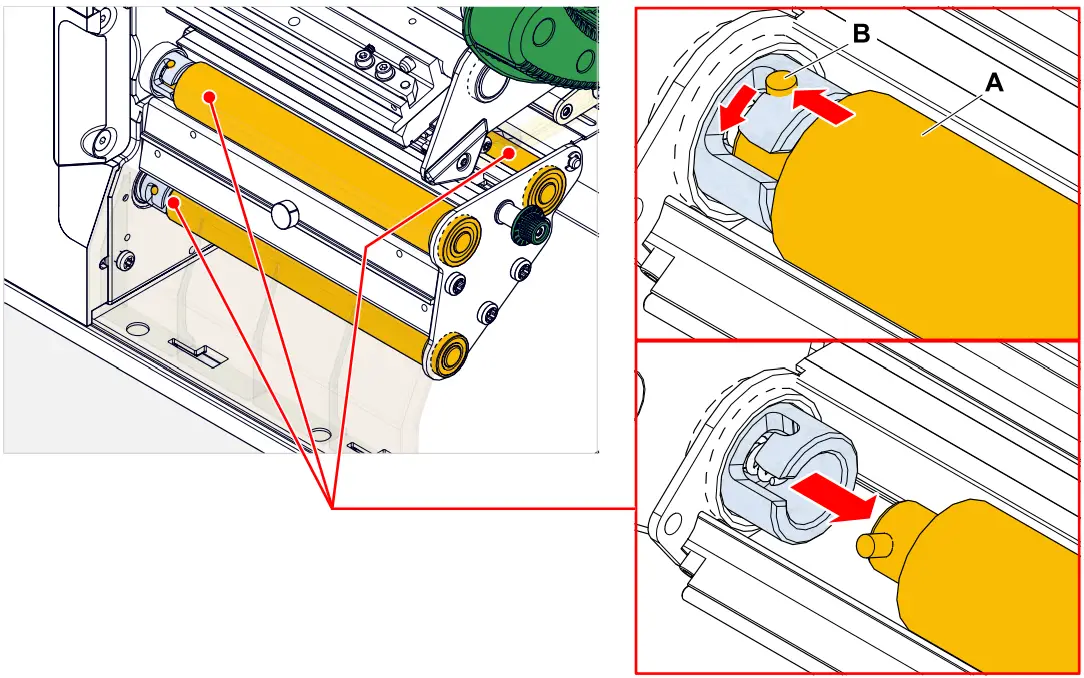 Installing:
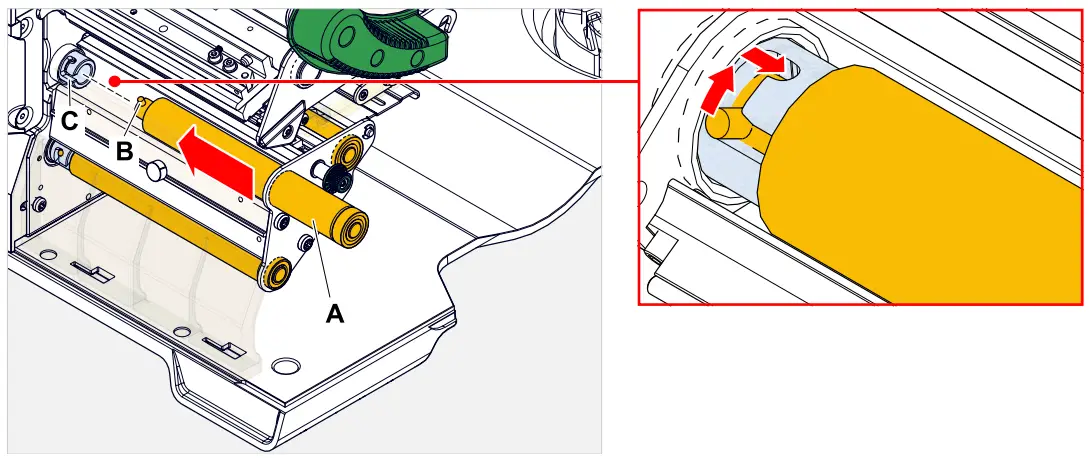
PRINT HEAD REPLACEMENT
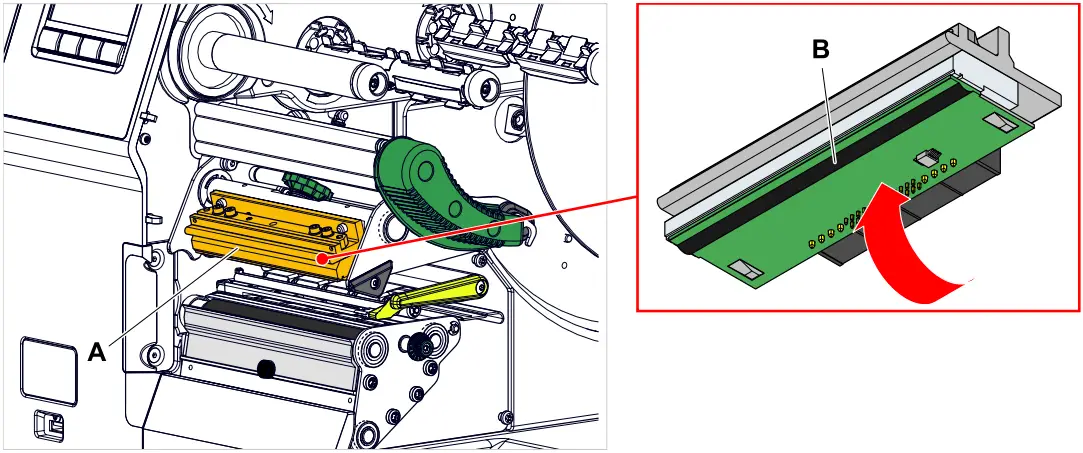 Fig. 63: A: Print head, B: Thermal strip at the print head
![]() WARNING!
WARNING!
Burn hazard. The print head becomes hot during operation.
► Allow print head to cool before touching.
► Be careful whenever touching the print head.
CAUTION!
Possible damage to the print head due to electrostatic discharge or contact with sharp edges.
► Switch off the machine at its main switch before replacing the print head!
► Always protect the print head against electrostatic discharge when performing maintenance and cleaning work! Use ESD protective equipment!
► Never touch the thermal strip with bare hands!
► Never contact the thermal strip with sharp objects!
If no professional ESD protective equipment (ESD wristband, ESD shoes, …) is available:
► Discharge your own body before touching the print head, e.g. by touching an earthed object (e.g. radiator) in your vicinity.
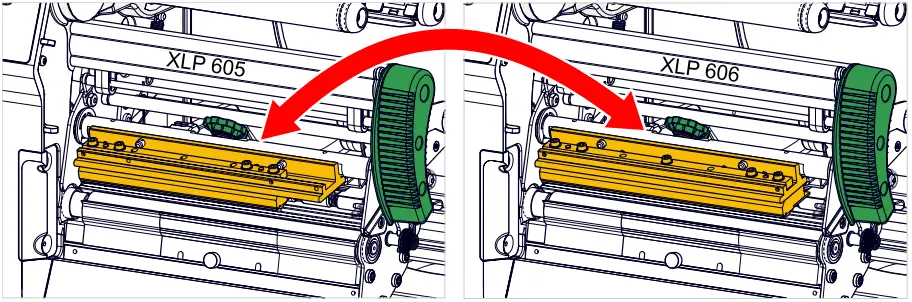 Fig. 64: The print heads of XLP 605 and XLP 606 can be interchanged. The built-in print head is
automatically detected and the relevant settings are adjusted.
Procedure
Removing the print head:
- Switch off the machine.
- Open the front hood (A, figure below).

- Open the print head pressure lever (B, figure above).
- (Optional) Loosen the ribbon web and push it aside at the print head.
- Loosen thumb screw (A) and pull print head (B) forward.
 Installing the print head:
 - Position the new print head with the holes (A) on the bolts (B). Carefully press the print head with the plug contacts on the rear side into the connector (C).

- Tighten thumb screw (D, figure above).

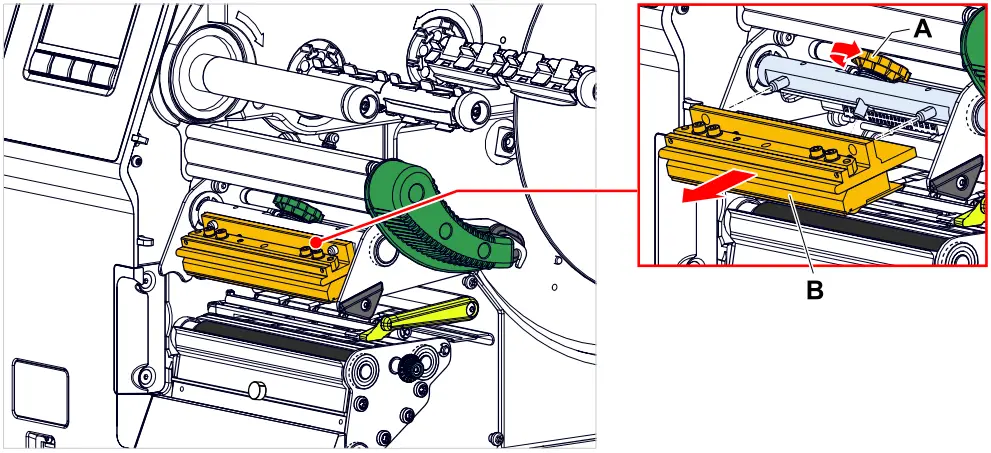 Installing the print head:
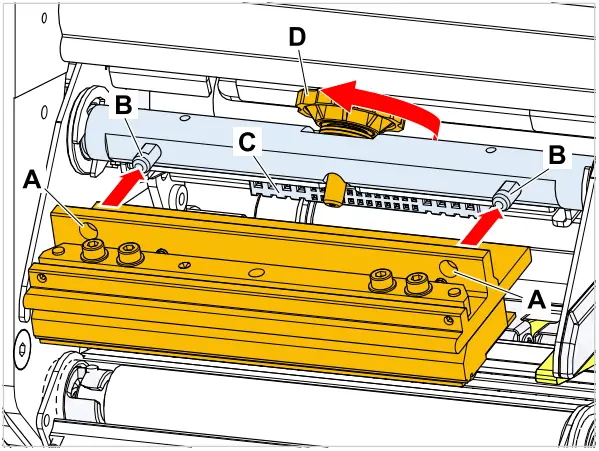
What to do next
It is not necessary to adjust the print head resistance or the print head width because the print head is equipped with a memory chip on which all data relevant for operation is stored. This stored print head data enables the machine control system to determine whether it is the correct print head type. If this is not the case, the following error message appears:
6033
Print Head not supp.
If no print head or a defective print head is installed, the following error message appears:
6034
P. Head missing or defect
Appendix
LABEL MATERIAL TYPES
What to look for when selecting label stock for the XLP 60x.
Material specification
The XLP 60x can process rolls as well as leporello fold (= fold-out or accordion fold material).
For more information on the material specifications, refer to chapter “Technical data” > “Label material”.
Punches/reflex marks
In general, one distinguishes between converted and unconverted material:
- Converted material: The start of each label is usually marked. With self-adhesive labels, this can be a gap (A) between the labels or, with cardboard labels, a small punch (B) on the edge. If the printer is equipped with the optional reflex sensor, it will be able to detect reflex markings (C) on the rolls.
- Unconverted material is referred to as “continuous form material” and does not have any label markings. The length of the label is determined through the length setting in the parameter menu.
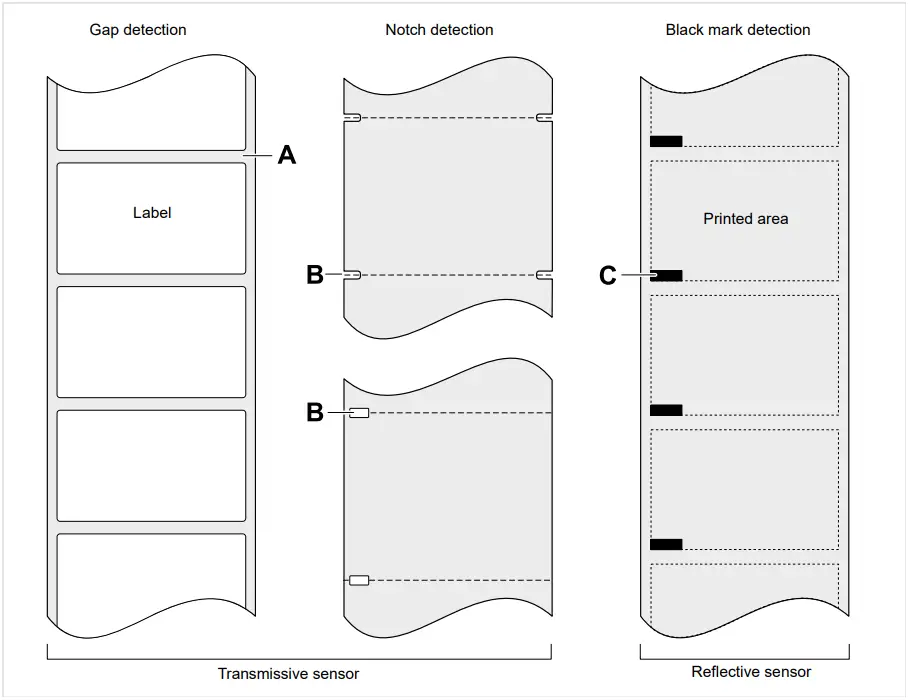 Fig. 65: Various types and positions of “start of label” markings.
Quality criteria
Pay attention to the following 3 factors when selecting the quality of label material:
- The abrasive behaviour of the surface structure of the material
- The chemical properties of the material that affect how ink is printed
- Temperature required for ink transfer
Abrasiveness
If the material is very rough (= strong sanding effect), the printhead will wear down more quickly than with smooth material. This is an important aspect of thermal printing. With thermal transfer printing, this does not pose much of a problem because you can select a ribbon that is wider than the material.
Print head temperature
Similarly, excessively high printhead temperatures can also cause problems. The material and the ribbon require more time to cool down, the printing quality becomes more critical and the printhead will wear down more quickly.
Related reference
Label Material on page 13
EU DECLARATION OF CONFORMITY
(Translation of original version)
We,
Novexx Solutions GmbH
Ohmstraße 3
D-85386 Eching
Germany
hereby declare that we have designed and built the machine designated below so that it is in conformity with the basic safety and health protection requirements of the directive named below:
| Models | XLP 604 / XLP 605 / XLP 606 |
| General designation | Label Printer |
| Applicable EU directives | 2014/30/EU (EMC) 2006/42/EC (Machinery) 2011/65/EU (RoHS) |
| Applied harmonized standards, especially | EN ISO 12100:2010 EN 62368-1:2014/A11:2017 EN 55032:2015/A11:2020 EN IEC 61000-6-2:2019 EN 61000-3-2:2014 EN 61000-3-3:2013 |
| The person authorized to compile technical documents | Novexx Solutions GmbH (for address see above) |
Eching, 9.8.2022 Alfredo Sansone
Head of Supply Chain and Operations and Compliance
APPLIED LICENCES
Open Source Software
This printer uses open source software. A directory of the used software libraries and licenses is stored in the machine and can be downloaded via web browser.
Enter the following address in the web browser: https://<hostname>/licenses.zip
<hostname> = Hostname or IP address of the machine
The web server must be activated (Interface > Network > Services > WEB server = “On”).
The file licenses.zip contains a number of subdirectories, each named after a used software library. Each subdirectory contains the open source license relevant for the respective software.
![]() Novexx Solutions GmbH
Novexx Solutions GmbH
Ohmstraße 3
85386 Eching
Germany
Telephone: +49-8165-925-0
www.novexx.com


 Label Printer User Guide")