
Cerwin-Vega SL-15 Quad Center Channel Speaker
INSTRUCTIONS
- Read instructions – All the safety and operating instructions should be read before the product is operated.
- Retain instructions – The safety and operating instructions should be retained for future reference.
- Heed Warnings – All warnings on the product and in the operating instructions should be adhered to.
- Follow Instructions – All operating and use instructions should be followed.
- Cleaning – Unplug this product from the wall outlet before cleaning. Do not use liquid cleaners or aerosol cleaners. Use a damp cloth for cleaning.
- Attachments – Do not use attachments not recommended by the product manufacturer as they may cause hazards.
- Water and Moisture – Do not use this product near water-for example, near a bath tub, wash bowl, kitchen sink, or laundry tub; in a wet basement; or near a swimming pool; and the like.
- Accessories – Do not place this product on an unstable cart, stand, tripod, bracket, or table. The product may fall, causing serious injury to a child or adult and serious damage to the product. Use only with a cart, stand, tripod, bracket, or table recommended by the manufacturer, or sold with the product. Any mounting of the product should follow the manufacturer’s instructions and should use a mounting accessory recommended by the manufacturer.
- Cart – A product and cart combination should be moved with care. Quick stops, excessive force, and uneven surfaces may cause the product and cart combination to overturn.
- Ventilation – slots and openings in the cabinet are provided for ventilation to ensure reliable operation of the product and to protect it from overheating. These openings must not be blocked or covered. The openings should never be blocked by placing the product on a bed, sofa, rug, or another similar surface.
- This product should not be placed in a built-in installation such as a bookcase or rack unless proper ventilation is provided or the manufacturer’s instructions have been adhered to.
- Power Sources – This product should be operated only from the type of power source indicated on the marking label and connected to a MAINS socket outlet with a protective earthing connection. If you are not sure of the type of power supply to your home, consult your product dealer or local power company.
- Power-Cord Protection – Power-supply cords should be routed so that they are not likely to be walked on or pinched by items placed upon or against them, paying particular attention to cords at plugs, convenience receptacles, and the point where they exit from the product.
- Mains Plug – Where the mains plug or an appliance coupler is used as the disconnect device, the disconnect device shall remain readily operable.
- Lightning – For added protection for this product during a lightning storm, or when it is left unattended and unused for long periods of time, unplug it from the wall outlet and disconnect the antenna or cable system. This will prevent damage to the product due to lightning and power-line surges.
- Overloading – Do not overload wall outlets, extension cords, or integral convenience receptacles as this can result in a risk of fire or electric shock.
- Flame Sources – No naked flame sources, such as lighted candles, should be placed on the product.
- Object and Liquid Entry – Never push objects of any kind into this product through openings as they may touch dangerous voltage points or short-out parts that could result in a fire or electric shock. Never spill liquid of any kind on the product.
- Loudspeakers – Excessive sound pressure from loudspeakers can cause hearing loss.
- Damage Requiring Service – Unplug this product from the wall outlet and refer servicing to qualified service personnel under the following conditions:
- When the power-supply cord or plug is damaged.
- If liquid has been spilled, or objects have fallen into the product.
- If the product has been exposed to rain or water.
- If the product does not operate normally by following the operating instructions. Adjust only those controls that are covered by the operating instructions as an improper adjustment of other controls may result in damage and will often require extensive work by a qualified technician to restore the product to its normal operation.
- If the product has been dropped or damaged in any way.
- When the product exhibits a distinct change in performance-this indicates a need for service.
- Replacement Parts – When replacement parts are required, be sure the service technician has used replacement parts specified by the manufacturer or have the same characteristics as the original part. Unauthorized substitutions may result in fire, electric shock, or other hazards.
- Safety Check – Upon completion of any service or repairs to this product, ask the service technician to perform safety checks to determine that the product is in proper operating condition.
Introduction
Welcome to the family! First off, you have great taste in loudspeakers. At Cerwin-Vega!, deep bass and great highs are a way of life. Nice to know you share our passion for music. Our company has been in business since 1953. And we consider you to be the newest member of the family.
Placement
Placement (SL-5M bookshelf speakers)
For left and right channels, place the speakers so that the tweeters are at ear level (i.e., normal seated position) and are on either side of the video receiver or monitor. You can place the speakers on bookshelves or use speaker stands. For use as a rear channel surround speaker, avoid corners of the room.
Placement (SL-45C, SL-25C center channel speakers)
The Center Channel Speaker should be in the middle between the front left and right main speakers and face toward the viewing/listening area. The tweeter should be at ear level (i.e., normal seated position).
Placement (SL-8, SL-28, SL-12, SL-15 floor standing speakers)
For left and right front channels, place the speakers so they are equal distance from each other and the ideal listening position (see illustration). The tweeter should be at ear level (i.e., normal seated position).
Installation
Wiring the System: All SL Series passive speakers feature flexible 5-way binding posts to support connections using bare wires (most popular method), split spade lug connectors, pin connectors, banana plugs and dual banana plugs *(SL-12 and SL-15 models are not compatible with standard dual banana plugs).
Connecting the System
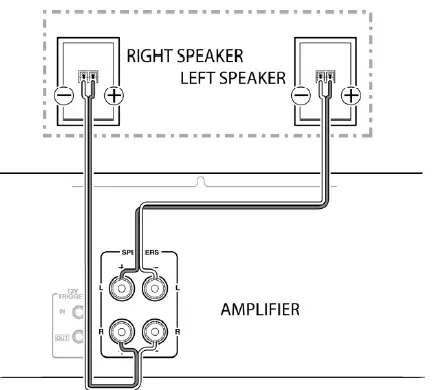
- STEP 1: Determine the type of speaker wire connection that will be made. The most common connection is using bare wire. Strip 1/2” to 5/8” (12 to 15mm) of insulation from the ends of the speaker cable to expose the bare wire; then twist the bare wires tightly.

- STEP 2: Unscrew the binding-post cover to expose a hole in the metal post. Insert the bare wire or pin connector into the hole noting that the positive terminal on the speaker connects to the positive terminal on the amplifier. The negative terminal on the speaker connects to the negative terminal on the amplifier. For split spade lug connections, simply place the ‘U’ shape against the metal post. For banana plugs, do not unscrew the binding post cover; remove the plastic cover and simply insert into the top of the posts.
- STEP 3: Screw the binding-post cover so that the connection is securely touching the metal post and will not fall out.

Placement Subwoofer
The placement of the SL-10S subwoofer can greatly affect the sound that is produces. In general, a good bass sound can be obtained by installing the subwoofer in a front corner, or at one-third the width of the wall, as shown. Experiment with different positions to find your listening preference.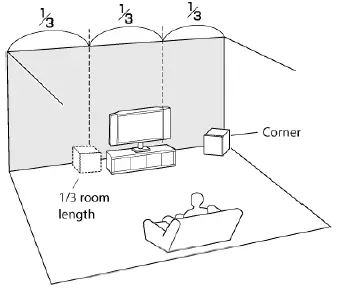
Installation SL-10s Subwoofer
Wiring the System: The SL-10S Subwoofer features a wide variety of inputs to support all different types of audio equipment. The most popular types of subwoofer connections are listed below. Determine the connection and obtain the correct signal cable. Choose one option only for hook-up. Do not hook up more than one option.
Subwoofer Features
- LFE IN: Mono “low frequency effects” connection. Use this input if receiver preamp/processor has a dedicated LFE or subwoofer OUT. Refer to the owner’s manual provided by your receiver/preamp/processor manufacturer. (see figure 1, back cover for hook-up)
- LINE IN: Stereo input to subwoofer. Connect to “LINE-OUT”, “MAIN-OUT or PREAMP-OUT”, of your receiver/preamp/processor using a dual RCA patchcord (not supplied). Refer to the owner’s manual provided by your receiver/ preamp/processor manufacturer.

- VOLUME CONTROL: Controls volume level of subwoofer. Used to balance the output of the subwoofer with the main speaker output.
- LOW-PASS FREQ: The crossover control allows you to adjust the upper limit of the subwoofer’s frequency response from 50 to 130 Hz. The subwoofer’s response
will begin rolling off above the set frequency. Set the LOW-PASS FREQ to the low frequency limit listed in the main speaker manual and consult the A/V receiver manual to determine if there are any recommendations (as some may already feature a built-in crossover).* (NOTE: LOW-PASS FREQ control does not function when the LFE input is used.) - PHASE: This switch allows you to compensate for having the subwoofer in a different location than the main speakers. This control allows the signal to be phase adjusted 180 degrees so the output of the subwoofer will match the phase of the main speakers. Engage the PHASE switch to “180”. At the listening position, listen to the midbass output. If it sounds weak, set PHASE back to “0”. Listen serveral times in each switched position to ensure the setting.
- STANDBY LED: Indicator of automatic standby state. The LED will be ‘GREEN’ when the audio signal is present and the subwoofer is on. The LED will be ‘RED’ when the subwoofer is in standby condition (no audio signal present after approximately 30 minutes.
- VOLTAGE SELECTION: User-switchable voltage selection for use with 110-120V/220-240V AC. To select a different voltage, use a flat head screwdriver to reposition the switch to the desired voltage and change the fuse to the appropriate rating. WARNING: Severe damage may result from improperly selected voltage. Make sure you know the voltage requirement of the country you are in before attempting to connect this subwoofer to AC power.
- POWER: Two-position power switch. In the “ON” mode, the subwoofer’s amplifier is automatically activated if an audio signal is present and will automatically become inactive when there is no audio signal present after approximately 30 minutes. In the “OFF” mode, power is shut off to the amplifier.
- POWER CORD RECEPTACLE: Connect IEC cord to this receptacle (supplied with the SL subwoofer). If the cord supplied does not fit an available AC outlet, purchase the correct AC cord from your audio dealer or an electrical supply store. REPLACEABLE FUSE: Protects system from overload, replace with fuse rating as indicated on amplifier panel at fuse location. The fuse holder is located at the AC receptacle.

Troubleshooting
NO SOUND
- Verify the connection between the amplifier and speaker is correct.
- A speaker requires two wires, one positive and one negative, between the amplifier and speaker.
- Verify source material is playing through the amplifier and that the volume is not at the lowest point.
- Check that the amplifier is not in ‘mute’. In some cases, the amplifier may feature a speaker A/B selector.
- Verify the speaker selector is set to the correct output that is connected to the speaker.
If there is no sound after a long time of use, verify the amplifier is not hot. - The amplifier may have overheated and shutdown automatically.
- If you listen at very high levels and have a powerful amplifier, check that the fuse did not blow (SL-28, SL-12, SL-15 models only).
BAD SOUND
- Verify the connection between the amplifier and speaker is correct.
- The positive terminal of the amplifier must be connected to the positive terminal of the speaker.
- The negative terminal of the amplifier must be connected to the negative terminal of the speaker.
- Adjust the volume to a lower level and set all EQ (treble, mid, bass) levels to flat.
- If the sound improves, than the amplifier is underpowered and cannot meet your listening expectation.
- Any hum or buzzing when no media is playing is due to amplifier.
- Verify if there are any ground loop issues and the amplifier is connected to clean power. Review the manual of the amplifier.
FAQS
Are they ok to run on 6 ohm receiver?
The Cerwin-Vega speakers have a nominal input impedance of 8 ohms. The majority of audio amplifiers have an output impedance of 8 ohms. There have been a few with 4 or 16.
Can i use this straight from a samsung tv with optical cable
No you need to run it with a receiver
Can someone please confirm dimentions? On Amazon it says 30 x 9 x 10 inch vs 6.52″x27.58″x7″ on Cevin Vega website.?
The SL-15’S are big floor speakers. The dimensions stated in the specs are for the speakers themselves. With 200 wpc or more, they will shake the house with huge bass and good sound quality. I’ve owned 3 pairs
What size are the speakers,How much watts it inputs?
Need more info my friend. Best thing to do is look up your speakers, I still have my pamphlet that came with mine, and all the specifications will be there. Should also be on the Tag on the rear of the speaker so have a look see!
One of the magnets fell off my sl-45c quad 5 1/4″ center channel speaker. can you buy a replacement driver?
Please contact the seller or manufacturer.
Can these be internally wired to 4 or 2 ohm?
That option is not available from the factory. If you have the materials and skill sets, you would be on your own and at the sacrifice of any factory warranty
Crossover? No crossover?
The Center Channel is a non-ported (not bass reflex) and I would assume that is does have a crossover as its performance of highs, lows and mids are great.
What material are the sl-45c woofers made of? polypropylene? butyl rubber? kevlar? cant find anything on cv site or anywhere else.
Upon close examination, the woofer cone material is pressed paper with a poly-foam suspension ring.
Is it normal for the center channel to be calibrated at high volume to the max on surround sound ? My old center channel was -2 ?
Sounds like your system that is doing the calibrated….may need some calibration
Is it really 27.5 inches deep?
Length awesome ctr channel with onkyo txnr696
Can I use this as a soundbar? Powered by my television only?
Nope, it doesn’t have a self contained power source or the right connections to use as a soundbar.
Are mounting brackets included?
No there is not any brackets must buy separate
I see this less expensive unknown brand (for me) very well reviewed. so, vs klipsch or polk, worth it ?
The frequency response for the Cerwin-Vega I have is excellent, particularly at the low end
Can these speakers be used for Dolby Atmos?
Yes it can be I use it for a centre speaker without issue sound great as its intended placement
Can it be mounted/advice for mounting on wall.
Yes if you buy some wall brackets. They make an L shaped bracket. Make sure you mount the brackets on wall studs. Then place speakers on brackets.


