
Philips BY240Z Remote Control Instruction Manual
Mounting Instruction
| 12NC | Description | Power | Upload Range | Op. Temperature |
| 911401892182 | BY240Z Remote control | 0.1W | Up to 15m(50ft.) | 0℃~50℃ |
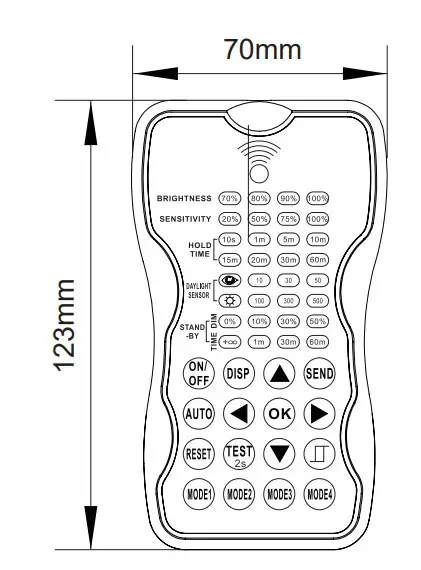
Dimensions
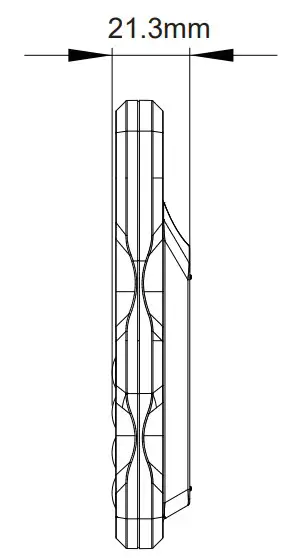

With carrying case
Power supply
2xAAA 1.5V battery, Alkaline perferred, not supplied
| Button | Description | Button | Description | Button | Description |
| | Press the | Press |  | Display the current/lastest setting parameters in LED indicators(the LED indicators will on for showing the setting parameters). | |
 | Pressbutton for factory resetting | ||||
 | Thebutton is for testing purpose sensitivity only. After you choose sensitivity thresholds, then you pressbutton,the sensor goes to test mode(hold time is only 2s) automatically ,meanwhile the stand-by period and daylight sensor are disabled. Press |  | Enter in the setting condition, the parameter LED of remote control will flash to be selected. and Navigate to UP and Down for choose selected parameters in LED indicators. | | Navigate to LEFT and RIGHT for choose selected parameters in LED indicators. |
 | Confirm the selected parameters selected parameters in remote control. |  | 4 Scene modes with preset parameters which are available to be changed and saved in modes. |  | Open and close smart daylight sensor, press  or or  enter into the setting condition, the parameter leds of remote control will flash to be selected, press for open or close smart daylightsensor. enter into the setting condition, the parameter leds of remote control will flash to be selected, press for open or close smart daylightsensor. |
 | Pressbutton, upload the current parameters to sensor(s), the LED light which the sensor connects will on/off asconfirm. |
LED Indicators
| LED | Description | LED | Description | LED | Description |
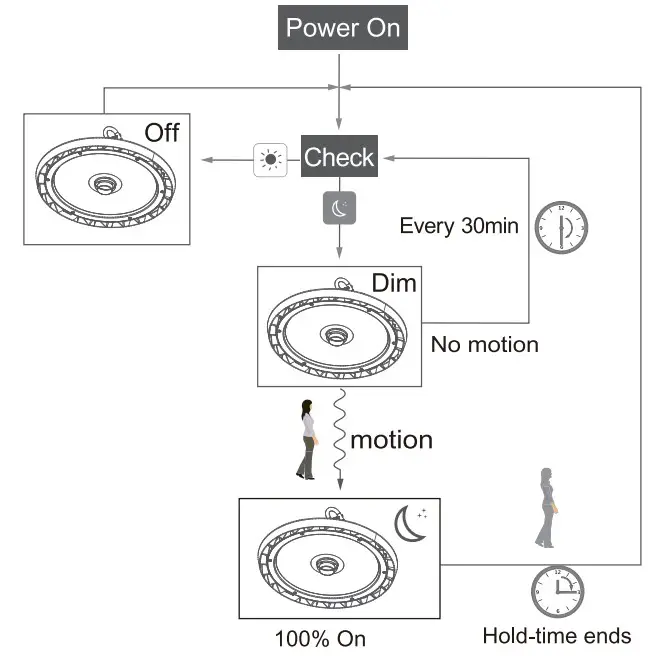
| BRIGHTNESS | High end trim turning function(To Set the output level of connected lighting during occupancy) |  | To select the current surrounding lux value as the daylight threshold. This feature enables the fixture to function well in any real application circumstances. | SENSITIVITY | To set the occupancy sensing sensitivity of the Sensor |
 | The daylight sensor stops working, and all motion detected could turn on the lighting fixture, no matter how bright the natural light is. | HOLD TIME | The time that the Sensor will turn off(if you choose stand-by level is 0) or dim the light to a low level after the area is vacated | STAND- BY DIM | To set the output level of connected lighting during vacancy. The sensor will regulate the lighting output at the set level. Setting the STAND-BY DIM level at 0 means light full off during vacancy. |
| DAYLIGHT SENSOR | To represents various thresholds of natural light level for the sensor . | STAND-BY TIME | To represents the time that the sensor will keep the light at low dim level after the HOLD TIME elapsed. |
Signify Luminaires (Shanghai) Co., Ltd.
Address: 2nd Floor, Building 1, No. 2555,
Hechuan Road, Minhang District, Shanghai
Postalcode: 200233 P.R. China
Sensor Configuration
- Press “AUTO”,the luminaire will flicker ON and OFF twice
- Press “DISP” to show latest configurations.
- Press
 or to enter into settings, navigate to the desired setting by
 to select new parameters.
 - Press “OK” to confirm and save all parameters,the luminaire will flicker ON and OFF.
- Aim at the luminaire and press “SEND” to upload new parameters. The luminaire will flicker ON and OFF once as confirmation.

Default Mode
| Brightness | Sensitivity | Hold Time | Daylight Sensor | Stand-by Dim | Stand-by Period | |
| MODE 1 | 100% | 75% | 5 min | Disabled | 30% | 30 min |
| MODE 1 | 100% | 75% | 1 min | Disabled | 30% | + ∞ |
| MODE 1 | 100% | 75% | 5 min | 30LUX | 30% | 30 min |
| MODE 1 | 100% | 75% | 1 min | 30% | + ∞ |
Configure New Mode
- Press “MODE 1,2,3 or 4”, the remote will display existing configurations.
- Press to select new parameters.
- Press“OK” to confirm and save all parameters.
Daylight Function Configuration
- Press
 , the remote LED indicators will show the latest parameters.
 - Press or enter in the setting condition, the parameter LED indicators of remote control will flash to be selected.
- Press
 ,2 LED indicators will flash in daylight sensor settings,press to select daylight
 as setpoint to light on automatically, pressto select daylight
 as setpoint to light off automatically
 - Press
 to confirm and save all setting.
 - Aim at the target sensor and press to upload the new parameter. The LED light which the sensor connects will on/off.
Open the daylight sensor by push when remote control is in setting condition.
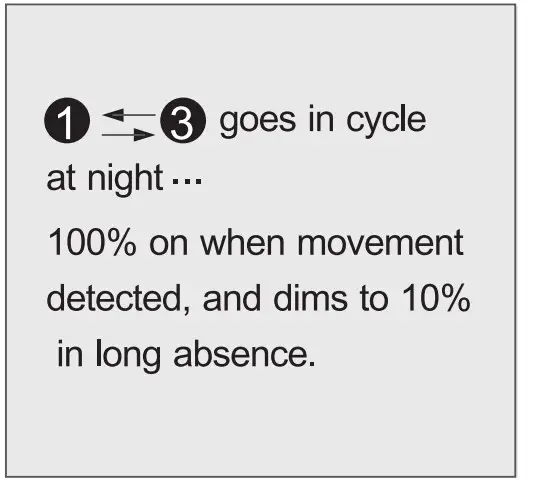
- The light switches on at 100% when there is movement detected.

- The light dims to stand-by level after the hold-time.
- The light remains in dimming level at night.

- When the natural light level exceeds setpoint off to light,the light will turn off even if when the space is occupied.
- The light automatically turns on at 10% when natural light is insuffcient (no motion).

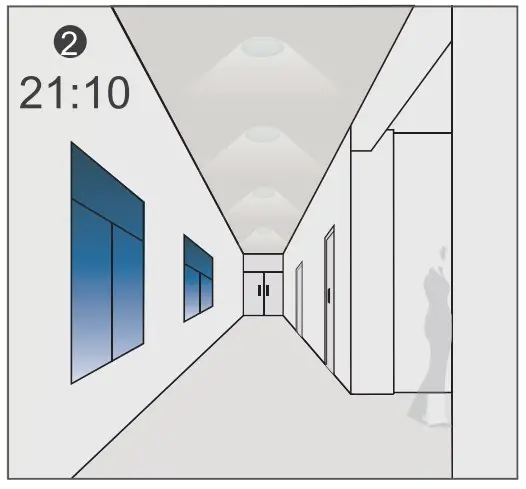
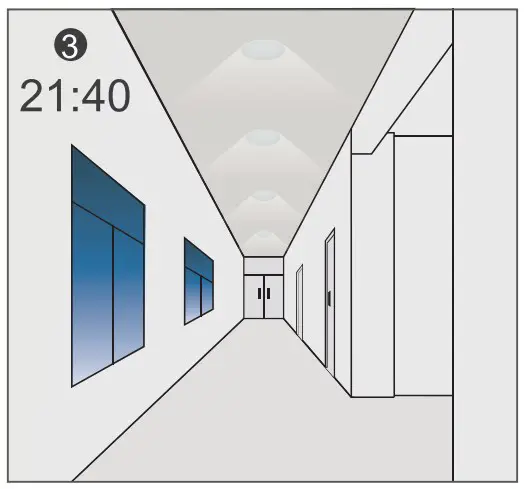
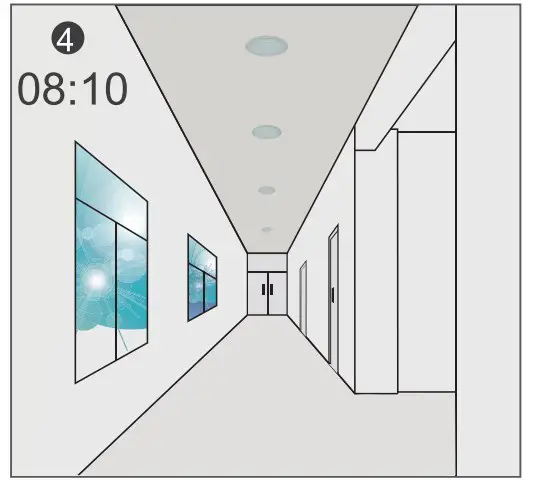
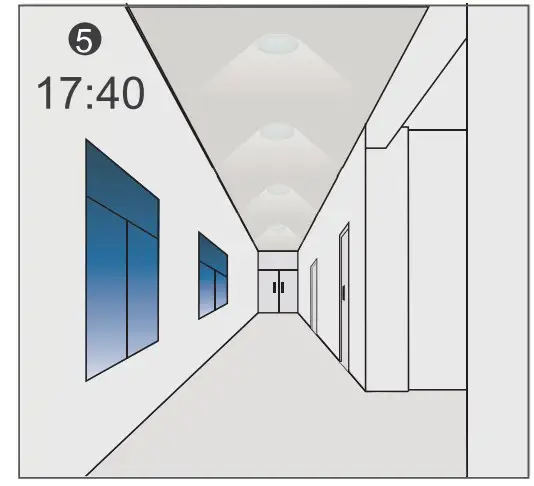
Settings on this demonstration:
Hold-time: 30min
setpoint to light on: 50lux
setpoint to light off: 300lux
Stand-by Dim: 10%
Stand-by period: +∞ (when the smart photocell sensor open, the stand-by time is only +∞)
![]() WARNING:
WARNING:
- Remove the batteries from compartment if the remote will not be used in 30 days.
- When using remote control to upload the current paramneters to sensor,please try to stand directly underneath the luminaire with sensor.


