
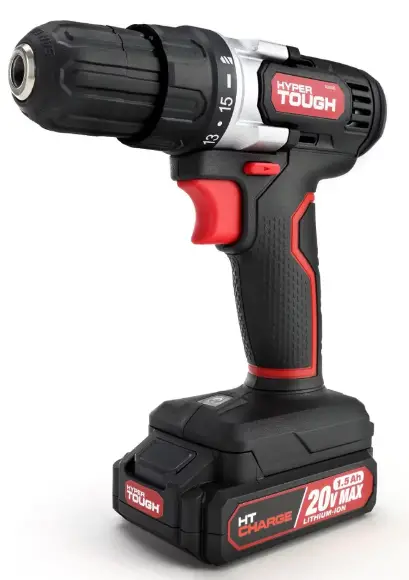
HYPER TOUGH 20 VOLT MAX CORDLESS DRILL
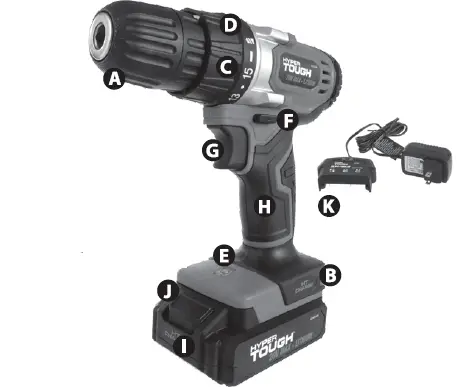
Overview
- A 3/8 In.(10mm)chuck
- B Double-end driver bit
- C Torque regulation ring
- D Torque indicator scale
- E LED work light
- F Forward / reverse switch
- G Variable speed trigger with electric brake
- H Rubber–covered handle
- I 20 Volt Max Lithium-ion rechargeable battery
- J Battery lock button
- K Charger Set

Please read before returning this product for any reason:
If you have questions or experience a problem with your Hyper Tough purchase, call 1-800-840-7856 from 8:00 a.m. to 5:00 p.m. Eastern Standard Time, Monday through Friday.
GENERAL POWER TOOLS SAFETY WARNINGS
- Read all of the instructions and pay close attention to the safety warnings. Failure to follow the warnings and instructions can result in electric shock fire and or serious injury.
- SAVE THESE WARNINGS AND INSTRUCTIONS YOU MAY NEED TO REFER TO THEM LATER
- The term “power tool” in the warnings refers to your mains-operated (corded) power tool or battery-operated (cordless) power tool.
SAFETY WARNINGS AND INSTRUCTIONS
- This manual contains important safety and operating instructions.
- Be sure that any attachments are recommended or sold by use of attachments by other manufacturers may not meet the same requirements and can result in fire, electric shock, or injury.
- Never pull by the cord – always pull by the plug when disconnecting.
- Never open the power tool – there are no parts inside that are serviceable by the customer.
- NEVER incinerate the power tool when it is ready to be discarded. It can explode in a fire.
WORK AREA SAFETY
- Keep your area well-lit and clear of the clutter that can invite accidents.
- Operate your tools in a safe area free of the presence of flammable liquids, gases, dust or potentially explosive atmospheres. Power tools can create sparks that can combust.
- Keep all distractions such as children away while operating the power tool. Distractions can cause accidents, or cause you to lose control.
ELECTRICAL SAFETY
- To reduce the risk of electrical shock power tool plugs must match the outlet. Double-insulated tools are equipped with a polarized plug (one blade is wider than the other). The plug is designed to fit into a polarized outlet only one way. If the plug does not fit properly into the outfit, try reversing the plug
if it still does not fit, you need to find an outlet that is polarized or contact a qualified electrician to install a polarized outlet. - Don’t modify the plug and don’t use any plug adapters with earth-grounded power tools. Double insulation eliminates the need for the three-wire grounded power cord and grounded power supply system.
- Avoid bodily contact with grounding services such as ranges, refrigerators, pipes, and radiators; there is a higher risk of electrical shock if your body is grounded.
- Don’t expose your power tools to wet conditions or rain. Water entering a power tool will increase the risk of electrical shock.
- Do not abuse the cord. Never use the cord to carry the tools or pull the plug from an outlet. Keep cord away from heat, oil, sharp edges or moving parts.
- Replace damaged cords immediately. Damaged cords increase the risk of electric shock.
- Be sure to use electrical supplies that are suitable for the conditions. If working outdoors, use extension cords rated for outdoor use (marked “W-N’ or “W'”) this reduces the risk of electrical shock.
- If you have to work in a damp location, be sure to use a ground fault circuit interrupter (GFCI) protected supply. This will help reduce the risk of electrical shock.
EXTENSION CORD USE
- Make sure the cord is clear and secure – do not step on, trip or otherwise damage or stress the cord.
- Don’t use an extension cord unless you have to – use of an improper extension cord can result in fire, shock or electrocution.
- Two-wire cords can be used with 2-wire or 3-wire extension cords. Only round-jacketed U.L. (Underwriters Laboratories) listed extension cords should be used. If you are going to use an extension cord outside, make sure the cord is manufactured for outdoor use. NOTE: Most cords used for outdoor use can also be used indoors. The letters “W” or”WA:’ on the cord jacket mean the cord is suitable for outdoor use.
- An extension cord must be of the proper gauge (wire size) – AWG or American Wire Gauge to be used safely, prevent power loss, and prevent overheating.
NOTE: the smaller the wire gauge number, the greater the capacity of that cable; for instance, 16 gauge has more capacity than 18 gauge. If you must use more than one extension cord, be sure each extension has at least the minimum required gauge size.
PERSONAL SAFETY
- Stay alert when operating this machinery to avoid the possibility of personal injury. Do not use these tools if you are under the influence of drugs, alcohol, or medication. Do not operate this machinery if you are tired.
- Use adequate personal protection – always wear eye protection. Suggested protective equipment include nonskid safety shoes, dust mask, hearing protection and/or a hard hat.
- Prevent unintentional starting – ensure that the power switch is off before plugging into a power source or connecting the battery. Don’t carry the tool by the trigger.
- Remove adjusting keys or switches before turning the tools on. A wrench or a key that is left attached to a rotating part of the tools may result in personal injury.
- Do not overreach. Keep proper footing and balance at all times. Proper footing and balance enables better control of the tools in unexpected situation.
- Dress properly. Loose clothing or long hair can become entangled in the moving parts of this machine – keep your clothes, gloves, hair or jewelry away from any moving machinery.
- Be sure to properly connect and use any devices that extract and collect dust. When used properly, dust collection can reduce situations related to dust and debris hazards.
- Do not run the cordless drill while carrying it at your side. A spinning socket or bit could become entangled with clothing and injury may result.
- Disconnect the plug or remove the battery pack from tool and place the switch in the locked or “OFF” position before making any assembly adjustments, changing accessories, or performing any inspection, maintenance or cleaning procedures. Such preventive safety measures reduce the risk of starting the tool accidentally.
- Do not use the cordless drill if it has been damaged, left outdoors in the rain, snow, wet or damp environments, or immersed in liquid.
POWER TOOL USE AND CARE
- Use clamps or another practical way to secure and support the workpiece to a stable platform. Holding the work by hand or against your body is unstable and may lead to loss of control.
- Do not force tool. Use the correct tools for your application. The correct tools will do the job better and safer at the rate for which it is designed.
- Do not use tools if switch does not turn it on or off. Any tool that cannot be controlled with the switch is dangerous and must be repaired.
- Disconnect the plug from the power source before making any adjustments, changing accessories or storing the tool. Such preventive safety measures reduce the risk of starting the tools accidentally.
- Store idle tools out of reach of children and other untrained persons. Tools are dangerous in the hands of untrained users.
- Maintain tools with care. Keep cutting tools sharp and clean. Properly maintained tools with sharp cutting edges are less likely to bind and are easier to control.
- Check for misalignment or binding of moving parts, breakage of parts and any other condition that may affect the operation of the tool. If damaged, have the tools serviced before using. Many accidents are caused by poorly maintained tools.
- Use only accessories that are recommended by the manufacturer for your model. Accessories that may be suitable for one tool, may become hazardous when used on another tool.
- Use this power tool and accessories in accordance with the instructions; always take into account the work to be performed and the conditions in which the work will be performed. Use of this tool for anything other than what it was designed could be harmful.
- Hold tool by insulated gripping surfaces when performing an operation where the cutting tool may contact hidden wiring or its own cord. Contact with a “live” wire will make exposed metal parts of the tool “live” and shock the operator.
SERVICE
- Tool service must be performed only by qualified repair personnel. Service or maintenance performed by unqualified personnel could result in a risk of injury.
- When servicing a tool, use only identical replacement parts. Follow the instructions in the maintenance section of the manual. Use of unauthorized parts or failure to follow. Maintenance instructions may create a risk of electric shock or injury.
SPECIFIC SAFETY RULES
- Exposure to loud noise can cause hearing damage. Always wear ear protection when using power equipment. Lt. WARNING: ALWAYS use safety glasses.
- Everyday eye glasses are NOT safety glasses.
- Use face or dust mask if operation is dusty.
ALWAYS WEAR CERTIFIED SAFETY EQUIPMENT
- ANSI Z87.1 eye protection (CAN/CSA Z94.3)
- ANSI S12.6 (S3.19) hearing protection
- NIOSH/OSHA respiratory protection
- For optimum control of your power tool, always use the auxiliary comes with the tool.
- Your tool has insulated gripping surfaces – be sure to hold the power tool by these surfaces to avoid electrical shock if the cutting part of the tool should make contact with a “live” wire.
- For best safety measures, lay the tool on it’s side when not in use, particularly if you’re working on a ladder or scaffold, high off the ground. with large battery packs can stand upright, but they’re easily tipped over, which could cause result in an injury.
- Power tools exert extreme force – be sure the item you’re working on is firmly secured with clamps or other reliable means. Do not try to hold the item by hand or against your body- you might lose control and be injured.
- Keep hair, clothing, or gloves away from air vents, as they may become entangled in the moving mechanism around these areas.
- Hold the tool firmly with both hands. Use the auxiliary handle if available; if there is no auxiliary handle, grip the handle at the bottom. Losing control of the device can result in personal injury.
STAY ALERT
- Watch what you are doing and use common sense. Don’t operate any tool when you are tired.
- WARNING: Some dust created when using power tools to sand, grind, drill or saw and/or other construction activities contains chemicals known to the
- State of California to cause cancer, birth defects or other reproductive harm. Some examples of these types of chemicals
- lead from lead-based paint
- crystalline silica from bricks and cement and other masonry products
- arsenic and chromium from chemically treated lumber
- Your risk from these exposures varies depending on how often you do work that involves these materials.
- To reduce exposure risk, work in a well-ventilated area with approved safety equipment like dust masks that are designed to filter out microscopic particles.
- Avoid prolonged contact with dust from construction activities like power sanding, sawing, grinding, and drilling. Always wear protective clothing and immediately wash any exposed areas with soap and water.
- If you allow dust to get into your eyes or mouth, or stay on your skin, you risk absorption of these harmful chemicals.
WARNING: Dust from use of this tool on construction material may cause serious and/or permanent respiratory (or other) injury. Direct the particles away from your face, and be sure to use NIOSH/OSHA-approved respiratory protection against dust exposure.
Symbols
For your easy reference, here are the symbols of the tool you may see on your tool label:
ALWAYS FOLLOW THE SAFETY RULES FOR THE USE OF THIS PRODUCT.
- You can get seriously hurt by using this tool unsafely or incorrectly.
- Always use caution, particularly if operating the power tool around electrical wiring. Your tool has insulated gripping surfaces – be sure to hold the power tool by these surfaces to avoid electrical shock if the cutting part of the tool should make contact with a “live” wire.
- Only operate the tool when you are securely holding it with both hands; do not leave the tool running.
- Don’t use water on your work surface – this tool is not waterproof.
- Always ventilate your working area adequately.
- Make sure to use appropriate respiratory protection. Use of this tool on some paints, wood, and particular products may produce dust containing hazardous substances
WARNING
- Do not allow the terminals of the battery to contact metal objects when carrying or storing the battery.
- If the battery terminals come in contact with conductive materials, it can cause fires – so use caution when transporting the battery.
NOTE: the US Department of Transportation Hazardous Material Regulations (HMR) prohibits transporting batteries in commerce or on airplanes (i.e. packed in suitcases and carry-on luggage) UNLESS they are properly protected from short circuits.
- Take special precautions when transporting individual batteries to make sure the terminals are well insulated and protected from anything that could contact them and cause a short circuit.
SAFETY WARNINGS AND INSTRUCTIONS: CHARGING THE BATTERY PACK
- This manual contains important safety and operating instructions.
- Before using the battery charger, read and become familiar with all of the use instructions and caution markings on the battery charger, battery pack, and product using the battery pack.
- CAUTION: Always use battery packs to reduce the possibility of injury; other battery types may burst, causing potentially harmful results.
- Keep the charger out of bad elements, such as rain and snow.
- Be sure that any attachments are recommended or sold by use of attachments by other manufacturers may not meet the same requirements and can result in fire, electric shock, or injury.
- Never pull by the cord – always pull by the plug when disconnecting the charger.
- Make sure the cord is clear and secure – do not step on, trip or otherwise damage or stress the cord.
- Extension cords – refer to ELECTRICAL SAFETY (CONT.) – EXTENSION CORD USE in this manual.
- Use only the supplied charger when charging your drill. Using a different charger can be hazardous or damage the drill
- Use only one charger when charging.
- Never open the charger or power tool – there are no parts inside that are serviceable by the customer. Return the power tool to for service.
- Never attempt to open or modify battery for any reason. Released electrolyte is corrosive and may cause damage to eyes and skin. It may be toxic if swallowed.
- NEVER incinerate the power tool or battery pack when they are ready to be discarded. The batteries can explode in a fire.
- There are certain conditions, such as extreme usage, charging or temperature conditions that can result in a small amount of leakage from the battery pack cells. This does not indicate a failure – however, should the outer seal get broken and the leakage touches your skin:
- Immediately wash with soap and water.
- Neutralize with a mild acid such as lemon juice or vinegar.
- In case the battery liquid gets in your eyes, flush your eyes with clean water for a minimum of 10 minutes and seek immediate medical attention. MEDICAL
NOTE: the liquid is a 25-35% solution of potassium hydroxide.
CHARGING THE BATTERY PACK
- Always have drill rotation switch in the neutral/lock position when removing or inserting the battery to avoid unintentional starting.
- To remove the battery pack from the tool, press the lock spring buttons (J in the functional description) and pull out.
- To insert, simply push the pack in until the lock spring clicks. S) To charge, connect the switching adapter/plug low-voltage lead to the charging stand.
- Insert the switching adapter/plug into a 120V household current receptacle.
- The step of the battery pack has positive and negative terminal markings on it. Align these with the identical markings on the top of the charging stand and insert the pack into the base. (Pack will not insert properly if reversed)
- The green light is the charge indicator. When the charger is connected to AC household current, the green light is on.
- The red light is the power indicator. When the battery is properly inserted into the charger and charging, the red light is on.
- Normal charging time is to 4 hours. The charger will charge the battery at the normal rate until charging is complete. The red charging indicator light will turn off once the charging is complete. After the battery is fully charged according to the charging time provided in the instructions, remove the battery pack from the charging stand. Battery temperature will cool to normal.
- When charging more than one battery pack, allow 15 minutes between charges.
- After many charge/discharge cycles, your battery will lose its ability to hold a charge. It should then be replaced. Dispose of batteries at an appropriate waste disposal facility. Do not throw batteries away in common trash receptacles.
ROTATION DIRECTION
Your drill is equipped with a 3-position forward / reverse / neutral-lock switch (F in the functional description) through the housing above the trigger.
- When knob is pushed toward the left, rotation is forward (clockwise).
- When pushed in from the left to the right side, rotation is reversed (counter-clockwise).
- When in center position, it is locked in neutral and the trigger is blocked. Do not push the rotation direction knob until the chuck stops turning.
TORQUE REGULATOR
- This is a position ring (C in the functional description) situated between the chuck and the drill body.
- When arrow on the top of the housing points to 1 on the Torque indicator scale (D in the functional description), torque is at a minimum before the clutch disengages the chuck from the drive.
- When the indicator is just past, the output is at maximum before it is disengaged. This is useful in driving screws into different types of material.
- More torque will set a screw deeper into the material, less torque will prevent it from stripping. Larger screws require more torque to drive than small ones. A little trial and error will show you which is the optimum setting for the situation.
- Release the trigger when the clicking sound indicates the chuck will not turn further.
- For drilling, always use the drill setting, indicated by the pictogram of a drill bit. At this setting, the drive does not disengage from the chuck.
KEYLESS CHUCK OPERATION
- Center the rotation direction knob to prevent the motor from accidentally starting. To insert a drill bit or other accessory:
- Grasp the rear half of the chuck (A) with one hand and use your other hand to rotate the front half in the counterclockwise direction, as viewed from the chuck end.
- Insert the bit or other accessory fully into the chuck, and tighten securely by holding the rear half of the chuck and rotating the front portion in the clockwise direction as viewed from the chuck end.
DRILLING
- Only use sharp drill bits.
- Secure work properly; do not try to hold objects by hand. (Refer to Safety Instructions)
- Be sure to wear appropriate, required safety equipment. (Refer to Safety Instructions)
- Make sure the work area is safe and secure. (Refer to Safety Instructions)
- Start drilling slowly, using light pressure to start the hole and prevent the bit from slipping out of it.
- Drill in a straight line, applying enough pressure to keep the bit biting, but not too much to stall the motor or deflect the bit.
- HOLD THE DRILL FIRMLY WITH TWO HANDS TO CONTROL THE TWISTING ACTION.
- In case the drill stalls, do not attempt to start it by clicking the trigger on and off – this can damage the drill.
- Minimize stalling upon breakthrough by reducing applied pressure and reducing speed through the last part of the hole.
- Once the hole is drilled, keep the motor running as you pull the drill bit out of the hole to reduce jamming.
- When drilling metals (except for cast iron and brass) use a cutting lubricant such as sulphurized cutting oil or lard oil. Note: cast iron and brass should be drilled dry.
- Drilling wood builds up chips in the flutes of twist drill bits. Frequently pull the bit out of the wood and clear the wood chips from the bit flutes during use.
- Make sure the switch turns the drill on and off.
DRILLING IN WOOD
Holes in wood can use the same twist drill bits that you would use for metal (or spade bits). Make sure the bits are sharp and frequently stop to clear the wood particles from the flutes.
DRILLING IN METAL
When drilling metals (except for cast iron and brass) use a cutting lubricant such as sulphurized cutting oil or lard oil. Note: cast iron and brass should be drilled dry.
DRILLING IN MASONRY
Use carbide-tipped masonry bits (refer to Drilling Section). Drill evenly keeping a uniform force on the drill, but not too much or you can crack the brittle material. If you are experiencing a smooth, even flow of dust, that indicates a good drilling rate
TROUBLESHOOTING
MAINTENANCE
- Keep the tool clean using a soft damp (not wet) cloth. Do not use solvents on the plastic parts.
- Lubrication is not necessary. After long use, have an authorized service center maintain and lubricate the tool. Should the chuck require replacement,
- Remove the battery pack
- Open the chuck jaws as widely as possible so you can get at the chuck retaining screw.
- Unscrew the chuck retaining screw with a Phillips screwdriver. Note that this is a left-hand threaded screw and you remove it by turning it clockwise.
- Clamp the shorter arm of a large Allen wrench in the chuck, aligning it with the jaws so they grip three of its six flat sides. Place the drill on a flat surface, and support the chuck with a piece of wood about 3/8″ (10 mm) above that surface. Or press the drill body on the working table and make the chuck hang in the air. (Be careful with your hand!) Strike the long arm of the wrench with a hammer so that the chuck turns counter-clockwise and unscrews from the spindle. This may require a fairly sharp blow. Repeat the process in reverse to install a new chuck.
- To maintain the best performance of your rechargeable battery, protect it from overheating, both from overcharging and during storage. Occasionally charge the battery for 7 hours. The battery may also benefit from a full discharge from time to time.
THE RBRC™ SEAL
The RBRC™ Seal (Rechargeable Battery Recycling Corporation) on the battery (or battery pack) indicates that the cost of recycling the battery or battery pack has already been paid by In some areas it is illegal to place spent batteries in the trash or municipal solid waste stream and the RBRC program provides an environmentally conscious alternative. RBRC in cooperation with other battery users, has established programs in the United States and Canada to facilitate the collection of spent batteries. Help protect our environment and conserve natural resources by contacting your local recycling center for information on where to drop off the spent battery, or call 1-877-2-RECYCLE.
SPECIFICATIONS
- 20V Max Li-ion battery
- 3/8″(10mm) keyless chuck
- No Load Speed: 0-600 RPM
- 15+1 position adjustable torque clutch
- Variable speed reversible trigger with electric brake
- Comfortable rubberized grip
- Build-in double-ended driver bit
- `Bright LED work light
- 3 – 4 hours charging time
Includes:
- 20V Max Drill/Driver
- Double-end driver bit
- 20V Max Li-ion battery pack
- Charger
- Instruction manual
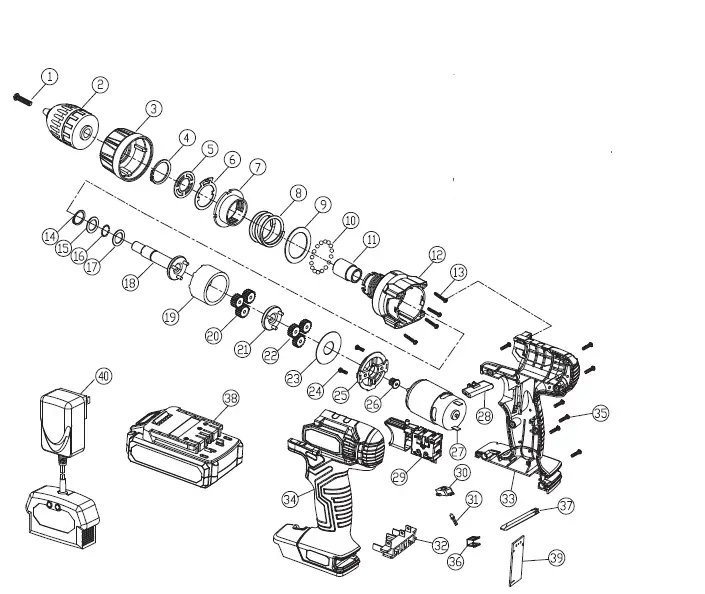
| NO. | DESCRIPTION |
| 1 | Screw |
| 2 | Chuck |
| 3 | Torque setting ring |
| 4 | Shaft spring washer |
| 5 | Plate |
| 6 | Sounder |
| 7 | Threaded ring |
| 8 | Torsion spring |
| 9 | Adjustable washer |
| 10 | Steel ball |
| 11 | Shaft sleeve |
| 12 | Front gear box |
| 13 | Screw |
| 14 | Shaft spring washer |
| 15 | Shaft washer |
| 16 | Steel ball |
| 17 | Shaft washer |
| 18 | Shaft |
| 19 | Rear gear case |
| 20 | 2 Class planet gear |
| 21 | 2 Class planet support |
| 22 | 1 Class planet gear |
| 23 | Washer |
| 24 | Screw |
| 25 | Motor connecting piece |
| 26 | Motor gear |
| 27 | DC motor |
| 28 | Forward / Reverse switch |
| 29 | Switch |
| 30 | LED transparent cover |
| 31 | LED light |
| 32 | Battery clip assembly |
| 33 | Right housing |
| 34 | Left housing |
| 35 | Screw |
| 36 | Driver bit support |
| 37 | Driver bit |
| 38 | Battery |
| 39 | PCB |
| 40 | Charger Set |
WARRANTY CONDITIONS
Dear Customer,
The Hyper Tough warranty offers you extensive benefits compared to the statutory Warranty period: 2 years from the date of purchase.
Costs:: Free repair/exchange or refund. No transport costs.
In order to make a claim under the warranty, please send us:
- together with the faulty item the original receipt and the warranty card were properly completed.
- the faulty product with all components included in the packaging.
Limited 2-Year Warranty
What Is Covered
Manufacturer warrants to the original purchaser that eligible products are free from defects in materials and workmanship for the period of 2 years from the date of purchase under normal usage.
What Is Not Covered
This warranty does not cover damage due to abuse, improper maintenance, failure to follow directions, neglect, unauthorized repair/alteration, ordinary wear, or expendable parts and accessories expected to become unusable after a reasonable period of use. This warranty not valid for use by a professional contractor or if the eligible products are used as rental equipment. Also, consequential and incidental damages are not recoverable under this warranty. Some states do not allow the exclusion or limitation of consequential or incidental damages, so the above limitation or exclusion may not apply to you.
What Test Rite Will Do
Test Rite will repair or replace any product that proves to be defective in materials or workmanship. In the event repair is not possible, Test Rite will either replace your product with a new product of similar composition and price, or refund the full purchase price of your product.
How To Get Service
In order to be eligible for service under this warranty, you must:
- Return warranty registration card within (30) days of purchasing ing product
- Register product online
- Write or call
- Or bring a defective item to the closest dealer/distributor
How State Law Applies
This warranty gives you specific legal rights and you may have other legal rights which vary from state to state For questions, please contact
- American Customer Service
- 5805C Peachtree Corners
- East Norcross,
- GA 30092, U.S.A 30092
- 1-800-840-7856
- ITEM # AQ75034G
- PHONE LINES AVAILABLE
- MONDAY THROUGH FRIDAY
- 8:00AM- 5:00PM EST
- E-mail: [email protected]
CALIFORNIA PROP 65
WARNING: Some dust created by power sanding, sawing, grinding, drilling and other construction activities contains chemicals known to the state of California to cause cancer, birth defects or other reproductive harm. Some examples of these chemicals are:
- Lead from lead-based paints,
- Crystalline silica from bricks and cement and other masonry products, and
- Arsenic and chromium from chemically treated lumber.
Your risk from these exposures varies, depending on how often you do this type of work. To reduce your exposure to this chemical: work in a well-ventilated area, and work with approved safety equipment, such as those dust masks that are specially designed to filter out microscopic particles.”
For more information go to HYPERLINK http://www.P65Warnings.ca.gov


