
Shure BLX14/SM31 Wireless Microphone System
Introduction
WIRELESS MICROPHONE SYSTEMS BY SHURE BLX. WORLD-CLASS SOUND OUT OF THE BOX. SIMPLIFYING WIRELESS FREEDOM Moving to wireless ought to be liberating rather than difficult. Shure BLX Wireless Systems offer the performance you can rely on right out of the box by combining professional sound quality with ease of setup and an intuitive interface. It’s the most accessible way to own the stage because it’s precisely constructed and available in a range of handheld, lavalier, instrument, and headset combinations.
IMPORTANT SAFETY INSTRUCTIONS
- READ these instructions.
- KEEP these instructions.
- HEED all warnings.
- FOLLOW all instructions.
- DO NOT use this apparatus near water.
- CLEAN ONLY with dry cloth.
- DO NOT block any ventilation openings. Allow sufficient distances for adequate ventilation and install in accordance with the manufacturer’s instructions.
- DO NOT install near any heat sources such as open flames, radiators, heat registers, stoves, or other apparatus (including amplifiers) that produce heat. Do not place any open flame sources on the product.
- DO NOT defeat the safety purpose of the polarized or groundingtype plug. A polarized plug has two blades with one wider than the other. A grounding type plug has two blades and a third grounding prong. The wider blade or the third prong are provided for your safety. If the provided plug does not fit into your outlet, consult an electrician for replacement of the obsolete outlet.
- PROTECT the power cord from being walked on or pinched, particularly at plugs, convenience receptacles, and the point where they exit from the apparatus.
- ONLY USE attachments/accessories specified by the manufacturer.
- USE only with a cart, stand, tripod, bracket, or table specified by the manufacturer, or sold with the apparatus. When a cart is used, use caution when moving the cart/apparatus combination to avoid injury from tip-over.
- UNPLUG this apparatus during lightning storms or when unused for long periods of time.
- REFER all servicing to qualified service personnel. Servicing is required when the apparatus has been damaged in any way, such as power supply cord or plug is damaged, liquid has been spilled or objects have fallen into the apparatus, the apparatus has been exposed to rain or moisture, does not operate normally, or has been dropped.
- DO NOT expose the apparatus to dripping and splashing. DO NOT put objects filled with liquids, such as vases, on the apparatus.
- The MAINS plug or an appliance coupler shall remain readily operable.
- The airborne noise of the Apparatus does not exceed 70dB (A).
- Apparatus with CLASS I construction shall be connected to a MAINS socket outlet with a protective earthing connection.
- To reduce the risk of fire or electric shock, do not expose this apparatus to rain or moisture.
- Do not attempt to modify this product. Doing so could result in personal injury and/or product failure.
- Operate this product within its specified operating temperature range.
This symbol indicates that dangerous voltage constituting a risk of electric shock is present within this unit.
This symbol indicates that there are important operating and maintenance instructions in the literature accompanying this unit.
WARNING: This product contains a chemical known to the State of California to cause cancer and birth defects or other reproductive harm.
CAUTION
For proper operation, set each transmitter to a different channel on the BLX88 receiver.
Consult your BLX Channel guide to select compatible channel sets.
QUICK START GUIDE
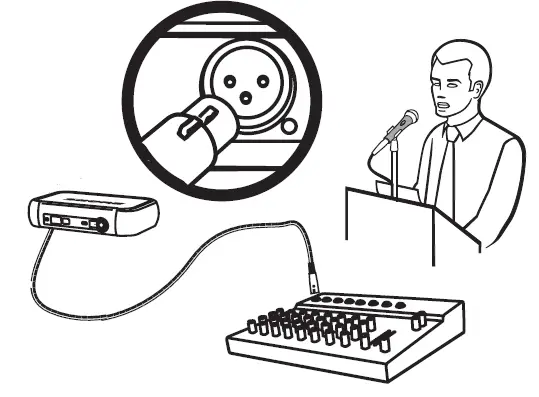
- Connect receiver to power source.

- Connect receiver to mixer or amplifier. Hold power button to turn on.

- Press group button on receiver to perform a group scan.

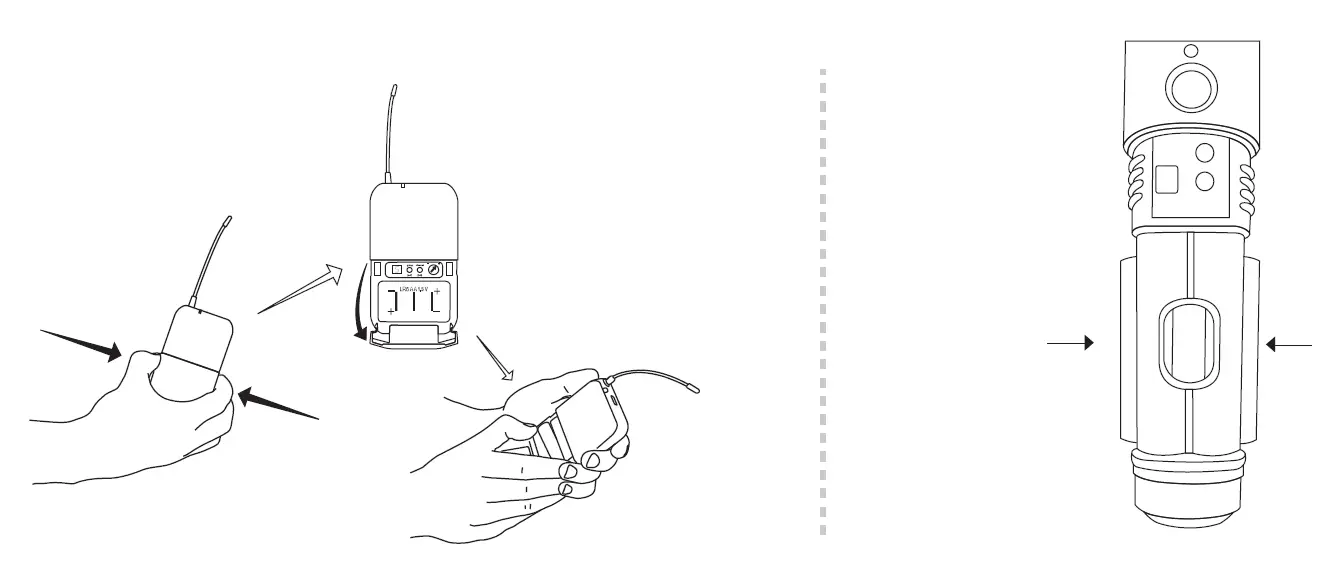
- Install batteries and turn on transmitter

- On the transmitter, set the group and channel to match the receiver. The audio LED on the receiver should illuminate.

If setting up additional systems, leave the first transmitter and receiver on. For each additional receiver, manually set the group to match the first receiver.
NOTE: The receiver will automatically perform a channel scan to find an available frequency after the group has been selected. Set the transmitter frequency to match the receiver.
- If sound is too faint or distorted, adjust the gain accordingly.
FEATURES
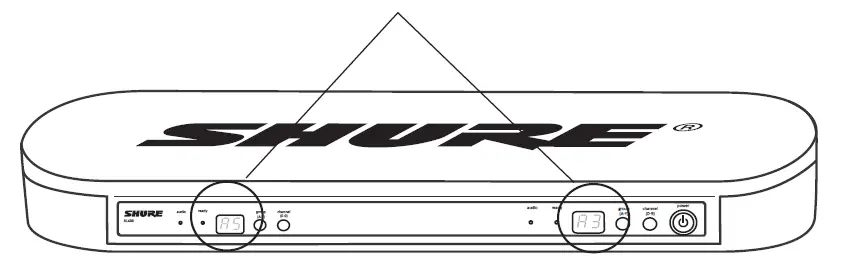
FRONT PANEL
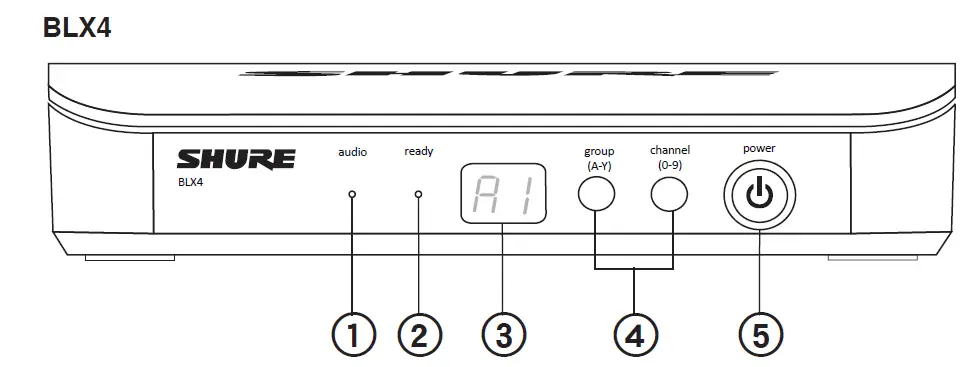
- AUDIO LED Indicates strength of incoming audio signal: green for normal and red for overload.
- READY LED Green light indicates system is ready for use and receiving transmitter signal.
- LED DISPLAY Displays group and channel setting.
- GROUP AND CHANNEL BUTTONS Scan: Push and release group button to scan for an open group and channel. Manual: Push and hold group button to select a group. Push channel button to select a channel in the current group.
- POWER BUTTON Push and hold to turn power on or off.
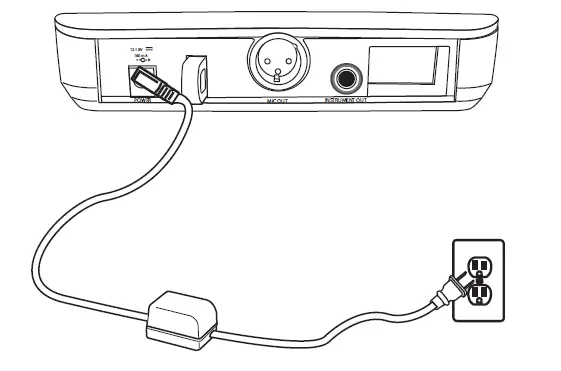
BACK PANEL
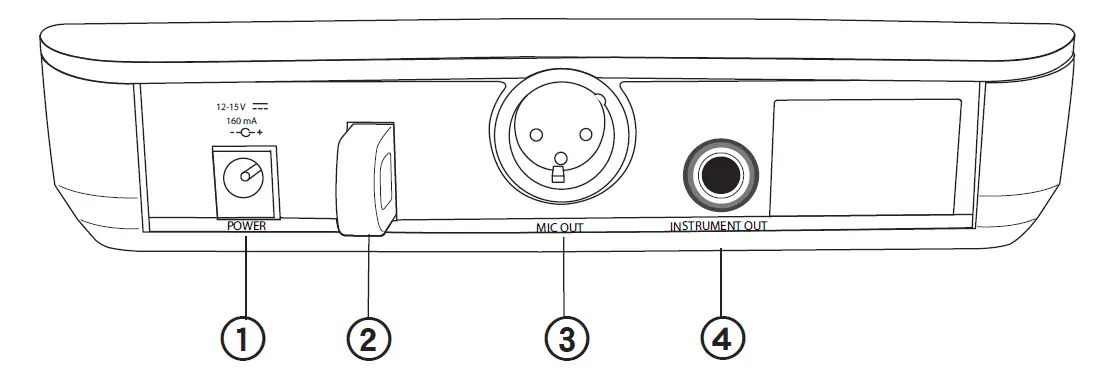
- DC Power Jack
- Adapter Cord Tie-Off
- XLR microphone output jack (MIC out)
- 35 mm (1/4″) instrument level output jack (instrument out)
TRANSMITTER LED INDICATORS
| LED Indicator | Status |
| Green | Ready |
| Rapidly Flashing Red | Controls locked |
| Solid Red | Battery power low (less than 1 hour remaining*) |
| Flashing Red and shuts off | Batteries dead (change batteries to power on transmitter) |
*For alkaline batteries only. For rechargeable batteries, solid red means the batteries are dead.
SINGLE SYSTEM SET UP
Before you begin, turn off all transmitters and turn on any equipment (other microphones or personal monitoring systems) that could cause interference during the performance.
- Press and release the group button on the receiver. The receiver scans for the clearest group and channel.
NOTE: If you want to stop the scan, push the group button again.
- Turn on transmitter and change the group and channel to match the receiver (See Setting Transmitter Group and Channel).
Once the system is set up, perform an audio check and adjust the gain if necessary.
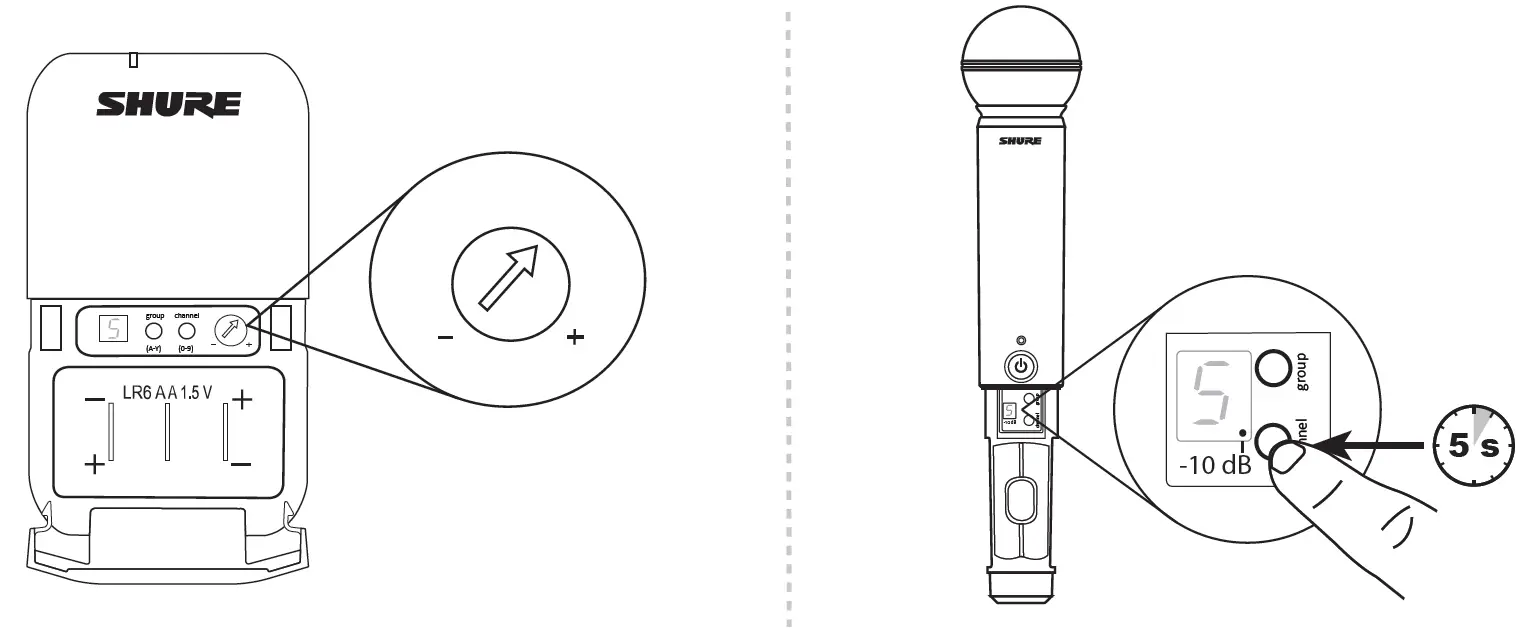
SETTING TRANSMITTER GROUP AND CHANNEL
Transmitter group and channel must be manually set to match the receiver.
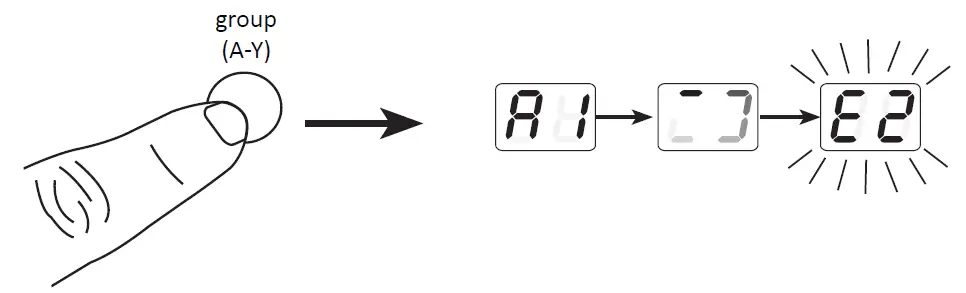
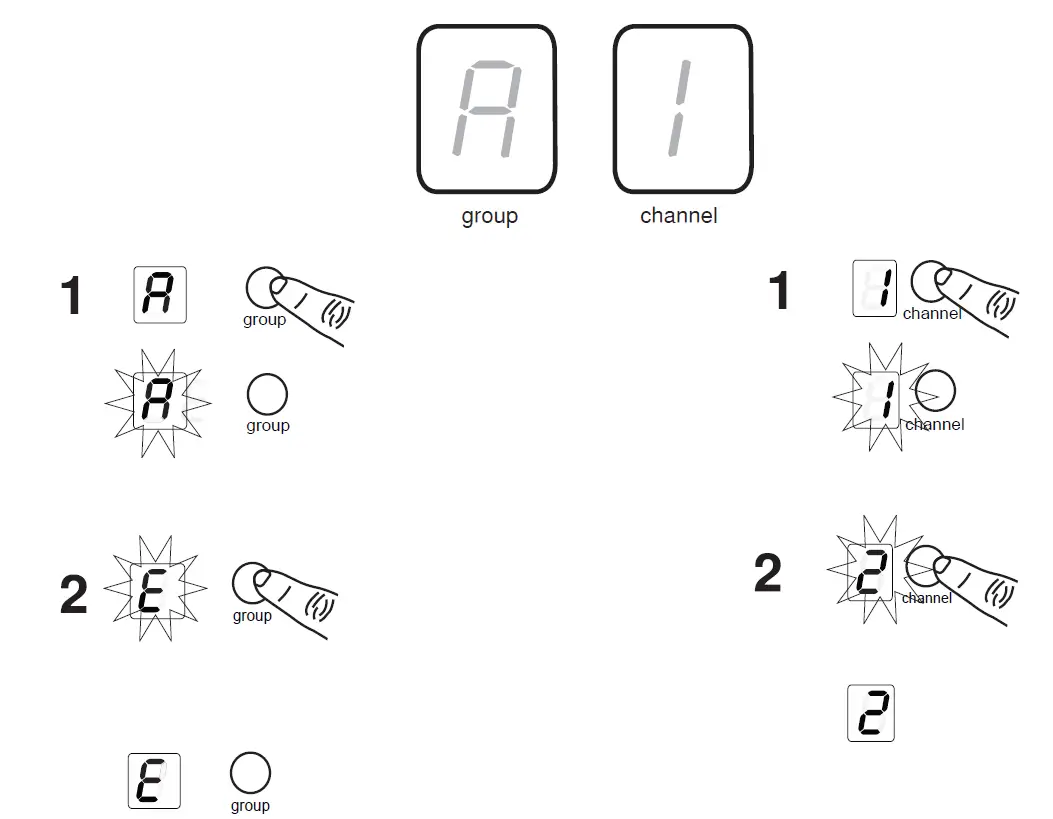
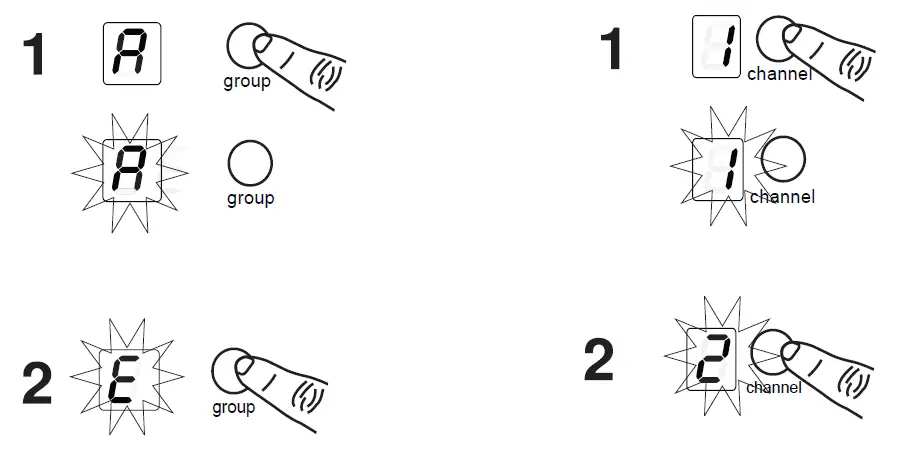
GROUP (LETTER)
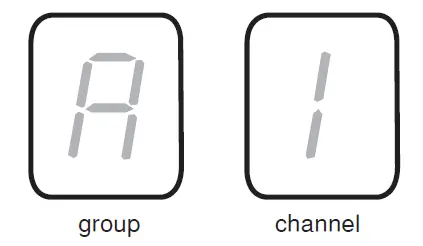
- Press and release the group button on the transmitter to activate the display. Press the group button again and the display flashes.
- While the display is flashing, press the group button again to advance to the de- sired group setting.
CHANNEL (NUMBER)
If channel needs to be changed, follow the same procedure using the channel button instead of the group button.
NOTE:
- When the group and channel correctly match the receiver, the ready LED on receiver illuminates.
- After manual setup, the transmitter alternately displays the group and channel setting for about two seconds.
MULTIPLE SYSTEM SETUP
Up to 12 systems can operate simultaneously (band and RF environment dependent).
IMPORTANT: Set up each system one-at-a-time. Once a receiver and transmitter are tuned to the same group and channel, leave the transmitter powered on. Otherwise, scans from the other receivers will not detect that channel as occupied. For the BLX88, be sure to setup both transmitters before progressing to the next receiver.
Turn on any other equipment that could cause interference during the performance so it will be detected during the group and channel scans in the following steps.
Before you begin system set up, turn all receivers ON and all transmitters OFF. For the first receiver:
- Perform a group scan. This finds the group with the most clear channels.
NOTE: For the BLX88, the group scan sets up both receivers at the same time. - Turn on the first transmitter and change the group and channel to match receiver.
- Leave the transmitter on and continue with the additional systems.
NOTE: If the selected group does not contain enough open channels, manually select group “d” when setting up larger systems.
FOR EACH ADDITIONAL RECEIVER
- Use manual setup to change the receiver to match the group setting of the first receiver. Recall that each time the group setting is changed, a channel scan is automatically done.
- Turn on the transmitter and change the group and channel to match the receiver.
- Leave the transmitter on and continue to the next system.
- Once all receivers are set up, perform an audio check on all microphones.
MANUALLY SETTING RECEIVER GROUP AND CHANNEL
The receiver group may need to be changed as part of a multiple system setup.
GROUP (LETTER)
- Hold the group button on the receiver until the display begins to flash.
- While the display is flashing, press the group button again to advance to the next group.
NOTE: Only the group setting will be displayed during the manual setup.
- Once the desired group is reached, release the group button. The receiver automatically performs a channel scan.
CHANNEL (NUMBER)
Always use a channel selected by the channel scan. However, if necessary, the channel can be set manually. Follow the same steps above using the channel button instead of the group button.
LOCKING AND UNLOCKING CONTROLS
Lock system controls to prevent accidental setting changes or power off.
TRANSMITTER (LOCK/UNLOCK)
Turn the transmitter on. Hold the group button, then press the channel button for approximately 2 seconds. The LED indicator rapidly flashes red when locked.
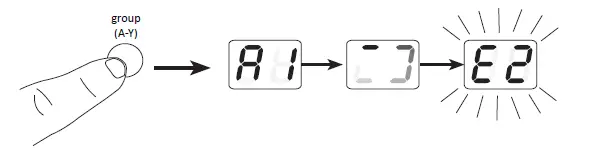
RECEIVER (LOCK/UNLOCK)
Turn the receiver on. Simultaneously hold the group and
channel button. The display flashes rapidly.
- When locked, the display flashes rapidly if any key is pressed.
- The BLX88 locks on both sides when locked from either side.
TIPS TO IMPROVE WIRELESS SYSTEM PERFORMANCE
If you encounter interference or dropouts, try the following suggestions:
- Choose a different receiver channel
- Reposition the receiver so there is nothing obstructing a line of sight to the transmitter (including the audience)
- Avoid placing transmitter and receiver where metal or other dense materials may be present
- Move the receiver to the top of the equipment rack
- Remove nearby sources of wireless interference, such as cell phones, two-way radios, computers, media players, Wi- Fi devices, and digital signal processors
- Charge or replace the transmitter battery
- Keep transmitters more than two meters (6 feet) apart
- Keep the transmitter and receiver more than 5 meters (16 feet) apart
- During sound check, mark trouble spots and ask presenters or performers to avoid those areas
GETTING GOOD SOUND
CORRECT MICROPHONE PLACEMENT
- Hold the microphone within 12 inches from the sound source. For a warmer sound with increased bass presence, move the microphone closer.
- Do not cover grille with hand.
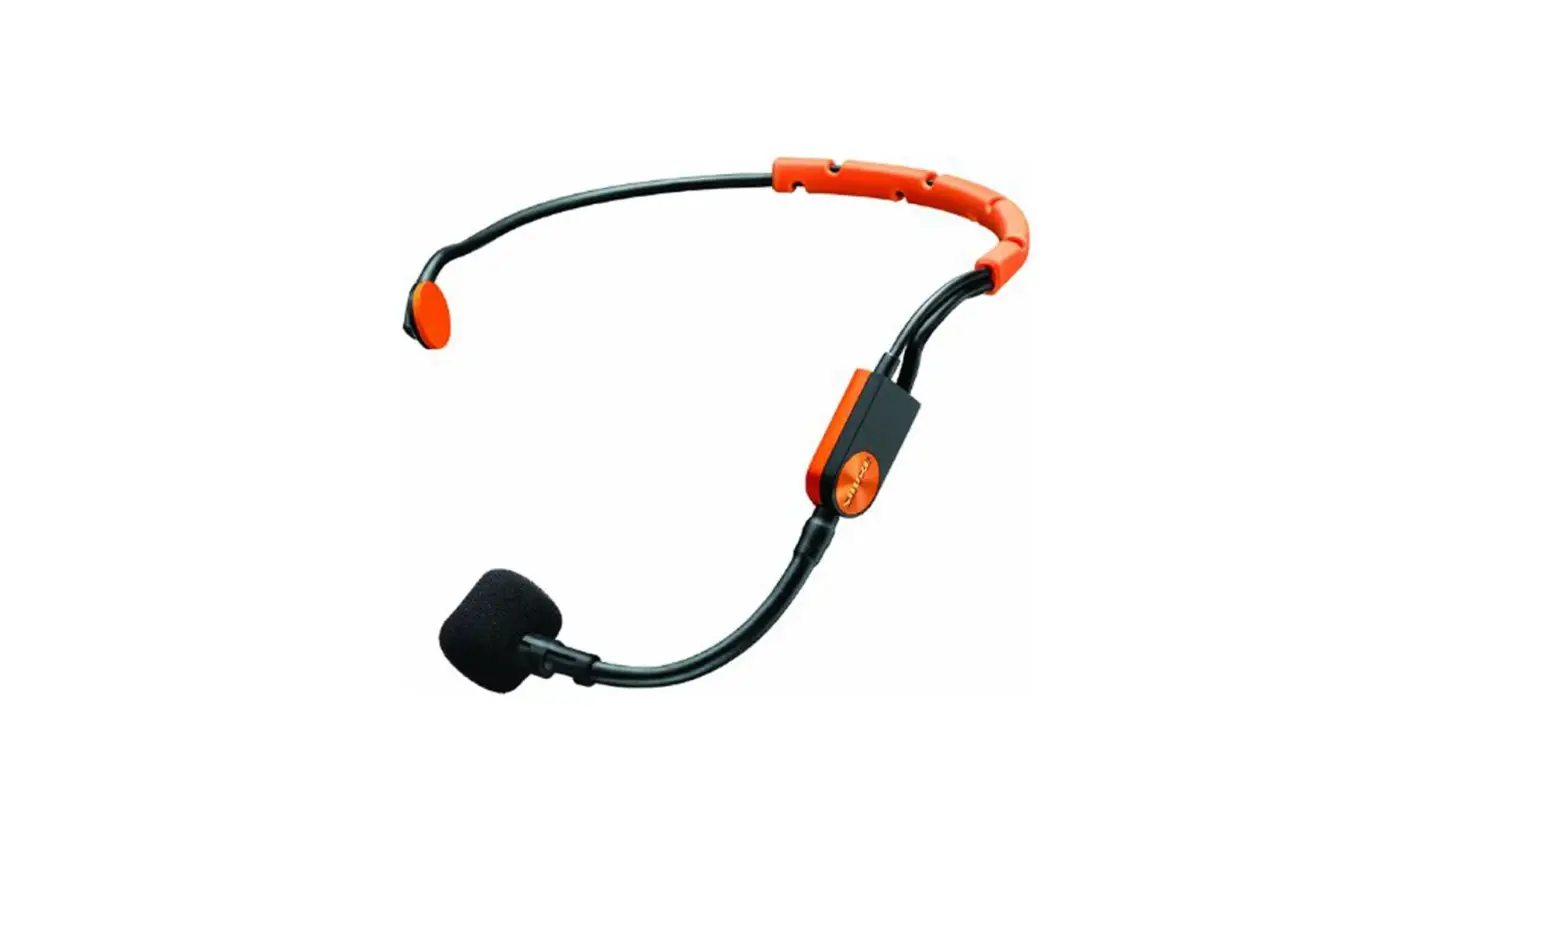
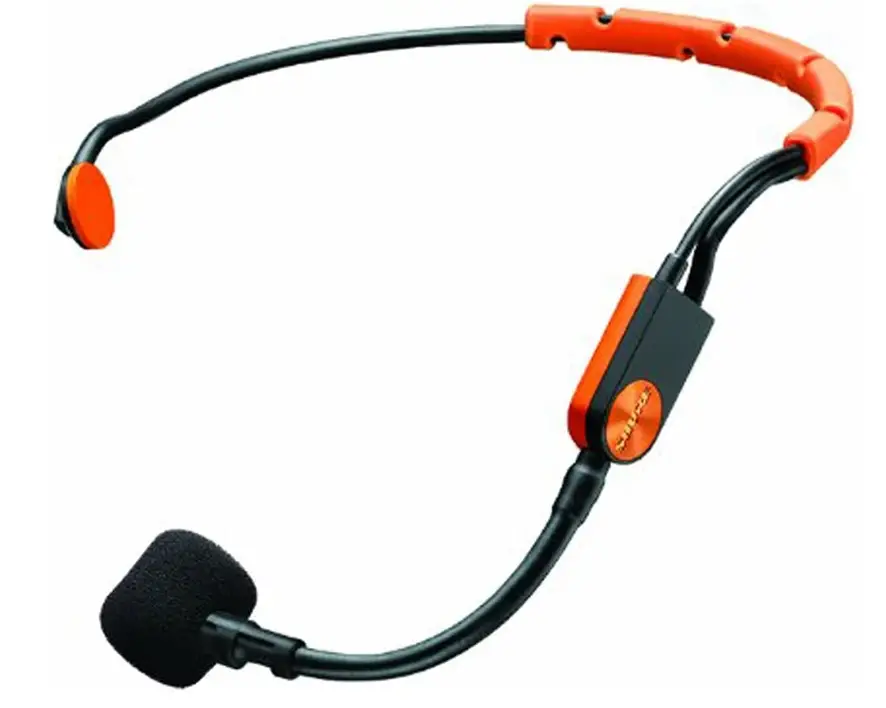
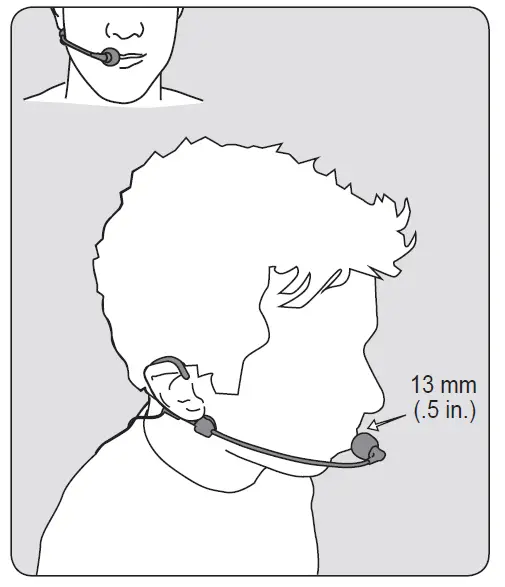
WEARING THE HEADWORN MICROPHONE
- Position the headworn microphone 13 mm (1/2 in.) from the corner of your mouth.
- Position lavalier and headworn microphones so that clothing, jewelry, or other items do not bump or rub against the microphone.
ADJUSTING GAIN
Monitor the audio LED indicator on the receiver front panel when setting the transmitter gain.
- Green: normal levels
- Red: excessive sound levels (overload).
The red LED should only illuminate infrequently when you speak loudly or play your instrument loudly.
TROUBLESHOOTING
| Issue | Indicator Status | Solution |
| No sound or faint sound | Receiver ready LED on | • Verify all sound system connections or adjust gain as needed (see Adjusting Gain)
• Verify that the receiver is connected to mixer/ amplifier |
| Receiver ready LED off | • Turn on transmitter
• Make sure the batteries are installed correctly • Perform transmitter setup (see Single System Setup) • Insert fresh batteries | |
| Receiver LED screen off | • Make sure DC adapter is securely plugged into electrical outlet.
• Make sure receiver is powered on. | |
| Transmitter indicator LED flashing red | Replace transmitter batteries (see Changing Batteries). | |
| Audio artifacts or dropouts | Ready LED flickering or off | • Change receiver and transmitter to a different group and/or channel.
• Identify nearby sources of RF interference, and shutdown or remove source. • Replace transmitter batteries. • Ensure that receiver and transmitter are positioned within system parameters • System must be set up within recommended range and receiver kept away from metallic surfaces. • Transmitter must be used in line of sight from re- ceiver for optimal sound |
| Distortion | Audio LED on receiver indi- cates overload (red) | Reduce transmitter gain (see Adjusting Gain). |
| Sound level variations when switching to different sources | N/A | Adjust transmitter gain as necessary (see Adjusting Gain). |
| Receiver/transmitter won’t turn off | LED/display flashing rapidly | See Locking and Unlocking Controls. |
SPECIFICATIONS
OUTPUT IMPEDANCE
| XLR connector | 200 Ω |
| 6.35 mm (1/4″) connector | 50 Ω |
AUDIO OUTPUT LEVEL
Ref. ±33 kHz deviation with 1 kHz tone
| XLR connector | –27 dBV (into 100 kΩ load) |
| 6.35 mm (1/4″) connector | –13 dBV (into 100 kΩ load) |
RF SENSITIVITY
-105 dBm for 12 dB SINAD, typical
IMAGE REJECTION
>50 dB, typical
DIMENSIONS
| BLX4 | 40 mm X 188 mm X 103 mm (H x W x D) |
WEIGHT
| BLX4 | 241 g (8.5 oz.) |
FAQs
It does not sync to anything. It is a transmitter and receiver pair. The receiver plugs into an analog audio input of some kind. It has 1/4″ and XLR outputs.
Shouldn’t be a problem.
Yes and an amplifier for the speakers, or a Bluetooth amplified speaker is what we use.
Yes, it is available from Amazon for $99 (at this time). Search “Shure SM31FH Wireless Fitness Headset Condenser Microphone”.
Yes as long as you change to a different channel during set up you can add several we have 10 at my church 3 are Shure.
This needs to be plugged into a mic or line level input. So if your speaker is powered, you should have one of those inputs. It doesn’t come with a cable, because there are different ways to connect. So you will need either an XLR to XLR mic cable or a 1/4″ to 1/4″ instrument cable, depending on your system.
Use Shure’s wireless frequency finder tool to determine which frequency band is best suitable for your area: http://www.shure.com/americas/support/tools/wireless-frequency-finder
I have only used it to teach dance classes indoors at RV parks. My Shure runs on 512 to 524 Megahertz only. Don’t know about playing it outdoors in the desert.
You need a little mixer to mix the music source and the microphone wireless receiver.
Each mic must have their own receiver.
No, this is a single channel system so you can only have 1 transmitter/microphone active at a time.
You would need a USB audio interface, to connect the mic receiver to your computer as a source for Zoom. The mic would not connect to your Bluetooth speaker directly.
This is a complete wireless system that plugs into a standard line level or mic level input. It is not just a headset. And it is not bluetooth.
The headset can be used with any wireless body pack that also uses the mini 4 pin xlr / TA4F connector, but you will need to make sure it is compatible if you are using another brand’s body pack as not all TA4F connectors are compatible with each other.
I do not see how you would use this with a cell phone. This is a wireless headphones mic system that traditionally connects to a mixer and routes to the PA speakers for people moving around and not connected to anything. Shure has something that is a lapel mic that you can connect to your phone if you want.


