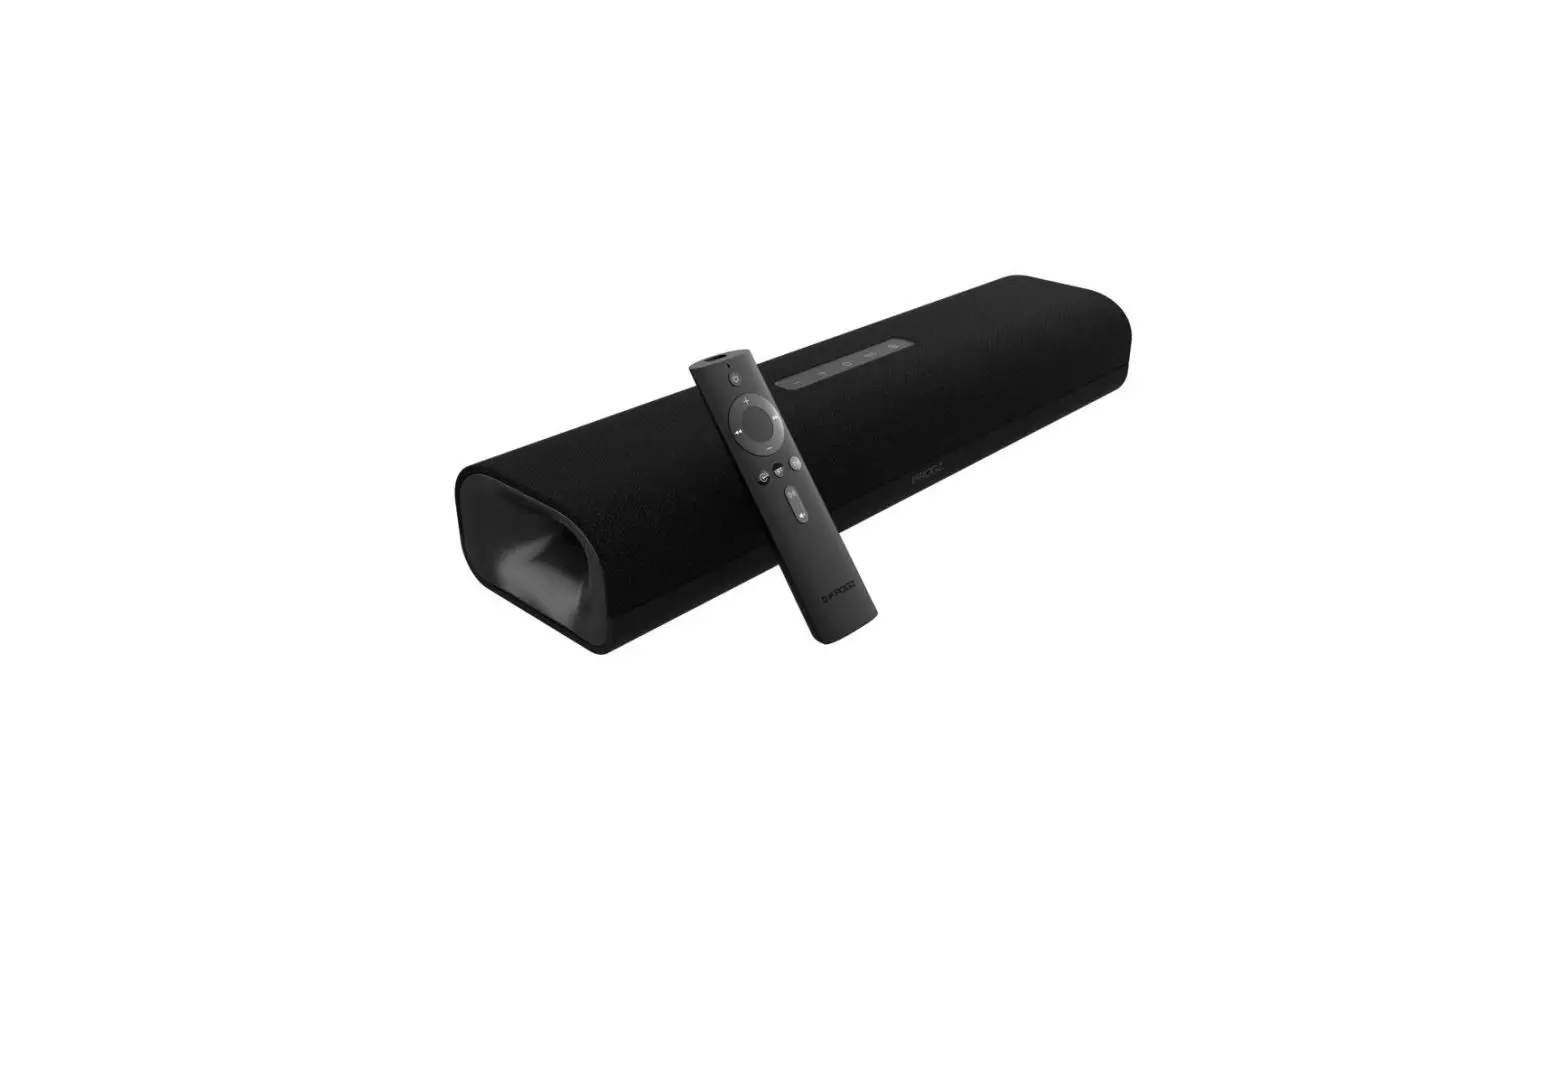
ifrogz Voiceboost 18-Inch Soundbar User Guide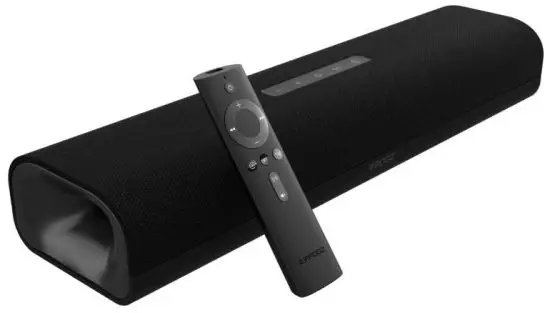
Introduction
Welcome to clarity on any TV. IFROGZ® VoiceBoost Soundbar offers dialogue-boosting technology that brings the most important audio to the forefront.
VoiceBoost
The IFROGZ VoiceBoost Soundbar features a dialogue-boosting technology that brings dialogue and voices to the forefront while dampening background noises. Voices now become clearer and easier to understand while watching any program or movie on TV.
The soundbar instantaneously analyzes sound coming from the TV to amplify and clarify only the most important part. Now, when you turn up the volume, you’ll turn up the clarity!
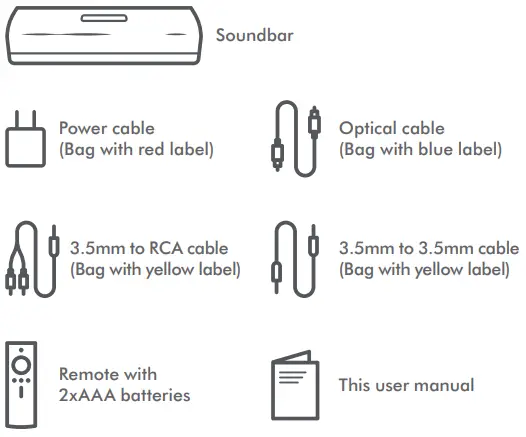
Box Contents
In the box, you will find the following:
Soundbar Controls and Connections
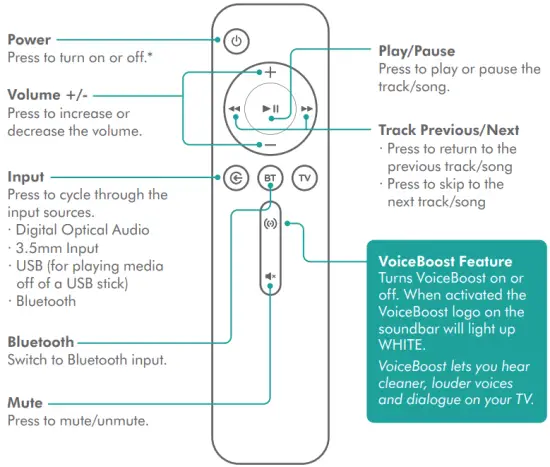
Soundbar Controls
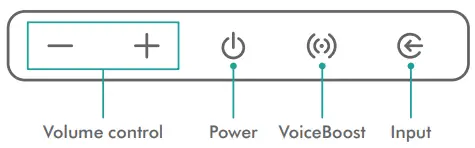
Soundbar Audio Inputs
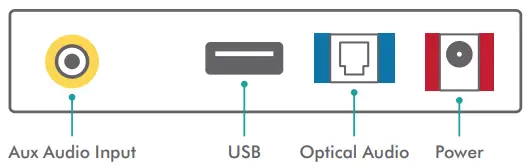
Note: All colors on the soundbar ports match the colored labels on the cable bags for easy set up.
Recommended Setup
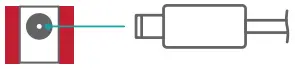
Digital Optical Cable
This section shows you how to connect the soundbar to your TV using the most common and recommended connection: optical output. For this setup you will use the optical cable (cable bag with BLUE label).
If you would like to connect using a different audio output on your TV, or if your TV does not have an optical output, please see the Alternate Connections section of this user manual.
To connect your soundbar to your TV using the optical output:
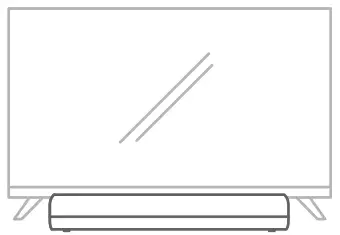
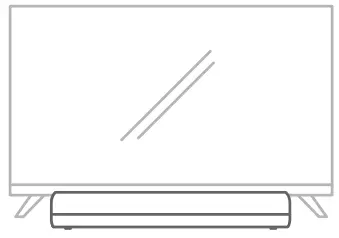
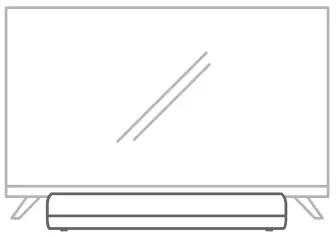
- Place the soundbar in front of your TV on a level surface. The soundbar will perform best if the front of the soundbar is facing in the direction of the viewers.

If you’d like to mount your soundbar to a wall, please see the Mounting Options section of this user manual. - Connect the power cable, wrapped in a bag with a RED label, to the back of soundbar. The soundbar’s power port is labeled as DC IN and is outlined in a matching RED color for added convenience.

- Connect the optical cable, wrapped in a bag with a BLUE label, to the soundbar. The port on the back of the soundbar is labeled as OPT and is outlined in a matching BLUE color for added convenience.

- Connect the other end of the optical cable to the back of your TV. It is typically labeled as DIGITAL AUDIO OUT on your TV.
Please Note: The optical cable can only be installed in one orientation, similar to a USB cable. Take note of the plug and port shape before installation. Do not force the plug into the port! - Turn on your TV and use the TV remote that came with your TV to turn the sound down until you cannot hear it.
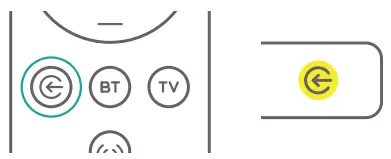
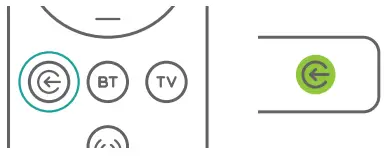
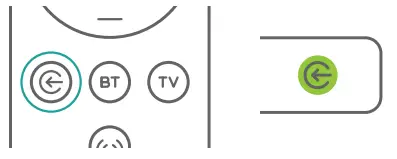
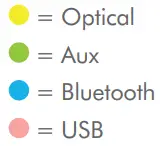
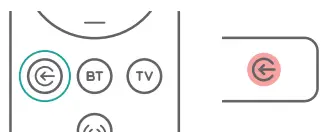
- Turn on the soundbar. Using the soundbar remote, press the Input Select Button and select the Digital Optical Input. The light in the front of the soundbar will be YELLOW to indicate this input.


Alternate Setups
AUX / 3.5mm Jack Out
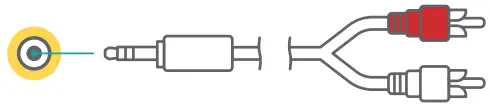
To connect your soundbar to your TV using the AUX/3.5mm output:
- Place the soundbar in front of your TV on a level surface. The soundbar will perform best if the front of the soundbar is facing in the direction of the viewers.

- Connect the power cable, wrapped in a bag with a RED label, to the back of soundbar. The soundbar’s power port is labeled as DC IN and is outlined in a matching RED color for added convenience.

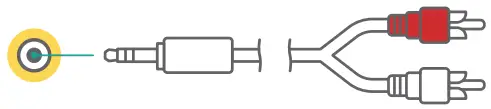
- Connect the 3.5mm to 3.5mm cable, wrapped in a bag with a YELLOW label, to the soundbar. The port on the back of the soundbar is labeled as AUDIO OUT and is outlined in a matching YELLOW color for added convenience

Note: This cable does not have the red/ white ends. - Connect the other end of the 3.5mm to 3.5mm cable of your TV. It is typically labeled as AUDIO OUT on your TV.
Turn on your TV and use the TV remote that came with your TV to turn the sound down until you cannot hear it.
Turn on the soundbar. Using the soundbar remote, press the Input Select Button and select the AUX Input. The light in the front of the soundbar will be GREEN to indicate this input.


RCA Out
To connect your soundbar to your TV using the RCA output:
- Place the soundbar in front of your TV on a level surface. The soundbar will perform best if the front of the soundbar is facing in the direction of the viewers.

- Connect the power cable, wrapped in a bag with a RED label, to the back of soundbar. The soundbar’s power port is labeled as DC IN and is outlined in a matching RED color for added convenience.

- Connect the RCA to 3.5mm cable, wrapped in a bag with a YELLOW label, to the soundbar. The port on the back of the soundbar is labeled as AUDIO OUT and is outlined in a matching YELLOW color for added convenience.

Note: This cable has red/white ends. - Connect the other end of the RCA to the 3.5mm cable of your TV. It is typically labeled as AUDIO OUT on your TV.
- Turn on your TV and use the TV remote that came with your TV to turn the sound down until you cannot hear it.
Turn on the soundbar. Using the soundbar remote, press the Input Select Button and select the AUX Input. The light in the front of the soundbar will be GREEN to indicate this input.

Connecting to Your Cable/Satellite Box
If you cannot access your TV’s audio ports (common in wall mounted situations) or just prefer to connect to your cable or satellite box, you can also connect the soundbar to the audio output of your cable or satellite box.
- On the back of your cable or satellite box, locate the audio output ports. These connections are typically labeled AUDIO OUT and they are most commonly the red/white RCA connections.
- Connect the power cable, wrapped in a bag with a RED label, to the back of soundbar. The soundbar’s power port is labeled as DC IN and is outlined in a matching RED color for added convenience.

- Connect the RCA to 3.5mm cable, wrapped in a bag with a YELLOW label, to the soundbar. The port on the back of the soundbar is labeled as AUDIO OUT and is outlined in a matching YELLOW color for added convenience.

Note: This cable does have the red/white ends. - Connect the other end of the RCA to 3.5mm cable to your satellite or cable box’s audio port, typically labeled as AUDIO OUT.
- Turn on your TV and use the TV remote that came with your TV to turn the sound down until you cannot hear it.
Turn on the soundbar. Using the soundbar remote, press the Input Select Button and select the AUX Input. The light in the front of the soundbar will be GREEN to indicate this input.
Connecting to Bluetooth®
Your IFROGZ VoiceBoost Soundbar can connect to your phone or other Bluetooth device to stream music and video audio over Bluetooth.
To connect to your soundbar via Bluetooth:
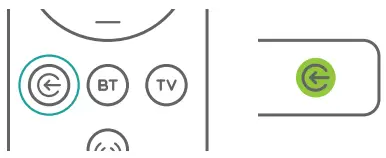
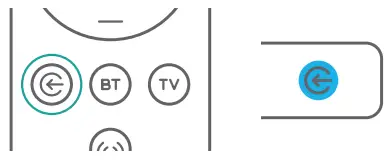
- Press the Bluetooth (BT) button on the remote to put the soundbar into Bluetooth Pairing Mode.

- On your device, go to Bluetooth under Settings and select “IFROGZ Soundbar 2.0.” Complete any additional steps your device may require.
- You will hear a “ding” indicating a successful connection.
- Enjoy wireless audio!
Using the Remote
Your IFROGZ VoiceBoost Soundbar includes an easy-touse remote.
Input Selection
Note: The soundbar will also automatically enter Standby Mode if no audio signal is detected for 30 minutes. When in Standby Mode, any command from the remote or audio signal will automatically turn the soundbar on.
USB Playback
Your IFROGZ VoiceBoost Soundbar can playback your favorite music files from just a USB stick!
Note: Plugging in your iPhone or other device via USB will not work to playback files. Only a USB stick will allow payback. All music files must be in wav, .mp3, or .aac format.
To play music off a USB stick:
- Plug the USB stick into the USB port on the back of the sound bar.
- Using the soundbar remote, press the Input Select Button and select the USB Input. The light in the front of the soundbar will be PINK to indicate this input.

- Use the Play/Pause and Previous/Next track buttons to control your music.
Mounting Options
Your IFROGZ VoiceBoost Soundbar can be mounted on a wall to match any TV wall mounted setup.
![]() It is the owner’s responsibility to mount the soundbar safely and securely on the wall.
It is the owner’s responsibility to mount the soundbar safely and securely on the wall.
![]() Do not place any objects on top or in front of the IFROGZ VoiceBoost soundbar when mounted.
Do not place any objects on top or in front of the IFROGZ VoiceBoost soundbar when mounted.
![]() Mounting hardware is NOT included.
Mounting hardware is NOT included.
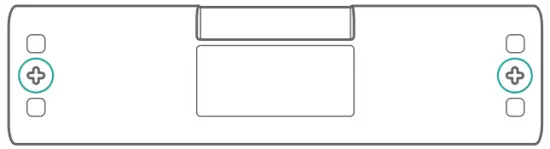
To mount the soundbar to a wall:
- Locate the two mounting points in a cross pattern on the bottom off the sound bar.

- Using additional hardware, use the anchor points to secure the soundbar on to most flat surfaces like a wall or shelf.
It is the owner’s responsibility to mount the soundbar safely and securely on the wall.
Ensure any mounting hardware points can handle a minimum of 7lbs each.
Having Trouble?
Our IFROGZ customer support team is available should you have any needs:
Online: www.support.zagg.com Or give us a call at: 1-800-700-9244
Warranty information available at:
www.zagg.com/warranty-policies
This device complies with Part 15 of the FCC Rules.
Operation is subject to the following two conditions: (1) this device may not cause harmful interference, and (2) this device must accept any interference received, including interference that may cause undesired operation.
THE MANUFACTURER IS NOT RESPONSIBLE FOR ANY RADIO OR TV INTERFERENCE CAUSED BY UNAUTHORIZED MODIFICATIONS OR CHANGE TO THIS EQUIPMENT. SUCH MODIFICATIONS OR CHANGE COULD VOID THE USER’S AUTHORITY TO OPERATE THE EQUIPMENT
This equipment has been tested and found to comply with the limits for a Class B digital device, pursuant to part 15 of the FCC Rules. These limits are designed to provide reasonable protection against harmful interference in a residential installation. This equipment generates, uses and can radiate radio frequency energy and, if not installed and used in accordance with the instructions, may cause harmful interference to radio communications. However, there is no guarantee that interference will not occur in a particular installation. If this equipment does cause harmful interference to radio or television reception, which can be determined by turning the equipment off and on, the user is encouraged to try to correct the interference by one or more of the following measures:
- Reorient or relocate the receiving antenna.
- Increase the separation between the equipment and receiver.
- Connect the equipment into an outlet on a circuit different from that to which the receiver is connected.
- Consult the dealer or an experienced radio/TV technician for help.
This equipment complies with FCC radiation exposure limits set forth for an uncontrolled environment. End user must follow the specific operating instructions for satisfying RF exposure compliance. This transmitter must not be co-located or operating in conjunction with any other antenna or transmitter.
©2020 ZAGG Inc All Rights Reserved | NASDAQ: ZAGG | MADE IN CHINA
The Bluetooth® word mark and logos are registered trademarks owned by Bluetooth SIG, Inc.
and any use of such marks by ZAGG Inc is under license.
Other trademarks are property of ZAGG.
![]()


