![]() LED Slim Lights
LED Slim Lights
MODEL SLIM3GIM-5CCT
Instruction Manual
WARNING
WARNING — THE INSTALLATION MUST BE CARRIED OUT BY A QUALIFIED ELECTRICIAN.
- LED Slim Lights are suitable for indoor use only. DO NOT use outdoors
- Please keep the LED Slim Lights away from any corrosive substance, and please use dry cloth when you clean them
- LED Slim Lights can only be installed by a qualified electrician
- Before installation or maintenance, please disconnect the power to prevent electric shock
![]() Application Notice
Application Notice
- For your safety, this fixture MUST be wired in accordance with local electrical codes and ordinances
- Turn the power off from the electrical panel before starting installation or attempting any maintenance. Indoor installation only
CAUTION
PLEASE READ THE INSTRUCTIONS BEFORE COMMENCING INSTALLATION AND RETAIN THEM FOR FUTURE REFERENCE.
Electrical products can cause death or injury, or damage to property. If in any doubt about the installation or use of this product, consult a competent electrician.
INSTALLATION GUIDE
Tools Required
- Saw
- Measuring Tape
- Electrical Wiring (use type and gauge suitable for application to connect the fixtures)
Driver Wiring
- Open the hardwire box swing cover and remove the appropriate knockout(s)
- Insert the electrical supply cable through the knockout and secure it with a cable connector (sold separately)
- Using wire nuts, connect the GREEN ground wire of the cable to the GREEN wire on box. Connect the WHITE wire of the cable to the WHITE wire of the box. Connect the BLACK wire of the cable to the BLACK wire of the box (see Fig.1)
- Place all wiring and connections back into the box and close the cover
- Insert hardwire box through the mounting hole (see Fig.2). New Construction Applications: Hardwire box shall be firmly secured to studs, joists, or similar fixed structural units Remodel Applications: DO NOT require the hardwire box to be firmly secured after the mounting plates, studs, joists, or structural units have been concealed
Pre-installation
- Turn power OFF from the electrical panel before starting the installation
- Locate a suitable position to plate the fixture and open in accordance to the cut-hole dimensions
- Run an electrical wire from the switch (power supply) through the mounting hole — use NMD90 Romex or BX cable

Fixture Installation
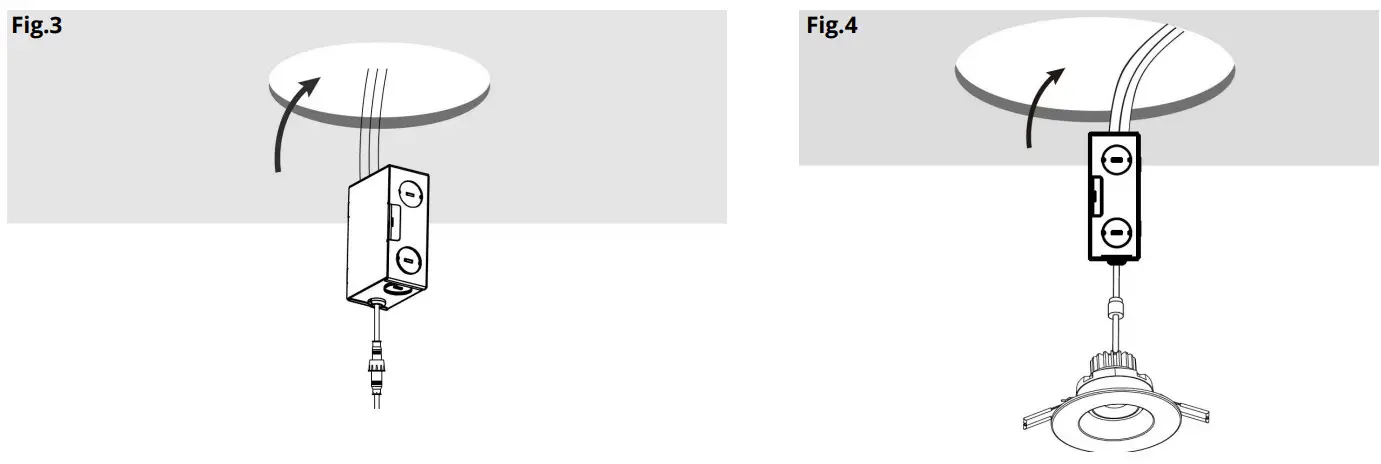
- Connect the fixture to the hardwire box by inserting and twisting the male / female connectors (see Fig.3 and 4)
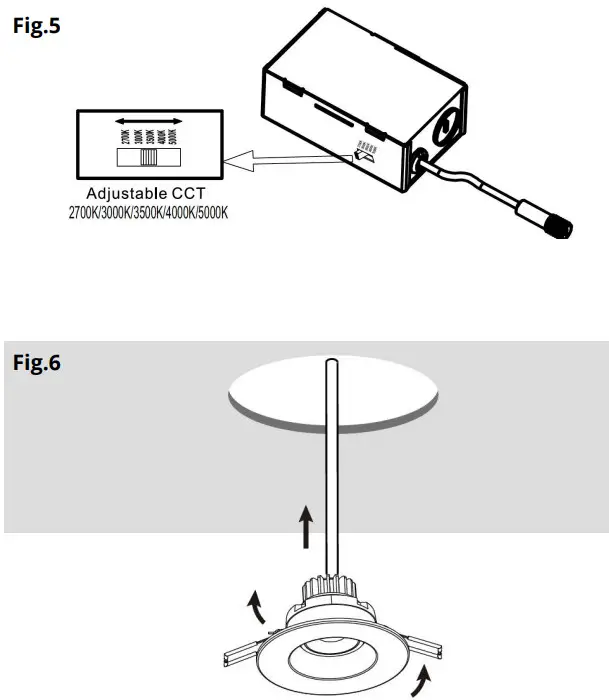
- Select desired color temperature using the selector button at the back of the fixture (preset to 3000K — warm white) (see Fig.5)
- Push spring-loaded clips on the fixture upwards and insert the fixture base into the mounting hole. Release the clips and the fixture will be pulled flush to the ceiling (see Fig.6)
- Once assembly is complete, turn ON power to confirm that fixture is working properly
Compatible Dimmer List
| BRAND | 1 FAMILY | MODEL |
| LUTRON | SKYLARK CONTOUR | CTCL-153P |
| DVCL-153PDH | ||
| CT-600P | ||
| DIVA | DVCL-153P | |
| LEVITON | DECORA | 6672 |
| 6674 | ||
| PASS & SEYMOUR | HARMONY | HCL453PTCCCV6 |
ORTECH reserves the right to modify at any time, without notice, any or all of our product’s features, designs, components and specifications to meet market changes.
[email protected]
www.ortechindustries.com
13376 Comber Way
Surrey BC V3W 5V9
375 Admiral Blvd
Mississauga, ON L5T 2N1![]() 1-888-543-6473
1-888-543-6473![]() 1-888-541-6474
1-888-541-6474


