Teac W-890RMKII-B Auto-Reverse Cassette Deck
Introduction
Before connecting and using the unit, please take time to read this manual thoroughly to ensure you understand how to properly set up and connect the W-890R, as well as the operation of its many useful and convenient functions. After you have finished reading this manual, please keep it in a safe place for future reference
IMPORTANT INSTRUCTIONS
- Read these instructions.
- Keep these instructions.
- Heed all warnings.
- Follow all instructions.
- Do not use this apparatus near water.
- Clean only with dry cloth.
- Do not block any ventilation openings. Install in accordance with the manufacturer’s instructions.
- Do not install near any heat sources such as radiators, heat registers, stoves, or other apparatus (including amplifiers) that produce heat.
- Do not defeat the safety purpose of the polarized or groundingtype plug.
- Protect the power cord from being walked on or pinched particularly at plugs, convenience receptacles, and the point where they exit from the apparatus.
- Only use attachments/accessories specified by the manufacturer.
- Use only with the cart, stand, tripod, bracket, or table specified by the manufacturer, or sold with the apparatus.
- Unplug this apparatus during lightning storms or when unused for long periods of time.
- Refer all servicing to qualified service personnel.
Dolby NR
Dolby NR is designed to reduce tape hiss, a noise introduced during the recording and playback processes. This cassette deck is equipped with Dolby B-type Noise Reduction. The Dolby NR system affects both recording and playback quality. In playback, be sure to set the DOLBY NR switch to the same position used when the recording was made.
Supplied accessories
In addition to this manual, the W-890R has been packed with the following:
- < Remote control unit (RC-1277) x 1
- < Batteries (AA) for remote control unit x 2
- < Stereo RCA pin cable x 2
- < Owner’s manual (this document) x 1
- < Warranty card x 1
Contact your TEAC supplier if any of these items are missing.
About this manual
In this manual, we use the following conventions:
- The names of keys and controls are given in the following typeface: EJECT.
- The alphanumeric portion of the display shows a message, this is shown in the following typeface
- If a preset indicator in the display (i.e. one which cannot change, but is either on or off) is shown, this is shown as follows
- Precautions and notes for placement and use
- The W-890R may be used in most areas, but to maintain top performance, and prolong operating life, observe the following notes, precautions and environmental conditions:
- Avoid exposing it to extremes of temperature and humidity and avoid mechanical shocks and vibration.
- Keep the unit away from strong magnetic fields (TV sets, computer monitors, large electric motors, etc.).
- The nominal temperature should be between 5°C and 35°C (41°F and 95°F).
- Relative humidity should be 30 to 90 percent.
- As the unit may become hot during operation, always leave sufficient space above the unit for ventilation. Do not install this unit in a confined space such as a bookcase, and do not put anything on top of the unit.
- Avoid installing this unit on top of any heat-generating electrical device such as a power amplifier.
- Make sure that the unit is mounted in a level position for correct operation.
- Do not open the sealed cabinet as this might result in damage to the circuitry or electrical shocks. If a foreign object should get inside the unit, contact your supplier or service agency.
About cassette tapes
- Do not open the cassette or pull the tape out of the cassette.
- Do not touch the tape surface.
- Do not use or store the tape in a humid or dusty place.
- Keep the tape away from any magnetic sources, such as speakers or TVs, otherwise noise may be produced during playback or important recordings may be erased.
Cassette tapes that you should not use
Poor performance, errors, or malfunctions may result if you use any of the tapes described below. Some of these tapes may also cause tape clog problems that can damage the tape transport mechanism.
Cassettes that are imperfectly shaped
Do not use a deformed cassette or one that has unstable tape movement or makes a strange sound during fast-forward or rewind.
Long play tapes
Tapes that are longer than 90 minutes are very thin and stretch easily, so using them can result in wow and flutter. In addition, long tapes can become tangled in the equipment, so please use caution with them.
Endless tapes
Do not use these tapes because they can easily get tangled in the tape transport mechanism.
Automatic tape type detection function
This cassette deck can detect what type of tape is being used based on the detection holes in the cassette shell. Be sure to use cassettes with detection holes. With this cassette deck, you can play back normal (Type I), chrome (Type II) and metal (Type IV) tapes. For recording, use normal (Type I) or chrome (Type II) tapes. Each deck (TAPE I and TAPE II) is equipped with its own auto tape type detection function, so you can use different types of tape at the same time.
Tape slack
Slack can cause the tape to get tangled in the capstan or other rotating parts. To prevent this, take up all tape slack using a pencil or the like inserted into the reel hole.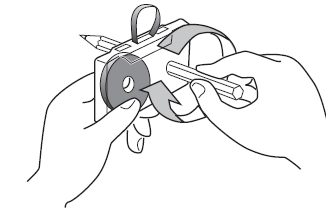
Accidental erasure prevention tabs
Tabs on top of the cassette shell allow you to prevent important recordings from being erased by mistake. There are two tabs on each cassette shell: one for side “A” and the other for side “B”. Once these tabs have been removed using a screwdriver or the like, there is absolutely no chance of the recording function being activated. To record on a cassette whose tab has been broken off, stick a piece of adhesive tape over the hole. Be careful not to block the tape type detection holes.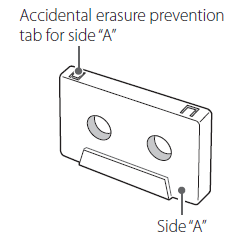
Maintenance
If the surface of the deck becomes soiled, wipe it clean with a dry, soft cloth. Never use volatile cleaners like thinners, benzine or alcohol because they will damage the surface finish. Do not allow the deck to remain in contact with rubber or vinyl products for a long period of time, as these could damage the surface finish.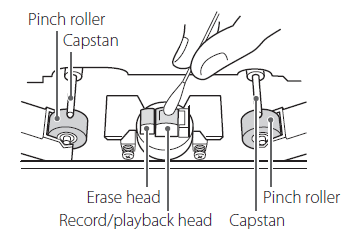
Connections

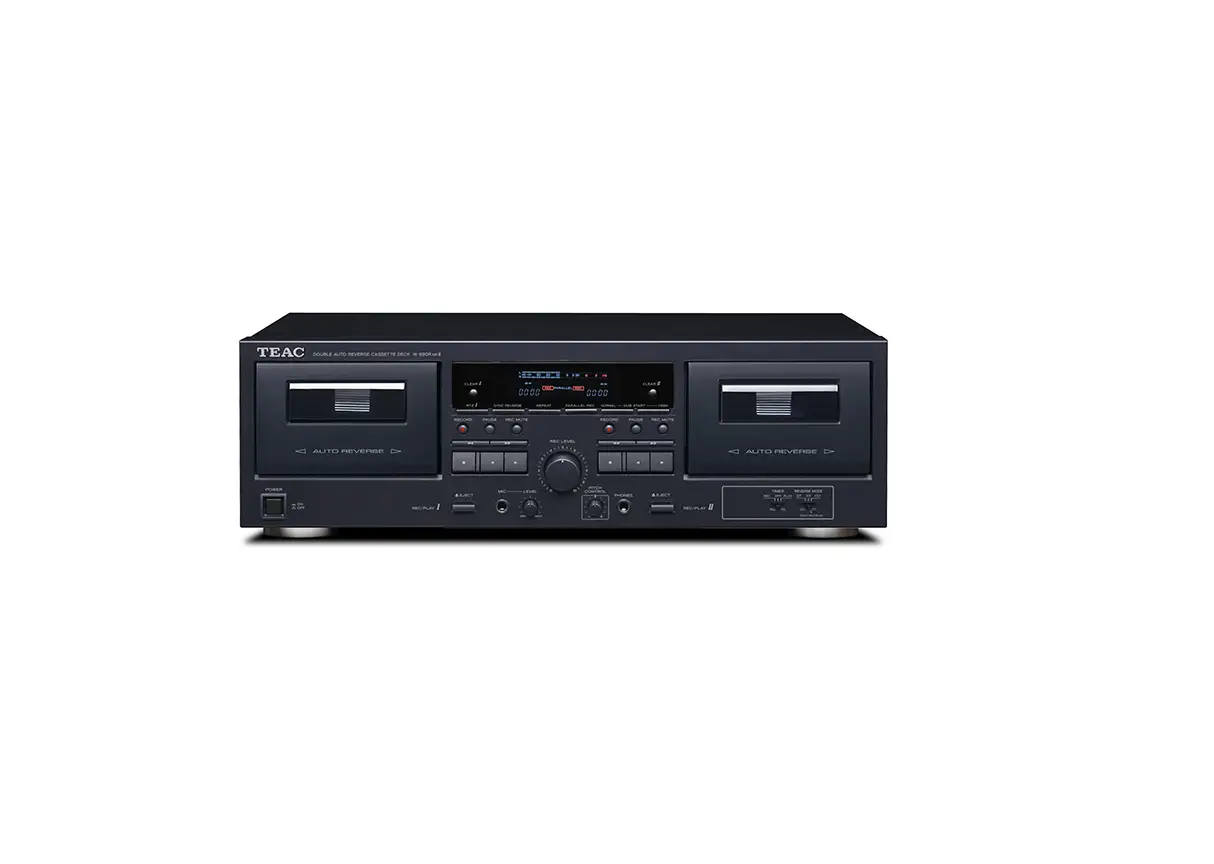
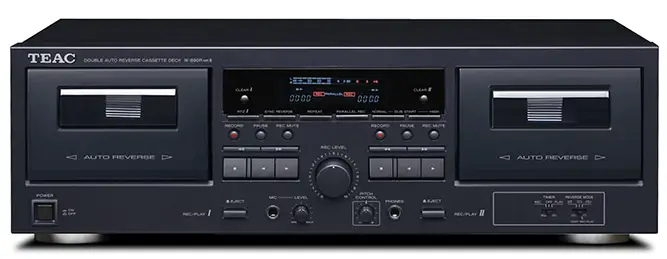
Features of the W-890R
Front panel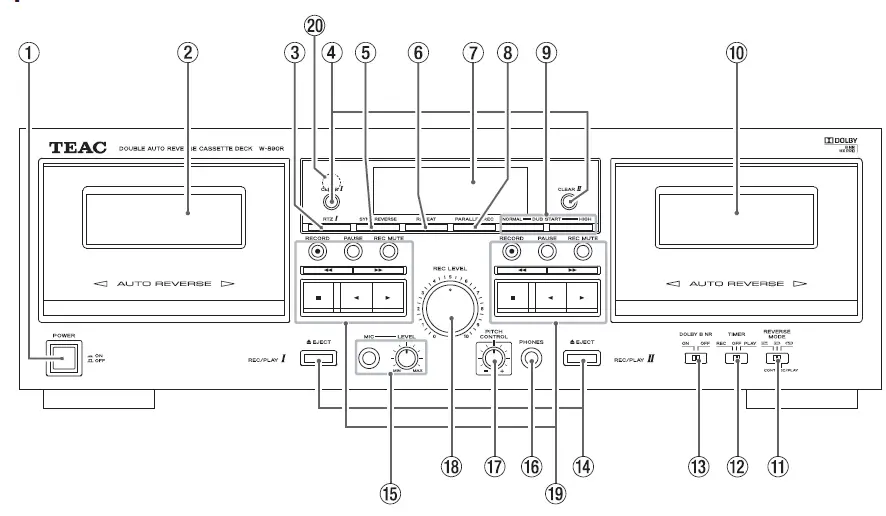
Remote Control Unit
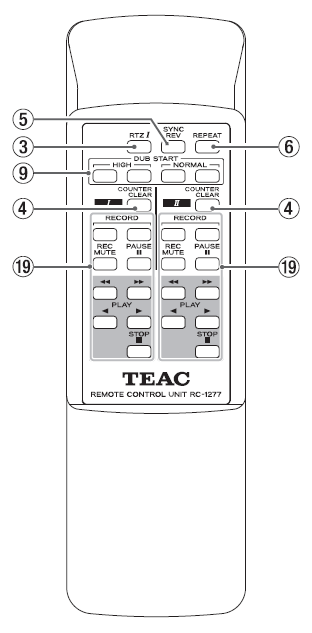
Using the Remote Control Unit
Cautions when using the remote control unit
- Point the remote control unit at the remote sensor of the cassette deck and operate the remote control unit at a distance of no more than 5 meters. Do not place objects between the remote control unit and remote sensor.
- Direct sunlight or very bright light will reduce the sensitivity of the remote sensor. If this is the case, use the control buttons on the cassette deck instead of the remote buttons.
- It is possible that other infrared-ray-sensitive equipment nearby may malfunction when you operate the remote control.
Loading batteries into the remote control unit
Remove the lid of the battery compartment, load two “AA” sized batteries in the indicated directions, and then replace the lid. When inserting batteries, be sure to observe proper polarity (+ and –).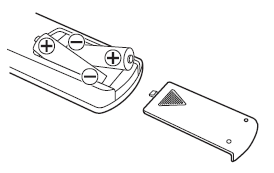
Display
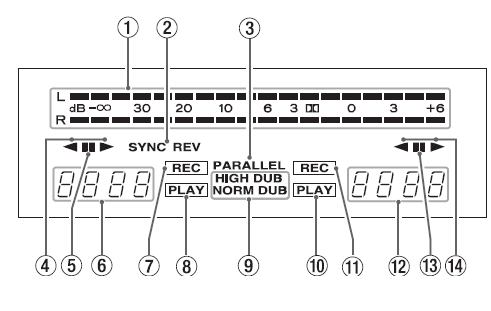
- Peak level meter
- This shows recording and playback levels.
- SYNC REV
- This indicator lights when the synchro reverse dubbing function is switched on.
- PARALLEL
- This indicator lights to indicate parallel recording is taking place.
- Playback/recording direction indicator of TAPE I deck
- Pause indicator
- This indicator lights when the TAPE I deck is temporarily stopped.
- Tape counter of TAPE I deck
- The tape counter indicates the relative position of the tape. You can reset the counter to zero whenever you want.
- When an A-B repeat operation is on, is shown.
- Record indicator
- This indicator lights when the TAPE I deck is in record mode.
- Play indicator
- This indicator lights when the TAPE I deck is in play mode.
- Dubbing indicator
- NORMAL DUB lights during normal speed dubbing, and HIGH DUB lights during high speed dubbing.
- Play indicator
- This indicator lights when the TAPE II deck is in play mode.
- Record indicator
- This indicator lights when the TAPE II deck is in record mode.
- Tape counter of TAPE II deck
- The tape counter indicates the relative position of the tape. You can reset the counter to zero whenever you want.
- When an A-B repeat operation is on, is shown.
- Pause indicator
- This indicator lights when the TAPE II deck is temporarily stopped.
- Playback/recording direction indicator of TAPE II deck
Connections with a timer
Connecting a commercially available timer to your audio setup lets you wake up to your favorite cassette tape, or start recording at specified times. Refer to the illustration below, and connect your audio components.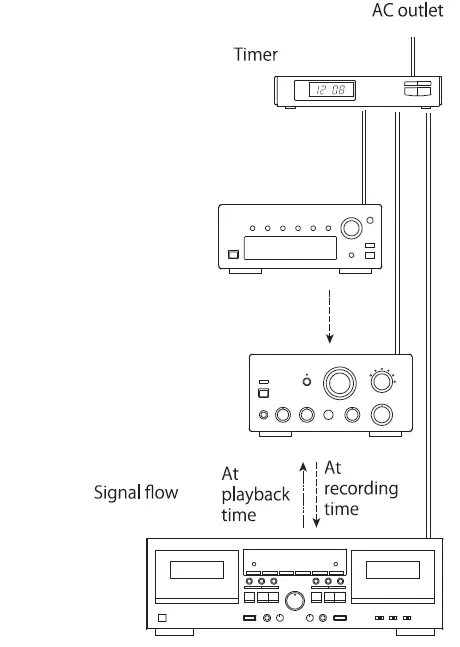
Troubleshooting
If you think that there is something wrong with this cassette deck, make the checks listed below before contacting a repair service. In some cases the problem may lie with another component. Check all components. If the problem cannot be solved with any of the following checks, contact your nearest TEAC authorized service center or your dealer for help.
Cannot switch on the power
Check the connection to the AC power supply. Check and make sure the AC source is not a switched outlet and that, if it is, the switch is turned on. Make sure there is power to the AC outlet by plugging another item such as a lamp or fan into the outlet.
- No sound
- Check the connection to the amplifier.
- Check the amplifier settings.
- Noisy playback
- Keep away from equipment that generates a magnetic field, such as a TV or microwave oven.
- Transport control keys do not work.
- Load a cassette tape if not loaded.
- If a cassette tape is loaded, reinsert it.
- The cassette compartment does not close.
- The cassette is not properly loaded. Reinsert it.
- Poor sound quality
- Clean the heads.
- Check that the Dolby NR switch is set to the same position as when recording was made.
- Cannot record
- If the erasure prevention tabs on top of the cassette are broken off, cover the holes using pieces of adhesive tape.
- Check the connection to the amplifier and to the source equipment.
- Set the amplifier input/output selectors correctly.
- Check the recording level setting.
- Playback speed seems somewhat fast or slow
- Check the pitch control setting.
- Auto reverse does not occur
- Set the REV MODE switch to j or p.
- If the REV MODE switch is set to j, start playback from the tape side facing you (side “A”).
- Synchro reverse dubbing is not possible.
- Set the REV MODE switch to the j position.
- Load cassettes into both decks.
- Set the tape transport direction to y on both decks.
- Continuous play/record is not possible
- Set the REV MODE switch to the p position.
- Load cassettes into both decks.
- To make a continuous recording, start with TAPE I .
Specifications
- Track System . . . . . . . . . . . . . . . . . . . . . . . . . . . 4-track, 2-channel stereo
- Heads Construction . . . . . . . .Record/playback head x 1 (each deck)
- Erase head x 1 (each deck)
- Tape Speed . . . . . . . . . . . . . . . . . . . . . . . . . . . . . . . . . . . . . . . . . . 4.8 cm/sec
- 9.5 cm/sec (high-speed dubbing mode)
- Pitch Control . . . . . . . . . . . . . . . . . . . . . . . . . . . . . . . . . . . . . . . . . . . . . . . .12%
- Fast Winding Time . . . . . . . . . . . . .approximately 160 sec (C-60 tape)
- Motor . . . . . . . . . . . . . . . . . . . . . . . . . . . . . . . . .DC servo motor (capstan)
- Wow and Flutter . . . . . . . . . . . . . . . . . . . . . . . . . . . . . . . . . .0.25% (WRMS)
- Frequency Response (Overall)
- Metal tape (Type IV, playback only) . . . . . . . . . . . . . . . . 30 Hz-19 kHz
- Chrome tape (Type II) . . . . . . . . . . . . . . . . . . . . . . . . . . . . . 30 Hz-18 kHz
- Normal tape (Type I) . . . . . . . . . . . . . . . . . . . . . . . . . . . . . . 30 Hz-17 kHz
- Signal to Noise Ratio (Overall)
- 58 dB (Dolby NR OFF, nominal recording level)
- 69 dB (Dolby NR ON, CCIR-ARM)
- Line Input (RCA jack) . . . . . . . .100 mV (input impedance 50k ohms)
- Mic Input (mono 1/4” Phone jack)
- 0.38 mV (input impedance 200k ohms)
- Line Output (RCA jack)
- 0.46 V (load impedance 50k ohms or more)
- Headphones Output (stereo 1/4” Phone jack) . . . 2 mW / 32 ohms
- Power Requirements . . . . . . . . . . . . . . U.S.A./Canada 120 V AC, 60 Hz
- U.K./Europe 230 V AC, 50 Hz
- Power Consumption . . . . . . . . . . . . . . . . . . . . . . . . . . . . . . . . . . . . . . . 22 W
- Dimensions (including protruding parts)
- 435 (W) x 145 (H) x 286 (D) mm
- (17 1/8” x 5 11/16” x 11 1/4”)
- Weight . . . . . . . . . . . . . . . . . . . . . . . . . . . . . . . . . . . . . . . . . . 4.3 kg (9 1/2 lb)
Included Accessories
- Remote control unit (RC-1277) . . . . . . . . . . . . . . . . . . . . . . . . . . . . . . . . x 1
- Batteries (AA) for remote control unit . . . . . . . . . . . . . . . . . . . . . . . . . x 2
- Stereo RCA pin cable . . . . . . . . . . . . . . . . . . . . . . . . . . . . . . . . . . . . . . . . x 2
- Owner’s manual (this document) . . . . . . . . . . . . . . . . . . . . . . . . . . . . . x 1
- Warranty card . . . . . . . . . . . . . . . . . . . . . . . . . . . . . . . . . . . . . . . . . . . . . . . . x 1
FAQS
does the unit include a remote control ?
Yes. The remote controls both decks. You can forward, rewind, stop, record or reverse either deck with it.
What is the real story on dolby. reviews say none. online manual says b&c.
This Teac W-890RMKII-B does not come with Dolby Noise Reduction. The Teac W-890R does come with Dolby noise reduction
Can you record through a line in or an aux cord?
it works like any cassette recorder. record in is from any audio line level source. and play it would be going to your receiver line input jacks .hope that helps you
Any hiss sound?
no hissing sounds during playback, even from 2nd generation recordings
I assume this is strictly analog? If it’s digital, why?
Frequency response High position tape (type II) 30 HZ-15 HZ (+0.3/-3 db) 30 HZ-17 HZ (+0.3/-12 db)
How do I hook it up to my receiver?
Connect to any non phonograph input on your receiver and any line or tape output on your receiver.
can I conected to a computer?
The only connections are for standard Right/Left Line in/Line out plugs, so I would agree with Vedat Alemdar…no, not directly.
Does this cassette deck require external speaker or does it play sound standalone?
stand alone would require a good pair of headphones output level in this case should be respected. the deck has a headphone out put stereo without unit adjustment to volume,
can I record mp3 to cassette ?
Mp3 is a digital format. You must convert it to analog format.
If I add this cassette deck to my stero component system will I be able to record tapes from my turntable and cd player?
You can record-but it doesn’t have separate right and left volume controls to adjust levels individually- can only adjust both channels with one master volume control, can’t remaster levels on uneven source
Do I need a mic? How does it catch the sound, built in?
Yes. You need external speakers and something to power them like an amp
Can you record tape to tape with this?
Yes, you can. Just read the directions carefully because it is possible to erase the tape you are taping “from” if you are not careful. it records tape to tape very well
Back again. Is the size really 21 x 14.5 x 9 inches?
Yes, size is really 21 x 14.5 x 9 inches
Is there a way to connect this item to a laptop or computer?
Yes, you will need a 1/8″ stereo male to rca female adaptor


