acaia Cinco Anniversary Limited Edition User Manual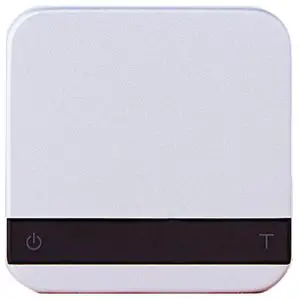
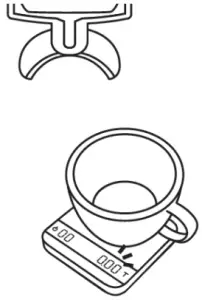
In the Box
Introduction
The instructions in this user manual apply to the Acaia Cinco. You have purchased a quality precision weighing scale that requires handling with care. Make sure to read through this user manual prior to using the scale. Start by checking that your Acaia Cinco box contains all the parts listed below:
- Acaia Cinco Scale
- Micro USB Charging Cable
- Acaia Cinco Carrying Case
- Acaia 5th Anniversary Pin Set
- Acaia Scale Weight 100 g
Next, follow the instructions in Getting Started to begin using your scale. To take full advantage of the Cinco’s many features, carefully read through the manual, which contains step-by-step procedures, examples, and other information.
Warning: Incorrect handling of this product could result in personal injury or physical damage.
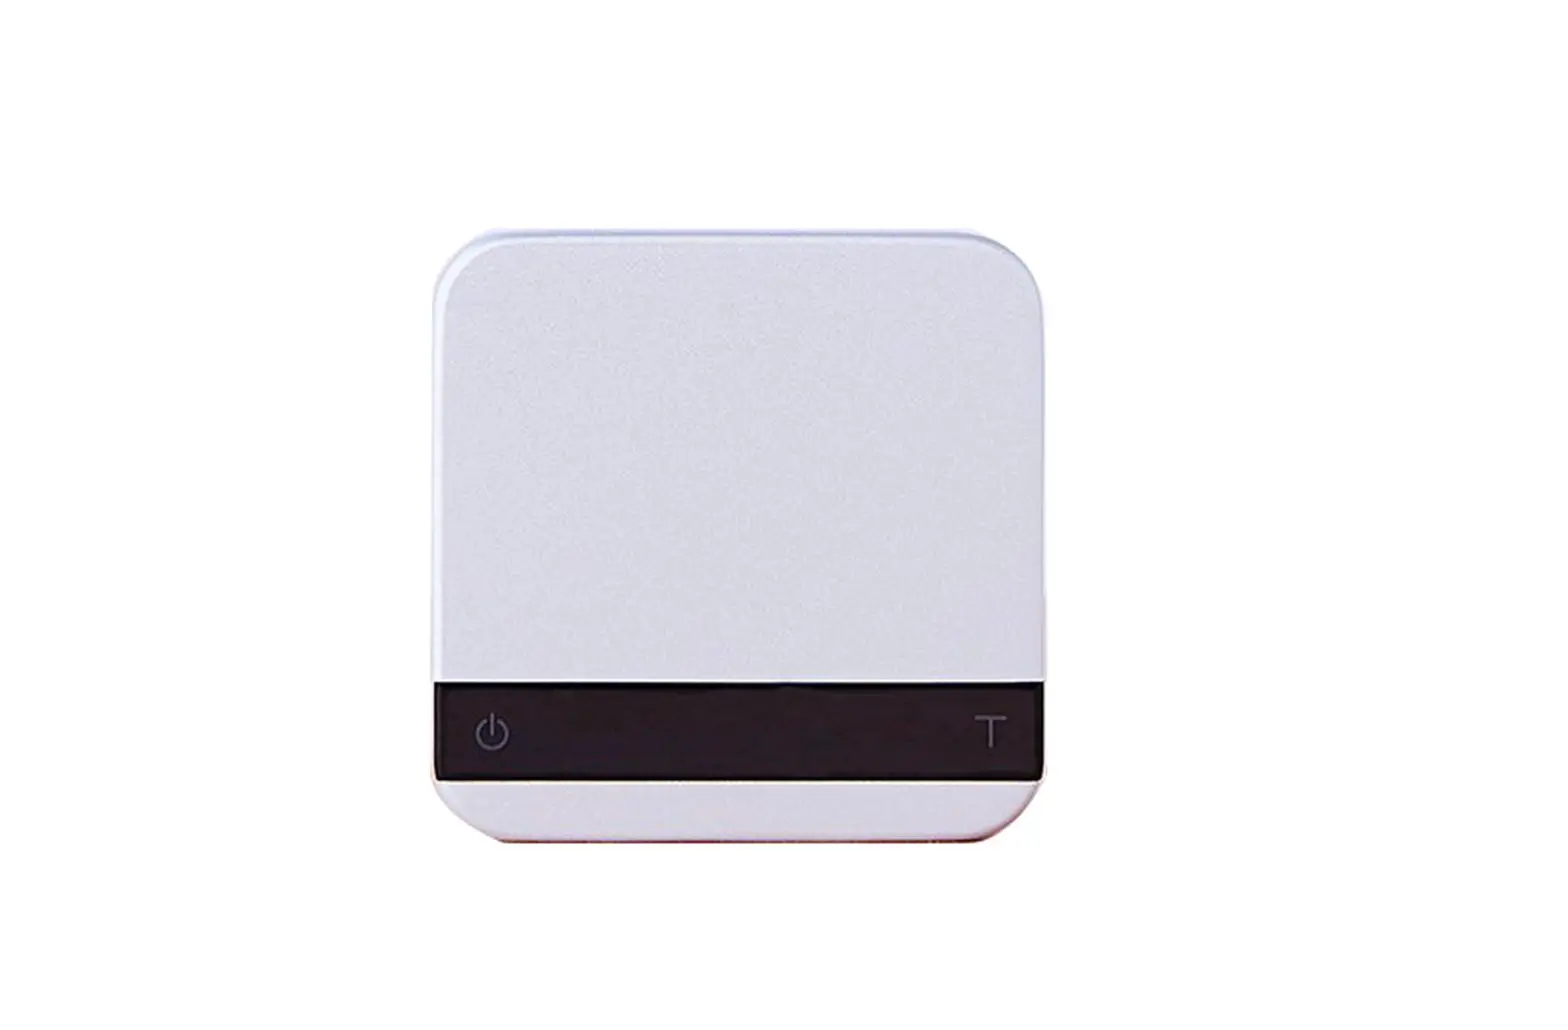
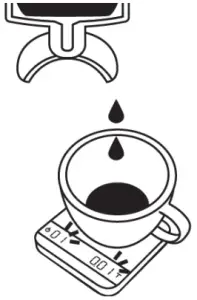
Scale overview
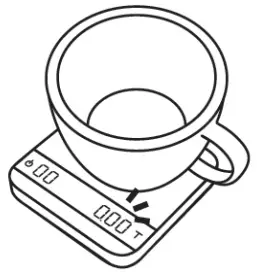
Note: For the best performance, place the weight in the center of the weighing pan.
Getting Started
Setting up your Cinco
Select a horizontal surface that is stable and vibration free to set up the scale.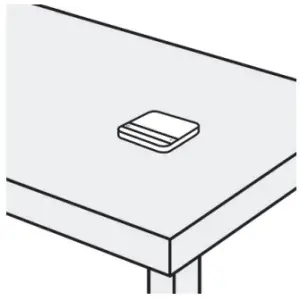
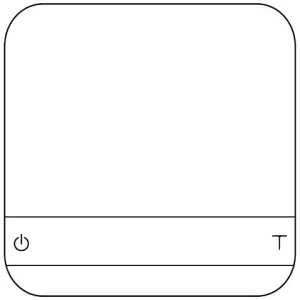
Power on/off
[Press] ![]() to turn on the scale.
to turn on the scale.
[Double tap] ![]() to turn off the scale.
to turn off the scale.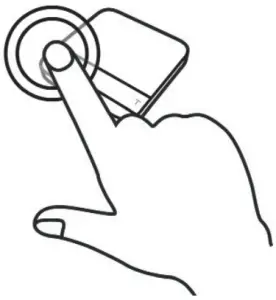
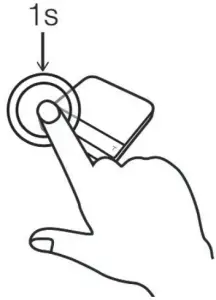
Tare weight
[Short press] ![]() to tare/zero the weight.
to tare/zero the weight.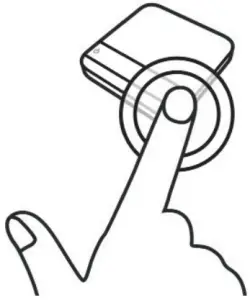
Switch mode
[Press and hold] ![]() to switch modes.
to switch modes.
- Please see the “Mode Introduction” section for more details.

Toggle units
[Press and hold] ![]() to toggle units.
to toggle units.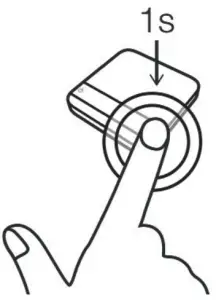
Product Care Information
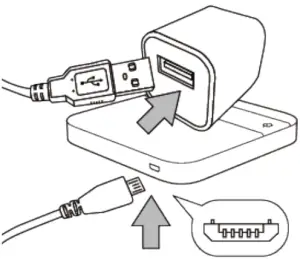
Charging the battery
- You can charge the battery by plugging the USB cable into any of the power supplies listed below:
- A computer
- A USB wall-charger with an output of 5 volts and 1 amp
- A DC car-charger with an output of 5 volts and 1 amp
- It takes about 1-2 hours to fully charge the battery. Try not to let the battery completely run out before charging. Charge as needed.
- Remaining battery power percentage can be viewed via the Acaia apps.

Note: Using a non-certified charger could damage your Acaia scale’s circuit board or battery.
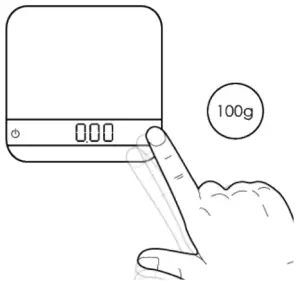
Calibration
- Turn on scale
Turn on the Acaia Cinco.
- Tap T button
Make sure the scale is in the weighing mode and the unit is set to ‘gram’, then tap ‘T’ button rapidly.
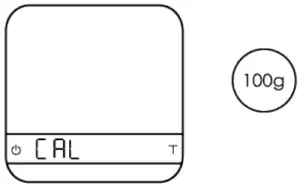
- Scale displays “CAL”
Keep tapping ‘T’ button until ‘CAL’ is shown on the display.
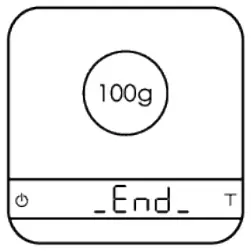
- Place a weight
Place a 100 g weight on the scale and wait until the display shows ‘_End_’.
Calibration is now complete.
Mode Introduction
Mode 1 – Weighing Mode
In the Weighing Mode, the scale will only display weight, in either grams or ounces.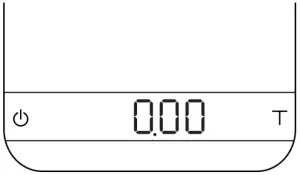
- There are two different weighing units in the Weighing Mode: gram and ounce.
- The LED display shows [ 0.00 ] when the scale is measuring in grams.
- The LED display shows [ 0.0000 ] when the scale is measuring in ounces.
Action
Operation
Tare
Tap Tare button
Toggle Units g/oz
Long press Tare button Switch Modes Long press Power button
To change the default weighing unit to either gram or ounce, please see Default Unit Setting in the Configuration section (p. 8).
Mode 2 – Dual Display Mode
In the Dual Display Mode, the scale displays [ 0:00 0.00 ] with a timer (left) and weight (right).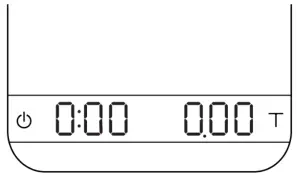
- There are two different weighing units in the Dual Display Mode: gram and ounce.
- When the scale is measuring in grams, the LED display shows [ 0:00 0.00 ].
- When the scale is measuring in ounces, the LED display shows [ 0:00 0.000 ].
- If the weight exceeds 500.00 grams, the scale will display [ _ _ _ _ ].
- The maximum time that can be displayed is 9 minutes and 59 seconds. When the limit is reached, the timer still goes up to until 999 minutes and 59 seconds. It can be observed through our iOS/Android App.
Action
Operation
Start/Stop/Reset Timer
Tap Power button Tare Operation Tap Tare button
Switch Mode
Press and hold Power button Toggle Units g/oz Press and hold Tare Button
Mode 3 – Auto Start Mode
This mode is designed for baristas who would like to measure the time of the shot starting from the first few drops of espresso. When a stable weight is detected, the scale will perform the auto tare operation. After the scale detects the espresso flow, the timer starts. The timer will stop when the espresso flow stops.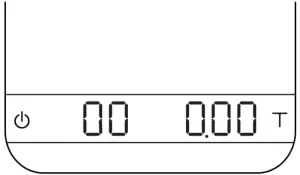
Display
- The LED display shows [ 00 0.00 ] with the timer on the left and the weight on the right in grams.
- The LED display shows [ 00 0.0000 ] with the timer on the left and the weight on the right in ounces.
- The timer displays from [ 00 ] to [ 99 ] and then stops.
Mode Description
- The auto tare function operates when a stable weight is placed on the scale.
- The timer will start automatically when the flow of espresso is detected.
- This mode is designed to measure the time of the shot starting from the first few drops of espresso.

- Place a stable weight on the scale.

- The scale will perform the auto tare function.

- When the scale detects the espresso flow, the timer will start.

Action
Operation Start/Stop/Reset Timer The timer will start when flow is detected
Tare
Tap Tare button Reset Mode Double tap Tare button
Stop Timer
The timer will stop when flow is no longer detected Switch Mode Press and hold Power button

Configuration
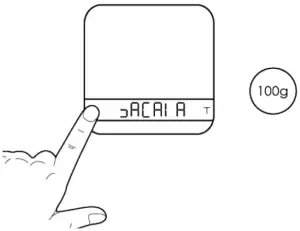
Enter settings
- Press and hold Power button while the LED display shows [ :ACAIA ] and then changes to [ SEt ].
- Tap T button to enter Settings. The first setting is [ SLEEP ].
- Please refer to the following table for key operations.
Action
Operation Advance to Next Setting Tap Tare button
Enter Setting
Long Press Tare button Toggle Options Tap Tare button
Save Option
Long Press Tare button Exit Settings Tap Power button
Settings menu
| Setting | Display | Options | Default |
Sleep Timer | SLEEP | 5, 10 , 20, 30, 60, Off | 5 |
| Zero Tracking | t r Ac E | 0.5 d, 1 d, 2 d, 3 d, Off | 1 d |
Key Sound | bEEP | On, Off | On |
| Zero Range | O. r AnGE | 2, 100 | 100 |
Weighing Filter | F ilt . | 2, 4, 6, 8, 16, 32, 64, 128 | 16 |
| Default Weighing Unit | Un it | Gram, Ounce | Gram |
Weighing Mode | NOdE_1 | On, Off | On |
| Dual Display Mode | NOdE_2 | On, Off | On |
Auto Start Mode | NOdE_3 | On, Off | On |
| Bluetooth On/Off | b t _SE t | On, Off | On |
Battery Saving | bA tt SA vE | 30, 90, 180, Off | 90 |
| Auto Start Sensitivity | SEn SE | 0.1 g, 0.2 g, Off | Off |
Auto Reset | Au t o_ r ES | Off, 10, 30 | 30 |
| Reset to Default | r ESE t. d | No, Yes |
Sleep Timer Setting [ SLEEP ]
- Sleep Timer settings can also be configured in the Acaia apps.
- The number indicates the amount of time before the scale automatically powers off. For example, when 10 is selected, the scale powers off after 10 minutes of being idle if the scale is disconnected from all mobile devices.
Zero Tracking Setting [ trAcE ]
- Zero Tracking is a function for automatically maintaining the zero indication within certain limits.
- Off: It is not recommended to turn off Zero Tracking because the zero indication can drift easily as the room temperature changes.
- 0.5 d~3 d: Zero Tracking is measured in units of division, or “d”. 1d is equal to 0.01 grams. For example, if Zero Tracking is set to 3 d, any weight less than .03 grams will automatically be zeroed.
- 1 d is recommended in general for the Acaia Cinco.
Key Sound Setting [ bEEP ]
- Key Sound settings can also be configured in the Acaia apps.
- Set the Key Sound function to on/off to enable/disable the beeping sound.
Zero Range Setting [ 0.rAnGE ]
- The Zero Range setting determines the range for which the Tare button executes zero operation instead of tare operation.
- When Zero Range is set to 2, the range for zero-setting will be 2% of the capacity, i.e., ± 10 g for Acaia Cinco. By pressing the Tare button, any weight within ± 10 g is zeroed out by zero operation while any weight that lies outside the range is tared out by tare operation.
- If Zero Range is set to 100, the range for zero-setting will be 100% of the capacity, i.e., ± 500 g for Acaia Cinco. Therefore, instead of tare operation, zero operation would be executed in this setting whenever the Tare button is pressed.
Notice: The difference between zero operation and tare operation is that zero operation would simply ignore the weight and display as 0 while tare operation would deduct the weight from the weighing result. However, zero operation does not increase the scale capacity.
Weighing Filter Setting [ Filt ]
- The Weighing Filter Setting determines the speed at which the load receptor responds to weight and determines the weighing value. The larger the number, the more stable but slower the weighing result will be. The number shown on the LED display indicates the current filter setting.
- Press the Tare button to change the parameter.
Default Unit Setting [ Unit ]
- The Default Weighing Unit is set to grams if [ 9 ] is selected and ounce if [ o2 ] is selected.
Weighing Mode Setting [ NOdE_1 ]
- The Weighing Mode is set to On by default.
- On: The Weighing Mode is enabled.
Off: The Weighing Mode is disabled.
- On: The Weighing Mode is enabled.
Dual Display Mode Setting [ NOdE_2 ]
- The Dual Display Mode is set to On by default.
- On: The Dual Display Mode is enabled.
- Off: The Dual Display Mode is disabled.
Auto Start Mode Setting [ NOdE_3 ]
- The Auto Start Mode is set to On by default.
- On: The Auto Start Mode is enabled.
- Off: The Auto Start Mode is disabled.
Bluetooth Setup Setting [ bt_SEt ]
- Off: Bluetooth is disabled. The scale does not allow any Bluetooth connection.
- On: Bluetooth is enabled. The scale allows Bluetooth connection. The user may connect the scale with Acaia apps.
Battery Saving [ bAttSA E ]
- The Acaia Cinco will wait for the selected number of seconds to enter Battery Saving. The LED display will dim to save power.
- The default length of time before entering Battery Saving is 90 seconds.
Auto Start Sensitivity [ SEnSE ]
- Minimum weight is decreased for more sensitivity. This is ideal for slower espresso shots in the droplet icon modes. Stability depends on environmental noise.
- The number indicates the sensitivity of flow detection in the droplet icon modes. Smaller value indicates higher sensitivity, but is recommended only for stable working environments.
- Tap the Tare button to toggle through the options.
Auto Reset [ Auto_rES ]
- After a cup is removed, the timer will automatically reset. This setting gives you options on how long to wait before resetting. It enables the user to pull successive shots of espresso quickly in Auto Start Mode.
- The number indicates the timeout value of timer reset after a cup is removed.
- Tap the Tare button to toggle through the options.
Reset to Default Setting [ rESEt d ]
- Select [ YES ] to set all settings to default value.
Appendix
Button functions
Function | Example | |
Power Button | Turn on | Press and hold for 0.5 seconds to turn on the scale. |
| Turn off | Double tap to turn off the scale. | |
Switch mode | While the scale is turned on, press and hold for one second to switch modes. | |
Start/Stop/Reset Timer | Tap to start/stop/reset timer. | |
| Back | While in Settings Menu, tap to go back to Modes. | |
Tare Button | Tare | Tap to perform tare operation. |
| Toggle units | Long press to switch between gram and ounce in Weighing Mode. | |
Switch option | While in Settings, tap to advance through sub-menus. While in sub-menus, tap to toggle options. | |
| Reset | While in Auto Start Mode, double tap to reset the mode. | |
Confirm | While in Settings, press and hold for two seconds to confirm the option selected in a sub menu. | |
Enter Calibration Mode | While in Weighing Mode, rapidly tap to enter Calibration Mode. |


LED indicators
- Battery Charge/Charge Error
The LED indicator on the upper left turns on when the battery is charging and turns off when the battery is fully charged. The indicator starts flashing or does not light up when the USB cable malfunctions. - Tare Operation/ Bluetooth Connected
The LED indicator on the lower left flashes when the Tare button is pressed or when Bluetooth is connected.

Error codes
Error Code | Description |
100 | Access Code Error, unrecognized access code. |
| 101 | EEPROM error, unable to access memory. Please contact Acaia support. |
102 | AD error, unable to access weighing signal. Please contact Acaia support. |
| 303 | Unable to find acceptable starting Zero point, most likely due to loadcell damage caused by excessive force or drop. Please contact Acaia support. |
| Over load: the weight is over the maximum capacity. |
 | Under load: the weight is under the minimum capacity. |
304 | Calibration error. Calibration cannot proceed when environmental noises are too strong. Please calibrate in a stable environment free of wind, vibration, etc. |
904 | Password error (the default password is 0000) |
| _H2O | Water in the Power button |
H2O_ | Water in the Tare button |
| _H2O_ | Water in the Power button and Tare button |

Update mode
Display Code | Description |
| UPdA t E | The scale is in update mode. Note: If you want to leave update mode, please connect the scale’s USB to a power source. |
Specifications
Model | AC001 |
Product Weight | 70 g ± 5 g |
| Product Dimensions | W: 65 mm L: 65 mm H: 13 mm |
Maximum Capacity | 500 g / 17.63 oz |
| Minimum Weight | 0.01 g |
Measuring Units | g / oz |
| Readability | 0.01 g / 0.05 g |
Repeatability | 0.01 g / 0.05 g |
| Linearity | 1 d / 2 d (d = 0.01 g / 0.05 g) |
Indication Limit | 515 g / 18.16 oz |
| Power Supply | 5 V / 500 mA |
Battery | Lithium-ion rechargeable 3.7 V 310 mAh |
| Battery Life | Up to 7 hours |
Display | LED |
| Material | Aluminum, Acrylic |
Connectivity | Bluetooth 4.0 |
| Warranty | 1 Year |
Inside the Package | Acaia Cinco Scale (Silver) x 1 Acaia Cinco Carrying Case x 1 Acaia 5th Anniversary Pin Set x 1 Acaia Scale Weight 100 g x 1 Micro USB Charging Cable x 1 |
Copyright
This user manual is protected by copyright. All rights reserved. No part of this manual may be reproduced, processed, duplicated or published in any form by photocopying, microfilming, reprinting or any other method, in particular electronic means, without the written consent of Acaia.
© Acaia, California, 2020


