
![]()
Operating Instructions
Wall-mounted fan heater
Item no: 2525295
![]()
1 Installation diagrams
2 Installation diagrams (continued)
*2525295_V3_0722_jh_mh_en 36028797534003979-2 I5/O3 en
3 Introduction
Dear customer,
Thank you for purchasing this product.
If there are any technical questions, please contact:
www.conrad.com/contact
4 Intended use
The product is a fan heater. The product is intended to be used as a stationary heating appliance to heat insulated and enclosed rooms of suitable sizes. Do not use the product as a portable heater.
Before operation, the heater must be mounted to a wall in a vertical position. The installation location must comply with the locally applicable regulations.
Use the towel rack to dry and heat towels.
The product is intended for indoor use only. Do not use it outdoors.
Contact with moisture must be avoided under all circumstances.
If you use the product for purposes other than those described, the product may be damaged.
Improper use can result in short circuits, fires, electric shocks or other hazards.
The product complies with the statutory national and European requirements.
For safety and approval purposes, you must not rebuild and/or modify the product.
Read the operating instructions carefully and store them in a safe place. Make this product available to third parties only together with the operating instructions.
All company names and product names are trademarks of their respective owners. All rights reserved.
5 Delivery contents
![]() Heater
Heater ![]() Installation material
Installation material![]() Towel rack
Towel rack ![]() Operating instructions
Operating instructions
6 Latest product information
Download the latest product information at www.conrad.com/downloads or scan the QR code shown. Follow the instructions on the website.
7 Description of symbols
The following symbols are on the product/appliance or are used in the text:
![]() The symbol warns of hazards that can lead to personal injury.
The symbol warns of hazards that can lead to personal injury.
![]() Protection class 2 (double or reinforced insulation, protective insulation).
Protection class 2 (double or reinforced insulation, protective insulation).
![]() This symbol indicates that the appliance must not be covered with clothes or other material to prevent overheating.
This symbol indicates that the appliance must not be covered with clothes or other material to prevent overheating.
8 Safety instructions
![]() Read the operating instructions carefully and especially observe the safety information. If you do not follow the safety instructions and information on proper handling, we assume no liability for any resulting personal injury or damage to property. Such cases will invalidate the warranty/guarantee.
Read the operating instructions carefully and especially observe the safety information. If you do not follow the safety instructions and information on proper handling, we assume no liability for any resulting personal injury or damage to property. Such cases will invalidate the warranty/guarantee.
8.1 Read first!
![]() Children of less than 3 years must be kept away unless continuously supervised.
Children of less than 3 years must be kept away unless continuously supervised.![]() Children aged from 3 years and less than 8 years shall only switch on/off the appliance provided that it has been placed or installed in its intended normal operating position and the children have been given supervision or instruction concerning use of the appliance in a safe way and understand the hazards involved. Children aged from 3 years and less than 8 years must not plug in, regulate and clean the appliance or perform maintenance.
Children aged from 3 years and less than 8 years shall only switch on/off the appliance provided that it has been placed or installed in its intended normal operating position and the children have been given supervision or instruction concerning use of the appliance in a safe way and understand the hazards involved. Children aged from 3 years and less than 8 years must not plug in, regulate and clean the appliance or perform maintenance.![]() This appliance can be used by children aged from 8 years and above and persons with reduced physical, sensory or mental capabilities or lack of experience and knowledge if they have been given supervision or instruction concerning use of the appliance in a safe way and understand the hazards involved. Cleaning and user maintenance shall not be made by children without supervision.
This appliance can be used by children aged from 8 years and above and persons with reduced physical, sensory or mental capabilities or lack of experience and knowledge if they have been given supervision or instruction concerning use of the appliance in a safe way and understand the hazards involved. Cleaning and user maintenance shall not be made by children without supervision.![]() Children shall not play with the appliance.
Children shall not play with the appliance.![]() Do not position the product directly below a mains socket.
Do not position the product directly below a mains socket.![]() A damaged mains cable may only be replaced by the manufacturer, a workshop commissioned by the manufacturer or a similarly qualified person, so as to prevent any danger.
A damaged mains cable may only be replaced by the manufacturer, a workshop commissioned by the manufacturer or a similarly qualified person, so as to prevent any danger.![]() WARNING: In order to avoid a hazard for very young children, this appliance must be installed so that the lowest heated rail is at least 600 mm above the floor.
WARNING: In order to avoid a hazard for very young children, this appliance must be installed so that the lowest heated rail is at least 600 mm above the floor.![]() CAUTION: Some parts of this product can become very hot and cause burns. Particular attention has to be given where children and vulnerable people are present.
CAUTION: Some parts of this product can become very hot and cause burns. Particular attention has to be given where children and vulnerable people are present.
![]() The heater can overheat when covered and cause fire. Do not cover the heater.
The heater can overheat when covered and cause fire. Do not cover the heater.
8.2 General
![]() The product is not a toy. Keep it out of the reach of children and pets.
The product is not a toy. Keep it out of the reach of children and pets.![]() Do not leave packaging material lying around carelessly. This may become dangerous playing material for children.
Do not leave packaging material lying around carelessly. This may become dangerous playing material for children.![]() If you have questions which remain unanswered by this information product, contact our technical support service or other technical personnel.
If you have questions which remain unanswered by this information product, contact our technical support service or other technical personnel.![]() Maintenance, modifications and repairs must only be completed by a technician or an authorised repair centre.
Maintenance, modifications and repairs must only be completed by a technician or an authorised repair centre.
8.3 Handling
![]() Handle the product carefully. Jolts, impacts or a fall even from a low height can damage the product.
Handle the product carefully. Jolts, impacts or a fall even from a low height can damage the product.
8.4 Drilling
![]() When penetrating the surface (example: drilling or inserting fasteners), make sure no cables or pipes are damaged. Inadvertently penetrating electric cables causes the life-threatening danger of an electric shock! Check for concealed wires and pipes before drilling or inserting fasteners.
When penetrating the surface (example: drilling or inserting fasteners), make sure no cables or pipes are damaged. Inadvertently penetrating electric cables causes the life-threatening danger of an electric shock! Check for concealed wires and pipes before drilling or inserting fasteners.
8.5 Installation
![]() Water can cause fatal electric shocks. Do not install and operate the product in the immediate surroundings of a bath, a shower or a swimming pool.
Water can cause fatal electric shocks. Do not install and operate the product in the immediate surroundings of a bath, a shower or a swimming pool.![]() If you install the product in a bathroom, observe the safety requirements and regulations that apply in your country.
If you install the product in a bathroom, observe the safety requirements and regulations that apply in your country.![]() Do not install and operate the product in areas where flammable liquids and materials are used or stored.
Do not install and operate the product in areas where flammable liquids and materials are used or stored.![]() Protect the product from direct sunlight.
Protect the product from direct sunlight.
8.6 Mains cable
![]() Do not modify or repair mains supply components including mains plugs, mains cables, and power supplies. Do not use damaged components. Risk of death by electric shock!
Do not modify or repair mains supply components including mains plugs, mains cables, and power supplies. Do not use damaged components. Risk of death by electric shock!
![]() Only connect the mains plug to a mains outlet protected by a residual current device (RCD) having a rated residual operating current not exceeding 30 mA.
Only connect the mains plug to a mains outlet protected by a residual current device (RCD) having a rated residual operating current not exceeding 30 mA.![]() The mains outlet must be located near to the device and be easily accessible.
The mains outlet must be located near to the device and be easily accessible.![]() Never plug in or unplug the mains plug when your hands are wet.
Never plug in or unplug the mains plug when your hands are wet.![]() Never pull the mains plug from the socket by pulling at the cable. Always pull it from the mains socket using the intended grips.
Never pull the mains plug from the socket by pulling at the cable. Always pull it from the mains socket using the intended grips.![]() Unplug the mains plug from the mains socket if you do not use the device for an extended period of time.
Unplug the mains plug from the mains socket if you do not use the device for an extended period of time.![]() Disconnect the mains plug from the mains socket in thunderstorms for reasons of safety.
Disconnect the mains plug from the mains socket in thunderstorms for reasons of safety.![]() Make sure that the mains cable is not squeezed, bent, damaged by sharp edges or put under mechanical stress.
Make sure that the mains cable is not squeezed, bent, damaged by sharp edges or put under mechanical stress.![]() Avoid excessive thermal stress on the mains cable from extreme heat or cold.
Avoid excessive thermal stress on the mains cable from extreme heat or cold.![]() Do not modify the mains cable. Otherwise the mains cable may be damaged. A damaged mains cable can cause a deadly electric shock.
Do not modify the mains cable. Otherwise the mains cable may be damaged. A damaged mains cable can cause a deadly electric shock.![]() Do not touch the mains cable if it is damaged.
Do not touch the mains cable if it is damaged.
– First, power down the respective mains socket (e.g. via the respective circuit breaker) and then carefully pull the mains plug from the mains socket.
– Never use the product if the mains cable is damaged.![]() A damaged mains cable may only be replaced by the manufacturer, a workshop commissioned by the manufacturer or a similarly qualified person, so as to prevent any danger.
A damaged mains cable may only be replaced by the manufacturer, a workshop commissioned by the manufacturer or a similarly qualified person, so as to prevent any danger.![]() Ensure that cables are not pinched, kinked or damaged by sharp edges.
Ensure that cables are not pinched, kinked or damaged by sharp edges.![]() Always lay cables so that nobody can trip over or become entangled in them. This poses a risk of injury.
Always lay cables so that nobody can trip over or become entangled in them. This poses a risk of injury.
8.7 Operation
![]() A blocked air intake can cause the heater to overheat and catch fire. Always keep the air intake unobstructed.
A blocked air intake can cause the heater to overheat and catch fire. Always keep the air intake unobstructed.![]() Do not insert or allow any foreign object to enter any intake or outlet opening. Foreign objects can cause an electric shock or fire, or damage to the appliance.
Do not insert or allow any foreign object to enter any intake or outlet opening. Foreign objects can cause an electric shock or fire, or damage to the appliance.![]() Consult an expert when in doubt about the operation, safety or connection of the product.
Consult an expert when in doubt about the operation, safety or connection of the product.![]() If it is no longer possible to operate the product safely, take it out of operation and protect it from any accidental use. DO NOT attempt to repair the product yourself. Safe operation can no longer be guaranteed if the product:
If it is no longer possible to operate the product safely, take it out of operation and protect it from any accidental use. DO NOT attempt to repair the product yourself. Safe operation can no longer be guaranteed if the product:
– is visibly damaged,
– is no longer working properly,
– has been stored for extended periods in poor ambient conditions or
– has been subjected to any serious transport-related stresses.
9 Product overview
9.1 Heater components
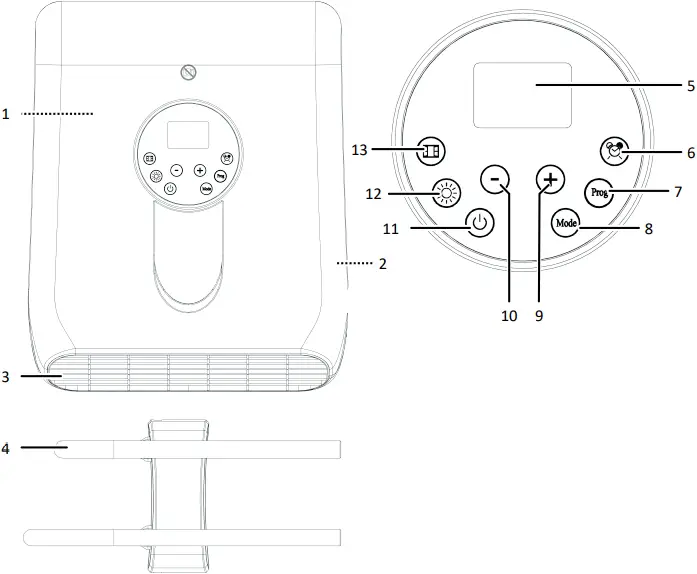
1 Air intake (rear) 2 Main switch
3 Hot air outlet 4 Towel rack
5 Display 6 Timer button TIMER
7 Program button PROG 8 Mode selection button MODE
9 Menu button UP 10 Menu button DOWN
11 Power button ON/OFF 12 Heating power button POWER
13 Button WINDOW
9.2 Display
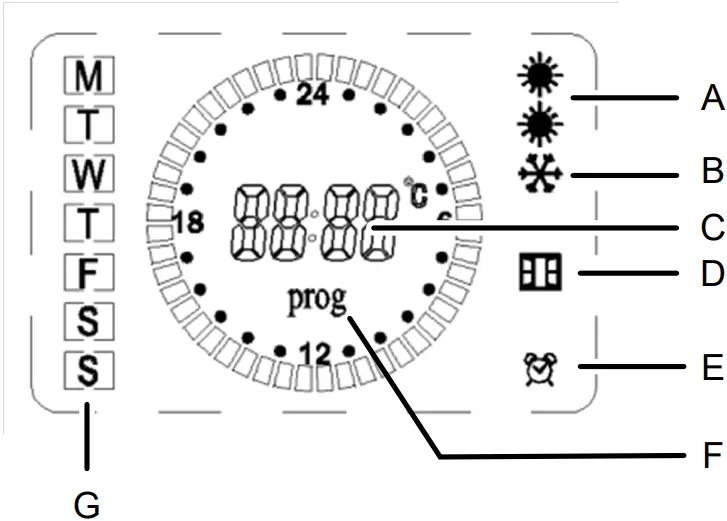
Display symbol Symbol indicates
A HEAT One symbol: Heater operates at medium power (1000 W), Two symbols: Heater operates at full power (2000 W)
B FROST Anti-frost working mode is activated
C TIME Time display
D WINDOW The open window sensing mode is activated., An open window was sensed.
E TIMER A timer is set.
F PROG Custom program mode is activated.
G WEEKDAY M=Monday, T=Tuesday, …, T=Thursday, …, S = Sunday
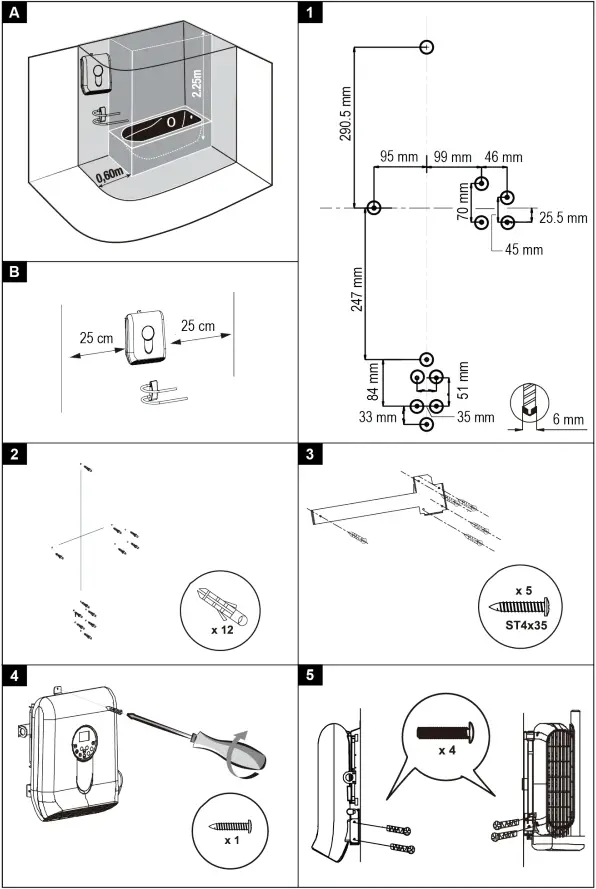
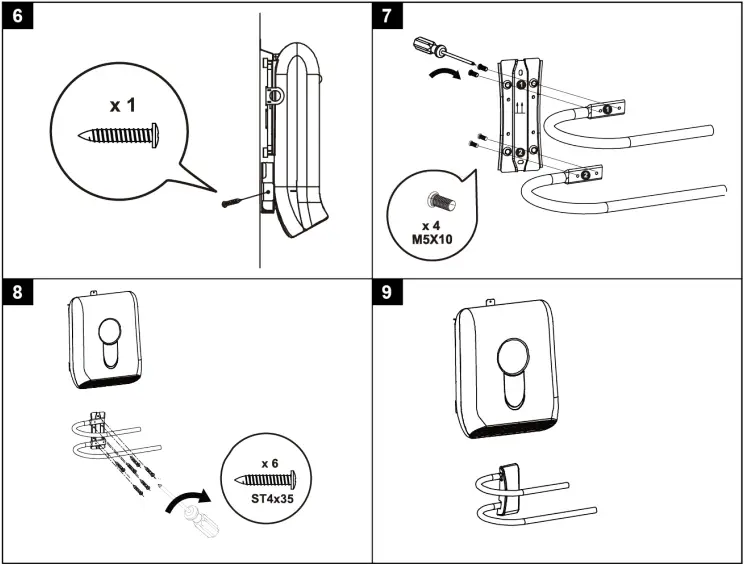
10 Installation
Before operation, the heater must be mounted to a wall in a vertical position. The installation location must comply with the locally applicable regulations.
Important:
If you are in any doubt, do not carry out the installation yourself; ask a qualified person to do it for you.
Important:
In order to avoid a hazard for very young children, install the heater and towel rack so that the lowest heated rail of the towel rack is at least 600 mm above the floor.
- Refer to the installation diagrams at the front of these operating instructions.
- Check that the installation location for the heater meets the requirements shown in figures [A] and [B].
- Follow the figures [1] to [8] to install the heater and towel rack. Figure [9] shows the installed heater with towel rack.
11 Operation
You can operate the heater in different modes that suit your needs.
Manual mode:
With the manual mode, you are in charge of setting room temperature and heating power. In manual mode you can also set countdown timers.
Full day anti-frost mode:
The anti-frost mode maintains the room temperature at 5 °C to prevent frost.
Custom program mode:
Custom programs divide every weekday into distinct programmable time periods of user-defined duration. For each period, you can set to operate the heater in comfort (default: 24 °C) or anti-frost (5 °C) working mode. Once you have programmed a custom program it is stored in memory and you can activate the program at any time.
11.1 Managing the power supply
The heater is equipped with a main switch to connect and disconnect the power supply.
Connecting the power supply
- Connect the mains cable to the mains supply.
- Flip the main switch to the position I.
 An audible sound is emitted. After 3 seconds, the heater enters the standby mode.
![]() The heater is ready for use.
The heater is ready for use.
Disconnecting the power supply
- Flip the main switch to the position 0.
- Disconnect the mains cable from the mains supply.
11.2 Switching the heater on and off
After the heater is connected to the mains supply you can switch the heater on and off via the touch panel.
Preconditions:![]() Main switch is in the position I.
Main switch is in the position I.
- Touch the power button ON/OFF to switch the heater on. The heater starts heating. The display shows the set temperature.
- Touch the power button ON/OFF to switch the heater off. The fan continues to run for 30 seconds to cool the internals.
11.3 Setting weekday and time
By setting the weekday and time, you will align the heater clock to the weekday and time settings of your location. This is important so that you can make use of the pre-set modes and custom programs.
Preconditions:![]() The heater is operating.
The heater is operating.
- Touch and hold the timer button TIMER for 3 seconds to enter the day and time setting mode. One of the weekday symbols [M], …, [S] flashes on the display.
- Use the menu buttons UP and DOWN to select the current weekday. Observe the corresponding weekday symbol on the display.
- Touch the timer button TIMER to save the setting. The hours flash on the display.
- Use the menu buttons UP and DOWN to select the hours of the current time.
- Touch the timer button TIMER to save the setting. The minutes flash on the display.
- Use the menu buttons UP and DOWN to select the minutes of the current time.
- Touch the timer button TIMER to save the setting. The display returns to normal operation.
11.4 Setting room temperature
The heater can maintain a room temperature between +5 to +35 °C with the support of two heating power settings (1000/2000 W). Set a temperature that suits your needs. If the set temperature is reached, the heater will stop heating. The display shows the temperature measured by the built-in temperature sensor and might deviate slightly from the actual room temperature.
Preconditions:![]() The heater is operating.
The heater is operating.
- Use the menu buttons UP and DOWN to set the desired room temperature. The setting will be saved automatically after 5 seconds from the last input and the display shows the current room temperature.
- Use the heating power button POWER to select a heating power.
![]() As soon as the set temperature is reached, the heater will stop heating.
As soon as the set temperature is reached, the heater will stop heating.
11.5 Manual mode
With the manual mode, you are in charge of setting room temperature and heating power. In manual mode you can also set countdown timers.
Preconditions:![]() The heater is operating.
The heater is operating.
- Repeatedly touch the mode selection button MODE until the symbol POWER shows on the display and the symbol PROG does NOT show on the display.
- Set temperature and heating power. For details, see Setting room temperature [
 33].
33].
![]() The heater operates in manual mode until you change the mode or switch the heater off.
The heater operates in manual mode until you change the mode or switch the heater off.
11.5.1 Setting countdown timers
Set a countdown timer to turn the heater off after the set time has elapsed.
Setting timers
Note:
You can only set hourly timers.
Preconditions:![]() The heater operates in manual mode.
The heater operates in manual mode.
- Touch the timer button TIMER to activate the timer mode. The symbol TIMER and the countdown time flash on the display.
- Use the menu buttons UP and DOWN to set the desired operating hours. The setting will be saved automatically after 5 seconds from the last input and the timer starts counting down.
![]() The symbol TIMER shows on the display until the countdown time has elapsed.
The symbol TIMER shows on the display until the countdown time has elapsed.![]() The heater switches off after the countdown time has elapsed.
The heater switches off after the countdown time has elapsed.
Cancelling timers
You can cancel an active timer at any time.
- Touch the timer button TIMER to cancel the timer mode.
11.6 Full day anti-frost mode
The anti-frost mode maintains the room temperature at 5 °C to prevent frost.
Preconditions:![]() The heater is operating.
The heater is operating.
- Repeatedly touch the mode selection button MODE until the symbol FROST shows on the display.
![]() The heater operates in anti-frost mode until you change the mode or switch the heater off.
The heater operates in anti-frost mode until you change the mode or switch the heater off.
11.7 Custom program mode
Custom programs divide every weekday into distinct programmable time periods of user-defined duration. For each period, you can set to operate the heater in comfort (default: 24 °C) or anti-frost (5 °C) working mode. Once you have programmed a custom program it is stored in memory and you can activate the program at any time.
You can create, preview, and update custom programs. For each weekday, you can program two (2x) periods.
11.7.1 Creating custom programs
To create a custom program, you will loop through each weekday and set the start and end times of each programmable period. You can only create one custom program.
Note:
For times outside your programmed time periods, the heater will operate in anti-frost working mode.
Preconditions:![]() The heater is operating.
The heater is operating.
- Repeatedly touch the mode selection button MODE until PROG shows on the display.
- Touch the program button PROG to enter the programming mode.
- Touch the menu button UP to enter the first programmable period. The display shows 1: and the symbol HOT flashes on the display.
- Use the menu buttons UP and DOWN to set the hours of the start time. Save with the button TIMER. Set the minutes of the start time and save again.
- Use the menu buttons UP and DOWN to set the hours of the end time. Save with the button TIMER. Set the minutes of the end time and save again. The display shows 2: and the symbol HOT flashes on the display.
- Continue programming the second programmable period.
- Continue programming the other weekdays. After all weekdays are programmed, the symbol HOT continues to flash for 2 minutes.
- Set temperature and heating power. For details, see Setting room temperature [ 33].
Note:
You can leave the custom programming mode any time by pressing the program button PROG.
11.7.2 Previewing custom programs
After programming a custom program, you can preview or review the program settings.
- Repeatedly touch the mode selection button MODE until PROG shows on the display.
- Touch the program button PROG to enter the programming mode.
- Repeatedly touch the timer button TIMER to cycle through the weekdays and preview the programmed periods.
- Touch the program button PROG to exit the programming mode.
11.7.3 Activating custom programs
You may be using the heater in different modes on different weekdays. Once you have programmed a custom program it is stored in memory and you can activate the program at any time.
Preconditions:![]() The heater is operating.
The heater is operating.
- Repeatedly touch the mode selection button MODE until PROG shows on the display.
![]() The heater operates in custom mode (custom program) until you change modes or switch the heater off.
The heater operates in custom mode (custom program) until you change modes or switch the heater off.
11.7.4 Updating custom programs
You can update a custom program without affecting existing settings.
- Repeatedly touch the mode selection button MODE until PROG shows on the display.
- Touch the program button PROG to enter the programming mode.
- Repeatedly touch the timer button TIMER to select the weekday you want to update.
- Touch the menu button UP to enter the first programmable period. The display shows 1: and the symbol HOT flashes on the display.
- Use the menu buttons UP and DOWN to set the hours of the start time. Save with the button TIMER. Set the minutes of the start time and save again.
- Use the menu buttons UP and DOWN to set the hours of the end time. Save with the button TIMER. Set the minutes of the end time and save again. The display shows 2: and the symbol HOT flashes on the display.
- Continue programming the second programmable period.
- Touch the program button PROG to exit the programming mode.
11.8 Sensing open windows
If the open window sensing mode is activated, the heater will sense open windows and stop heating. An open window is defined as a temperature drop of 5 °C or more over a period of 30 minutes.
11.8.1 Activating the window sensing mode
Preconditions:![]() The heater is operating.
The heater is operating.
- Touch the button WINDOW. The symbol WINDOW flashes on the display.
![]() If an open window is sensed, the heater stops heating.
If an open window is sensed, the heater stops heating.
11.8.2 Resetting the window sensing mode
To continue heating after an open window was sensed you need to reset the open window mode.
- Close the window.
- Touch the button WINDOW. The symbol WINDOW flashes on the display.
![]() You have reset the open window sensing mode. The mode is activated again.
You have reset the open window sensing mode. The mode is activated again.
11.8.3 Deactivating the window sensing mode
- Touch the button WINDOW. The symbol WINDOW disappears from the display.
![]() The heater will no longer sense open windows.
The heater will no longer sense open windows.
11.9 Using the towel rack
With the towel rack you can heat and dry towels.
Important:
When you use the towel rack, make sure the towels do not cover the heat outlet of the heater.
11.10 Overheat protection
If the heater becomes too hot, the overheat protection will turn the heater off. You can reset the heater to operate it again.
To reset the heater:
- Flip the main switch into the position 0.
- Let the heater cool down to room temperature.
- Remove any visible causes (example: a towel covering the heat outlet).
- Flip the main switch into the position 1.
- Switch the heater on.
![]() The heater is ready for operating again.
The heater is ready for operating again.
Important:
If the heater does not switch back on or the heater keeps on switching off, have the heater checked by a professional.
12 Cleaning and care
Important:
– Do not use aggressive cleaning agents, rubbing alcohol or other chemical solutions. They damage the housing and can cause the product to malfunction.
– Do not immerse the product in water.
12.1 Cleaning the housing
- Disconnect the product from the power supply.
- Let the product cool down to ambient temperature.
- Clean the product with a dry, fibre-free cloth.
12.2 Cleaning the air intake
Regularly clean the air intake for good performance.
- Disconnect the product from the power supply.
- Let the product cool down to ambient temperature.
- Remove dust from the air intake with a vacuum cleaner and a brush.
13 Disposal
 This symbol must appear on any electrical and electronic equipment placed on the EU market. This symbol indicates that this device should not be disposed of as unsorted municipal waste at the end of its service life.
Owners of WEEE (Waste from Electrical and Electronic Equipment) shall dispose of it separately from unsorted municipal waste. Spent batteries and accumulators, which are not enclosed by the WEEE, as well as lamps that can be removed from the WEEE in a non-destructive manner, must be removed by end users from the WEEE in a non-destructive manner before it is handed over to a collection point.
Distributors of electrical and electronic equipment are legally obliged to provide free take-back of waste. Conrad provides the following return options free of charge (more details on our website):![]() in our Conrad offices
in our Conrad offices![]() at the Conrad collection points
at the Conrad collection points![]() at the collection points of public waste management authorities or the collection points set up by manufacturers or distributors within the meaning of the ElektroG
at the collection points of public waste management authorities or the collection points set up by manufacturers or distributors within the meaning of the ElektroG
End users are responsible for deleting personal data from the WEEE to be disposed of.
It should be noted that different obligations about the return or recycling of WEEE may apply in countries outside of Germany.
14 Technical data
14.1 Power supply
Input voltage …………………………………. 230 – 240 V/AC
Input AC frequency ………………………. 50 Hz
14.2 Heating
Heat output ………………………………….. max. 2000 W
Temperature adjustment range …….. +5 to +35 °C
Room size ……………………………………. 15 – 25 m²
14.3 Environment
Operating temperature ………………… -20 to +40 °C
Operating humidity ……………………… 20 – 90 % RH (non-condensing)
Storage temperature …………………….. -20 to 40 °C
Storage humidity ………………………….. 20 – 90 % RH (non-condensing)
14.4 Others
Protection class …………………………….. Class II
Ingress protection …………………………. IP24
Weight (approx.) ……………………………. 2.5 kg (heater)
0.59 kg (towel rack)
Dimensions (W x H x D) (approx.) .. 31 x 38 x 13 cm (heater)
39 x 15 x 18 cm (towel rack)
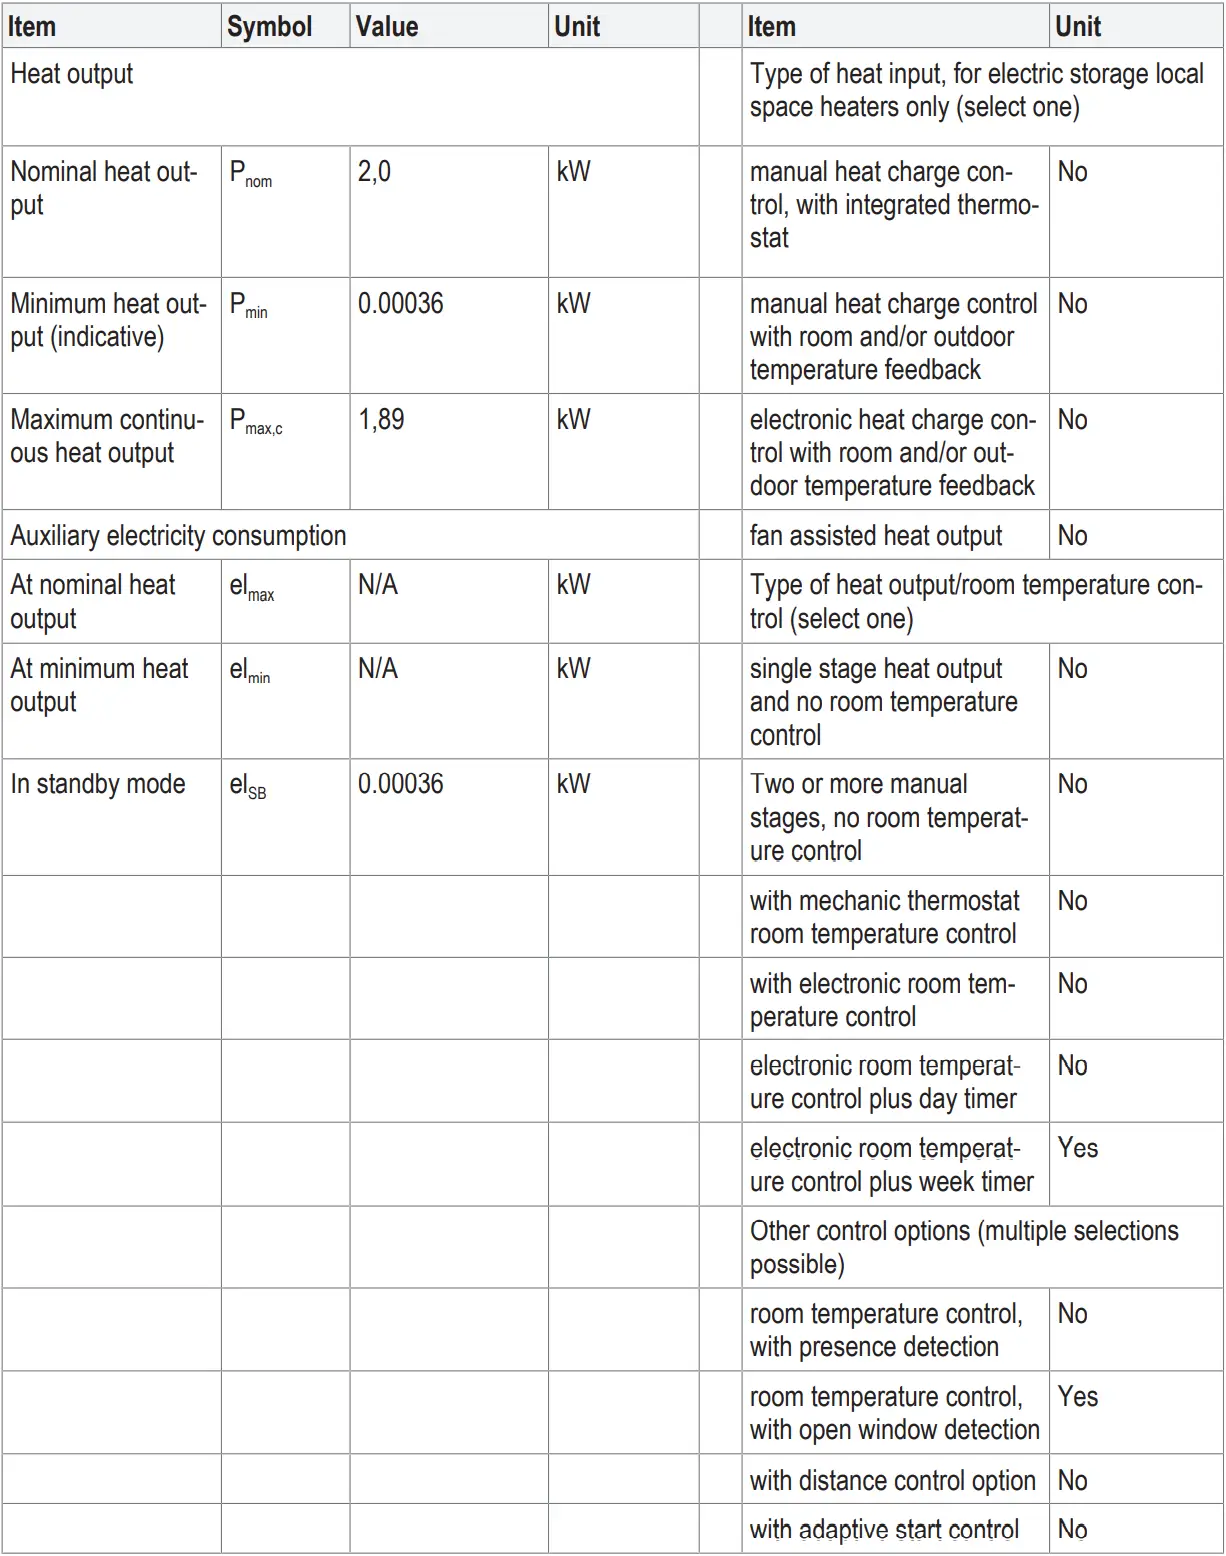
15 Information requirements for electric local space heaters
Model identifier(s): WH-FHsq-W002

This is a publication by Conrad Electronic SE, Klaus-Conrad-Str. 1, D-92240 Hirschau (www.conrad.com).
All rights including translation reserved. Reproduction by any method (e.g. photocopying, microfilming or the capture in electronic data processing systems) requires prior written approval from the editor. Reprinting, also in part, is prohibited. This publication reflects the technical status at the time of printing.
Copyright by Conrad Electronic SE *2525295_V3_0722_jh_mh_en 36028797534003979-2 I5/O3 en
References
 Conrad Electronic » Your sourcing platform
-
Conrad Electronic » Your Sourcing Platform
-
Conrad Electronic – Alle Teile des Erfolgs
-
Conrad Electronic » Your Sourcing Platform
-
Contact Us | Conrad.com
-
Document
-
Conrad Electronic Online Shop » Alle Teile des Erfolgs
-
Conrad Electronic » Your Sourcing Platform


