
TAKSTAR TAK55 High Quality Studio Grade Professional Recording Microphone User Manual

Foreword
Dear Customer,
Thank you for purchasing TAKSTAR TAK55 professional reording microphone. Pleaseread the user manual carefully before operation and keep it for reference in future. If you have any question or suggestion, please contact our local dealer.
Product introduction
TAK55 is a condenser microphone with dual gold plated diaphragm. It features highly accurate correction circuit and components to offer wide frequency response and dynamic range, pure original sound; LF attenuation, sensitivity attenuation and three polar patterns are desig11ed to meet the challenging requirement in professional recording. broadcasting station and PA profession.
Features
- Dual gold plated diaphragm capsule ensures accurate directivity and wide frequency response.
- Highly accurate correction circuit and components ensure pure original sound.
- Three polar patterns (uni-directional, bi-directional omni-directional) suit for different pickup applications.
- High SPL processing capability suits for different audio sources pickup.
- Low background noise meets the requirement of professional recording.
- Built-in attenuation switch effectively reduces LF noise.
- Sensitivity attenuation switch endures high SPL pickup.
- Provided with professional anti-vibration shock mount
- Professional windscreen effectively eliminates pop noise and wind noise.
- Al alloy case for convenient transportation and storing.
Application
- studio, broadcasting station, stage performance, video post-processing, personal recording, instrument recording
Application
- TAK55 microphone: 1 pc
- Aluminum case: l pc
- Shock mount: l pc
- User manual: 1 pc
- Windscreen: l pc
Specification

- Capsule: Cl>34mm dual gold plated large diaphragm capsule
- Polar Pattern: Uni-directional{Bi-dlirectional{Omni-dlirectional
- Frequency Response: 20Hz-20kHz
- Cardioid Directivity Sensitivity: -39dB±3dBV (OdB>-lV/Pa at lkHz)
- Sensitivity Attenuation: -lOdB
- LF Attenuation: 150Hz {6dB/Oct)
- Equivalent Noise Level: ,s;;2odBA (IEC 581-5)
- Peak SPL: 130dB (THD,s;; 1% at lkHz)
- Output Impedance: 1500±30% (at lkHz)
- Operating Voltage: 48V phantom power
- Unit Dimension: 157x55x38mm
- Net Weight: 372g
Function Instruction
1. Directivity adjusting function:
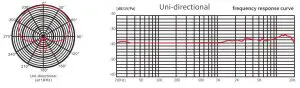
- Set the switch to ”
 “for uni-directional. The microphone picks up from the right front. At this time, it is effective to control feedback or reject ambient noise or isolate the sounds from multiple actors. It suits for single audio source recording and it is the frequently-used pickup way.
 - Set the switch to” 8 ” for bi-directional. The microphone picks up the equal
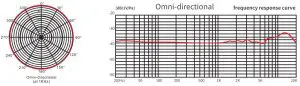
sensitivities from right front and right back. It can eliminate the sound from two sides. This directivity suits for bidirectional recording and is generally used for stereo pickup. - Set the switch to ” 0 ” for omni-directional. It picks up equal and even effect from 360 degree horizontally. One microphone can pick up multiple vocals and Instrument sounds. It eliminates proximity effect but keep the live ambient sound to suit for multiple audio source pickup.
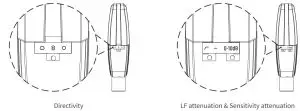
3. Sensitivity attenuation function:
- Set the switch to “0dB” position for no attenuation status.
- Set the switch to “-10dB” position for high SPL and wide dynamic pickup (pickup from bass drum and trumpet in symphony band) while attenuating -10dB sensitivity.
Installation
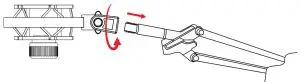
- Assemble the shock mount onto the microphone stand or the microphone stand boom via tightening the fixing nut. It is recommended to keep the shock mount upward and the nut downward to prevent the microphone drops.

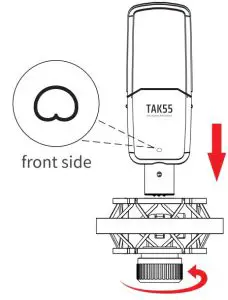
- The microphone is silkscreened the model number TAK55 and a” ” uni-directional mark, this side is the frontside, facing this side to the audio source and install to the shock mount, then tighten the fixing nut to hold the microphone.

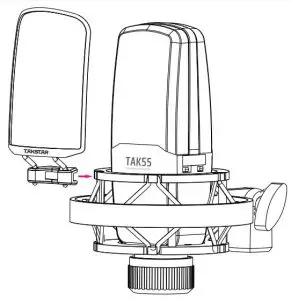
- Assemble the windscreen onto the shock mount via the clip.

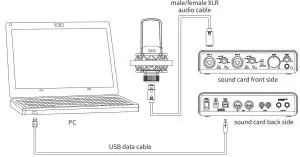
- Via the male/female XLR cable connect the microphone connector with microphone balanced input equipment (e.g. sound card, mixer, power amplifier, etc) which has 48V phantom power. If the equipment has no phantom power, buy an additional 48V phantom power for connection.
Note: the48V phantom power specification for this product: DC 48V±4V/2.8mA±20%. (1) The connecting way of audio equipment with 48V phantom power: (2)The connecting way of audio equipment without 48V phantom power:
- Fix the connection cable onto micruphonestand or the stand boom, and leave a cable loop to effectively isolate the vibration.
- Before operation, set the equipment volume control to minimum, then tum on the phantom power switch, increase the volume slowly to the propervolume to avoid too high sound pressure surges the speaker. Put the microphone away from the speaker as much as possible, and keep the capsule against the speaker to avoid howling.
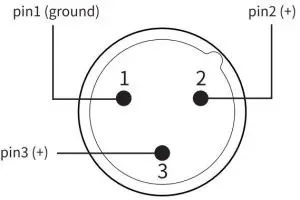
- The microphone output connector is a 3 pin XLR male connector.
Refer to the picture below:
 (2)The connecting way of audio equipment without 48V phantom power:
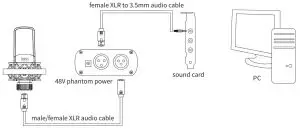
Cautions
To avoid electric shock, over temperature, catching fire, radiation, explosion, mechanical risk and hurt or property loss caused by Improper use, please read the following Items carefully before operation:
- Adjust the volume to proper level during operation. Do not operate at high volume level to avoid hearing loss.
- If abnormal phenomenon (smoke, abnormal smell) happens, please turn off the power switch and disconnect the power plug with power socket immediately, and send the product to local dealer for maintenance.
- The product and accessories should be put in dry and ventilated place rather than humid or dusty environment. Prevent the product from fire, rain, water,over-<X>lliding, throwing, vibrating, vent hole covered to avoid function destroyed.
- When the product needs to be installed on wall or ceiling, please fix it tightly to avoid dropping risk.
- Please abide by safety rules during operation. Do not use the product in the place prohibited by regulation or law to avoid accident.
- Do not disassemble or repair the product by yourself to avoid hurt. If you have question or need service, please contact the local dealer.
- Only use the phantom power right for this product. The applicable altitude and climate conditions of this product is subject to the phantom power. The meaning of the icons on phantom power is as below:


Scan for more product information
Designed & Manufactured by: Guangdong Takstar Electronic Co., Ltd.
Address: No.2 Fu Kang Yi Rd., Longxi Boluo Huizhou,Guangdong 516121 China
International Sales: Tel: +86 752 6383644 Email: [email protected] Website: www.takstar.com
Read More About This Manual & Download PDF:


