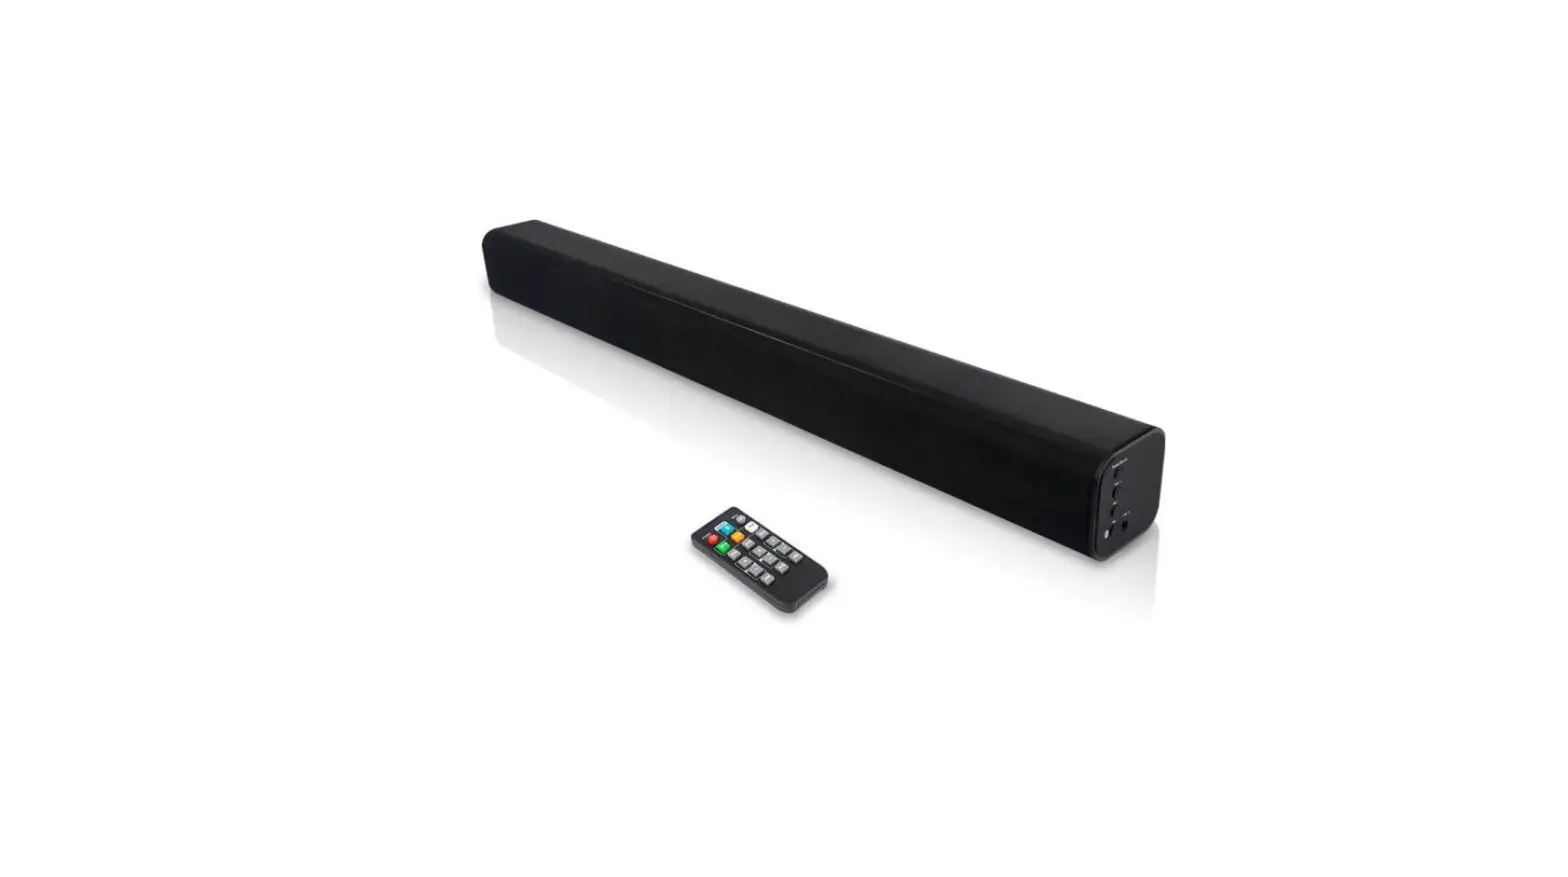

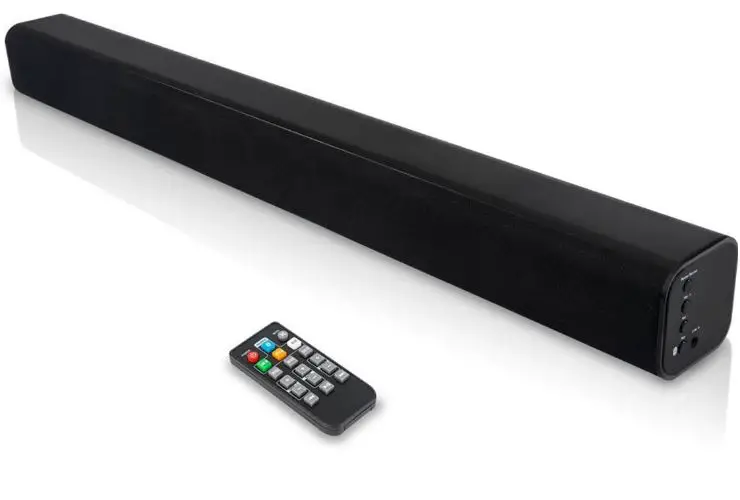
AMC-G309U Video Sound Bar
- Copying, reproducing or transmitting this file is not allowed if a license is not provided by our company. Unless copying this file is for the purpose of backup after purchasing this product.
- In order to keep improving the product. Our company reserves the right to make changes to product specifications without prior notice. The information in this file is subject to change without prior notice.
- To fully explain or describe how this product should be used, this manual may refer to the names of other products or companies without any intention of infringement.
- Disclaimer of Warranties: Our company is neither responsible for any possible technological, editorial errors or omissions, nor responsible for any incidental or related damages arising from providing this file, using, or operating this product.
SYMBOLS INSTRUCTION
| Symbol | Instructions |
| & Explanation | To represent the supplement and explanation of the text. |
| & Note | To indicate that the user is alerted to some important operation or to prevent the potential danger of injury and property damage. |
| Warning | To indicate a potential risk that, if not avoided, may result in injury accidents, equipment damage or business interruption. |
| Dangerous | To indicate a high potential risk that, if not avoided, may result in significant risk of death or injury. |
SAFETY NOTES
The following important notes must be followed carefully to run the camera and respective accessories in total safety. The camera and relative accessories are called video system in this section.
- Before installing the camera, please read this manual carefully. Please follow installation instructions indicated in this manual during installation. Please keep this manual for future use.
- Please put the power cable, video cable and control cable in safe place.
- Do not operate the camera beyond the specified temperature and humidity. Working temperature range of the camera is between 0°C ~ + 40°C. The ambient humidity range is 10%RH ~ 90%RH.
- During transporting, avoid violent shake or force to the camera.
ABOUT THE PRODUCT
Feature
- Designed with built-in all-in-one camera, microphone, and speaker;
- With Speaker Tracking Function and Auto Framing Tracking Function;
- 110° ultra-wide FOV with no distortion, full coverage of the whole meeting room;
- 4K Ultra HD video @30fps, brings super clear video experience;
- EPTZ realizes automatic viewfinder and intelligently selects all participants;
- Effective and accurate speaker detection and tracking function, fast and accurate close-up of speakers;
- Built-in high-sensitive omnidirectional microphone, up to 5 meters of sound pickup distance, supports ANS, AEC, AGC;
- USB 3.0, MJPEG/H.264/H.265;
- Supports UVC/UAC protocol;
- Configure mute and mute prompt functions;
- Supports Bluetooth and USB connection (can not work together);
- Exquisite remote control settings, easy to hold and control.
Application Scenarios 
COMPONENTS
Accessories
When you open the box, check all accessories according to the packing list.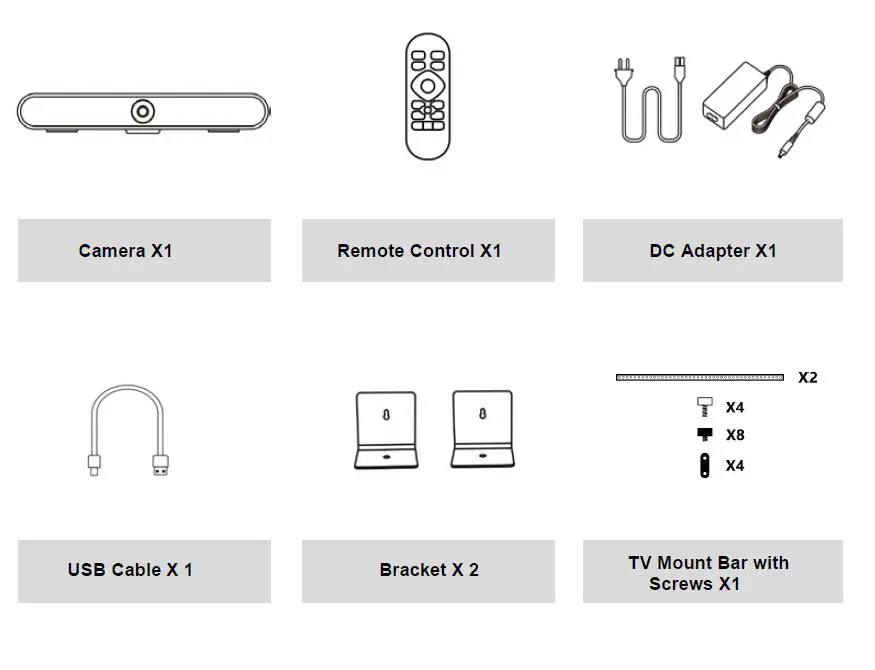
Main Parts & Interfaces
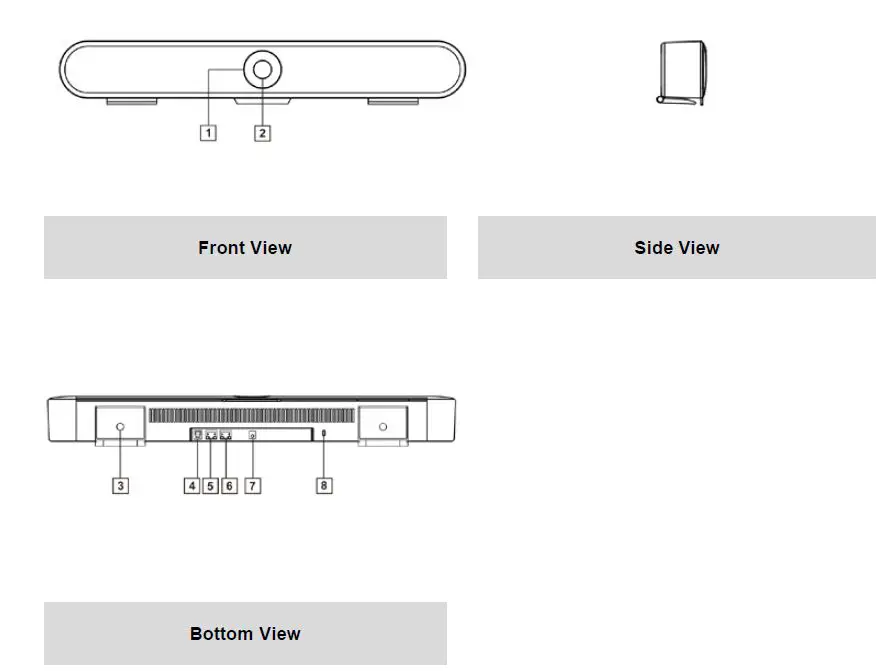
| No. | Interface/ Component | No. | Interface/ Component |
| 1 | LED Light | 5 | Ethernet |
| 2 | Camera Lens | 6 | EXT(connect with external microphone) |
| 3 | Bracket | 7 | Power(DC12V) |
| 4 | USB Type B | 8 | Service |
Remote & Control(Standard)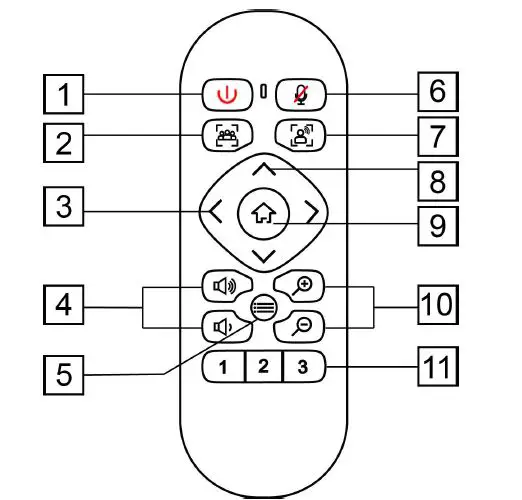
| No. | Name | Function |
| 1 | Privacy | Turn on / off privacy protection |
| 2 | Auto Framing | Turn on / off Auto framing |
| 3 | Pan | Ø In menu mode, set menu options Ø In non-menu mode, pan right / left |
| 4 | Volume | Increase / decrease volume |
| 5 | Menu | Open / close the OSD menu |
| 6 | Mute | Turn on / off the microphone sound |
| 7 | Speaker Tracking | Turn on / off the speaker tracking |
| 8 | Tilt | Ø In menu mode, set menu options Ø In non-menu mode, tilt up / down |
| 9 | HOME | Ø In menu mode, confirm to Enter Ø In non-menu mode, press to move camera to Home position Ø Long press Home button to switch between USB and Bluetooth audio |
| 10 | Zoom | Zoom in / out |
| 11 | Number | Ø Short press to CALL saved preset Ø Long press(2 seconds) to set preset |
Common Function
- EPTZ
The camera supports EPTZ control and 4x digital zoom. The EPTZ can be controlled via direction keys to adjust the image position. And the current image size can be adjusted via zoom button.
Note: the Pan / Tile button can not work under the max FOV. - Auto Framing
This product has auto framing function. Press the corresponding key and the camera screen can be intelligently scaled according to the number of people in the meeting scene, and centralize all participants. Press again to turn off the auto framing.
Note: the auto framing state will be ended by pressing PTZ buttons, Auto Framing button or call the saved presets. - Speaker Tracking
The all-in-one supports the Speaker Tracking function. Press the Speaker Tracking button to turn on / off the Speaker Tracking function. The all-in-one will give the person who is speaking a close-up view under the Speaker Tracking ON state. - Set/Call The Preset
Long press (2 seconds) the number buttons to set preset;
Short press the number buttons to CALL saved preset, and the camera will quickly go to the saved preset position. - Menu Function
After entering the menu, select the menu options via the direction keys. Press the HOME key to enter the options, adjust the options by using the pan button. Press the Menu key to return to the previous menu until the exit menu. - Built-in USB to network adapter
The all-in-one has a built-in USB network adapter. After connecting the network cable to the camera, the computer connect to the camera can access the network through the USB cable without connecting other network cables. Only one USB cable can realize the synchronous transmission of audio, video and network, eliminating the trouble of multiple wiring. - USB And Bluetooth Switching Instructions
After the camera is connected to the USB cable and powered on, the default is USB mode. Long press the HOME key for 2 seconds, the sound source of the horn is switched to Bluetooth, and the word “BT” is displayed on the screen for 5 seconds. Bluetooth is visible and automatically connected to the device (pairing connection is required for the first time).Bluetooth name: 4K Tracking Soundbar.
In Bluetooth mode, long press the HOME key for 2 seconds, the Bluetooth is disconnected, the screen displays the word “USB” for 5 seconds, the sound source of the speaker is switched to USB, and the Bluetooth is invisible and cannot be connected
Indicator
| Action | Indicator Status |
| Power on, video disable | Green |
| Power on, video enable | Blue |
| Mic Mute | Red |
| Adjust The Volume | Green, the range of light on varies with the volume |
INSTALLATION
Dimension Figure
Front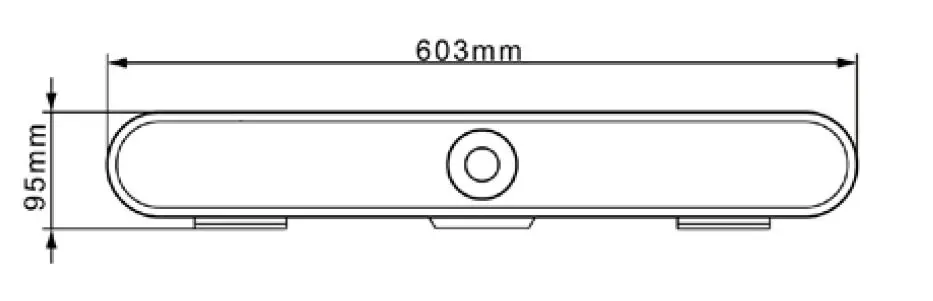
Bottom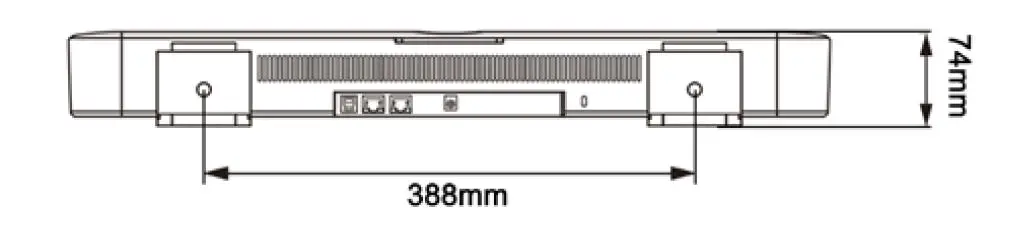
Installation
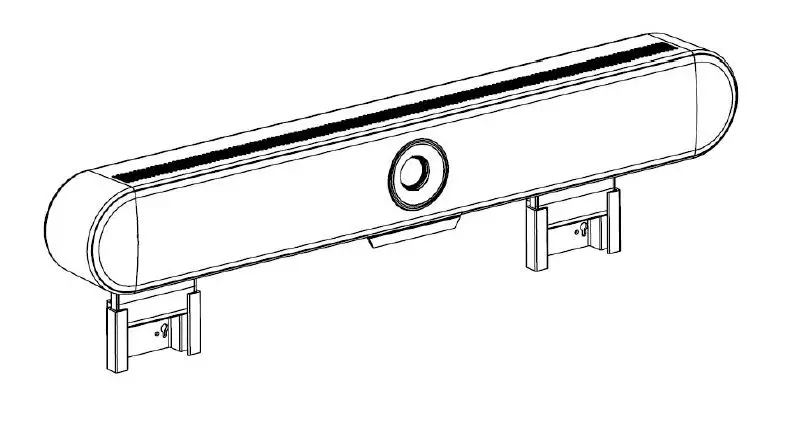
Bracket(Standard)
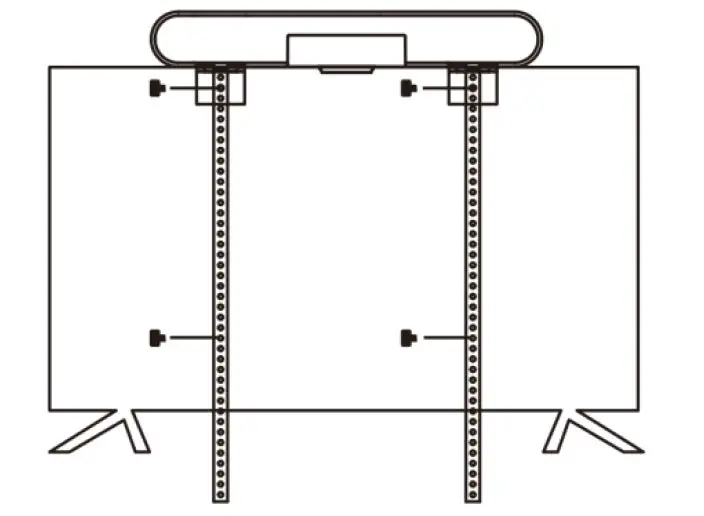
- If your TV doesn’t have mounting bracket, please fix the mount bars with screw holes on the back of your TV

- If your TV has a mounting bracket, please fix the mount bars with screw holes on themounting bracket.


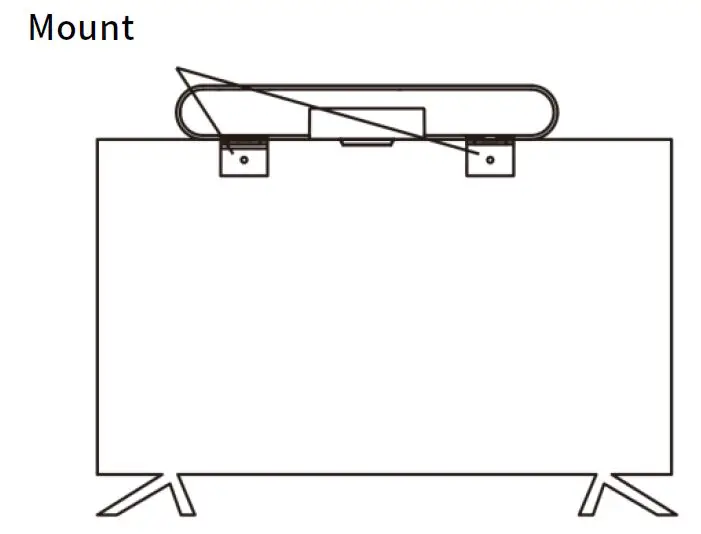
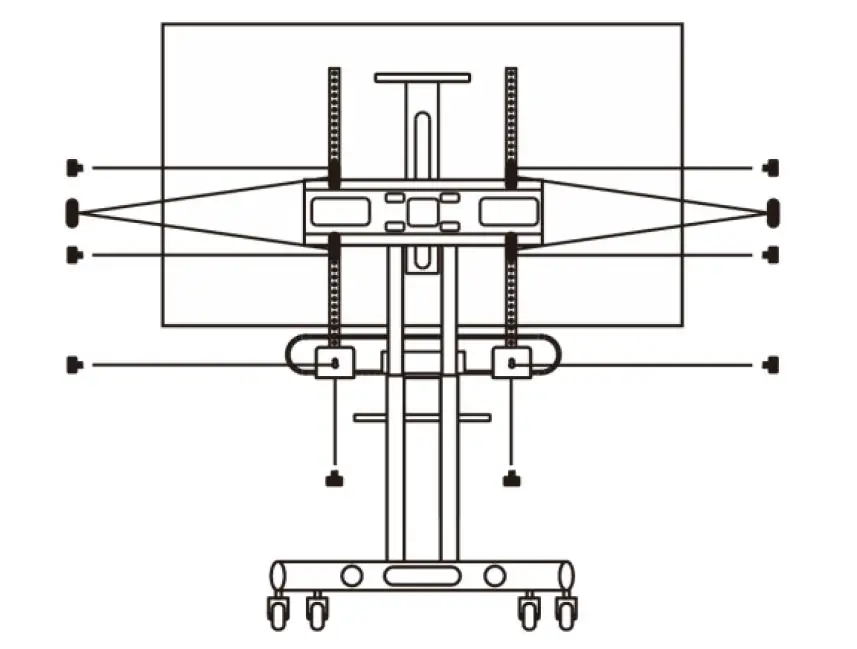
Wall-mount
- Referring to the aperture and position of the mounting hole, drill the corresponding holeat the mounting place and fix the bracket in the mounting place with screws.

- Insert the camera base into the groove of the bracket. To ensure the safety of the camera, make sure the camera is firmly attached to the bracket before you let it go

Connection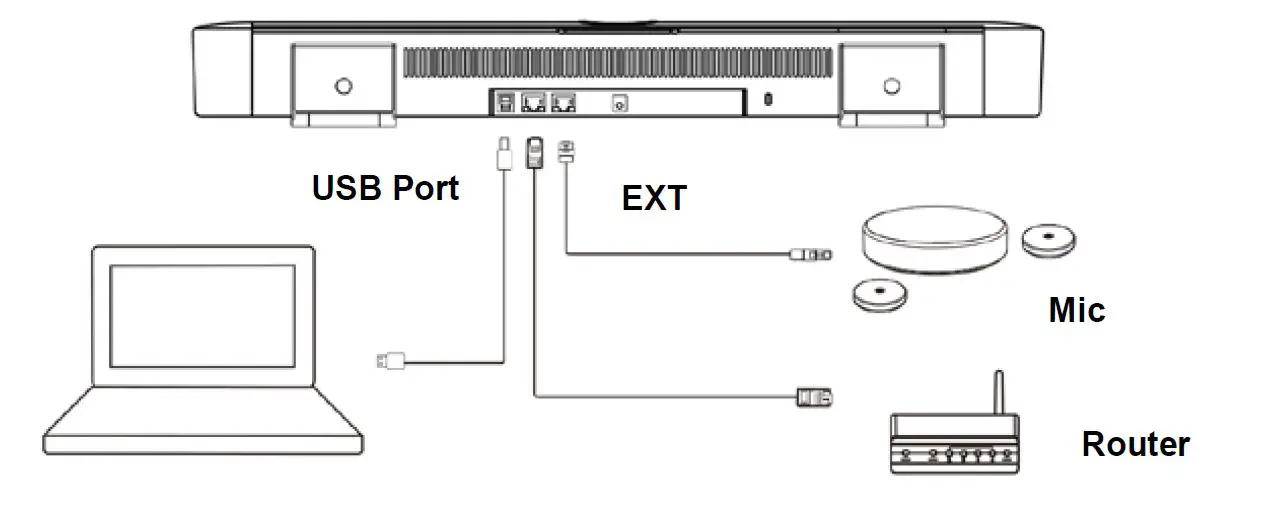
Bluetooth Connection: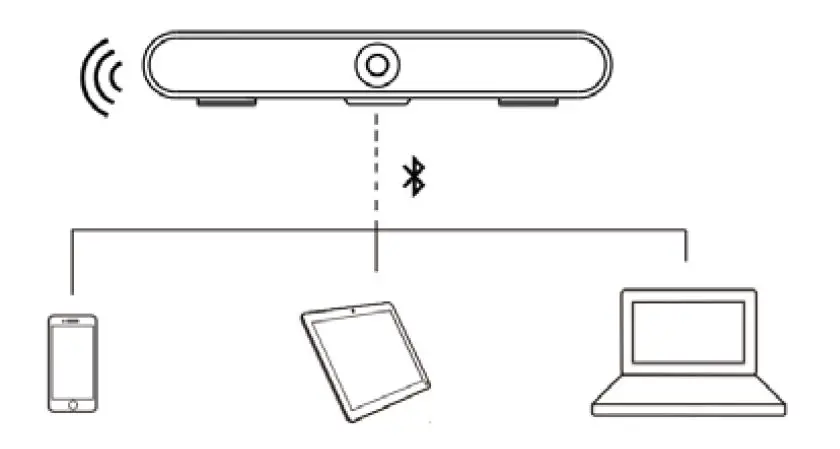
Menu Structure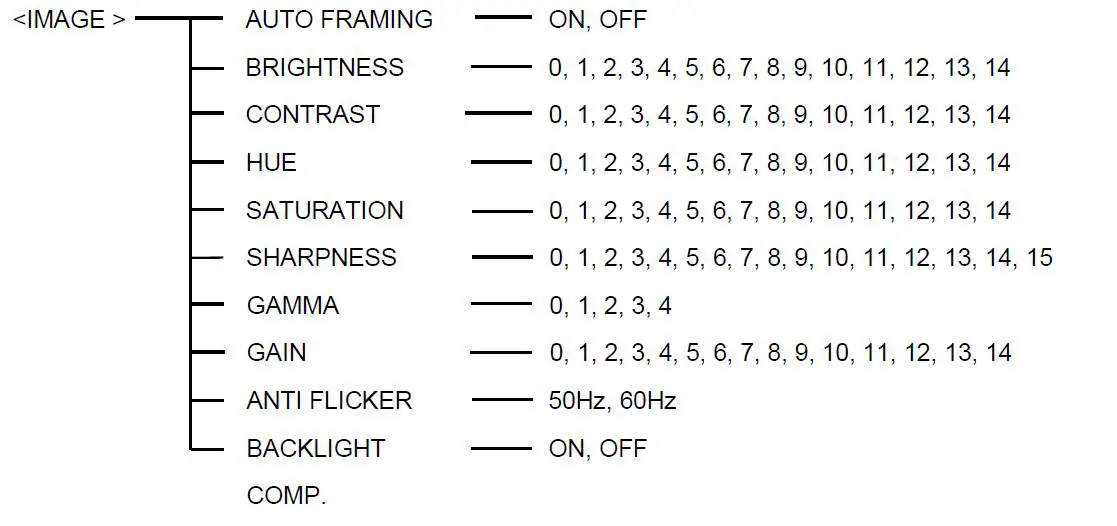
Menu function instructions
- Press the menu key on the remote control to enter the menu.
- Press the up / down / left / right buttons of the remote control to select the menu option.
When the font of the option is enlarged, it means that the option has been selected. Press thehome key to access the selected menu. - Use the left and right buttons of the remote control to change the setting value.
| Menu | Options | Function Descriptions |
| Brightness | Adjust the brightness of the image. | |
|
Contrast | Refers to the ratio between the brightest and darkest areas of the image. The greater the ratio, the more gradation levels from black to white will be, thus the richer the color performance, the clearer the image is. | |
| Hue | Adjust the overall color of the image. | |
|
Saturation | Refers to the purity and brightness of image color, the higher the saturation, the color effect is bright and beautiful. | |
|
Sharpness | Adjust the sharpness of image and image edge sharpness. The higher this number is, the more contrast the detail in the plane of the image will be, making it look clearer. | |
| Gamma | Adjust the permeability of the image. | |
| Gain | Adjust the light sensitivity. | |
|
Anti Flicker | Prevent image flickering when working in an env-ironment with refresh rates that are inconsistent with the power supply system. | |
|
Backlight Comp. | The camera lens can automatically compensate for the brightness of darker targets in the strong light background. | |
|
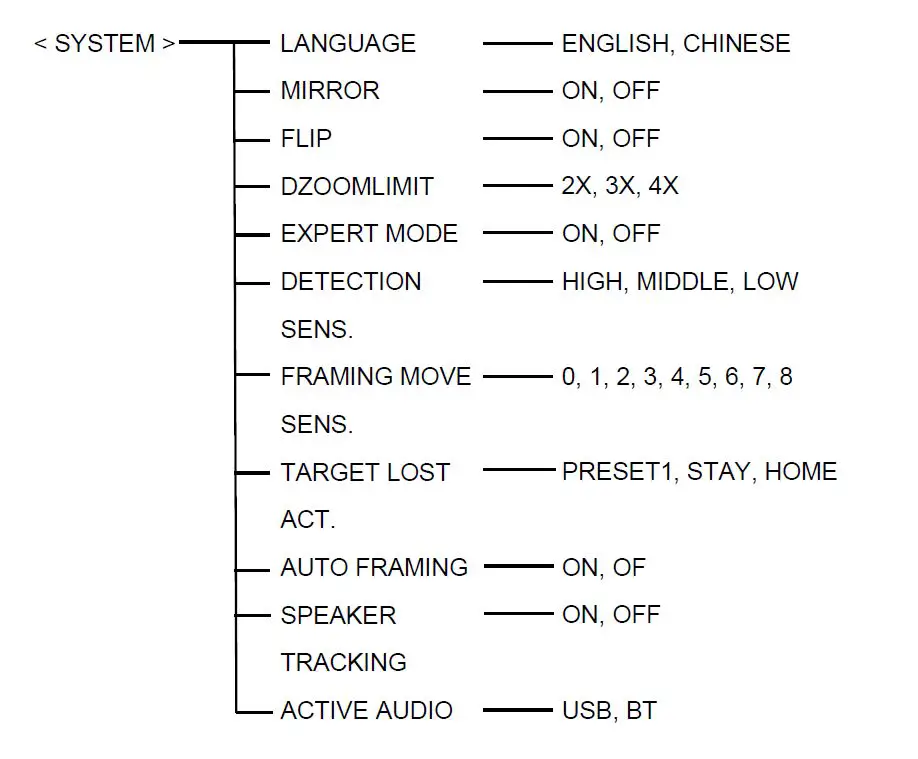
System | Language | Switch between English or Chinese. |
| Mirror | The camera image is turned 180 ° horizontally. | |
| Flip | The camera image flips 180 ° vertically. | |
| Dzoomlimit | Set the digital magnification. | |
| Expert Mode | Start this mode to display the OSD box of the selected target in the image. | |
| Detection Sens. | Adjust detection sensitivity of automatic frame. |
| Framing Move Sens. | Set automatic frame selection and screen movement sensitivity. | |
|
Target Lost Act. | The camera action when the auto framing target is lost. Keep the original position or take a panoramic view, or automatically adjust to the set preset point. | |
|
Auto Framing | When choosing “ON”, the camera will be zoom in / out to center all participants in the picture, according to the conference scene. | |
| Speaker Tracking | Turn on/off the sound source positioning function. | |
| Active Audio | Switch between USB or Bluetooth mode. | |
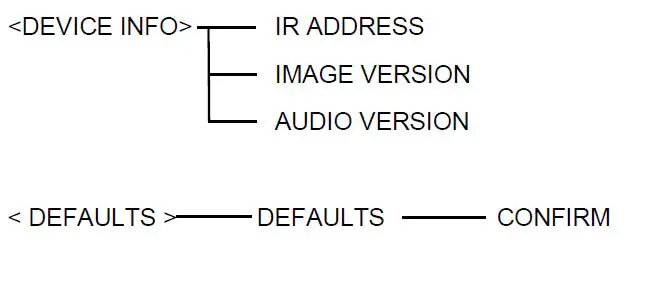
|
Device Info | IR Address | Address when the remote control controls the camera. |
| Image Version | The version number of the image software. | |
| Audio Version | The version number of the audio software. |
TECHNICAL DATA
| Camera | |
| Image Sensor | 1/2.8″ 4K CMOS, 8.46MP |
| IRIS | F2.2 |
| Focal Lens | f=2.1mm |
| Digital Zoom | 4X |
| Field of View | Horizontal: 110°, Vertical: 74° |
| EPTZ | Support |
| Min Focus Distance | 50cm |
| Min Illumination | 50Lux |
| Exposure | Auto, Manual, Shutter Priority |
| White Balance | Auto, Manual |
| Digital Noise Reduction | 2D, 3D |
| Image Flip | Flip, Mirror |
| Audio | |
| Built-in Mic | 4MIC array |
| Pick-up Distance | 5meter |
| Audio Process | ANS, AEC, AGC |
| Speaker | Support |
| Interface | |
|
USB | 1 channel USB3.0, Type B; 1. support UVC 1.0 2. support MJPEG/H.264/H.265 1) MJPEG: 4K@30fps, 1920×1080@30/25fps, 1280×720@30/25fps 2) H.264: 4K@20fps, 1920×1080@30/25fps, 1280×720@30/25fps 3) H.265: 4K@20fps, 1920×1080@30/25fps, 1280×720@30/25fps 3. support UAC |
| Network | 1 channel RJ-45, 10/100/1000M |
| Mic-Extension | Support |
| Bluetooth | Support |
| Remote-Control | Support |
| Power | DC 12V |
| General | |
| Consumption | < 8W |
| Working Temperature | 0°C ~ + 40°C |
| Storage Temperature | -20°C ~ +60°C |
| Working Humidity | 10%RH ~ 90%RH |
| Storage Humidity | 10%RH ~ 95%RH |
| Dimension (L×W×H) | 603mm×74mm×95mm |
| Net Weight | 1.66kg |
| Color | Black |
After-sales service
Dear users, in order to ensure that you fully enjoy the quality service, please carefully read the following product and service charter.
The company provides limited warranty and lifetime maintenance services
- The limited warranty period is 12 months from the date of shipment. During the limited warrantyperiod, you will enjoy the free service of the product, which will be sent by the user or sent to thecompany for repair (improper use, man-made or irresistible of the failure, does not belong to thewarranty).
- More than 12 months of the limited warranty period, the product failure to implement paidmaintenance services.
Maintenance response time
- The user will send the product to the company and receive a 24-hour response service.
- Users back the product to my company before, please contact with the related person of our company in advance, and then send the product back to my company. Otherwise, there is no maintenance of the situation, the user is responsible for their own.
This user manual is only for reference. It is subject to change. Please ask for the latest version from your supplier.
CA/YF- AMCG309UV2-ZD-011
Y06020711010


