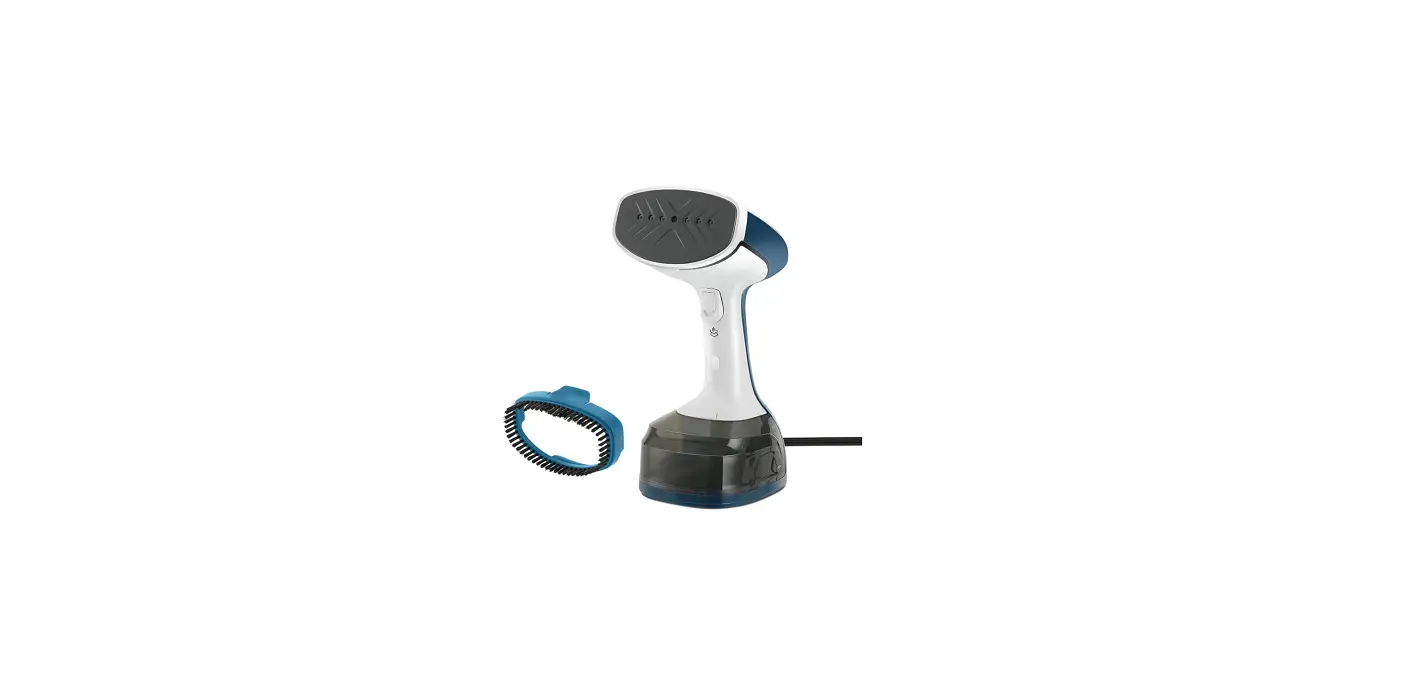
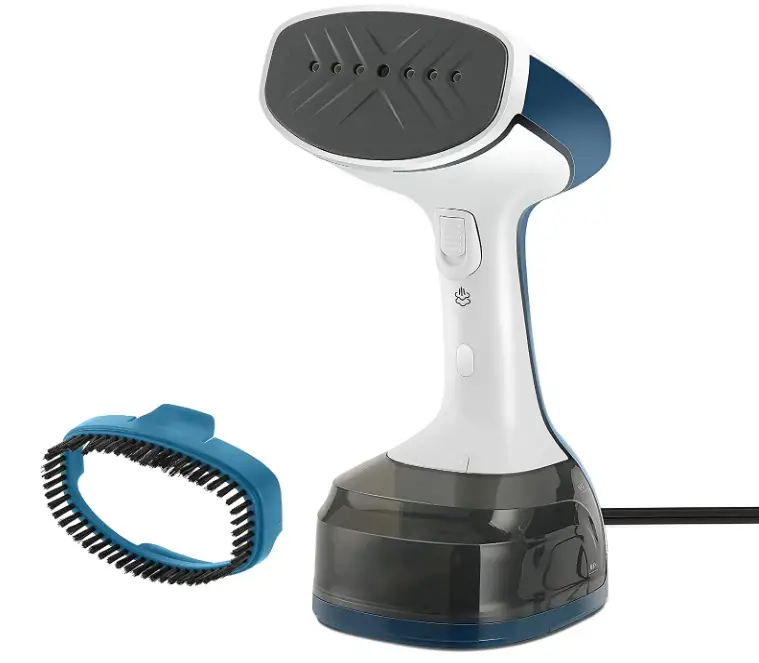
Sunbeam GCSBHS-100 1200W Steam Burst Handheld Steamer
IMPORTANT SAFEGUARDS
When using electrical appliances, basic safety precautions should always be followed including the following:
READ ALL INSTRUCTIONS BEFORE USE
- Use appliance only for its intended use.
- To reduce the risk of electric shock, do not immerse the appliance in water or other liquids.
- Always turn the appliance to “Off” before plugging or unplugging the appliance from the electrical outlet. Never yank cord to disconnect from outlet; instead, grasp plug and pull to disconnect.
- Do not allow cord to touch hot surfaces. Let appliance cool completely before putting away. Loop cord loosely around appliance when storing.
- Always disconnect appliance from electrical outlet when filling with water or emptying, and when not in use.
- Do not operate appliance with a damaged cord, or if the appliance has been dropped or damaged. To reduce the risk of electric shock, do not disassemble or attempt to repair the appliance, take it to a qualified service center for examination and repair. Incorrect reassembly or repair could cause a risk of fire, electric shock, or injury to persons when the appliance is used.
- Close supervision is necessary for any appliance being used by or near children. Do not leave appliance unattended while connected.
- Burns could occur from touching hot metal parts, hot water, or steam. Use care when you turn a steam appliance upside down – there may be hot water in the reservoir.
- To reduce the risk of contact with hot water emitting from steam vents, check appliance before each use by holding it away from body and operating steam button.
- To reduce the likelihood of circuit overload, do not operate another high wattage appliance on the same circuit.
- Never steam clothes while someone is wearing.
- If an extension cord is absolutely necessary, a 15 ampere rated cord should be used. Cords rated for less amperage may overheat. Care should be taken to arrange the cord so that the cord cannot be pulled or tripped over.
- When filling the water tank, watch for water that can drip onto the floor and cause you to slip and fall.
- Care should be taken to arrange the cord so that it cannot be pulled or tripped over. Always make sure you can move freely without getting tangled with the cord.
- Appliance may cause personal injury or be damaged if dropped.
- The use of attachments not recommended or sold by the appliance manufacturer may cause injuries or void your warranty.
- To avoid personal injury and damage to the appliance, only add water to the water tank. NEVER add cleaning solutions, perfumes, oils or any other chemical additives.
- To reduce the risk of electrical shock, this appliance has a polarized plug (one blade is wider than the other). This plug fits a polarized outlet only one way; if the plug does not fit fully into the outlet, reverse the plug. If it still does not fit, contact a qualified electrician. Do not attempt to defeat this safety feature.
Thank you for purchasing the Sunbeam® Power Steam Fabric Steamer. With powerful continuous steam technology and easy-to-use accessories, this Steamer will bring out the best in garments, linens, drapes and more–quickly and efficiently! .
BEFORE FIRST USE
- Unpack your Steamer; remove and peel off any labels adhered to the unit.
- Remove and save instruction manual.
- Wipe outside of the unit with a damp cloth or sponge to remove any dust. Dry thoroughly.
- Keep unit on a flat, leveled surface.
- When using your Steamer for the first time, you may notice a small amount of smoke and a slight odor. This is normal when heating the appliance for the first time and there is no reason for concern.
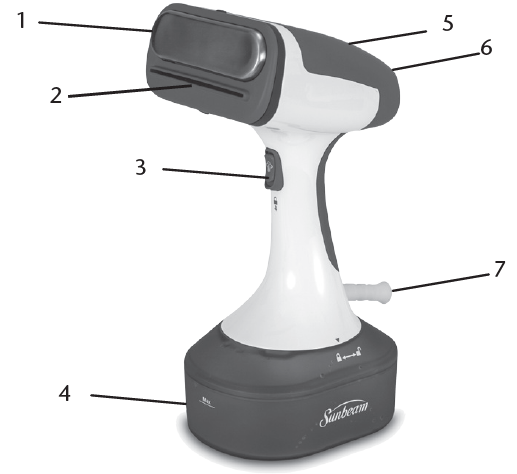
LEARNING ABOUT YOUR SUNBEAM® POWER STEAM FABRIC STEAMER
- Heated press bar
- Steam exit
- Steam Trigger, with locking mechanism
- Removable water tank with water inlet tube
- Red/green power indicator light
- Off, Low/High slide switch
- 10-ft. cord (12-ft. cord on GCSBHS-100)
- Steam Handle
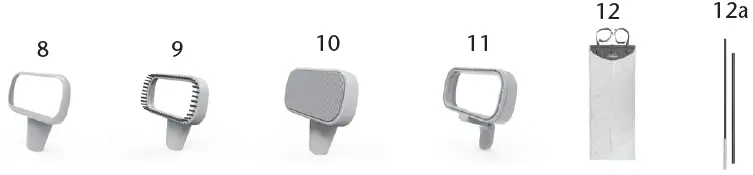
- Fabric brush
- Lint pad/steam diffuser
- Creaser (available on Model GCSBHS-100)*
- Over the door press pad (available on Model GCSBHS-100)*
Support rods
*For more information about this product and its accessories, please visit sunbeam.com
Accessories Attachments
ABOUT YOUR FEATURES AND ACCESSORIES
FEATURES
- Heated press bar – Works like an iron soleplate to press wrinkles out.
- Wide steam exit – Provides wide coverage of steam for your garments and fabrics.
- Steam trigger, with locking mechanism –Integrated switch, gives you the option to steam on demand or set the switch in the lock- down position for up to 15 minutes of continuous steam.
- Removable water tank with water inlet tube – Easily twists off for quick refills. A water inlet tube inside the water transmits the water from the tank to steamer head. A loud vibrating noise indicates that the water is low in the water tank and time to refill.
- Red power indicator light – Lights up when unit is plugged in to an electrical outlet and set to High or Low setting.
- Green ready indicator light – Lights up to indicate the unit is ready for use.
- Off & Low/High slide switch – Turns unit off and provides two steam settings for use on a variety of fabrics.
- 10-ft cord (12-ft cord on Model GCSBHS-100) – Gives you the freedom to move around without getting in the way.
ACCESSORIES
- Steam Handle – Lets all the hot steam get the best results for you while you comfortably hold the steamer.
- Fabric Brush – Use for general steaming to loosen the fibers of your thick and heavy fabrics for better steam penetration.
- Lint Brush & Steam Diffuser – Use to pick up lint, pet hair, dust and more. The cushion also helps diffuse steam for a smooth steaming to protect your delicate garments.
- Creaser – Use to get iron-like creases on your shirts and pants.
- Over the Door Press Pad – Quick to set up, serves as a vertical ironing board to press out tough wrinkles, allowing you to steam right on the hanger and skip the ironing board!


OPERATING INSTRUCTIONS
FILLING WATER TANK
Warning: To avoid personal injury and damage to the unit, only add water to the water tank. NEVER add cleaning solutions, perfumes, oils or any other chemical additives.
Note: Your Steamer is designed to be used with tap water. However, if you have hard water, we recommend using distilled water for better results.
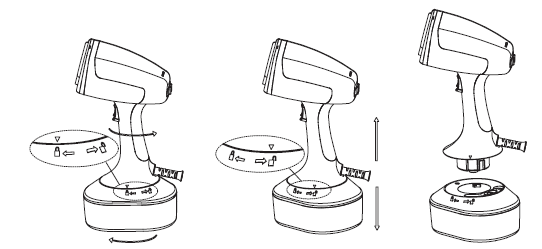
- Place Steamer on a flat surface.
- Hold the water tank with one hand while turning the steamer handle counterclockwise with other hand until the arrow on the handle reaches the unlock button on the water tank. Lift the handle off the water tank. Set the Steamer aside (Figure 1).

- Take the water tank to a sink. Pull the rubberized water-fill cover to open and pour tap water from the faucet into the water-fill opening until it reaches the Max water level in water tank (Figure 2). If water spills outside of the tank, or within the center water tank cavity, wipe it dry with a paper towel or cloth.

Warning: When filling the water tank, watch for water that can drip onto the floor and cause you to slip and fall.
Tip: It is not necessary to have a full tank of water for the Steamer to generate steam. For best results, just make sure the water tank is at least half full. - Close the water-fill cover, insert the handle into the water tank and turn clockwise until the arrow on the handle aligns with the lock symbol ( ) on the tank. Pull on the handle to ensure it is fully locked in position.
Note: If you need to add water while steaming, unplug the steamer, wait until it cools and follow above steps. If a loud vibrating noise is heard, then the water level is low and needs to be refilled.
ATTACHING AND REMOVING ACCESSORIES
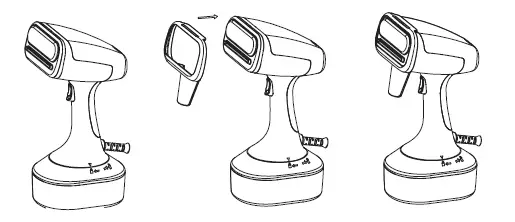
- To attach: Grasp both sides of the accessory and insert the heated press bar opening at the top of the accessory, behind the small tab above the heated press bar then gently press accessory onto steamer head until it snaps into place.
- To remove: Grip accessory handle and gently pull toward you to separate from the steam head (Figure 3).

USING YOUR STEAMER VERTICALLY
You can use your Steamer in the vertical position to press with steam hanging garments and drapes.
Note: If your model incudes the Over the Door Press Pad, follow the instructions under SETTING UP AND USING YOUR OVER THE DOOR PRESS PAD.
Caution: Heated press bar gets hot. Do not touch!
- With the water tank filled, attach desired accessory to use on your garment (refer to ATTACHING AND REMOVING ACCESSORIES).
- Hang your garment to be steamed on a clean, rust-free hanger.
- Plug unit into a standard electrical outlet.
Warning: Care should be taken to arrange the cord so that it cannot be pulled or tripped over. Always make sure you can move freely without getting tangled with the cord. - Slide the switch to Low or High. The red power indicator light illuminates and will cycle on and off as the temperature is maintained, and in just approximately 45 seconds, the green ready light will also illuminate. The green light may cycle off, and the pump will stop if the temperature is too low to generate steam.
Caution: Burns could occur from touching hot metal parts, hot water, or steam. Use care when you turn a steam appliance upside down – there may be hot water in the reservoir. - You are now ready to start steaming!
- Hold your Steamer by the handle in vertical position with the head pointing toward the fabric and away from you and your body. Warning: Steam is hot. Always point steamer exit away from yourself, other persons, pets, plants and walls. Never steam clothes while they are being worn.
- With your free hand, pull the fabric tight and press the trigger switch as you move the Steamer over the fabric.
Tip: If using the Creaser accessory, press the lever to open it and just run the edge of your fabric through it to create an iron-like crease. - You can use the trigger two ways:
- Press the switch to generate steam and release it to pause the steam. OR
- To get continuous steam for up to 15 minutes, you can press the trigger switch and move it down to the lock down position.
- Touch the fabric lightly with the heated press bar, moving it in a downward motion, beginning at the top of the garment and moving downward. Caution: The heated press bar gets hot, do not touch.
- Repeat this step until fabric is wrinkle free.
Tip: For more difficult wrinkles, try steaming from the underside of the fabric. - When finished, move trigger switch up to release it from the lock down position and slide switch to Off.
- Place Steamer on a flat surface and unplug from electrical outlet.
- Wait until Steamer has cooled and empty water tank.
Note: Always unplug the Steamer when not in use.
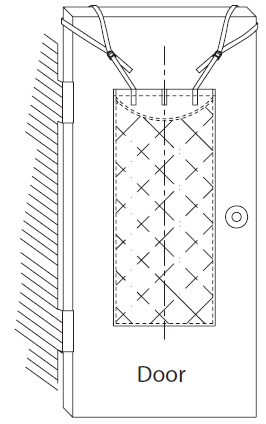
SETTING UP AND USING THE DOOR PRESS PAD
Setting Up
- Verify that you have all the parts necessary for the setup (see illustration under LEARNING ABOUT YOUR STEAMER).
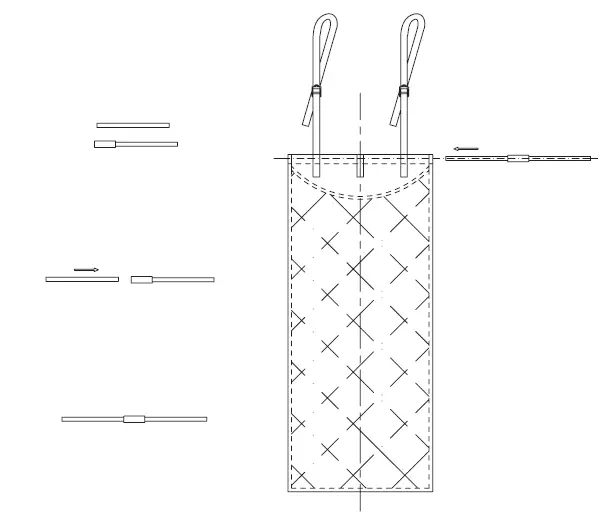
- Attach the 2 support rods together then insert the combined rod into the top opening of the press pad (Figure 4).

- With the door completely open, position one strap loop over each corner of any door, making sure the white terry cloth side with the Sunbeam logo is facing toward you.
- Loop each strap around each corner on the door (Figure 5).
 Tip: You can pull on the straps through the fasteners to adjust their lengths to fit the door.
Notice: Steam can get through and around the press pad. Do not use on doors that are sensitive to heat or moisture. - Once the strap loops fit and the press pad is at a comfortable height, gently pull down on it to ensure it is secure. Close the door completely to help keep the press pad secured in place for pressing.
 Tip: You can pull on the straps through the fasteners to adjust their lengths to fit the door.
USING YOUR PRESS PAD
- If the press pad is set up, hang your garment to be steamed on a clean, rust-free hanger and insert the hanger in the center loop at the top of the press pad. If it is not set up, refer to the instructions in Setting Up section, above. Use any of the two side loops on the press pad to hang your clothes when steaming sleeves.
- Follow steps 1-13 under STEAMING VERTICALLY.
STEAMING HORIZONTALLY
You can also use your Steamer as an iron to refresh sheets, pillows, mattress, sofas and more.
- After the water tank is filled, make sure there is no residual water inside the center water tank cavity. Attach the water tank to the steamer. Attach the desired accessory to the steamer and follow steps 3 and 4 under USING YOUR STEAMER VERTICALLY.
- Once the Steamer has reached set temperature, press trigger switch and in a horizontal position, move the steamer continuously over the fabric being steamed.
Caution: The heated press bar gets hot, do not touch. - Once you finish, slide switch to Off and unplug unit. Wait for unit to cool
STEAMING TIPS
- Improper use of the Steamer can cause property damage due to the steam. Always read the instructions in this manual before using your Steamer.
- Do not operate the Steamer with an empty water tank. To add water during operation, turn steamer off, wait for it to cool down then remove water tank and refill.
- Always read the fabric care labels to help determine fabric type to be steamed. If unsure of fabric’s fiber, test a small hidden area, such as an inside seam or hem, before steaming.
- For more difficult wrinkles, try steaming from the underside of the fabric.
- Use caution when hanging clothing on the Over the Door Press Pad. Too much weight or pulling on the garment may cause the press pad to slip from the door and fall down.
- When steaming, touching fabric lightly with the steam nozzle can help in wrinkle removal. It is important to make contact with the garment and/or fabric.
- Heavier fabrics require more steam.
- Only use water in the unit. Do not add cleaning solutions, scented perfumes, oils or any other chemicals to the water that can cause damage to the appliance.
- Do not use steam against wall or doors.
- When hanging garment on a door while steaming, be careful not to damage the door with steam. Use the Over the Door Press Pad to protect your door.
- After use, empty water tank by turning it upside down to ensure all water empties out and avoid leaks.
- When steaming, move the steamer continuously over the item being pressed. Do not keep steamer over an area for any period of time to avoid
CARE AND CLEANING
CLEANING
- Make sure unit is off, unplugged and allow it to cool completely before cleaning.
- If there is water in the water tank, remove the tank and turn it upside down to ensure all the water empties out.
- Wipe exterior surfaces with a soft, damp cloth. Dry thoroughly. Warning: Never immerse steamer, cord or plug in water or any other liquid.
- Do not use abrasive cleaners or scouring pads that can scratch the surface.
- Do not place in the dishwasher.
- Remove press pad from the door to disassemble:
- Grip one end of the support rods and slide out.
- Place press pad in the washer and wash in cold water and laundry detergent then air dry.
- Once dry, reassemble the press pad as instructed under SETTING UP AND USING YOUR OVER THE DOOR PRESS PAD.
CLEANING WITH VINEGAR AND WATER
It is recommended to clean your Steamer every two months to reduce mineral buildup that can affect the performance of your unit.
- Turn off the unit and let it cool completely.
- Remove water tank and make sure it is empty.
- Fill water tank with a solution of 50% white vinegar and 50% water up to the max level.
- Plug unit into electrical outlet and press trigger to run a full steaming cycle.
- Once steaming is finished, fill with clean water and repeat process until the vinegar odor is eliminated.
STORAGE
Fold the cord in loops and store the unit in upright position, in a clean dry place with a flat, sturdy surface. Make sure the water tank is empty. If not, remove it and turn it upside down to ensure all the water empties out and avoid leaks.
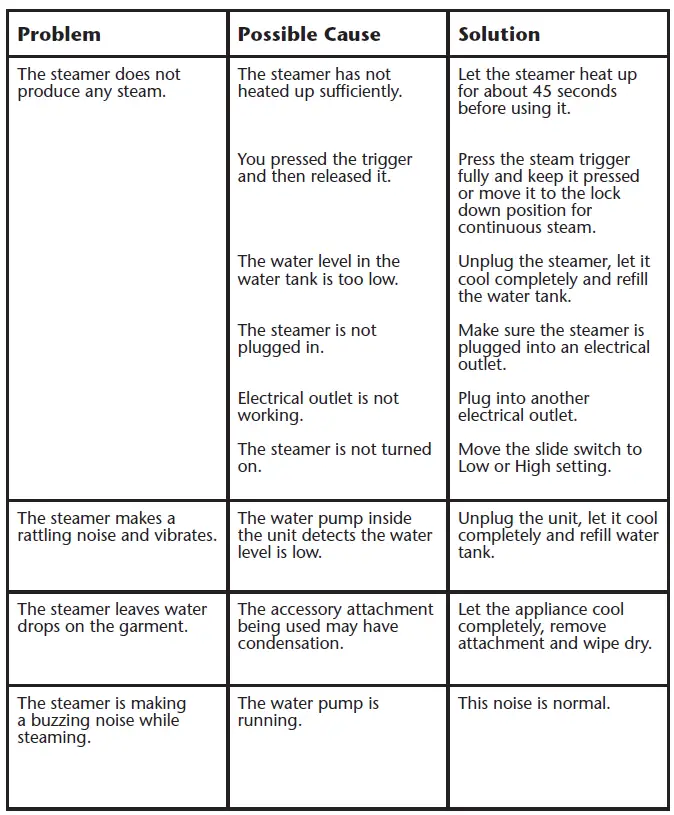
TROUBLESHOOTING
3-Year Limited Warranty
Sunbeam Products, Inc. doing business as Jarden Consumer Solutions or if in Canada, Sunbeam Corporation (Canada) Limited doing business as Jarden Consumer Solutions (collectively “JCS”) warrants that for a period of 3 years from the date of purchase, this product will be free from defects in material and workmanship. JCS, at its option, will repair or replace this product or any component of the product found to be defective during the warranty period. Replacement will be made with a new or remanufactured product or component. If the product is no longer available, replacement may be made with a similar product of equal or greater value. This is your exclusive warranty. Do NOT attempt to repair or adjust any electrical or mechanical functions on this product. Doing so will void this warranty.
This warranty is valid for the original retail purchaser from the date of initial retail purchase and is not transferable. Keep the original sales receipt. Proof of purchase is required to obtain warranty performance. JCS dealers, service centers, or retail stores selling JCS products do not have the right to alter, modify or any way change the terms and conditions of this warranty.
This warranty does not cover normal wear of parts or damage resulting from any of the following: negligent use or misuse of the product, use on improper voltage or current, use contrary to the operating instructions, disassembly, repair or alteration by anyone other than JCS or an authorized JCS service center. Further, the warranty does not cover: Acts of God, such as fire, flood, hurricanes and tornadoes.
What are the limits on JCS’s Liability?
JCS shall not be liable for any incidental or consequential damages caused by the breach of any express, implied or statutory warranty or condition.
Except to the extent prohibited by applicable law, any implied warranty or condition of merchantability or fitness for a particular purpose is limited in duration to the duration of the above warranty.
JCS disclaims all other warranties, conditions or representations, express, implied, statutory or otherwise.
JCS shall not be liable for any damages of any kind resulting from the purchase, use or misuse of, or inability to use the product including incidental, special, consequential or similar damages or loss of profits, or for any breach of contract, fundamental or otherwise, or for any claim brought against purchaser by any other party.
Some provinces, states or jurisdictions do not allow the exclusion or limitation of incidental or consequential damages or limitations on how long an implied warranty lasts, so the above limitations or exclusion may not apply to you.
This warranty gives you specific legal rights, and you may also have other rights that vary from province to province, state to state or jurisdiction to jurisdiction.
How to Obtain Warranty Service
In the U.S.A
If you have any question regarding this warranty or would like to obtain warranty service, please call 1-800-458-8407 and a convenient service center address will be provided to you.
In Canada
If you have any question regarding this warranty or would like to obtain warranty service, please call 1-800-667-8623 and a convenient service center address will be provided to you.
In the U.S.A., this warranty is offered by Sunbeam Products, Inc. doing business as Jarden Consumer Solutions located in Boca Raton, Florida 33431. In Canada, this warranty is offered by Sunbeam Corporation (Canada) Limited doing business as Jarden Consumer Solutions, located at 20 B Hereford Street, Brampton, Ontario L6Y 0M1. If you have any other problem or claim in connection with this product, please write our Consumer Service Department.
PLEASE DO NOT RETURN THIS PRODUCT TO ANY OF THESE ADDRESSES OR TO THE PLACE OF PURCHASE
SUPPORT
For product questions: Sunbeam Consumer Service
Canada: 1-800-667-8623
USA: 1-800-458-8407 www.sunbeam.com
© 2015 Sunbeam Products, Inc. doing business as Jarden Consumer Solutions. All rights reserved. Distributed by Sunbeam Products, Inc. doing business as Jarden Consumer Solutions, Boca Raton, Florida 33431
FAQs
What should you do every time you use a Sunbeam GCSBHS-100 steamer?
Ensure that the tank’s water level is just perfect. Learn what materials you can steam. Examine the fabric care labels for recommendations if you are unclear about a material. Carefully handle sensitive materials. Allow your steamed clothing time to dry after it is de-wrinkled.
What kind of water do you use in a Sunbeam GCSBHS-100 handheld steamer?
Overall, one of the greatest water kinds to utilize in garment steamers is distilled water. In fact, because it improves the efficiency and durability of the steamer, you’ll discover that many textile steamers on the market expressly recommend using this type of water.
How often should you empty the water from the Sunbeam GCSBHS-100 steamer?
In other words, do not allow water remain in your steam appliance for more than 30 days. We advise emptying the water from your steam appliance every 30 days.
How do you clean a Sunbeam GCSBHS-100 handheld steamer?
Clean and Soak the Nozzle: Soak the nozzle for at least eight hours or overnight in the warm vinegar. Rinse the nozzle well in warm water after removal. To gently remove any residues from each nozzle, use a toothpick. Repeatedly rinse, then pat dry with a towel.
What is the temperature in a Sunbeam GCBHS-100 handheld steam cleaner?
Internal boilers in steam cleaners heat water to temperatures as high as 325 degrees Fahrenheit. When water is heated to these levels, it turns into very hot steam that may be utilised to enter small holes on a variety of surfaces.
Can you use a Sunbeam GCSBHS-100 steamer without water?
Yes. Simply disconnect your steam iron, allow it to cool, and then empty the water tank to remove the water from the iron. Turn the dial to the dry/steam setting, if your iron has one, or to the “MIN” setting, if it doesn’t have a dry/steam option.
Should a Sunbeam GCSBHS-100 handheld steamer touch clothes?
Hold the plate of your garment steamer against your clothing to remove the most creases from it.
Do Sunbeam GCSBHS-100 handheld steamers remove wrinkles?
For travelling and removing creases from smaller goods like shirts, handheld steamers are fantastic. If you want to get rid of creases in clothes, especially delicate materials that can’t be ironed like silk, woollens, and items with pleating, a steamer can take the place of an iron.
Do you put hot or cold water in Sunbeam GCSBHS-100 steamer?
Hang the garments on a towel rack or shower rod after turning them inside out. Plug in your steamer after filling it with cold water. Let the appliance “cook” until steam starts to come out of it.
Can you leave water in Sunbeam GCSBHS-100 steamer overnight?
Never let the steamer sit with water in it overnight. Due to the mineral deposits that accumulate from continuous usage, neglected steamers frequently spew hot water. Use a vinegar and water cleaning solution.
Can you put soap in a Sunbeam GCSBHS-100 handheld steam cleaner?
These devices only require crisp, cold tap water. In these systems, no chemicals or detergents should be utilized.
How long does a Sunbeam GCSBHS-100 steam cleaner take to heat?
In a sealed boiler, water is heated until it boils, producing steam, which is how a steam cleaner operates. Depending on the apparatus, this can take anywhere from one to six minutes per litre of water.
Can you clean everything with a Sunbeam GCSBHS-100 steam cleaner?
Many surfaces in the house, including sealed tile, hardwood floors, grout, sinks, tubs, worktops, carpets, beds, upholstery, showers, ovens, stove tops, grills, glass, and more, may be safely cleaned with steam cleaners.


