![]() ACTIVEPAD MOTECARE Foot
ACTIVEPAD MOTECARE Foot
Foot Use EMS Sport Device
MXES-FR230
PA1520-00
User Manual
Thank you for buying this product. Please read this user manual in advance and use the product safely. Please keep this user manual for future reference.

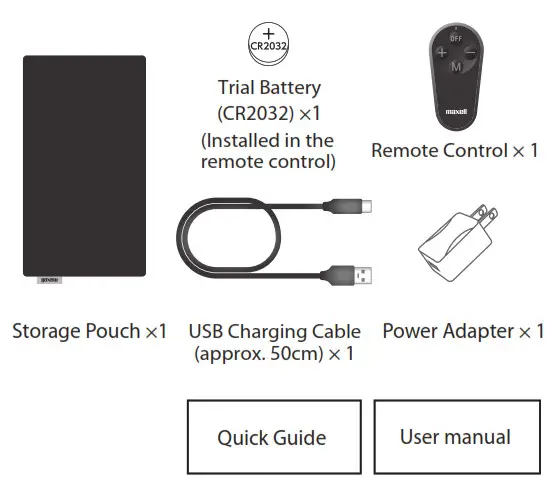
Contents of the box ※ Inside the storage pouch
 | Accessories
|
Introduction
Before reading the instruction manual
- This instruction manual is subject to change without notice.
- In order to improve the product, the appearance of some parts or specifications may be changed without notice.
- Unauthorized duplication of part or all of this instruction manual is prohibited except for personal use.
Moreover, without permission.
Disclaimer
- We assume no responsibility for any damage caused by fire, earthquake, action by any third party, other accidents, customer’s intention or fault, incorrect use, or use under other abnormal conditions.
- The warranty stated in the warranty certificate is all we warrant, and we do not warrant anything except for this warranty including express warranty and implied warranty.
- We assume no responsibility for any damage caused by any usage not described in this Instruction Manual.
- This product is not intended for use with equipment and devices related to human life such as medical equipment and devices, nuclear equipment and devices, aerospace equipment and devices, transportation equipment, and equipment and devices which require a high standard of reliability. We assume no responsibility if this product is used for the control systems of these types of equipment and devices and if any injury or fire occurs due to the failure of the product.
Safety caution
Please be sure to observe it for safe use.
| Danger | Danger refers to misuse which might lead to death or serious injury*1 to a high degree. | |
| Warning
| The warning refers to misuse which might lead to death or serious injury*1 . | |
| Caution | Caution refers to misuse which might lead to injury*2and may cause property damage*3 |
Example of symbols | |
 | Prohibited actions when handling the product. Graphic symbols representing specic instructions are shown in black color in the shape of |
 | Caution to re, electric shock, high temperature when handling the product. Graphic symbols representing specic instructions are shown in black color in the shape of |
 | Instruction which must be followed. Graphic symbols representing specic instructions are shown in white color in the of ●. |
| |
Prohibited to use with the following electronic medical equipment
| |
| Do not touch leaked liquid If liquid leaks from this device and gets into the eye, do not rub. Rinse with plenty of clean water immediately and consult a doctor. It may cause blindness. | |
| Keep batteries out of reach of children Children may swallow the battery. If a battery is swallowed, it may cause death. Consult a doctor immediately for instructions. | |
The following people must consult the doctor before use
|  |
The following people must not use the device
| |
| If you feel unwell, stop use immediately This may cause accidents or physical deterioration. | |
| Do not use near your heart, head, face, eyes, neck, or vulva This may cause accidents or physical deterioration. | |
| Do not use in highly humid locations such as bathroom This may cause overheating, electric shock, malfunction, mold or rust. |  |
| Do not put into heating appliances such as microwave ovens or pressure cookers This may cause overheating, smoke or fire. | |
| Do not operate with wet hands This may cause overheating, shock, malfunction. |  |
| Do not pour liquid or water on the device This may cause overheating, smoke, fire, rupture, malfunction or injury. | |
| Store in a place out of a child’s reach This may cause accidents or physical deterioration. | |
| Do not sleep during use This may cause accidents or injury. | |
| Do not wear metal accessories such as necklaces during use This may cause a strong electric shock. | |
| Do not disassemble or remodel This may cause overheating, smoke, fire, rupture, liquid leak, malfunction, or injury |  |
| Stop using broken devices This may cause accidents or injury. | |
| Do not use multiple devices at the same time This may cause accidents or injury. | |
| Do not use with other EMS devices This may cause accidents or injury. | |
| Do not use while standing This may cause accidents or injury. | |
| Do not carry out housework involving water, knives, or fire during use This may cause accidents or injury. | |
| Do not short the terminals This may cause overheating, electric shock, malfunction, or injury. | |
| Do not put into the fire This may cause smoke, fire, or rupture. |
| Charge within 10-35°C Charging out of this temperature range may result in liquid leak, overheating, rupture or malfunction. | |
| Do not forcibly press the device This may deform, liquid leak, overheating, fire, rupture, or malfunction. | |
| Do not use the device on the same body part more than once a day Even up to 2 different parts per day. | |
| Do not use continuously Continuous usage may result in muscular or neuropathic pain. | |
| Do not use other electrical devices such as mobile phones during the use This may cause accidents. | |
| Do not use before or whilst driving This may cause traffic accidents. | |
 Do not use and store in locations of high temperature
This may cause accidents, injury, or malfunction.- Do not step on, drop or apply strong shock to the device
This may deform, liquid leak, overheating, fire, rupture, or malfunction. - Do not place flammable or heavy objects on the device, or cover the device with foreign objects such as towels or cushions
This may cause overheating, fire, rupture, liquid leak. - Do not use for purposes other than body training, relaxation
This may cause accidents or injury. - Do not exercise while using this product
This may cause injury.
Precautions for the controller, power adapter, and charging cable  Charge once every 3 months
The battery will deteriorate and cannot be used. Use only the attached power adapter and charging cable
This may cause overheating, fire, rupture, or malfunction.- Do not use the power adapter or charging cable for anything other than this product
This may cause overheating, fire, rupture, or malfunction. - Securely and fully insert the power adapter
If the plug is not inserted fully, it may cause electric shock or fire due to accumulated dust.  If any abnormality occurs during charging, immediately disconnect the power
adapter from the outlet This may cause overheating, fire, rupture, or malfunction.
Precautions for remote control- Insert the “+” and “-” poles of the battery correctly
This may cause rupture, damage, malfunction, or injury due to overheating or leakage. - Use specified battery
This may cause rupture, damage, malfunction, or injury due to overheating or leakage. - Do not use a battery that has exceeded the recommended usage period
It may cause injury or malfunction. - Precautions for using the remote control
The remote control of this product (hereafter, this remote control) uses the 315 MHz frequency, band In this frequency band, it is used for wireless keys of front doors and remote control key for the car as well as for specific low-power devices such as telemeters, Tele controls, and data transmission.
 If any abnormality occurs during charging, immediately disconnect the power
- If you use a cardiac pacemaker, please consult the medical device manufacturer as it uses a specified low-power.
- Before using this remote control, make sure that there are no specific low-power devices such as telemeters, Tele controls, and data transmissions nearby.
- In the unlikely event that this remote control causes harmful radio wave interference with a specific low-power device, immediately change the location or operate the controller without using the remote control.
- If you have any other problems, such as harmful radio wave interference caused by using this remote controller, please contact our “Customer Support Center”.
- This remote control has been certified as a specified low power device based on the Radio Law. Therefore, no license is required to use it. However, it is prohibited to disassemble or modify the product or remove the certification label.
- Do not use in places where the use of mobile phones or wireless devices is prohibited such as in hospitals or priority seats in trains.

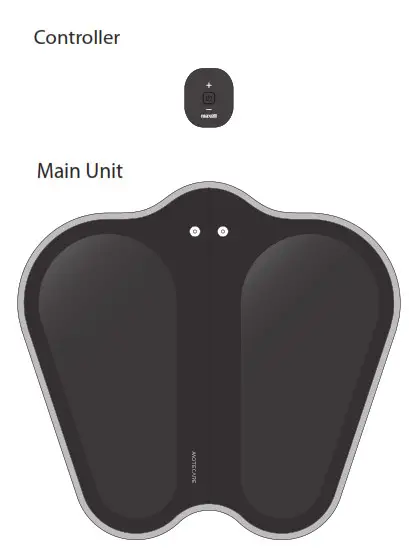
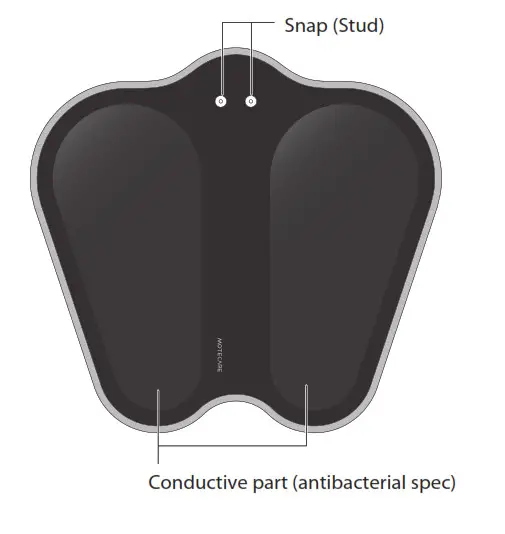
Name of each part
| Main Unit
|
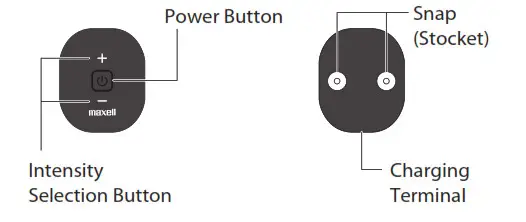
| Controller
|
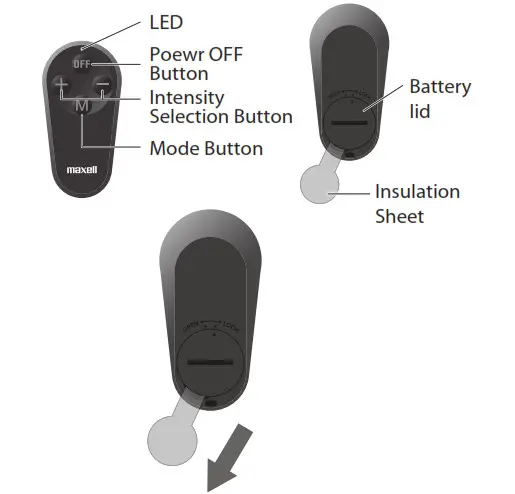
| Remote Control
|
Usage
Remote Control
Remove insulation sheet Pull out the insulation sheet of the remote control.
Controller
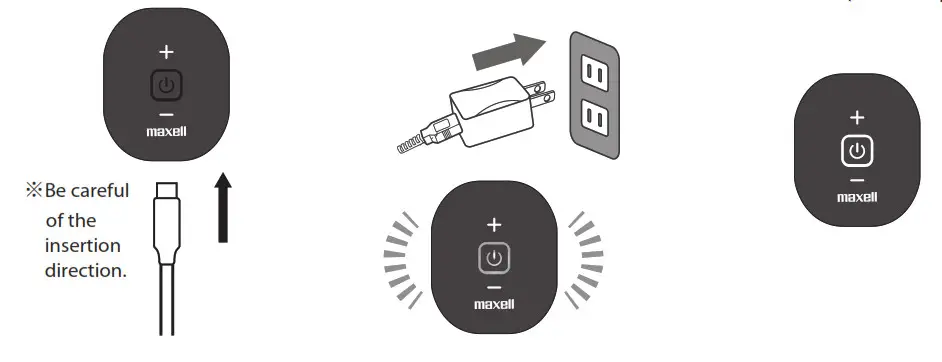
Charging (Charge before use )
- Connect the device and the power adapter with the cable.
- When the power adapter is plugged into a power outlet, the LED will light up and charging will begin.
- When charging is complete, the power button will stop flashing and remain lit. Remove the power adapter and charging cable.

Precautions for charging the controller
- Charging time is approximately 2.5 hours (charging time varies depending on the remaining battery capacity and the charging environment).
- The buttons cannot be operated while charging.
- Please use only the supplied charging adapter and charging cable.
- Charge in an ambient temperature between 10 ~ 35˚C.
- The number of times that can be used per charge varies depending on the intensity setting level, usage environment and usage conditions.
- When storing, please charge once every 3 months. Otherwise, the battery may deteriorate and cannot be used.※The remote control battery cannot be charged.
| Number of Training | Intensity 15 | Approx. 20 times |
※Training Mode
When Using
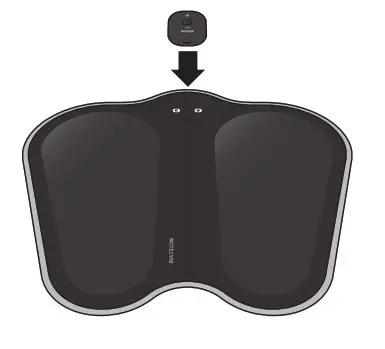
Attach to the main unit
Pay attention to the positions of the snap stud and socket, and attach the controller firmly to the main unit until you hear a click.
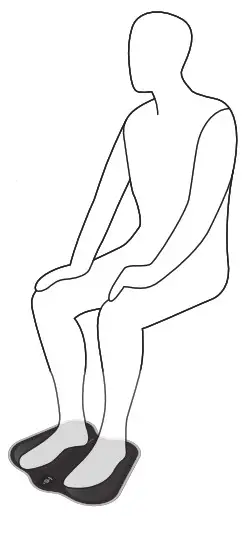
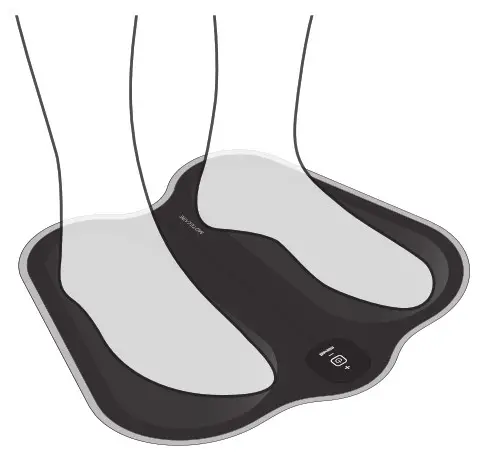
Put your feet on the main unit
Place the product on the floor and put your feet on the main unit while seated.
※If you use the product while standing, you may lose balance due to the intensity of electrical stimulation, and you may fall and get injured.
※ Cannot be used with socks or stockings. Please use the product with barefoot.
※ Wipe off sweat and dirt before use.
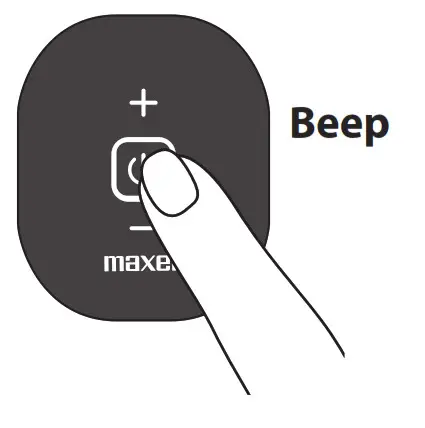
Turn on the power
Press and hold the power button (approx. 2 seconds) A beep will sound and
the power button will light. When the device turns on, the intensity is preset to level 1 (minimum).
※If your body is not in close contact with the conductive parts, a beeping sound will continue and the power button will blink (approx. 1 minute). If there is no close contact with the body within this 1 minute, the power will
be turned off automatically.
※The power of the controller cannot be turned on by operating the remote control.
※Please use the remote control for the following procedures.
Switch modes
By pressing the mode button on the remote control, a sound is emitted from the controller and the mode will
be switched. When the power is turned on, the mode is set to training.
※When you switch the mode, intensity starts from 1 (minimum ).
*The sound of the controller and mode switching

| Mode and Features | Training Steps
| Stimulation Frequency Type | Intensity Level Selection | Training Time |
| Training mode A variety of stimuli can effectively train the wide range of muscles of the legs and hips | 20 Steps | 25 Types | 15 Level | approx. 10 mins |
| Relaxation Mode It provide a mild and comfortable stimulus to the feet | 14 Steps | 17 Types | 15 Level | approx. 10 mins |
| Sole Relaxation Mode It provides a comfortable tapping feeling to the feet | 3 Steps | 3 Types | 15 Level | approx. 10 mins |
| Calf Relaxation Mode It provide a comfortable massaging effects to the calf | 3 Steps | 3 Types | 15 Level | approx. 10 mins |
Adjusting intensity
- Adjust by pressing the intensity selection buttons “+” and “-” on the remote control. There are 15 levels of electrical stimulation.
- When you operate the “+” or “-” button, it makes a beeping sound.
- When the intensity reaches 15 (maximum) or 1 (minimum), it gives a beeping sound.
※When the power is turned on, the intensity level is 1 (minimum). - You can also use the controller to switch modes and adjust the intensity.<Switch modes with the controller>
- Pressing the power button (short press) while the power button is lit will cause the controller to make a sound and switch the mode. When the power is turned on, the mode is set to training.
<Adjust intensity with the controller> - While the power button is lit, press the controller intensity selection buttons “+” and “-” to adjust. There are 15 levels of electrical stimulation.
- When you operate the “+” or “-” button, it makes a beeping sound.
- When the intensity reaches 15 (maximum) or 1 (minimum), it makes beeping sounds.
※When the power is turned on, the intensity level is 1 (minimum).
※The intensity selection buttons of the controller are an electrostatic type, so they may not work in the following cases. - Pressing with your nails
- Wearing adhesive plaster
- Operating with dry fingers
- A sticker on the controller
- Controller is dirty
Usage example
- The following usage is recommended. (Be sure to use while sitting or lying down)
※If you use the product while standing, you may lose balance due to the intensity of electrical stimulation,
and you may fall and get injured.
※If your body is not in close contact with the conductive parts, a beeping sound will continue, and the power button will blink (approx. 1 minute). If there is no close contact with the body within this 1 minute, the power will be turned off automatically.
※Wipe off sweat and dirt before use.
| Recommended Usage | Vertical Use
| Horizontal Use
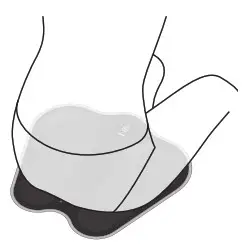
| Using for Calves | |
 | 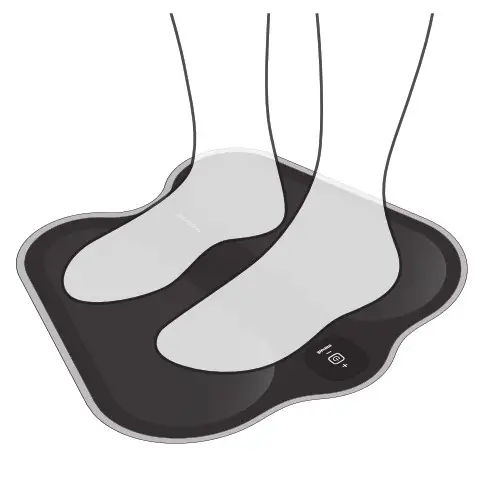 | 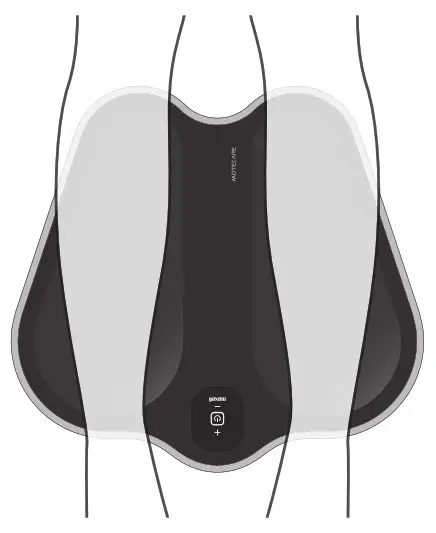 | ||
| Objective | Stimulation to the entire lower leg Training soles, calves, and anterior shin muscles | Stimulation to the soles of the feet Caring for your feet while relaxing | Stimulate your calves while relaxing | |
| Recommended Modes | Training | Relaxation Sole Relaxation | Relaxation Calf Relaxation | |
| Recommended Usage | For Thighs | For Hip | ||
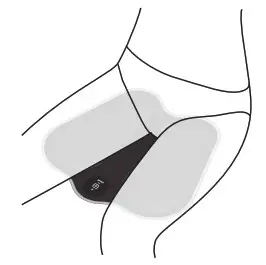 |  | |||
| Objective | Stimulate and train thegluteus maximus muscles | Stimulate and train the gluteus maximus muscles | ||
| Recommended Modes | Training | Training | ||
❾Training finishes
※The power will automatically turn off in approx.10 minutes in any of the modes.
- To turn off the power during use, press and hold the power OFF button of the remote control to OFF (approx. 2 seconds). Alternatively, press and hold the power button on the controller (approx. 2 seconds). As it makes the beeping sounds, the light of the power button will be turned off and the power will be turned off.
- After starting the operation, approx.10 mins, it will have a beep sound and then automatically turn OFF.
Caution
- If you feel pain or numbness during use, switch off the device, change the position of your feet or sitting position, and then try again.
- Do not forcibly increase the intensity.
- In the beginning, please start the training from a low-intensity level (level 1, etc.), and gradually increase the intensity after getting used to electrical stimulation.
- Traning steps will be switched automatically and do not support manual operation.
- When the device is stopped during the training, the next training will start from the beginning.
- Use within 10-35°C.
- If the power button does not light on or the electrical stimulus cannot be felt, the battery may be exhausted. Please charge the controller.
- Be sure to disconnect the charging cable before use.
If you feel pain during electrical stimulation
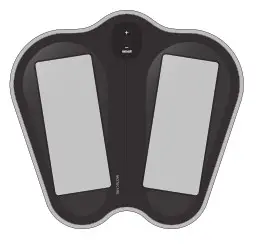
- Wet 2 pieces of non-woven fabric or thin cloths with water, wring them well,
place a piece on each conductive part of both sides of the main unit.
※The controller and the main unit are not waterproof. Please do not allow the controller or the main unit to get wet.
※Please do not use wet tissues with chemicals (for face cleansing, makeup removing, etc).
※When you placing the non-woven fabric, please do not let it touch the controller or the snaps.
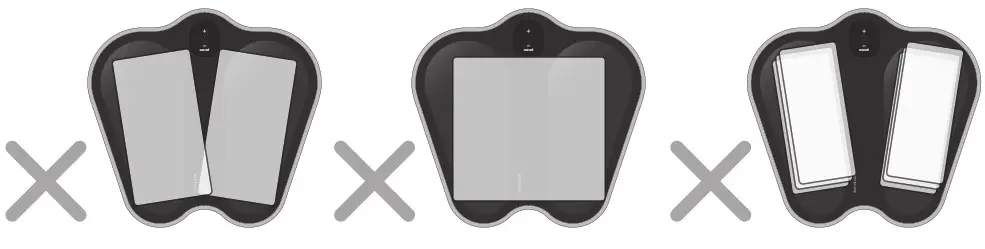
- Do not use the product in the following ways.
The left and right non-woven fabrics are in contact
Using one piece of non-woven fabric
Using non-woven fabrics in layers. Using dry non-woven fabric
- Even after changing the position of your feet or the sitting position or using a non-woven fabric, you still feel strong
electrical stimulation, stop using this product immediately.
Storage Method
- After use, wipe off sweat and moisture, remove the controller from the main unit. Fold the main unit, and store it in the storage pouch with the controller, remote control, charging cable, and power adapter. If you leave the product without wiping off sweat and moisture, the product life may be shortened.
- Make sure that the power is not turned on, and store it away from high temperatures, high humidity, direct sunlight, and dusty places.
- When not in use for a long period of time, charge the controller and remove the battery from the
remote control for storage.
Please charge the battery once every 3 months. Otherwise, the battery may deteriorate and cannot be used.
Maintenance
Never carry out maintenance during charging and ensure the power supply is off.
Be sure to the power off and remove the controller from the main unit.
Maintenance of main unit, controller, and remote control
- Please use a dry and soft cloth to wipe away the dirt on the device.
- For severe dirt, please use a damp soft cloth to wipe away the dirt on the device gently. Please squeeze out water from a wet cloth before wiping.
Caution - This product is not waterproof. Please do not splash water on the main unit, controller, and remote control.
- Do not wipe with chemicals such as benzene, thinner, or alcohol.
- If the product is used without being cleaned or stored for a long period of time, it may cause
performance deterioration and malfunction. Regular maintenance is recommended.
Replace Battery of the remote control
If the LED on the remote control does not light, or if the remote control does not respond when you point it at the controller, the battery may be exhausted. Replace with new batteries.
※The included battery is for trial use. The battery life may be short.
※The remote control battery cannot be charged.
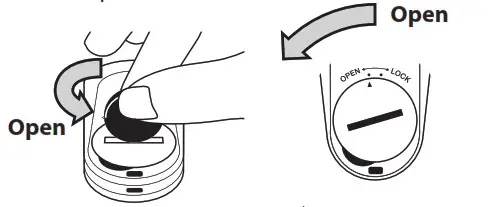
Open the battery lid
Use a coin etc. to open the battery lid.
※Be careful not to lose the battery lid.
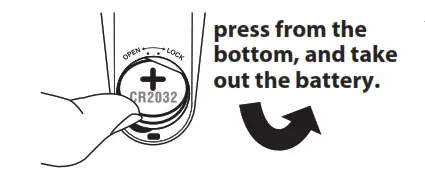
Take out the battery
Put your finger in the recess, press from the bottom, and take out the battery.
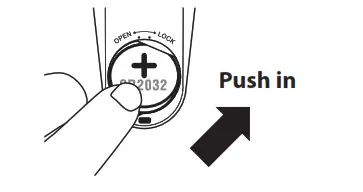
Insert a battery
Insert the battery with the “+” mark facing up.
Battery Used Button type lithium battery CR2032
( Recommendation: Maxell Manufacturer )
※Make sure that the battery is installed securely.
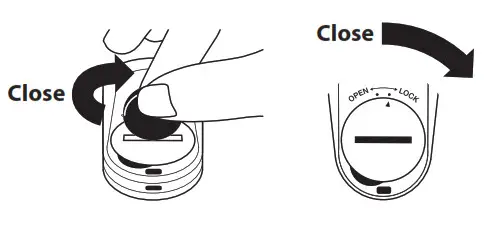
Close the battery lid
Use a coin etc. to close the battery lid.
※Make sure that the battery lid is tightly closed. If the battery cover is not closed securely, the remote control may not operate.
Caution
- Do not insert the battery with the “+” and “-” poles in the incorrect orientation.
This may cause rupture, damage, malfunction, or injury due to overheating or leakage. - If a battery or battery lid is swallowed, contact a doctor immediately for instructions.
- Be sure to replace the battery with a new one.
- For the removed battery, cover the “+” and “-” poles with adhesive tape to insulate it, then dispose of it according to the disposal rule of the district where you live (city).
Troubleshooting
| Problem | Cause | Solution |
| Cannot power on (controller) | Controller battery level is low | Charge the controller |
| The time to press and hold the power the button is not long enough | When the power button is pressed for approx. 2 seconds, a beep sounds and the power turns on | |
| Trying to turn on the power with the remote control | The power cannot be turned on with the remote control. Press and hold the power button on the controller (approx. 2 seconds) | |
| The beeping does not stop (controller ) | The controller and the main unit are not connected | Please securely attach the controller to the main unit |
| Not into:iv contact with the body | Please adjust the position where you put your fee or site swoon | |
| Extremely dry skin | use water to moisten your rim end try again | |
| Device cannot operate (controller, main unit) | Ccesedie battery is exhausted | Charge the controller |
| Power turns on renomaucaly after certain time | This device will stop after a mode approx. 10 mins | |
| Cannot feel the training Electrical stimulation is weak, and does not increase | Not in close contact with the body | Please adjust the position where you put your feet or sitting position |
| Confront. Battery level is low | Chzege the Controller | |
| Intensity setting is low | Press “+” on the intensity selection button to increase the intensity | |
| r: is in a age rent mode le | Select the mode refeerrg to P 9 0 Exarrpit 44 use | |
| Extreme* dry thin | use water to moisten your skin and try again | |
| Remote control battery is exhausted | Pialtat.tha remote “rater a bailer/ wah a | |
| Sensation is too strong or kith peon.. | ireenety settee) Is !ugh | Press “-” on the intensity selection button to decrease the intesity |
| no: inCIO:iv contact withthe body | Please adjust the position where you put your feet or where sitting position | |
| Phrysgd peed-sirs/lion that makes you feel stngeue to electrical stimutoon | Please refer to P.10 “If you feel pain during the electrical stimulation”, wet 2 pieces of nonwoven fabric or thin cloths with water, wring them well, place a piece on each conductive part of both sides of the main unit | |
| used tM<MFy | Fa the sane pot of body. use once a day | |
| unable to <huge Conootlerl | The charging cable is nth inserted properly | Securery inset the posser adapter to the end |
| t1Ddtes not Ighe iRemot«ontniT | Rteneee control testa” k, exhausted | Replacethe remote ccegfeel s battery witha newbattery |
| Remote control cannot operate | Radio waves from the remote control do not reach the controller | Alm the ttifrotic tonuoi at slit commit and operate. Please operate the remot«not closer to the controller |
| The remote control battery is exhausted | ReViste the remote critter listener vitth a w | |
| Controller battery level is exhausted | Charge the CO–4101kt | |
| Try to turn ON the power path the remote control | The power cannot be turned on with the remote controll. Press and hold the power button on the controller (approx. 2 seconds) |
Device disposal
Regarding controller![]() Caution: Regarding disposal of rechargeable batteries in Japan
Caution: Regarding disposal of rechargeable batteries in Japan
The controller of this product is equipped with a lithium-ion battery (rechargeable battery).
Rechargeable batteries can be recycled. Please do not remove this rechargeable battery by yourself,
please contact our “Customer Support Center”. For the collection/recycling of rechargeable batteries and cooperating organization of recycling, please refer to the JBRC website.
Regarding remote control
When disposal, be sure to remove the battery (coin-type lithium battery) from the remote control, cover the “+” and “-” poles with adhesive tape to insulate it, then dispose of it according to the disposal rule of the district where you live (city).
Regarding main unit, power adapter, charging cable
Please dispose it according to the disposal rule of the district of where you live (city).
Specification
| Device (included controller) | Dimension | W360 x H340 x D22mm (excluding protrusions) | |
| Weight | Approx. 150g | ||
| Controller | Battery | Lithium-ion battery 3.7V 120mAh | |
| Operation Time | Each mode approx. 10mins | ||
| Accessories | Remote Control | Dimension | W37xH70xD11mm (excluding protrusions) |
| Weight | Approx. 14 g (without battery) | ||
| Battery | Coin type battery ( CR2032 ) | ||
| Transmission Frequency | 315 MHz | ||
| Transmission Distance | Approx. 3m (sight distance) | ||
| Trial Battery | Coin Type Battery (CR2032) | Installed on the remote control | |
| Power Adapter | Input | AC 100-240V 50 / 60Hz | |
| Output | DC5V / lA Max. | ||
| Charging Cable | Length | Approx. 50cm | |
| Storage Pouch | Dimension | W35xH20cm | |
Antibacterial effect
| Part name | Main unit | The part performed antibacterial treatment | Conductive part |
| Test method | Based on JIS Z 2801-2012 | Antibacterial method | Kneaded into conductive silicone rubber |
| Testing organization | Guangzhou Microbiology Research Institute (China) | ||
Maxell, Ltd.
30-13 Motoyoyogi-Cho, Shibuya-Ku, Tokyo 151-8527


