
HiKOKI WR22SE Power Impact Wrench

GENERAL POWER TOOL SAFETY WARNINGS
WARNING
Read all safety warnings and all instructions. Failure to follow the warnings and instructions may result in electric shock, fi re and/or serious injury.
Save all warnings and instructions for future reference.
The term “power tool” in the warnings refers to your mains-operated (corded) power tool or battery-operated (cordless) power tool.
- Work area safety
- Keep work area clean and well lit. Cluttered or dark areas invite accidents.
- Do not operate power tools in explosive atmospheres, such as in the presence of flammable liquids, gases or dust. Power tools create sparks which may ignite the dust or fumes.
- Keep children and bystanders away while operating a power tool. Distractions can cause you to lose control.
- Electrical safety
- Power tool plugs must match the outlet. Never modify the plug in any way. Do not use any adapter plugs with earthed (grounded) power tools. Unmodified plugs and matching outlets will reduce risk of electric shock.
- Avoid body contact with earthed or grounded surfaces, such as pipes, radiators, ranges and refrigerators. There is an increased risk of electric shock if your body is earthed or grounded.
- Do not expose power tools to rain or wet conditions. Water entering a power tool will increase the risk of electric shock.
- Do not abuse the cord. Never use the cord for carrying, pulling or unplugging the power tool. Keep cord away from heat, oil, sharp edges or moving parts. Damaged or entangled cords increase the risk of electric shock.
- When operating a power tool outdoors, use an extension cord suitable for outdoor use. Use of a cord suitable for outdoor use reduces the risk of electric shock.
- If operating a power tool in a damp location is unavoidable, use a residual current device (RCD) protected supply. Use of an RCD reduces the risk of electric shock.
- Personal safety
- Stay alert, watch what you are doing and use common sense when operating a power tool. Do not use a power tool while you are tired or under the influence of drugs, alcohol or medication. A moment of inattention while operating power tools may result in serious personal injury.
- Use personal protective equipment. Always wear eye protection. Protective equipment such as dust mask, non-skid safety shoes, hard hat, or hearing protection used for appropriate conditions will reduce personal injuries.
- Prevent unintentional starting. Ensure the switch is in the off position before connecting to power source and/or battery pack, picking up or carrying the tool. Carrying power tools with your finger on the switch or energising power tools that have the switch on invites accidents.
- Remove any adjusting key or wrench before turning the power tool on. A wrench or a key left attached to a rotating part of the power tool may result in personal injury.
- Do not overreach. Keep proper footing and balance at all times. This enables better control of the power tool in unexpected situations.
- Dress properly. Do not wear loose clothing or jewellery. Keep your hair, clothing and gloves away from moving parts. Loose clothes, jewellery or long hair can be caught in moving parts.
- If devices are provided for the connection of dust extraction and collection facilities, ensure these are connected and properly used. Use of dust collection can reduce dust-related hazards.
- Power tool use and care
- Do not force the power tool. Use the correct power tool for your application. The correct power tool will do the job better and safer at the rate for which it was designed.
- Do not use the power tool if the switch does not turn it on and off . Any power tool that cannot be controlled with the switch is dangerous and must be repaired.
- Disconnect the plug from the power source and/or the battery pack from the power tool before making any adjustments, changing accessories, or storing power tools. Such preventive safety measures reduce the risk of starting the power tool accidentally.
- Store idle power tools out of the reach of children and do not allow persons unfamiliar with the power tool or these instructions to operate the power tool. Power tools are dangerous in the hands of untrained users.
- Maintain power tools. Check for misalignment or binding of moving parts, breakage of parts and any other condition that may affect the power toolʼs operation. If damaged, have the power tool repaired before use. Many accidents are caused by poorly maintained power tools.
- Keep cutting tools sharp and clean. Properly maintained cutting tools with sharp cutting edges are less likely to bind and are easier to control.
- Use the power tool, accessories and tool bits etc. in accordance with these instructions, taking into account the working conditions and the work to be performed. Use of the power tool for operations diff erent from those intended could result in a hazardous situation.
Service
- Have your power tool serviced by a qualified repair person using only identical replacement parts. This will ensure that the safety of the power tool is maintained.
CAUTION
Keep children and infirm persons away. When not in use, tools should be stored out of reach of children and infirm persons.
IMPACT WRENCH SAFETY WARNINGS
- Hold power tool by insulated gripping surfaces, when performing an operation where the fastener may contact hidden wiring or its own cord. Fasteners contacting a “live” wire may make exposed metal parts of the power tool “live” and could give the operator an electric shock.
ADDITIONAL SAFETY WARNINGS
- When using the tool at a hight , make sure that there is nobody below.
- Use earplugs if using for a long time use.
- Switch the reversing switch only after the motor has stoped when it is necessary to change the direction of the rotation.
- Use a step up transformer when a long extension cable is used.
- Confirm the tightening torque by a torque wrench before use in order to assertain the correct tightening torque to be used. English 19
- Assemble the socket securely to the impact wrench with the socket pin and ring.
- Confirm whether the socket has any cracks in it.
- Always hold the handle and side handle of the impact wrench firmly. Otherwise the counterforce produced may result in inaccurate and even dangerous operation
SYMBOLS
WARNING
The following show symbols used for the machine. Be sure that you understand their meaning before use.
| To reduce the risk of injury, user must read instruction manual. | –min/–min | Running Time/Down Time | ||
| V | Rated voltage | —/min | revolutions per minute | |
| A | Current | Clockwise rotation | ||
| W | Watt | Counterclockwise rotation | ||
| n0 | No-load speed | Class II tool | ||
SPECIFICATIONS
- Be sure to check the nameplate on product as it is subject to change by areas.
- Tightening the bolt without extension cord at rated voltage.
OPTIONAL ACCESSORIES (sold separately)
Variety of sockets
- Although the HiKOKI Impact Wrench is delivered with
only one standard socket, ample sockets are available
to cover impact tightening of various sizes and types of
bolts.
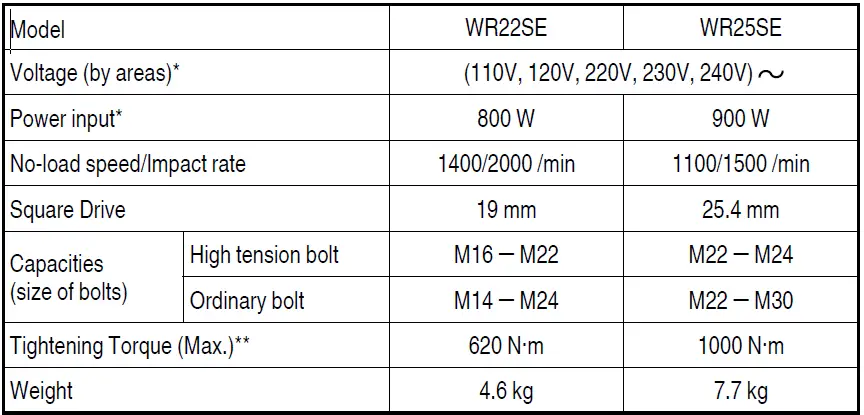
| B(mm) | Ordinary Socket | Long Socket | ||||||||
| Dimension (mm) SD Code No. | Dimension (mm) SD Code No. | |||||||||
| E | L | E | L | |||||||
| 19 | 23 | 38 | 15 |
55 | 874527 | |||||
| 24 | 40 | 874528 | 24 | 34 | 23 | 60 | 955033 | |||
| 26 | 42 | 16 | 874529 | 26 | 38 | 25 | 85 | 955034 | ||
| 27 | 43 | 874530 | 27 | 39 | 26 | 85 | 955035 | |||
| 30 | 47 | 19 | 874532 | 30 | 43 | 26 | 85 | 955037 | ||
| 32 | 50 | 874523 | 32 | 46 | 26 | 100 | 955038 | |||
| 35 | 52 | 874533 | ||||||||
| 36 | 55 | 874534 | 36 | 55 | 26 | 55 | 955092 | |||
| 25.4 | 36 | 58 | 40 | 72 | 956080 | |||||
| 41 | 63 | 38 | 68 | 873636 | ||||||
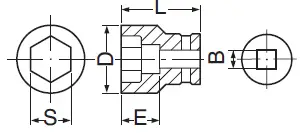
- Extension bar : Code 873633
The extension bar is convenient for working in very restricted spaces or when the socket provided cannot reach the bolt to be tightened.
CAUTION
When the extension bar is used the tightening torque is reduced slightly compared with the ordinary socket. So it is necessary to operate the tool a little longer to get the same torque.
PRIOR TO OPERATION
- Power source
Ensure that the power source to be utilized conforms to the power requirements specifi ed on the product nameplate. - Power switch
Ensure that the power switch is in the OFF position. If the plug is connected to a receptacle while the power switch is in the ON position, the power tool will start operating immediately, which could cause a serious accident. - Extension cord
When the work area is removed from the power source, use an extension cord of suffi cient thickness and rated capacity. The extension cord should be kept as short as practicable. - Check the receptacle
If the receptacle only loosely accepts the plug, the receptacle must be repaired. Contact a licensed electrician to make appropriate repairs. If such a faulty receptacle is used, it may cause overheating, resulting in a serious hazard. - Confirming condition of the environment
Confirm that the work site is placed under appropriate conditions conforming to prescribed precautions. - Mounting the side handle
After loosening the handle, slide it over the main unit and tighten the handle to secure it. When sliding over the main unit, make sure to align the unit’s protrusion with the side handle’s slot. - Mounting the socket
Select a socket matched to the bolt to be tightened or loosened. Insert the socket on the anvil of the wrench, and secure it with the pin and ring. When dismantling the socket, reverse the sequence.

HOW TO USE
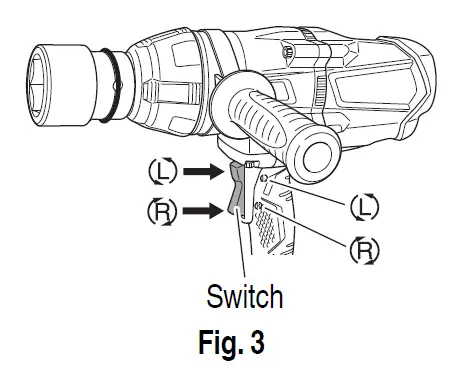
- Operation of switch The switch in this machine functions as a motor switch and rotational direction selector switch. When the switch is set to R indicated on the handle cover, the motor rotates clockwise to tighten the bolt. When the switch is set to L, the motor rotates counterclockwise to loosen the bolt. When the switch is released, the motor stops.
CAUTION
Be sure to turn the switch OFF and wait until the motor completely stops before changing the direction of wrench revolution. Switching while the motor is rotating will result in burning the motor.
- Tightening and loosening bolts A hex socket matching the bolt or nut must first be selected. Then mount the socket on the anvil, and grip the nut to be tightened with the hex. socket. Holding the wrench in line with the bolt, press the power switch to impact the nut for several seconds. If the nut is only loosely fitted to the bolt, the bolt may turn with the nut, therefore preventing proper tightening. In this case, stop impact on the nut and hold the bolt head with a wrench before restarting impact, or manually tighten the bolt and nut to prevent them slipping.
OPERATIONAL CAUTIONS
- Do not touch the bumper or hammer case during continuous operation The bumper and hammer case become hot during continuous screw tightening so be careful not to touch them at that time.
- Work at a tightening torque suitable for the bolt under impact The optimum tightening torque for nuts and bolts differs with material and size of the nuts and bolts. An excessively large tightening torque for a small bolt may strech or break the bolt. The tightening torque increases proportionally to the operating time. Use the correct operating time for the bolt.
- Selecting the socket to be matched to the bolt Be sure to use a socket which is matched to the bolt to be tightened. Using an improper socket will result not only in insufficient tightening but also in damage to the socket or nut. A worn or deformed hex or square-holed socket will not give an adequate tightness for fitting to the nut or anvil, consequently resulting in loss of tightening torque. Pay attention to wear of socket holes, and replace before further wear developes. Matching socket and bolt sizes are shown in Table 1 on page 20. The numerical value of a socket designation denotes the side to side distance (S) of its hex hole.
- Holding the tool Hold the Impact Wrench firmly with both hands by the body handle and the side handle. In this case hold the wrench in line with the bolt. It is not necessary to push the wrench very hard. Hold the wrench with a force just
sufficient to counteract the impact force. - Confirm the tightening torque The following factors contribute to a reduction of the tightening torque. So confi rm the actual tightening torque needed by screwing up some bolts before the job with a hand torque wrench. Factors affecting the tightening torque are as follows.
- Line voltage:
The tightening torque decreases when the line voltage becomes low. English 23 - Operating time:
The tightening torque increases when the operating time increases. But the tightening torque does not increase above a certain value even if the tool is driven for a long time

- Diameter of bolt:
The tightening torque diff ers with the diameter of the bolt. Generally a larger diameter bolt has a larger tightening torque. - Tightening conditions:
The tightening torque diff ers according to the torque ratio; class, and length of bolts even when bolts with the same size threads are used. The tightening torque also diff ers according to the condition of the surface of metal through which the bolts are to be tightened. - Using optional parts:
The tightening torque is reduced a little when an extension bar, universal joint or a long socket is used. - Clearance of the socket: A worn or deformed hex or a square-holed socket will not give an adequate tightness to the fitting between the nut or anvil, consequently resulting in loss of tightening torque. Using an improper socket which does not match to the bolt will result in an insuffi cient tightening torque. Matching socket and bolt sizes are shown in Table 1 on page 20.
- The protection function
To protect the tool, the protection function will be activated, automatically shutting down the unit in the event of any problems. (Table 2 on page 24 describes each situation for which the aforementioned may occur.)


- Excessive load protection function For excessive load conditions, the tool will shutdown to prevent damage. Discontinue the heavy load task and unplug the power cord from the outlet. When the cord is plugged back in, the tool will recover.
- Increased temperature protection function Automatic shutdown is activated to prevent damage from high temperatures. The tool’s internal temperature will increase for tasks involving the use of large currents of electricity, or when used in high temperature environments. Please allow the tool to rest for 10 to 15 minutes before continuing a task.
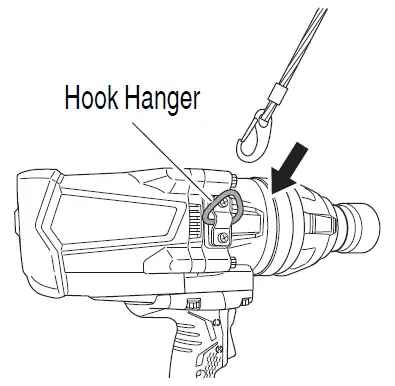
- Using the hook hanger (WR25SE) When using the hook hanger, make sure the rope or wire is securely fastened to the hanger.
CAUTION
Always make sure to use a rope or wire with sufficient strength to support the weight of the main unit and withstand impact from dropping.
MAINTENANCE AND INSPECTION
WARNING
Be sure to switch power OFF and disconnect the plug from the receptacle during maintenance and inspection.
- Inspecting the socket
A worn or deformed hex or a square-holed socket will not give an adequate tightness to the fitting between the nut or anvil, consequently resulting in loss of tightening torque. Pay attention to wear of socket holes periodically, and replace with a new one if needed. - Inspecting the mounting screws
Regularly inspect all mounting screws and ensure that they are properly tightened. Should any of the screws be loose, retighten them immediately. Failure to do so could result in serious hazard. - Maintenance of the motor
The motor unit winding is the very “heart” of the power tool. Exercise due care to ensure the winding does not become damaged and/or wet with oil or water. - Replacing supply cord
If the replacement of the supply cord is necessary, this has to be done by the manufacturer of this agent in order to avoid a safety hazard. - Service parts list
CAUTION
Repair, modifid cation and inspection of HiKOKI Power Tools must be carried out by a HiKOKI Authorized Service Center.
This Parts List will be helpful if presented with the tool to the HiKOKI Authorized Service Center when requesting repair or other maintenance. In the operation and maintenance of power tools, the safety regulations and standards prescribed in each country must be observed.
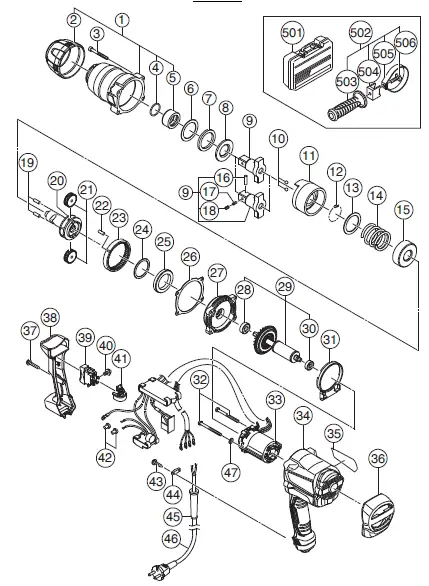
| ITEM NO. | PART NAME | Q’TY |
| 1 | HAMMER CASE (D) ASS’Y | 1 |
| 2 | BUMPER (D) | 1 |
| 3 | SEAL LOCK HEX. SOCKET HD. BOLT M5 | 4 |
| 4 | O-RING | 1 |
| 5 | METAL (F) | 1 |
| 6 | WASHER (D) | 1 |
| 7 | DAMPER (D) | 1 |
| 8 | WASHER (F) | 1 |
| 9 | ANVIL (A) | 1 |
| 9 | ANVIL (B) ASS’Y | 1 |
| 10 | STEEL BALL D7.14 | 2 |
| 11 | HAMMER (D) | 1 |
| 12 | STEEL BALL D3.969 | 38 |
| 13 | HAMMER WASHER | 1 |
| 14 | SPRING | 1 |
| 15 | SPRING SHEET | 1 |
| 16 | ROLL PIN D2×14 | 1 |
| 17 | SPRING | 1 |
| 18 | PLUNGER | 1 |
| 19 | GEAR SHAFT | 2 |
| 20 | SPINDLE | 1 |
| 21 | IDLE GEAR | 2 |
| 22 | NEEDLE ROLLER D5×10 | 1 |
| 23 | RING GEAR | 1 |
| 24 | WASHER (E) | 1 |
| 25 | METAL (E) | 1 |
| 26 | PACKING (D) | 1 |
| 27 | INNER COVER (D) | 1 |
| 28 | BALL BEARING | 1 |
| 29 | ROTOR ASS’Y (D) | 1 |
| 30 | BALL BEARING | 1 |
| 31 | FAN GUIDE (D) | 1 |
| 32 | HEX. HEAD TAPPING SCREW D4×60 | 2 |
| ITEM NO. | PART NAME | Q’TY |
| 33 | STATOR CONTROLLER (D) SET | 1 |
| 34 | HOUSING (D) | 1 |
| 35 | NAME PLATE | 1 |
| 36 | TAIL BUMPER (D) | 1 |
| 37 | TAPPING SCREW (W/FLANGE) | 1 |
| 38 | HANDLE COVER (D) | 1 |
| 39 | SWITCH | 1 |
| 40 | MACHINE SCREW (W/WASHER) M3.5×5 | 4 |
| 41 | SWITCH ADAPTER | 1 |
| 42 | CONNECTOR | 2 |
| 43 | TAPPING SCREW (W/FLANGE) D4×16 | 2 |
| 44 | CORD CLIIP | 1 |
| 45 | CORD ARMOR | 1 |
| 51 | CORD | 1 |
| 501 | PLASTIC CASE | 1 |
| 502 | SIDE HANDLE ASS’Y | 1 |
| 503 | SIDE HANDLE | 1 |
| 504 | HANDLE HOLDER | 1 |
| 505 | HANDLE RING | 1 |
| 506 | SQUARE BOLT M8 | 1 |
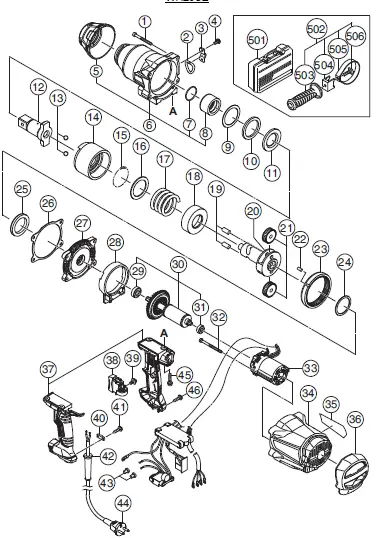
| ITEM NO. | PART NAME | Q’TY |
| 1 | SEAL LOCK HEX. SOCKET HD. BOLT M6X50 | 4 |
| 2 | HANGER (B) | 1 |
| 3 | HANGER (A) | 1 |
| 4 | SEAL LOCK SCREW (W/SP. WASHER) M5×12 | 2 |
| 5 | BUMPER (C) | 1 |
| 6 | HAMMER CASE (C) | 1 |
| 7 | O-RING (P-35) | 1 |
| 8 | METAL (B) | 1 |
| 9 | WASHER (C) | 1 |
| 10 | DAMPER (C) | 1 |
| 11 | WASHER (B) | 1 |
| 12 | ANVIL (C) | 1 |
| 13 | STEEL BALL D10.3 | 2 |
| 14 | HAMMER (C) | 1 |
| 15 | STEEL BALL D4.76 | 35 |
| 16 | HAMMER WASHER (C) | 1 |
| 17 | HAMMER SPRING (C) | 1 |
| 18 | SPRING SHEET (C) | 1 |
| 19 | NEEDLE ROLLER | 2 |
| 20 | SPINDLE (C) | 1 |
| 21 | IDLE GEAR (C) | 2 |
| 22 | NEEDLE ROLLER | 2 |
| 23 | RING GEAR (C) | 1 |
| 24 | WASHER (A) | 1 |
| 25 | METAL (A) | 1 |
| 26 | PACKING (C) | 1 |
| 27 | INNER COVER (C) | 1 |
| 28 | FAN GUIDE (C) | 1 |
| 29 | BALL BEARING 6001DDCMPS2L | 1 |
| 30 | ROTOR ASS’Y | 1 |
| 31 | BALL BEARING 608VV | 1 |
| 32 | HEX. HD. TAPPING SCREW D5×70 | 2 |
| ITEM NO. | PART NAME | Q’TY |
| 33 | STATOR CONTROLLER (C) SET | 1 |
| 34 | HOUSING (C) | 1 |
| 35 | NAME PLATE | 1 |
| 36 | TAIL BUMPER (C) | 1 |
| 37 | HANDLE (A).(B) SET | 1 |
| 38 | SWITCH | 1 |
| 39 | MACHINE SCREW (W/WASHER) M3.5×5 | 4 |
| 40 | CORD CLIP | 1 |
| 41 | TAPPING SCREW (W/FLANGE) D4×16 | 2 |
| 42 | CORD ARMOR D8.8 | 1 |
| 43 | CONNECTOR 50091 | 2 |
| 44 | CORD | 1 |
| 45 | HEX. SOCKET HD. BOLT (W/ WASHERS) M5X20 | 4 |
| 46 | TAPPING SCREW (W/FLANGE) D4×20 | 4 |
| 501 | CASE (PLASTIC) | 1 |
| 502 | SIDE HANDLE ASS’Y | 1 |
| 503 | SIDE HANDLE | 1 |
| 504 | HANDLE HOLDER | 1 |
| 505 | HANDLE RING | 1 |
| 506 | SQUARE BOLT M8 | 1 |


