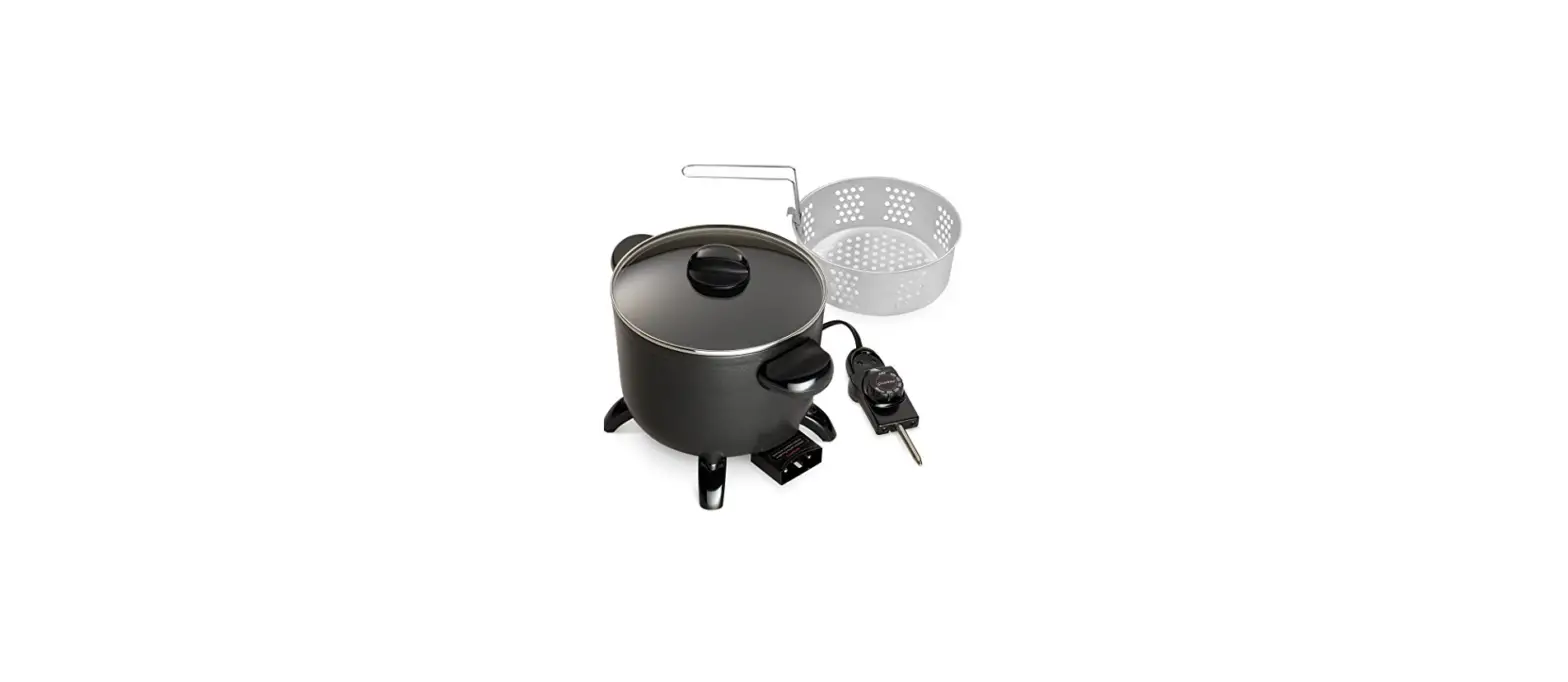
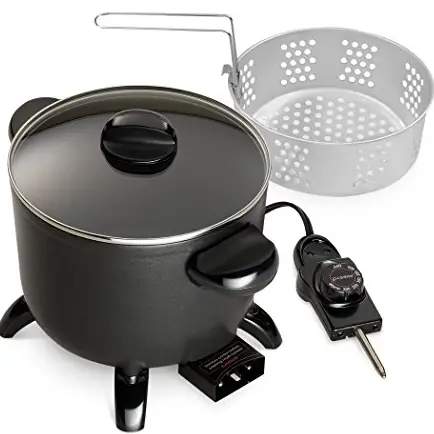
Presto 06006 Kitchen Kettle Multi-Cooker Steamer
INSTRUCTIONS
This is a Listed appliance. The following important safeguards are recommended by most portable appliance manufacturers.
IMPORTANT SAFEGUARDS
- Read all instructions.
- To protect against electrical shock or burns, do not immerse heat control or magnetic cord in water or other liquid.
- Be sure that handles and legs are assembled and fastened properly before using this appliance. See detailed assembly instructions on page 2.
- Be sure handle is properly attached to basket and locked in place. See detailed assembly instructions on page 2. Failure to securely attach basket handle can result in release of basket during use which may result in severe burns.
- Do not touch hot surfaces. Use handles or knobs.
- Do not let children handle or put electrical cords or plugs in their mouths.
- Close supervision is necessary when any appliance is used by or near children.
- It is recommended that this appliance not be moved when it contains hot oil or other hot liquid. If it must be moved when it contains hot oil or other hot liquid, use extreme caution.
- Always attach heat control and magnetic cord to appliance first, then plug cord into the wall outlet. To disconnect heat control and magnetic cord, turn control to OFF, remove plug from wall outlet, and then remove magneric plug end from heat control. Allow appliance to cool, then remove heat control from appliance.
- Unplug from outlet and remove heat control from appliance when not in use and before cleaning. Allow appliance to cool before putting on or taking off parts and before cleaning.
- Do not operate any appliance with a damaged cord or plug or in the event the appliance malfunctions or has been damaged in any manner. Return the appliance to the Presto Factory Service Department for examination, repair, or adjustment.
- The use of accessory attachments not recommended by the appliance manufacturer may cause injuries. Use only genuine Presto™ accessories and replacement parts.
- Do not use outdoors.
- Do not let cord hang over edge of table or counter or touch hot surfaces.
- Do not place on or near a hot gas or electric burner or in a heated oven.
- Do not use appliance for other than intended use.
Important Cord and Plug Information
This appliance has a polarized plug (one blade is wider than the other). To reduce the risk of electric shock, this plug is intended to fit into a polarized outlet only one way. If the plug does not fit fully into the outlet, reverse the plug. If it still does not fit, contact a qualified electrician. Do not attempt to modify the plug in any way. A short power supply cord is provided to reduce the risk resulting from becoming entangled in or tripping over a longer cord. DO NOT USE WITH AN EXTENSION CORD. Do not allow the cord to run underneath or around the appliance. The magnetic cord may not detach easily if the cord is positioned in this fashion. Connect the power supply cord to a 120VAC electrical outlet only
How to Attach Legs and Handles
- Tools Required: Phillips screwdriver
- Parts Included: 4 Legs, 2 Handles
To Attach Legs to Base
- Place the multi-cooker upside down on the table or counter.
- Using the screwdriver, remove the screws from the four mounting projections on the bottom of the multi-cooker and set aside. Use these screws to attach the legs to the base.
- Position one of the legs, rubber foot facing up, over one of the mounting projections
- Align the hole in the leg with the hole in the mounting projection and fasten securely with the screw. The leg should not rock or move if twisted.

- Continuing to tighten, once secure, can result in the stripping of screws or the cracking of legs.
- Repeat step 3 for other three legs.
- Turn the multi-cooker right side up on the table or counter. When properly assembled, the multi-cooker should sit level with no leg rock
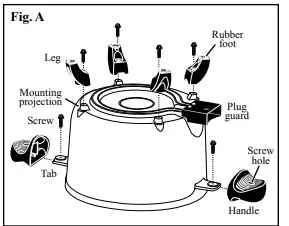
To Attach Handles to Base
- Place the multi-cooker upside down on table or counter.
- Using the screwdriver, remove the screws from the tabs on each side of the base and set aside. Use these screws to attach the handles to the base. HINT: When removing the screw under the plug guard, hold the screwdriver at a slight angle or use a short screwdriver or a screwdriver with a long shank.
- Slide one of the handles, with the screw hole up, onto the tab so the hole on the tab aligns with the hole on the handle (Fig. A). Fasten
securely with the screw. The handle should not wobble, but slight movement from side to side is normal. - Repeat step 3 for the other handle.
- Turn the multi-cooker right side up on the table or counter. When properly installed, the handles should be parallel with the table or counter.
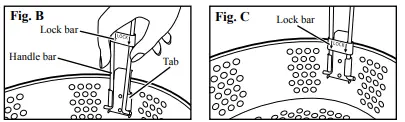
To Attach Basket Handle
- Slide lock bar up on handle and place one of the handle bars into one of the tabs on the bracket. Then squeeze the handle bars together and fit the other handle bar into the opposite tab on bracket.
- After attaching handle to basket, make sure to slide the lock bar down to the locked position to insure against accidental detachment of the handle from the basket.
Before First Use
This versatile electric multi-cooker braises, steams, boils, deep fries, and more. It is also great for making soups, stews, and desserts. Before using the multi-cooker for the first time, become familiar with its various parts , read the instructions carefully, and wash it according to the Care and Cleaning instructions 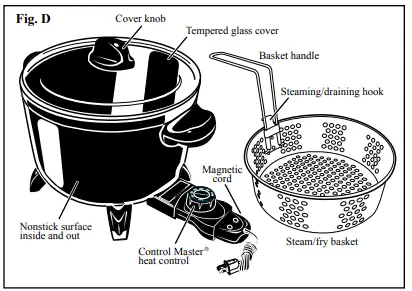
How To Use.
- Place multi-cooker on a dry, level, heat-resistant surface away from the wall and the edge.
- Do not let the cord hang or drape over the edge of the counter or table within reach of children. Remove the cover from the multi-cooker
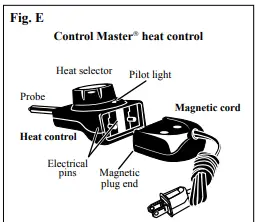
- Insert the probe end of the heat control into the multi-cooker so the two electrical pins on the appliance are fully inserted into the heat control.
- Then attach the magnetic cord to the heat control by aligning the magnetic plug end with the two electrical pins located on the back of the heat control
- Due to the fact that the magnetic plug end is polarized, it is intended to be attached to the heat control only one way.
- The printed patent information on the plug end should be facing up. The daisy and cautionary language should be facing the counte
- When properly aligned and positioned correctly, the plug end will magnetically attach itself to the heat control
- Using the index below, determine the type of cooking method desired and turn to the referenced page.
- Plug the multi-cooker into a 120VAC electrical outlet only. Preheat multi-cooker as indicated by the cooking method and follow the cooking instructions.
- During cooking, the pilot light will go on and off indicating temperature is being maintained
Specific Uses
Your Kitchen Kettle™ multi-cooker/steamer is truly versatile as you can prepare soups and stews, steam vegetables and seafood, and even deep fry in it. Because this multi-cooker does so many things, this book first provides a general overview of how to use, clean, and care for it and then specific sections on the various cooking methods available to you. Detailed instructions and recipes can be found on the pages indicated below
Care and Cleaning
- Soaking the multi-cooker to loosen food residue is not necessary.
- If, however, soaking the multi-cooker is desired, do not soak for more than two hours. Soaking for more than two hours may damage the nonstick finish.
- Do not use steel wool or abrasive kitchen cleaners.
- Do not immerse Control Master® heat control or magnetic cord in water or let either come in contact with any liquid.
- In time, the nonstick finish may darken over the heating element. To remove this discoloration, use a solution of two tablespoons of automatic dishwasher detergent powder and two cups of water.
- Bring the water to a boil in the multi-cooker and then reduce the heat to simmer level (between WARM and 200º) by turning the heat control down until the pilot light goes out. Slowly stir in the dishwasher detergent. Simmer uncovered for 20 minutes.
- Drain the solution and wash the multi-cooker in warm, soapy water.
- Rinse and dry thoroughly. After treating the multi-cooker, it is recommended that the cooking surface be wiped lightly with vegetable oil before the next use.
- Periodically check the screws on the handles and legs for looseness. Retighten, if necessary, with a Phillips screwdriver.
Glass Cover Care and Use Instructions
The glass cover may break for no apparent reason if you fail to follow these instructions. Broken glass can cause personal injury or property damage. Handle the cover carefully. Do not scrape or gouge the glass with hard or sharp utensils. Do not handle a hot cover with a wet towel or place it on a cold or wet surface. Sudden, extreme changes in temperature may cause the glass to break. Do not use the cover if it is chipped or cracked. Avoid rough handling in use and storage. Keep the cover clean. Allow the cover to cool before washing. This cover is dishwasher safe. Do not use steel wool cleaning pads or abrasive powders which can scratch or weaken the glass. Nonabrasive pads or powders may be used if necessary.
Simmer
The multi-cooker makes preparing your favorite soups and stews so easy. In your multi-cooker, foods will simmer at some point between WARM and 200°. Heat the multi-cooker at 250° until the food boils. Then place the cover on the multi-cooker and reduce the heat to the simmer level by turning the heat control down until the pilot light goes out
Beef Stock
- 1½ tablespoons vegetable oil
- 2 pounds beef soup meat
- 8 cups water
- 1 cup sliced onion
- 1 cup celery, cut into 1-inch pieces
- 1 cup carrot, cut into 1-inch pieces
- ½ tablespoon parsley flakes
- 1 bay leaf
- 1 teaspoon salt
- ⅛ teaspoon pepper
Preheat multi-cooker at 375°. Add oil and brown meat. Add water, onion, celery, carrot, parsley, bay leaf, salt, and pepper; bring to a boil. Turn heat control down until pilot light goes out. Cover and simmer 2 to 3 hours. Strain stock. 6 to 8 servings
Traditional Beef Stew
- 1½ tablespoons vegetable oil
- 2 pounds beef stew meat
- 4 cups beef stock or broth
- ½ teaspoon salt
- ¼ teaspoon pepper
- 1 small onion, diced
- 3 carrots, cut into 1-inch pieces
- 1 cup sliced mushrooms
- 1 cup peas
Preheat multi-cooker at 375°. Add oil and brown meat. Add stock, salt, and pepper. Bring to a boil. Turn heat control down until pilot light goes out. Cover and simmer 1 to 2 hours. Add onions, carrots, nushrooms, peas, and celery. Cover and simmer 30 minutes or until vegetables are tender. If desired, thicken with a paste made of cornstarch and water. 6 to 8 servings
Southwest Stew
- 2 tablespoons vegetable oil
- 4 boneless, skinless chicken breast halves, cut into
- 1-inch pieces
- 1 green bell pepper, cut into ¾-inch pieces
- 1 red bell pepper, cut into ¾-inch pieces
- 1 jalapeño pepper, chopped
- 1 cup coarsely chopped purple onion
- 2 cloves garlic, minced
- 1 can (14- to 15-ounce) pinto beans
- 1 can (14- to 15-ounce) stewed tomatoes
- 1 cup whole kernel corn
- 1 cup salsa, desired level of spiciness
- 1 tablespoon chili powder
- 2 teaspoons ground cumin
- ½ teaspoon salt
Preheat multi-cooker at 375°. Add oil and brown chicken. Add peppers, onion, and garlic; cook for 2 to 3 minutes. Add beans, tomatoes, corn, salsa, chili powder, cumin, and salt. Bring to a boil. Turn heat control down until pilot light goes out. Cover and simmer for 20 to 25 minutes. Garnish with cilantro, if desired.. 6 servings
Minestrone
- 3 cups beef stock or broth
- 1½ cups tomato juice
- 4 ounces beef soup meat
- 4 ounces sausage
- 2 cups shredded cabbage
- ¾ cup chopped onion
- ¾ cup sliced carrot
- ¾ cup green beans
- ½ cup sliced celery
- 1 can (14- to 15-ounce) diced tomatoes
- 2 garlic cloves, minced
- 1 teaspoon dried basil
- 1 teaspoon dried oregano
- ½ teaspoon salt
- ¼ teaspoon black pepper
- 1 can (14- to 15-ounce) cannelloni or navy beans, drained
- 1 ounce spaghetti, broken in half
- ¼ cup grated Parmesan cheese
Add beef stock, tomato juice, soup meat, sausage, cabbage, onion, carrots, green beans, celery, tomatoes, garlic, basil, oregano, salt, and pepper to multi-cooker. Set heat control at 250° and bring to a boil. Turn heat control down until pilot light goes out. Cover and cook for 30 minutes. Add beans and spaghetti; cook until spaghetti is tender, about 20 minutes. Top with Parmesan cheese. 8 to 10 servings
Chicken and White Bean Chili
- 1 cup dry great northern beans
- 1 tablespoon vegetable oil
- 1 pound boneless, skinless chicken breasts, cut into ¾-inch pieces
- ½ cup chopped onion
- ½ cup sliced carrot
- 2 cloves garlic, minced
- 1 jalapeño pepper, seeded, minced
- 4 cups chicken stock or broth
- 1½ teaspoons packed brown sugar
- 1 teaspoon white wine vinegar
- 2 teaspoons chili powder
- 1 teaspoon dried oregano
- ¼ teaspoon ground allspice
Clean and rinse beans. Soak beans overnight in 4 cups of water or by using the quick soak method. To soak beans using quick method, place beans in multi-cooker and cover with 4 cups of water. Set heat control at 250° and bring to a boil; boil for 1 to 2 minutes. Turn off heat control, cover, and let stand for at least 1 hour. Drain off soaking water and remove beans. Dry multi-cooker. Preheat multi-cooker at 375°. Add oil and brown chicken. Add onion, carrot, garlic, and jalapeño pepper. Sauté 1 to 2 minutes. Stir in beans, chicken stock, brown sugar, vinegar, chili powder, oregano, and allspice. Bring to a boil. Turn heat control down until pilot light goes out. Cover and simmer until beans are tender, about 1 hour. 4 servings
Steam
Fish
Place one to two cups of water, wine, or herb-flavored broth into multi-cooker. Set heat control at 250°. Remove handle from basket. Place one layer of fish fillets in basket and, using tongs, attach basket to multi-cooker rim with steaming hook. Cover and steam 5 to 10 minutes or until the fish flakes easily when tested with a fork.
Fresh Vegetables
Place two cups water in the multi-cooker. Set heat control at 250°. Remove handle from basket. Place vegetables in basket and, using tongs, attach basket to multi-cooker rim with steaming hook. Cover and steam as indicated in the table below. Steaming time begins once water starts to boil. Add additional water as necessary
| Type of Vegetable | Steaming Time | Type of Vegetable | Steaming Time | |
| Asparagus, thin spears | 3–4 minutes | Cauliflower, whole head | 18–20 minutes | |
| Asparagus, thick spears | 4–5 minutes | Cauliflower, florets | 7–9 minutes | |
| Beans, whole | 7–8 minutes | Corn-on-the-cob | 10–15 minutes | |
| Beans, 1-inch pieces | 7–8 minutes | Kale, cut into strips | 6–7 minutes | |
| Beets, 2½- to 3-inch diameter | 35–40 minutes | Parsnips, ¼-inch slices | 6–7 minutes | |
| Broccoli, spears | 5–7 minutes | Potatoes (white), small (1 to 2 ounces each) whole | 13–15 minutes | |
| Broccoli, florets | 5–7 minutes | Potatoes (white), medium, quartered | 13–15 minutes | |
| Brussels Sprouts, 1- to 1½-inch diameter | 9–11 minutes | Potatoes (sweet), 1-inch slices | 17–19 minutes | |
| Cabbage, 2-inch wedges | 15–20 minutes | Rutabaga, ¾- to 1-inch slices | 20–22 minutes | |
| Carrots, whole | 18–22 minutes | Spinach, whole leaves | 3–4 minutes | |
| Carrots, ¼-inch slices | 6–7 minute | Squash (yellow, crookneck, zucchini) ¼-inch slices | 5–7 minutes | |
| Carrots, baby-cut | 11–14 minutes | Turnips, ¾- to 1-inch slices | 10–12 minutes |
Boil
Pasta
Following package directions, place water and salt into multi-cooker. Set heat control at 250°. Bring water to a rolling boil. Add pasta gradually so that the boiling is not disturbed. Continue to boil uncovered until pasta is tender. Drain. Basket may be used for draining cooked pasta.
Fluffy Rice
Place 2 cups rice, 1 teaspoon salt (optional), and amount of water specified below in multi-cooker. Set heat control at 250°. Cover and bring to a vigorous boil, stirring once. Turn heat control down until pilot light goes out and simmer for the amount of time specified in the table. Turn heat control to OFF and let stand, covered, for 5 minutes. Fluff with fork .
Helpful Hints
- Fry foods of uniform size and thickness as they will fry more evenly and at the same speed.
- Do not overfill the basket. Frying too much food at once lowers the oil temperature and causes food to absorb too much oil.
- Use only heat-resistant utensils. Hot oil damages most plastic or rubber utensils.
- Do not leave metal utensils in the multi-cooker as they will become hot and can cause injury.
- Avoid preheating the oil longer than necessary and turn off the multi-cooker once the last batch of food has been removed.
- The longer the oil is heated, the more it deteriorates.
- Use vegetable oils, such as peanut, canola, corn, sunflower, soybean, and light olive oil, which can withstand the high temperatures required for deep frying.
- Do not use extra virgin olive oil or other vegetable oils as they deteriorate at temperatures below those required for deep frying.
- Do not use solid fat (shortening, butter, margarine, lard). Solid fat will not melt uniformly and will cause severe smoking.
- When breading food, use any type of flour, corn meal, fine bread or cracker crumbs, or commercial breading to coat food.
- To get breading to adhere better to food, dip food first in a mixture of egg and milk; see Crispy Coating recipe on page 9.
- Foods that are battered may stick to the basket; therefore, you may wish to fry these foods without the basket.
- If, however, you want to use the basket, lower it into the oil before placing battered foods in the oil.
- When using the multi-cooker without the basket, a heat-resistant scoop should be used to add or remove foods.
Handling Oil after Frying
After frying foods, allow the oil to cool. To strain oil for reuse, place a funnel into the original oil container or other airtight container and line the funnel with a filter or a double thickness of cheesecloth. Slowly pour the oil into funnel. Store the oil in a cool, dark area. The number of times the oil can be reused will depend on the type of oil used and the food that is fried in it. For example, the oil will need to be replaced more often if fish or food coated with bread or cracker crumbs is fried frequently. Replace the oil if it is dark in color, has an unpleasant odor, smokes when heated, or foams excessively during frying
How to Fry
- Place the multi-cooker on a dry, level, heat-resistant surface away from the wall and the edge. Do not let the cord hang or drape over the edge of the counter or table within reach of children. Remove the cover from the multi-cooker.
- To prevent possible heat damage to your countertop, place a heat-resistant counter protector, such as aluminum foil, under the multi-cooker, taking care not to place the foil under the legs.
- Fill the multi-cooker with vegetable oil up to the oil level line, which is located on the inside of the unit. Never use more than seven, 8-ounce cups of vegetable oil.
- Plug the cord into a 120VAC wall outlet only. Set the heat control at 400° and preheat for 20 minutes. Leave the heat control at 400° for frying.
- While the oil is preheating, prepare the food for frying. Remove any excess moisture by patting dry with paper towels. Moist foods cause excess foaming and spattering. Place basket on the countertop. The basket can be filled to the rim for most foods.
- For homemade fries, only fill the basket ½ full. Overfilling can result in the oil boiling over which may cause burns or damage to the multi-cooker.
- Once the oil has preheated, slowly lower the basket into the oil and fry food until golden brown. If the oil starts to boil up too quickly lift the basket out of the oil for a couple of seconds, then lower it again. Repeat as necessary until the basket is completely lowered into the multi-cooker.
- To prevent the risk of personal injury or property damage, use caution when cooking with hot oil.
- When the frying time has elapsed, make sure the food is golden brown. Then lift the basket and hook it onto the multi-cooker rim to allow the oil to drain from the food.
- Allow the oil to cool completely before straining or before moving or cleaning the multi-cooker.
| Type of Food | Frying Time | Type of Food | Frying Time | |
| Chicken, raw, breaded | 13–18 minutes | French fries, homemade (see recipe below) | 10–12 minutes | |
| Fish, raw, battered or breaded | 3–4 minutes | Onion rings, frozen | 2–3 minutes | |
| Fish, frozen | 7–8 minutes | Onion rings, raw, battered | 1½–2½ minutes | |
| French fries, frozen
| 11–12 minutes | Shrimp, raw, breaded or battered | 3–5 minutes |
Consumer Service Information
If you have any questions regarding the operation of your Presto® appliance or need parts for your appliance, contact us by any of these methods:
- Call 1-800-877-0441 weekdays 8:00 AM to 4:00 PM (Central Time)
- Email us through our website at www.GoPresto.com/contact
- Write: National Presto Industries, Inc.
- Consumer Service Department
- 3925 North Hastings Way, Eau Claire, WI 54703-3703
Inquiries will be answered promptly by telephone, email, or letter. When emailing or writing, please include a phone number and a time when you can be reached during weekdays. When contacting the Consumer Service Department, please indicate the model and series numbers of the multi-cooker. These numbers can be found on the bottom of the plug guard. Presto Factory Service Department is equipped to service Presto® appliances and supply genuine Presto™ replacement parts. Genuine Presto™ replacement parts are manufactured to the same exacting quality standards as Presto® appliances and are engineered specifically to function properly with its appliances. Presto can only guarantee the quality and performance of genuine Presto™ replacement parts. “Look-alikes” might not be of the same quality or function in the same manner. To ensure that you are buying genuine Presto™ replacement parts, look for the Presto® trademark.
- Canton Sales and Storage Company
- Presto Factory Service Department
- 555 Matthews Drive
- Canton, MS 39046-3251
Warranty
Presto® Limited Warranty
This quality Presto® appliance is designed and built to provide many years of satisfactory performance under normal household use. Presto pledges to the original owner that should there be any defects in material or workmanship during the first year after purchase, we will repair or replace it at our option. Our pledge does not apply to damage caused by shipping. Outside the United States, this limited warranty does not apply. To obtain service under the warranty, call our Consumer Service Department at 1-800-877-0441. If unable to resolve the problem, you will be instructed to send your Presto® appliance to the Presto Factory Service Department for a quality inspection; shipping costs will be your responsibility. When returning an appliance, please include your name, address, phone number, the date you purchased the appliance, and a description of the problem you are encountering. We want you to obtain maximum enjoyment from using this Presto® appliance and ask that you read and follow the instructions enclosed. Failure to follow instructions, damage caused by improper replacement parts, abuse, misuse, disassembly, alterations, or neglect will void this pledge. This warranty gives you specific legal rights, and you may also have other rights which vary from state to state. This is Presto’s personal pledge to you and is being made in place of all other express warranties
FAQS
How many quarts is the Presto 06006?
Presto® 1.75 Quart Kitchen Kettle™ Multi-Cooker, Steamer and Deep Fryer 06006.
How many quarts is the Presto big kettle multi-cooker & steamer?
Presto® Big Kettle™ 2.75Qt Multi-Cooker/Steamer 06008 – Walmart.com
What does a presto multi-cooker do?
Makes soups and casseroles. Steams vegetables and rice. Cooks pasta. Roasts beef, pork, and poultry.
Can you cook rice in a Presto?
Using tongs or hot pads, carefully remove bowl from cooker. Remove foil. Separate the grains by lifting gently with a fork while steaming
Can you can in a 6 qt Presto pressure cooker?
Note that pressure canners are generally 12-quart size or larger. Presto currently has 16 and 23 quart canners. Therefore, the 6 quart pressure cooker you have will not be suitable for canning.
Can Presto Kitchen Kettle be used as a slow cooker?
The Presto can actually slow-cook.
What size Multicooker do I need?
If you’re cooking for one to two people, then anything from 1.4l upwards should be just fine. For families of four to five, we’d suggest nothing smaller than 4l. If you cook for a crowd regularly or are seriously into batch cooking, then we’d suggest a 6-7l multi cooker.
Do multi-cookers use a lot of electricity?
Eliminating the need to use a steamer, deep fryer, a slow cooker, an oven, hob, bread maker, a rice cooker and even a microwave (you get this gist) – a multi cooker takes up only a small amount of space on a counter top and by using only one electric plug socket, it’s energy efficient too.
Can you cook anything in a multi-cooker?
A multi-cooker is one of the most useful tools you can have in your kitchen. You can easily cook an entire meal in one pot, without ever turning on your stove.
What can you cook in a multi cooker steamer?
Steams vegetables and rice. Cooks pasta. Roasts beef, pork, and poultry. Handy basket for steaming, blanching, and deep frying.
Can you steam food in kettle?
Chop some vegetables and add them to the kettle with water for a steaming bowl of hot soup.
Can we fry egg in kettle?
Don’t use an electric kettle with an exposed heating coil
Why we should not cook rice in pressure cooker?
It is believed that cooking rice in a pressure cooker creates a harmful chemical that can lead to a lot of diseases.
Can I throw an egg in a rice cooker?
Set your timer when everything is cold and you put the eggs in the rice cooker and turn the rice cooker on. 20 minutes for hard-cooked eggs. 13-15 minutes for soft-cooked eggs
Why should you not stir rice when cooking?
Never stir your rice! Stirring activates starch and will make your rice gloppy. That’s what makes risotto so creamy.” Rice is like pasta—you have to salt the water, or else you’ll have bland rice


