
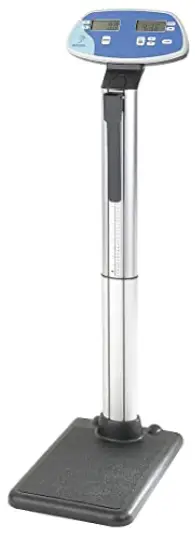
 Doran DS5100 Digital Physician Scale
Unpacking and Assembly
Introduction
Thank you for purchasing a Doran scale. This product has been designed with the highest level of technology. We are dedicated to deliver a superior product that will provide many years of trouble free service. As an ISO9000 registered company, Doran Scales is dedicated to delivering products built with strict compliance to our high quality standards. If you have any questions regarding your scale, please contact Doran Scales, Inc.
Cautions and Warnings
Your new scale is a durable industrial grade product, but it is also a sensitive weighing instrument. Normal care should be taken when handling and using this product. Improper handling or abuse can damage the scale and result in costly repairs that may not be covered by the warranty. Please observe the following precautions to insure years of trouble free service from your new scale.
- Do not use sharp objects to press any of the buttons.
- Do not use the scale if the scale is damaged in any way.
- Do not leave patients unattended on the scale.
- Do not exceed the scale capacity.
- Do not drop the scale.
- Do not drop objects on the scale.
- When transporting, do not hit other objects, walls or doorframes with the scale.
Care & Cleaning
With reasonable care, this product will last for many years. Here are some tips to care for your scale. Failure to comply with these guidelines may void the warranty. - Hand clean the scale base and indicator with a moist cloth.
- Only clean with a mild detergent.
- Do not get water inside the base or display.
- Do not use strong solvents or abrasive cleaners as this can damage the touch panel or other plastic parts.
- Do not immerse.
- Examine the scale periodically for damage and wear and tear before use.
- Remove batteries during long periods of non-use.
Moving Scale
The scale has two wheels at the rear of the scale platform. Grasp the scale display neck just above the aluminum column and tilt the scale back towards you until only the wheels contact the floor. Use the wheels when moving the scale to prevent damage. Once the scale has been moved, press ZERO before weighing.
NOTE: The DS5100 will automatically perform a zero function periodically.
When moving the scale, it may perform an automatic zero, which will affect the accuracy of the weight reading. Be sure to zero the scale after it has been moved.
Scale Assembly Instructions
Before assembly, ensure you have all the components below. If any items are missing, contact Doran Scales. Please be careful to follow all instructions. Improper assembly may void the warranty. If you notice any shipping damage, notify the shipper immediately. Be sure to retain all shipping materials in case the scale must be shipped elsewhere.
Component List

- Indicator and Upper Tower
- Scale Platform
- Scale Platform Hand Nut
- Lower Tower
- Wire Harness
- Tower Hand Nut
- Lower Height Rod
- Upper Height Rod
- Height Rod Arm
- Height Rod Screw
- Carefully remove the scale from the shipping carton. The Upper Tower (1), Lower Tower (4) and Scale Platform (2) are Connected by the Wire Harness (5) and must be removed for the packaging together.
CAUTION: DO NOT PUT STRESS ON THE WIRE HARNESS WHEN REMOVING ITEMS FROM THE BOX. - Insert the Lower Tower (4) into the Scale Platform (2). Carefully pull the wire harness from the top of the Lower Tower to prevent pinching the cable between the Lower Tower (4) and the Scale platform (2).
- Hand tighten the Scale Platform Hand Nut (3) to the threaded rod on the bottom of the Scale Platform (2).

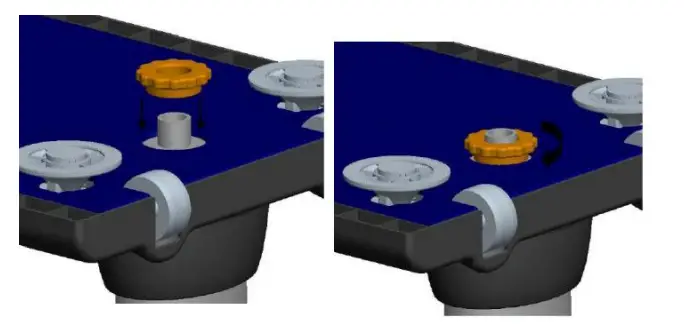
- Place the Upper Tower (1) onto the Lower Tower (4). Be careful not to pinch the Wire Harness (5).
- Hand Tighten the Tower Hand Nut (6).
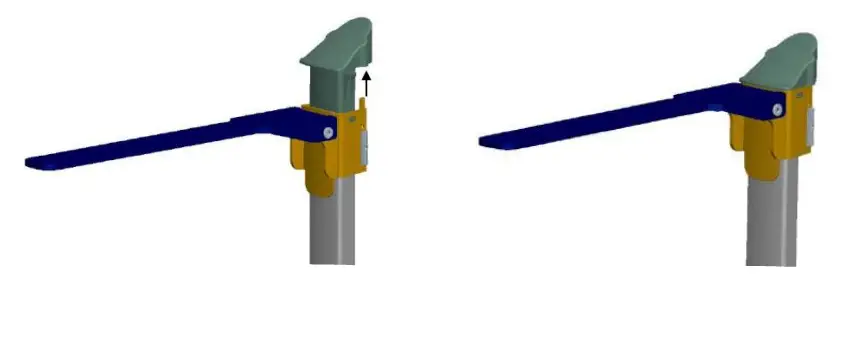
- Slide the Height Rod Arm (9) onto the Upper Height Rod (8) and snap into place. Be sure the tabs on the Upper Height Rod (8) are completely seated into the Height Rod Arm (9) slots and do not force into place.

NOTE: Proper installation of the Height Rod Arm (9) is shown above. The Upper Height Rod (8) tabs are engaged completely and the Height Rod Arm (9) tabs are inserted into the Upper Height Rod cap properly. - Connect the Upper Height Rod (8) and the Lower Height Rod (7) and install the Height Rod Screw (10) and washer using a Phillips screwdriver.
- Insert the Height Rod assembly into the opening at the top of the Indicator and Upper Tower (1)
- Place the scale on a stable flat surface. The scale should rest evenly on all four feet.
- Press ZERO and the scale is ready to weigh.
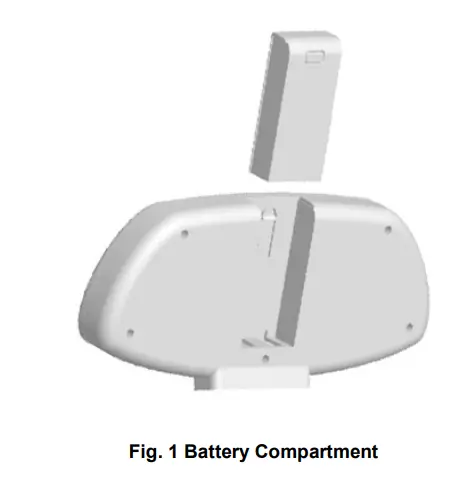
Battery Installation
The DS5100 comes with a set of four C alkaline batteries. These batteries supply three years of typical use. The batteries can be accessed at the rear of the scale display.
- Press the button at the top of the battery compartment to release.
- Slide the compartment upwards and remove the compartment from the scale.
- Insert the new set of batteries with the correct polarity.
- Reinsert the battery compartment and slide downwards until you hear a click.

Scale Operation
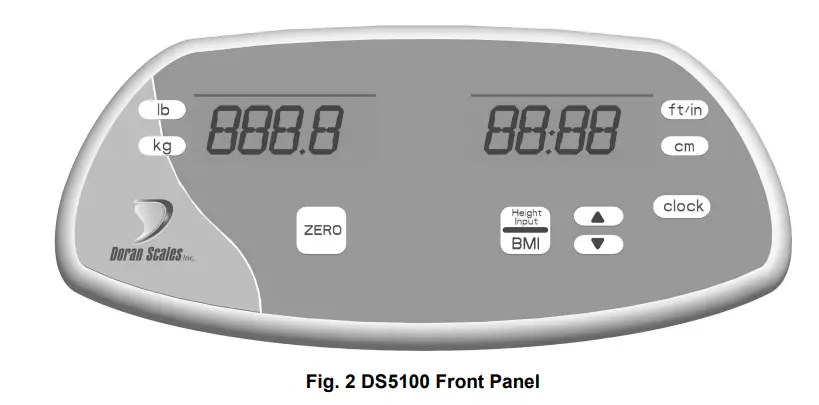
Display Pushbuttons
The Model DS5100 controls consist of ZERO, LB, KG, FT/IN, CM, CLOCK and BMI buttons. The display is used to provide weight indications and operator messages indicating scale operation.
Power On/Off
The scale automatically turns on when a patient stands on the scale. The scale has an Automatic Shutoff Timer that will power down the indicator when not in use.
Zero
When the zero button is pressed, the scale will be reset to zero weight. Use this function when the display is not reading zero when the scale platform is empty and after the scale has been relocated.
Weight Units Select
Press LB to weigh in pounds.
Press KG to weigh in kilograms.
The current unit will be displayed to the right of the weight digits.
BMI Units Select
Press FT / IN to enter patient height in feet and inches.
Press CM to enter patient height in centimeters.
The current unit will be displayed to the right of the height digits.
Downloaded from www.Manualslib.com manuals search engine
BMI
Scale enters BMI mode. See instructions below.
Clock
Accesses clock settings. See instructions below.
Scale Displays
Two LCD displays are utilized to indicate Weight, BMI, Clock values as well as the current scale status.
Weight Display
The patient weight is displayed on the left LCD display.
Hold
Indicates a stable weight has been achieved and held on the display. This indicates an accurate weight has been achieved.
Low Batt
Indicates when the batteries require replacement.
BMI / Clock Display
The BMI height and BMI calculated values are displayed on the left LCD in
BMI mode. When not in the BMI mode, the left LCD will display the current time.
Weighing a Patient
- Step on the scale and stand still.
- When a stable weight is reached the display will lock and the HOLD annunciator will be displayed.
- The weight will be displayed until the scale automatically shuts off.
BMI (Body Mass Index) Operation
- Step on the scale and stand still.
- When a stable weight is reached the display will lock and the HOLD annunciator will be displayed.
- Press BMI.
- The height will flash on the right display.
- Adjust the height with the up and down arrows and press BMI to accept the current height.
- The patient weight and BMI value will be displayed until the scale automatically shuts off.
Reset Scale To Zero
- Clear the scale platform.
- Press ZERO.
- The display will show dashes.
- When the scale becomes stable, the display will read zero.
Set Clock
- Press and Hold the CLOCK button.
- When the display reads 24Hr or 12HR, release the CLOCK button.
- To select 12-hour or 24-hour mode, press the up arrow button.
- Press CLOCK to select the displayed hour format.
- The hour digit(s) will flash.
- Use the up and down arrow keys to enter the correct hour.
- Press CLOCK to accept the current hour value.
- The minute digits will flash.
- Use the up and down arrow keys to enter the correct hour.
- Press CLOCK to accept the current minute value and exit the clock mode.
Height Measurement
When moving the height rod arm, lift the arm upwards until you hear a click. Grasp the arm at the point closest to the hinge of the height rod arm. Improper use of the height rod arm may void the warranty.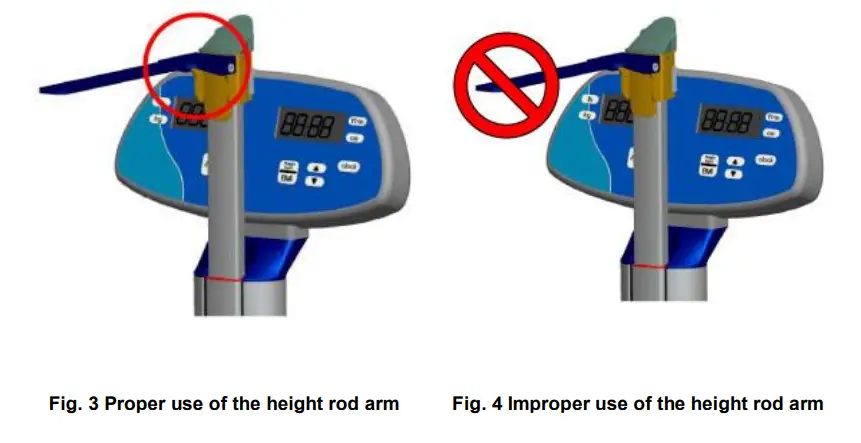
To measure a height 43.25” (110cm) or LOWER
- Extend the Height Rod Arm.
- Step onto the scale.
- Adjust the Height Rod Arm until it touches the top of the patient’s head.
- The height reading is indicated by the bottom of the Height Rod Arm as shown below.


To measure a height ABOVE 43.25” (110 cm)
- Extend the Height Rod Arm.
- Pull the Height Rod Arm above the height to be measured.
- Step onto the scale.
- Adjust the Height Rod Arm until it touches the top of the patient’s head.
- The height reading is indicated by the height reading above the stationary plastic indicator.
Scale Calibration
Calibration
CAUTION: Scale calibration requires a full set of certified weights up to 400lb or 200kg. Calibrating this scale improperly will void the warranty and will require field service or return of the scale to the factory.
At any time to exit calibration without saving, press kg.
- To calibrate in pounds press LB, to calibrate in kilograms press KG
- Simultaneously press and hold the LB and ZERO buttons for two seconds.
- Release both buttons when the display will reads 0 lb or 0 kg.
NOTE: To exit calibration without saving, press KG. - Remove all weight from scale platform and press ZERO
NOTE: During calibration be sure vibration and air currents are not present. - Once the zero calibration is successful, the display will read 100 lb (50kg).
- Place 100 lb (50 kg) on the scale and press ZERO.
- When successful, the display will read 200 lb or 100 kg.
- Place 200 lb (100 kg) on the scale and press ZERO.
- When successful, the display will read 300 lb or 150 kg.
- Place 300 lb (150 kg) on the scale and press ZERO.
- When successful, the display will read 400lb or 200 kg.
- Place 400 lb (200 kg) on the scale and press ZERO.
Calibration Troubleshooting
If Err 0 appears on the display during step 4, the calibration zero is out of range. Remove all weight from the platform and press BMI to perform the zero calibration again. If this error persists, consult the raw counts table below.
If ErrSp appears on the display during step 6,8,10 or 12, the span calibration is out of range. Place the proper weight on the platform and press BMI to perform the span calibration again. If this error persists, consult the raw counts table below.
To Access Raw Counts:
- Simultaneously press and hold the LB and ZERO buttons for two seconds.
- When both buttons are released, the display will read 0 lb or 0 kg.
- Press LB and the RAW A/D count is displayed.
- Apply test weights and compare results to the table below.
Press KG to exit.
The following table shows the acceptable Raw Counts for no load and each calibration point. If the scale’s raw counts are not within the ranges specified in the following table, contact Doran’s Technical Assistance department at 800-264-4107.
| Calibration Requirements in Raw Counts | ||
| Minimum | Maximum | |
| Zero Calibration Point | 200 | 20,000 |
| 100 lb (50 kg) | 7,328 (8,080) | 10,992 (12,120) |
| 200 lb (100 kg) | 14,656 (16,160) | 21,984 (24,240) |
| 300 lb (150 kg) | 21,984 (24,240) | 32,976 (36,260) |
| 400 lb (200 kg) | 29,312 (32,320) | 43,968 (48,480) |
Specifications
| Scale Dimensions | 22.6” L x 15” W x 54” H |
| Platform Dimensions | 15” L x 13” W x 2” H |
| Power | 4 C Alkaline Batteries
Four year battery life in typical applications. |
| Displayed Units | lb, kg |
| Capacity | 500 x 0.1 lb 200 x 0.05 kg |
| Construction | ABS Plastic Housing Aluminum Tower and Height Rod Mild Steel and Plastic Platform |
Troubleshooting
General Problem Resolution
| Problem | What to Do or Check |
| Scale will not turn on when buttons are pressed or when a patient stands on the scale. | Check the battery compartment to be sure the batteries are installed with the correct polarity.
Ensure that the battery compartment is installed properly and is pushed fully into place.
The scale requires XX lb to turn on when stepped on. For a lighter weight press ZERO and have the patient stand on the scale platform before the scal display times out. |
| Weight reading will not repeat or scale does not return to zero when weight is removed. | Person or object other than that being weighed is touching the scale.
Verify that there is nothing caught in the feet area of the platform or interfering with the feet. |
| Scale overloads before scale capacity is reached. | Verify scale calibration is correct. If problem persists, recalibrate the scale. |
| Scale will not come to zero when the ZERO button is pressed. | Make sure that the scale is stabilizing. After pressing the ZERO button, the scale should zero as soon as it becomes stable. |
| Weight readings are not correct. | Verify the scale calibration with an accurate test weight. If the readings are not correct, recalibrate.
Be sure the platform is on a flat surface and all four feet are touching the surface. |
| Scale drifts off zero. | Check for air currents and/or vibration around the scale. |
| Scale shuts itself off prematurely. | Install a new set of batteries. |
Error Messages
| Error Message | What to Do or Check |
| Er EP | The setup parameters loaded in nonvolatile memory have become corrupted. If this problem persists, contact Doran Technical Support for assistance. |
| Er Ad | The A/D communication is not detected. Ensure the wire harness was not pinched during assembly. If this problem persists, contact Doran Technical Support for assistance. |
| Err 0 | The calibration zero is out of range.Error is displayed after a zero calibration attempt. Refer to the Calibration Troubleshooting section for additional information. If this problem persists, contact Doran Technical Support for assistance. |
| Errsp | The span calibration is out of range. Error is displayed after a span calibration attempt. Refer to the Calibration Troubleshooting section for additional information. If this problem persists, contact Doran Technical Support for assistance. |
| ould | The scale is in overload. The load on the scale platform exceeds the scale capacity by more than 105%. Remove excess weight from scale platform. If the problem persists, recalibrate. If this problem still persists, contact Doran Technical Support for assistance. |
| Gsol | The scale is in an extreme overload condition. The load on the scale platform exceeds the scale capacity by more than 150%. Immediately remove excess weight from scale platform as damage not covered under the warranty can occur. If problem persists, recalibrate. If this problem still persists, contact Doran Technical Support for assistance. |
Limited Three-Year Warranty
Doran Scales, Inc. warrants Model DS5100 to be free from defects in material and workmanship for a period of three (3) years from date of shipment. Any product found to be defective within this time period may be returned to Doran’s factory, freight prepaid, with prior return authorization and proof of purchase showing date of original sale, for repair or replacement at no charge. Doran’s liability under this warranty is limited to the repair or replacement of the defective product and in no event shall Doran Scales, Inc. be liable for consequential or indirect damages to equipment or personnel. Nor shall Doran Scales, Inc. be liable for damages to equipment or for personal injury caused by misuse, overload, accidental damage, alteration, improper installation, or unauthorized opening of the equipment. Under no circumstances will Doran Scales, Inc. be responsible for any indirect or consequential damages due to errors in weighing or failure of a Doran Scales, Inc. product to perform properly.
THIS WARRANTY IS IN LIEU OF ALL OTHER WARRANTIES, EXPRESS OR IMPLIED. THIS WARRANTY CONSTITUTES DORAN’S EXCLUSIVE WARRANTY. THERE ARE NO OTHER WARRANTIES, EXPRESS OR IMPLIED, INCLUDING ANY WARRANTY OF MERCHANTABILITY OR FITNESS FOR A PARTICULAR PURPOSE.
Doran Scales, Inc.
1315 Paramount Pkwy
Batavia, IL 60510
1-800-264-4107
www.doranscales.com
FAQS
Does it come pre-calibrated?
It will be very close, the screw that calibrates it took me about a minute to get it perfect. Here is something you need to know about the seca 700. The metal bar that attaches from the pad you step on and goes to the upper portion must not be bent. If it is bent, bend it back until straight. If it is not straight, it will rub on the inside and not give you accurate readings. There is no mention of this in the directions. I had to bend mine straight and now I love mine. I checked the accuracy using water and it was spot on. It is way more accurate than my digital one. Make sure it sits on something level. Not carpet. This will measure small changes in weight if you set it upright.
what is the overall height of the scale?
Just right for anyone to read… as would be expected!
Does this have measure on kilograms?
No, this model is pounds-only, however, we manufacture the same scale in a kg-only version and one that is kg/lbs mixed (which has a maximum capacity of 400 lbs in the case of the mixed version). For questions or clarification on the Versions available please feel free to call our customer service team at (800) 542-7322 from 7:00 AM – 4:00 pm PST Monday – Friday.
Will this scale rust?
Technically yes if it’s in a super-humid environment like a gym locker room, or over the course of many years, again depending on humidity levels again because it’s made mostly of metal. I would say that is true for all scales of this type essentially in that it can’t be said they are immune to rust so to speak.
What color is it?
Exactly as shown in the photo with a powder coat white frame, black base top and column sleeve, black weights and Balance assembly. The included height rod will be an aluminum color with a bit of black and very small amount of red color on some parts.
Is it all metal? Is the weight indicator bar made of metal or plastic?
It’s mostly metal with some plastic parts. It’s well built and sturdy. The bar is made of metal.
Are the numbers on the beams cast, etched, painted, or labels?
The numbers are black paint on an aluminum surface. The sliders do not make contact with the paint. I have had this scale for some time and weigh myself every day. There has been absolutely no wear showing on the numbers.
WHy does it say “Made in USA or Imported?
It might be as easy as that some are made in the USA and some are made elsewhere.
How flat does the floor have to be?
I’m not 100 % certain. The base of the scale is about 2.5 inches high – and the platter you step on (the black part in the picture) is above that. So the floor could be carpeted without affecting the scale noticeably. But I’m not sure how ‘flat’ the floor needs to be. You could certainly prop up one side vs. another to level the scale – and that would resolve any problems. The scale is very consistent (which makes sense given that it works on actual weights and not some spring/electronic device).
Can you assemble the scale without the height bar?
Yes, the height rod can simply be left off during assembly. Also a version of this scale with no height rod included, if you don’t prefer the height rod now or in the future, can be purchased directly here https://us.secashop.com/products/measuring-stations-and-column-scales/seca-700/7001121008
what is the size of the platform?
The Seca 700 Platform is 13.2″ W x 3.1″ H x 13.6″ D.
Does this model have the wheels?
The Seca 700 Series includes castors on all models.


