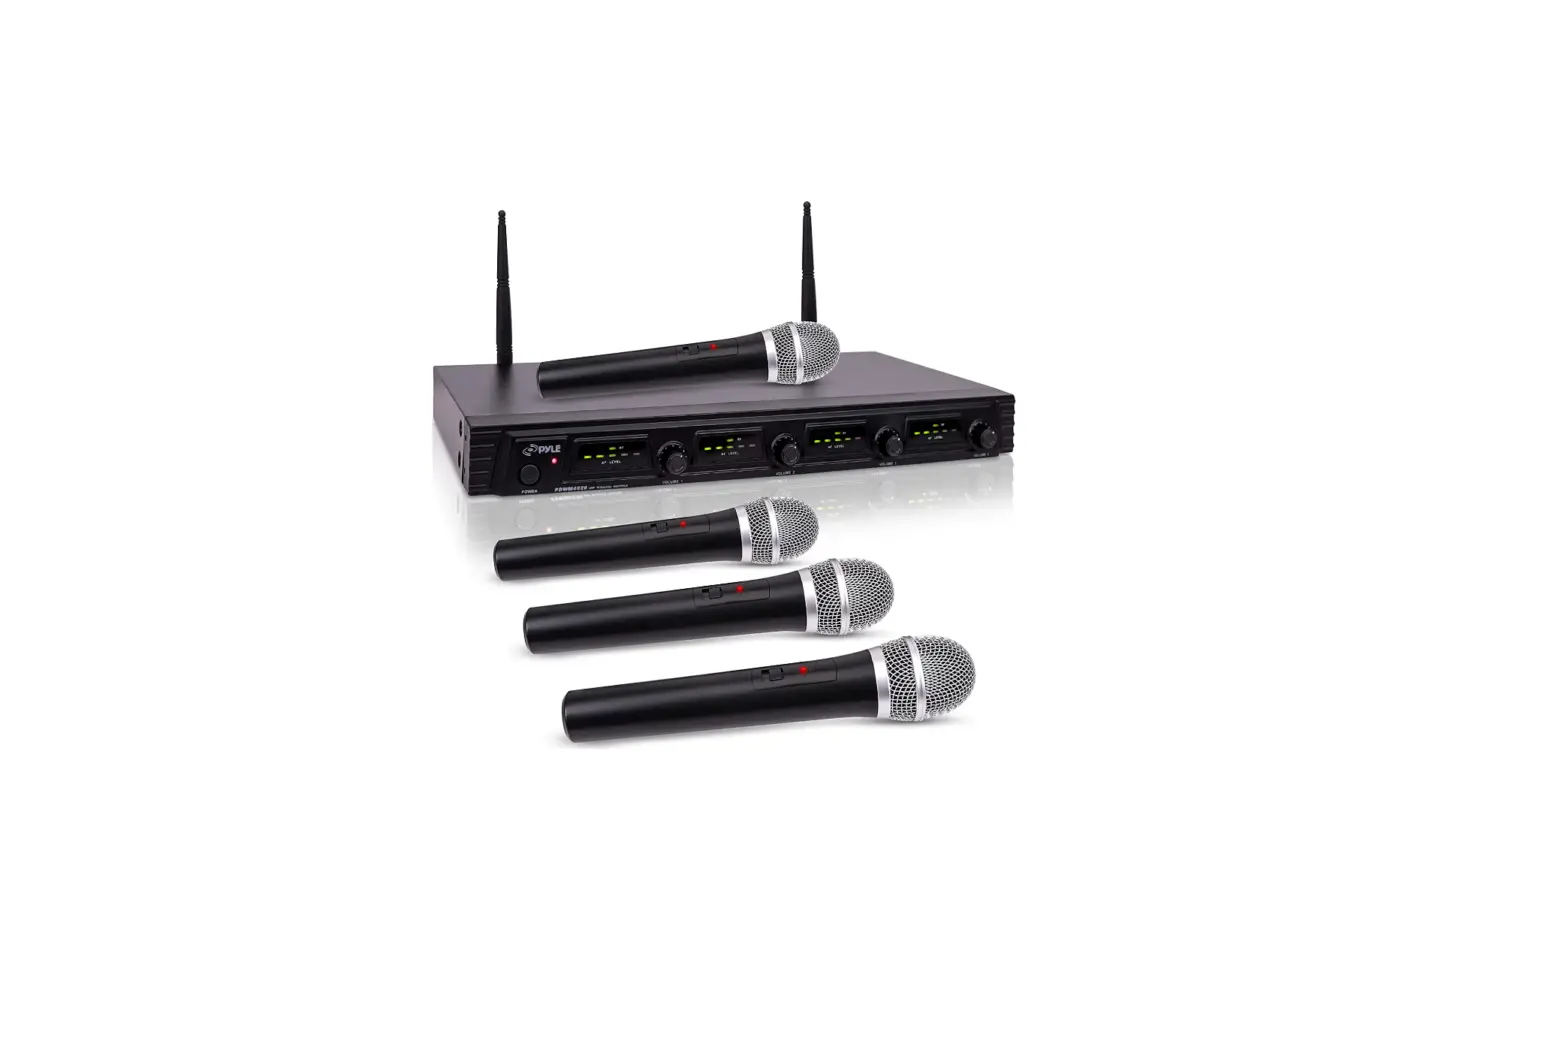

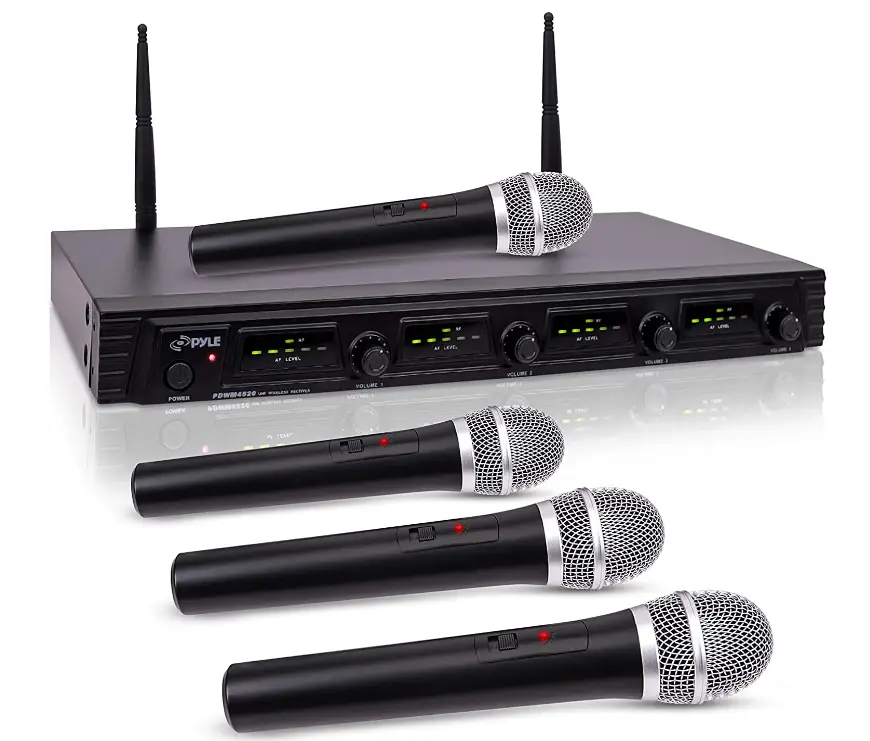
Pyle PDWM4520 Wireless Microphone System
Introduction
His portable wireless microphone system by Pyle Pro boasts a 4 channel architecture, a wide frequency response range, and mobility for active on-stage performances. Unlike other low-grade VHF units, this mic set has UHF signal audio transmission for an unmatched performance with high signal to noise ratio for clear, noise and distortion-free, sharp vocal and great sound reproduction. You may balance the vocals as you see fit with to the unit’s individual, adjustable volume controls for each of the 4 dynamic microphones. Perfect for conferences, professional engagements, PAs, and DJ parties. The receiver has 4 separate balanced XLR output ports for connecting your stereo speaker, sound mixer, and other accessories.
For ease of use, it also incorporates a dual antenna and LED indicator lights for the RF and AF signals. The rack mountable receiver base device includes a wall power converter, four wireless handheld microphones, and rack mounting hardware. The gadget can be used both indoors and outdoors, such as in a church or classroom for educational purposes.
INTRODUCTION
Your new wireless Series system is designed to give you the best of both sound reinforcement worlds: the freedom of a wireless system, and the excellent quality. This manual covers each of the Series system: The VocalArtist-UHF, The Presenter-UHF, The headset UHF and The Guitarist-UHF.
SYSTEM FEATURES
All UHF Series systems offer a variety of exceptional features, including:
- Simultaneous Output Use: Unbalanced 1/4′ phone plug and balanced XLR output connectors may be used simultaneously to different external devices.
- Range: UHF Series transmitters will work at a distance of up to 50 meters (about 164 ft.) from the receiver.
- Noise Squelch: Squelch circuit analyzes signal strength and quality so that can reduce the likelihood of noise burst due to environmental RF (radio frequency) noise.
- Low Battery Warning Light: A red light on the body-pack and hand-held transmitters warns the user that there is less than one hour of battery life left.
SYSTEM TYPE
The Vocal Artist-UHF is a hand-held system designed for singers who desire the high quality of microphones and the freedom of wireless performance. The Presenter-UHF is a body-pack system designed for public speakers who prefer an inconspicuous, hands-free lavalier microphone.
The Headset-UHF is a body-pack system designed for users in physically active applications, who desire the freedom of hand-free microphone.
The Guitarist-UHF is a body-pack system designed for use with electric guitars, basses, and other electric instruments.
FOUR-CHANNEL RECEIVER FEATURES
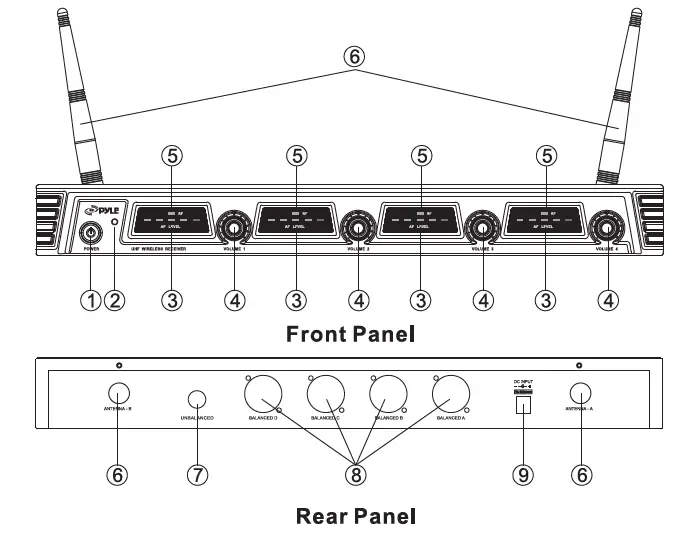
- Power Button: Power ON/OFF the receiver.
- Power Indicator: Indicates the power ON/OFF.
- “AF”Audio Level indicator: Indicates the wireless system audio signal level.
- Volume Knob: Adjust the volume output of receiver.
- “RF” Signal Indicator: It glows when the Receiver receive RF signal from Transmitter.
- Antenna A/B.
- “1/4” Audio Output Jack: Connects the audio cable from this jack to the input port of amplifier, mixer.
- XLR Balanced Output Jack: Connects the audio cable from this jack to the input port of amplifier, mixer.
- Power Jack: Connects the DC adapter to receiver.
MICROPHONE-TRANSMITTER FEATURES
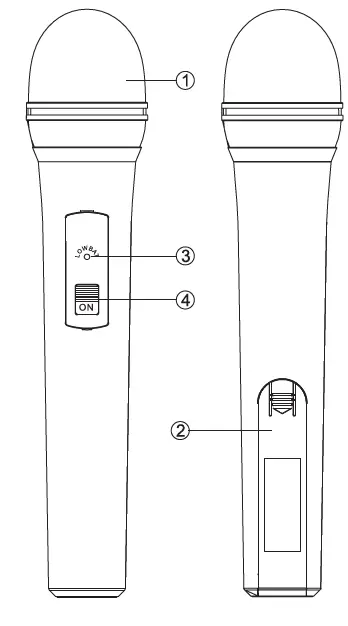
- Grille: Protects the cartridge and helps reducing the breath sounds and wind noise.
- Battery Cover: Open it to install the battery.
- Low Battery Indicator: Red light glows when it is lack of power and should renew the battery.
- Power and Audio Mute Switch.
BODY-PACK TRANSMITTER FEATURES
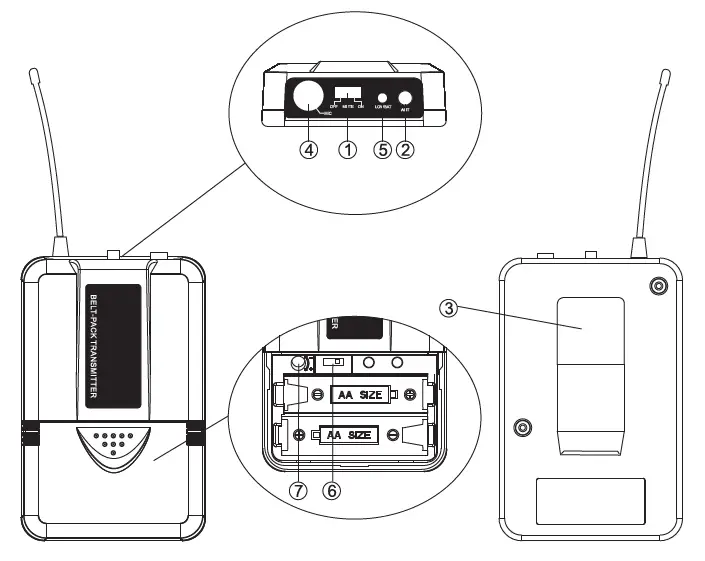
- Power and Audio Mute Switch.
- Antenna: Transmit the RF signal of transmitter.
- Belt Clip: Attach the transmitter to the belt.
- Audio Input Jack: Suitable for lavalier system/headset system.
- Low Battery Indicator: Red light glows when it is lack of power and should renew the battery.
- State Setting Switch: Set the using state of lavalier system (L) / headset system (H).
- Gain Adjusting Volume: Adjust the transmitter audio input gain.
TRANSMITTER BATTERY INSTALLATION
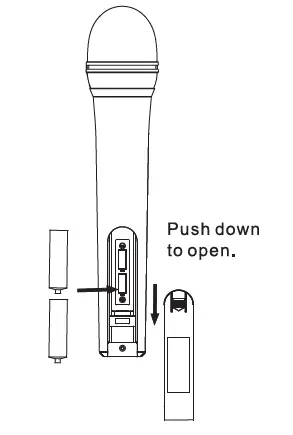
- Battery Installation of Handheld Microphone: Open the battery cover. Insert the supplied batteries into battery jar in polarity and cover the battery cover.

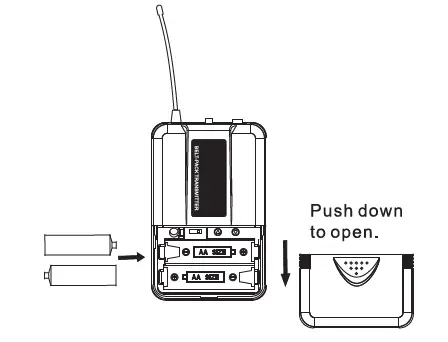
- Battery Installation of Bodypack Transmitter: Push open the battery cover. Insert the supplied batteries into battery jar in polarity and close the battery cover.

BODYPACK TRANSMITTER CONNECTION
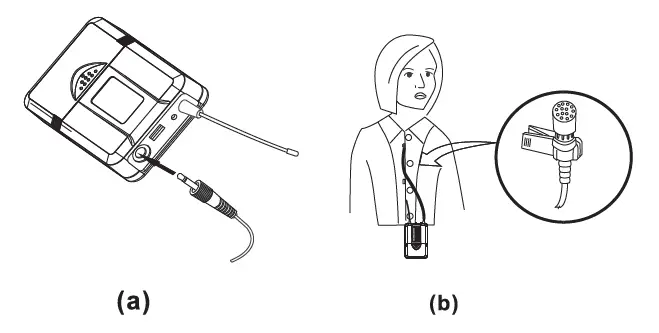
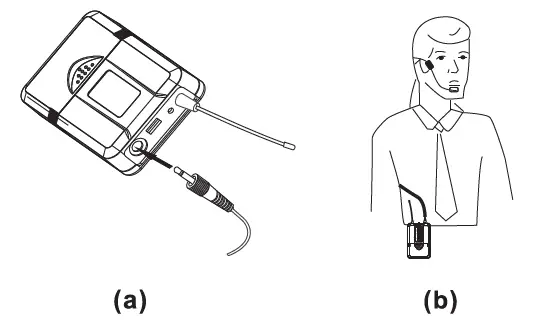
- Lavalier Microphone Connection: Connect the connector of supplied lavalier microphone to the connecting jack of transmitter (shown as below) Set the transmitter work state in wireless lavalier system (L).

- Headset Microphone Connection: Connect the connector of supplied headset microphone to the connecting jack of transmitter (shown as below) Set the transmitter work state in wireless headset system (H).
SYSTEM CONNECTION
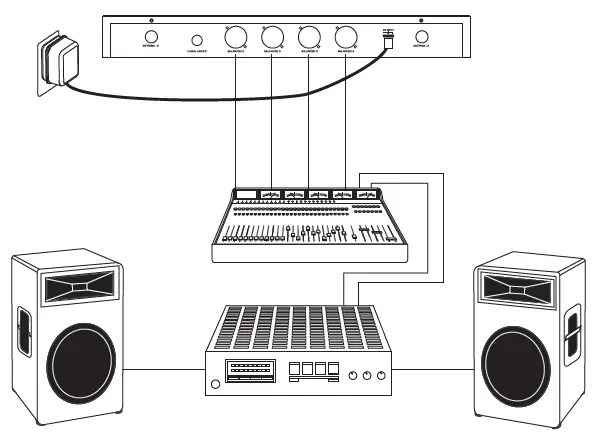
- Receiver Power Connection: Connect the DC connector of supplied AC/DC adapter Into the DC power input of receiver. Plug the AC Input connecter into an AC120/60Hz or AC220V/50Hz outlet. (Shown as below)

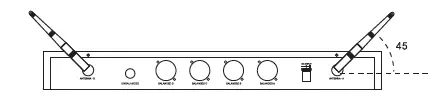
- Antenna: Keep the position of antenna at a 45 angle from vertical. (Shown as below)

- Audio Connection: Connect the corresponding output of receiver by supplied 1/4w phone jack audio cable or your XLR cable to the Input of power amplifier, mixer.


The audio gain control on transmitter has been factory-at the mid-range position for best performance in most applications. This may be necessary for soft singers or talkers, or guitar or basses with low outputs.
- To Increase Gain: Rotate the transmitter gain control clockwise using a screwdriver to increase audio gain.
- To Reduce Gain: Rotate the transmitter gain control counterclockwise with the screwdriver to reduce audio gain.
- To return audio gain to the factory setting, rotate the transmitter audio gain control to the mid position.
TIPS FOR ACHIEVING MAXIMUM PERFORMANCE
- Make sure you can always see a receiver antenna from the transmitter position.
- Keep the distance from transmitter to receiver antenna as short as possible.
- Point receiver antennas away from each other at a 45 angle from vertical.
- Avoid placing the receiver antennas near metal surfaces and obstruction.
- If stacking or rack mounting receivers in a multiple-system use situation, do not allow antennas to touch or cross.
- Perform a walk-through before Performance or Presentation. If dead spots are found, adjust location of receiver. If dead spots remain, mark spots and avoid.
TROUBLESHOOTING
| PROBLEM | INDICATOR STATUS | SOLUTION |
| No Sound | Red transmitter indicator is not flashing | Slide transmitter POWER ON/OFF switch to ON position. Make sure battery is inserted properly, observing battery (+/-). If the battery is inserted properly, replace with fresh battery. |
| No Sound | Red transmitter indicator is flashing | Slide transmitter MUTE/ON switch to ON position |
|
No Sound | Red receiver POWER light off | Make sure AC adapter is securely plugged into electrical outlet and into DC input connector. Make sure AC electrical outlet works and supplies proper voltage |
|
No Sound | Receiver signal indicators A/B lights glowing | Turn up receiver volume control. Confirm that the output connections from the receiver to the external equipment are secure |
|
No Sound | Receiver signal indicators A/B lights off. Transmitter and | Confirm transmitter and receiver~ frequency match. Move transmitter |
| receiver POWER lights glowing | closer to receiver. | |
| Sound level differs from the level of a cabled Instrument. | Receiver signal indicators A/B lights glowing | Adjust transmitter gain level to compensate.
Adjust receiver volume as necessary |
| Sound level differs from the level of different guitars | Receiver signal indicators A/E lights glowing | Readjust transmitter gain level to compensate differences in guitar outputs |
| Distortion level increases gradually | Receiver signal indicators A/B lights and transmitter LOW BATTERY light glowing |
Replace transmitter battery |
| Bursts of noise or other audible radio signals present |
Signal indicators A/B lights ON | Identify potential sources of interference (other RF sources) and turn OFF, remove or use a wireless system operating on a different frequency |
| Momentary loss of | Receiver signal indicator A/B lights OFF when sound is lost | Reposition receiver and perform |
| sound as transmitter is | walk-through again. If audio dropouts | |
| moved around | persist, mark “dead” spot-and avoid them | |
| performing area. | during performance. |
SYSTEM SPECIFICATIONS
- WIRELESS OPERATING FREQUENCY RANGE: Approximately 573.0 – 597.8 MHz (Available frequencies depend on applicable regulations in country where system is used).
- OPERATING RANGE: 50m (approximately 164ft) under typical conditions
- AUDIO FREQUENCY RESPONSE: 100 to 18,000Hz, ±3dB
- THD: <1%
- MOBILE STATE RANGE: > 100dB
- OPERATIG TEMPERATURE RANGE: 20.2°F to 165.2°F (-29°C to 74°C)
NOTE: Battery characteristics may limit this range.
OPTIONAL ACCESSORIES
1/4″ to 1/4″ Cable (The Guitarist -UHF only) 1/4″ to Miniature Connector 1.8 Meter (6ft.) Receiver-Mixer Cable
RECEIVER SPECIFICATION
| Power Requirements | 120V or 230VAC adaptor with 2.1 mm female plug |
| Power Requirements | 12-15 V DC nominal,500mA+ |
| Signal/Noise Ratio | MORE THAN 85dB |
| Border Upon Channel Rejection | MORE THAN 70dB |
| Image & Spurious Rejection | MORE THAN 70dB |
| Audio Output Level | 0-±300mV |
| Receiving Sensitivity | -105dBm |
| Dimensions | 394MM X 235MM X 55MM |
HAND-HELD TRANSMITTER SPECIFICATIONS
| Power Requirements | 1.5VAA battery X 2 |
| Nominal Current Drain | LESS THAN 100mA |
| Modulation Type | FM |
| RF Output | MORE THAN 10dBm |
| Max Deviation | ±70KHz |
| Spurious Emission | MORE THAN 55dB |
|
Dimensions | 238mm x 50mm x 50mm 250mm x 51mm x 51mm |
BODY-PACK TRANSMITTER SPECIFICATIONS
| Power Requirements | 1.5VAA battery X2 |
| Nominal Current Drain | LESS THAN 100mA |
| Modulation Type | FM |
| RF Output | MORE THAN 10dBm |
| Max Deviation | ±70KHz |
| Spurious Emission | MORE THAN 55dB |
| Dimensions | 100MM X 65MM X 30MM |
UHF Band Receiver System
- Quad Frequency Channel Design (Channel1, 2, 3, 4)
- Broad Frequency Response Range & Low Distortion
- High Signal/Noise Ratio Performance
- RF Signal &AF Signal LED Indicators
- Radio Frequency and Audio Frequency
- Independent Channel Adjustable Volume Controls
- Detachable Dual Antennas
- Rack Mountable System
- Includes (4) Handheld Microphones
- 4 XLR Output Connector Jacks
SYSTEM RECEIVER:
- Wireless Operating Frequency Range: 573.0 – 597.8 MHz
- Image & Spurious Rejection: >70dB
- Receiving Sensitivity: -105dBm
- Signal/Noise Ratio: >85dB
- Border Upon Channel Rejection: >70dB
- H.D.: <0.5%
- Audio Output Level: 0-300mV
- Power Requirements: 12-15V DC nominal 1000mA
- Dimensions (L x W x H): 15.51″ x 9.25″ x 2.16″
MICROPHONES
- RF Power Output: >10dBm
- Modulation Type: FM
- Deviation: +/- 40kHz
- Nominal Power Current: <40mA
- Spurious Emission: >55dBc
- Battery Powered: 2 x ‘AA’ Batteries (Included)
- Batteries Included
- Weight: 180g
FAQs
I’m a DJ/KJ and had returned this particular model because since all four mics are set on the same frequency and if more than one mic is live and in use, one mic had the tendency of overpowering the others and causing the others to “shut down” – as I experienced during a couple of my gigs. Just to rule out any fluke, I decided to use the same system on another gig and the same thing happened. The voice quality is great but I would not recommend this model if more than one mic is being used simultaneously. I eventually purchased a four-mic system (UHF) with each of the mics having its own different frequency.
it uses AA.
Yes, I use it with my portable Karaoke machine!
I am not sure. In our case both of our lapel microphones were on a much lower frequency, VHF and these are UHF.
1 year parts & labor.
We bought two units and did run into some interference because the channels could be picked up on either unit. We ended up only needing one unit right now so we are good. If we use the second unit I will need to contact Pyle to see if we can change frequency.
Works very well, but preferable to use rechargeable batteries, cause the other batteries don’t last.
On the back of the unit there is a 1/4″ mono jack that outputs the combined signals from the 4 mics. The volume level of each mic is separately controllable as is the output level to the jack. With a suitable adapter cable this should allow connection to the mic input of a lap top.
the mic works around 30 to 50 ft away from the receiver without obstacles. For more info, kindly visit our website pyleaudio.com. Type the model number on the search box PDWM4520.
No don’t buy those wires, it comes with the wires that connect to your amp.
The unbalanced port is for a single connection between the microphone set and the amplifier or mixer. Unlike the balance connection which you will need to connect each channel of the microphone to the mixer.
I use these mics for karaoke, and I use the 1/4 in output jack on the microphones to the karaoke mic input and the karaoke RCA outputs to my receiver.


