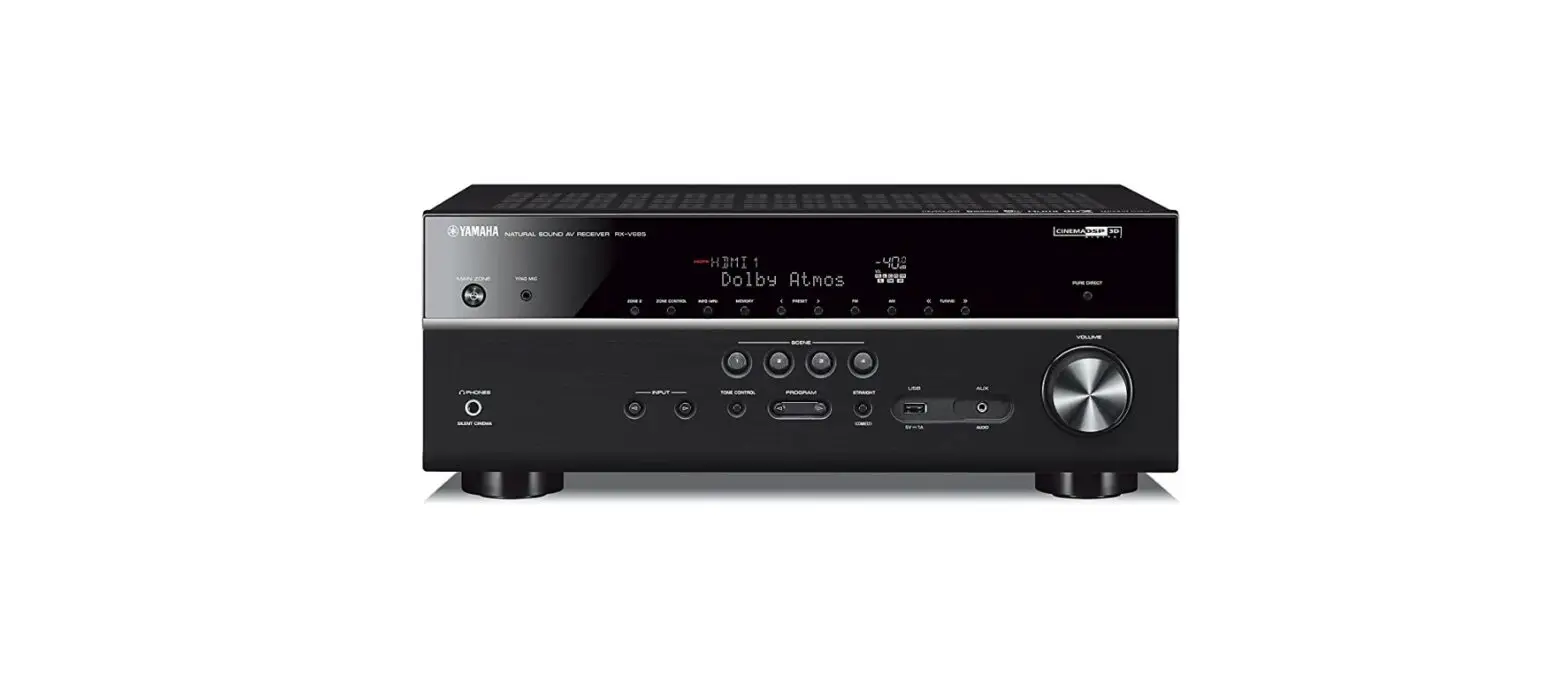
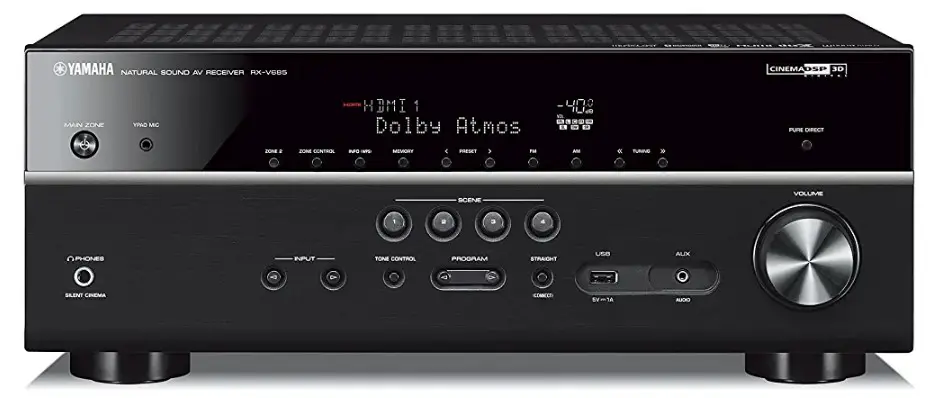
Yamaha RX-V685 7.2-Channel AV Receiver
IMPORTANT SAFETY INSTRUCTIONS
The above warning is located on the rear of the unit.
Explanation of Graphical Symbols
The lightning flash with arrowhead symbol, within an equilateral triangle, is intended to alert you to the presence of uninsulated “dangerous voltage” within the product’s enclosure that may be of sufficient magnitude to constitute a risk of electric shock to persons.
The exclamation point within an equilateral triangle is intended to alert you to the presence of important operating and maintenance (servicing) instructions in the literature accompanying the appliance.
- Read these instructions.
- Keep these instructions.
- Heed all warnings.
- Follow all instructions.
- Do not use this apparatus near water.
- Clean only with dry cloth.
- Do not block any ventilation openings. Install in accordance with the manufacturer’s instructions.
- Do not install near any heat sources such as radiators, heat registers, stoves, or other apparatus (including amplifiers) that produce heat.
- Do not defeat the safety purpose of the polarized or grounding-type plug. A polarized plug has two blades with one wider than the other. A grounding type plug has two blades and a third grounding prong. The wide blade or the third prong are provided for your safety. If the provided plug does not fit into your outlet, consult an electrician for replacement of the obsolete outlet.
- Protect the power cord from being walked on or pinched particularly at plugs, convenience receptacles, and the point where they exit from the apparatus.
- Only use attachments/accessories specified by the manufacturer.
- Use only with the cart, stand, tripod, bracket, or table specified by the manufacturer, or sold with the apparatus. When a cart is used, use caution when moving the cart/apparatus combination to avoid injury from tip-over.
- Unplug this apparatus during lightning storms or when unused for long periods of time.
- Refer all servicing to qualified service personnel. Servicing is required when the apparatus has been damaged in any way, such as power-supply cord or plug is damaged, liquid has been spilled or objects have fallen into the apparatus, the apparatus has been exposed to rain or moisture, does not operate normally, or has been dropped.
IMPORTANT
Please record the serial number of this unit in the space below.
MODEL:
Serial No.:
The serial number is located on the rear of the unit. Retain this booklet in a safe place for future reference.
PRECAUTIONS
PLEASE READ CAREFULLY BEFORE USE. BE SURE TO FOLLOW THESE INSTRUCTIONS.
The precautions listed below are to prevent risk of harm to the user and others, as well as to prevent property damage, and to help the user use this unit properly and safely. Be sure to follow these instructions.
After reading this manual, be sure to keep it in a safe place where it can be referenced at any time.
- Be sure to request inspections or repairs from the dealer where you purchased the unit or from qualified Yamaha service personnel.
- Yamaha cannot be held responsible for injury to you or damage of the products caused by improper use or modifications to the unit, or data that is lost or destroyed.
- This product is for ordinary homes. Do not use for applications requiring high reliability, such as managing lives, health care or high-value assets.
WARNING
This content indicates “risk of serious injury or death.”
Power supply/power cord
- Do not do anything that could damage the power cord.
- Do not place it near a heater.
- Do not bend it excessively or alter it.
- Do not scratch it.
- Do not place it under a heavy object.
Using the power cord/adaptor with the core of the cord exposed could cause electric shocks or a fire.
- Do not touch the power plug or cord if there is a chance of lightning. Failure to observe this may cause electric shocks.
- Use this unit with the power supply voltage printed on it. Failure to connect to an appropriate AC outlet may cause a fire, electric shocks, or malfunctions.
- Check the electric plug periodically and remove any dirt or dust which may have accumulated on it. Failure to observe this may cause a fire or electric shocks.
- When setting up the unit, make sure that the AC outlet you are using is easily accessible. If some trouble or malfunction occurs, immediately turn off the power switch and disconnect the plug from the AC outlet. Even when the power switch is turned off, as long as the power cord is not unplugged from the wall AC outlet, the unit will not be disconnected from the power source.
- If you hear thunder or suspect approaching lightning, quickly turn off the power switch and pull the power plug from the AC outlet. Failure to observe this may cause a fire or malfunctions.
- If not using the unit for long periods of time, be sure to pull the power plug from the AC outlet. Failure to observe this may cause a fire or malfunctions.
Do not disassemble
Do not disassemble or modify this unit. Failure to observe this may cause a fire, electric shocks, injury, or malfunctions. If you notice any irregularities, be sure to request an inspection or repair from the dealer where you purchased the unit or from qualified Yamaha service personnel.
Water warning
- Do not expose the unit to rain, use it near water or in damp or wet conditions, or place on it any containers (such as vases, bottles or glasses) containing liquids which might spill into any openings or places where water may drop. A liquid such as water getting into the unit may cause a fire, electric shocks, or malfunctions. If any liquid such as water seeps into the device, turn off the power immediately and unplug the power cord from the AC outlet. Then, request an inspection from the dealer where you purchased the unit or from qualified Yamaha service personnel.
- Never insert or remove an electric plug with wet hands. Do not handle this unit with wet hands. Failure to observe this may cause electric shocks or malfunctions.
Fire warning
- Do not place any burning items or open flames near the unit, since they may cause a fire. Maintenance and care
- Do not use aerosols or spray-type chemicals that contain combustible gas for cleaning or lubrication. The combustible gas will remain inside the unit, which may cause explosion or fire.
Battery use
- Do not disassemble a battery. If the contents of the battery get on your hands or in your eyes, it can cause blindness or chemical burns.
- Do not dispose of batteries in fire. Doing so may result in the battery bursting, causing a fire or injury.
- Do not expose a battery to high temperatures, such as direct sunlight or a fire. The battery may burst, causing a fire or injury.
- Do not attempt to recharge batteries that are not intended to be charged. Charging could cause the battery to burst or leak, which can cause blindness, chemical burns, or injury.
- If the batteries do leak, avoid contact with the leaked fluid. If the battery fluid should come in contact with your eyes, mouth, or skin, wash immediately with water and consult a doctor.
Battery fluid is corrosive and may possibly cause loss of sight or chemical burns.
Wireless unit
- Do not use this unit near medical devices or inside medical facilities. Radio waves from this unit may affect electro-medical devices.
- Do not use this unit within 15 cm (6 in) of persons with a heart pacemaker implant or a defibrillator implant. Radio waves from this unit may affect electro-medical devices, such as a heart pacemaker implant or defibrillator implant.
If you notice any abnormality
- If any of the following abnormalities occur, immediately turn off the power and disconnect the power plug. If any of the following abnormalities occur, immediately turn off any amplifiers and receivers.
- The power cord/plug is damaged.
- An unusual smell or smoke is emitted from the unit.
- Foreign material gets into the interior of the unit.
- There is a loss of sound during use.
- There is a crack or damage in the unit.
Continued use could cause electric shocks, a fire, or malfunctions. Immediately request an inspection or repair from the dealer where you purchased the unit or from qualified Yamaha service personnel.
- Be careful not to drop or apply strong impact to this unit. If you suspect the unit may have been damaged due to dropping or impact, immediately turn off the power and pull the power plug from the AC outlet. Failure to observe this may cause electric shocks, a fire, or malfunctions. Immediately request an inspection from the dealer where you purchased the unit or from qualified Yamaha service personnel.
CAUTION
This content indicates “risk of injury.”
Power supply/power cord
- Do not use an AC outlet where the power plug fits loosely when inserted. Failure to observe this may cause a fire, electric shocks, or burns.
- When removing the electric plug from the unit or an AC outlet, always hold the plug itself and not the cord. Pulling by the cord can damage it and cause electric shocks or a fire.
- Insert the power plug firmly all the way into the AC outlet. Using the unit when it is not plugged in sufficiently can cause dust to accumulate on the plug, causing a fire or burns.
Installation
- Do not place the unit in an unstable position where it might accidentally drop or fall over and cause injuries.
- Do not block this unit’s ventilation holes (cooling slits). This unit has ventilation holes on the top/side/bottom to prevent the internal temperature from becoming too high. Failure to observe this may trap heat inside the unit, causing a fire or malfunctions.
- When installing this unit:
- Do not cover it with any cloth.
- Do not install it on a carpet or rug.
- Make sure the top surface faces up; do not install on its sides or upside down.
- Do not use the device in a confined, poorly-ventilated location.
Failure to observe the above may trap heat inside the unit, causing a fire or malfunctions. Ensure that there is adequate space around the unit: at least 30 cm (11-3/4 in) on top, 20 cm (7-7/8 in) on the sides, and 20 cm (7-7/8 in) on the rear.
- Do not install the unit in places where it may come into contact with corrosive gases or salt air. Doing so may result in malfunction.
- Avoid being near the unit during a disaster, such as an earthquake. Since the unit may turn over or fall and cause injury, quickly move away from the unit and go to a safe place.
- Before moving this unit, be sure to turn off the power switch and disconnect all connection cables. Failure to observe this may damage the cables or cause you or someone else to trip and fall.
- For proper installation of the outdoor antenna, make sure to have it done by the dealer from where you purchased the unit or by qualified service personnel. Failure to observe this may cause the installation to fall and result in injury. Installation requires special skills and experience.
Hearing loss
- Do not use the unit/speakers or headphones for a long period of time at a high or uncomfortable volume level, since this can cause permanent hearing loss. If you experience any hearing loss or ringing in the ears, consult a physician.
- Before connecting the unit to other devices, turn off the power for all devices. Also, before turning the power of all devices on or off, make sure that all volume levels are set to the minimum. Failing to do so may result in hearing loss, electric shock, or device damage.
- When turning on the AC power in your audio system, always turn on the amplifier or receiver LAST, to avoid hearing loss and speaker damage. When turning the power off, the amplifier or receiver should be turned off FIRST for the same reason. Failure to observe the above may cause hearing impairment or speaker damage.
Maintenance
- Remove the power plug from the AC outlet before cleaning the unit. Failure to observe this may cause electric shocks.
Handling caution
- Do not touch the surface having this label. Doing so may cause burns. The label on the device indicates that the surface to which the label is attached may become hot during operation.
- Do not insert your hand or fingers into the ventilation holes of this unit. Failure to observe this may cause injury.
- Do not insert foreign materials such as metal or paper into the ventilation holes of this unit. Failure to observe this may cause a fire, electric shocks, or malfunctions. If foreign material gets into the unit, immediately shut off the power and pull the power plug from the AC outlet and request an inspection from the dealer where you purchased the unit or from qualified Yamaha service personnel.
- Do not do the following:
- put heavy items on top of the equipment.
- place the equipment in a stack.
- apply unreasonable force to buttons, switches, input/output terminals, etc.
- Avoid pulling the connected cables to prevent injuries or damage to the unit by causing it to fall.
Battery use
- Always replace all batteries at the same time. Do not use new batteries together with old ones. Using new ones with old ones could cause a fire, burns, or inflammation due to fluid leaks.
- Do not use batteries other than specified batteries. Doing so cause fire, burns, or inflammation due to leakage.
- Do not mix battery types, such as alkaline batteries with manganese batteries, or batteries from different makers, or different types of batteries from the same maker, since this can cause a fire, burns, or inflammation due to fluid leaks.
- Keep batteries away from children. A child could accidentally swallow a battery. Failure to observe this may also cause inflammation due to battery fluid leaks.
- Do not put in a pocket or bag, carry, or store batteries together with pieces of metal. The battery could short, burst, or leak, causing a fire or injury.
- Always make sure all batteries are inserted in conformity with the +/- polarity markings.
Failure to do so might result in a fire, burns, or inflammation due to fluid leaks. - When the batteries run out, or if the unit is not to be used for a long time remove the batteries from the remote control to prevent possible leakage of the battery fluid.
- When storing or discarding batteries, insulate the terminal area by applying tape, or some other protection. Mixing them with other batteries or metal objects can cause a fire, burns, or inflammation due to fluid.
Notice
Indicates points that you must observe in order to prevent product failure, damage or malfunction and data loss.
Power supply/power cord
- If not using the unit for a long period of time, be sure to pull the power plug from the outlet.
Even if the z (Standby/On) switch has been turned off (the screen display is off), a minute current is still flowing.
Installation - Do not use this unit in the vicinity of other electronic equipment, such as a TV, radio, or mobile phone. Failure to observe this may cause this unit or the TV or radio to produce noise.
- Do not use this unit in a location that is exposed to direct sunlight, that becomes extremely hot, such as near a heater, or extremely cold, or that is subject to excessive dust or vibration. Failure to observe this may cause the unit’s panel to become deformed, the internal components to malfunction, or for operation to become unstable.
- Install this unit as far away from other electronic equipment as possible.
Digital signals from this unit may interfere with other electronic equipment. - If using a wireless function, avoid installing this unit near metal walls or desks, microwave ovens, or other wireless network devices.
Obstructions could shorten the transmission distance.
Connections
- If connecting external units, be sure to thoroughly read the manual for each unit and connect them in accordance with the instructions.
Failure to properly handle a unit in accordance with the instructions could cause malfunctions. - Do not connect this unit to industrial units.
Digital audio interface standards for consumer use and industrial use are different. This unit has been designed to connect to a consumer-use digital audio interface. Connections to an industrial-use digital audio interface could not only cause this unit to malfunction, but could also damage the speakers.
Handling
- Do not place vinyl, plastic, or rubber products on this unit. Failure to observe this may cause discoloration or deformation in the panel of this unit.
- If the ambient temperature changes drastically (such as during unit transportation or under rapid heating or cooling) and there is a chance condensation may have formed in the unit, leave the unit for several hours without turning on the power until it is completely dry before use. Using the unit while there is condensation can cause malfunctions.
Maintenance
- When cleaning the unit, use a dry, soft cloth. Using chemicals such as benzine or thinner, cleaning agents, or chemical scrubbing cloths can cause discoloration or deformation.
Batteries
- Be sure to discard used batteries in accordance with local regulations.
Information
About content in this manual
- The illustrations and screens in this manual are for instructional purposes only.
- The company names and product names in this manual are the trademarks or registered trademarks of their respective companies.
- Software may be revised and updated without prior notice.
Introduction
- This unit is a product for enjoying music and video at home.
- This document explains basic speaker system setup and unit configuration, followed by step-by-step instructions. Basic operations, such as playing Blu-ray Discs, DVDs, and radio content, are also explained. The unit is equipped with a number of other functions not described in this document. For more information about this product, refer to the Owner’s Manual on the Yamaha website.
Follow one of the methods described below to view the latest Owner’s Manual.
In HTML format
- Scan the QR code found on the front cover of this document.
- Visit the following website.
http://avpro.global.yamaha.com/manual/avr/rxv685/
In PDF format
- Visit the following website. http://download.yamaha.com/
- [For U.S. customers only]
Visit the following website for additional information, FAQ’s, downloads such as “Owner’s Manual” and product updates. http://usa.yamaha.com/support/
Trademarks and trade names used in this document are those of their respective owners. See the Owner’s Manual for more information.
Features
The unit is also capable of the following, which are not described in this document. See the Owner’s Manual to help you get the most out of the unit.
- Playing music files stored on a media server (PC or NAS)
- Playing iTunes music or iPhone/iPad/iPod touch music over a network M(AirPlay)
- Playing music in multiple rooms (Zone function)
- Configuring system settings (ADVANCED SETUP menu) For more information, see “What you can do with the unit” in the Owner’s Manual.
AV SETUP GUIDE
AV SETUP GUIDE is an app that guides you through the process of connecting a TV or playback device, such as a BD/DVD or CD player, and speakers to the AV receiver. Search “AV SETUP GUIDE” on the App Store or Google Play for details.
Preparation
Confirming package contents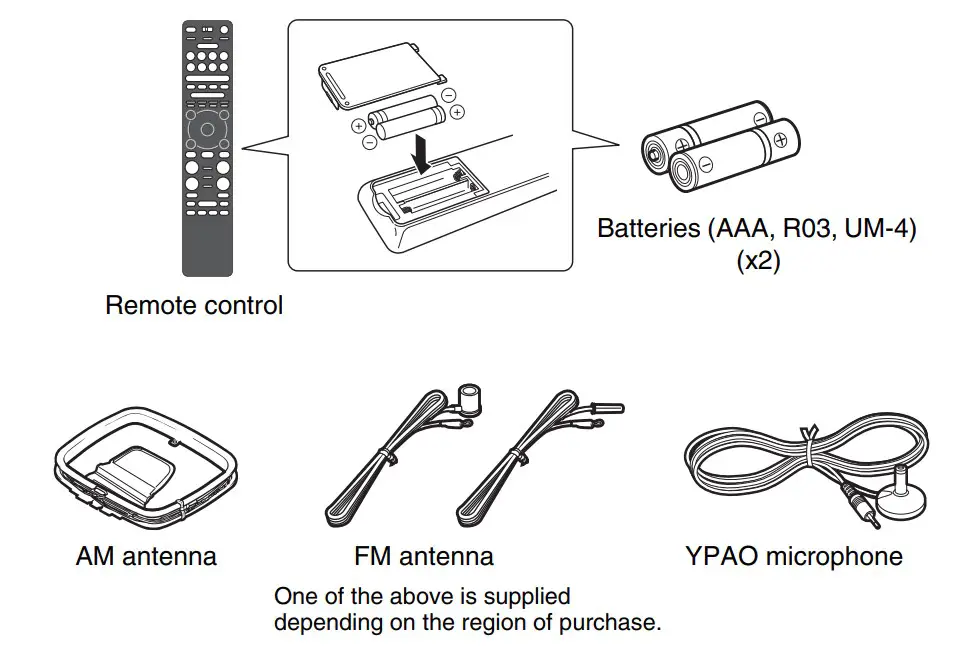
Preparing cables
The following cables (not supplied) are required to build the system described in this document.
- Speaker cables (depending on the number of speakers)
- Audio pin cable (x1)
- HDMI cables (x3)
- Network cable (x1) (when connecting to a router via a network cable)
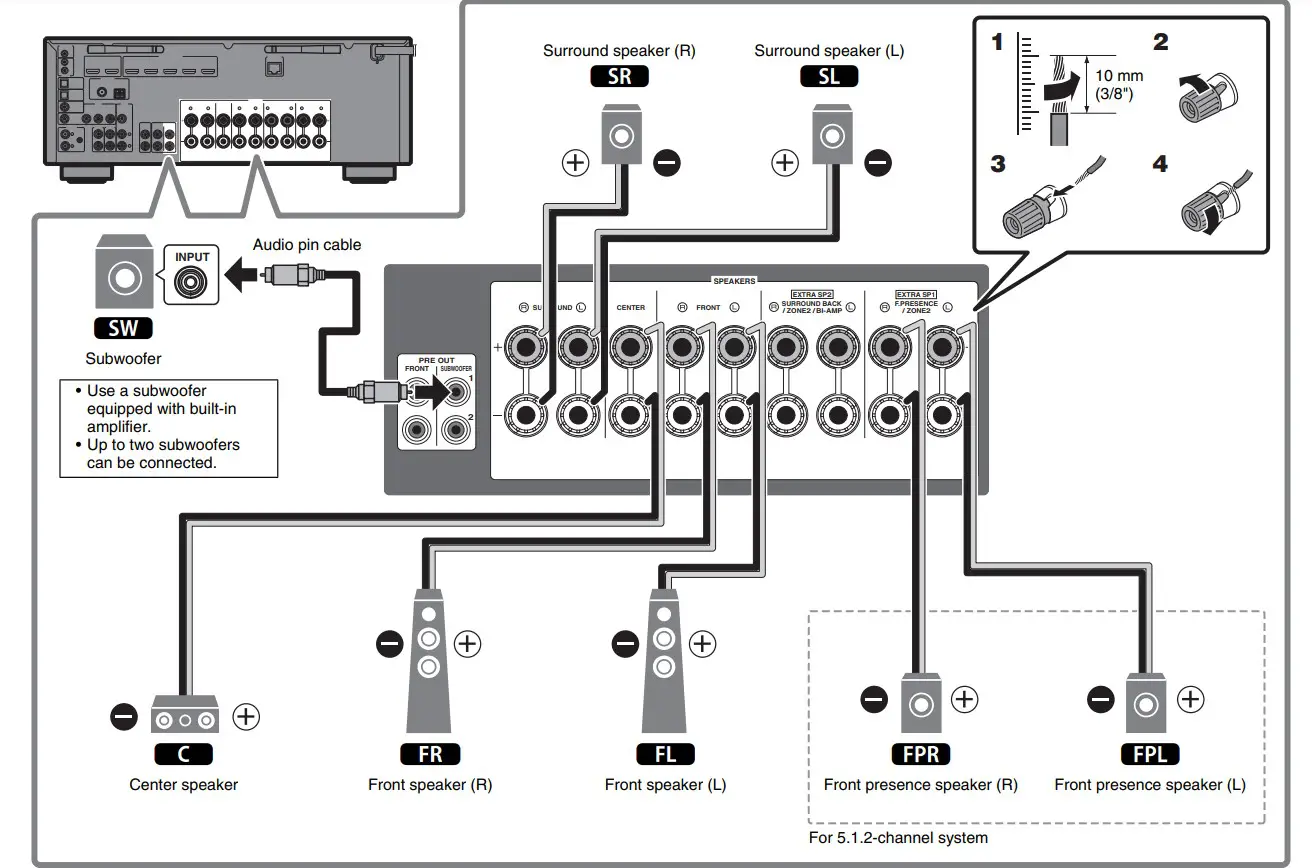
Connecting speakers/subwoofer
Positioning speakers
Use the diagram as a reference for positioning speakers.Use the diagram as a reference for positioning speakers.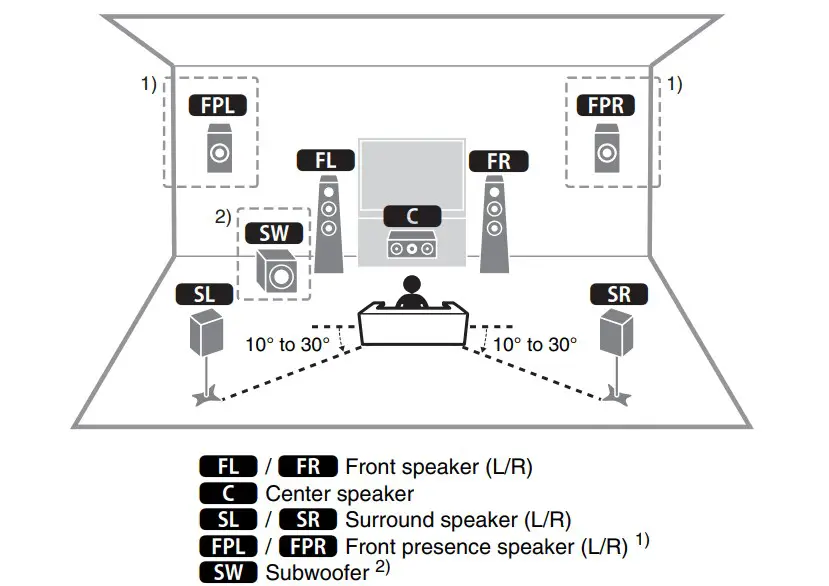
- For 5.1.2-channel system
- Up to two subwoofers can be connected.
When connecting 6-ohm speakers
Set the unit’s speaker impedance to “6 Ω MIN”. For details, see “Setting the speaker impedance” under “Connecting speakers” in the Owner’s Manual.
Precautions for connecting speaker cables
- Be sure that the unit and subwoofer are turned off.
- Prepare speaker cables in a place away from the unit, to avoid accidentally dropping wire strands into the unit’s interior which could result in a short circuit or malfunction of the unit.
- Improper connection of speaker cables could cause a short circuit resulting in damage to, or malfunctioning of, the unit or speakers.
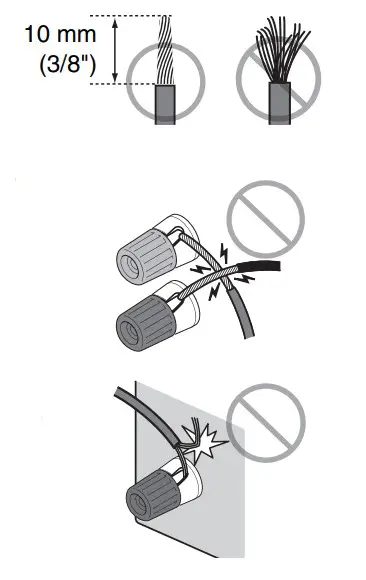
- Carefully remove approximately 10 mm (3/8″) of insulation from the speakerconnection ends of the cables, and twist the bare wires of each speaker cable together firmly.
- Do not allow the bare wires of separate speaker cables to come into contact with one another.
- Do not allow speaker cable bare wires to come into contact with metal parts on the unit (rear panel and screws).
If “Check SP Wires” is shown on the front display when the unit is turned on, turn off the unit and be sure that speaker cables have not caused a short circuit.

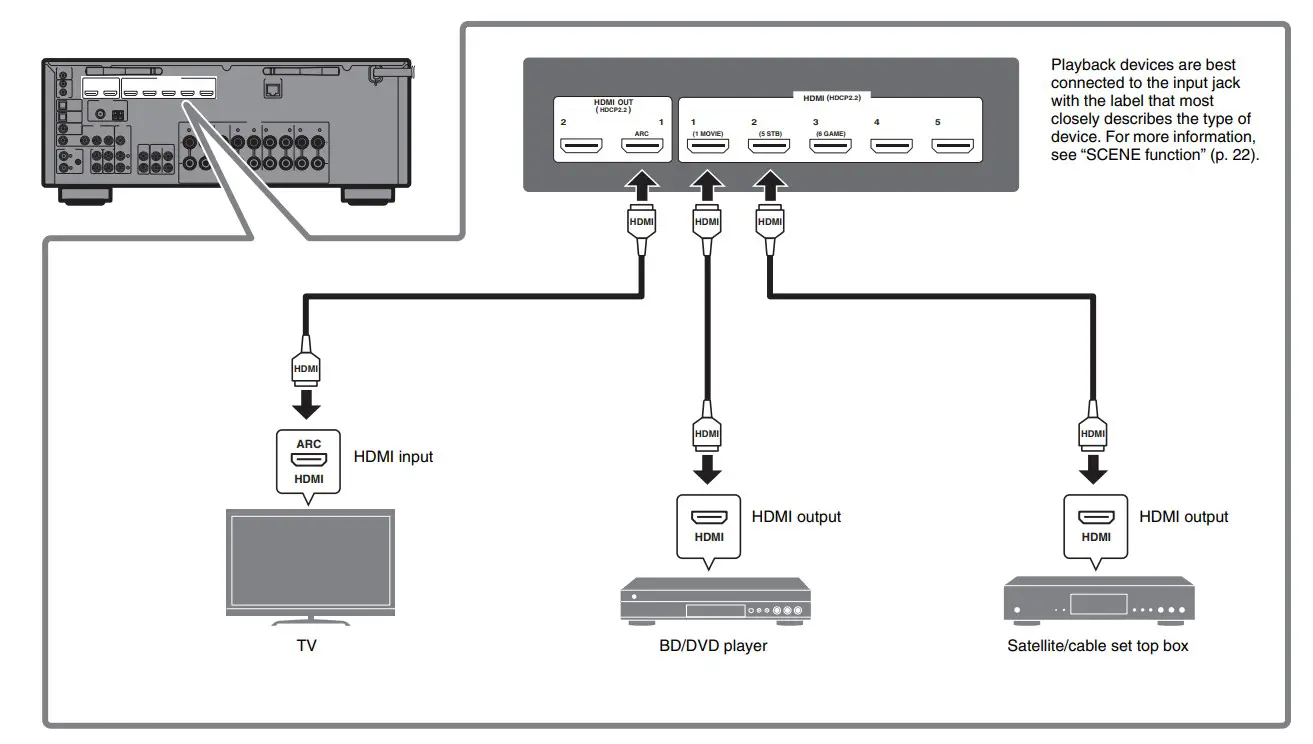
Connecting external devices 
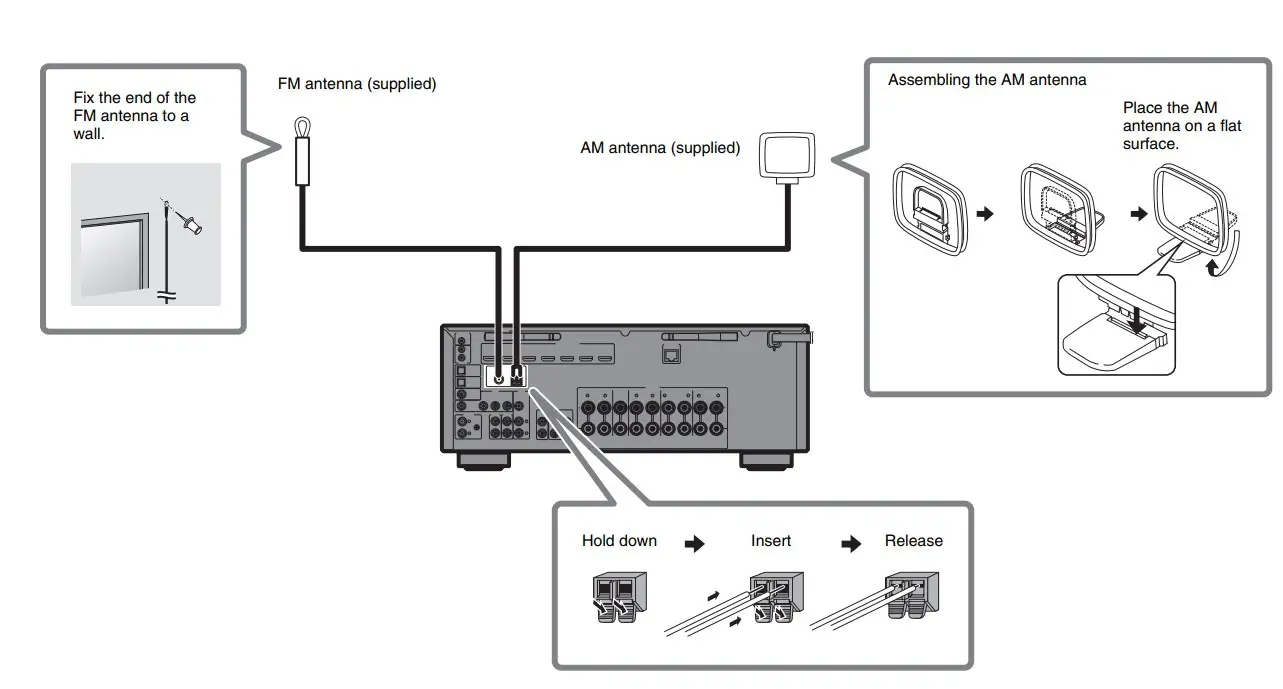
Connecting the FM/AM antennas
 Preparing a network connection
 Preparing a network connection
Prepare a wired or wireless network connection in accordance with your network environment.
Note
The wireless antenna must be raised if the unit will be connected to a Bluetooth device.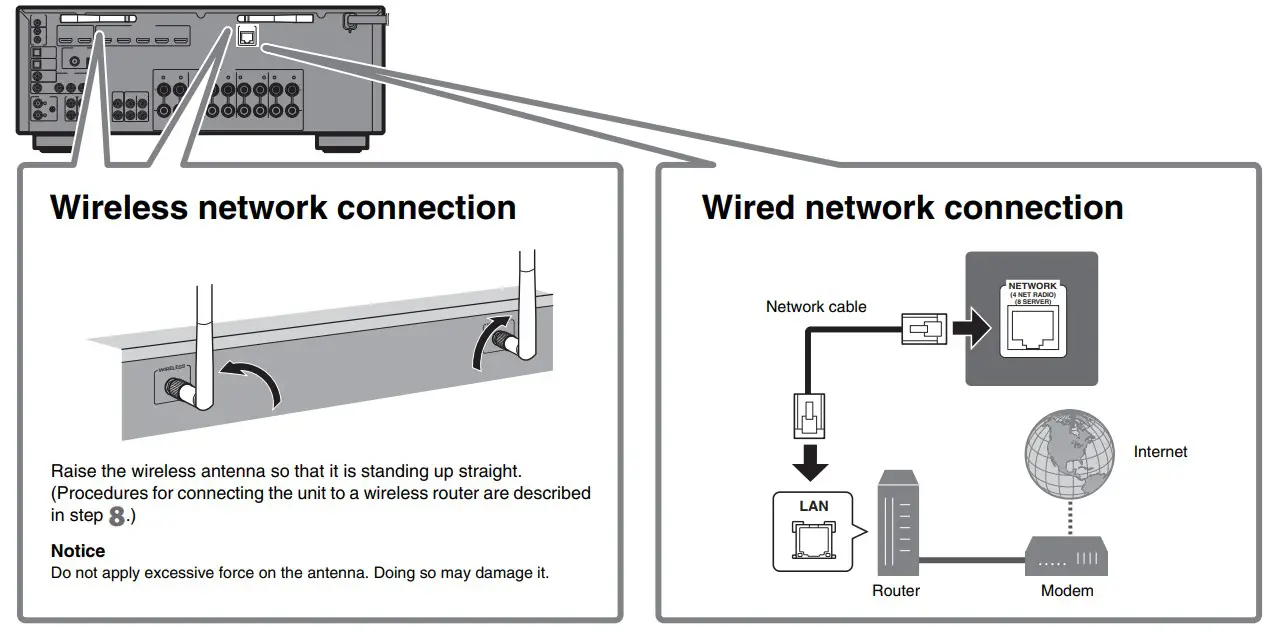
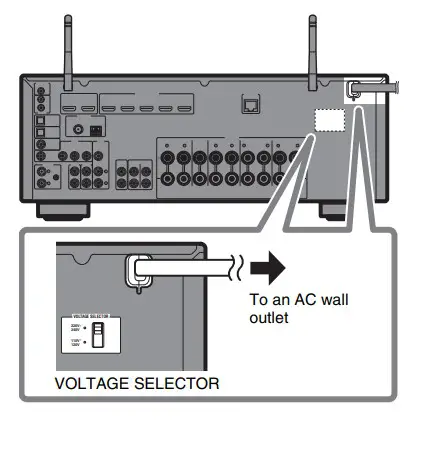
Connecting the power cable to an AC wall outlet,
and turning on the unit
Warning
Before connecting the power cable (Taiwan, Brazil, and Central and South America models only) Set the switch position of VOLTAGE SELECTOR according to your local voltage.
Voltages are AC 110–120/220–240 V, 50/60 Hz.
- Plug the power cable into an AC wall outlet.

- Press z (receiver power) to turn on the unit.

- Turn on the TV and switch the TV input to display video from the unit (HDMI OUT jack).


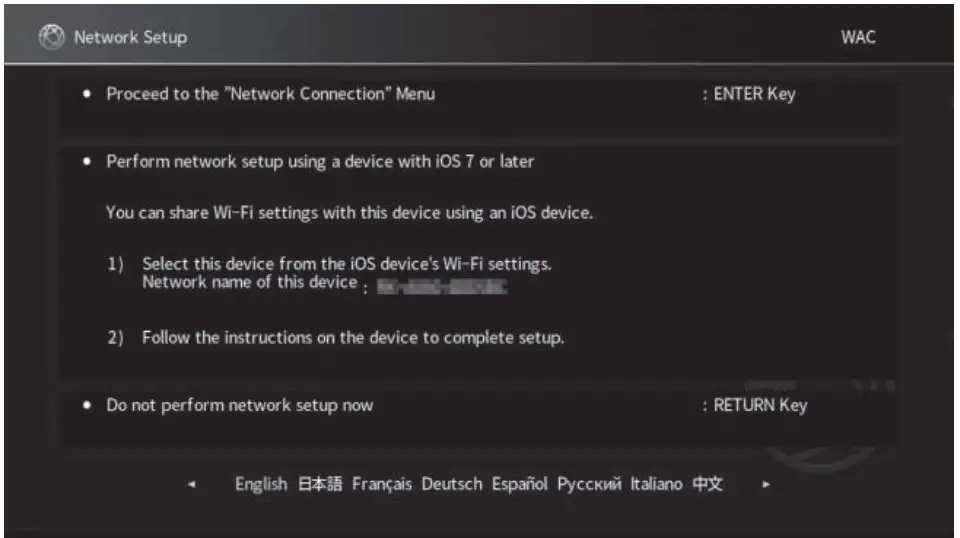
The Network Setup screen shown below will be displayed on the TV when the unit is turned on for the first time after purchase. It may take several tens of seconds for the screen to be displayed (WAC: Wireless Accessory Configuration).
See “Setting up a wireless connection using an iOS device” under “Connecting to a network wirelessly” in the Owner’s Manual when using this function to connect the unit to a network. This document explains wireless connection using the Music Cast CONTROLLER app installed on your mobile device. Follow the procedure described under “8 Setting MusicCast” (p. 18).
Note
This screen will not be displayed if the unit is connected to a router via its NETWORK jack (wired connection).
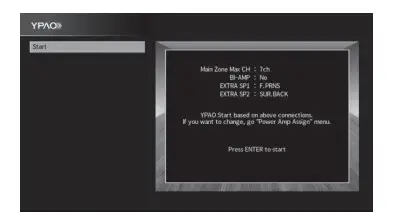
Optimizing the speaker settings automatically (YPAO)
The Yamaha Parametric room Acoustic Optimizer (YPAO) function detects speaker connections, measures the distances from them to your listening position(s), and then automatically optimizes the speaker settings, such as volume balance and acoustic parameters, to suit your room.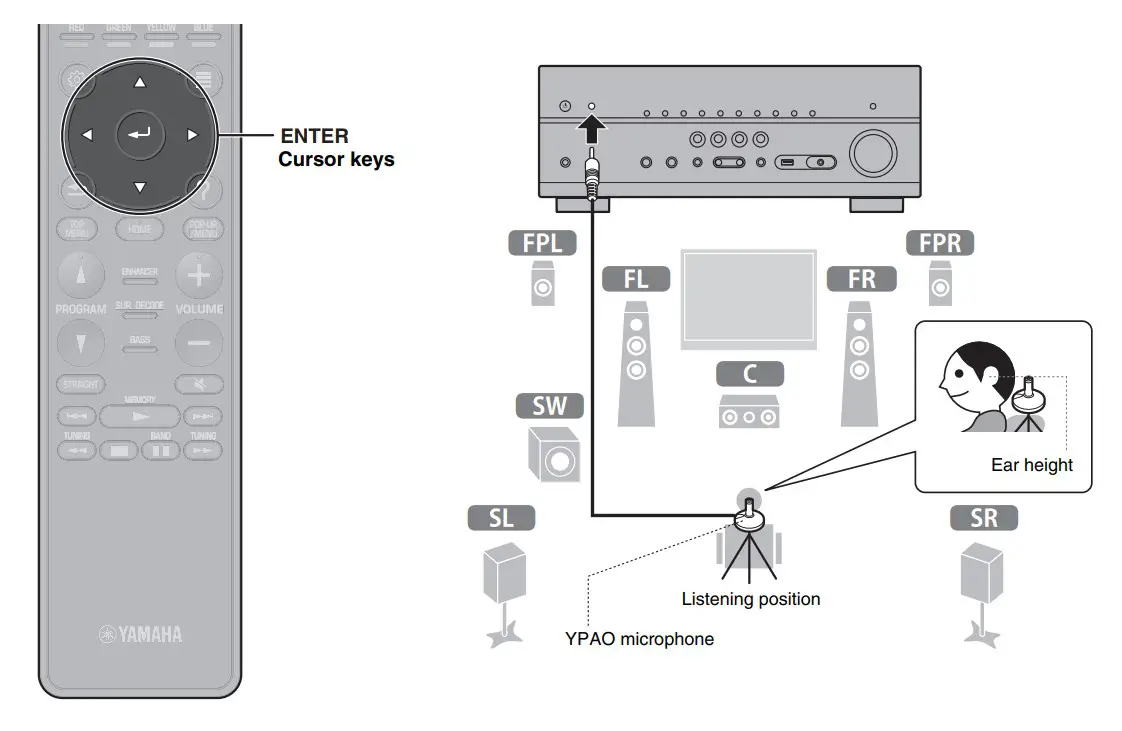
Note the following regarding YPAO measurement
- Test tones are output at high volume and may surprise or frighten small children.
- Test tone volume cannot be adjusted.
- Keep the room as quiet as possible.
- Stay in a corner of the room behind the listening position so that you do not become an obstacle between speakers and the YPAO microphone.
- Do not connect headphones
- Turn on the subwoofer and set the volume to half.
If the crossover frequency is adjustable, set it to maximum.
- Place the YPAO microphone at your listening position and connect it to the YPAO MIC jack on the front panel.
The screen below appears on the TV.
Note
Place the YPAO microphone at your listening position (same height as your ears).
We recommend the use of a tripod as a microphone stand. You can use the tripod screws to stabilize the microphone. - Use the cursor keys to select “Start” and press ENTER.
The measurement will start in 10 seconds.
It takes about 3 minutes to measure.
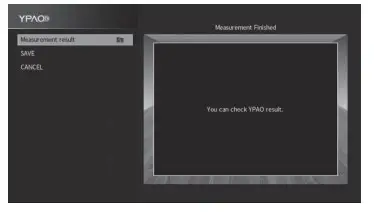
The screen below appears on the TV when the measurement finishes.
Note
If an error message (such as ERROR 1) or warning message (such as WARNING 2) appears, see “Error messages from YPAO” or “Warning messages from YPAO” under “Optimizing the speaker settings automatically (YPAO)” in the Owner’s Manual. - Select “Measurement result” and press ENTER to display the result, if necessary. After confirming the result, press RETURN to return to the “Measurement Finished” screen.
- Use the cursor keys to select “SAVE” and press ENTER.
- Disconnect the YPAO microphone from the unit.
This completes the optimization of the speaker settings.
Setting MusicCast
What is MusicCast
MusicCast is a brand new wireless musical solution from Yamaha, allowing you to share music among all of your rooms with a variety of devices. You can enjoy music from your smartphone, PC, NAS drive and music streaming service anywhere in your house with one easy-to-use app. For more details and a lineup of MusicCast-compatible products, refer to the following site:
http://www.yamaha.com/musiccast/
- Seamlessly control all MusicCast-compatible devices with the dedicated app “MusicCast CONTROLLER”.
- Play back music from music streaming services. (The compatible music streaming services may differ depending on your region and product.)
- Configure wireless network settings of MusicCast-compatible devices.
Note
See the Owner’s Manual for information on other wireless connection methods if the MusicCast CONTROLLER app will not be used.
Using MusicCast CONTROLLER
To use the network features on the MusicCast compatible device, you need the dedicated app “MusicCast CONTROLLER” for the operation. Search for the free app “MusicCast CONTROLLER” on the App Store or Google Play and install it to your device.
Adding the unit to the MusicCast network
Perform the following procedure to add the unit to the MusicCast network.
You can also configure the unit’s wireless network settings at once.
Note
The SSID and security key for your network will be needed.
- Tap the “MusicCast CONTROLLER” app
 on your mobile device and tap “Setup”.
Note
If you have already connected other MusicCast compatible devices to the network, tap “Settings” and then “Add New Device”. - Follow the app’s on-screen instructions.
- Press and hold the CONNECT button on the front panel of the unit for 5 seconds, as instructed by the app.

- Follow the app’s on-screen instructions to configure network settings.
When a connection has been established, “Completed” will be displayed in the front display of the unit.
Network connection with the MusicCast CONTROLLER app is now complete, and the unit has been registered as a MusicCast-enabled device.
 on your mobile device and tap “Setup”.
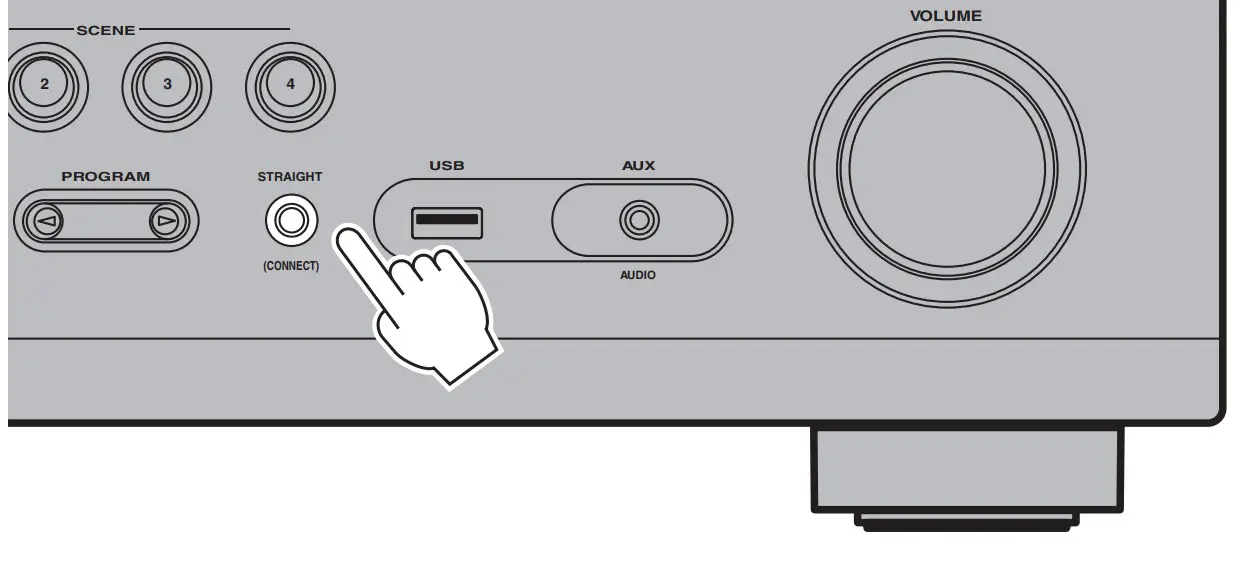
Playback
This section describes basic operations such as playing Blu-ray Discs and DVDs, and tuning into radio stations. Most operations can be performed using the remote control.
Basic playback functions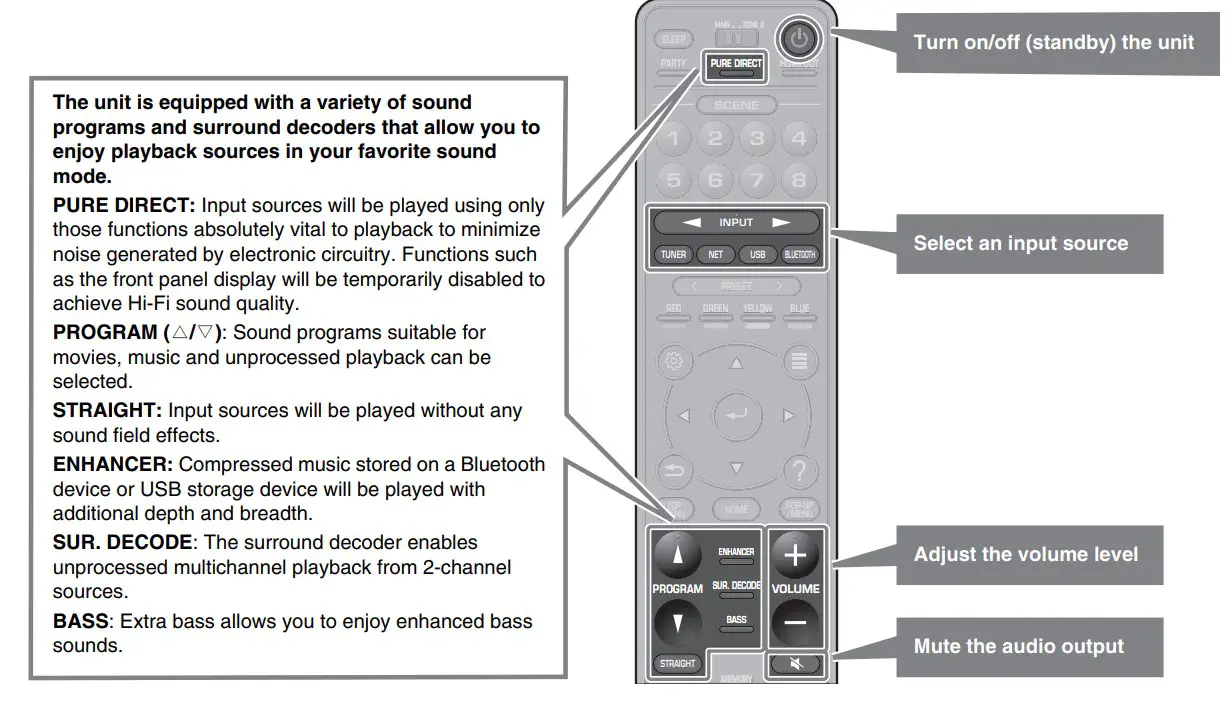
Playing a BD/DVD
We recommend playing back multichannel audio (5.1-channel or more) to feel surround sound produced by the unit.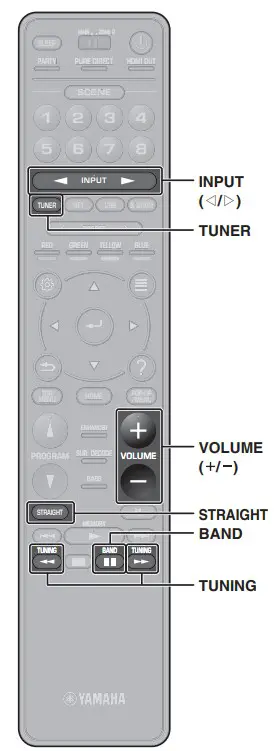
- Turn on the BD/DVD player.
- Press INPUT
 repeatedly to select “HDMI 1”.
The name of the connected device such as “BD player” may be displayed.
- Start playback on the BD/DVD player.
- Press STRAIGHT to select “STRAIGHT”.
Note
When “STRAIGHT” (straight decode) is enabled, each speaker produces each channel audio signal directly (without sound field processing). - Press VOLUME to adjust the volume.
Note
When sound is not heard, or no sound is output from a specific speaker, see “TROUBLESHOOTING” in the Owner’s Manual.
 repeatedly to select “HDMI 1”.
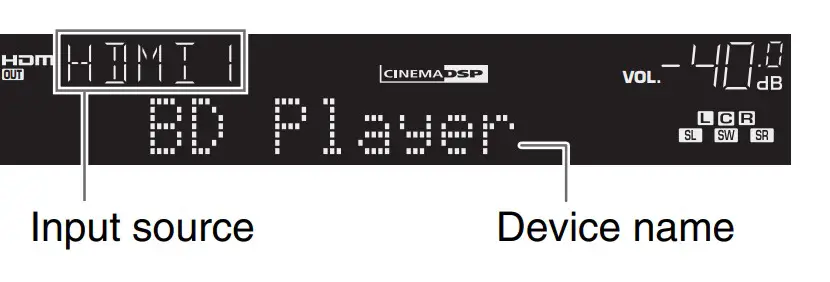
Listening to FM/AM radio
- Press TUNER to select “TUNER” as the input source.
- Press BAND to select FM or AM.
- Press TUNING to set a frequency.
Hold down the key for about a second to search stations automatically.
“TUNED” lights up when the unit is receiving an FM/ AM radio station signal. “STEREO” lights up when the unit is receiving a stereo FM radio signal.

Setting the frequency steps (Asia, Taiwan, Brazil, General, and Central and South America models only)
At the factory, the frequency step setting is set to 50 kHz for FM and 9 kHz for AM.
Depending on your country or region, set the frequency steps to 100 kHz for FM and 10 kHz for AM.
- Set the unit to standby mode.
- hold down STRAIGHT on the front panel and press MAIN ZONE z.
- Press PROGRAM on the front panel repeatedly to select “TU”.

- Press STRAIGHT on the front panel to select “FM100/AM10”.
- Press MAIN ZONE z to set the unit to standby mode and turn it on again.

Listening to Internet radio
- Press NET repeatedly to select “NET RADIO” as the input source.
The browse screen is displayed on the TV. - Use the cursor keys to select an item and press ENTER.
When an Internet radio station is selected, playback starts and the playback screen is displayed.
Note
Internet radio stations can also be selected using the MusicCast CONTROLLER app installed on your mobile device.
Listening to music from streaming services
The MusicCast CONTROLLER app installed on your mobile device can be used to receive streaming services.
- Select a streaming service on the MusicCast CONTROLLER app screen.
- Select a station.
Note
The following may be required, depending upon the streaming service used.- Install the streaming service app on your mobile device
- Register a streaming service account Notes on streaming services
- Streaming services may be changed or discontinued without notice.
- Supported streaming services may vary by the country or region of use.

See the Owner’s Manual for settings other than those shown above.
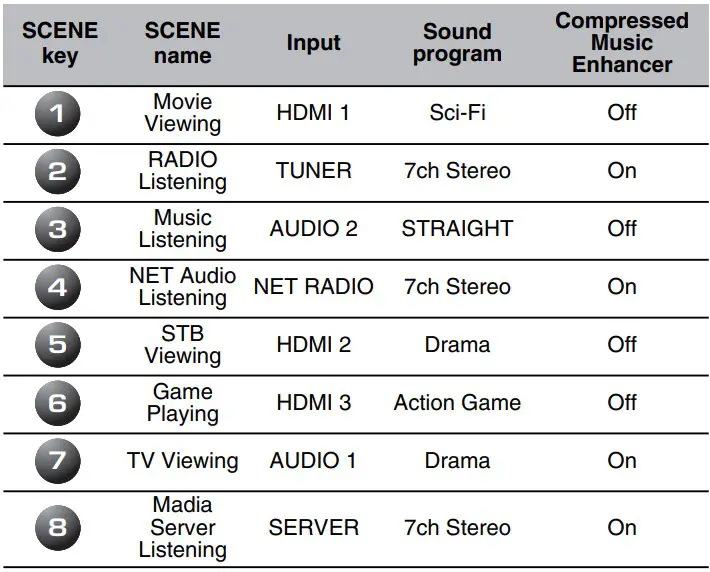
Registering a scene
The settings assigned to each SCENE key by default can be changed to suit individual preferences.
- Play an input source.
- Apply settings for functions such as Sound programs and Compressed Music Enhancer.
- Press and hold a SCENE key until “SET Complete” appears on the front display.
Playing music stored on a Bluetooth® device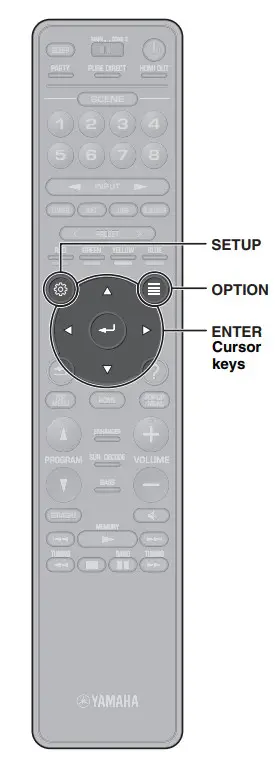
- Press BLUETOOTH to select “Bluetooth” as the input source.
- Select the unit (network name of the unit) from the available device list on the Bluetooth device.
If the passkey is required, enter the number “0000”. When the connection is established, the indicator will glow in the front display. - Select a song and start playback on the Bluetooth device.
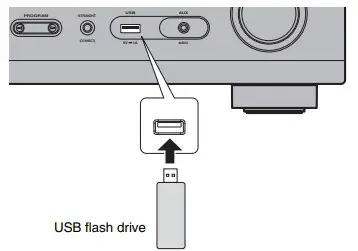
Playing music stored on a USB flash drive
- Connect the USB flash drive to the USB jack.

Note
Connect the USB flash drive directly to the USB jack. Do not use an extension cable. - Press USB to select “USB” as the input source.
The browse screen is displayed on the TV. - Use the cursor keys to select an item and press ENTER.
When a song is selected, playback starts and the playback screen is displayed.
Basic operation of the Option menu
This section explains basic operation of the Option menu. The Option menu can be used to configure the unit’s playback functions according to the input source.
- Press OPTION.

The Option menu is also displayed on the TV screen. - Use the cursor keys to select an item and press ENTER.
- Use the cursor keys to select asetting.
- Press OPTION.
For more information, see “Configuring playback settings for different playback sources (Option menu)” in the Owner’s Manual.

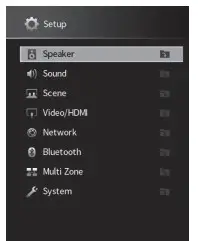
Basic operation of the Setup menu
This section explains basic operation of the Setup menu. The setup menu can be used to configure the unit’s functions in detail.
- Press SETUP

- Use the cursor keys to select a menu and press ENTER.
- Use the cursor keys to select an item and press ENTER.
- Use the cursor keys to select a setting and press ENTER.
- Press SETUP.
For more information, see “Configuring various functions (Setup menu)” in the Owner’s Manual.
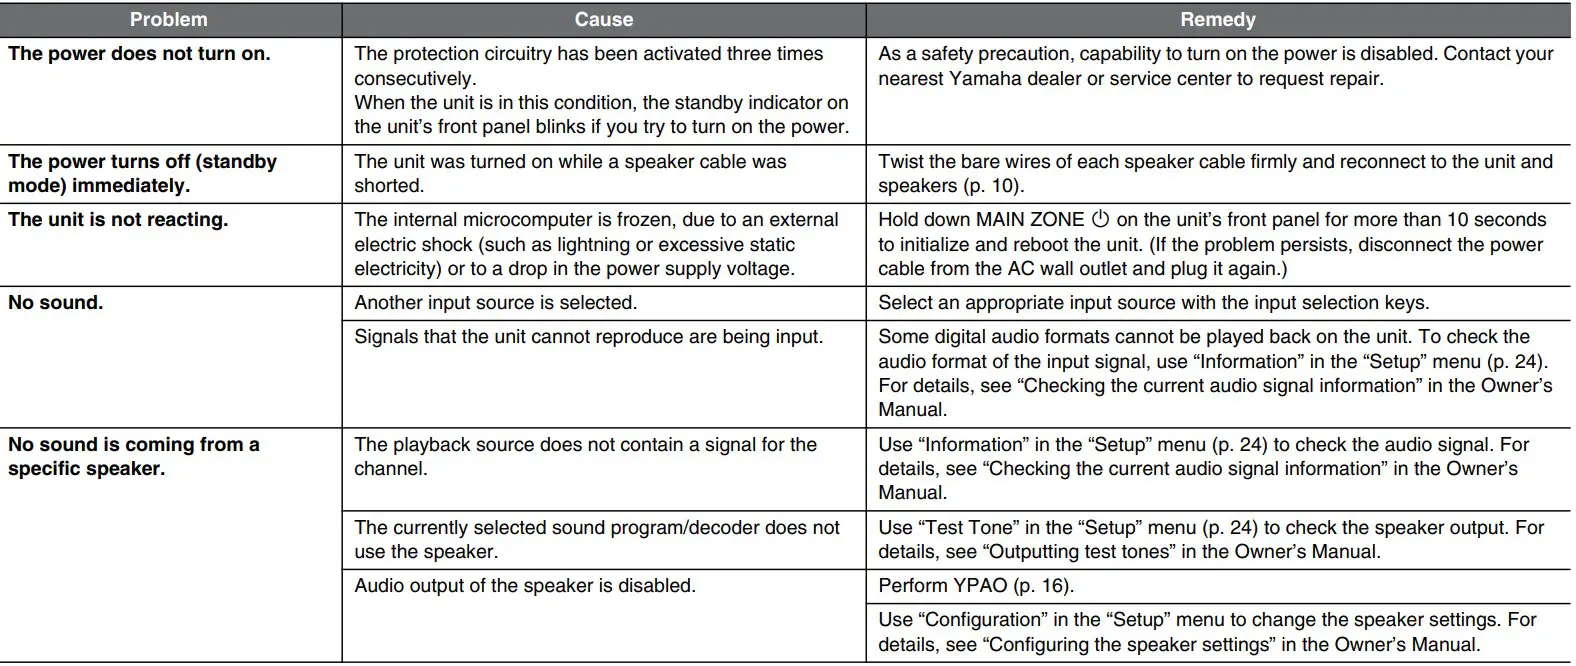
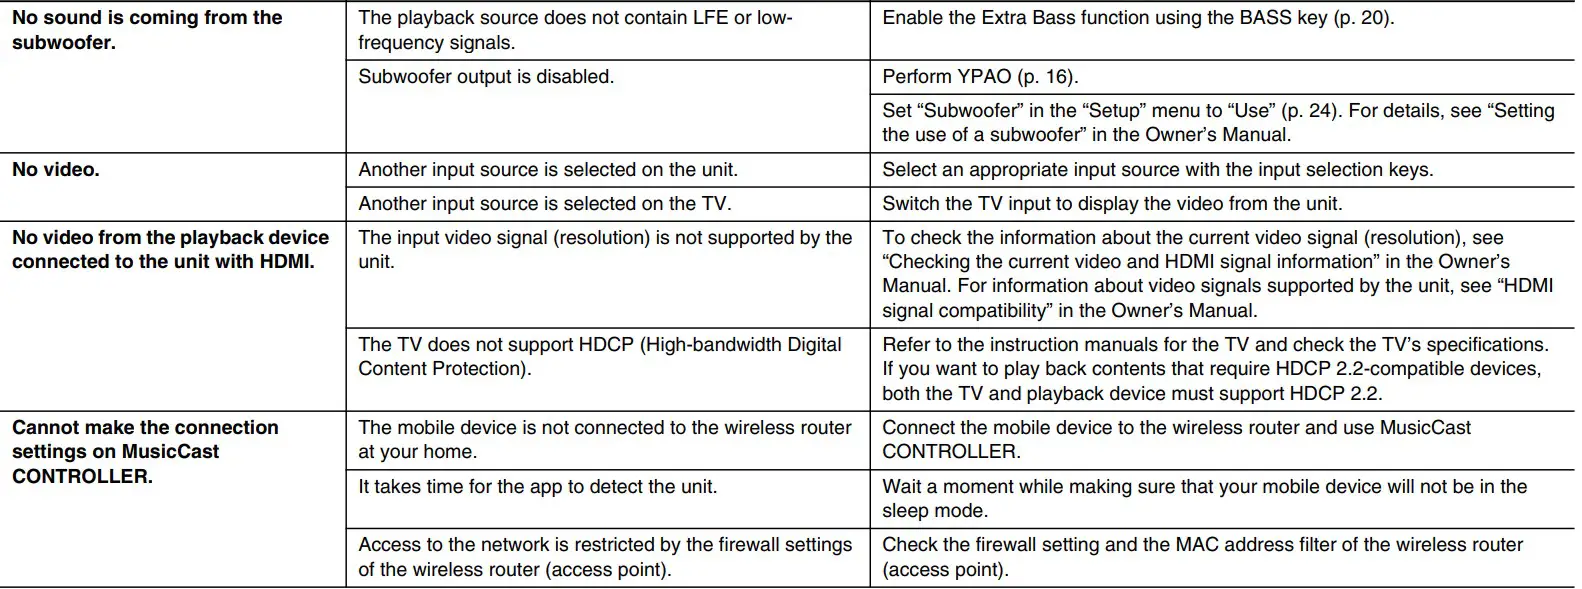
Troubleshooting
if trouble occurs, first check the following:
Make sure of the following when the unit does not function properly.
- The power cables of the unit, TV and playback devices (such as BD/DVD players) are connected to AC wall outlets securely.
- The unit, subwoofer, TV and playback devices (such as BD/DVD players) are turned on.
- The connectors of each cable are securely inserted in to jacks on each device.
If there is no problem with the power and cables, refer to the instructions shown in the table below.
If the problem you are experiencing is not listed or if the instructions do not help, turn off the unit, disconnect the power cable, and contact the nearest authorized Yamaha dealer or service center.

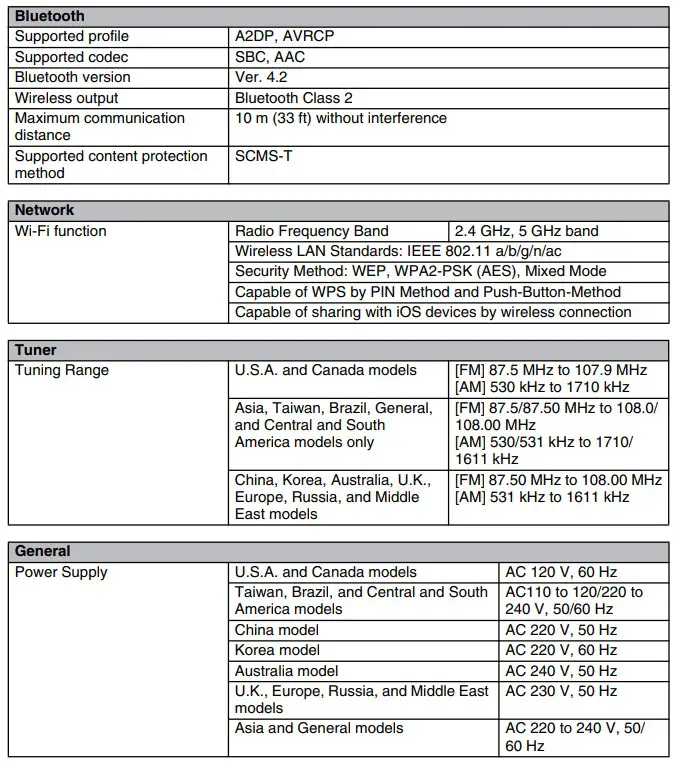
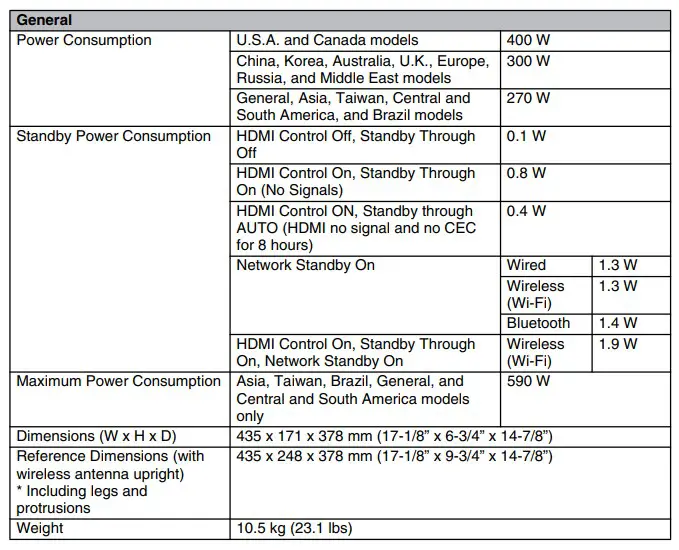
Specifications 

FAQS
So can this fit a total of 4 100watt speakers at once OR 4 25watt speakers at most?
This amp can safely power only 2, 8-ohm speakers at once. if you tried to connect 4, 8-ohm speakers at once you would be driving a 4-ohm load and this amp doesn’t deal with 4-ohm loads very well. It’s an 8ohm amp.
What is the Bluetooth range?
There are 3 classes of BT devices. The ranges are under 10m (Class3); 10m (Class2) and 100m (Class3). The range you get between two devices will be the range of the least powerful device. If that’s a cell phone streaming music, expect less than ten meters. If it is a computer with a Class2 BT radio, expect a solid ten meters. But the only way you will get more than ten meters (30 feet) reliably, is if both devices are Class 3. And portable devices rarely are.
Even though there is no subwoofer output, can one be connected anyway?
YES:
You can use a speaker-to-line level adapter. Connect to the B speakers and use the RCA plugs on the adapter to connect to the subwoofer.
frequency response is listed as 40hz being the lowest, if a sub was added to this would nothing below 40hz be produced?
Long answer: the frequency response of an audio product is drawn on an x-y coordinate plot with the “y” range as the sound pressure (or volume) and the “x” range as the frequency ( from 0 to some maximum Hertz…20,000 or more). Graphs on this plot often look like an upside-down cereal bowl. The two “corners” of the bowl, where the bottom meets the sides, are where the sound pressure (volume) of that frequency begin to drop off dramatically. The graph never has two “square” corners. Those two corners are always rounded. And the sides are never straight up and down…they always slope.
The frequency range is the flat part of that upside-down bowl. The maximum and minimum points are taken from each of the two sides of the bowl where the sound pressure (volume) value is a pre-determined percentage of the average sound pressure ( along the “flat” part of the bowl).
So…to answer the question, the frequencies below that 40Hz value probably exist in the signal…but the volume may be so low that for you to provide enough amplification to hear (or feel, in the case of 40Hz and below) may be cost prohibitive and may introduce enough noise in the replay that you might find it objectionable.
The minimum and maximum frequency response values are important to the shopper because they help you select the speakers. Why spend more for a set of speakers that have a range of 20-20k, when the usable frequency of the receiver is 40-20k?
Does this receiver transmit to a Bluetooth-enabled speaker? Or would I have to use one of the speaker slots and connect to a Bluetooth transmitter?
No, it does not transmit to speakers. You would have to connect to the speaker outputs and a Bluetooth transmitter.
It does receive a signal from your phone or device as input and it works quite well.
How do i connect to my tv?
connect the audio out from the TV to one of the “line in” inputs on the receiver.
220v alimentation?
As an authorized USA dealer the manufacturer provides us access only to 120V products. This is a fantastic-sounding receiver. World Wide Stereo is 37 years old and a very proud Yamaha dealer.
can this work on 220?
Only if you have a converter to bring the voltage down to 110
Should as most metal buildings don’t reject FM signals?
it should as most metal buildings don’t reject FM signals
Will this drive my vintage B and W speakers?
not plugd in
How many watts into 4ohms?
Curious why the question. If an amplifier is rated for 100 watts into 8 ohms, then it will probably deliver 200 watts into 4 ohms. The specs say it delivers 125W @8 ohms. They also say the High Dynamic Power for 8/6/4/2 ohms is 125/150/165/180w. Hope that helps.
what is the pairing process?
As others have answered: you have to ensure that Bluetooth sharing is turned “on” on both devices / remote; the device should then request confirmation of pairing…
Is the Bluetooth built-in or does it have a plug-in adapter?
Built-in. Just follow the instructions in the manual to set up or pair.
How is it connected to the cable box?
It is not connected to the cable box.
This product is for 220 v?
The “American” model is 120 v only, All the other models are 220. Mine is 120 v only
Can an Equalizer be hooked to this receiver?
yes, you can hook equalizer.
How many speakers can you connect?
There are two separate paired inputs for sets of speakers. So you end up with an A set and a B set. Both can play simultaneously. They are pinch wire connections so you are limited on the number by how many wires sets you could effectively enter into the small clamp aperture.
How do you connect an antenna to this unit?
This unit comes with an FM antenna that snaps onto the back and hangs the other end to the wall behind it.


