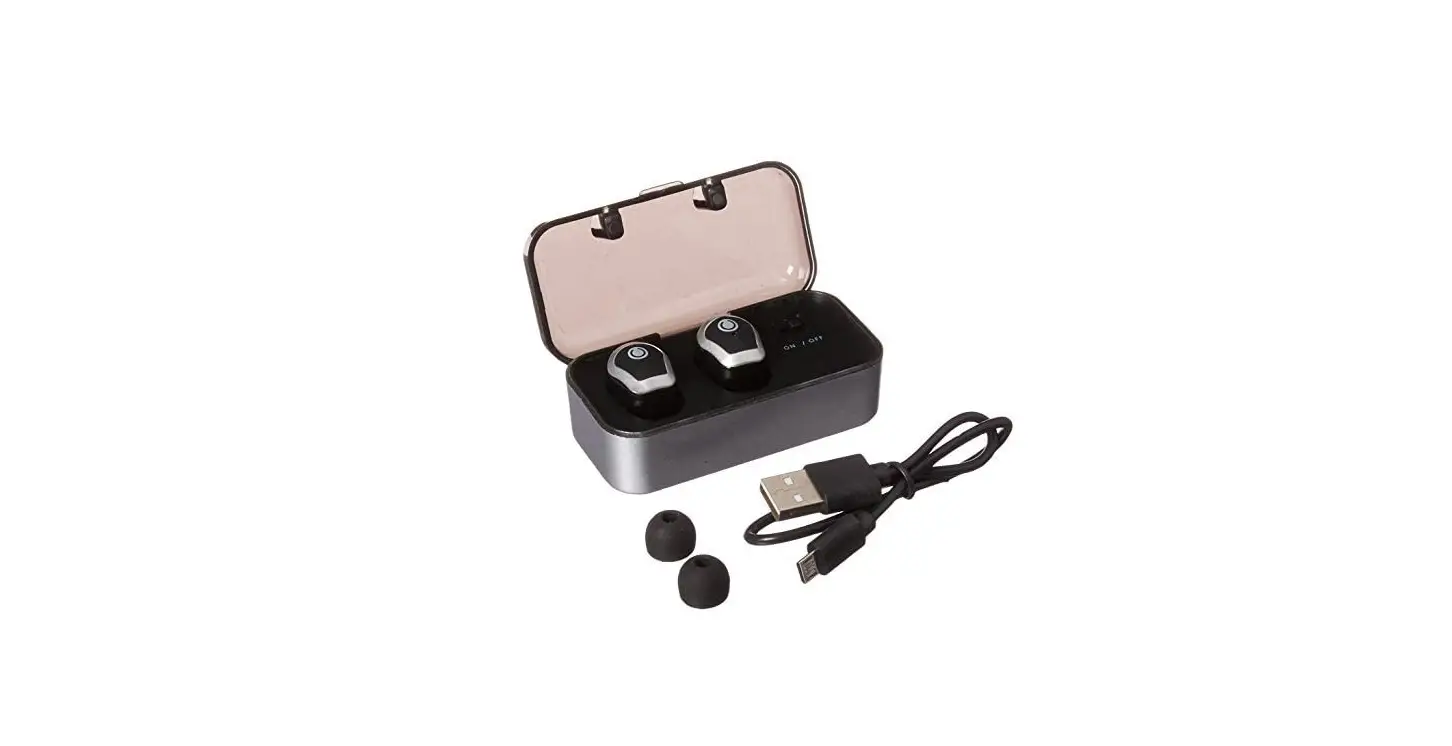
SPRACHT HS-2040 True Wireless Bluetooth Earbuds with Charger Case User Guide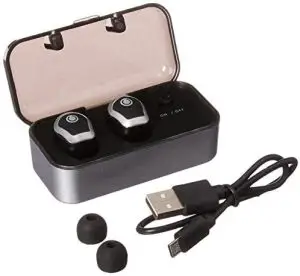
FEATURES
Thanks for choosing Blunote Buds TW™. It’s important to read this User Manual: it will help you connect the Buds and pair with your Bluetooth™ device.
- Bluetooth® V4.1 + EDR
- To enhance your music listening experience, the Buds feature a high quality, embedded 48 MIPS dual-MAC DSP co-processor
- Support for noise reduction and echo cancellation
- Recharger battery case (600mAh) to charge Buds on the go
- Play time up to 2.5 hours on one charge
- You have the option of three methods to pair Buds
There is also video on our website at www.spracht.com showing how to re-initialize the Buds.
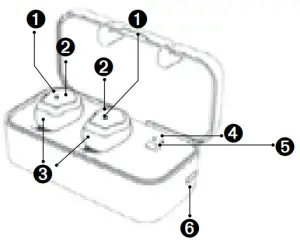
Note: the Buds are marked L and R on their back sides
- Red and blue LED indicator
- Multi Function Button (MFB)
- Microphone
- Charging and power capacity indicator LEDs
- On-Off switch
- Micro USB
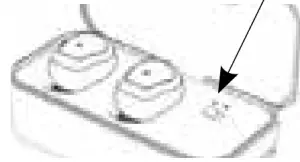
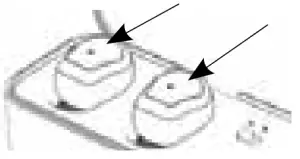
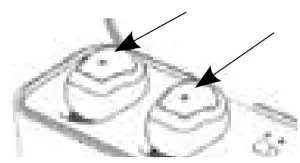
Correct Bud placement with mic facing forward
POWER ON/OFF AND CONNECT
IMPORTANT Before using the Buds for the first time, make sure to fully charge the Buds in the case. When the Red LEDs on the Buds turn off and the Blue LEDs turn on, the Buds are charged. Note that red LEDs should be on for both Buds if they are charging properly.
Power On Stereo Mode — Method 1
- With the Buds in the case, turn the switch to the left (ON) and wait for 5 seconds. The blue LEDs on the case will turn off.

- Slide the switch to the right (OFF); the Buds power on.
The Left/Main Ear Bud will connect to the Right Ear Bud within 10 seconds. If they don’t connect within that time, double press both Buds until you hear the prompt “Ready to Pair”. - Confirm that Bluetooth® on your phone/tablet is turned on. Look for available Bluetooth® devices. You should see Blunote Buds TW: choose that one. Your phone/ tablet should now be connected to the Ear Buds.
Power On In Stereo Mode — Method 2
This method allows you to hear the voice prompts while you are setting up the buds.
- You can either put both buds in your ear to start with, or put just the Left Ear Bud in your ear. Press the Multi Function Button (MFB) for 3 seconds, then release: you will hear “Power On”.

Note: If you want to see the LEDs to confirm the Buds are in pairing mode, you’ll have to take them out of your ears. The Blue and Red LEDs will be flashing alternately. - Confirm that Bluetooth® on your phone/tablet is turned on. Look for available Bluetooth® devices. You should see Blunote Buds TW: choose that one. You will hear “Pairing”, then “Pairing Successful”, and “Connected”.
- If you haven’t already, place the Right Bud in your ear. Press the Multi Function Button (MFB) for 3 seconds, then release: you will hear “Power On”. As soon as the Second Bud connects with the Main, you will hear “Connected”. Each Bud will announce which it is: Right Channel for the Right Bud and Left Channel for the Left.
Power On Stereo Mode — Method 3
- Take the Buds out of the case. Press the Multi Function Button (MFB) on both Buds for 3 seconds, then release: the blue LEDs will flash 3 times.
- Double press both Buds. After a few seconds, the Left/Main Bud will begin to connect to the Right Bud. When they have successfully connected, the Left Bud’s LEDs will alternately flash blue and red. On the Right Bud only the blue LED will flash.

- The Left Bud will now enter pairing mode.
- Confirm that Bluetooth® on your phone/tablet is turned on. Look for available Bluetooth® devices. You should see Blunote Buds TW: choose that one. Your phone/ tablet should now be connected to the Ear Buds.
Adjust Volume Use your phone or tablet’s volume settings to adjust the volume on your Buds.
Reconnecting
Once you have paired using any method, your Buds will remember the phone/tablet they were paired to last. To reconnect, take both Buds out of the case or turn on both units (by pressing the MFB for 3 seconds), and the Left/Main Bud will re-pair automatically, and the Right/Second Bud will connect to the Left automatically.
Using Only One Bud
- Turn on the Bluetooth® device you want to pair.
- Power on the Bud by pressing and holding the MFB for 3 seconds until the blue LED flashes.
- When the blue and red LEDs flash alternately, select Blunote Buds TW on your phone/tablet’s Bluetooth® list.
- The LEDs will stop flashing, indicating your device is paired.
IMPORTANT: If you use just one bud in Single Ear Mode and then want to use both Buds at the same time in Stereo Mode later, please note that you must pair the LEFT/Main Bud first. If you pair the Right Bud first, the Left one will not connect afterwards in Stereo Mode.
You will need to start over by deleting the 2 Bluetooth® entities in your phone/tablet (you will see Blunote Buds TW™ listed twice. Delete both). Turn off the Buds and restart them. Start the pairing process from the beginning, using Method 1.
Power Off
press the MFB on either Bud until you hear the voice confirmation of “Power Off”.
Using Voice Commands
Press and hold the MFB on the Left/Main Bud for 3-4 seconds to enter voice command mode.
Left/Main and Right (Second) Buds
The Buds are marked R and L on their back sides.
- While pairing, the Bud that alternately flashes both the blue and red LEDs is the Left/Main.
- If you double click the MFB, the Bud which can redial the last number is the Left/Main.
- If you make a phone call, you will only hear the voice at the other end through the Left/Main Bud. The Left channel is the Left/Main Bud, the Right channel is the Right/Second Bud
Note If the Left Bud re-pairs with your device and is playing music, but the Right Bud is not playing because it’s not connected with the Left/Main Bud, turn off both units. Check your phone/tablet and confirm there is only one Blunote Buds TW™ showing. If there are 2, delete both and start the pairing and connecting process from the beginning.
Charging
- Put the Buds in the case and slide the switch to the left. When the blue LEDs on the buds flash, it indicates the battery is low. No LED means very low charge.
- When the blue LED goes to solid on, the charge is complete.
- On the case: There are 2 LEDs, 1 red/1 blue, indicating the charge level in the case. Full battery is shown by the red LED being steady on. When the red LED is flashing it means it’s charging. If the battery is very low, the red LED will flash until powered off or the case is turned off.
NOTES
- Whether using both Buds or only a single one, the pairing time is 120 seconds.
- If the Buds don’t connect with a phone, tablet or other Bluetooth® device they will power off after 5 minutes.
- When using the Buds as a pair, if the Left/Main Bud fails to connect with the Right Bud, you will need to reset them by powering them off and back on.
- If you’re using a single Bud connected to one phone/ tablet and you want to pair the other one to a different device, make sure the buds are separated by 33′ (10m)before attempting to pair the second device.
- If you want to pair the Buds with a new phone/tablet, you need to first turn off both Buds, and delete the profile in the Bluetooth® settings in your original device. This is especially true if your devices are within 33’ (10M) of each other, the Bluetooth® range. You can then follow the Power On instructions to pair with the new device.
- If you are using the buds as a set, only the Left/Main Bud can be used to answer calls, or reject, cancel and redial calls. You will hear the voice on a call only through the Left Bud; the Right will be inactive.
- To charge the Buds, place them in the case, slide the switch to the left (ON), and plug the USB cable into a power source.
- Use the recharge battery case to charge your Buds on the go. The red LEDs on the case will indicate how much charge is left (rapid flashing indicates very low battery, steady on shows full battery).
Table of Ear Bud States
| Ear Bud State | Button Action | Result | Voice Prompt | LEDs |
| Power Off | Press/ hold 5s | Power On | Power On | Blue LED flashes 3x |
| Power On | Press/ hold 5s | Power Off | Power Off | Blue LED flashes 3x |
| Connected | Press | Play/Pause | No Change | |
| Incoming Call | Press | Answer Call | Answer | |
| Call Active | Press | End Call | Call Ends | |
| Outgoing Call | Press | Cancel Call | Cancel the Call | |
| Connected/ Music | Press 2x | Last 4′ Redial | Last Redial | |
| Incoming Call | Press 2x | Reject Call | Reject the Call | |
| Incoming Call | Call from Phone # | |||
| Enter Pairing Mode | Press 2x | Enter TWS Pairing Mode | Pairing | |
| Left/Right Connect | Left Channel Right Channel |
Warranty Information
Spracht warrants its products against defects or malfunctions in material and workmanship under normal use and service, with the exceptions stated below. This warranty lasts for one year from the original date of purchase. Coverage terminates if you sell or otherwise transfer the product. In order to keep this warranty in effect, the product must have been handled and used as prescribed in the instructions accompanying the product. Spracht shall (at its option) repair or replace a defective unit covered by this warranty, or shall refund the product purchase price. Repair, replacement with a new or reconditioned unit, or refund, as provided under this warranty, is your exclusive remedy. This warranty does not cover any damages due to accident, misuse, abuse, or negligence. Spracht shall not be liable for any incidental or consequential damages. Some states do not allow limitation or exclusion of incidental or consequential damages, so the above limitation or exclusion may not apply to you.
To make a warranty claim, the purchaser must obtain a return authorization number (RA) from Spracht (serial number and purchase date required), and then return the product to Spracht at purchaser’s expense. A copy of the original dated receipt or shipping document must accompany the product. To obtain a return authorization, see “Warranty” on our website at www.spracht.com, send an e-mail to [email protected], or contact us at:
Spracht
974 Commercial Street, Suite 108
Palo Alto, CA 94303 USA
Ph: 650-215-7500
Fx: 650-485-2453
For repair or replacement of a failed product, allow 4 to 6 weeks for processing and shipment. This warranty gives you specific legal rights, and you may also have other rights which vary from state to state.
Website: www.spracht.com


![Wireless Earbuds, [2020 Ces Award] Earfun Free Bluetooth 5.0 Earbuds With Wireless Charging Case-complete Features/owner's Guide](https://static-data1.manualsee.com/1/img/213/3779604/2022/07/Wireless-Earbuds-2020-CES-Award-EarFun-Free-Bluetooth-5.0-Earbuds-with-Wireless-Charging-Case-Featured-1568x740.png "Wireless Earbuds, [2020 Ces Award] Earfun Free Bluetooth 5.0 Earbuds With Wireless Charging Case-complete Features/owner's Guide")


