![]()
Originalanleitung
Fleischwolf
Artikel Nr. 86 02 74 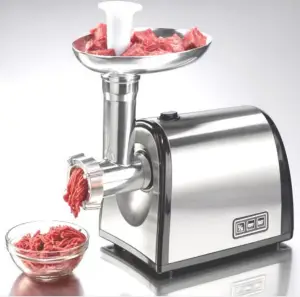
Original Instructions
Meat Grinder
Article No. 86 02 74 
Dear Customers
Instruction manuals provide valuable hints for using your new device. They enable you to use all functions, and they help you avoid misunderstandings and prevent damage. Please take the time to read this manual carefully and keep it for future reference.
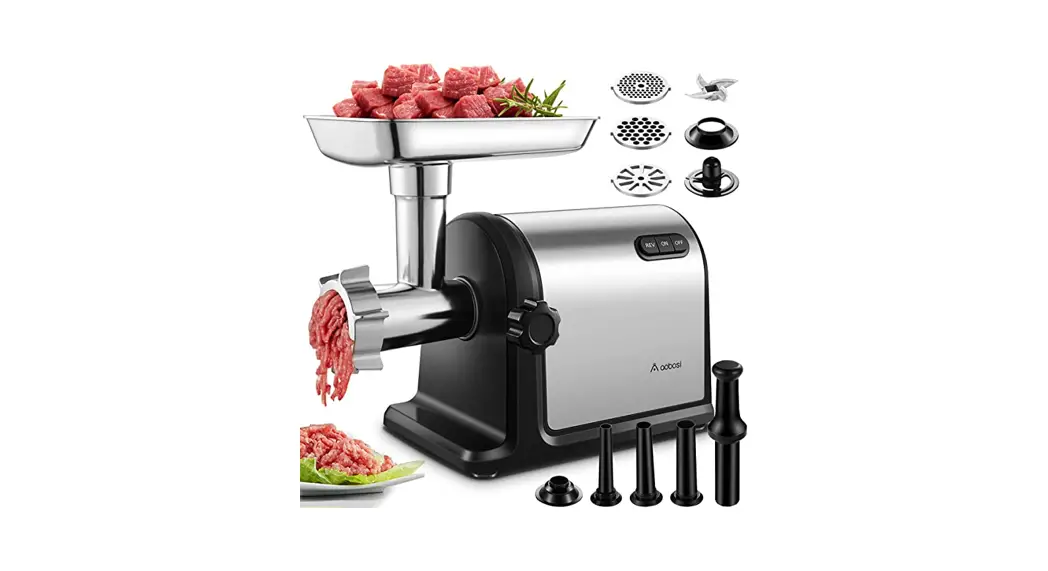
Overview 
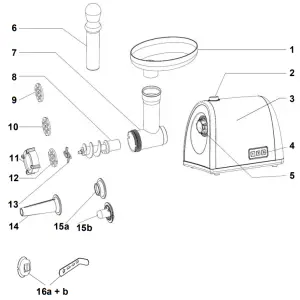
| 1 | Tray |
| 2 | Releasing Knob |
| 3 | Motor Unit |
| 4 | [I/II OFF REV] Switches |
| 5 | Drive |
| 6 | Pusher |
| 7 | Filling Tube |
| 8 | Worm Shaft |
| 9 | Grinding Disc, fine 3 mm |
| 10 | Grinding Disc, medium 5 mm |
| 11 | Lock Ring |
| 12 | Grinding Disc, coarse 7 mm |
| 13 | Blade |
| 14 | Sausage Horn |
| 15a+ b | Horn for Kibbe + Adaptor for Kibbe |
| 16a+ b | Holder and Biscuit Shaper |
Safety Notes
Please note the following safety notes to avoid malfunctions, damage, or physical injury:
- Make sure the voltage corresponds to the type label on the unit.
- Read these instructions for use carefully. Use the appliance only for preparing food.
- Persons with limited physical, sensorial or mental abilities are not allowed to use the appliance unless they are supervised and briefed for their safety by a qualified person.
- This appliance is not a toy and does not belong in the hands of children. Never leave the appliance unsupervised when in use. Keep it out of reach of children or persons in need of supervision. Children should be supervised to ensure that they do not play with the appliance.
- The device must not be used by children. Keep the device and the power cord away from children.
- Do not operate the appliance without ingredients. The blades will become hot and blunt.
- Keep long hair tied back and do not wear long jewellery. Make sure jewelry, loose clothing or hair cannot get into the moving parts of the appliance. Always be concentrated when working with the appliance.
- Please keep the appliance and the accessories clean at all times as they come into direct contact with food. Before using clean all parts thoroughly.
- Before each use, make sure there are no visible damages and the accessories are properly assembled.
- Do not use solvents, benzene or alcohol to clean the appliance. Never immerse the motor unit in water or any other liquid, nor rinse it under tap water. Only use a moist cloth to clean the motor unit. Do not wash the parts in the dishwasher.
- Place the appliance only on an even surface while operating it. Do not place the appliance in a sink or on inclined surfaces.
- Do not use the appliance outdoors and only use original accessories.
- Do not jam the cord or pull the cord around the edges. Do not pinch the power cord in any way and keep it away from hot surfaces.
- Before cleaning, changing accessories, or when not in use, first disconnect the plug from power mains. Do not pull the plug with wet hands. There is a risk of electric shock! To unplug the plug grasp the plug itself and not the cord.
- Turn off and unplug the appliance immediately if the appliance became wet. Do not immerse the appliance into the water and do not allow water to enter into the housing.
- The blade is very sharp. Always handle the blade with care.
- Do not attempt to cut or grind frozen food. Do not cut meat with bones, sinews, rind, or gristles.
- To grind whole nuts, always take a small amount and grind.
- Do not reach into the moving parts while the appliance is running. Only use the pusher to push ingredients down the filling tube and do not use other objects for this urpose.
- Wait until moving parts have stopped before you handle the appliance or remove parts.
- If the appliance becomes blocked or if there is excessive noise, immediately turn off and pull the power plug.
- The device is not intended for continuous professional operation. The device is intended to be used in closed rooms only and in similar applications such as staff kitchen areas in shops, offices, and other working environments; farm houses; by clients in hotels, motels, and other residential type environments; bed and breakfast type environments. The use in any other way is not considered as intended use.
- If the appliance becomes damaged, do not use it furthermore. If the power cord of this appliance becomes damaged, do not attempt to repair it yourself. Contact our ustomer support department.
Assembling
Before first Use
Remove the appliance and the accessory out of the packaging and check for any damage in transit. Dispose of packaging materials or store it out of reach of children. Plastic bags may become a deadly toy for children.
Hygiene Instructions
Minced meat is extremely perishable and can go bad very quickly. Under certain circumstances (warm climate or too long storage) it offers an ideal breeding ground for spoilage micro-organisms such as salmonella. Therefore keep the below mentioned hygiene regulations:
- Make sure all parts are clean, especially your hands, knives, cutting boards, etc.
- Only use fresh meat and well cooled meat because it warms up while grinding.
- Refrigerate the minced meat at +4° C and use the minced meat within 6 hours.
- When storing minced meat, freeze it immediately after processing.
- Clean all parts of the appliance after each use. Make sure there are no remains left on the attachments.
General Hints
- The maximum continuous operating time is 10 minutes (KB Time). To avoid overheating allow the appliance to cool down for 10 minutes after using it continuously for 10 minutes.
- This appliance is equipped with overheat protection. This system will automatically cut off the power supply to the appliance in case of overheating. In case this happens, simply turn off the appliance and unplug it. Allow the appliance to cool down for half an hour.
- All removable parts are not dishwasher-safe. Do not clean these parts in the dishwasher!
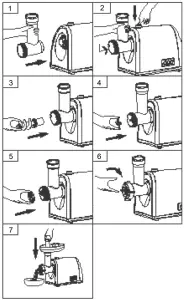
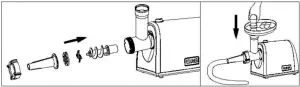
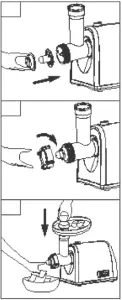
Assemble the electric meat grinder as pictured in drawings 1 – 7.
- Tilt the filling tube (7) forwards and place it into the drive (5).
- For locking the filling tube (7), depress the releasing knob (2) and simultaneously turn the filling tube upwards. For unlocking and removing the filling tube, depress the releasing knob and tilt the filling tube forwards.
- Insert the worm shaft (8) into the horizontal part of the filling tube (the cutter housing).
- Now insert the blade (13) on the tip of the worm shaft.
- Insert the desired grinding disc (9, 10 or 12), according to the desired grinding result, on the worm shaft. Hint: All grinding discs are lightly oiled in order to protect them from corrosion. Clean the grinding discs with lukewarm soapy water before use. Do not wash in the dishwasher!
- Screw the lock ring (11) on the cutter housing. Do not overtighten the lock ring!
- Insert the tray (1) into the filling tube (7) and place the transparent bowl under the cutter housing to collect the minced meat. Only use the pusher (6) to gently push the meat into the filling tube. Hints: Cut the meat into small pieces, so the meat easily fits into the filling tube. Remove bones, gristles, rind, or sinews as much as possible. Never use frozen meat!
Operating
Switching ON
Before inserting the power cable to mains, make sure the appliance is switched off by pressing the OFF switch once.
Forward Operation
1. Press the ON switch I/II once. By pressing the button again the motor unit will run at a higher speed.
2. To switch off the appliance, press the OFF switch.
Reverse Operation
Press the REV switch for reverse operation. Use this function if the cutter housing is blocked or clocked.
Attention: Wait until the motor has come to standstill before pressing the reversal button. If the blocking cannot be released at all, switch off the appliance. Pull the power plug, disassemble the cutter housing and clean it thoroughly.
Hints
- Allow the appliance to make 4 – 5 turns without food, so the remaining food can fall into the bowl.
- Switch off the appliance and pull the power plug.
- Please note, the grinding disc might get stuck onto the worm shaft and cannot be removed easily. To remove the grinding disc, use a suitable and clean object and lift up the grinding disc from the worm shaft.
Accessories
The coarse grinding disc (12) is intended to be used for making ground meat and the fine and medium grinding discs (9) and (10) are intended for making finely minced consistency for sausages.
Preparation of Sausages
Only use the pusher (6) to gently push the meat into the filling tube! Do not apply to much pressure while pushing.
- Attach the desired grinding disc (9, 10 or 12) on the blade (13). Insert the sausage horn (14) through the lock ring (11) and fasten the lock ring on the cutter housing.

- Prepare the sausage meat with the desired ingredients and seasons and place the meat on the tray. Soak the casing for approx. 10 minutes in lukewarm water. Hints: Calculate approx. 1.60 m casing for each kilo of sausage filling. You can use natural casing or artificial casing. Ask your butcher.
- Slide the soaked casing on the sausage horn. Tie the end of the casing and after filling a section; turn the sausage for some turns in order to produce an empty section of casing and to tie the sausage.
- Switch on the electric grinder and use the pusher only to gently push the seasoned meat into the filling tube. If the casing gets stuck on the sausage horn, wet it warm tepid water.
- After finishing, switch off the appliance and unplug it from the power mains.
Preparation of Kibbe
- First, insert the adaptor for Kibbe (15b) directly on the worm shaft. Finally, attach the horn for Kibbe (15a) on the adaptor.
- Tighten the parts with the lock ring (11). Do not overtighten the lock ring. Prepare the minced meat with ingredients and seasons as usual and place the meat on the tray.
- Push the meat through the filling tube only by using the pusher.
Using the Biscuit Former
- Attach the biscuit former on the worm shaft.
- Slide the biscuit shaper on the shaper holder up to the desired form. Form the prepared dough into a roll of 3 thicknesses and feed the dough through the filling tube.
- Switch on the appliance. Only use the pusher to press the dough through the filling tube! Cut the extruded dough into pieces of any desired length
Cleaning and Storing
Cleaning and Storing
- Clean the appliance and the accessory before and after each use.
- Clean the plastic and metal parts thoroughly with hot water and mild detergent. Do not clean all parts in the dishwasher.
- The blade is sharp. Be careful when cleaning the blade.
- Dry all parts immediately after cleaning and apply some vegetable oil on the grinding discs and the worm shaft in order to lubricate and protect them from corrosion.
- Clean the housing thoroughly with a lightly moistened cloth.
- After a normal wear lifespan, replace the blade or the grinding discs only with Westfalia’s original replacement parts.
- Store the appliance in a dry place out of reach of children.
Technical Data
| Nominal Voltage | 230 V- 50 Hz |
| Nominal Power | 550 W |
| Power Consumption in OFF mode | 0 W |
| Protection Class | |
| Dimensions | 250 x 160 x 230 mm |
| Weight | 2700 g |
| Max. Operating Time (KB Time | 10 Minutes |
EC Declaration of Conformity
We, the Westfalia Werkzeugcompany, Werkzeugstraße 1, D-58093 Hagen, declare by our own responsibility that the product
Meat Grinder
Article No. 86 02 74
is according to the basic requirements, which are defined in the European Directives and their amendments.
2011/65/EU
Restriction of the Use of certain Hazardous Substances in electrical and electronic Equipment (RoHS)
2014/30/EU
Electromagnetic Compatibility (EMC)
EN 55014-1:2017+A11, EN 55014-2:1997+A1+A2+AC,
EN 61000-3-2:2014, EN 61000-3-3:2013
2014/35/EU
Low Voltage Directive (LVD)
EN 60335-1:2012+AC+A11, EN 60335-2-14:2006+A1+A11+AC+A12,
EN 62233:2008
2009/125/EC
Energy-related Products (ErP)
Verordnung (EG) Nr. 1275/2008
The technical documentation is on file at the QA department of the Westfalia Werkzeugcompany.
Hagen, 22 nds of December 2020
Thomas Klingbeil,
Customer Services
Disposal
![]() Dear Customer,
Dear Customer,![]() Please help avoid waste materials.
Please help avoid waste materials.
If you at some point intend to dispose of this article, then please keep in mind that many of its components consist of valuable materials, which can be recycled. Please do not discharge it in the rubbish bin, but check with your local council for recycling facilities in your area. ![]()


