VEE GEE 1200CM Series Compound Microscopes
Introduction
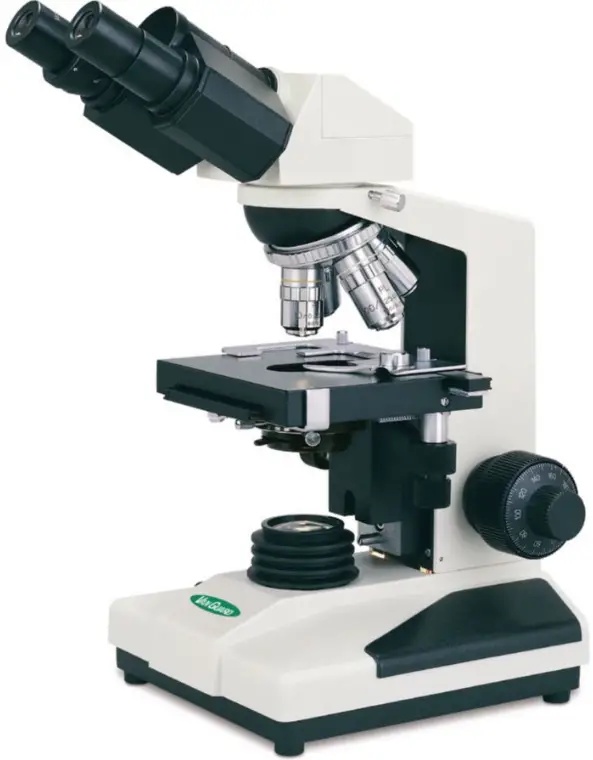
VanGuard 1200CM Series Compound Microscopes provide the necessary specifications for diagnostic and educational use in medical/veterinary clinics, universities, and industrial laboratories.
- Research Level
- Bright field & Phase Contrast Models
- Precision Optics
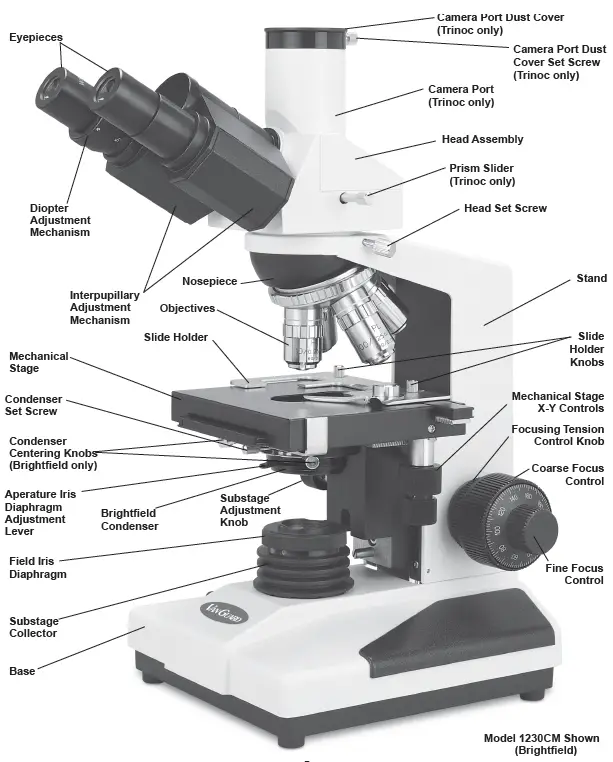
Viewing Head. Monocular, binocular (Seidentopf), or trinocular (Seidentopf) heads rotate 360° and are inclined at 30°. All models feature Interpupillary and dioptric adjustment. The trinocular heads feature a sliding main prism (100/100 split) to provide either 100% of the image to the camera port or 100% of the image to the eyepieces.
Eyepieces. 10X widefield (DIN) with a field number of 18.
Nosepiece. Quadruple, reversed, ball bearing nosepiece with high-grade lubricant and positive stops. The nosepiece is reversed (inward-facing) to allow for easier manipulation of slides and to aid in keeping the objectives clean.
Objectives. Choose from achromatic or plan achromatic. Objectives are made to DIN standards and are coated.
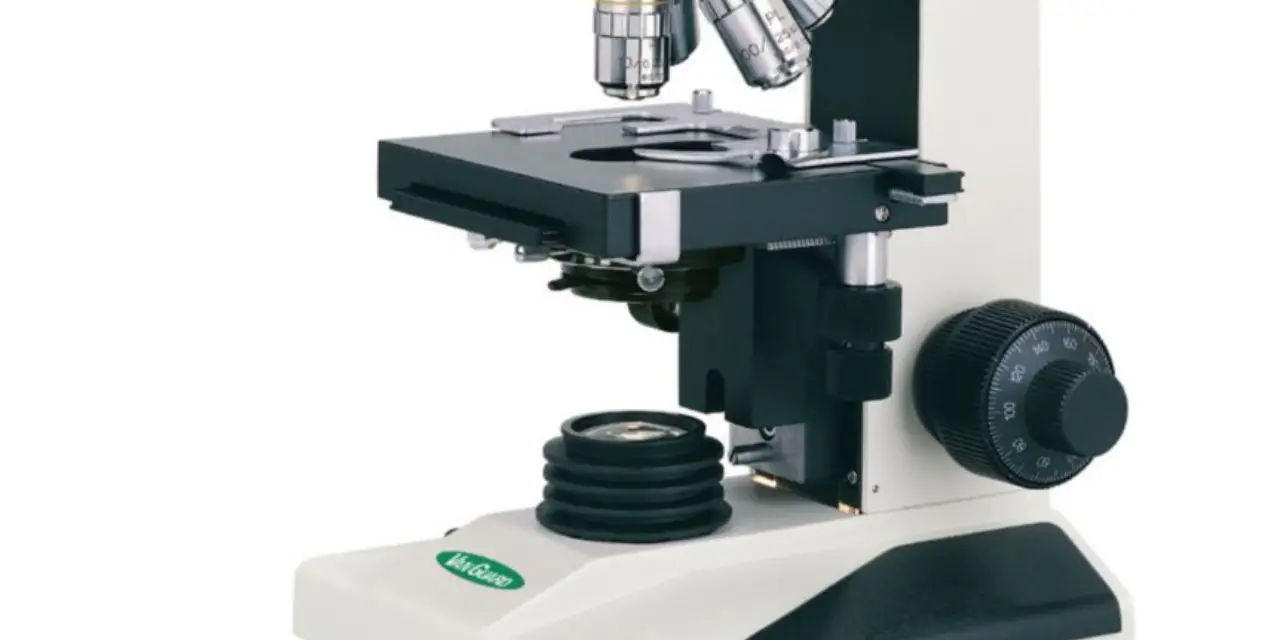
Stage. Delivering a high level of fluid motion control and longevity, the stage measures 125x135mm. Features a removable spring-clip slide holder and a chemical resistant finish. Motion is controlled by a right-hand, low position coaxial control and is driven by a rack and pinion system.
Focusing Movement. Coaxial, low-position, coarse and fine focus controls feature a 40mm focusing range and are graduated to 2 microns per division. Fitted with tension adjustment and safety up-stop.
Condenser. Bright field models come with a 1.25 N.A. Abbe condenser. Phase contrast models come with a 1.25 N.A. Zernike condenser with phase annulus rings for 10X, 25X, 40X, and 100X; also has a “0” setting for bright field work. All condensers are mounted on a rack and pinion focusing mechanism and feature spring-loaded centering knobs and iris diaphragm with a swing-in filter holder.
Illumination. 20W variable halogen light source. Comes with blue, green (phase contrast only) and neutral density filters. 0.5A 250V fuse.
Base. Stable 180 x 210mm fitted with anti-skid rubber feet.
Body. Cast metal, ergonomic body with stain-resistant enamel finish.
Included Parts
All microscopes listed below are shipped with a dust cover (1 ea.), instruction manual (1 ea.), warranty card (1 ea.), spare halogen bulb (1 ea.), and a spare fuse (1 ea.).
Model 1210CM
Monocular Head (1 ea.)
Stand (1 ea.)
Bright field Condenser (1 ea.)
10X Eyepiece (1 ea.)
4X Achromatic Objective (1 ea.)
10X Achromatic Objective (1 ea.)
40X Achromatic Objective (1 ea.)
100X Achromatic Objective (1 ea.)
Dispersion Filter (1 ea.)
Blue Filter (1 ea.)
Model 1211CM
Monocular Head (1 ea.)
Stand (1 ea.)
Bright field Condenser (1 ea.)
10X Eyepiece (1 ea.)
4X Plan Objective (1 ea.)
10X Plan Objective (1 ea.)
40X Plan Objective (1 ea.)
100X Plan Objective (1 ea.)
Dispersion Filter (1 ea.)
Blue Filter (1 ea.)
Model 1220CM
Binocular Head (1 ea.)
Stand (1 ea.)
Bright field Condenser (1 ea.)
10X Eyepiece (2 ea.)
4X Achromatic Objective (1 ea.)
10X Achromatic Objective (1 ea.)
40X Achromatic Objective (1 ea.)
100X Achromatic Objective (1 ea.)
Dispersion Filter (1 ea.)
Blue Filter (1 ea.)
Model 1221CM
Binocular Head (1 ea.)
Stand (1 ea.)
Bright field Condenser (1 ea.)
10X Eyepiece (2 ea.)
4X Plan Objective (1 ea.)
10X Plan Objective (1 ea.)
40X Plan Objective (1 ea.)
100X Plan Objective (1 ea.)
Dispersion Filter (1 ea.)
Blue Filter (1 ea.)
Model 1222CM
Binocular Head (1 ea.)
Stand (1 ea.)
Phase Contrast Condenser Assembly (1 ea.)
Phase Contrast Centering Telescope (1 ea.)
10X Eyepiece (2 ea.)
10X Achromatic Phase Objective (1 ea.)
20X Achromatic Phase Objective (1 ea.)
40X Achromatic Phase Objective (1 ea.)
100X Achromatic Phase Objective (1 ea.)
Dispersion Filter (1 ea.)
Blue Filter (1 ea.)
Green Filter (1 ea.)
Model 1223CM
Binocular Head (1 ea.)
Stand (1 ea.)
Phase Contrast Condenser Assembly (1 ea.)
Phase Contrast Centering Telescope (1 ea.)
10X Eyepiece (2 ea.)
10X Plan Phase Objective (1 ea.)
20X Plan Phase Objective (1 ea.)
40X Plan Phase Objective (1 ea.)
100X Plan Phase Objective (1 ea.)
Dispersion Filter (1 ea.)
Blue Filter (1 ea.)
Green Filter (1 ea.)
Model 1230CM
Trinocular Head (1 ea.)
Stand (1 ea.)
Bright field Condenser (1 ea.)
10X Eyepiece (2 ea.)
4X Achromatic Objective (1 ea.)
10X Achromatic Objective (1 ea.)
40X Achromatic Objective (1 ea.)
100X Achromatic Objective (1 ea.)
Dispersion Filter (1 ea.)
Blue Filter (1 ea.)
Model 1231CM
Trinocular Head (1 ea.)
Stand (1 ea.)
Bright field Condenser (1 ea.)
10X Eyepiece (2 ea.)
4X Plan Objective (1 ea.)
10X Plan Objective (1 ea.)
40X Plan Objective (1 ea.)
100X Plan Objective (1 ea.)
Dispersion Filter (1 ea.)
Blue Filter (1 ea.)
Model 1232CM
Trinocular Head (1 ea.)
Stand (1 ea.)
Phase Contrast Condenser Assembly (1 ea.)
Phase Contrast Centering Telescope (1 ea.) 1
0X Eyepiece (2 ea.)
10X Achromatic Phase Objective (1 ea.)
20X Achromatic Phase Objective (1 ea.)
40X Achromatic Phase Objective (1 ea.)
100X Achromatic Phase Objective (1 ea.)
Dispersion Filter (1 ea.)
Blue Filter (1 ea.)
Green Filter (1 ea.)
Model 1233CM
Trinocular Head (1 ea.)
Stand (1 ea.)
Phase Contrast Condenser Assembly (1 ea.)
Phase Contrast Centering Telescope (1 ea.)
10X Eyepiece (2 ea.)
10X Plan Phase Objective (1 ea.)
20X Plan Phase Objective (1 ea.)
40X Plan Phase Objective (1 ea.)
100X Plan Phase Objective (1 ea.)
Dispersion Filter (1 ea.)
Blue Filter (1 ea.)
Green Filter (1 ea.)
Parts & Accessories
Optional Accessories: Digital Camera Systems:
Part Number: Description:
1400-CDPC-10: USB Digital Camera System, 10 Megapixels – for 1210- and 1220-series
1200-CDPC-10: USB Digital Camera System, 10 Megapixels – for 1230-series
1400-CDPC-5: USB Digital Camera System, 5 Megapixels – for 1210- and 1220-series
1200-CDPC-5: USB Digital Camera System, 5 Megapixels – for 1230-series
1400-CDPC-3: USB Digital Camera System, 3 Megapixels – for 1210- and 1220-series
1200-CDPC-3: USB Digital Camera System, 3 Megapixels – for 1230-series
Other Accessories:
Part Number: Description:
Call for Part Numbers Eyepieces: 10X, 16X, 20X
Call for Part Numbers Objectives: Achromatic:4X, 10X, 20X, 40X, 100X(oil)
Plan Achromatic: 4X, 10X, 20X, 40X, 100X(oil)
Achromatic Phase: 10X, 20X, 40X, 100X(oil)
Plan Achromatic Phase: 10X, 20X, 40X, 100X(oil)
1200-IOG Immersion Oil, Low Viscosity (1/4 oz. Bottle)
 For information about parts, accessories, or service — contact your dealer directly or contact VanGuard Microscopes at 1-800-423-8842.
Parts & Accessories
 Setup
Setup
Assembly
The next three pages are dedicated to assembling a working microscope. The following section “Using your 1200CM Series Microscope” (starting on page 10) explains the various features of the microscope and how to use them.
- After removing the microscope parts from the protective foam and plastic packaging and checking it over for all components and accessories (see list on page 3), you can begin assembly.
- Place the stand on a stable counter top.
NOTE:
Do not release the head until it is firmly secured with the head set screw. - Loosen the head set screw (circled
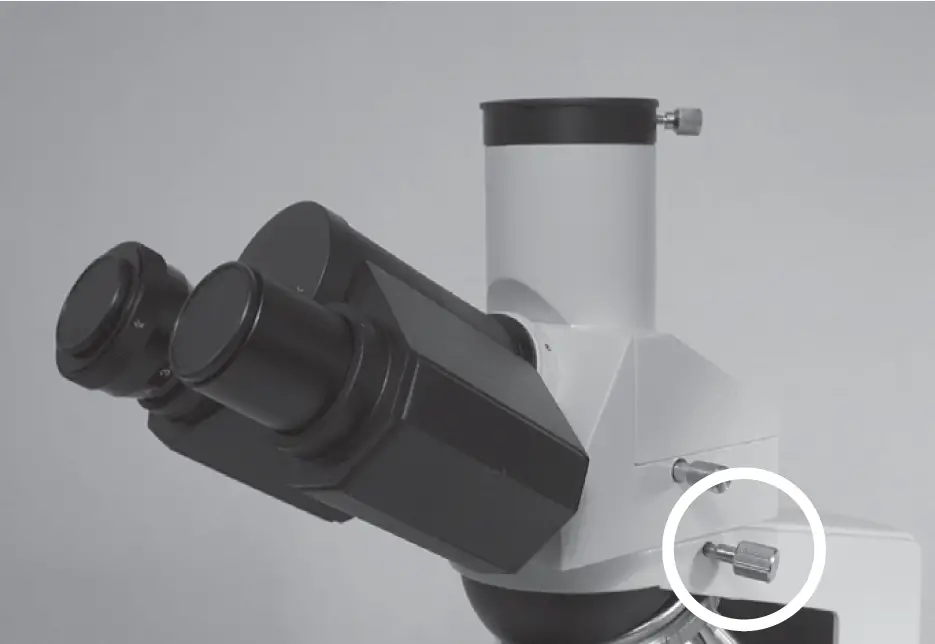 and rotate the head 180° so the eyepieces face forward.
 - Retighten the head set screw.
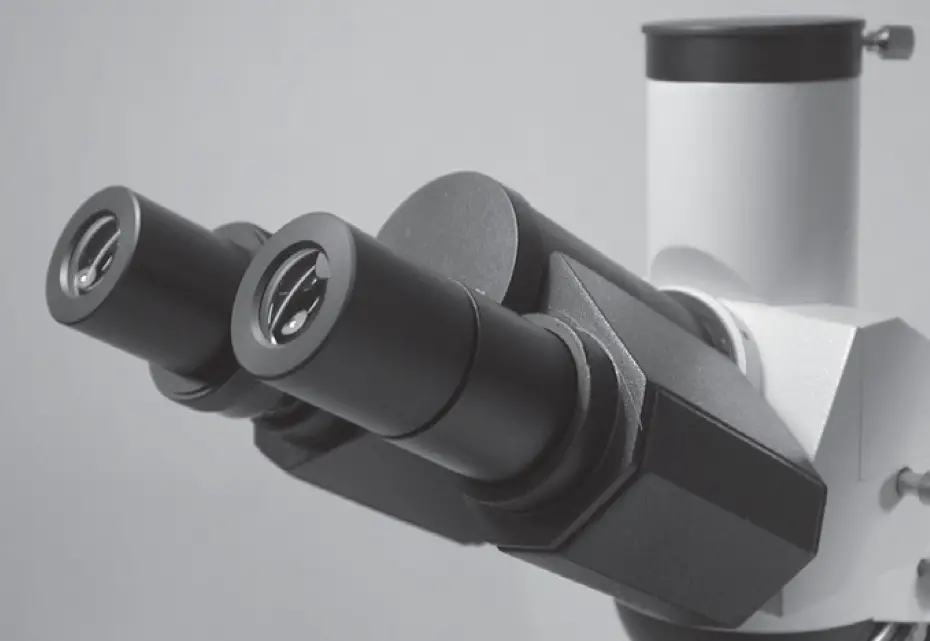
- Remove the dust caps from the eye tubes, then insert the eyepieces into the eye tubes .
- After removing the objectives from their storage containers, individually install each one into the nosepiece by threading them clockwise into the threaded holes of the nosepiece .
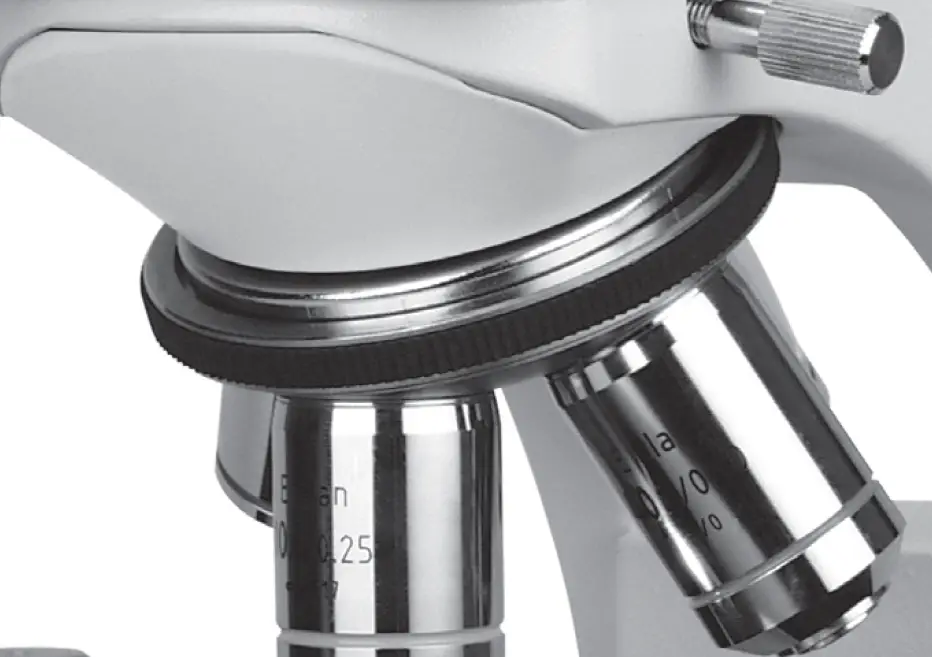 It is generally considered best practice to install the objectives in numerical order.
The next four steps describe how to install the condenser. With phase-contrast models the condenser comes pre-installed. If this is the case, assembly is complete. Skip ahead to “Centering the Condenser” on page 8 unless you need to reattach your condenser for any reason.
Note:
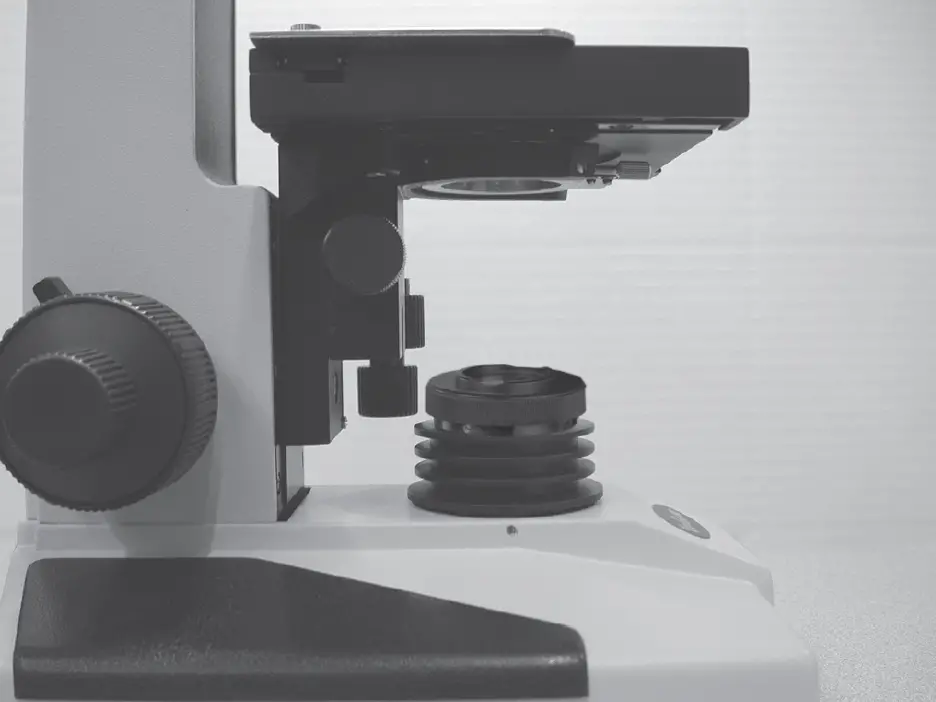
The phase contrast condenser is pictured, but the assembly instructions are identical for the bright field condenser. - Raise the substage and stage to their maximum height .
 Raise the stage via the coarse focus control and the substage using the substage adjustment knob.
 - Loosen the condenser set screw enough to allow the neck of the condenser to slide through the silver ring.
- Gently slide the condenser up through the silver ring of the condenser mount until it will go no further . Make sure that the condenser is oriented as shown in .
 If the condenser will not slide freely through the silver ring (and you’ve checked that the condenser set screw is backed out far enough), do not force, simply wiggle the condenser while lightly pushing up.
 - Once the condenser assembly is in place, lower the substage via the substage adjustment knob and tighten the condenser set screw just enough to prevent the condenser from spinning or sliding out.
 Raise the stage via the coarse focus control and the substage using the substage adjustment knob.
Substage Adjustments
- Centering: The condenser must be centered in the light path to ensure proper light control. A simple method for centering is as follows:
- Rotate the nosepiece until the 10X objective is in the light path.
- Raise the substage assembly fully by turning the substage adjustment knob counter-clockwise.
- Open the aperture iris diaphragm to the largest setting by using the aperture iris diaphragm adjustment lever which extends from the condenser assembly.
- While looking into the microscope eyepieces, close the field iris diaphragm to the smallest setting by turning the uppermost section of the substage illuminator counter-clockwise.
- Closing the iris in this manner will reduce the field so that a small white hexagon is visible within a black field .
 Focusing of the hexagon is performed by turning the coarse/fine focus controls. This white hexagon is the light which is passing through the field iris and should be centered in the black field. If not, move it to the center
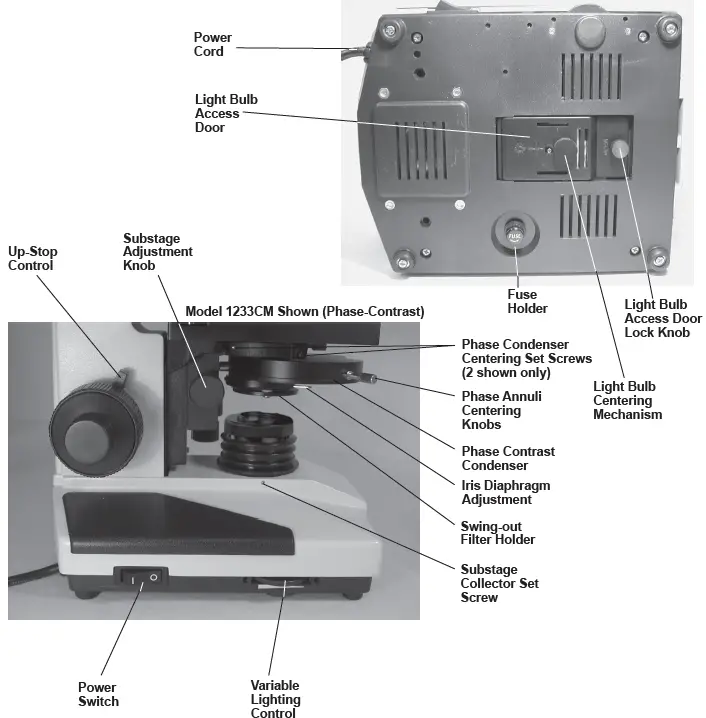
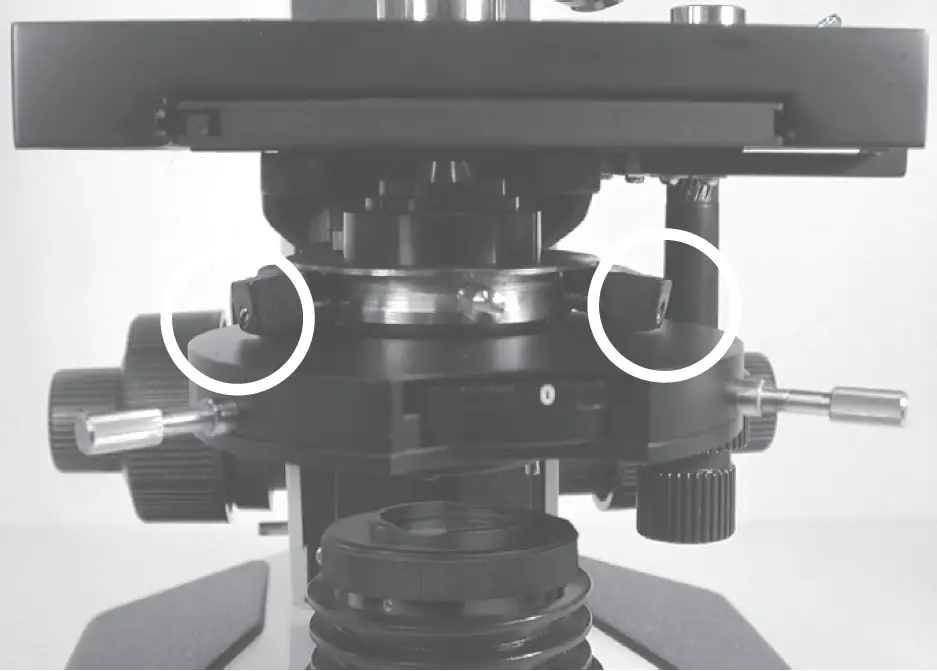
 by tightening and/or loosening the condenser centering knobs. Note: On phase contrast models condenser centering is done with set screws (screwdriver not included) instead of knobs. Locations for two of the set screws are shown in the photo above (figure 5), and two more are on the rear of the condenser mount. It is easiest to back the set screws all the way out and tighten each one slightly while checking often that the condenser is still centered.
 - Fine tuning can be done by opening the field iris diaphragm until the white hexagon almost fills the entire field ,
 and then readjusting .
 After centering the condenser open the field iris diaphragm slightly wider than the field of view.
- Vertical Focusing: The condenser can be raised and lowered with the substage adjustment knob to focus the light for optimal illumination.
- Aperture Adjustment: The light path can be adjusted with the aperture iris diaphragm adjustment lever located just below the condenser. Aperture adjustments are made to induce contrast into a specimen, not to adjust light intensity.
 After centering the condenser open the field iris diaphragm slightly wider than the field of view.
Centering the Illuminator
Verifying that the illuminator is centered will allow maximum light to reach the specimen. This adjustment is usually not required as our microscopes are shipped with the illuminator pre-centered. If for some reason the illuminator should need to be centered again follow the instructions below.
- Remove the substage collector by loosening the set screw on the left hand side.
- The bulb filament should be centered in the opening. If it is not, loosen the bulb centering mechanism on the bottom of the microscope.
- Reposition the bulb so that the filament is at the center of the opening. Make sure that the reflector beneath the bulb is aligned with the light bulb access door so that the access door can still be opened.
- Tighten the bulb centering mechanism.
- Reinstall the substage collector.
If you purchased a bright field model this completes your setup. Skip ahead to page 10, “Using your 1200CM Series Microscope”. If you purchased a phase contrast model, continue below.
Aligning the Phase Contrast Annulus Rings
Once the phase contrast condenser assembly has been centered, the phase contrast annulus rings must be centered for the objectives. Phase contrast is a system which involves a series of light baffling annular rings. Proper alignment of these rings is absolutely necessary to achieve phase contrast.
- Begin by turning on the substage illuminator with the power switch.
- Set the objectives so they are in the approximate position for actual use. This is best achieved by placing a slide on the stage, rotating the 100X objective into position, and raising the stage until the tip of the 100X objective is just above the slide (almost touching).
- Rotate the nosepiece until the 10X objective is in the light path.
- Rotate the annuli turret in the phase contrast condenser assembly until the “10” is seen in the viewing window.
- Remove an eyepiece from one of the eye tubes and replace with the phase contrast centering telescope.
- Looking through the phase contrast centering telescope, turn the uppermost piece of the phase contrast centering telescope until the image is in focus.
- The image seen through the phase contrast centering telescope should resemble rings superimposed on one another.
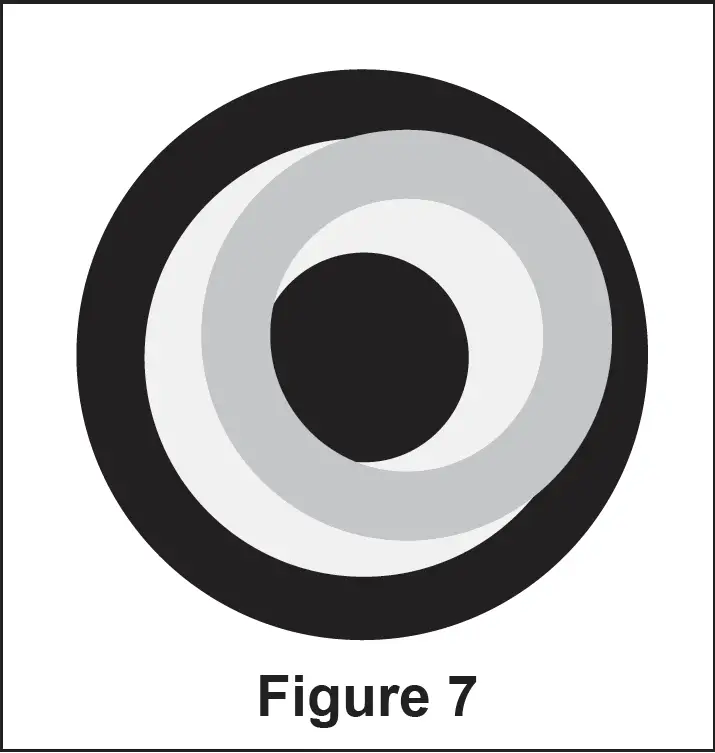 What is actually being viewed are the phase rings. Holding a white sheet of paper on the stage and sliding back and forth between the objective and stage will make this easier to see.
 - Turn the phase annuli centering knobs, which extend from the phase contrast
condenser assembly, until the two rings of light are centered upon one another .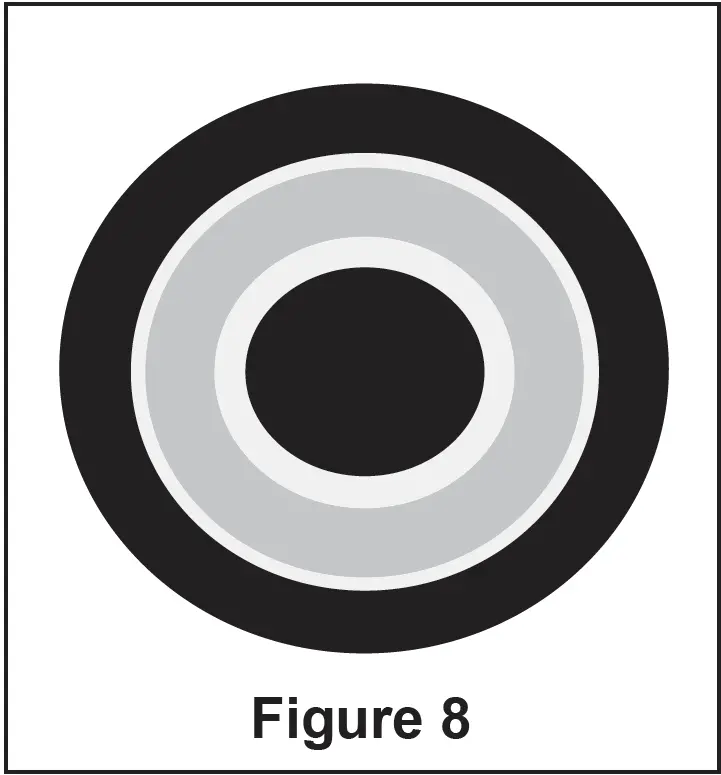
- Once the phase rings are centered, remove the phase contrast centering telescope and replace with the eyepiece.
- The phase rings are now centered for the other remaining objectives. This process shouldn’t need to be repeated for each objective setting, although it is advised to perform off and on checks with the phase contrast centering telescope to confirm that the phase rings are still centered.
NOTE:
Bright field work can be achieved on models with a phase contrast condenser. The “0” setting on the phase annulus turret is used for this purpose.
Variable Lighting Control/Power Switch
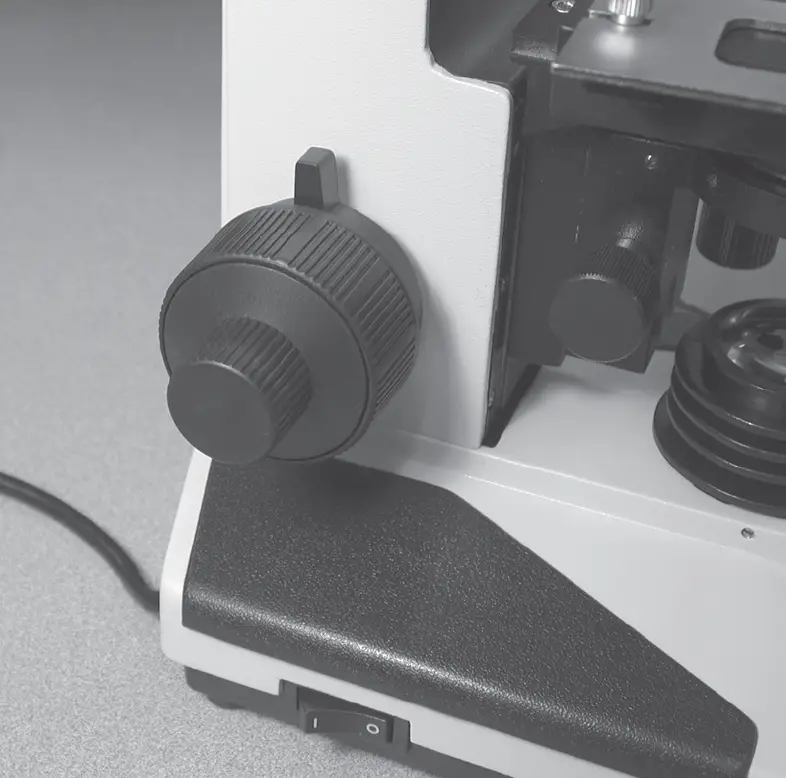
VanGuard 1200CM Microscopes are equipped with a rheostat controlled variable lighting control, which allows the user to set the lighting anywhere between off and full brightness. The variable lighting control is located on the left side of the microscope in front of the power switch. To increase the brightness roll the wheel towards the rear of the microscope. The rocker switch located on the left hand side of the microscope (see page 6) turns the power on or off. To turn the power on press the rocker on the end marked “|”. To turn the power off press the rocker on the end marked “O”.
Focusing and Mechanical Stage Mechanisms
- Focusing adjustment is achieved by turning the coarse/fine focus controls .
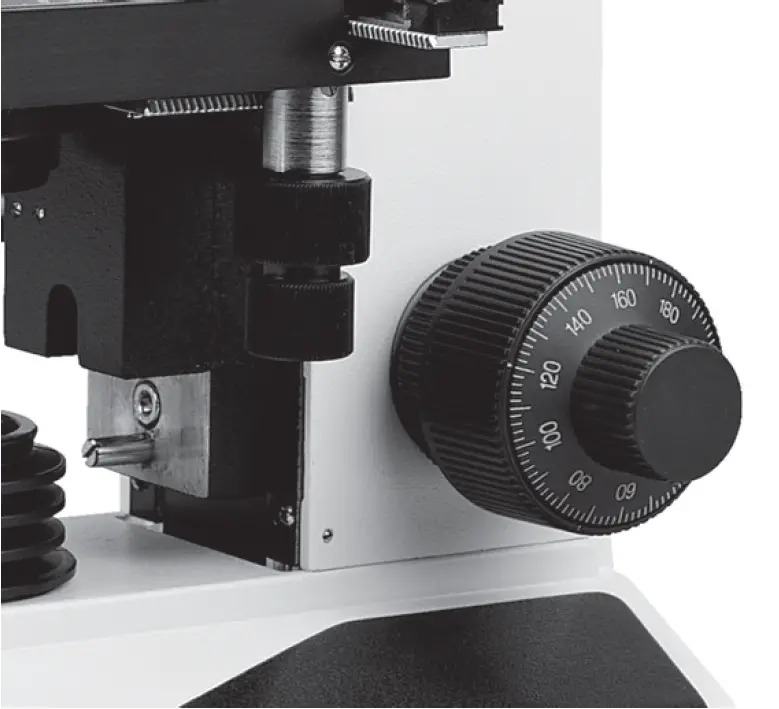
The large knob is used for coarse adjustment, the smaller knob for fine adjustment. The coaxial arrangement allows for easy, precise adjustment without stage drift. - Turning the coarse/fine focus control raises and lowers the stage vertically. One complete turn of the fine focusing knob raises or lowers the stage 0.3mm; the smallest graduation refers to 2 microns of vertical movement. One complete turn of the coarse focusing knob raises or lowers the stage 3.6mm. To ensure long life, turn the focusing knobs slowly and uniformly.
- The focusing tension control knob is located just inside of the right-hand focus control knob. For tighter tension, turn the control knob in a clockwise motion. For looser tension, turn the control knob in a counterclockwise motion.
- Vertical Focusing: The condenser can be raised and lowered with the substage adjustment knob to focus the light for optimal illumination.
- Aperture Adjustment: The light path can be adjusted with the iris diaphragm adjustment lever located underneath the condenser. Aperture adjustments are made to induce contrast into a specimen, not to adjust light intensity.
- The mechanical stage X-Y controls, located underneath the right-hand side of the stage, provide easy and accurate positioning of the sample. One complete turn of the longitudinal (Y) control (lower half of the stage controls) will move the specimen 34mm left or right. One complete turn of the transverse (X) control (upper half of the stage controls) will move the specimen 20mm front or back.
- The spring-loaded slide holder can be removed for users who prefer to not use a mechanical stage. Simply loosen the knurled slide holder knobs which lock the slide holder on the stage, and slip out the slide holder.
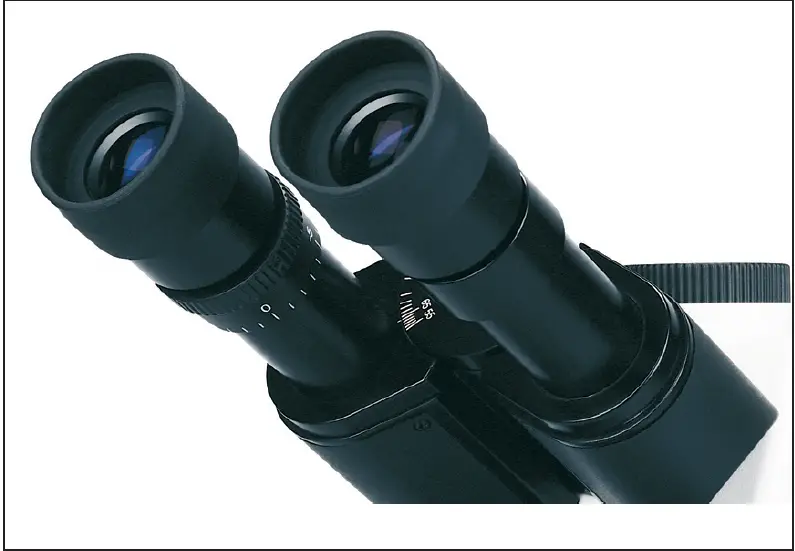
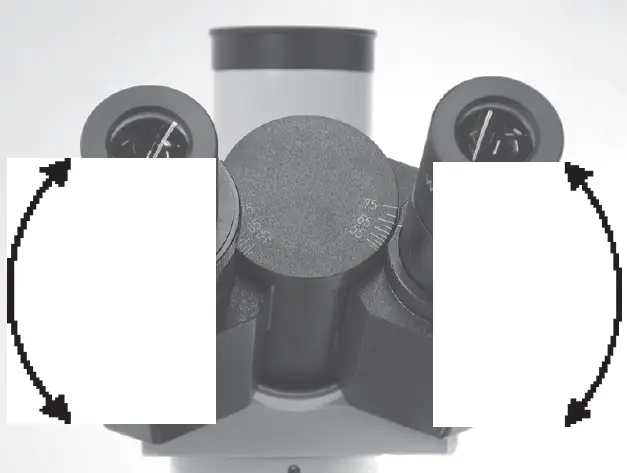
Interpupillary and Diopter Adjustment
- Interpupillary adjustment (the distance between eyepieces) is made through a “folding” action. The Seidentopf design allows for a folding adjustment which is quickly and easily done for each user .
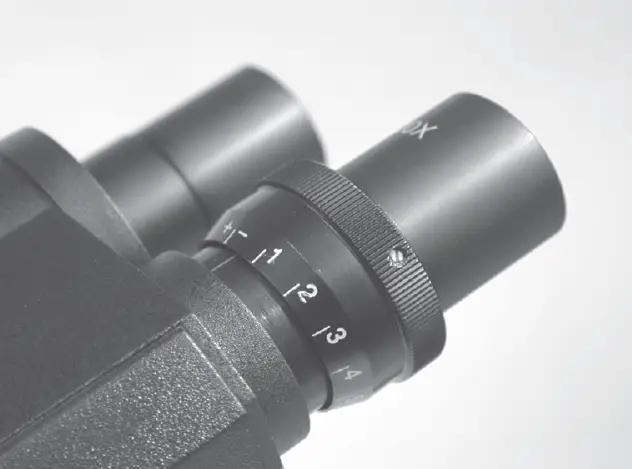
- Diopter adjustment allows for proper optical correction based on each individual’s eyesight. This adjustment is easily made and is recommended prior to each use by different users to prevent eyestrain.
- Using the 40X objective and a sample slide (i.e. one which produces an easily focused image), close your left eye and bring the image into focus in your right eye with the coarse/fine focus control.
- Once the image is well-focused using only your right eye, close your right eye and check the focus with your left.
- If the image is not perfectly focused, make fine adjustments with the diopter adjustment mechanism located on the left eyetube .
- Once complete, the microscope is corrected for your vision.
Setting the Up-Stop Mechanism
The up-stop mechanism is located just inside of the left-hand focus control knob. It allows the user to set a maximum point to which the stage can be raised, which prevents damage to the specimen and objective.
- To set this point, turn the up-stop mechanism in a counterclockwise motion, so that its tab is facing down (which is also the “no up-stop position” for normal use).
- Raise or lower the stage, by turning the focus control knobs, to the desired height. Be careful not to raise the stage high enough to crash into the objective.
- Once achieved, turn the up-stop mechanism in a clockwise motion, so that its tab is facing up .
- Once gently tightened, the up-stop mechanism will not allow the stage to be raised higher than the set point.
Using the Camera Port
- Assemble the adapters and connect to the camera using the instructions provided with the camera/adapter kit.
Note:
Camera kit is not included with this microscope. Please see page 3 for available camera kits. - Loosen the camera port set screw ,
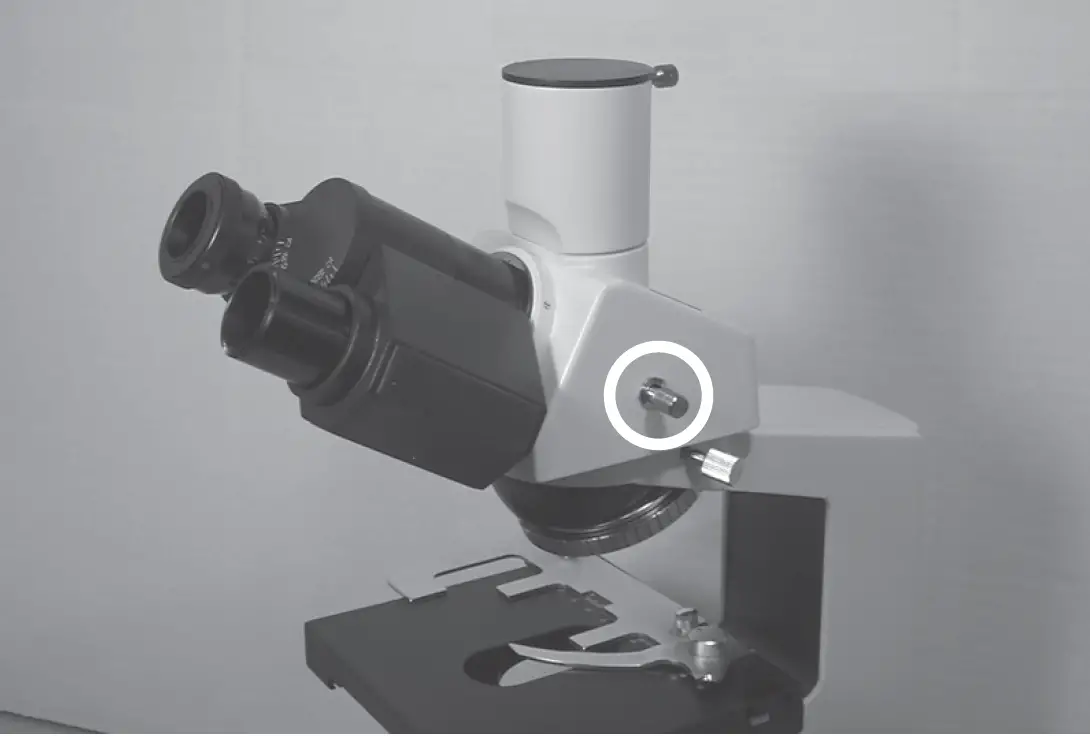 and remove the camera port dust cap.
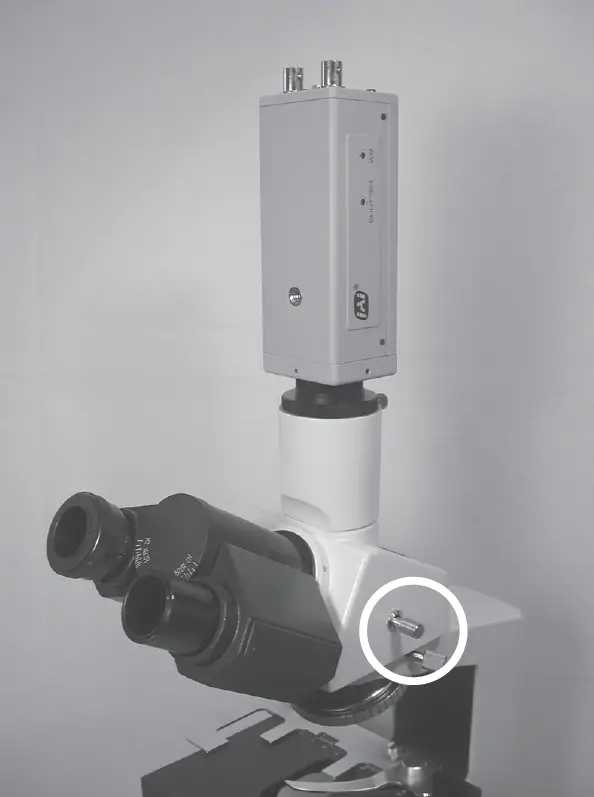
 - Place the adapter/camera assembly on top of the camera port and slide the dovetail flange into place.
Note:
Do not release the camera/adapter assembly until it is firmly secured with the camera port set screw. - Tighten the camera port set screw.
- Pull the prism slider completely out to divert the image to the camera port. The prism slider is the silver knob on the right side of the head assembly .
 Note:
Note:
The 1200 Series Microscopes utilize a 100/100 sliding prism. This prism diverts 100% of the light to the camera port while the prism slider is pulled out. For this reason the eyepieces can not be used while the prism slider is pulled out. - When the camera port is not in use, be sure to cover with the camera port dust cap.
Oil Immersion Objectives
The 100X objective which comes with this microscope must be used with immersion oil in order to maintain image quality. After use, the objective tip needs to be wiped clean so that no oil residue remains Procedure for using immersion oil
- Place one drop of immersion oil on the prepared
- Slowly lower the 100X objective until it makes contact with the drop of immersion oil. You should now be able to focus on the specimen.
Procedure for cleaning the 100X Oil Immersion Objective:
- Lightly moisten a cotton swab with lens cleaner.
- Wipe the objective with a twisting motion in order to remove all traces of the immersion oil.
- Check that all immersion oil has been removed before storing the objective.
Note:
- Under no circumstances should an oil immersion objective be left sitting in oil for an extended period of time. Exceptionally long immersion periods can cause oil to penetrate the objective’s sealant and obscure the optics, which is not covered under warranty.
- You should avoid getting oil on any objective other than the 100X, as they are not sealed. Pay particular attention to the 40X, given its resemblance to the 100X objective.
Using Filters
Your Vanguard Microscope was supplied with two or three filters. Bright field models come with a neutral density (frosted) filter and a blue filter. Phase contrast models add a green filter.
Procedure for Using Filters:
- Locate the swing-out filter holder located on the bottom of the condenser.
- Using the tab, swing the filter holder out of the light path.
- Insert the desired filter into the filter holder.
- Swing the filter and filter holder back into the light path.
Neutral density filters can be used to soften harsh illumination for both viewing and photomicroscopy. Neutral density filters can control photograph exposure levels.
The green filter is used mainly for added contrast and photograph color correction during phase contrast work.
The blue filter is used to approximate natural light and photograph color correction.
Filtering is a user preference and application specific issue and therefore is beyond the scope of this manual. There are many sources available that explain proper filtering technique and theory.
Replacing the Light Bulb
- Before attempting to replace or remove the light bulb, UNPLUG THE MICROSCOPE FROM ANY POWER SOURCE AND ALLOW THE BULB TO COOL COMPLETELY.
- Carefully lay the microscope on its side to locate the light bulb access door on the bottom of the microscope
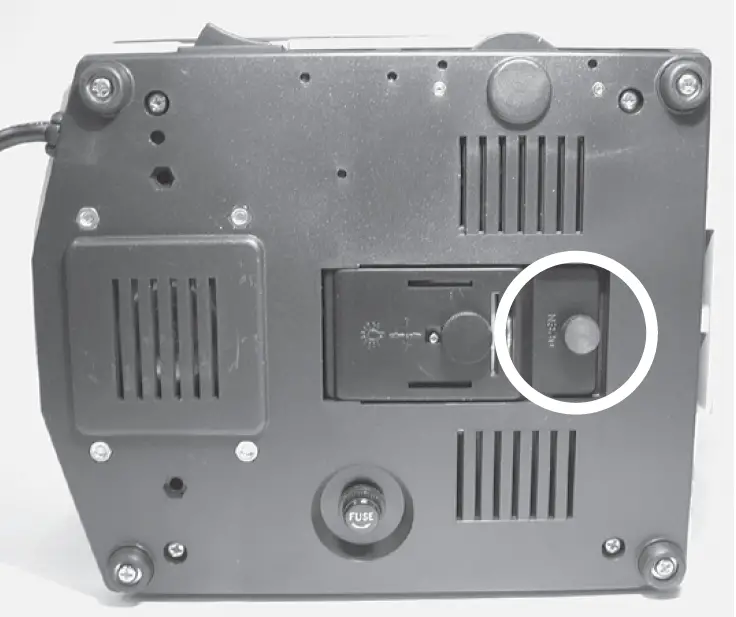
- To open the door, unscrew the knob and pull outward.
- Once the door is open, the bulb can be removed by grasping the bulb and pulling it from its socket.
Note: Be careful not to touch the glass bulb when replacing — use a tissue or other medium to grasp the bulb. This will prevent the oils from your hand from reducing lamp life. - If contact is made with the bulb, clean with rubbing alcohol and allow a brief drying period.
- When replacing, insert the new bulb into the same socket. Make sure that the pins on the bulb slide easily into the socket. You should not have to force the bulb.
- Close the light bulb access door and screw the knob back in to lock.
- Return the microscope to normal operating position.
- If necessary reenter the illuminator following the instructions on page 9.
Replacing the Fuse
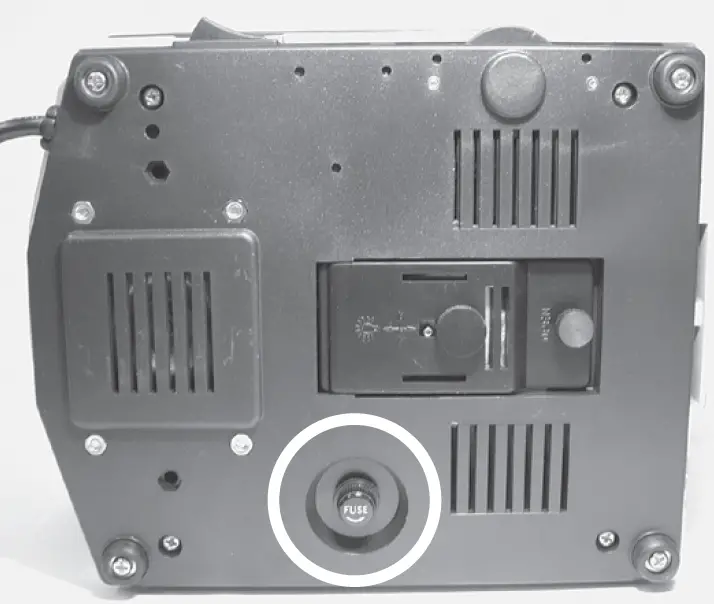
- If the microscope is plugged in but the lamp is not turning on, the fuse could be blown. To check the fuses, UNPLUG THE MICROSCOPE FROM ANY POWER SOURCE.
- Carefully lay the microscope on its side and locate the fuse holder

- Unscrew the fuse holder from the base.
- Remove the fuse from the fuse holder by pulling on the fuse.
- If the fuse is blown (the wire inside is broken, or the glass is blackened) insert a new fuse (see below for replacement fuse information) into the fuse holder. Screw the fuse holder back into the base.
- Return microscope to normal operating position.
Replacement Lamp –– 20W Halogen (Cat. No. 1400-20WHL)
Replacement Fuse — 0.5A, 250V (Cat. No. 1200-FS1)
Maintenance
Caring for your 1200CM Microscope
- The eyepieces and objectives on VanGuard Microscopes are coated. They should never be wiped while dry as any dirt or dust will scratch the coating. The surfaces should either be blown off with an air canister, or blown and cleaned with an air-bulb and camel-hair brush. It is recommended to then use a lens cleaner. Never use anything other than lens cleaner on any optical component. Apply with a cotton swab for a minimum of wetting, then wipe the surface clean with a quality lens tissue.
- The same care instructions apply to all optical parts on this VanGuard Microscope, including the substage collector and the condenser lenses.
- All other parts can be cleaned with a paper towel and rubbing alcohol. Be aware that rubbing alcohol can break down lubricants, so be careful when cleaning near the following parts:
- Stage rack and pinion gears
- Focus controls
- Nosepiece
- Substage gears
- Substage controls
- xylene, since it breaks down the bonding material holding the lenses, should never be used as a cleaner.
- Periodically your VanGuard Microscope should be fully serviced by a qualified service technician.
- In order to keep dust and debris out of the optical pathways, always keep the camera port and eye tubes covered (with either eyepieces or dust caps), and always use the dust cover when the microscope is not in use.
Troubleshooting
This chart may help resolve some of the more common problems associated with using a compound microscope. Simply follow the steps until your problem is resolved. As always, you can contact your dealer or VanGuard Microscopes if you ever need help.
| Step # | Possible Cause | I can’t get any light How to Check Result Solution | For More Info | ||
| 1 | Light not switched on | Visually inspect | Switched on | Go to next step | |
| Not switched on | Move power switch to “|” position | Page 10 | |||
| 2 | Not plugged in | Visually inspect | Plugged in | Go to next step | |
| Not plugged in | Plug in | ||||
| 6 | Variable lighting control (VLC) turned all the way down | Visually inspect | VLC turned up | Go to next step | |
| VLC turned down | Turn VLC up | Page 10 | |||
| 3 | Not getting power | Plug in another electrical appliance | Getting power | Go to next step | |
| Not getting power | Switch to different outlet | ||||
| 4 | Bad fuse | Visually inspect (see page 13) | Good fuse | Go to next step | |
| Bad fuse | Install new fuse | Page 14 | |||
| 5 | Bad bulb | Try different bulb | Good bulb | Contact dealer or VanGuard Microscopes | Page 17 |
| Bad bulb | Install new bulb | Page 14 | |||
| Step # | Possible Cause | I can’t get enough light How to Check Result Solution | For More Info | ||
| 1 | Variable lighting control (VLC) is turned down too far | Visually inspect | VLC turned up | Go to next step | |
| VLC turned down | Turn VLC up | Page 10 | |||
| 2 | Bulb not centered | Visually inspect (page10) | Bulb centered | Go to next step | |
| Bulb not centered | Center the bulb | Page 9 | |||
| 3 | Condenser not centered | Recenter the condenser (page 8) | Centered | Go to next step | |
| Not Centered | Center the condenser | Page 8 | |||
| 4 | Condenser height not adjusted properly | Visually inspect | Adjusted properly | Go to next step | |
| Not adjusted properly | Adjust condenser height | Page 10 | |||
| 5 | Dirty condenser and/or substage illuminator | Visually inspect | Dirty | Clean condenser and/or substage illuminator with lens cleaner and lens cloth | Page 15 |
| Not dirty | Consider purchasing auxiliary lighting or Kohler Illumination kit. Contact dealer or VanGuard Microscopes | Page 17 | |||
| Step # | Possible Cause | I can’t raise the stage How to Check Result Solution | For More Info | ||
| 1 | Up-Stop Mechanism is set too low | Visually inspect | Set incorrectly | Set to “no up-stop” | Page 11 |
| Set correctly | Go to next step | ||||
| 2 | Stage is at maximum height | Visually inspect | At max height | Can’t be raised any further | |
| Not at max height | Contact dealer or VanGuard Microscopes | Page 17 | |||
I can’t see anything through the eyepieces/camera Step # Possible Cause How to Check Result Solution For More Info | |||||
| 1 | Light not turned on | Visually inspect | Turned on | Go to next step | |
| Not turned on | Turn on light | Page 10 | |||
| 2 | VLC set too low | Visually inspect | Not set too low | Go to next step | |
| Set too low | Increase VLC | Page 10 | |||
| 3 | Objectives not installed | Visually inspect | Installed | Go to next step | |
| Not installed | Install objectives | Page 7 | |||
| 4 | Condenser not installed | Visually inspect | Condenser installed | Go to next step | |
| Condenser not installed | Install condenser | Page 7 | |||
| 5 | Prism slider pulled out/pushed in (trinocular models only) | Visually inspect | Prism slider in correct position | Go to next step | |
| Prism slider not in correct position | Pull out for camera/push in for eyepieces | Page 12 | |||
| 6 | Something blocking light path between substage illuminator and objectives | Visually inspect | Blockage | Remove blockage | |
| No blockage | Contact dealer or VanGuard Microscopes | Page 17 | |||
| Step # | Possible Cause | I can’t focus on the specimen How to Check Result Solution | For More Info | ||
| 1 | Up-stop set too low | Visually inspect | Set too low | Reset up-stop to appropriate height | Page 11 |
| Not set too low | Go to next step | ||||
| 2 | Using the 100X objective without immersion oil | Visually inspect | Using oil | Go to next step | |
| Not using oil | Use immersion oil | Page 13 | |||
| 3 | Condenser not installed | Visually inspect | Condenser installed | Go to next step | |
| Condenser not installed | Install condenser | Page 7 | |||
| 4 | Oil in objective/dirty objectives | Visually inspect | Objectives clean | Go to next step | |
| Objectives dirty | Clean or replace objectives | Page 15 | |||
| 5 | Slide placed on stage upside down | Visually inspect | Slide upside down | Flip slide | |
| Slide not upside down | Go to next step | ||||
| 6 | Cover glass too thick | Visually inspect | Cover glass too thick | Use #1.5 (0.17mm) cover glass | |
| Cover glass not too thick | Contact dealer or VanGuard Microscopes | Page 17 | |||
| Step # | Possible Cause | The stage keeps drifting down How to Check Result Solution | For More Info | ||
| 1 | Focus tension is set too low | Check focus tension control knob (page 10) | Not enough tension | Increase tension | Page 10 |
| Plenty of tension | Contact dealer or VanGuard Microscopes | Page 17 | |||
Specifications
- Viewing Head: Trinocular/Binocular/Monocular
- Viewing Head Type: Seidentopf [Trinocular/Binocular Models]
- Head Rotation: 360°
- Head Inclination: 30°
- Sliding Prism: 100/100 Split [Trinocular Models]
- Interpupillary Adjustment: 55-75mm
- Dioptric Adjustment: -5 to +5
- Eyepiece Magnification: 10X Widefield
- Eyepiece Field Diameter: 18mm
- Optional Eyepieces: 16X [Field Diameter: 11mm]
20X [Field Diameter: 11mm] - Nosepiece: Quadruple Position/Reversed
- Bright field Objectives: 4X [0.10 NA, 17.0mm WD, 4.5mm FOV]
[Achromatic or Plan Achromatic] 10X [0.25 NA, 8.0mm WD, 1.8mm FOV]
40X [0.65 NA, 0.40mm WD, 0.45mm FOV]
60X [0.85 NA, 0.30mm WD, 0.3mm FOV]
100X(oil) [1.25 NA, 0.25mm WD, 0.18mm FOV] - Phase Contrast Objectives:
[Achromatic or Plan Achromatic] [0.25 NA, 8.0mm WD, 1.8mm FOV]
[0.40 NA, 0.50mm WD, 0.9mm FOV]
[0.65 NA, 0.40mm WD, 0.45mm FOV]
[1.25 NA, 0.25mm WD, 0.18mm FOV] - Stage Dimensions: 125mm x 135mm
- Stage Motion: Right-Hand Coaxial Control/Rack & Pinion Drive
Stage Movement Range: 30 x 70mm - Focusing Movement: Coaxial Coarse & Fine Controls/Safety Up-Stop
- Focusing Range: 40mm
- Focusing Graduation: 2 Microns/Division
- Bright field Condenser: 1.25 NA Abbe Condenser with Iris Diaphragm
- Phase Contrast Condenser: 1.25 NA Zernike Condenser with Iris Diaphragm
- Phase Centering Tool: Telescoping Eyepiece [Included with Phase Contrast Models]
- Lower Illumination: 20W/6V Variable Quartz Halogen
- Fuse: 0.5A, 250V
- Voltage: 110V
- Base Dimensions: 180mm x 210mm
- Overall Dimensions: 210mm (L) x 180mm (W) x 380mm (H) [Binocular/Monocular Models]
- Weight: 0.7kg [Binocular Models]


