![]() C5 WiFi Full HD Remote Lens Motorcycle Camera System
C5 WiFi Full HD Remote Lens Motorcycle Camera System
User Manual
C5 WiFi Full HD Remote Lens Motorcycle Camera System
- Please follow the instructions below to download the INNOVA C5 mobile WiFi app for both Android & iOS.
- Please follow the instructions below to format the MicroSD card to be FAT32 before recording begins.
- Please do not attempt to repair, modify, or alter this product and/or it’s accessories.
Format MicroSD card to be FAT32
Follow one of the below methods to format the MicroSD card to be FAT32
- Formatting by App- App => Setting =>Formatting => Yes ( Red power button quick flashes)
- Formatting by buttons- 1. Press the red power button once to stop flashing (Solid red), 2. Press the WiFi button (Flashing) for 8 seconds. Red button power off and power on again (Solid red).
- Formatting on PC- if SD card is more than 32GB, download the SD card for matter from https://www.sdcard.org/downloads/formatter_4/
App download and Operation
Downloading the App
a) Search and download INNOVV C5 on the Google Play Store for Android or the App Store for Apple devices. Compatible with iOS 8.3 or Android 5.1 and above.
b) Scan the QR code below to download INNOVV C5 App right to your device.
C) Storage must be allowed from App permissions for downloading videos/photos from the camera to your device.
- Downloading the App
a) Search and download INNOVV C5 on the Google Play Store for Android or the App
Store for Apple devices. Compatible with iOS 8.3 or Android 5.1 and above.
b) Scan QR code below to download INNOVV C5 App right to your device.
C) Storage must be allowed from App permissions for downloading videos/photos from the camera to your device.

https://play.google.com/store/apps/details?id=com.maple.innovv&rdid=com.maple.innovv
https://itunes.apple.com/cn/app/innovv-c5/id1235353801?mt=8
App Connection
- Select INNOVV_C5_*** from WiFi networks to connect
- Settings => Wireless & networks => INNOVV C5
- The default password is 12345678
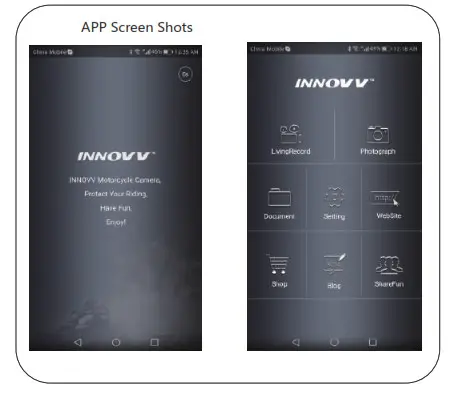
Recording
Click![]() to enter the recording section.
to enter the recording section.
Red dot is flashing if the camera system is recording, Click![]() to stop recording, and Click
to stop recording, and Click![]() to start recording.
to start recording.![]() to adjust brightness. To
to adjust brightness. To![]() view full-screen video To
view full-screen video To![]() exit full-screen video.
exit full-screen video. ![]() back button.
back button.
Click![]() To review recordings and photos.
To review recordings and photos.
Recordings and photos can be toggled to play, review, download or delete.
Key Indicators and Function
| Power Button | Turn ignition on, after 10 seconds power on delay, power button flashes red, recording starts. |
| The power button is solid red and the record stop | |
| WiFi Button | The WiFi button flashes green after the recording started. And WiFi is on standby for connection. |
| A successful and continuous WiFi connection will be indicated by a solid green light. | |
| Press the WiFi button to drop the connection, and the WiFi flashes green again. | |
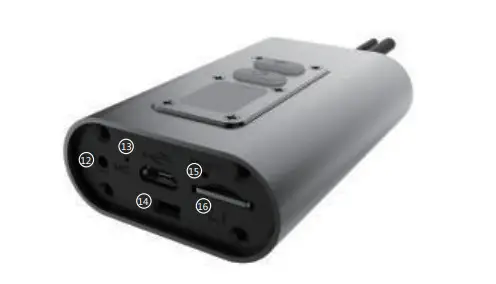
| USB Port | Works as factory service port only, not for powering |
| Reset Key | Hold down the reset key to trigger a device reboot in case of an error. |
| Operation and LED Indicator | ||
| Operation | Power Button (Red Color) | WiFi Button (Green Color) |
| Live recording | Flashes red (1 times/second) | Flashes of green or solid green |
| Recording stop | Solid Red | Flashes of green or solid green |
| Photograph | Quick flashes red (3 times/second) | Flashes of green or solid green |
| WiFi Connection stand-by | Flashes red or solid red | Flashes green (1 times/second) |
| WiFi Connected | Flashes red or solid red | Solid green |
| WiFi Terminated | Flashes red or solid red | Flashes of green flash slowly |
| No Micro SD Card | Flashes red quickly (3 times/second) | Flashes of green or solid green |
| SD Card Formating | Solid Red => Off => Solid Red | Flashes of green or solid green |
| Firmware Upgrading | Flashes red (1 times / second) => (1 times / second)=> Red Off | Flashes of green or solid green |
Trouble Shooting
Please refer to our troubleshooting instructions below for any problems or errors that may arise. Please also contact your INNOVA dealer for additional information and guides.
| Trouble Shooting | |||
| Fault | Button Indicator | Causes | Operation |
| WiFi connected, can not access App or App is processing only | WiFi button solid green Power button flashes red or slid red | 1.WiFi has been disconnected | Turn WiFi network On and OFF, then reconnect. |
| 2. The distance between the Mobile device & Camera system is too far, or the WiFi signal was blocked | Move the Mobile device close to the Camera system and reconnect the WiFi | ||
| 3. The mobile device is not compatible, WiFi connection is weak | Upgrade or change the mobile devices | ||
| SD card in DVR. no recording after power supply. | WiFi button flashes green | 1. SD card was unreadable | Follow up the instruction to format SD card |
| 2. SD card was broken or low speed | Change SD card to be high speed (Class 10 or Above) | ||
| Power button solid red | 3. Loop Video was Off, SD card was fulfilled | Change SD card or Format SD card | |
| 4. Unstable connection between lens cable and DVR | Disconnect Type c connector and re-connect. | ||
| 5. Video calbe was bent or pinch point. even broken | Check video cable | ||
| 6. Wrong settings or System broken | Reset the camera system, or Re-install firmware | ||
| SD card in DVR. no recording after power supply. | WiFi button off Power button off | 1. Too low power supply from the power source | Check the power supply. |
| 2. Wires from the 12v to 5v converter made the wrong connection to the power source | Correct wire connection. | ||
| 3. Inline fuse from 12v to 5v converter was blown. | Replace the inline fuse. | ||
| 4. DVR is overheated | DVR cool down, press reset button. | ||
| Can not download videos/photos from camera to device. | INNOW C5 app is not allowed to store data to your device. | Storage must be allowed from App permissions for downloading videos/photos from the camera to your device. Settings => App Permissions => INNOW C5 => Storage Settings => App => INNOW C5 => Storage | |
| Live recordings disappear after the device on screen lock mode. | Screen is locked and living recording can not display on the lock screen | Display on the lock screen Settings => App => INNOW C5 => Notifications | |
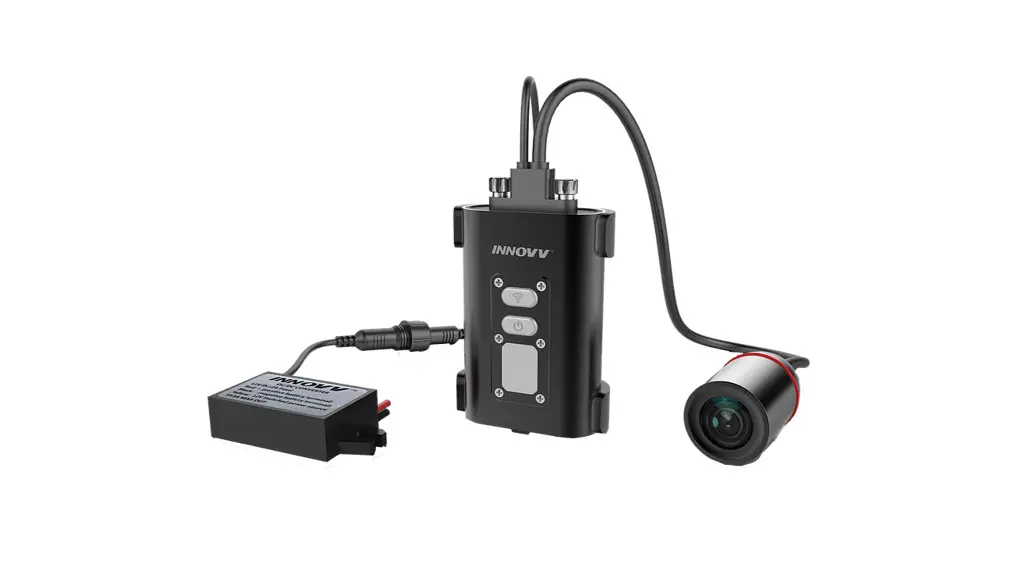
Product Over View
| 1. DVR | 6. Power Cable |
| 2. WiFi Button | 7. Lens Plug |
| 3. Power Button | 8. Thumb Screw |
| 4. Lens | 9. Power Cable Connector |
| 5. Lens Cable | 10.12V to 5V DC Converter |
| 11. DVR Holder | |
Installation Reference
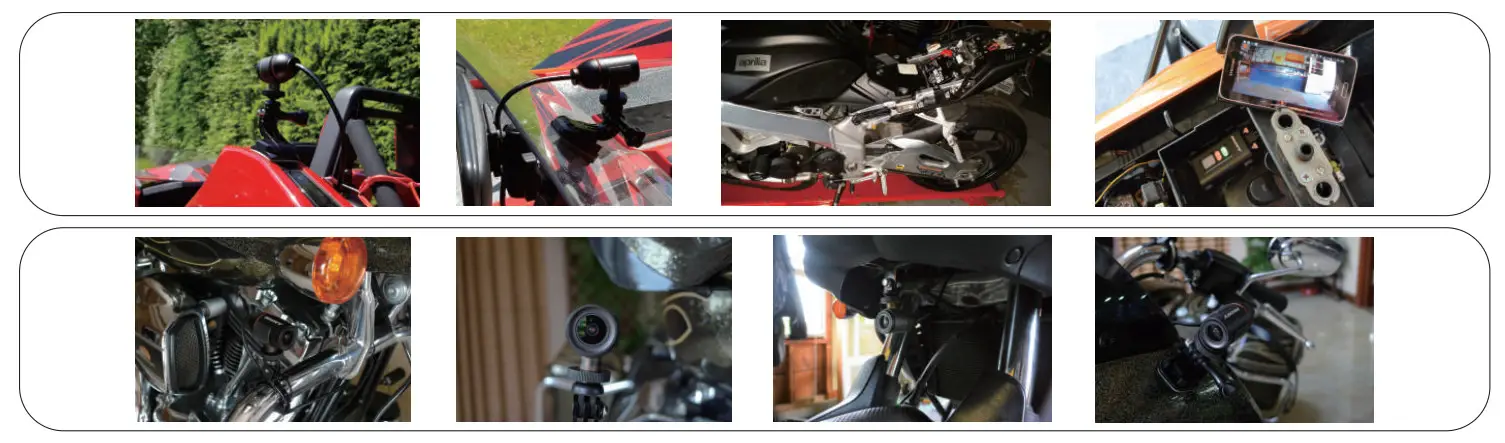
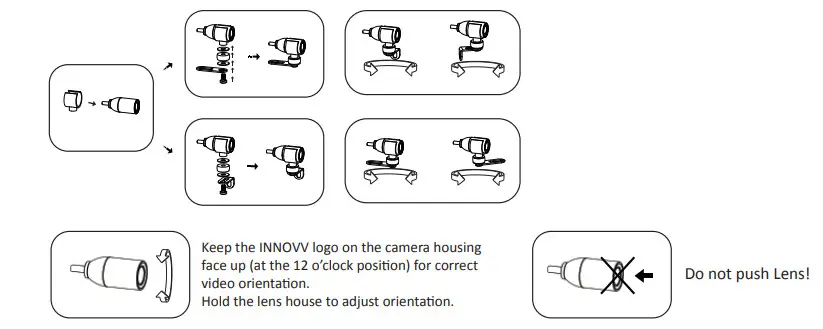
Camera Bracket Installation
Camera and DVR Connection

12V DC Converter Connection
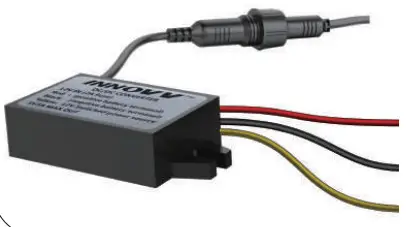
Input Wires Connection:
Red Wire: + (Positive Battery Terminal), Black Wire: – (Negative
Battery Terminal)
Yellow Wire: To 12V Switched Power Source, that is to trigger power supply from power source to camera system when the ignition is on.
OUTPUT: DC 5V 2A (Max).
There is a 10-second delay for ignition power on or power off.
Installation Instructions
- Locate a position that will allow the best view.
- Ensure the mount is secure and will not interfere with the operation of the motorcycle. Consider the range of motion on the front forks of a motorcycle.
- The camera may be mounted in several positions using the provided mounting accessories. Ensure you do not unscrew the camera case or it may cause damage to the lens inside.
- Route the camera cable in a safe manner back to the DVR location. Ensure the cables are not subjected to a pinch point or in an area that will expose it to high temperature from the engine, and keep the cable away from all of the other cables (particularly headlight, and tail light cables) to avoid EMI (Electro-Magnetic Interference).
- The C5 is designed to start/stop recording when the ignition is turned on/off.
- The yellow wire from the supplied DC 12V to 5V converter is to connect the switched power source which has power only when the main ignition switch is on. The red wire is to connect the reliable and stable 12V power source, like the positive terminal of the battery. The black wire is to the ground connection.
- Please keep a distance between the DVR and the Converter.
- USB ports beside of memory slot work as factory service ports only, not for power.
- The C5 has an internal Mic to record audio. An external microphone (not included) can also be connected to the camera to record communications, etc.
![]() Like us on Facebook!
Like us on Facebook!
www.facebook.com/Innovv


