
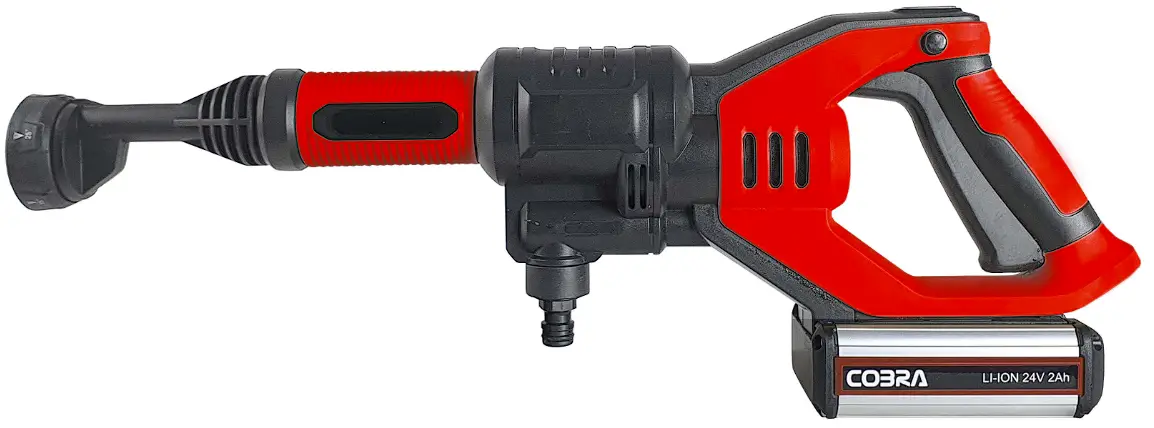
Cobra PW18024V 24V Pressure Washer
Pressure Washer Parts Identification
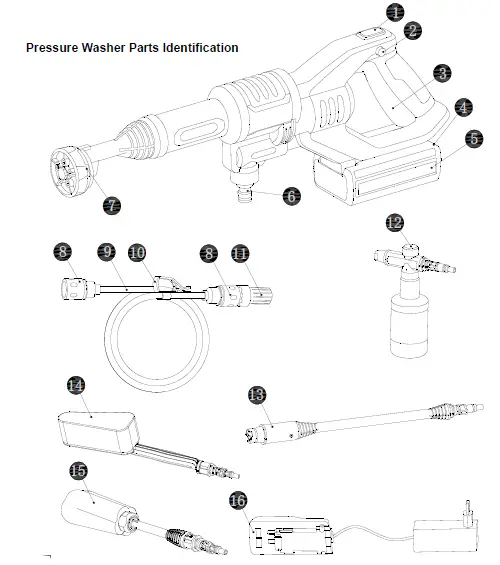
- Pressure Selector
- Pipe connector
- Trigger lock
- Inlet pipe
- Trigger
- Hose clamp
- Battery pack lock
- Water pipe filter
- Battery pack
- Soap bottle
- Water inlet connector
- Long lance
- Multi-function nozzle
- Long brush
- Wheel brush
- Charger

Machine Specification
| Model | PW18024V (HPD2301A) | |
| Charger voltage /frequency | 100V-240V~50/60Hz | |
| Rated voltage | 24V Max | |
| Rated pressure | High | 2.2MPa |
| Low | 0.8MPa | |
| Rated flow rate (high) | 180L/h | |
| Maximum inlet pressure | 0.5MPa | |
| Water absorption height | 1.8m (Max 1.8m) | |
| Machine weight | 1.8kg | |
Accessories
| PW18024V (HPD2301A) | |
| Water Inlet pipe | 1 |
| Multi-function nozzle | 1 |
| Long lance | 1 |
| Long brush | 1 |
| Wheel brush | 1 |
| Storage bag | 1 |
| Battery pack | 1 |
| Charger | 1 |
We recommend that you purchase accessories from the store where you purchased the product. A detailed description of the accessories can be found in the accessory package. The in-store staff will help and advise you.
Operating Instructions
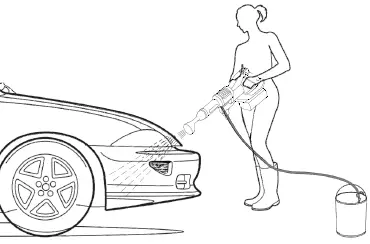
Intended use: this tool is intended cleaning and watering. Non-commercial use only.
Note: Please read the instructions carefully before using the machine
Installation and Operation
| Set up steps | |
| Preparatory work | |
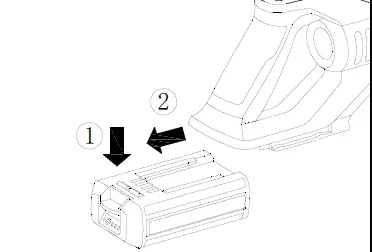
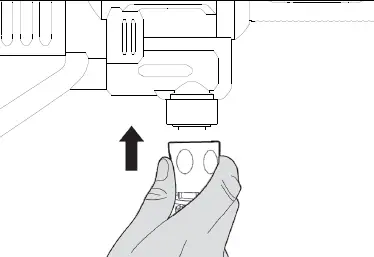
| Remove the battery pack | See Figure A1 |
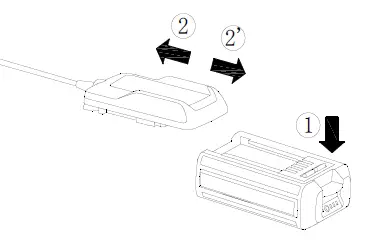
| Charge the battery pack, see the charger instructions for detailed steps. | See Figure A2 |
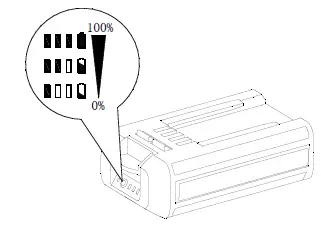
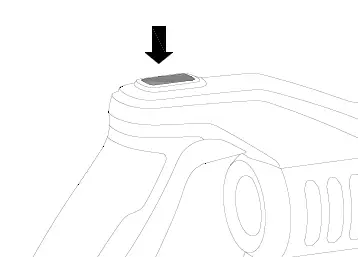
| Battery pack battery indicator | See Figure A3 |
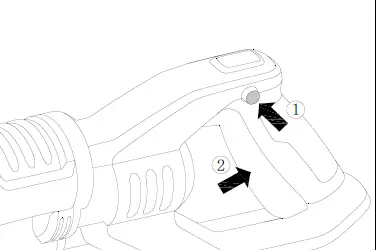
| Install the battery pack | See Figure A4 |
| Fitting accessories | |
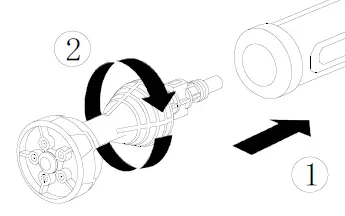
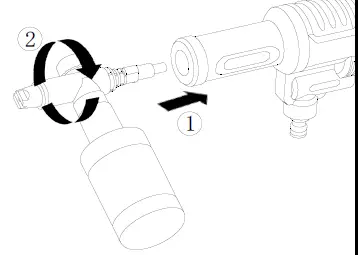
| Install multi-function nozzle Note: After the nozzle is installed, shake the nozzle from side to side to check if it is installed. | See Figure A1B |
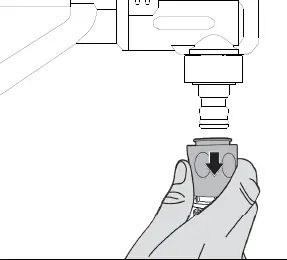
| Connecting the water inlet pipe Note: After the water pipe is installed, gently pull the water pipe to check if it is connected firmly. Reconnect as necessary. | See Figure D |
| Operation | |
| Select working mode The washer has two modes of operation. The higher setting is used for cleaning stubborn dirt, and the energy-saving mode (ECO light) is used to clean dirt that is easier to clean or for simple flushing. | See Figure E |
| Operating instructions Note: The air in the water pipe must be drained every time you use it. This is done by placing the washer in a position high above the waist (<1.5 m) and then selecting the high mode. The water enters the water pipe and is ejected | See Figure F |
| from the washer before cleaning begins. The entire process takes about 15 seconds. | |
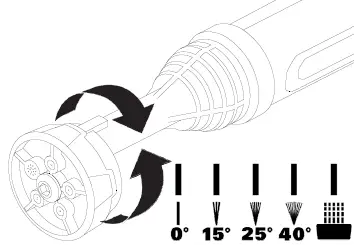
| Select the required water spray mode Note: The water spray effect must be selected according to the working conditions. The 0°, 15°, 25° and 40° modes are suitable for cleaning and are suitable for watering. Warning: Do not change the water spray mode whilst spraying | See Figure C |
| Warning: Do not use dirty, muddy or corrosive water. | See Figure G |
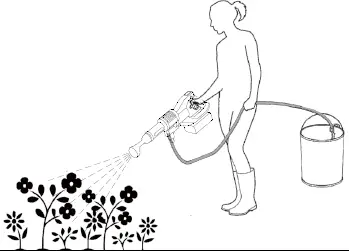
| Watering | See Figure H |
| Other | |
| The washer can also be used with other accessories (assembly method the same as illustrated for the multi-function nozzle) | |
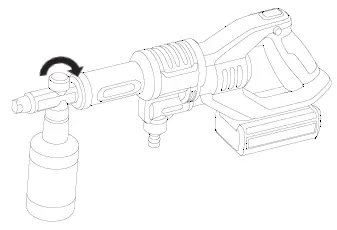
| Connect the soap bottle to spray foam to clear stubborn dirt; adjust the soap spray rate by turning the top knob | See Figure K |
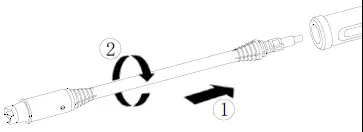
| Connect long guns to clean dirt such as the ground and walls; adjust the fan spray angle by rotating the tip | See Figure N |
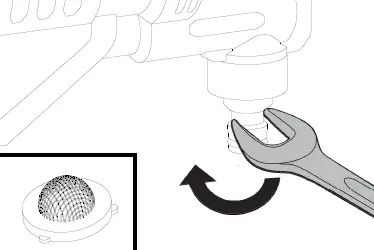
| Cleaning the inlet connector strainer | See Figure P |
| Cleaning water pipe filter screen | See Figure Q |
Troubleshooting
| Symptom | Possible Cause | Solution |
| ECO light flashes | Low battery | Charge the battery |
| No power after starting | Low battery | Charge the battery |
| Unexpected power breaking | High temperature, automatic protection | After the temperature is lowered, turn it on again. |
| Reduced water flow | Filter blockage leads to poor water intake | Clean the water pipe filter. |
| Inlet pipe is bent | Straighten the pipe | |
| Inlet water is dirty | Replace with clean water | |
| Cannot take up water | Inlet water leak | Tighten the water joint |
| Poor connection between water pipe and water inlet connector | Reinstall the inlet and outlet fittings | |
| The water pipe filter is not fully inserted into the water | Insert the water pipe filter completely into the water | |
| Slow water pumping | Energy saving mode is selected | Switch to high mode |
| Multi-function nozzle connection leaks | Multi-function nozzle is not installed at right position | The multi-function nozzle is inserted into the bottom and then rotated and fixed |
| Multi-function nozzle leaks | The nozzle is not rotated to the correct position | Rotate the nozzle to the water mark and to the arrow alignment mark |
Repair and Maintenance
Always remove the battery pack from the washer before servicing and maintenance.
Check the tool and parts for damage before each use. If the machine or components are found to be damaged, stop using the equipment and contact the supplier or manufacturer for service.
Maintenance of Water Filter
First remove the transparent cover of the filter, then remove the dirt on the filter, rinse the filter with water, and finally put the transparent cover back.
Cleaning and Storage
Remove the washer and inlet pipe before storage, pour off the water remaining inside the tool and accessories; and pour out the remaining water inside the inlet pipe.
Remove the battery pack of the machine and store it separately.
Wipe the body with a soft brush or a clean cloth. Do not use water, solvents or polishes.
Keep the equipment in a safe, dry place away from children. Do not place other items on the machine.
Environmental Protection
According to EU directive 2012/19/EU on electric and electronic equipment and its implementation into national law, all electric tools must be separately collected and environmentally friendly recycled. Alternative disposal: If the owner of the power tool does not return the tool to the manufacturer, he is responsible for proper disposal at a designated collection point that prepares the device for recycling according to national recycling laws and regulations. This does not include accessories and tools without electric or electronic components. Instructions for Charger (C27-2110)
Product and general safety warnings
Warning! Read all warnings and all instructions. Failure to follow the warnings and instructions below can result in electric shock, fire, and/or serious injury. Save all warnings and instructions for review.
Read the instructions before charging:
- Only use the charger indoors.
- Do not charge non-rechargeable batteries
If the power cord or charger is damaged, do not use. Please contact a Cobra service agent.
Symbol
- Warning mark
- Reading instructions
- For indoors, beware of rain
- Double insulation
- Positive electrode
- Negative electrode
Charger Specification
| Rated input voltage | 100-240V~50/60Hz |
| The output voltage | 25V |
| Recharging current | 1A |
| Rechargeable battery type | Lithium battery |
| Charging time | Approximately 2 hours |
| Weight | 0.24kg |
Charging Procedure
Note: Please read the instructions carefully before using the machine.
Warning! Only charge the correct batteries with the charger. Do not use other chargers to charge the battery pack or use this charger to charge other battery packs and batteries that cannot be charged. Do not touch any metal objects with the charger or the contacts of the battery pack, as this may cause a short circuit or circuit hazard.
- Please pay attention before use:
Check that the battery pack is the correct type before fitting to the charger and the tool. Where the battery pack is at low power state recharge it. It must be charged before use. Press the battery pack green button to display the battery pack power. - How to charge – Charging steps
a. Plug the charger into a suitable power outlet.
Insert the battery pack into the charger. The red light indicates that charging is starting.
Once the battery is fully charged, the green light is illuminated. Please unplug the charger. b. Press the battery compartment latch and remove the battery pack.
Charger Light Indicators
| Indicator status | Status description |
| Red light is always on | Charging |
| Green light is always on | Finished charging |
| Flashing red light | Battery failure Check with a Cobra Service center |
Problem Solving
| Why can’t I insert the battery pack into the charger? | a) First check if the charger and battery pack are compatible. b) The battery pack can only be inserted into the charger in one direction. Turn the battery pack until it can be inserted into the hole in the charger. When the red indicator light of the charger lights up, charging starts. |
| Why is the charging time of the same battery pack long and short? | Charging time is affected by many factors, but this is not a product defect.
|
Warranty
This product is warranted in accordance with legal regulations for a 24 month period effective from the date of purchase by the first user.
This product will not be covered if used in a commercial application.
This warranty covers all material or production failures, it does not include: defects from normal wear and tear, parts such as, bearings, brushes, cables, air cleaning elements, brake pad, clutch disc, tire, wheel, recoil starter rope, belts, cutter blades, plugs, lubricant oils and grease or accessories. Damage or defects resulting from abuse, accidents or alterations, natural fading of painted or plated surfaces, sheet peeling and other natural deterioration.
Any damage that occurs from the use of non-genuine Cobra parts will not be covered.
We reserve the right to reject any claim where the purchase cannot be verified or when it is clear that the product was not maintained properly. (Clean ventilation slots, carbon brushes and serviced regularly)
Expenses incidental to the warranty claim that are not covered;
- Compensation for loss of time, commercial loss or rental costs of substitute product.
- Costs incurred for transportation to and from the dealership.
- Any damage that occurs from the following will not be covered; exposure of the product to smoke and soot, chemical agents, bird droppings or other animal waste, seawater, sea breeze, salt or other environmental phenomena.
- Any damage resulting from operating methods other than those indicated in the owner’s manual will not be covered.
Your purchase receipt must be kept as proof for date of purchase. Your un-dismantled product must be returned to your dealer in an acceptably clean state, accompanied by your proof of purchase.
Please Register Your Product:
If your dealer did not collect registration information from you, please take a few minutes and register your purchase with Cobra.
You can register by completing and mailing the registration card that should be in the box or by going online to: www.cobragarden.co.uk and clicking on Product Registration.
Before using the product, all operators must read this manual
EC-DECLARATION OF CONFORMITY
| We herewith declare, | Cobra Garden Machinery, Henton & Chattell Ltd, London Road, Nottingham NG2 3HW UK |
| That the following machine complies with the appropriate basic safety and health requirements of the EC Directive based on its design and type, as brought into circulation by us. | |
| In case of alteration of the machine, not agreed upon by us, this declaration will lose its validity | |
| Product | Cordless Cleaner / Washer |
| Machine Type: | PW18024V (HPD2301A) |
| Rated voltage | 24V d.c |
| Max flow: | 3l/min |
| Measured sound power level: | 91dB(A) |
| Guaranteed sound power level: | 98dB(A); Notified Body for EC Directive 2000/14/EC:0036 Intertek Testing Services Shanghai, Building no. 86, 1198 Quinzhou Road (North) Shanghai. |
| Applicable EC Directives: | EC Directive of Electromagnetic Compatibility 2014/30/EU EC Machinery Directive 2006/42/EC EC Directive of noise emission 2000/14/EC |
| Applicable Harmonized Standards: | EN 60745-1 EN 60745-2-15 EN 55014-1 EN 55014-2 |
| Authorized Signature/Date/ Place: | Peter J. Chaloner 23-12-2020 |
| Title of Signatory: | Managing Director |
| Name and address of the person authorized to compile the technical file | Cobra Garden Machinery, Henton & Chattell Ltd, London Road, Nottingham NG2 3HW UK |


