![]()
A129 Duo Dash Cam Support
User Manual 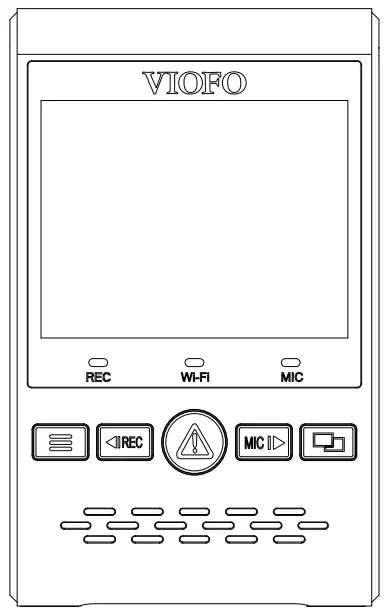
The user manual is available on
https://support.viofo.com
V22.3.25
Copyright (c) 2018, VIOFO Ltd, all rights reserved.
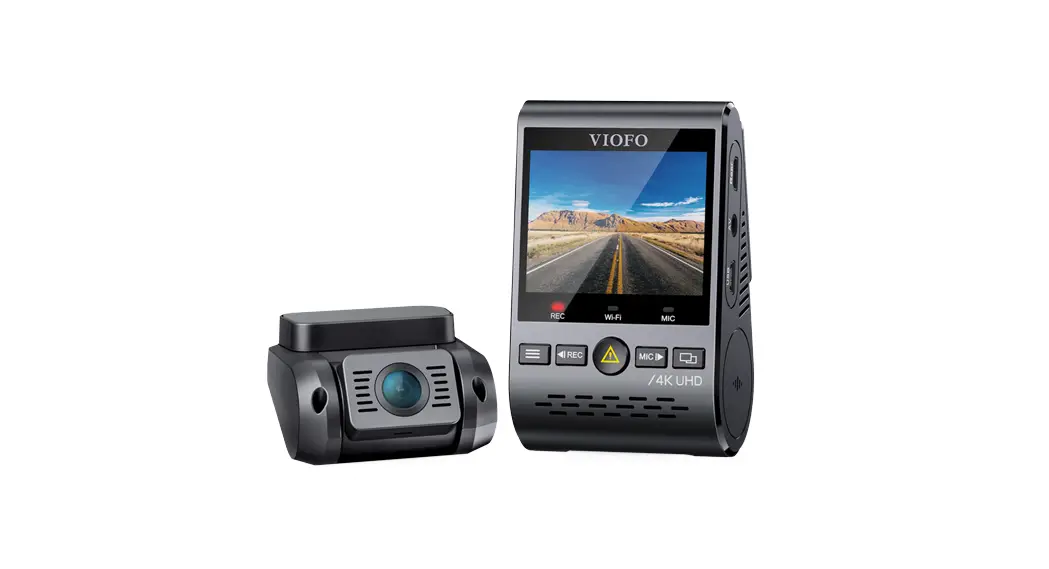
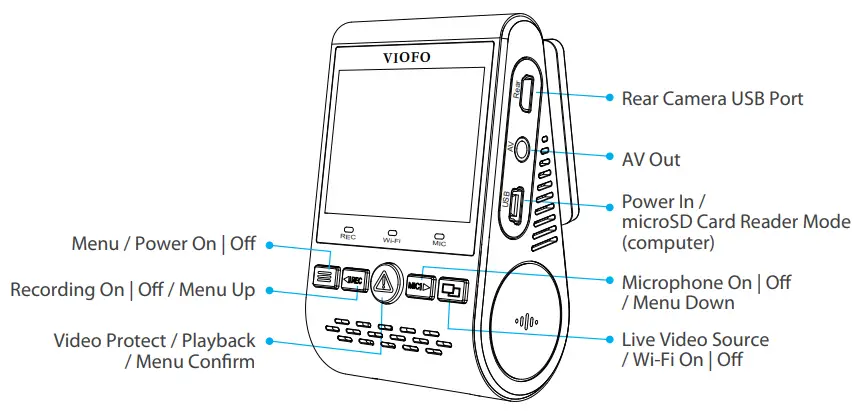
Product Overview
Standard Items
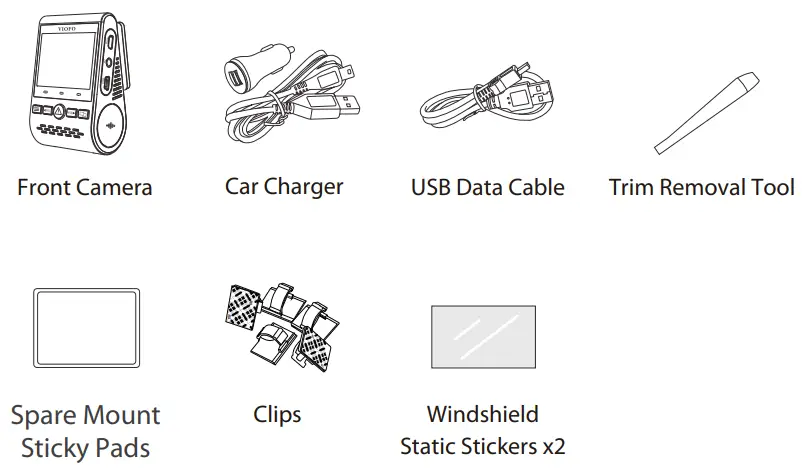
* Note: The USB data cable is only for connecting the camera with the computer to transfer video files or upgrade firmware, not for charging the camera.
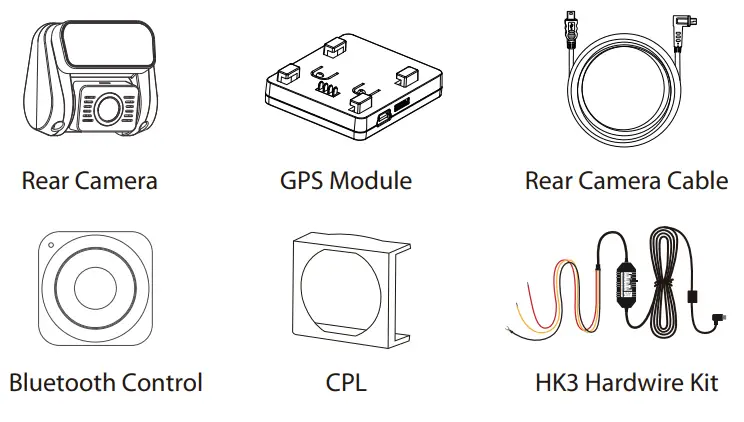
Optional Accessory
Product Diagram
- Front Camera


- Rear Camera (Optional)

- Bluetooth Remote Control (Optional)
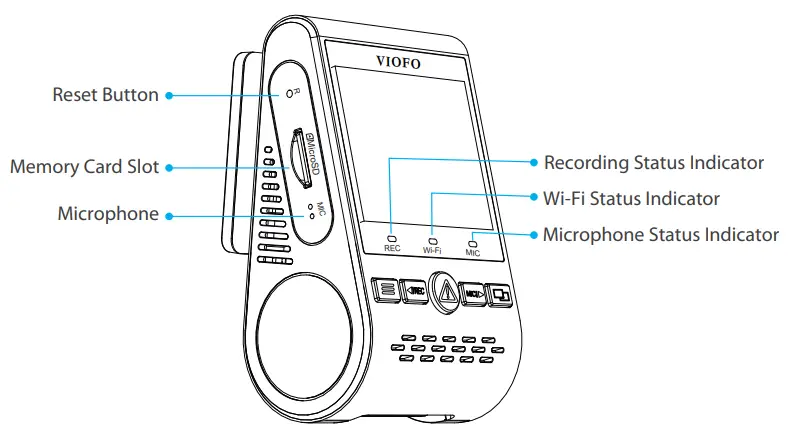


Inserting / Removing the memory card
Inserting the memory card
Push the memory card into the card slot until you hear a click, with the card label facing forward (away from the screen).

Removing the memory card
Ensure that the camera is turned off / not recording, and then push the edge of the memory card with your fingernail. The card will spring out far enough to be removed.
Note:
The MicroSD card is sold separately. The microSD card must have a Class-10 or UHS-I rating and a capacity up to 256GB. 64GB,128GB, and 256GB microSD cards must be formatted with the FAT32 file system, either on a computer or in the camera.
We recommend you buy the VIOFO brand memory card which is manufactured with top-tier MLC NAND flash, making them durable and reliable.
Formatting the card
Format the card (‘Format’ option in Dash Camera ‘System settings’) to prepare for first use in the dash camera.
Formatting will permanently erase any data on the microSD card. For best performance, format periodically (after backing up any important files).
LED Indicators
| LED | LED Status | Behavior |
| REC | Solid Red | Recording |
| Flashing Red | Not recording; Updating Firmware | |
| Wi-Fi | Solid Red | Wi-Fi Enabled |
| Off | Wi-Fi Disabled | |
| MIC | Solid Red | Microphone enabled |
| Off | Microphone disabled |
Buttons and Icons
| Mode | Buttons | Behavior |
| Standby Mode (Not Recording) | Click once to enter the menu | |
| Click once to start recording | ||
| To enter playlist | ||
| Click once to enable/disable audio recording | ||
| Long press to enable the Wi-Fi |
| Mode | Buttons | Behavior |
| Recording Mode | Click once to take a video snapshot *Note: To enter the menu settings, please stop recording first. | |
| Click once to start recording | ||
| Click once to lock the file being recorded | ||
| Click once to enable/disable audio recording | ||
| Click once to toggle screen view |
| Mode | Buttons | Behavior |
| Playlist Mode | Back to previous menu / Stop playback | |
| Menu up / Change playback speed /Delete the video | ||
| Select the current / Play / Pause | ||
| Menu down / Change playback speed/ Lock current / Unlock current | ||
| N / A |
| Mode | Buttons | Behavior |
| Setting Menu Mode | Return to the previous menu / Exit setting menu | |
| Menu up | ||
| Enter / Confirm | ||
| Menu down | ||
| N / A |
Installation
Front camera installation
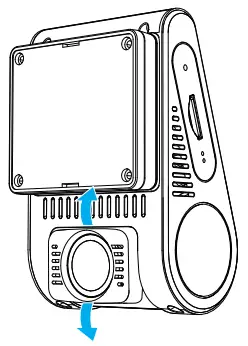
- Insert the clips, then slide the mount horizontally into the slot on the back of the camera.

- Select a location on the windshield rear of the rear-view mirror.

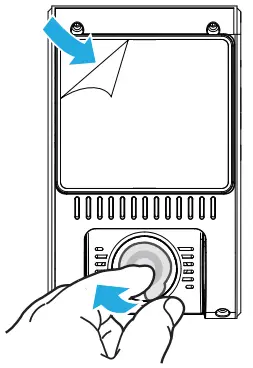
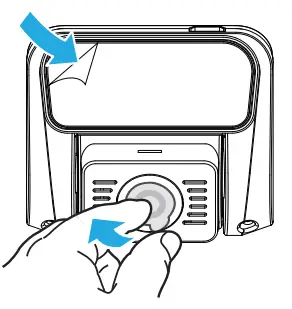
- Wipe clean the installation surface of the windscreen with a dry cloth, it must be grease free for the sticky pad to stick firmly.
- Peel the protection film off the sticky pad and camera lens.

- Fix the front camera on the selected location.
- Adjust the lens angle
– Look at the live view on the LCD.
– Adjust the angle of the lens up / down if necessary.

 Rear camera installation
- Select an installation location Select a location on the windscreen, without defrost grid wires, and where the camera can record the entire rear view.
- Wipe clean the installation surface of the windscreen with a dry cloth.

- Peel the protection film off the sticky pad and camera lens.
- Fix the rear camera on the selected location.
Cable Connection
- Connecting to Power
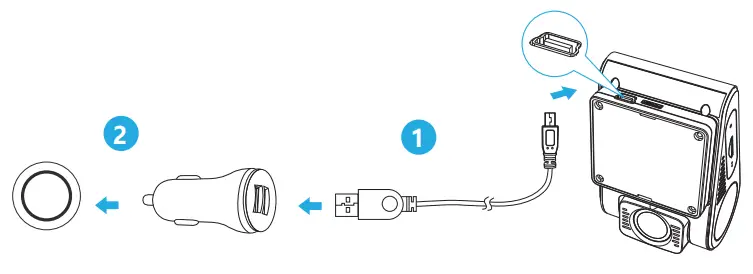
 Plug the USB power adapter into your vehicle’s 12V / 24V female power socket. Insert the car charger USB cable’s male port into the camera’s mount USB port.
Note: Both GPS mount and non-GPS mount can be used for power. - Connecting with Rear Camera
 Plug the USB power adapter into your vehicle’s 12V / 24V female power socket. Insert the car charger USB cable’s male port into the camera’s mount USB port.
Power off the product and connect the rear camera cable to the front camera (main unit).
Cable routing should be as shown in the following two diagrams. Use the cable clips to help fix the two cables conveniently and safely.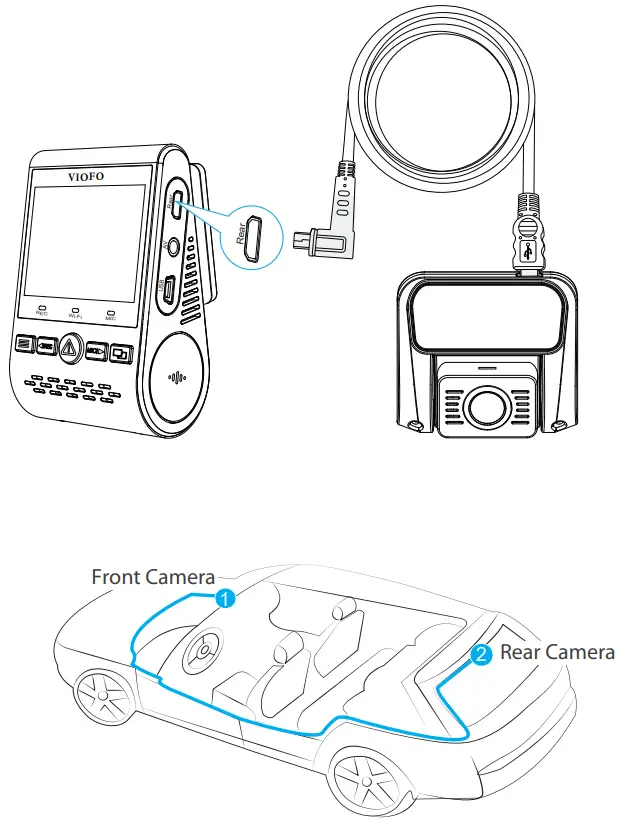 Tips
Tips
- Do not install/mount the camera in a location that interferes with the driver’s visibility and safety.
- Install/mount the camera close to the rearview mirror so that both sides of the scene being recorded are equally covered by the camera’s FOV (field of view).
- To ensure a clear view on rainy days, the lens should be positioned within the windshield wiper’s sweeping range.
- Do not install/mount the camera on or near airbag panels.
- Installation / mounting location should not be affected by sun control film (window tint). There should not be any other electronic equipment close to the camera for optimal performance.
Note:
Do not install/mount the camera or cables near an airbag panel or within the airbag’s working range. The manufacturer is not liable for any injury or death caused by the deployment of the airbag.
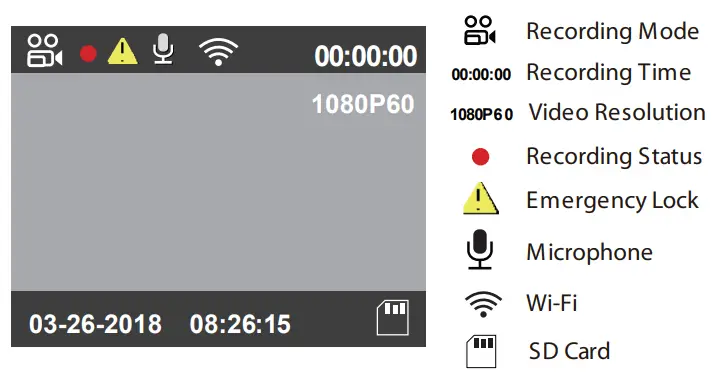
Display Overview
Operation
Power On / Off
- When you start the engine, the camera will turn on and begin recording automatically.
- When you turn off the engine or unplug the charging cable from
the power adapter, the camera will stop recording and turn off. - Long press [
 ] button to power on or off the camera.
Loop Recording
- Insert a microSD card into the camera’s card slot and automatic loop recording will begin once the camera detects power.
- Time frame for each video file is 1 / 2 / 3 / 5 / 10 minutes.
- When there is insufficient space on the microSD card, loop recording will automatically overwrite the oldest files (one by one).
- Loop recording files are saved to SD card: \ DCIM \ MOVIE folder.
Emergency Recording
- Automatic emergency recording When the G-sensor is activated by a collision, the current footage will be locked automatically to avoid being overwritten by the loop recording.
- Manual emergency recording Pressing the [
 ] button during a recording will lock the current file being recorded. Once locked, the file will not be overwritten by the loop recording feature.
Note: The collision sensing feature can be adjusted in settings under the “G-sensor” option. Locked files are saved to an SD card: DCIM \ Movie \ RO
Playback Videos
- Under standby mode (not recording), press the [ ] button to enter the playlist.
- Use the arrow buttons [

 ] to select the desired video and press the button [ ] to play.
 - Press the [ ] button to exit.
Note:
- Separate files are created for the recordings of the front and rear cameras.
- The file name of the front camera is Year_Date_Time_***F and Year_Date_Time_***R for the rear camera.
- The video resolution of the front and rear camera are 1080P/30fps.
- After unplugging the rear camera, the resolution of the front camera will switch to 1080P @60fps automatically.
Motion Detection
If turned ON, the camera will start recording on detecting any movement within its FOV (field of view). Once the camera does not detect any movement for 60 seconds, it will stop recording and return to ‘Motion-Detection’ mode. The recording will resume if any new movement is detected.
Note:
Do not turn on ‘Motion Detection’ unless your vehicle is parked. If ‘Motion Detection is enabled while driving, the camera may not record continuously.
PC Mode
- Connect the camera to a computer by using the included short Mini USB cable.
- The camera will automatically turn on and “microSD Card Reader Mode” will be displayed on its LCD screen.
- The computer will detect a “removable disk”.
- There will be two folders under the DCIM folder:
•Movie (loop recording video files) Contains subfolder: RO (Protected / Locked video files)
•Photo (Video snapshot files) - Copy the files needed to your computer drive.
View on a TV
The camera has an AV out port for connecting an external display such as a monitor or TV. Please note that the product doesn’t come supplied a 3.5mm male to 3 RCA AUX cable.
PIP Mode
There are four modes for live preview on the A129 LCD screen and via Wi-Fi while the rear camera is attached.
Note:
Picture in picture (PIP) mode is available only while the rear camera is attached.
| Mode | Description |
| Front + Rear (Rear overlaid) | Show preview video for the front and rear camera on the LCD screen, the rear camera preview is on the top left side. |
| Rear+ Front (Front overlaid) | Show preview video for front and rear the camera on the LCD screen, the front The camera preview is on the top left side. |
| Front Only | Show preview video for the front camera only on the LCD screen. |
| Rear Only | Show preview video for the rear camera only on the LCD screen. |
Mute
During a private conversation, pressing the [ ![]() ] button will mute the audio (Disable the microphone).
] button will mute the audio (Disable the microphone).
Firmware Upgrade
Follow the instructions on this website to upgrade the firmware: (https://support.viofo.com/a/solutions/articles/19000097350 )
Note:
- Before using a microSD card to upgrade the firmware, formatting the card in the camera is necessary to ensure stable read and write operation.
- Do not unplug or power off the camera during a firmware upgrade, it may cause the camera to subsequently fail to boot.
System Settings
You can set the product features according to your needs and preferences using the camera button or the VIOFO app. To enter the menu settings, please stop recording first.
- Resolution: Setting video resolution of footage recorded, Front camera only: 1920*1080P 60FPS, 1920*1080P 30FPS Front + Rear Camera: 1920*1080P 30FPS
- Bitrate: You can set the bitrate for video. High bitrate may improve the quality and smoothness of the video, especially when recording fast motion or high contrast scenes. sing high bitrate mode may decrease the amount of recording time available on your memory card. Using low bitrate will save space and record for a longer time.
- Live Video Source: Front camera / Rear camera / PIP mode 1 / PIP mode 2.
- Loop Recording: Off / 1 / 2 / 3 / 5 / 10 minutes. The recording will begin automatically after powering on with a microSD card in the device. Each recorded file is up to three minutes long, with old footage being replaced when microSD card storage is full.
- WDR (Wide Dynamic Range): Dynamic range is the ratio of the brightest portion of the image to the darkest portion of the image. WDR enables the camera to deliver video with near-perfect exposure in varying lighting situations.
- Exposure: Adjusting the value of the EV (Exposure Value) properly can create better footage under different light sources. It ranges from -2.0 to +2.0. You can adjust the V for the front and rear camera separately. Default is set at 0.0.
- Parking Mode: There are 3 options under parking mode:
① Auto Event Detection The camera will automatically record for 1 minute while a moving object is detected while the car is parked and will stop recording if no new movement.
② Time-Lapse recording Time-lapse record a video at low frames at 1 / 2 / 3 / 5 / 10 / 15 fps, It keeps recording continuously without audio recorded.
③ Low Bitrate Recording
This mode record video in low bitrate 4MB/s for both front and rear. It keeps recording continuously in mini file size with audio recorded. Note: We recommend buying IOFO HK3 ACC hardwire kit cable for parking mode recording. - Parking Recording Timer: Set the parking recording duration. Time-lapse Recording: Record video from frames captured at specific time intervals to conserve memory and reduce the time it takes to review video. The default is off.
- Motion Detection: When activated, the camera will start recording if there is movement in front of the camera. Once the camera does not detect movement for 60 seconds, t stops recording and returns to “Motion Detection” mode. The camera will record again the time of detecting a new movement.
- GPS: Turn on / off the GPS logger. A GPS module is used to include the location data in the recorded videos. If disabled, your camera will no longer measure your speed and position; nor synchronize the time/date. (Only available when connect with GPS signal) Please use “Dashcam Viewer” to playback videos and visualize your position and speed on your computer.
- Speed Unit: Kilometer per hour (KMH) and miles per hour (MPH) are available for the speed units.
- G-Sensor: The G-sensor measures shock forces and locks the video recorded at the time. The settings from “low to high” determine the amount of force needed to lock the file from being overwritten. We recommend that you set it at low.
- Wi-Fi: Set it On / Off. Press the [
 ] button for 3 or 5 seconds to enable Wi-Fi quickly. We recommend choosing 5GHz Wi-Fi mode.
 - Date Stamp: Imprint the time and date on the recorded video.
- GPS Info Stamp: Imprint the GPS information on the recorded video.
- Camera Model Stamp: Imprint the camera model on the recorded video.
- Record Audio: Turn on and off the microphone. This can also be changed during recording by pressing the microphone button [ ].
- Screen Saver: The screen goes black by default after 3 minutes while recording. You can set it by adjusting the different time intervals on the menu.
- Boot delay: The camera will boot seconds later when powered on. The settings are Off / 5s / 10s.
- Date / Time: Set system date / time.
- Time Zone: Set the current time zone for GPS time and date calibration.
Note: the time zone must be manually adjusted for daylight savings. - Language: Set the on-screen display to English, Traditional Chinese, French, etc.
- Beep Sound: Turn all notification sounds On / Off.
- Frequency: Set it to minimize flickering and banding in the recorded video.
- Image Rotation: Turn the screen upside down. It’s fit for both front and rear cameras.
- Rear Camera Mirror: Rear Camera Mirror can make the image of the rear camera be displayed and recorded as reversed compared to the actual view, you can set the setting On / Off.
- Format: The operation will delete all data on the microSD card.
Note: Once you format the card, all information will be deleted and unrecoverable. Make sure to back up all files that you needed before formatting. - Format Warning: Set the number of days between format warnings.
- Default Setting: Restore device to factory settings.
- Car Number: Imprint the car number on the recorded video.
- Custom Text Stamp: Imprint the customized text on the recorded video.
- Firmware Version: Check the current firmware version of the camera.
Review and Control on Smartphone
The VIOFO app allows you to control your camera remotely by using a smartphone. Features include full camera control, live preview, playback, and video recording. While the i-Fi is enabled, the camera can be only controlled by the VIOFO app.
Turn on the Wi-Fi in the menu or long-press the [![]() ] button. When the Wi-Fi is on, a Wi-Fi status icon and the password appear on the camera LCD screen.
] button. When the Wi-Fi is on, a Wi-Fi status icon and the password appear on the camera LCD screen.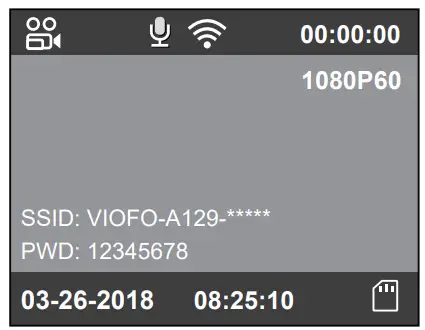
Connecting the camera to a smartphone
- Open the Google play store on an Android device or the Apple app store on an iOS device.
- Download and install VIOFO APP.
- Run VIOFO APP.
- Turn on the Wi-Fi in the menu or long-press the [ ] button.
- On the VIOFO app, follow app instructions to connect with the camera.
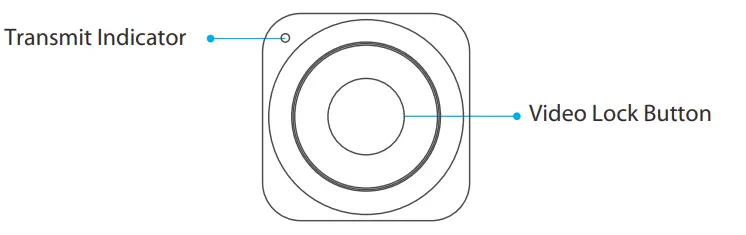
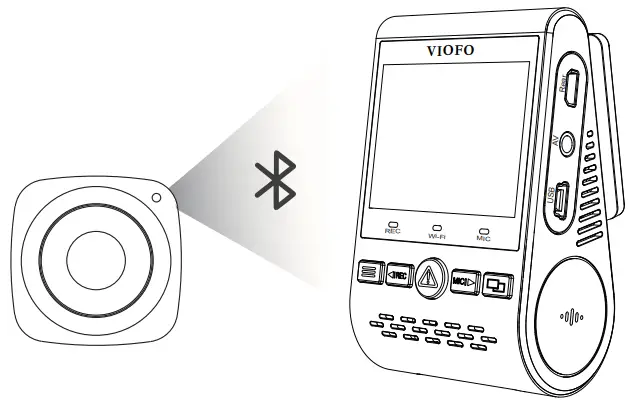
Bluetooth Remote Control
With the Bluetooth remote control (Optional) mounted in a convenient location on your dashboard, you can safely protect important videos from being overwritten, without needing to take your eyes off the road. When you press the Bluetooth remote, the camera will lock the current video file and take a video snapshot.
Pairing with a dash camera
- Power on the camera.
- Press and hold the video lock button on the remote control for 3 seconds to pair it with the camera.
- I get paired successfully, and the LED indicator of the remote turns blue.
Notice
FCC Statement
This equipment has been tested and found to comply with the limits for a Class B digital device, pursuant to part 15 of the FCC Rules. These limits are designed to provide reasonable protection against harmful interference in a residential installation. This equipment generates, uses, and can radiate radio frequency energy and, if not installed and used in accordance with the instructions, may cause harmful interference to radio communications. However, there is no guarantee that interference will not occur in a particular installation. If this equipment does cause harmful interference to radio or television reception, which can be determined by turning the equipment off and on, the user is encouraged to try to correct the interference by one or more of the following measures:
- Reorient or relocate the receiving antenna.
- Increase the separation between the equipment and receiver.
- Connect the equipment into an outlet on a circuit different from that to which the receiver is connected.
- Consult the dealer or an experienced radio / TV technician for help.
Caution:
Any changes or modifications to this device not explicitly approved by the manufacturer could void your authority to operate this equipment.
This device complies with part 15 of the FCC Rules. Operation is subject to the following two conditions:
(1) This device may not cause harmful interference.
(2) this device must accept any interference received, including interference that may cause undesired operation.
Shenzhen VIOFO Technology Co., Ltd, declares that this Radio Frequency peripheral is in compliance with the essential requirements and other relevant provisions of Directive 1999/5/EC.
Customer Service
Thanks for choosing VIOFO! From the date of purchase on, all products are warranted for 12 months and all accessories are warranted for 3 months. VIOFO offers lifetime technical support for all our users. We are committed to making sure that you are 100% satisfied with our products and services.![]() Product Registration Program
Product Registration Program
VIOFO also has a Product Registration Program to help customers extend the warranty by 6 months. Visit www.viofo.com and register your new product to extend the warranty from 12 months to 18 months.![]() Your Opinion Matters
Your Opinion Matters
If you have any thoughts on how we can do even better, connect with us today at [email protected].![]() Video Sharing
Video Sharing
Share videos caught on the VIOFO camera with us. Let’s enjoy your newfound together! Gain a chance to get a mysterious gift at [email protected].
How to Contact Us?![]() Submit a ticket at support.viofo.com
Submit a ticket at support.viofo.com![]() Live chat box at www.viofo.com
Live chat box at www.viofo.com![]() [email protected]
[email protected]![]() www.facebook.com/viofo.world
www.facebook.com/viofo.world![]() +86 755 8526 8909 (CN)
+86 755 8526 8909 (CN)![]() Mon-Fri 9am-6pm
Mon-Fri 9am-6pm


