 Sage BJS700 Big Squeeze Slow Compression Juicer

SAGE® RECOMMENDS SAFETY FIRST
At Sage® we are very safety conscious. We design and manufacture consumer products with the safety of you, our valued customer, foremost in mind. In addition, we ask that you exercise a degree of care when using any electrical appliance and adhere to the following precautions.
IMPORTANT SAFEGUARDS
READ ALL INSTRUCTIONS BEFORE USE AND SAVE FOR FUTURE REFERENCE
- A downloadable version of this document is also available at sageappliances.com
- Before using it for the first time ensure your electricity supply is the same as shown on the label on the underside of the appliance.
- Remove and safely discard any packaging materials before first use.
- To eliminate a choking hazard for young children, safely discard the protective cover fitted to the power plug.
- This appliance is for household use only. Do not use the appliance for anything other than its intended use. Do not use in moving vehicles or boats.
Do not use outdoors. Misuse may cause injury. - Fully unwind the power cord before operating.
- Position the appliance on a stable, heat-resistant, level, dry surface away from the edge and do not operate on or near a heat source such as a hot plate, oven or gas hob.
- Vibration during operation may cause the appliance to move.
- Do not let the power cord hang over the edge of a bench or table, touch hot surfaces or become knotted.
- Always ensure the appliance is turned OFF, unplugged at the power outlet and has been allowed to cool before cleaning, attempting to move or storing.
- Always turn the appliance to the OFF position, switch it off at the power outlet and unplug at the power outlet when the appliance is not in use.
- Do not use the appliance if the power cord, plug, or appliance becomes damaged in any way. If damaged or maintenance other than cleaning is required, please contact Sage Customer Service or go to sageappliances.com
- Any maintenance other than cleaning should be performed by an authorised Sage® service centre.
- Children should not play with the appliance.
- Cleaning of the appliance should not be carried out by children unless they are 8 years or older and supervised.
- The appliance and its cord should be kept out of reach of children aged 8 years and younger.
- The installation of a residual current safety switch is recommended to provide additional safety when using all electrical appliances.
Safety switches with a rated operating current of not more than 30mA are recommended. Consult an electrician for professional advice. - Always ensure the appliance is properly assembled before use.
The appliance will not operate unless properly assembled. - Do not use the appliance on a sink drainboard.
- Keep hands, fingers, hair, clothing as well as spatulas, and other utensils away from moving or rotating parts during operation.
- Do not use the appliance for anything other than food and/or beverage preparation.
- In order to avoid the possible hazard of the appliance starting by itself due to inadvertent resetting of the overload protection, do not attach an external switching device (such as a timer) or connect the appliance to a circuit that can regularly switch the appliance on and off.
- Carefully read all instructions before operation and save them for future reference.
- The appliance can be used by persons with reduced physical or mental capabilities or a lack of experience and knowledge, only if they have been given supervision or instruction concerning the use of the appliance in a safe way and understand the hazards involved.
- This appliance shall not be used by children.
- Do not leave the appliance unattended when in use.
- Do not push food into the feed chute with your fingers or other utensils. Always use the food pusher provided. Do not place hands or fingers into the food chute when it is attached to the appliance.
- Do not juice stone fruit unless seeds and/or stones have been removed.
- Do not operate the juice extractor without the pulp and juice container in place.
- Do not use the juice extractor if the juicing screw is damaged.
- Do not operate the machine longer than 20 seconds before inserting ingredients.
The symbol shown indicates that this appliance should not be disposed of in the normal household waste.
It should be taken to a local authority waste collection center designated for this purpose or to a dealer providing this service.
For more information, please contact your local council office.
![]() To protect against electric shock, do not immerse the power plug, cord, or appliance in water or any liquid.
To protect against electric shock, do not immerse the power plug, cord, or appliance in water or any liquid.
SAVE THESE INSTRUCTIONS
 Components
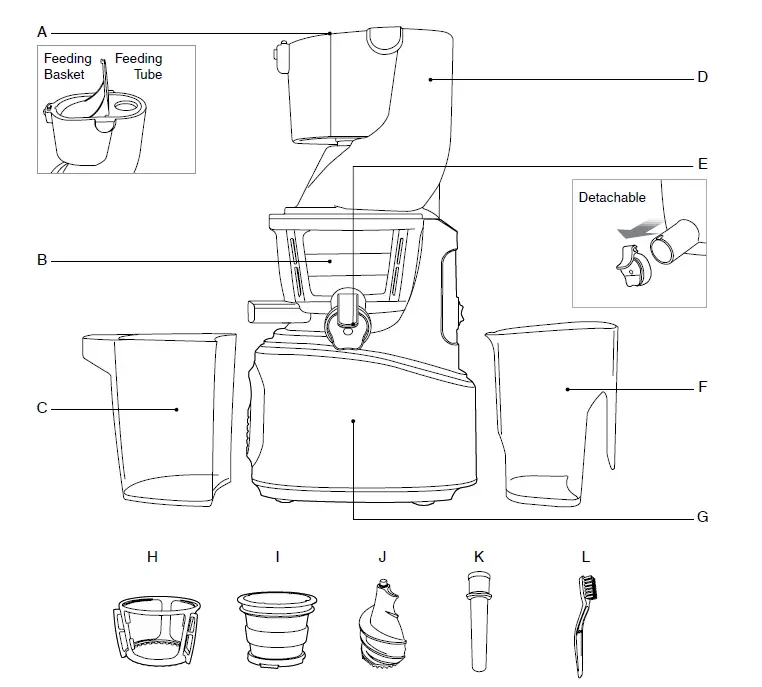
- A. Feeding Tube & Basket
- For different sizes of produce.
- B. Juicing Bowl
- C. Pulp Cup
- D. Drum Lid
- E. Detachable Smart Cap
- F. Juice Jug
- G. Motor Body
- H. Rotation Wiper
- I. Strainer
- J. Juicing Screw
- K. Pusher
- L. Cleaning Brush
Rating Information
- 220–240V~ 50/60Hz 240W
 Assembly
BEFORE FIRST USE
- Before using your Juicer for the first time, remove any packaging material and promotional labels.
- Ensure the power is in the OFF position, the juicer is switched off at the power outlet and the power cord is unplugged.
- Wash bowl and juicing tools in warm soapy water with a soft cloth. Rinse and dry thoroughly.
- When first using your appliance, you may notice an odour coming from the motor. This is normal and will dissipate with use.

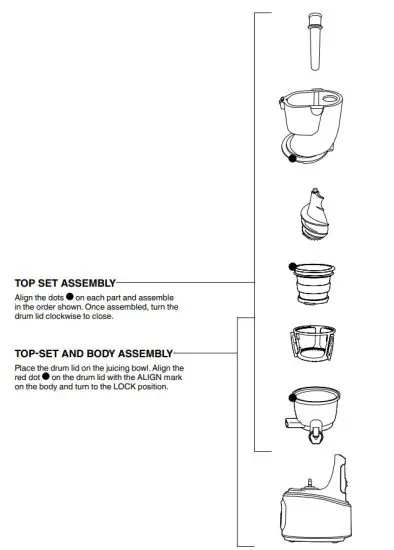
ASSEMBLY
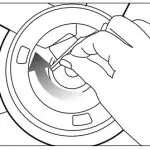
- Firmly insert the compression silicone into the slot below the pulp spout. The Juicer may leak if not assembled properly.

- Assemble the strainer into the rotation wiper then place this assembly in to the juicing bowl ensuring the red dot on the strainer is aligned with the red dot on the juicing bowl.

- Place the juicing screw into the strainer. Turn and press down on it until it clicks into place.The juicing screw needs to be locked in place in order to close the drum lid.
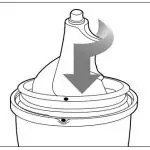
- Place the drum lid onto the juicing bowl aligning the dot on the drum lid with the red dot on the juicing bowl.
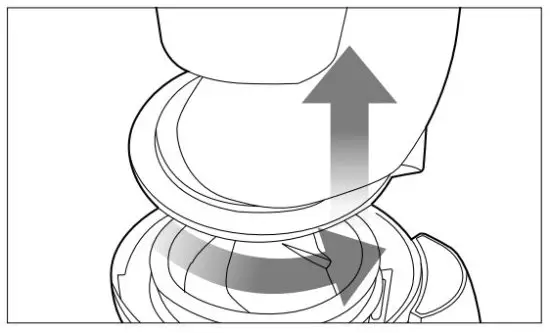
 TIP: For easy assembly holds the drum lid by grabbing the feeding tube and turning clockwise as shown in the illustration.
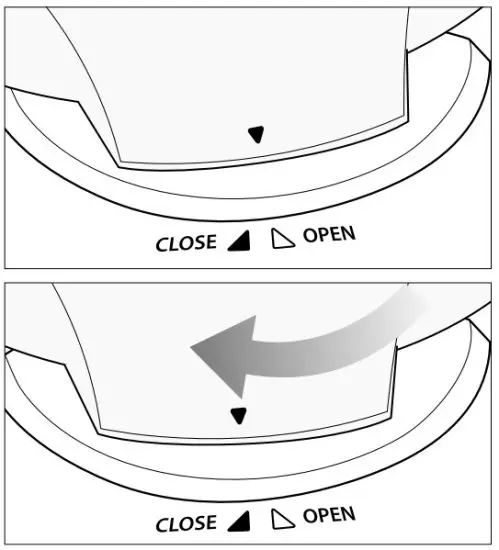
- Align the red dot on the drum lid with the ALIGN mark on the body and turn to the CLOSE position.
- Align arrows on drum lid and motor body.
 NOTE: The juicer will not operate if the down arrow on the drum lid is not completely aligned with the CLOSE mark on the body.
 - Place the pulp cup under the pulp spout and place the juice cup under the juice spout as shown in the illustration.

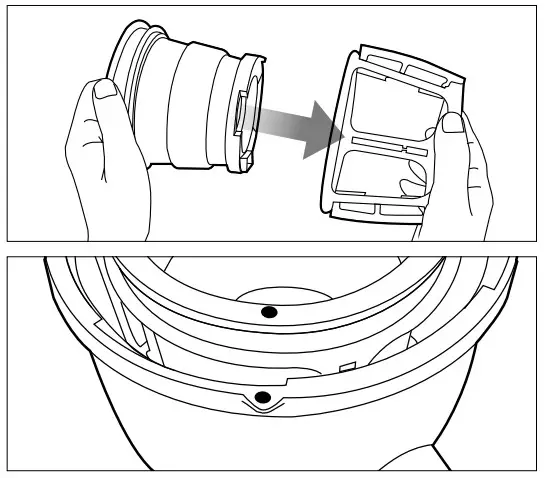
 The juicing screw needs to be locked in place in order to close the drum lid.
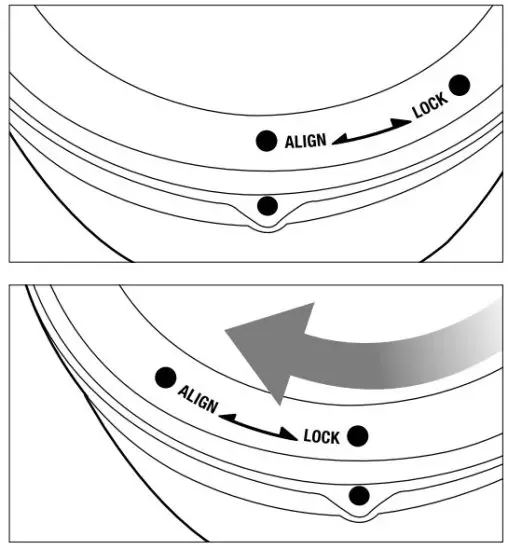 TIP: For easy assembly holds the drum lid by grabbing the feeding tube and turning clockwise as shown in the illustration.
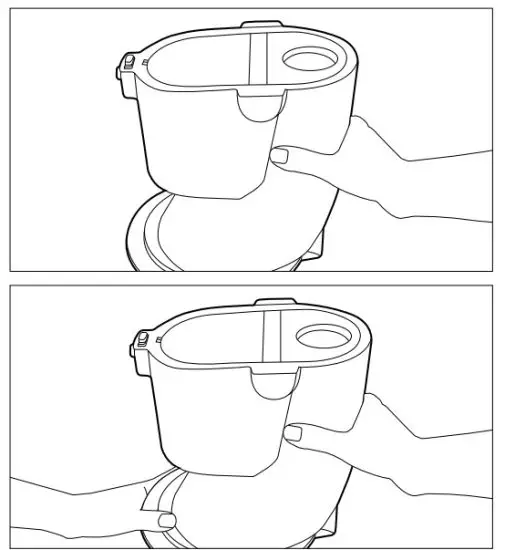

 NOTE: The juicer will not operate if the down arrow on the drum lid is not completely aligned with the CLOSE mark on the body.
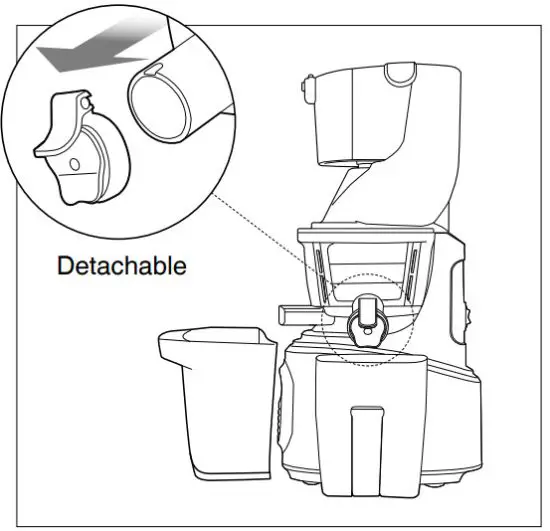
 Operation
USING YOUR JUICER
- After preparing the ingredients, plug the power cord into a wall outlet. Do not touch the power cord with wet hands. It may cause electrical shock, short-circuit, or fire.
- Press the FORWARD button to operate.
- Forward: Pulls down and slowly masticates the ingredients.
- Reverse: Pushes the ingredients back up to dislodge them. The REVERSE button only works while holding down the switch.
- Forward: Pulls down and slowly masticates the ingredients.
- Reverse: Pushes the ingredients back up to dislodge them. The REVERSE button only works while holding down the switch.

HARD VEGETABLES & HIGH FIBRE FOODS (E.G. CARROTS, BEETROOT, & SPINACH)
Insert into the feeding tube.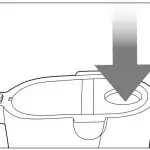
Tough and fibrous ingredients: Cut to 2cm wide and 5cm long.
Fibrous leafy vegetables: (celery, kale, collard greens, etc.): Cut the stems into 5cm long and bundle up the leafy part as you insert them into the juicer.
SOFT FRUITS & VEGETABLES (E.G. APPLES, ORANGES & TOMATOES)
Insert into the feeding basket.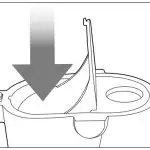
Soft ingredients: Cut ingredients into 1–4 pieces. Insert the prepared ingredients into the feeding basket and push down the ingredient with the basket lid to extract.
 Care & Cleaning
- Extract all the remaining pulp in the juicing bowl before stopping the juicer.
- For easier clean-up, operate the juicer for an additional 30 seconds after the juice is extracted. Then fill the juicing bowl with water and run the juicer before opening the drum lid.
- When the drum lid is stuck, press the REVERSE – OFF – FORWARD button in this order, switching back and forth 2 to 3 times to dislodge.
- Then place both hands on the drum lid and firmly press down while simultaneously turning the drum lid to open.
CLEANING THE JUICER
- Switch OFF and unplug the power cord from the wall outlet.
- Turn the drum lid counterclockwise to open.
 WARNING: When moving the appliance, do not lift it by grabbing the feeding tube. Always lift the appliance by grabbing the body or handle.
 - Turn the top-set counterclockwise and lift off the body.

- Remove the juicing screw, strainer, and rotation wiper unit from the juicing bowl.
Clean with the provided brush.
NOTE
Immediately clean the juicer after each use.
If the remaining residue in the juicer dries up, it can make disassembling and clean-up difficult.
The excess build-up can cause poor performance in future uses. For easier disassembly, place the top set in the sink and run the water through from the top of the top set.
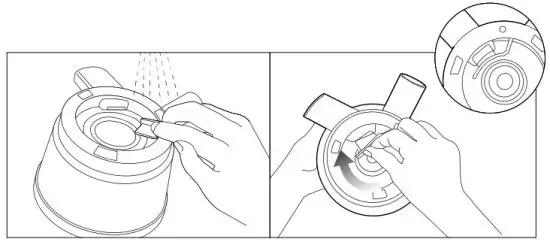
We do not recommend washing any parts of the juicer in the dishwasher. Washing parts in the dishwasher can cause damage to them due to prolonged exposure to harsh detergents, hot water, and pressure. - Place the juicing bowl under running water and unplug the compression silicone to clean the pulp spout.

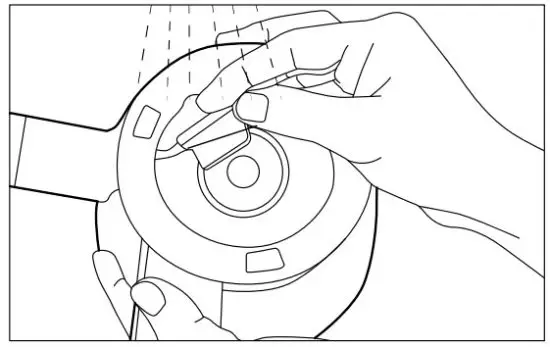
- Under running water, clean the outside of the juicing screw with a dish scrub. Use the tip of the cleaning brush to push out any residue in the crevices on the bottom of the juicing screw.
 Thoroughly clean the juicing screw ensuring that the juicing screw is clean without any residue.
Thoroughly dry the bottom of the juicing screw.
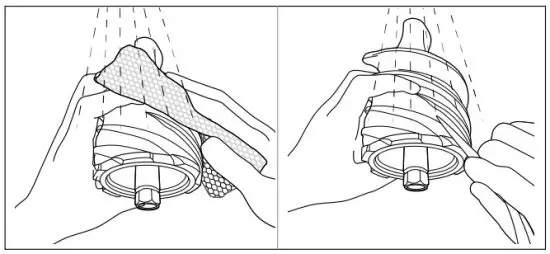
After juicing ingredients with seeds, make sure to thoroughly clean the bottom crevice of the juicing screw. (If this area isn’t properly cleaned, it can cause the part to be damaged). - Clean the body with a soft damp towel and dry.
 If the towel is dripping wet, make sure to squeeze out the excess liquid before using it on the juicer.
 WARNING: When moving the appliance, do not lift it by grabbing the feeding tube. Always lift the appliance by grabbing the body or handle.
 Thoroughly clean the juicing screw ensuring that the juicing screw is clean without any residue.
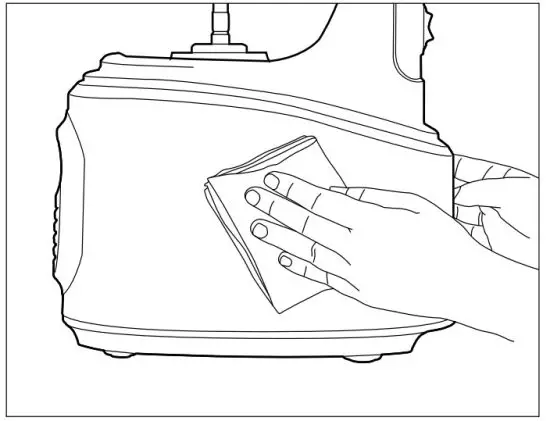 If the towel is dripping wet, make sure to squeeze out the excess liquid before using it on the juicer.
CLEANING SILICONE PARTS
- Clean the rotation wiper under running water.
- Thoroughly dry after cleaning. Before assembling the top-set, ensure that the compression silicone and silicone ring are firmly inserted.
- If the compression silicone and silicone ring are not firmly inserted, juice may leak from the bottom of the juicing bowl.
COMPRESSION SILICONE
- Unplug to clean.
- After cleaning, firmly insert into the slot below the pulp spout.

SILICONE RING
Remove the silicone ring from the juicing bowl to clean.
After cleaning, push in the silicone ring with the smaller surface facing down.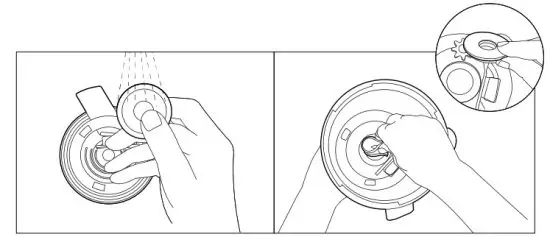
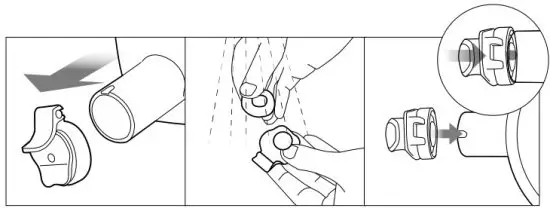
SMART CAP
- Remove from the juice spout to clean.
- After cleaning, attach the smart cap to the smart cap silicone on the juice spout.

Troubleshooting
| PROBLEM | EASY SOLUTION |
| There is no power to the juicer |
NOTE: Juicer will not operate if parts are not assembled properly. |
| Low juice yield |
|
| There is too much pulp in the juice |
|
| The drum lid will not close |
|
| Odd noise from the juicer |
|
| The extracted pulp is very moist |
|
| During operation, the juicing bowl shakes |
|
| During juicing, the juicer stopped |
|
| Layers of separation in the juice |
|
| The drum lid is stuck |
|
| Juice dripping down the body |
|
| Is it possible to juice ingredients with tough fibre? |
|
| Discolouration of the plastic parts |
|
| Using for purposes other than juicing |
|
 Guarantee
2 YEAR LIMITED GUARANTEE AND 5 YEAR LIMITED MOTOR GUARANTEE
Sage Appliances guarantees this product for domestic use in specified territories for 2 years for all parts of the product and 5 years for the product’s motor from the date of purchase against defects caused by faulty workmanship and materials. During this guarantee period, Sage Appliances will repair, replace, or refund any defective product (at the sole discretion of Sage Appliances).
All legal warranty rights under applicable national legislation will be respected and will not be impaired by our guarantee. For full terms and conditions on the guarantee, as well as instructions on how to make a claim, please visit www.sageappliances.com.
CONTACTS
BRG Appliances Limited
- Unit 3.2, Power Road Studios, 114 Power Road, London, W4 5PY
- Freephone (UK Landline): 0808 178 1650
- Mobile Calls (National Rate): 0333 0142 970
Registered in England & Wales No: 8223512
Registered in Germany No: HRB 81309 (AG Düsseldorf)
Registered in France No: 879 449 866 RCS
Due to continued product improvement, the products illustrated or photographed in this document may vary slightly from the actual product.
Copyright BRG Appliances 2021
BJS700/SJS700 UG6 B20


