Yealink IP DECT Phone User Guide
Quick Start Guide(V80.10)
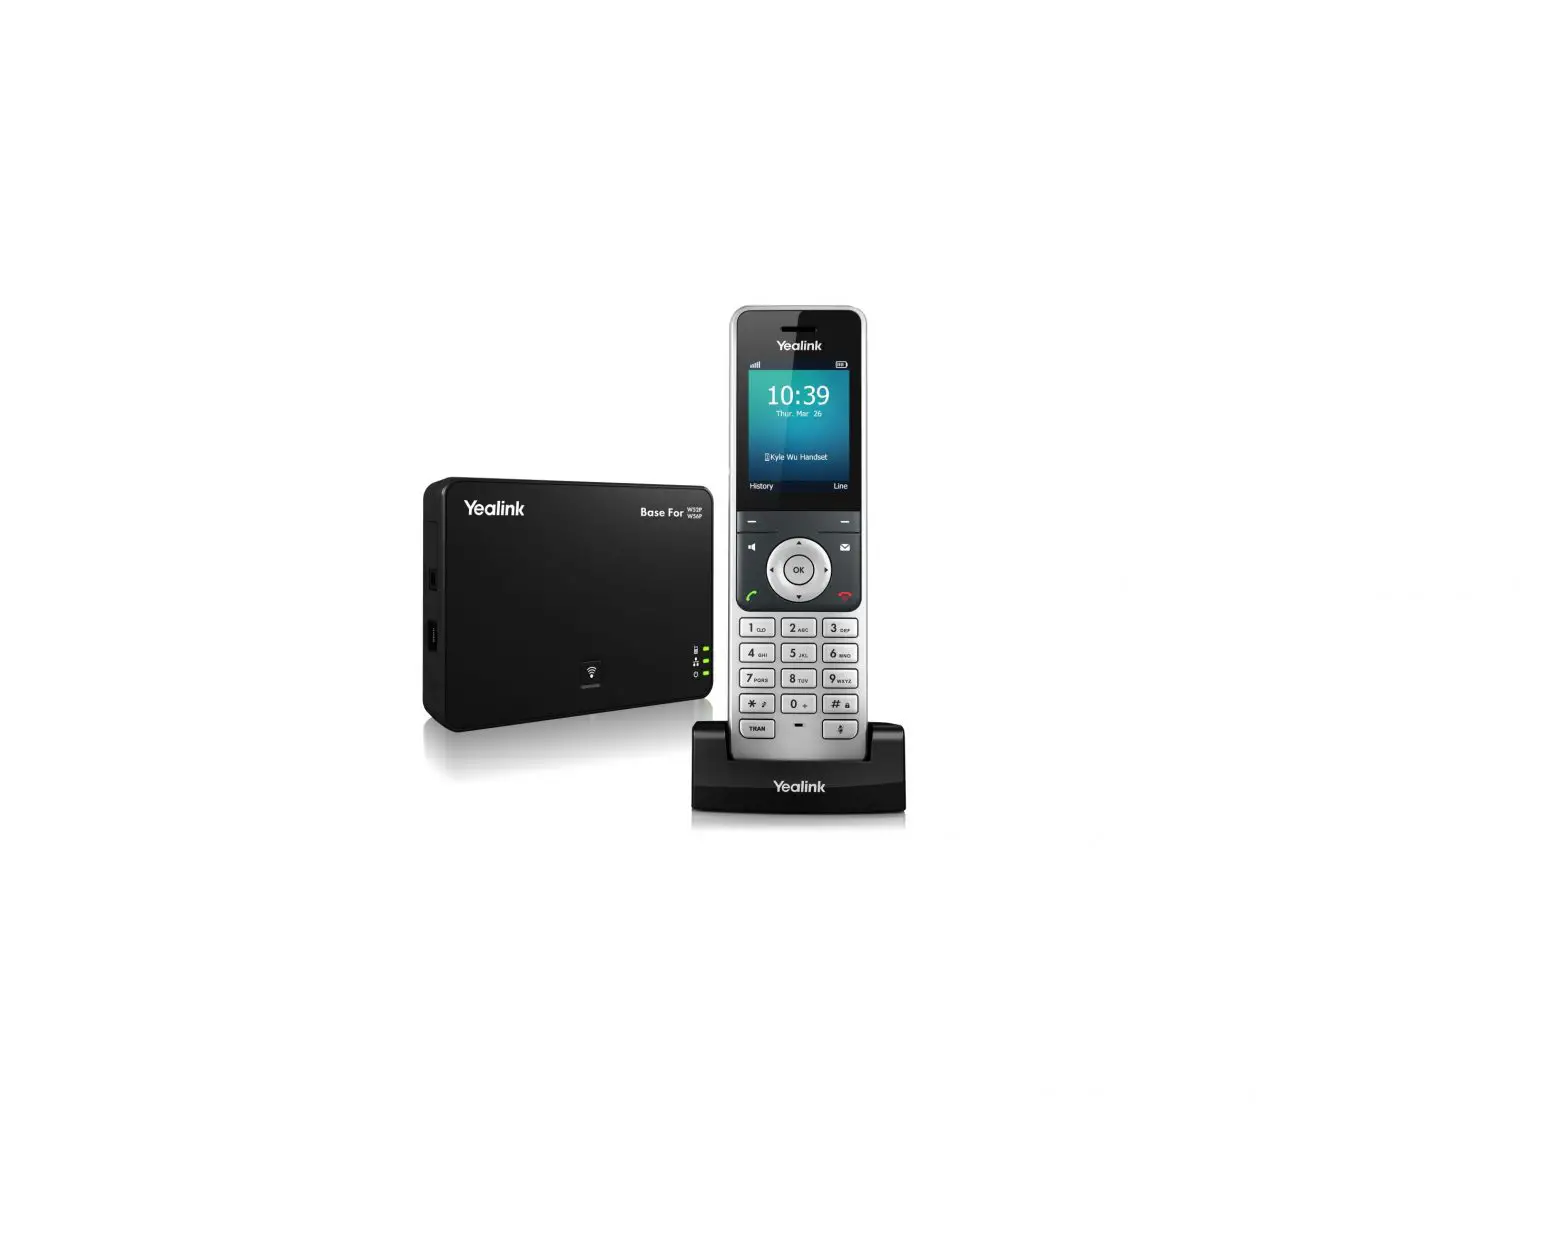
PACKAGING CONTENTS

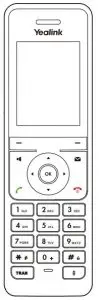
W56H Handset
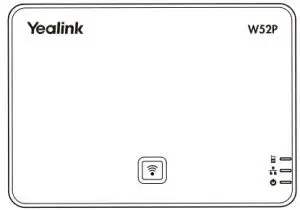
W52P Base Station
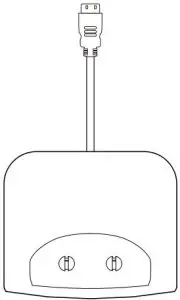
USB Charger Cradle
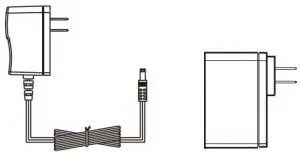
Two Power Adapters
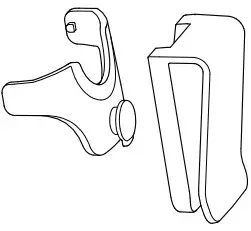
Belt Clip
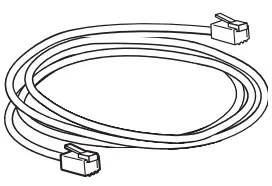
Ethernet Cable
Rechargeable Battery
Quick Start Guide


Note: W56P IP DECT phone consists of W52P base station and W56H hanset.
The following items are included in your W56H package:
W56H Handset
USB Charger Cradle
Power Adapter
Belt Clip
Rechargeable Battery

Note: We recommend that you use the accessories provided or approved by Yealink. The use of unapproved third-party accessories may result in reduced performance
Assembling the DECT Phone
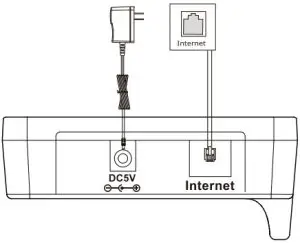
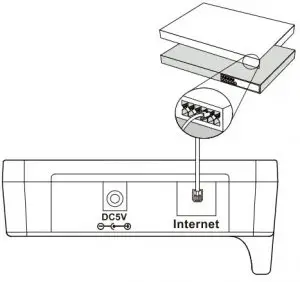
- Connect the network and power for the base station in one of the following ways, as shown below:
- a. AC Power Option

- b. PoE (Power over Ethernet) Option

Note: If inline power (PoE) is provided, you do not need to connect the power adapter. Make sure the hub/switch is PoE-compliant. The base station should be used with original power adapter (5V/600mA) only. The use of the third-party power adapter may cause the damage to the base station
- a. AC Power Option
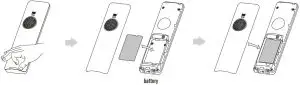
- . Insert the battery into the handset, as shown below:

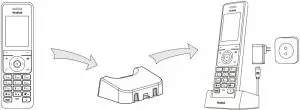
- Connect the charger cradle and charge the handset, as shown below

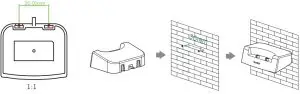
Note: The handset should be used with original power adapter (5V/600mA) only. The use of the third-party power adapter may cause the damage to the handset. The charging status of the handset is indicated in the top right-hand corner of the LCD screen. - (Optional) Mount the charger cradle on the wall, as shown below:

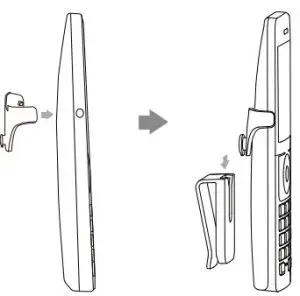
- Attach the Belt Clip, as shown below:

Getting Started
Shortcuts
This helps you get quick access to features by pressing the shortcut keys directly without having to scroll through the menu.You can press the following predefined shortcut keys to access some frequently used features when the handset is idle: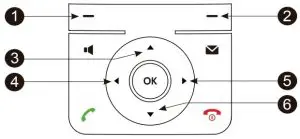
- Press the left soft key to access the call history.
- Press the right soft key to check the line status.
- Press
 to place an internal call.
 - Press
 to decrease the ringer volume.
 - Press to increase the ringer volume.
- Press to access the directory.
Entering and Editing Data- Press
 one or more times to switch among input modes or enter “#”.
 - Press to select the special characters or enter “*”.
- Press a digit key one or more times to enter the desired character or digit.
- Press the Del soft key to delete entered characters.
- Press the Save soft key to accept the change or
 to cancel.
- Press
 to increase the ringer volume.
 to select the special characters or enter “*”.
Handset Registration
You can register up to 5 handsets to one base station. Each handset can be registered to 4 different base stations.
- .Do one of the following to register your handset manually:
- Long press
 on the base station till the registration LED slow flashes. Then press the OK key to enter the main menu on the handset, select Settings->Registration->Register Handset. If the handset LCD screen prompts “Press base page 2s then press OK”, long press on the base station till the registration LED slow flashes. Then press the OK soft key on the handset, select Register Handset.
 - If the handset LCD screen prompts “Press base page 2s then press OK”, long press on the base station till the registration LED slow flashes. Then press the OK soft key on the handset, select Register Handset.
- Long press
- Select the desired base and press the OK soft key. The handset begins searching the base.
- Press the OK soft key after searching a base successfully.
- .Enter the base PIN (default: 0000), and then press the Done soft key to complete registeration.
Note: After the success of registration, the handset LCD screen prompts “Handset subscribed”. If the handset LCD screen prompts “Searching for Base”, please check your base station if powered on.
Network Settings
You can configure the base station to obtain network settings in one of the following ways:
DHCP: By default, the base station attempts to contact a DHCP server in your network to
obtain the valid network settings, e.g., IP address, subnet mask, gateway address and DNS address.
Static IP Address: If the base station cannot contact a DHCP server for any reason, you need
to configure the IP address, subnet mask, gateway address, primary DNS address and secondary DNS address for the base station manually
PPPoE: If you are using an xDSL modem, you can connect your base station to the Internet via PPPoE mode. Contact the ITSP for the account and password.
To configure the network parameters for the base station manually:- 1.Press the OK key to enter the main menu, and then select Settings->System Settings ->Network.
- .Enter the system PIN (default: 0000), and then press the Done soft key.
- .Select desired type from the IP Address Type field.
- .Make the desired changes.
- .Press the Save soft key to accept the change.
Note: Wrong network settings may result in inaccessibility of your DECT phone and may have an impact on the network performance. For more information on these parameters, contact your system administrator.
 on the base station till the registration LED slow flashes. Then press the OK key to enter the main menu on the handset, select Settings->Registration->Register Handset. If the handset LCD screen prompts “Press base page 2s then press OK”, long press on the base station till the registration LED slow flashes. Then press the OK soft key on the handset, select Register Handset.
Basic Operations
Turning Handset On/Off
To turn the handset on, do one of the following:
Press then the LCD screen lights up
Place the handset in the charger cradle. The handset will be turned on automatically.
To turn the handset off:
Long press![]() to turn the handset off.
to turn the handset off.
Locking/Unlocking Keypad
- Long press when the handset is idle to lock the keypad.
- Long press again to unlock the keypad.
Silent Mode
- Long press Long press when the handset is idle to switch the silent mode to On.
- Long press Long press again to switch the silent mode to Off.
Handset Settings
Handset Name
To rename the handset:
- Press the OK key to enter the main menu, and then select Settings->Handset Name.
- .Edit the value in the Rename field.
- Press the Save soft key to accept the change.
Volume Adjustment
- Press or when the handset is idle to adjust the ringer volume.
- Press orduring a call to adjust the receiver volume of speakerphone/earpiece.
Ring Tones
- Press the OK key to enter the main menu, and then select Settings->Audio->Ring Tones ->Melodies.
- Press or to highlight the Intercom Call option or the desired line.
- Press or to select the desired ring tone.
- Press the Save soft key to accept the change.
Local Directory
To add a contact:
- Press the OK key to enter the main menu, and then select Directory.
- Press the Options soft key, and then select New Contact.
- .Enter the desired value in the Name, Number and Mobile field respectively.
- Press the Save soft key to accept the change.
To edit a contact:
- Press the OK key to enter the main menu, and then select Directory.
- Press or to highlight the desired entry.
- .Press the Options soft key, and then select Edit.
- Edit the value in the Name, Numberand Mobile field respectively.
- Press the Save soft key to accept the change.
To delete a contact:
- .Press the OK key to enter the main menu, and then select Directory.
- .Press or to highlight the desired entry.
- .Press the Options soft key, and then select Delete to delete the selected entry.
To assign a speed dial number:
- .Press or the OK key to enter the main menu, and then select Settings->Telephony->Speed Dial.
- Press or to highlight the desired digit key, and then press the Assign soft key.
- Press or to highlight the desired entry, and then press the OK soft key.
If both the office number and mobile number are stored, press or to highlight the desired number, and then press the OK soft key again.
Basic Call Features
Placing Calls
To place a call directly:
- Do one of the following:
- Enter the desired number when the handset is idle.
- Press
 to enter the pre-dialing screen. Enter the desired number using the keypad.
If there are multiple lines assigned to your handset as outgoing lines, press the Line soft key to select the desired line. If you do not select a line, the handset uses the default outgoing line to dial out.
2.Press ,
, or
or to dial out.
 or
or to dial out.
To place a call from the local directory:
- .Press when the handset is idle.
- Press or to highlight the desired entry, and then press to dile out using the default line.
If multiple numbers for the contact are stored, pressor to highlight the desired number, and then press or again to dial out using the default line.
To place a call from the call history:
- .Press the History soft key when the handset is idle, and then select the desired call history list.
- Press or to highlight the desired entry, and then press or to dial out using the default line
To place a call from the redial list:
- Press or when the handset is idle.
- Press or to highlight the desired entry, and then press or
To place a call using the speed dial key:
Long press the speed dial key to place a call to preset number directly.
Answering Calls
To answer a call, do one of the following:
- Press the Accept soft key.
- Press .
- Press
- . Press .

Note: You can ignore an incoming call by pressing the Silence soft key or reject an incoming call by pressing .
Ending Calls
- Press .
Call Mute
- Press
 during a call to mute the call. again to un-mute the call.
 - Pressagain to un-mute the call.
 again to un-mute the call.
Call Hold and Resume
To place a call on hold:
Press the Options soft key during a call, and then select Hold.
To resume a call, do one of the following:
- If there is only a call on hold, press the Resume soft key.
- If there are two calls on hold, press the Resume soft key to resume the current call. Press the Swap soft key to swap between calls.
Call Transfer
You can transfer a call in the following ways:
Blind Transfer
- Press the Options soft key during a call, and then select Transfer.
- .Enter the number you want to transfer the call to.
- Press the Transfer soft key.
Semi-Attended Transfer
- .Press the Options soft key during a call, and then select Transfer.
- .Enter the number you want to transfer the call to.
- .Press ,or to dial out.
- Press the Transfer soft key when you hear the ring-back tone.
Attended Transfer
- Press the Options soft key during a call, and then select Transfer.
- Enter the number you want to transfer the call to.
- Press ,orto dial out.
- Press the Transfer soft key after the call is answered.
Call Forward
To enable the call forward feature on a specific line:
- Pressor the OK key to enter the main menu, and then select Call Features->Call Forward.
- .Pressor to highlight the desired line, and then press the OK soft key.
- Press or to highlight the desired forwarding type, and then press the OK soft key.
Always—-Incoming calls are forwarded immediately. Busy—-Incoming calls are forwarded when the line is busy.
No Answer—-Incoming calls are forwarded if not answered after a period of time. - .Select Enabled from the Status field.
- Enter the number you want to forward the incoming calls to in the Target field. For No Answer Forward, press or to select the desired ring time to wait before forwarding in the After Ring Time field.
- Press the Save soft key to accept the change.
About us
Founded in 2001, Yealink, a leading provider of VoIP Phone and IP communication solutions, has been focusing on VoIP products characterized by reliable quality, easy deployment and affordable price for more than a decade. Today, customers from over 140 countries rely on Yealink as the backbone of global collaboration to extend the value of network communications.
More about Yealink
Since 2001, Yealink has continued to develop state-of-the art, hi-tech VoIP communication terminals that include IP video phones, IP phones and USB phones. With a worldwide market in more than 140 countries, the company has also established a first-class international service network. Our priorities are quality, functionality, ease-of-use, customer support and competitive pricing. To provide new solutions for the future in this fast-evolving sector, Yealink’s large, talented and highly-experienced VoIP R&D team is totally committed to the pursuit of excellence. To date, we have passed more than 80 interoperability tests and meet certification requirements set by leading VoIP system and platforms. Yealink works in close partnership with T-Mobile, Telefonica, Portugal Telecom and other leading telecommunication service providers.
YEALINK NETWORK TECHNOLOGY CO.,LTD.
Web: www.yealink.com
Addr: 4th-5th Floor, South Building, No.63
Wanghai Road, 2nd Software Park, Xiamen, China(361008)
Copyright©2016Yealink Inc.All right reserved.


