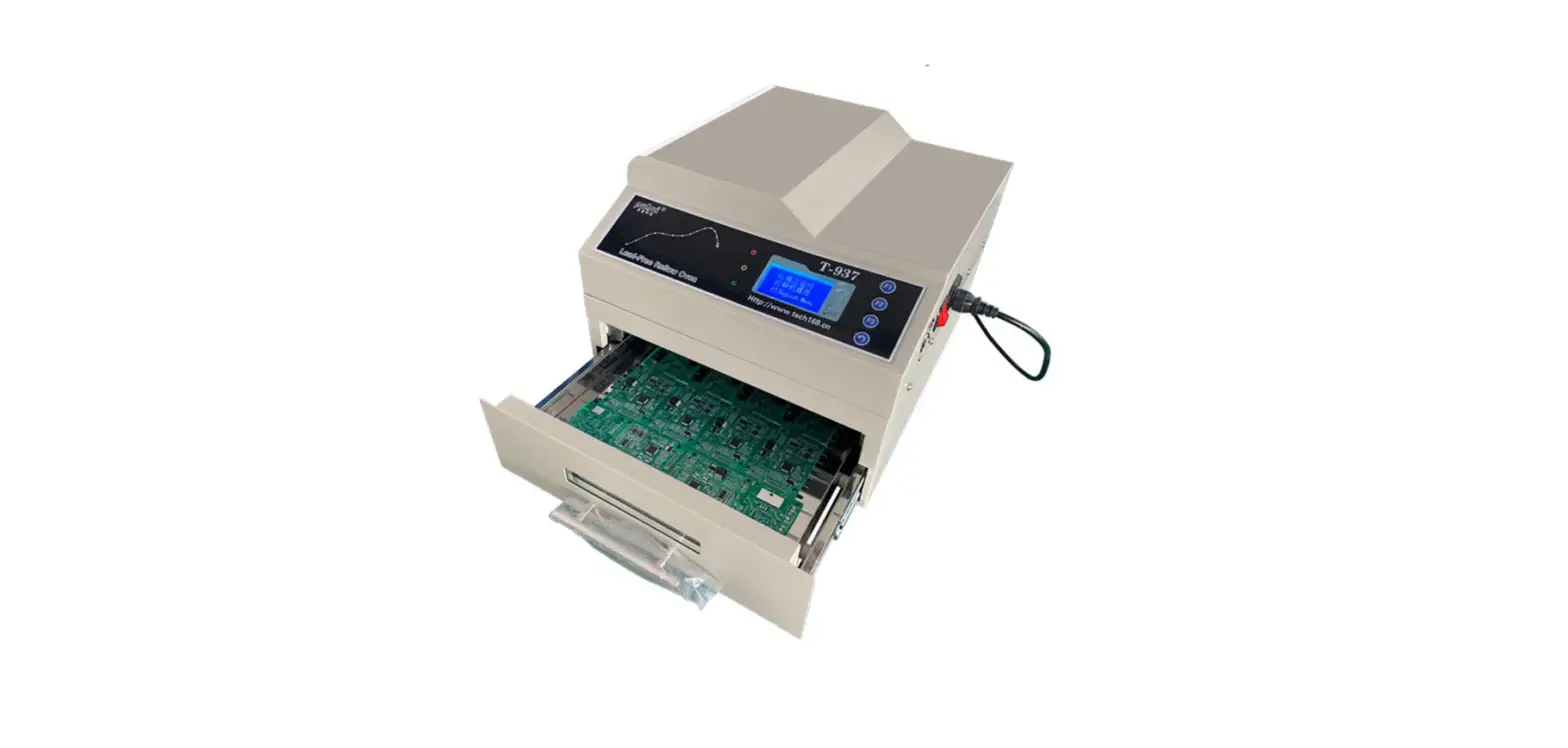
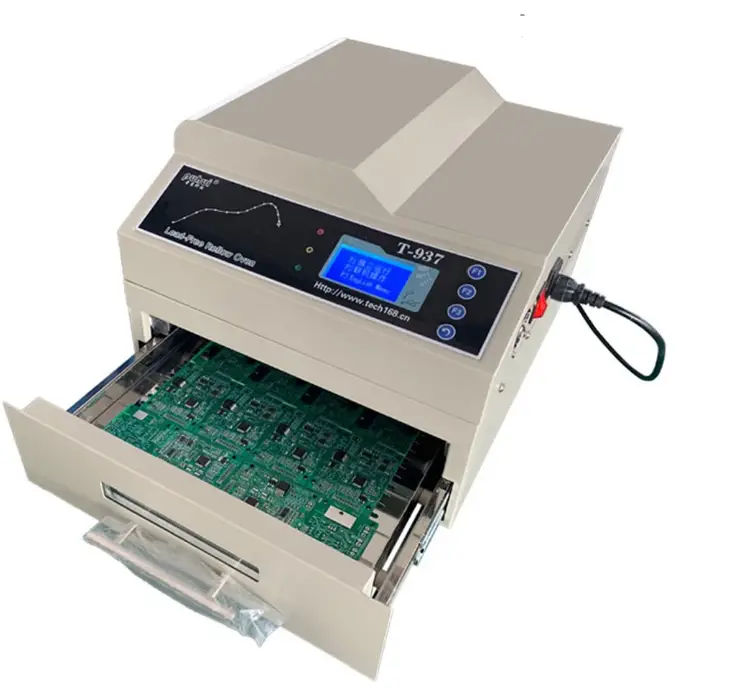
puhui T-937 Lead Free Reflow Oven 
Parameters
| Soldering area | 306mmX322mm |
| Dimension | 404mmX372mmX280mm |
| N. Weight | 15.5kg |
| Voltage/Frequency | AC220 ~ 230V/ 50~ 60Hz |
| Power rating | 2300W |
| Cycle time | 2~ 16 min |
| Temp rage | Room temp ~ 350 “C |
Configuration
| Name | Q’ty |
| T-937 lead-free reflow oven | 1 |
| Power line | 1 |
| fuse | 1 |
| CD | 1 |
| COM communication line | 1 |
Main parts
Mainbody 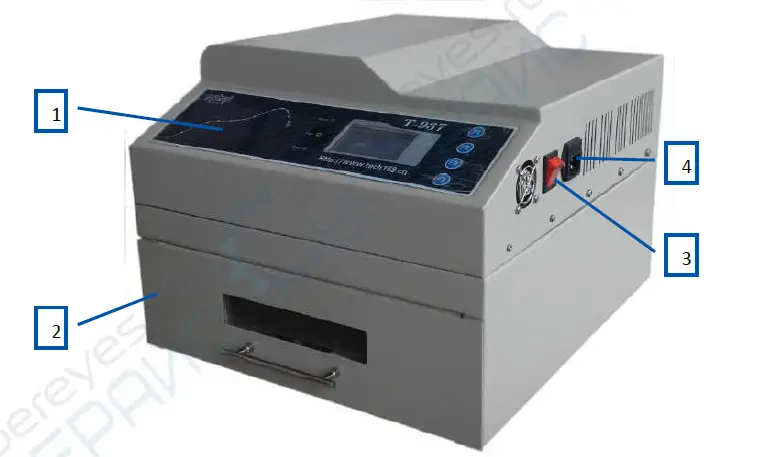
- Operation panel
- Drawer
- Switch
- Plug base
Operation Panel 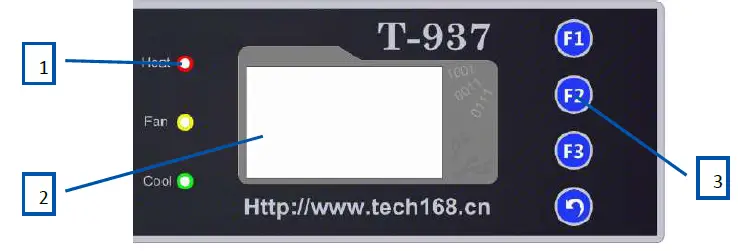
- Indicator light
- Display
- Key
Others 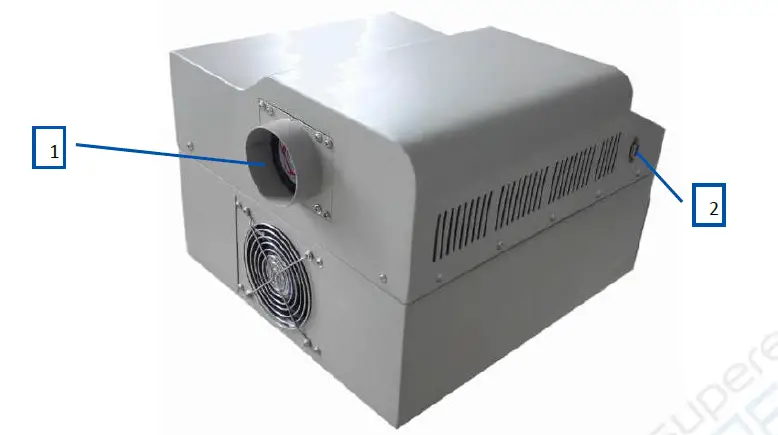
- Exhaust
- COM
Installation
- Please put this reflow oven on the flat tabletop.
- Please put this reflow oven in safe environment, not flammable or combustible.
- Please leave 20mm around the machine, for heat dissipation.
- The machine must be connected with Earth wire.
Software Interface
Main Interface 
- Menu bar
- Shortcut bar
- client drawing area
- display setting area
- operation tip area
- T-t da ta wave
- control point
- control point line
- toolbar
The client drawing area 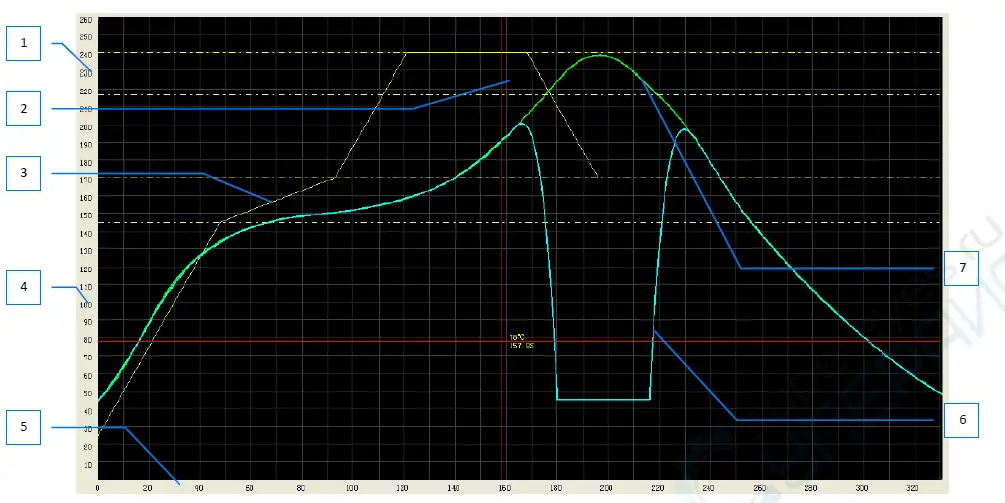
- temp axis
- cursor
- solder paste character wave
- coordinate display
- time axis
- effected wave
- wave graph
Shortcut bar
- check machine memory wave
- run the machine memory wave
- solder paste brand
- solder paste model
- re-set viewport
- set cycle time
- current oven temp
Display setting area 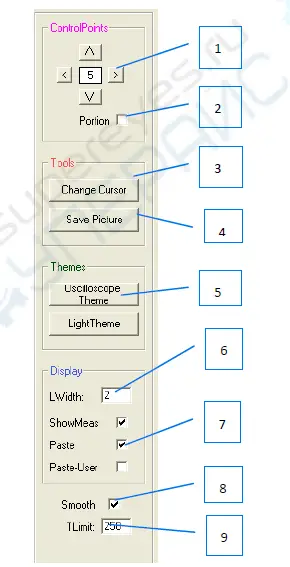
- control points moving direction
- partially/completely move the control point
- change to set control point cursor
- save pic in client drawing area
- show topics
- wave line width
- paste
- smooth wave
- temp setting range
Manual Instruction
- Install RS232 driver
Please see the CD-“usb driverV3.1” - Install the software
Open the CD, find the “T-937 回流焊控制系统.exe(T-937 Reflow Soldering Control System.exe)”, double-click, start to install. - Software Operation
- Viewport setting
After open the software, you will see the ”viewport setting”, in order to get good visual effect, please set the time parameter of viewport to ”reflow target time +10S”, set the temp parameter to “target peak temp+20℃, press “confirm”
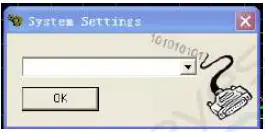
- Operation with PC
Please use the communication line to connect with computer.
Open T-937 software, press menu bar-other function-system parameter, open the setting window. Select “USB-SERIAL CH340 (COM**)”, press “confirm” and return to main interface, you will see like this in the shortcut bar, then press F2 on the reflow oven, T-937 reflow oven LCD displayer will show “connected with PC”, also you will see in the software, connect successfully. - Make the wave
- Set the solder paste character click “Display setting area -7 paste”, the wave will display in the client drawing area. Click “display setting area – paste user”, it will show the user-defined paste character, or the the paste character from the paste database.
 Use the paste database from software
Select the paste model from the shortcut bar, the paste wave will display in client drawing area.
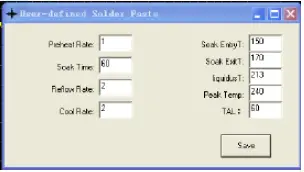
User define paste data
Click “others” –“ user defined solder paste”, it will show “user defined paste window”, fill in the paste parameters you use, click “save”. This wave will display in the client draw area. - Set up the wave
open the wave from machine memory
Click “menu” – “open recipe”, select the wave you want to use.
Tips:this machine is with 8 waves inside, if these 8 waves can not match your solder paste, please adjust the wave in order to match with your solder paste, get good reflow effect.
Set up wave
Under “place control points state”, the mouse cursor will change to (click the right mouse button to switch “place/check control points state”), then click in the client draw area, place the control point, set up new wave. - Adjust the wave
Under “check control points state”, double click the client draw area, it will show many control
also you can use to adjust the wave in different direction, it can change the wave fastly. Tips:the paste character wave show the theoretical wave, in fact, due to the influence of various factors such as heat conduction rate, so please adjust the wave according to the actually reflow effect, in order to get perfect soldering effect.
 - Preview the wave
Please click “operation” – “profile preview” to check the wave which the user made if it meets request, if the temps are over the “T Limit” (in the display setting area, No.9) , this software will set these temps to 45℃ automatically. - Set the wave heating time
Please set the heating time in the shortcut bar –
- Save the wave
Click “menu”-“save recipe”, fill in the wave name, press “save”. - Manager the wave
Click “database management”–“recipe management” , will display the wave management window.
- Set the solder paste character click “Display setting area -7 paste”, the wave will display in the client drawing area. Click “display setting area – paste user”, it will show the user-defined paste character, or the the paste character from the paste database.
- Send the wave to T-937 reflow oven
T- 937reflow oven has 8 file areas for saving the waves, if not connect with PC, T-937 reflow oven can perform the wave independently.
After making the wave in the computer side, click “operation” –“send to device” , select the profile No. to send. - View the waves in machine
Click the “view” , select the profile No, this wave will display in the client drawing area, then you can adjust the wave here, and save it.
- Run the wave in machine
Click the “run” in the shortcut bar, select the profile No, it will show wave running window, start soldering.
- Viewport setting
 Use the paste database from software
 to adjust the wave in different direction, it can change the wave fastly. Tips:the paste character wave show the theoretical wave, in fact, due to the influence of various factors such as heat conduction rate, so please adjust the wave according to the actually reflow effect, in order to get perfect soldering effect.
Independent Operation
Panel
Interface 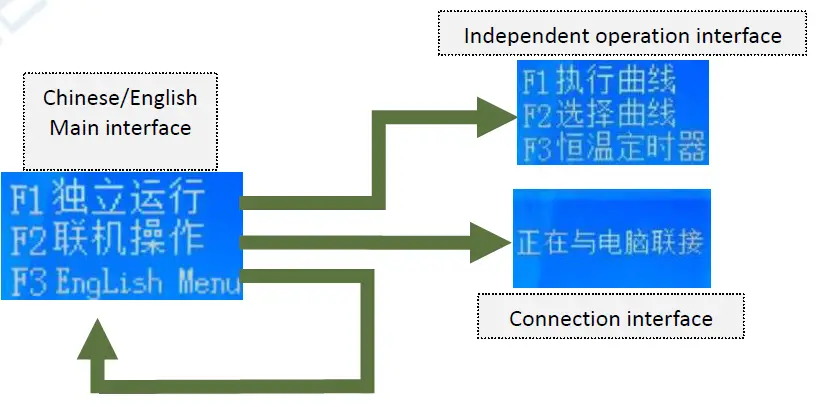
The main interface 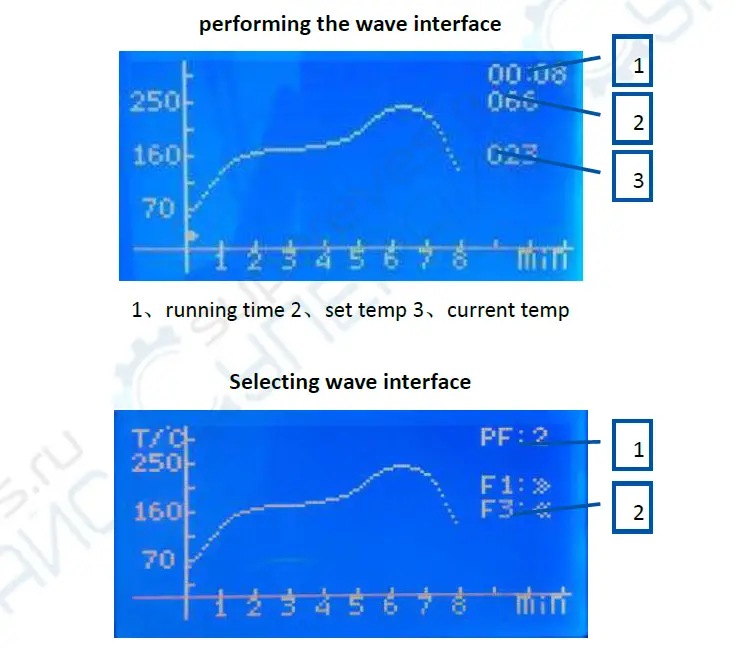
- wave number
- operation tips(F1/select next wave ; F3/select last wave; F2:switch last/next 8 mins wave)
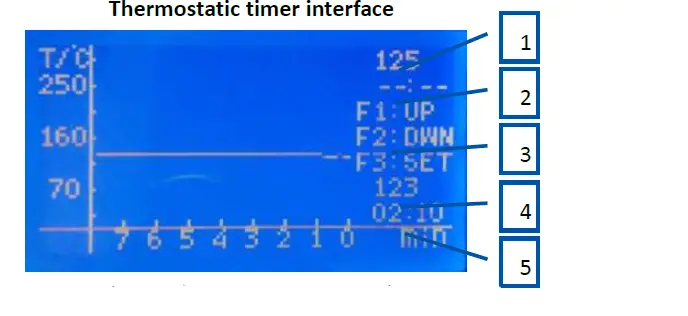
- Set temp
- set time(–:– is untimed model)
- operation tips(F1/ up,F2/ down,F3/switch set temp or set time
- current temp
- current running time
Operation
- Enter the software interface
Press F1, will come to the independent operation interface - Select the wave
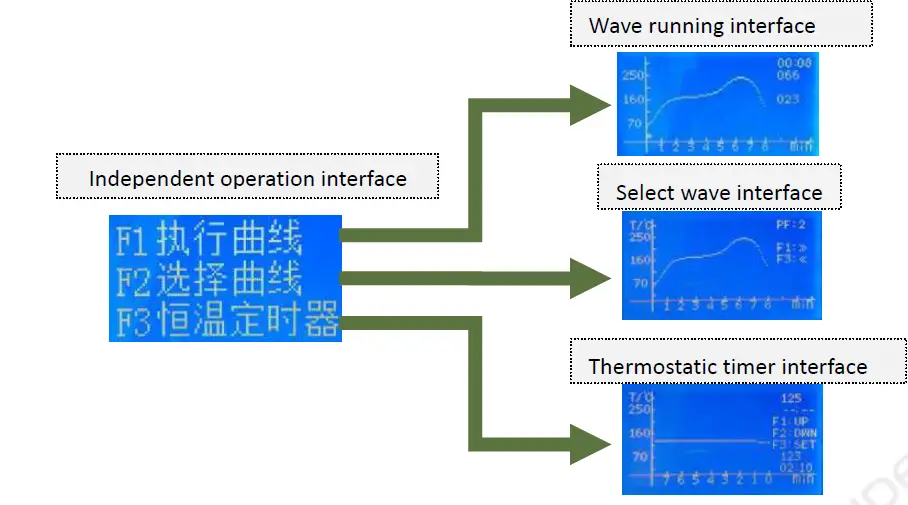
Under the independent operation interface, press F2 to select wave, press F1 and F3 to select the wave you need, then press “return key” to independent operation interface. - Run the wave
Under the independent operation interface, press F1, it will run the wave you selected. - Thermostatic timer function
Under the independent operation interface, press F3, start the thermostatic timer function. Thermostatic timer function means the machine can keep thermostatic temp if you set time, once time over, the machine stop heating.
Press F3 change “set temp”/”set time”, press F1/F2 to adjust the numerical value, the time is–:– is untimed model, means the machine is keeping thermostatic heating, not stop automatically. - Change language
Under the main interface, press F3 to change the language.
Attention
- If not use this machine for long time, please unplug the power line plug.
- The machine should be connected to the exhaust passage within the outdoor ventilation or exhaust recovery, prevent solder paste volatiles poisoning.
- This machine is with strict protective insulation materials, please don’t open the machine casually.
Warranty
The warranty for mainbody is one year, for parts is three months, provide lifetime technical guide.
Declaration
If there is inconsistency between this user manual and the actual product, the actual product shall govern.


