
Dsoon TL2100 Time Lapse Camera User Manual
IMPORTANT NOTE
Congratulations on your purchase of one of the best trail cameras on the market! We appreciate your business and want to earn your trust. Please refer to the instructions in this manual to ensure that you are completely satisfied with this product.
Dsoon Customer Service:
Email: [email protected].
Facebook Messenger


Product Overview
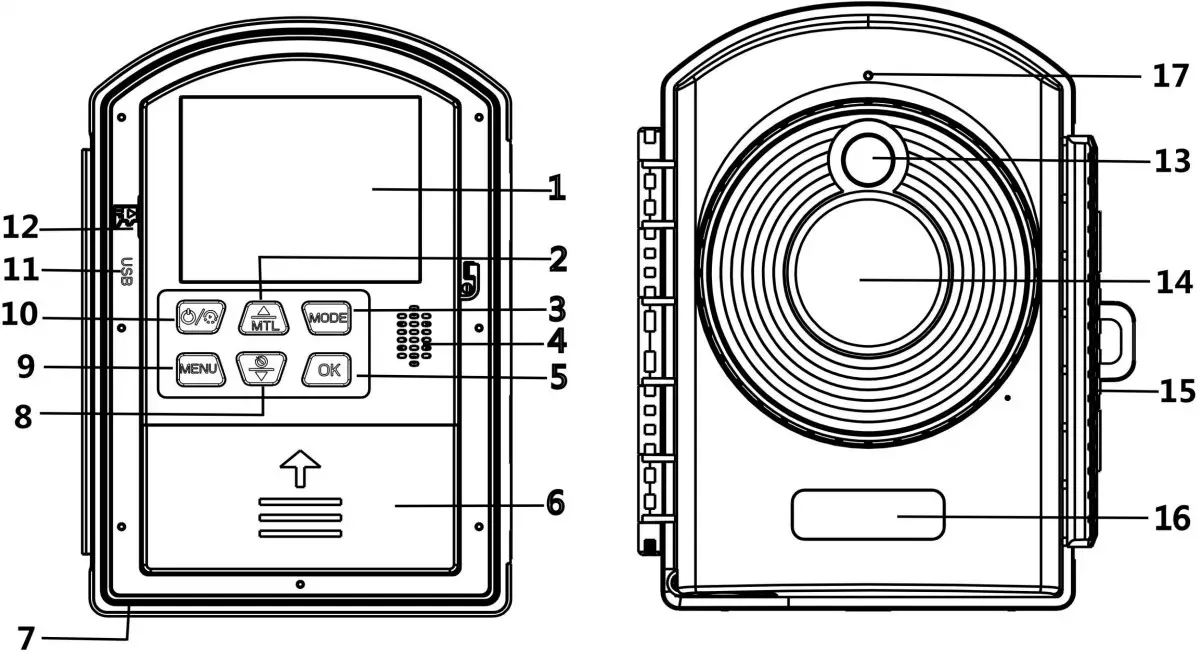
| 1.Display Screen | 2.Up Button / Manual Time-lapseButton |
| 3.Mode/Right Button | 4.Speaker |
| 5.OK Button | 6.Battery Compartment |
| 7.DC Jack | 8.Down Button / Selfie Button |
| 9.Menu Button | 10.Power Button/ Time-lapse Button |
| 11.USB Jack | 12.Micro SD Card Slot |
| 13.Fill Light | 14.Lens |
| 15.Verschlussklammern | 16.Brand |
| 17.Green Status Indicator |
| Button | Function |
| Power Button / Time-lapse Button | Long press to turn on/off;After power on, press the button to enter the shooting state |
| MENU Button | Enter/Exit menu |
| MODE Button / Right Button | Switch between camera mode/video mode/playback mode; Move the cursor to the right when setting the time |
| OK Button | Shooting/OK confirmation |
| Up Button / MTL Button | Upward to scan all menu and options/Manual time-lapse photography shortcut |
| Down Button / SelfieButton | Downward to scan all menu and options/Time-lapse selfie, press the OK button to start shooting |
Specification
| LCD Screen | 2.4″ TFT LCD |
| Lens | Starlight lens angle of view: 110° |
| Photosensitive Chip | Starlight 2 megapixels, 1/2.7″ |
| Resolution | 1920*1080 / 1280*720 |
| Shooting Distance | 60CM~infinity |
| Supplementary Light | A single 120°2W white LED will enable the supplementary light only when the user needscompletely dark |
| Customize theShooting Cycle | Set the shooting time flexibly according to the weekand time |
| Loop Shooting | ON/OFF; (When ON, the oldest document will bedeleted when the card is full) |
| ExposureCompensation | +3.0 EV ~-3.0 EV in increments of 0.5EV |
| File Format | photos: JPG, video: AVI |
| Power Source | 1.5V, 12* AA alkaline batteries |
| Storage Media | TF card,(up to 512GB,Class 10 or above) |
| PC Interface | Micro USB 2.0 |
| Installation Method | Brackets, straps, ropes |
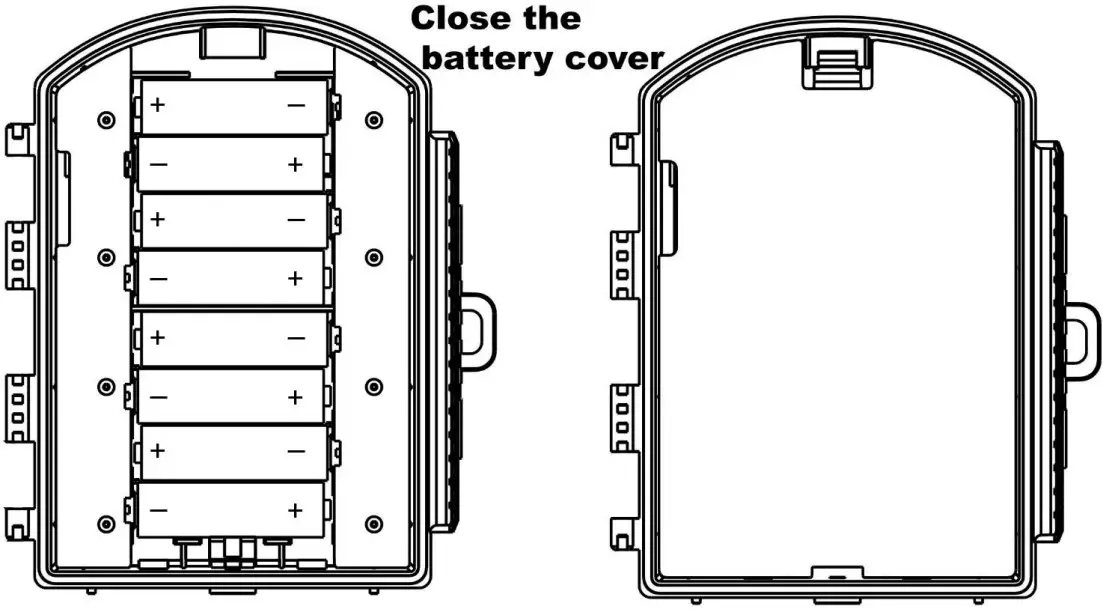
Power Supply
Please install batteries before using the camera.
- Open the time-lapse camera case and remove the battery cover. Install 1.5V, 12* AA alkaline batteries(4 batteries allow normal use of the camera).Please make sure the electrode is correct.
- If the camera is in low power, please connect the camera to a power adapter

Inserting Storage Media
Before recording, please insert a TF card into the camera and format the memory card first.
- Do not insert the memory card
- If the capacity of the memory card is full, the camera will stop recording automatically and the LED lights If you choose to turn on Endless Capture in the camera’s menu, when the memory card is full, it will automatically overwrite the camera’s previous captures.
- Press the edge of the TF card gently to pop up the TF card.
Basic Operation
Adjustment Mode
| Photo Mode | For taking still photos. | |
| Video Mode | For recording video. | |
| Playback Mode | For playing the recorded files. |
Press the Mode Button can change the 3 modes
| Take Photos | Press OK Button to take a picture. |
| Record Video | Press OK Button to record a video clip or to stop recording. |
| Playback Files | 1.Press Up/Down Button to scan photos or video. 2.Press OK Button to play the video or stop.3.Press Menu Button:Delete Current File:Options:[Cancel]/[Delete]. Delete all Files:Options:[Cancel]/[Delete].Activate Slide Show : Playback the photos inslideway. Each photo display 3 seconds. Press OK Button to stop playing.Write Protect : It can avoid accident deletion.Options:[Write-protect current file]/[Write-protect |
Menu in Photo and Video Mode are As Below
| Menu | Function |
| Setting | Display the set mode, interval time, recording time, current battery power, TF card available space. |
| Mode | Options:[Timelapse Photo]/[Timelapse Video]/ [Timing Photo] /[Timing Video]. |
| Fill Light LED | Set the Led switch. Options :[On]/[Off]. |
| Exposure | Options:[+3.0 EV]/[+2.5 EV]/[+2.0 EV]/ [+1.5 EV] / [+1.0 EV] /[+0.5 EV]/[+0.0 EV]/[-0.5 EV]/[-1.0 EV]/[-1.5 EV]/[-2.0 EV]/[-2.5 EV]/[-3.0 EV]. |
Language | Option:[English]/[Deutsch]/[Dansk]/[Suomi]/[Svensk a]/[Español]/[Francais]/[Italian]/[Nederlands]/[Portug ués]/[Simplified Chinese]/[Traditional Chinese]/[Japanese]/[Cestina]/[Polski]/[Pyccknñ]/[Korean]. |
| Photo Resolution | Options:[2MP(1920X1080P)] / [1MP(1280 X 720P)]. |
| Video Resolution | The bigger the resolution is ,the longer the video time can be stored.Options:[1920X1080P] /[1280 X 720P]. |
Frequency | Set the light source frequency to match frequency of electricity supply in local region to prevent interference.Options:[50Hz]/[60Hz]. |
Video Length | the length of the video for each timelapse (not the length of the final video).Options: 3 seconds~120 seconds. |
| Photo Stamp | Stamp the date&time on the photos or not. Options:[Time&date]/[Date]/[Off]. |
| Target Recording Time 1 | You can set the start time and end time of camera recording. After the setting is completed, the camera will only record during the set time period every day, and it will be on standby at other times.Options:[On]/[Off]. |
| TargetRecording Time 2 | Same as Target Recording Time 1. |
| Beep Sound | Options:[On]/[Off]. |
| Endless Capture | Set the camera to record video in loop. Options:[On]/[Off]. |
| Date Format | Date format: dd/mm/yyyy; yyyy/mm/dd; mm/dd/yyyy. |
Time & Date | Press the mode Button to select the position to be modified, press the up/down Button to modify the value, and press the OK Button to confirm. |
| Audio Recording | Open this function,the camera will record audio when recording video.Options:[On]/[Off]. |
| Reset Settings | Restore the camera to factory default settings including password,serial number and so on.Options:[Yes]/[No]. |
| Version | Look up the Firmware information of the camera. |
| FormatMemory Card | Options:[Yes]/[No]. |
| Status LED | The green light will blink when the camera isrecording, and it will blink 5 times continuously when |
Time-lapse Setting(If you do not know how to operate the camera, please contact us
You can set automatic or manual time-lapse for time-lapse shooting.
Set Automatic Time-lapse Shooting
After starting up, you can click the MENU Button and press the Up/Down Button to switch to MODE option
| Timelapse(Photo) | It can be set to take 1 photo every 3 seconds to 24 hours,and automatically connect photos to generate time-lapse AVI videos in real time. |
| Timelapse(Video) | It can be set to record a short video of 3 seconds to 120seconds every 3 seconds to 24 hours, and automatically connect to AVI video. |
| Timing Photo | it can be set to take 1 photo every 3 seconds to 24 hours. |
| Timing Video | it can be set to record a video from 3 seconds to 120 seconds every 3 seconds to 24 hours. |
After selecting the shooting mode, you need to confirm the details
| Timelapse(Photo) | 1.Set the days of the week you need to record. 2.Set the frame rate of photo. |
| 3.Set the interval time for Timing. | |
| Timelapse(Video) | 1.Set the days of the week you need to record.2.Set the length of the video for each timelapse (not the length of the final video).3.Set the interval time for Timing. |
| Timing Photo | 1.Set the days of the week you need to record.2.Set the interval time for Timing. |
| Timing Video | 1.Set the days of the week you need to record.2.Set the length of the video for each timelapse (not the length of the final video).3.Set the interval time for Timing. |
After setting, return to the main interface and short press the Power Button. The screen will prompt a 15-second countdown after the time-lapse
After the countdown is over, it will enter the time-lapse and Timing mode, enter the time-lapse mode and the camera will shoot according to the time you set; if short press the power Button again to stop time-lapse shooting.
Set Manual Time-lapse Shooting for Photo and Video
| Photo | 1. press the mode Button to switch to the photo mode. |
| 2. press the Up / MTL Button to enter or stop the manual photo time-lapse photo.3. press OK Button to shoot. | |
| Video | 1. press the mode Button to switch to the video mode.2. press the Up / MTL Button to enter or stop the manual photo time-lapse photo.3. press OK Button to shoot. |
About the Install
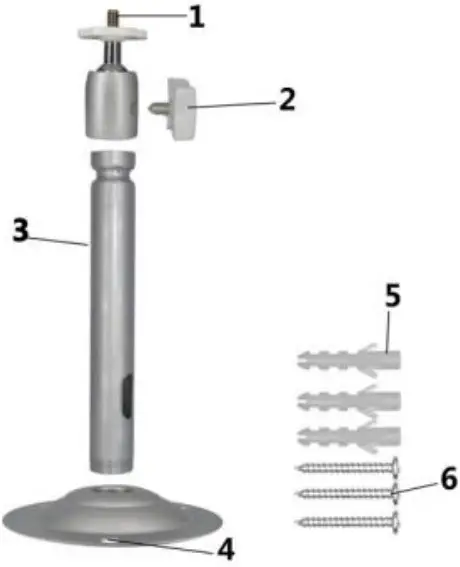
Using the Wall Bracket
Components
- Tripod screw
- Bracket fixing screw
- Bracket support rod
- Drill holes
- Wall plugs
- Screws

Install Steps
- Mark the drill holes by holding the foot of the wall bracket at the desired mounting location and marking the hole
- Screw the wall bracket to the wall using the supplied screws .
- Mount the camera on the tripod screw and screw the camera a little way on (about three turns).
- Use a drill with a 6 mm drill bit to drill the required holes and insert the plugs and insert the wall plugs flush with the wall.
- Turn the camera in the desired direction and lock it with the lock nut .
- To move the camera into its final position, undo the two pivot bolts a little, position the camera and fix the position by tightening the two pivot bolts
Using the Circular Tube Bracket
Components
- Machine fixed gear
- Fixed tightening shaft
- Fastening screw
- Ring hole
- Tighten steering shaft
- Metal screws

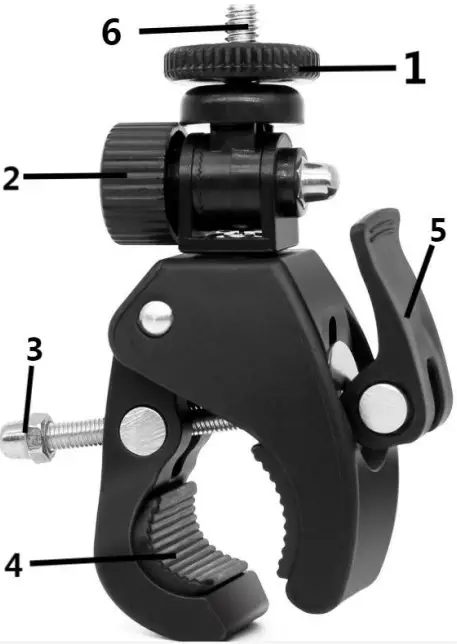
Install Steps
- Lift up the tightening steering shaft (5) and open the ring hole (4).
- Fix the bracket on the tube, turn the tightening steering shaft (5) to tight and then press the tightening steering shaft (5) down vigorously.
- Fix the tripod slot at the bottom of the time-lapse camera to the metal screw 6) of the bracket.
- Rotate the machine fixed gear (1) to adjust the direction of 360°.
- Rotate the fixed tightening shaft (2) to adjust the direction by 180°.
Using the Mounting Belt
Use the mounting belt to mount the Time-lapse camera to any object (e.g. tree) you can get the belt around. Pull the belt through the rectangular oblong holes on the back and put the belt around the desired object. Now fasten the belt.
Using the Rope (Elastic Cord)
Use the Rope to mount the time-lapse camera to any object. Pull the rope through the round holes on the back and put the rope around the desired object. Now make a loop or knot to tighten the Rope
Download Files to the Computer
- Using a Card Reader
- Connecting the Camcorder to a PC by the USB Cable
Notes for Using
- Remove the batteries from the device if it is not used for a longer time.
- After inserting the battery, it cannot be turned on normally. It may be because the battery is not installed flatly. Touch the battery to make it flat.Before cleaning the device, disconnect it from the power supply (remove batteries).Only use a dry cloth to clean the exterior of the device, do not use any cleaning fluid.
- When setting the time period to shoot, please correct the camera’s time first.
- To let the camera enter the recording mode normally, please be sure to click the Time-lapse Button


