
Camsoy Smart Life Camera S1
QR code: Youtube video You can scan the OR code to check the install video on Youtube
If you dont know how to install it or other questions, please contact us by this e-mail: [email protected]
Please read user manual before using
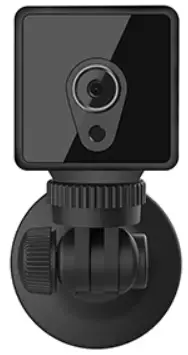
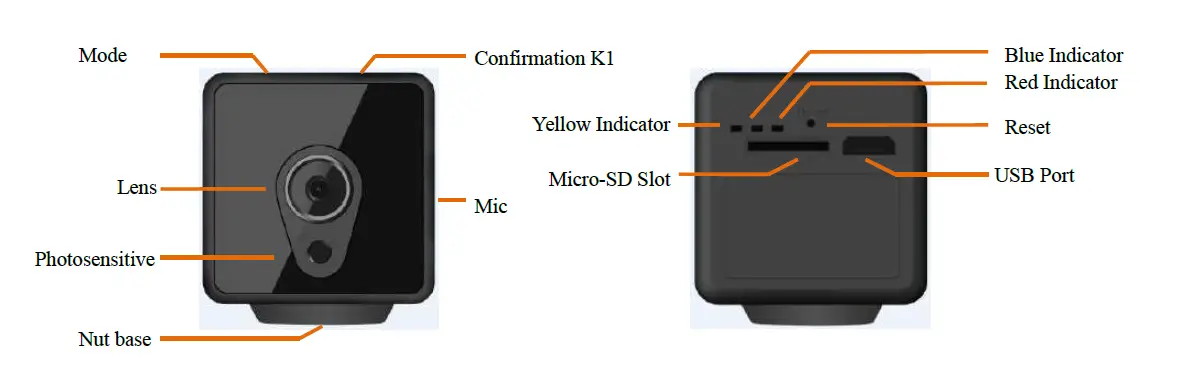
Product Details
Download APP
Scan the QR Code or search the keyword “iCookyCam” to download and installation APP from the application market.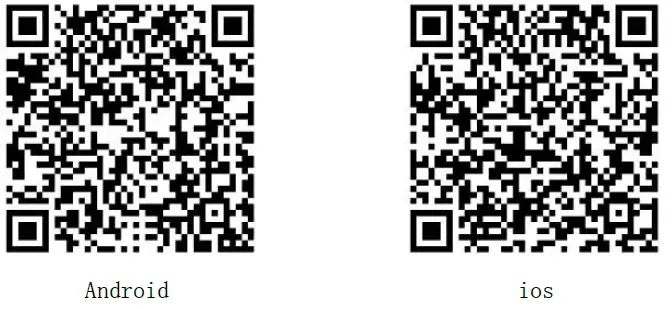
Warm Prompt: Don’t use WeChat to scan the QR code, please use browsers, mobile QQ, or other tools to scan.
Power ON / Power OFF Operation
Insert Micro SD Card: Class10 or above is recommended. Maximum support 64GB, Please format the memory card before using.
Warm Prompt: Pay attention to the direction of the memory card!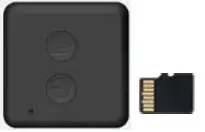
Power ON: Connect the camera to the power supply or long-press the confirmation button K1 for 3 seconds, Red & Blue indicator keeps on, and then continuous scintillation, the camera starts to initialize(it takes around 60 seconds). After initialization succeeds Blue indicator flashes slowly, the camera enters AP connection mode and starts recording automatically. Press the confirmation button once to stop video recording, blue indicator keeps on and the camera turns to standby mode.
Warm Prompt
If you want to power on without connecting to the USB charger, make sure that the camera has enough power!
2. If after initialization succeeds red indicator flashes slowly, showing that the machine is in the IP connection mode, please long press the mode button K2 for 5 seconds to return to AP connection mode and blue indicator flashes slowly.
If the memory card is not inserted, the red and blue indicator flicker at the same time when the machine is initialized, and the camera can’t turn on the video. The memory card does not support hot swap, if you want to pull off or insert the memory card, Please turn off the camera first.
Power OFF: long press the confirmation button for 5 seconds, Red & Blue indicator flashes for 7 times and turn off. Warm Prompt: It is not possible to power off the camera through the above operation when USB power is connected.
IP Connection Mode
After initialization succeed, Switch on Wi-Fi/WLAN, choose iCooky_***** from available networks and type in password 12345678.(P 3.1)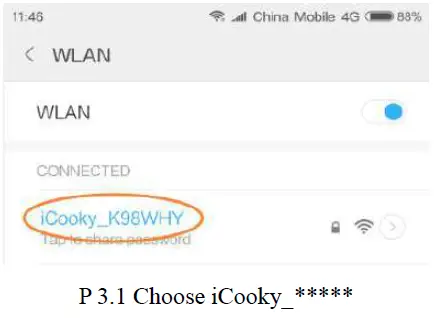
Warm Prompt: The effective range of the WiFi signal iCooky_***** sent by the camera is within 10 meters. When the mobile phone exceeds the range, it will be disconnected from the WiFi signal.
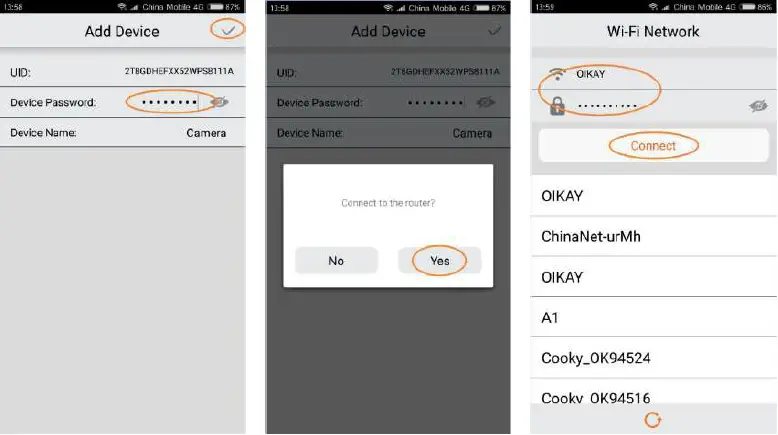
Log into iCookyCam APP, click the “+” in the middle or below the interface, then choose “Not been connected to the router”, click “Next” to enter the add device interface, input “ok123456” in the device password bar and then click “√”, APP will prompt “Connect to the router?”, please select “Yes” to enter the “Wi-Fi Network” setup interface. Choose the network you want to connect and input the right Wi-Fi password, then click “Connect”. (P 3.2.1-3.2.7) Warm Prompt: For your personal privacy, please change the default password of the camera in time!!!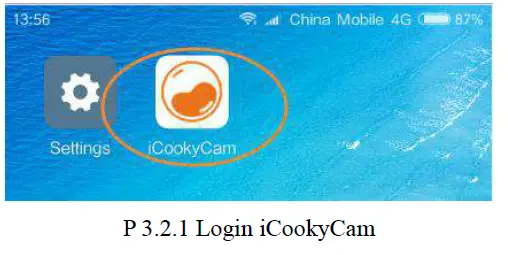

- P 3.2.2 Click “+”
- P 3.2.3 Click “Not been connected to the router”
- P 3.2.4 Click “Next”

- P 3.2.5 Input the default password
- P 3.2.6 Click “Yes”
- P 3.2.7 Connect WiFi
Warm Prompt:
- Please choose the right network and type the incorrect password. The camera turns to AP mode if the wrong password were typed in, blue indicator flashes slowly in AP mode. Please click Delete on APP and withdraw from APP, check out APP and add a device again.
- In order to improve the stability and success rate of WiFi connection, try to be close to the wireless router.
- For initial use, the device requires a certain amount of time for IP connection. Please wait patiently. ( About 1-3 minutes based on network conditions). After the IP connection is successful, the red indicator flashes slowly. After multiple refresh, if still showing offline, please try to check the network environment of the device and the mobile phone is good or not.
- SSID with special characters and 5G network are both not compatible with APP. Only 2.4G frequency WiFi is supported, 5G frequency WiFi is not supported temporarily, and WiFi encryption mode can not be WEP mode, and the password can not be empty.
The camera starts to restart after click “Connect”, Please wait for about 90 seconds, at the same time, APP automatically returns to the device list interface and successfully adds the camera to the list. Red indicator flashes slowly after the camera reboots, and the camera turns into IP connection mode. click the camera in the list to preview image and control the camera. (P 3.3.1-3.3.2)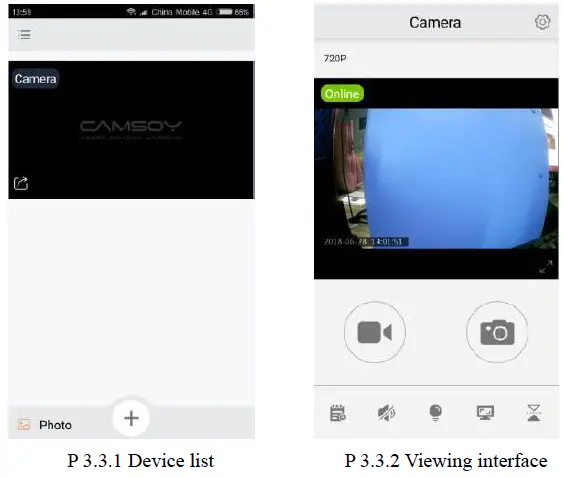
AP Connection Mode
If you need only AP connections but not IP connections, please select “No” when prompted “Connect to the router?” in the above P3.2.6 operation steps. APP automatically returns to the device list interface and successfully adds the camera to the list. Click the camera in the list to preview image and control the camera.(P 4.1.1-4.1.3)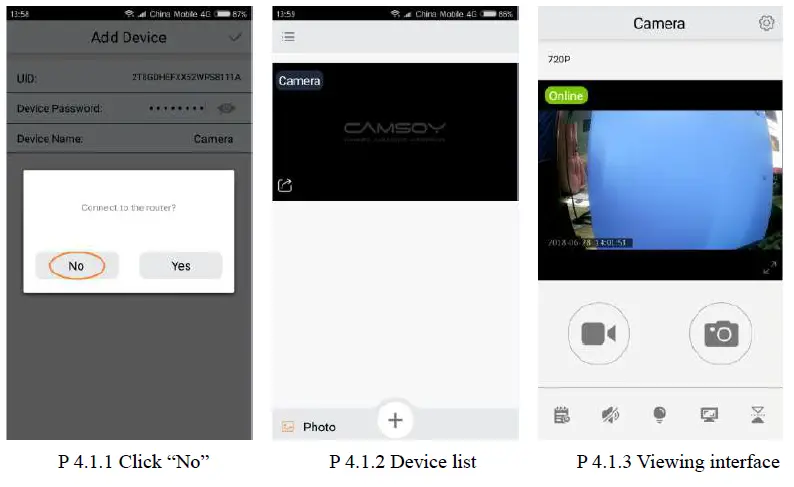
To switch from IP connection mode to AP connection mode: long press the Mode button K2 for 5 seconds.
Marks:
AP connection mode: The camera connects to the Wi-Fi of the smartphone for a short-distance preview image. IP connection mode: Camera connect to the router for the unlimited distance preview image.
Add the camera manually
If the camera has been connected to the Internet to work in IP remote mode, when you want to add the camera to other people’s APP, please open APP on the other’s phone, click the “+” in the middle or below the interface, select the “Been connected to the router”, and enter to the Lan Search interface. (P 5.1-5.3)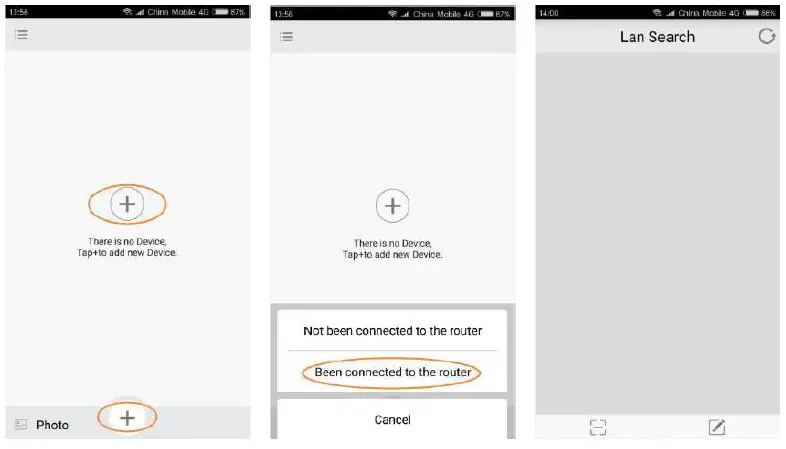
- P 5.1 Click “+”
- P 5.2 Click “Been connected to the router”
- P 5.3 Lan Search interface
Search addition under the same WiFi
If the mobile phone and the camera are connected to the same WiFi, then in the “Lan Search” interface will automatically search all the camera serial numbers under the WiFi, select the camera that you need to add, and input device password (the default password is”ok123456″) can be added successfully. (P 5.1.1-5.1.2)
Scanning QR code addition
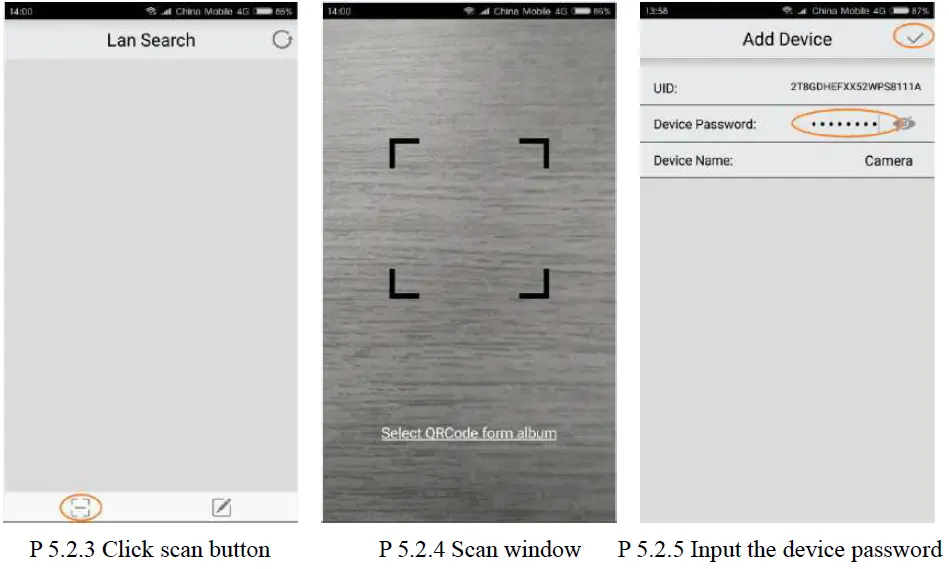
Open the APP that has already added the camera, find the camera that needs to be added in the device list, and click the share button in the lower right corner to automatically generate a camera QR code. Open the APP on the phone that needs to add the camera, enter the “Lan Search” interface, click the QR code scan button in the lower left corner to open the scan window, scan the generated camera QR code, and then input the correct device password to add. (P 5.2.1-5.2.5)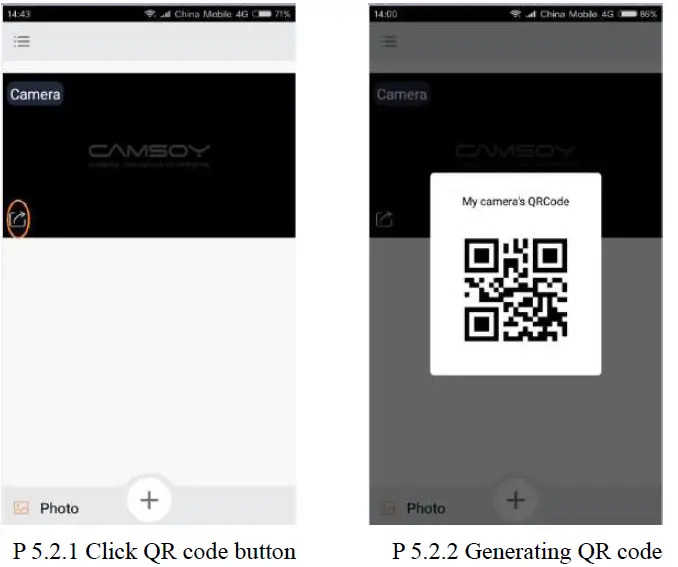
Manual input addition
Open the APP that needs to add the camera, enter the “Lan Search” interface to select the manual add button in the lower right corner, and input the correct device UID and password in the “Add Device” interface to be added successfully.(P 5.3.1-5.3.2)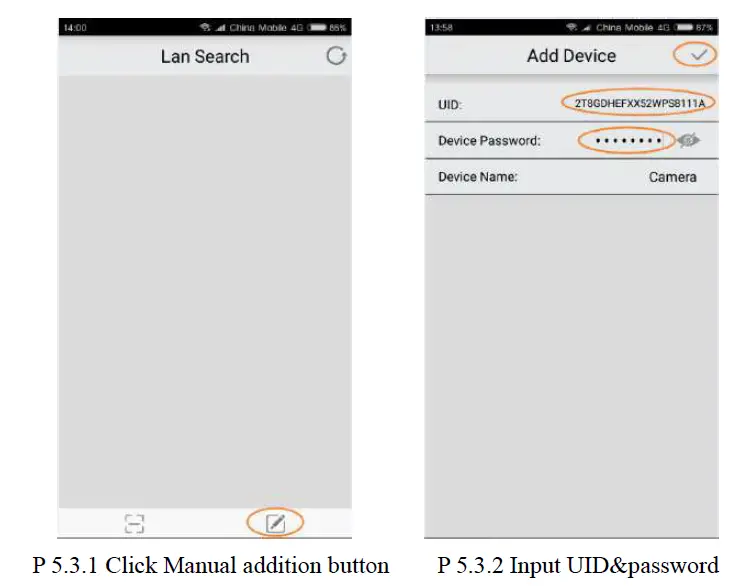
Interface introduction
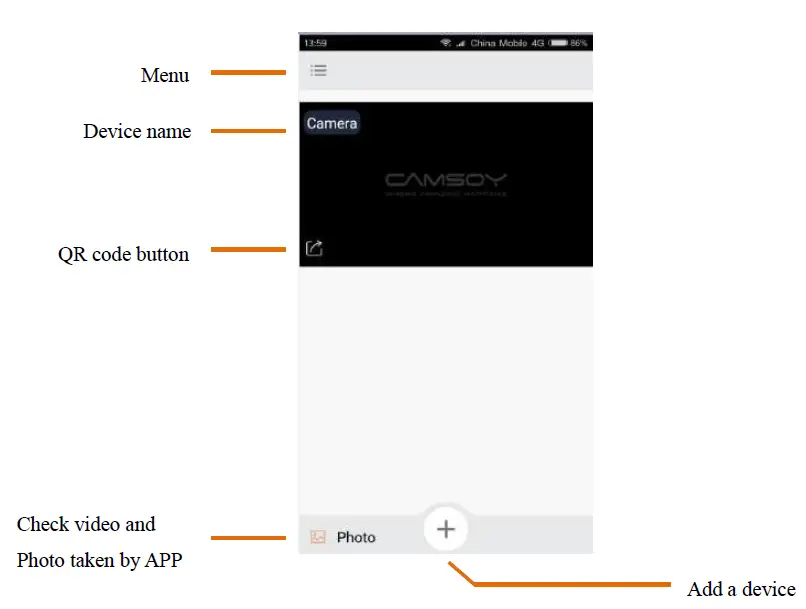
Device list interface
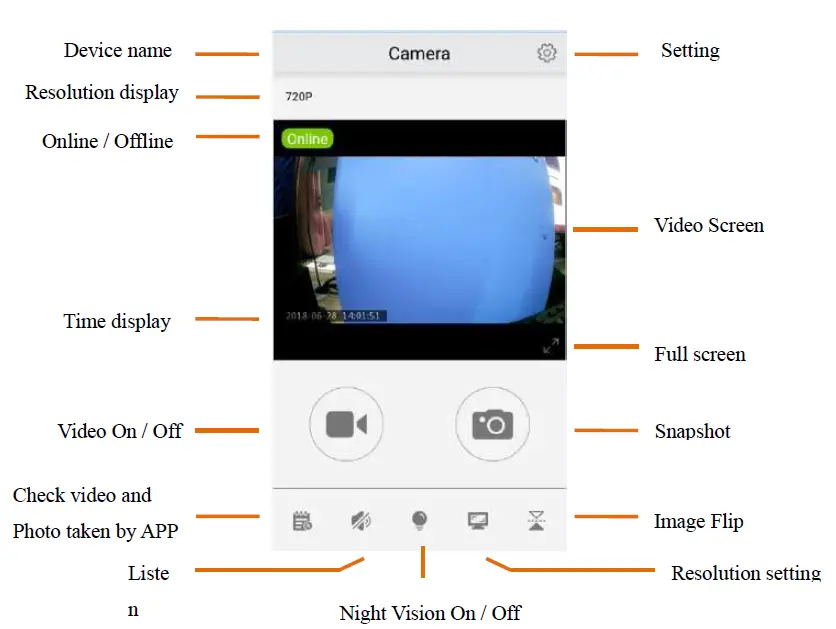
Real-time interface
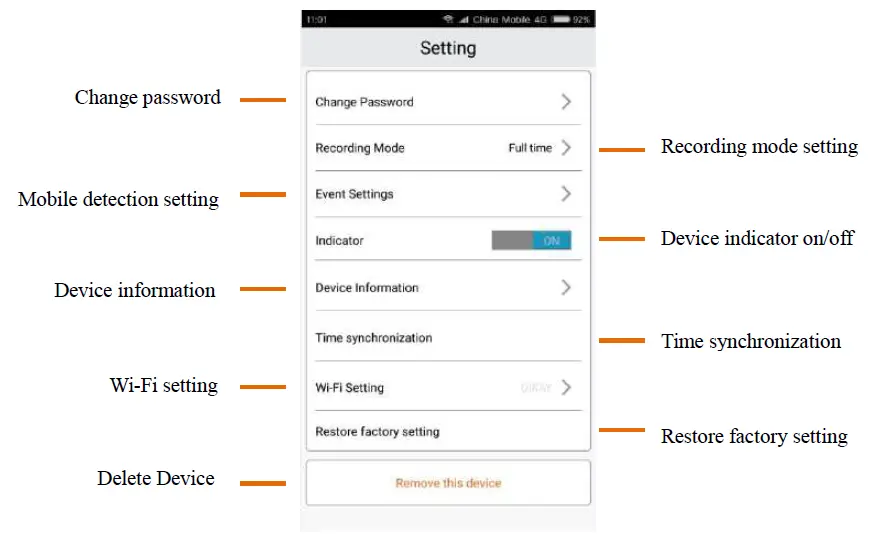
Setting interface
Reset Device Password
Under IP connection & standby mode (Video/Photo/Motion Detection), connect the USB power for a charge, long press the confirmation button for 5 seconds, and the red and blue indicators flash quickly. The machine will reboot automatically after a successful reset P.W..It takes about 1 minute, Please wait patiently.
Working Mode Switching
After initialization succeeds, press the Confirmation Button K1 once, the camera turns into standby mode. Then press Mode Button K2 once to change a working mode, in turn, they are: Full-Time Video / Photo / Motion Detection.
- Full-Time Video Mode
After initialization succeeds, the camera starts recording automatically, if the camera working in AP mode, the blue indicator flashes slowly, if the camera working in IP mode, the red indicator flashes slowly. Press Confirmation Button K1 once, and the camera turns into Full Time Video Standby Mode and the blue indicator keeps on(AP mode) or the red indicator keeps on(IP mode). - Photo Mode
In Full-Time Video Standby Mode, press Mode Button K2 once, blue indicator(AP mode) flashes 3 times quickly or the red indicator(IP mode) flashes 3 times quickly and then keeps on, and the camera turns into Photo Standby Mode. Press Confirmation Button K1 once, and the camera turns into photo mode and takes one photo every 15 seconds, at the same time, the blue indicator(AP mode) or red indicator(IP mode) flashes once. Press Confirmation Button K1 again, and the camera turns into Photo Standby Mode. - Motion Detection Mode
In Photo Standby Mode, press Mode Button K2 once, red & blue indicator keeps on, and the camera turns into Motion Detection Standby Mode. When the camera detects an object moving, the blue indicator keeps on & red indicator flashes slowly(AP mode) or the red indicator keeps on & blue indicator flashes slowly(IP mode), the camera starts recording automatically.
Indicators
| Camera Mode | Indicator Status |
| AP Connection Mode | Blue Indicator |
| IP Connection Mode | Red Indicator |
| Full Time Video Mode Working/Standby | Indicator Flashes / Indicator keeps on |
| Photo Mode Working /Standby | Indicator Flashes once every 15 seconds/ Indicator Flashes 3 times quickly and then keeps on |
| Motion Detection Mode Working /Standby | Blue Indicator keeps on& Red Indicator Flashes; Red Indicator keeps on& Blue Indicator Flashes /Red & Blue Indicator keeps on |
| No Memory Card | Blue & Red Indicator Flashes at the same time |
| Connect USB & insufficient electricity | Yellow indicator keeps on |
| Connect USB & Sufficient quantity of electricity | Yellow indicator keeps off |
| Unconnected USB | Yellow indicator keeps off |
FAQ
- What should do if the Red & Blue indicator always flashes after the power is on? Check whether the memory card is inserted correctly, please format the memory card before using it.
- Why did nothing happen after a long pressing the Confirmation button? Check the battery of the camera, please fully charge the camera for a first-time user.
- No reaction of the indicator and camera after pressing the confirmation button. Try formatting a micro-SD card or using a pin to reset the camera.
- Why the temperature of the camera is high while working? The camera turns hot especially when IR led turns on, it’s safe to use.
- How long it takes for the battery fully charged? It takes around 2 ~3 hours to fully charge the battery. Please use a qualified charger, input voltage 5V=1A
Attention
- Use a qualified charger, input voltage 5V/1A.
- Do not drop this product or subject it to a strong impact.
- Do not touch the camera lens and image sensor directly. If you need to clean, please use dry The net soft fabric is slightly moistened with alcohol and wiped gently to remove dirt;
- Avoid direct light, such as strong sunlight, focusing lighting otherwise it is easy to cause images too bright or pulling light (in this case not equipment failure), and reduce the life of the photosensitive sensor;
- Avoid working under extreme conditions such as moisture, dust, extreme cold, extreme heat, etc. Degree -5 °C -50 °C, do not place strong electromagnetic radiation and other places.
- Avoid heat accumulation, please do not artificially block the ventilation near the camera, and keep a good cooling ring territory.
- Please strictly abide by the relevant laws and decrees of the state, and shall not use this product for any illegal purposes, otherwise, the consequences will be conceited.
Warm Prompt
Please format the TF card before using and format the TF card once every three months. Force majeure (earthquake, tsunami, lightning, voltage instability) due to natural disasters and poor use the product hardware, program damage, or data loss, the company does not assume any responsibility. The interface between Android and ios is basically the same as that of operation because there is a slight difference in the version, there is no detailed introduction here. Thank you for using CookyCam smart life cameras, we are very sorry for the inconvenience due to software upgrades or other reasons! If you encounter any problems in use, please contact us in time. We will be dedicated to serving you 24 hours! You can also pay attention to our official WeChat or Email, frequency tutorials, product information, and online customer service.


