![]()
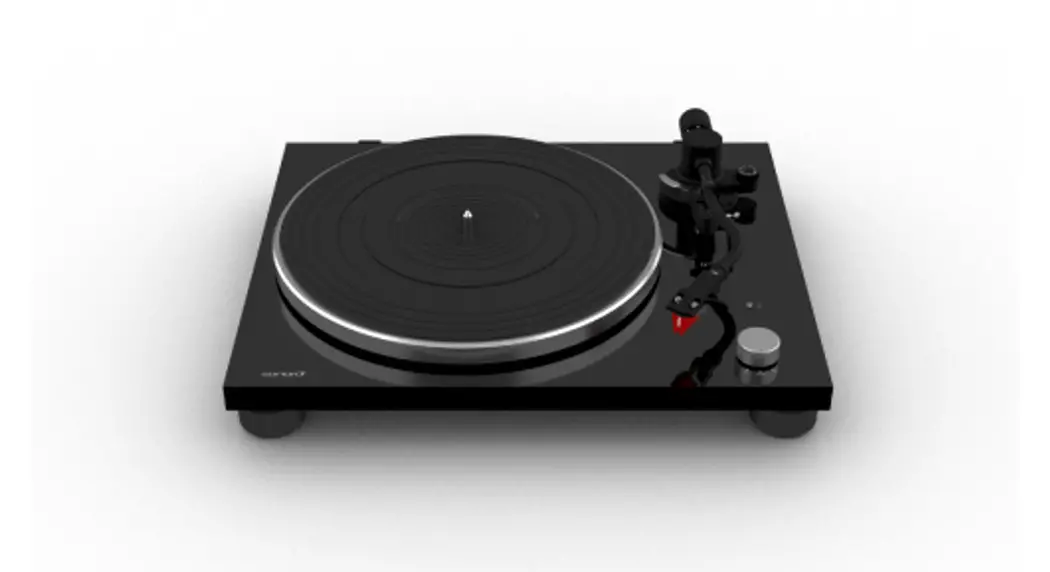
PLATINUM
SO-2000
TURNTABLE
Operating manual![]()
The Bluetooth® word mark and logos are registered trademarks owned by the Bluetooth SIG, Inc. and any use of such marks by sonoro audio GmbH is under license. Other trademarks and trade names are those of their respective owners.

Qualcomm aptX is a product of Qualcomm Technologies, Inc. and/or its subsidiaries. Qualcomm is a trademark of Qualcomm Incorporated, registered in the United States and other countries. apt X is a trademark of Qualcomm Technologies International, Ltd., registered in the United States and other countries.
Introduction
Thank you for purchasing PLATINUM. This operating manual provides all the information required for the trouble-free and safe operation of the PLATINUM. It is the users’ responsibility to make sure, the turntable is positioned, connected, and used in a safe way. The images in this operating manual are intended to illustrate the actions necessary to operate the PLATINUM.
PLATINUM is intended for personal use only. It is not intended for commercial use.
Enjoy your PLATINUM!
Getting to know your PLATINUM
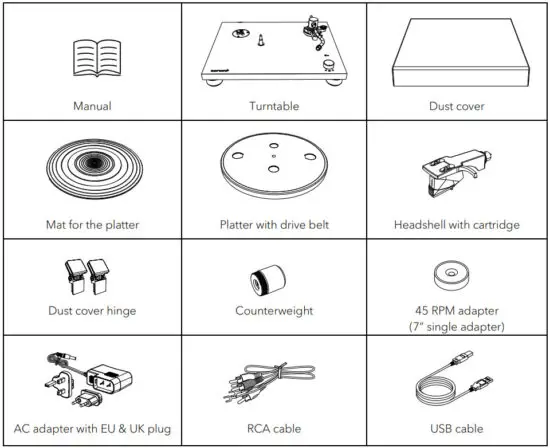
2.1 Scope of delivery
Check that the following parts are included.
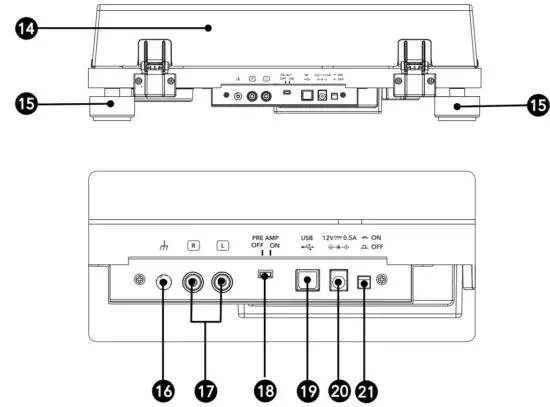
2.2 Controls and ports
Top view
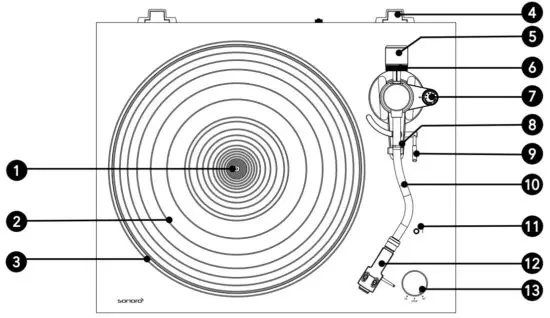
- Spindle
- Mat for the platter
- Platter
- Dust cover hinge holders
- Counterweight
- Tracking force gauge ring
- Anti-skating dial
- Tonearm rest with clamp
- Tonearm lifter
- Tonearm
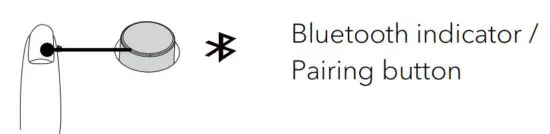
- Bluetooth indicator / Pairing button
- Headshell with cartridge
- Speed / STOP rotatory switch knob
Rear side view
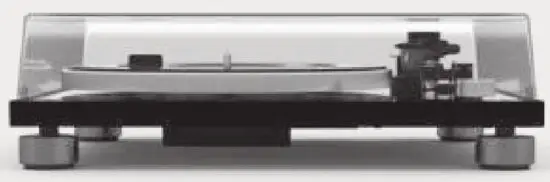
- Dust cover
- Feet
- Grounding terminal
- Stereo output terminals
- Pre-amplifier selector switch
- USB output
- DC input jack
- ON
 / OFF
/ OFF
Technical specifications
Turntable
| Type | 2-speed, fully manual operation |
| Drive system | Belt drive |
| Motor | DC motor |
| Speed | 33 1/3 RPM, 45 RPM |
| Turntable platter | Die-cast aluminum, diameter 300 mm |
| Wow and flutter | < 0.15% (33 RPM) at 3KHz |
| Signal to noise ratio | > 67 dB (A-weighted, 20KHz, LPF) |
| Output levels Pre-amplifier OFF Pre-amplifier ON | 5.5mV±3dB (1 KHz, 5cm/sec) 300 mV-±3dB (1KHz, 5cm/sec) |
| Output jacks | RCA |
Tonearm
| Arm type | Static balanced S-shaped tonearm |
| Effective length | 224 mm |
| Overhang | 19 mm |
| Stylus pressure adjustment range | 0 to 2.5 g |
| Applicable cartridge weight range | 5 to 7.5 g |
Cartridge
| Model | Ortofon 2M Red |
| Type | Moving Magnet |
| Recommended load impedance | 47,000 ohms |
| Amplifier connection | MM-input |
| Output voltage | 5.5mV (1KHz, 5 cm/sec) |
| Stylus type | Elliptical |
| Stylus tip radius | r/R 8/18 μm |
| Tracking force range | 1.6 to 2.0g (standard 1.8g) |
| Cartridge weight | 7.2g |
| Headshell weight | 9.3 g (including screws, nuts and lead wires) |
| Headshell overhang adjustment | ± 5 mm |
Specifications are subject to change without notice.
USB port
| Supporting interface | USB 1.1 Compliant Windows 7 or above, or MAC OSX or above |
Bluetooth
| Bluetooth version | 4.0 |
| Output class | Class 2 |
| Frequency band | 2.402 GHz – 2.480 GHz |
| Modulation method | FHSS |
| Profile | A2DP 1.3 |
| Supported codecs | SBC, aptX audio |
| Maximum output power | 10.0 dBm |
| Maximum communication range | approx. 10m |
General
| Dimension ( W x D x H) | 420 x 356 x 125 mm |
| Weight | Approx. 3.9 kg |
| Operating temperature | 0 °C ~ +40 °C |
| Power consumption OFF ON | 0.1W or less 1.5W or less |
| Replacement stylus (sold separately) | Ortofon 2M Red / 2M Blue |
AC Adapter
| Manufacturer’s name and address | Golden Profit Electronics Ltd. Shayao Chenwu Village, Shijie Town, Dongguan, Guangdong, China |
| odel identifier | GPE006D-120050-Z |
| Input voltage | AC 100 – 240 V |
| Input AC frequency | 50 / 60 Hz |
| Output voltage | DC 12.0 V |
| Output current | 0.5 A |
| Output power | 6.0 W |
| Average active efficiency | More than 78.9 % |
| Efficiency at low load (10%) | 70.0% |
| No-load power consumption | 0.10 W or less |
Assembling the turntable
![]() Note:
Note:
- PLATINUM requires some assembly before using it for the first time.
- Do not connect your turntable to a power outlet with the AC adapter until you are finished the assembly.
- Keep the carton and packing materials. They provide an ideal container to transport the unit.
- There is a stylus protective cover that is attached to the stylus. Keep the cover as you assemble your turntable.
- The stylus is a high-precision component. Do not touch the stylus with your fingers, or banging the stylus into the platter, may cause damage to the stylus.
- Remove the cable tie used to secure the tonearm at the time of delivery.
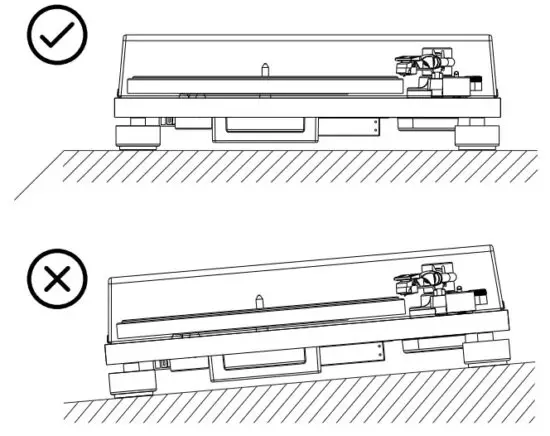
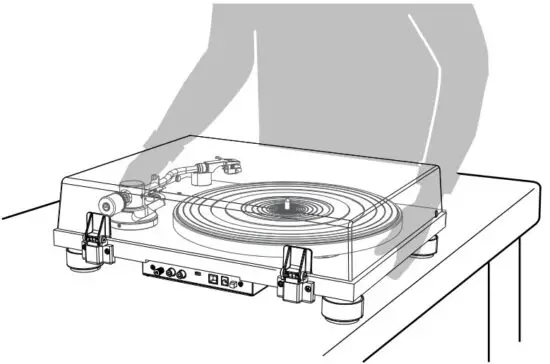
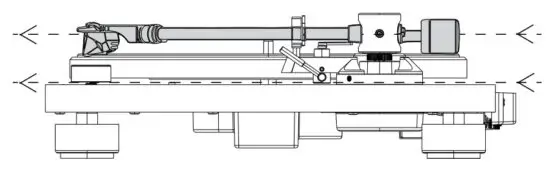
- Placing PLATINUM
- Place it on a flat surface so that the record can be accurately traced.
2. Placing the platter
- Hold the platter firmly.
- Place the platter on the spindle gently.
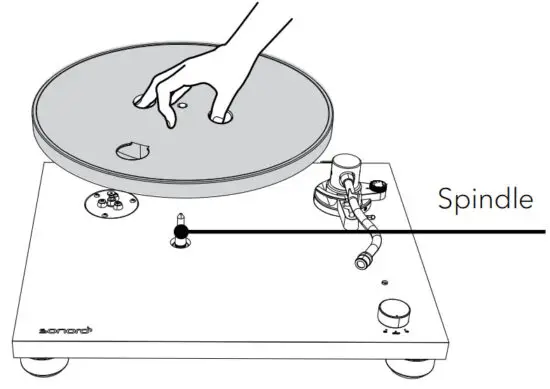
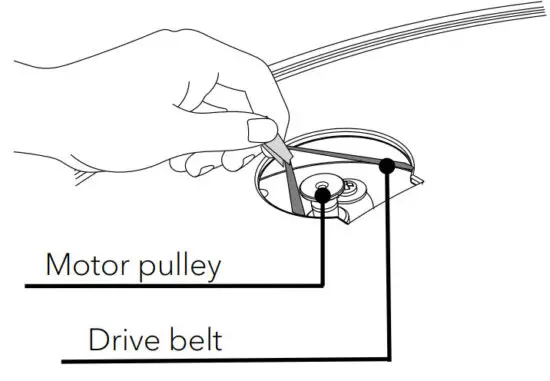
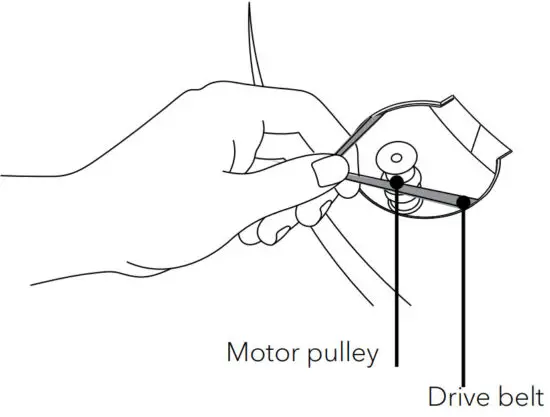
- Turn the platter to the position where you can see the motor pulley through the circle hole on the platter.
3. Attaching the drive belt
- Peel off the adhesive tape, and pull and hold the red ribbon.
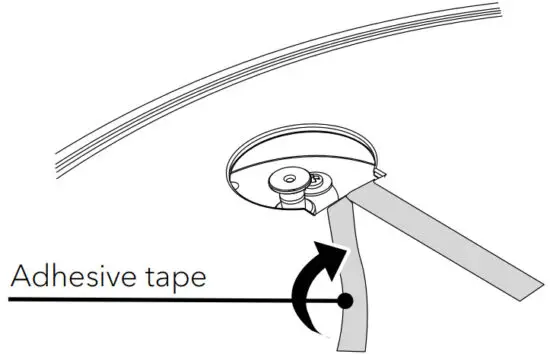
- Then, hook the drive belt around the motor pulley.
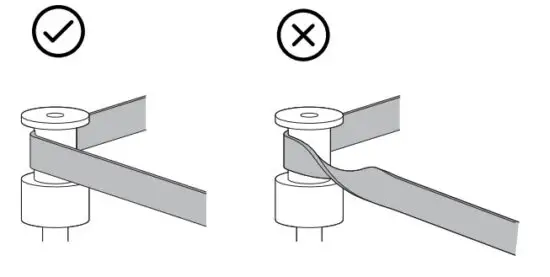
- Be careful not to let the drive belt become twisted.
- Remove the red ribbon from the drive belt.
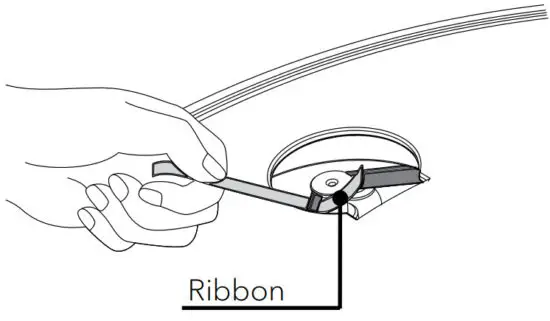
- Rotate the turntable several times to make sure that the drive belt is secure and rotating smoothly.

4. Placing the mat
- Place the mat of the platter on the platter.

- The mat has a top and a bottom. The side with the ridged concentric circles should be placed down.

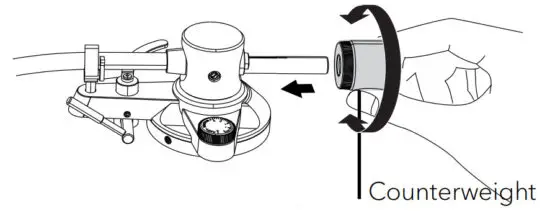
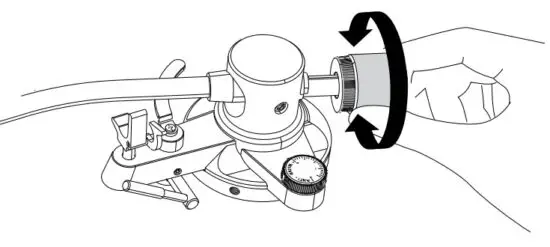
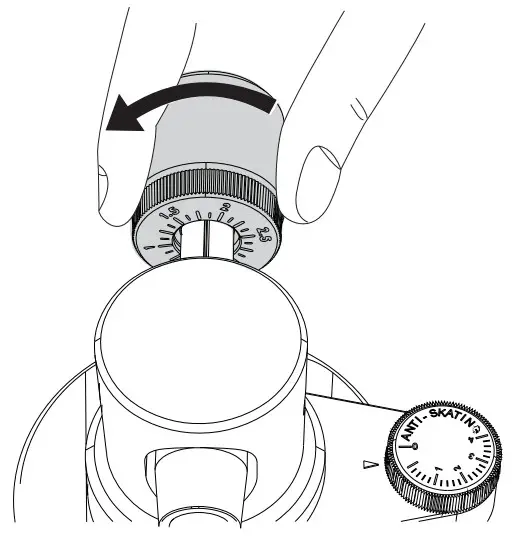
5. Installing the counterweight
- Place the counterweight over the end of the tonearm, and slowly turn it anti-clockwise while gently pushing it.
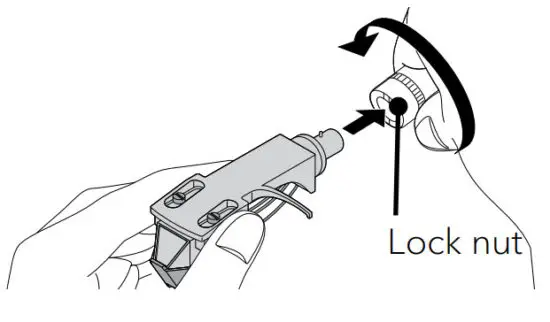
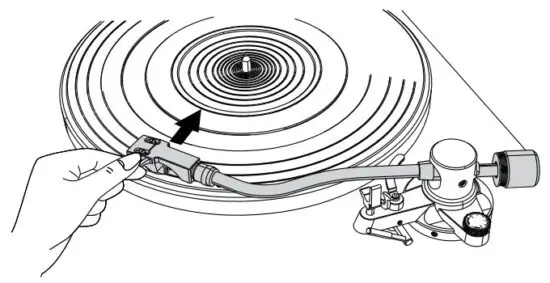
6. Installing the headshell
- Insert the headshell on the end of the tonearm.
- Turn the lock nut in the clockwise direction to secure the headshell.
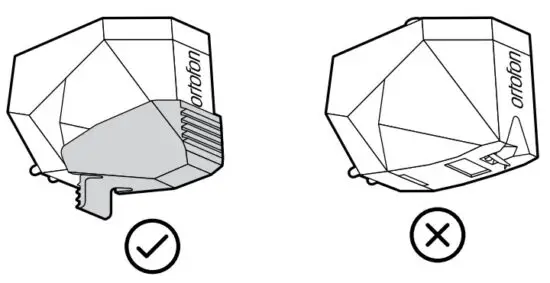
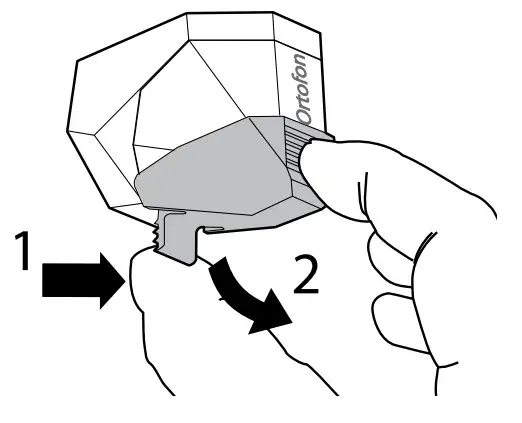
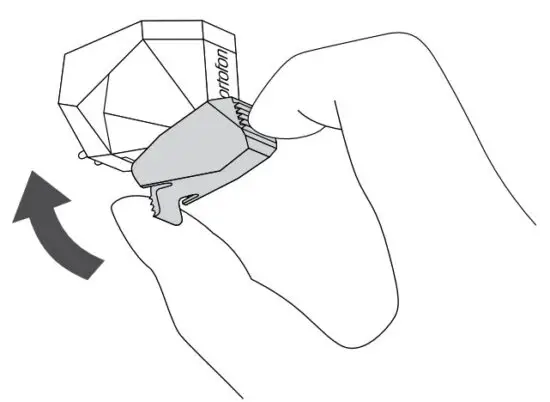
7. Removing the stylus protective cover
- Hold the stylus protective cover from its front and back, and while pushing the latch on the rear part.
- Slowly tile the cover downward.
8. Setting the tonearm balance
- Set the anti-skating dial to zero.
- Release the tonearm rest clamp.
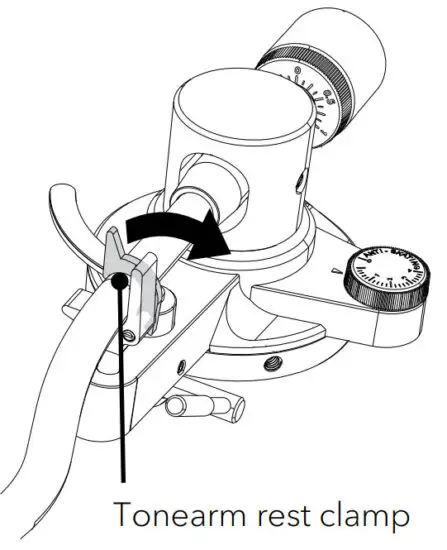
- Raise the tonearm lifter.

- Holding the finger lift of the headshell, move the tonearm over the turntable.
- Lower the tonearm lifter.
- Adjust the counterweight so that the tonearm is floating parallel to the turntable.


- Return the tonearm to its original position.
- Lock the tonearm rest clamp.
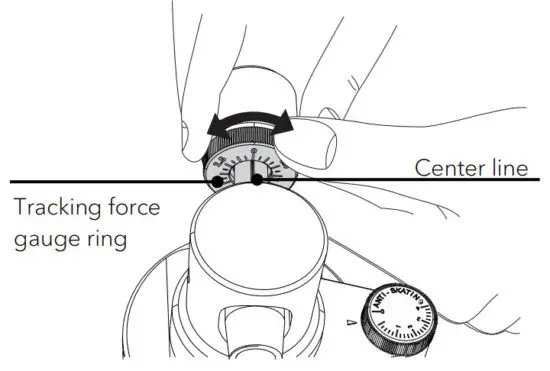
9. Setting the tracking force
- Turn the tracking force gauge ring so that the center line aligns with 0 on the scale.
- Only turn the ring. Be careful not to let the counterweight turn.

- Turn the counterweight and the tracking force gauge ring together so that the tracking force gauge ring scale matches the stylus pressure specified for the cartridge.
- The recommended tracking force of the included cartridge is 1.8g.
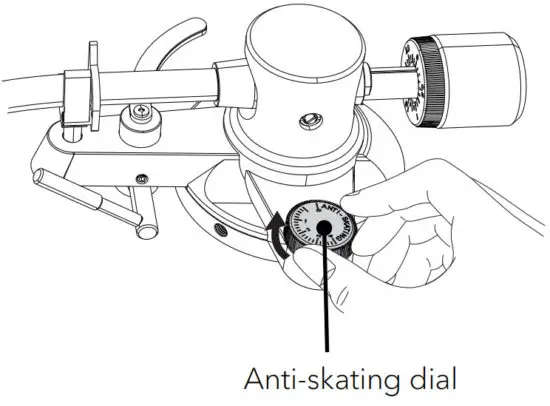
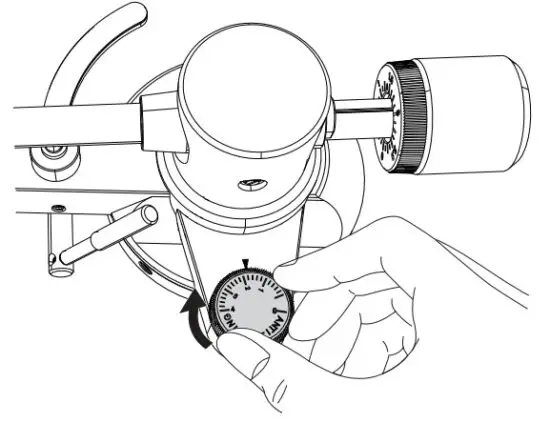
10. Setting the anti-skating dial
- Set the anti-skating value is the same as the tracking force gauge range value.
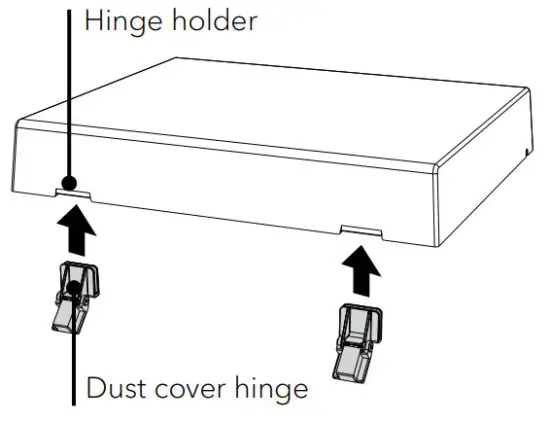
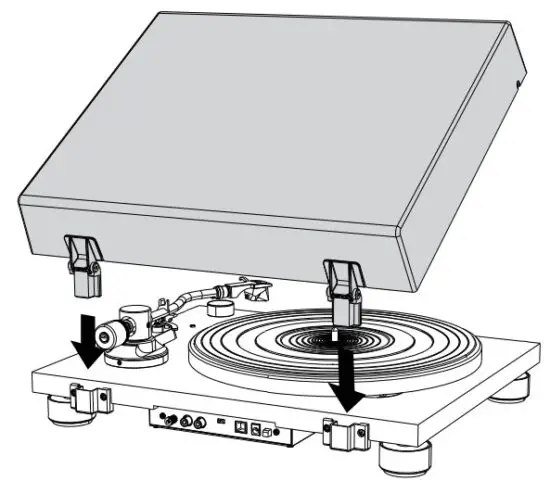
11. Installing the dust cover
![]() Note:
Note:
- The dust cover is designed to protect the turntable sensitive components. When the product is not in use, it should remain close.
- Do not open or close it when a record is playing.
- Be careful not to pinch your finger when opening and closing the dust cover
- Do not place anything on the dust cover.
- Insert the dust cover hinges completely into the hinge holders on the dust cover.

- Align the dust cover hinger with the finger holder on the rear of the turntable and push in the dust cover.

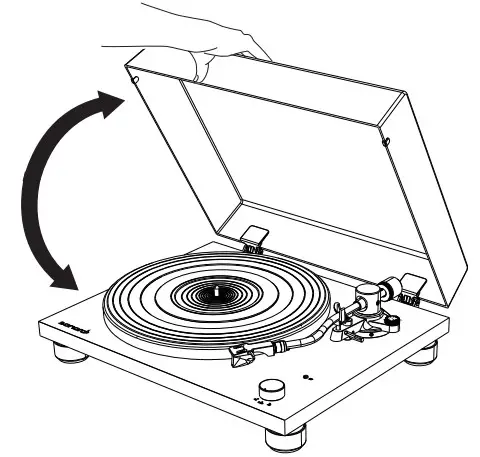
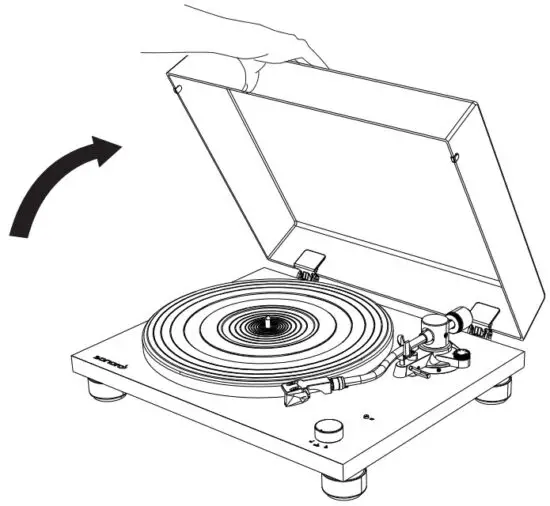
12. Opening and closing the dust cover Opening
- Hold the front edge of the dust cover and gently lift it open completely until it stops.
- The dust cover will stay open in its positions.
Closing - Gently lower the dust cover until it is closed.

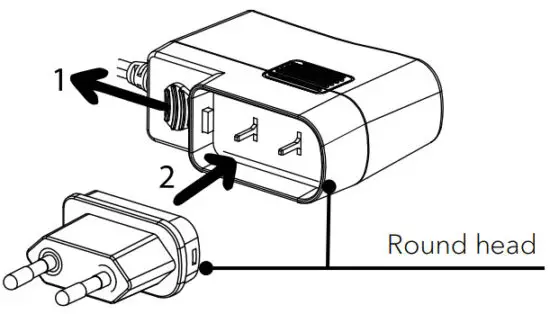
13. Attaching and detaching the AC adapter’s power plug
![]() WARNING!
WARNING!
Risk of electric shock!
- Do not insert the power plug alone to the AC inlet socket.
- Make sure the plug and adapter are locked thoroughly.
Attaching the power plug
- Pull down the clip and hold it.
- Match the round corner of the plug to the adapter.
- Insert the desired power plug vertically into the contact pins of the adapter until it completely pushes inward.
- Release the clip and lock the power adapter in place.
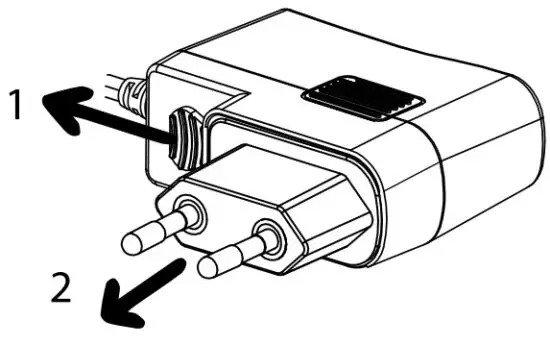
Detaching the power plug
- Pull down the clip and hold it.
- Pull the power plug vertically out of the power supply.
Connecting PLATINUM
![]() Note:
Note:
- The mounted Ortofon 2M RED cartridge is a MM cartridge, so please set your audio system to MM (not MC).
- Make sure the audio system/amplifier you connected to PLATINUM is switched off and its volume set low.
- Before turning on your audio system and PLATINUM, make sure all connections are made properly, and you choose the right preamplifier setting.
- Failures in doing so may lead to loud hum noise which may damage your audio system or speakers.
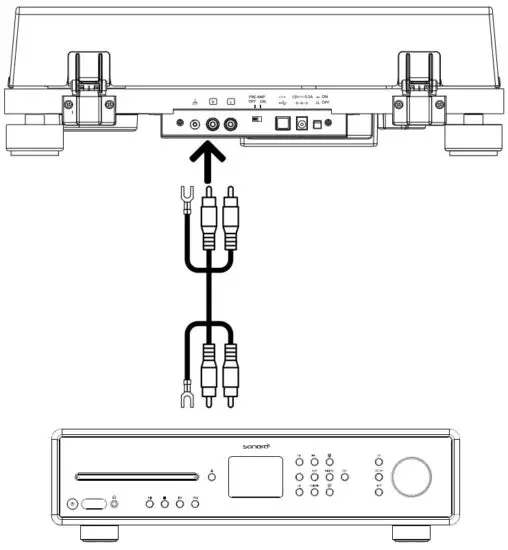
- Connecting to an audio system/amplifier
- Connect your audio system and PLATINUM by using the delivered RCA cable.
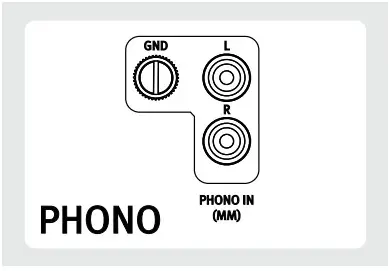
- If your audio system has a built-in phono amplifier, there most probably will be a grounding terminal. Please screw the grounding cables on both sides: Your audio system and PLATINUM. As well plug the RCA plugs into the phono input of your audio system and the output of PLATINUM.

 Note:
Note: - The ground terminal of PLATINUM is not a safe ground connection.
- Depending on the amplifier, connecting the ground terminal might have the reverse effect of increasing noise. In this case, it is not necessary to connect the ground terminal.
- It is not recommended to connect PLATINUM’s phono ground to MAESTRO’s phono ground plate.
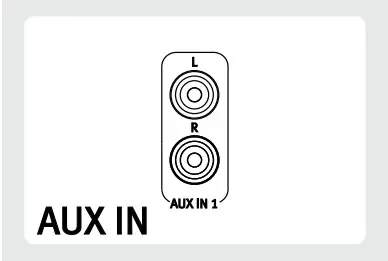
- If your audio system has no phono input, use a free Aux-in RCA input.

- The white plug is for the left channel, and the red plug is for the right channel.

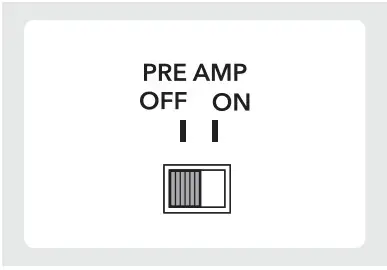
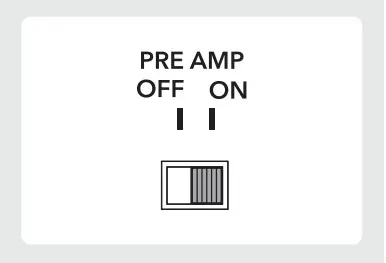
2. Setting pre-amplifier selector switch Switch the pre-amplifier switch on the back side of PLATINUM according to the features of your audio system/amplifier PLATINUM is connected to:
- Set the switch to the OFF position. If your audio system/amplifier has a PHONO input jack, PLATINUM can be connected directly to it, bypassing it’s built-in preamplifier by switching it OFF.

- Set the switch to the ON position. If your audio system/amplifier has no phono input, you can use the built-in pre-amplifier of PLATINUM by switching it ON.

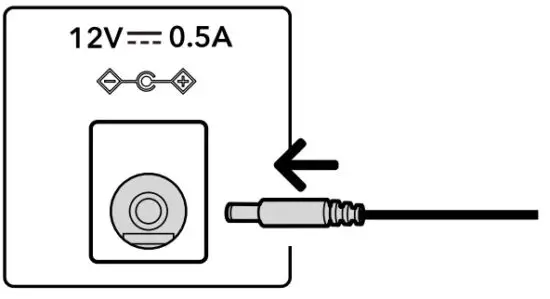
3. Connecting the AC adapter
- After completing all other connections, connect the included AC adapter to the DC input socket.

- Insert the power supply into an AC inlet socket.
Playing a record
![]() Note:
Note:
- Before you play a record, turn down the audio device’s volume. The loud, crackling noise made by the tone arm descending and the stylus comes into contact with the record could damage the speakers or audio device. Wait until the stylus has completely descended, and then adjust the volume.
- Even new records may produce a crackling noise when you play them. Please note that this noise is a characteristic of playing records.
- Place only one record on the platter at a time.
- Close the turntable cover during record playback to avoid dust.
- Do not stop turntable rotation during playback.
- During record playback, feedback could occur if the volume is too loud. If this happens, lower the volume of the amplifier.
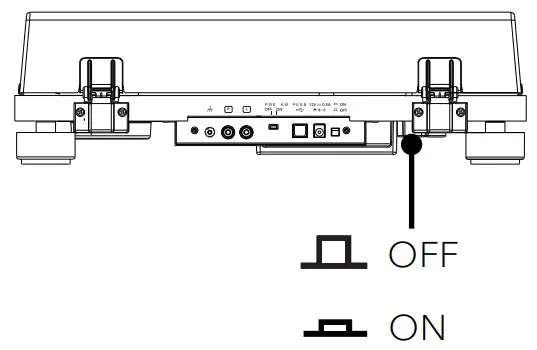
- Switch on the turntable.
Press the ON/OFF button on the back of the turntable to turn it on.
- Open the dust cover gently.

- Remove the stylus protective cover.
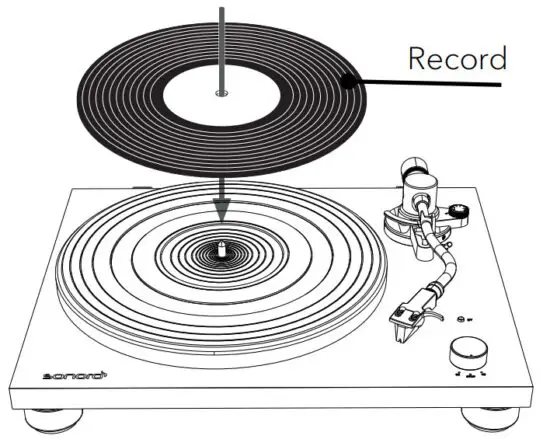
- Place a record on the platter
• Place the record on the mat of the platter so that the center hole aligns with the spindle. • To play 7-inch (17cm) records (EP records), place the supplied 45 RPM adapter on the spindle.
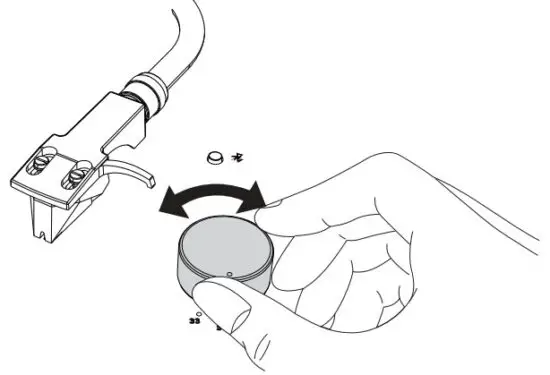
- Use the Speed / STOP rotatory switch knob
Note:
• The rotation speed is usually printed on the center label of the record or the record jacket.
• The rotation speed can be set to 33 or 45 RPM. Select the rotation speed appropriate for the record. • When the Speed / STOP rotatory switch knob is set to 33 or 45 position, the platter will start rotating.
 - Release the tonearm rest clamp.
- Raise the tonearm lifter.
- Holding the finger lift of the headshell, move the tone arm over the edges of the record or the track where you want to start playback.

- Lower the tonearm lifter.
• Lower the tone arm slowly until the stylus touches the record and playback begins. - Gently close the dust cover.
 • To play 7-inch (17cm) records (EP records), place the supplied 45 RPM adapter on the spindle.
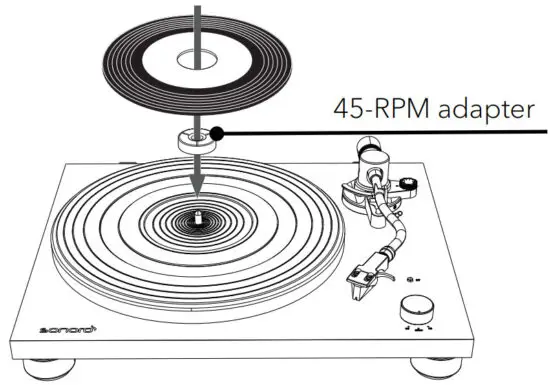
 • When the Speed / STOP rotatory switch knob is set to 33 or 45 position, the platter will start rotating.
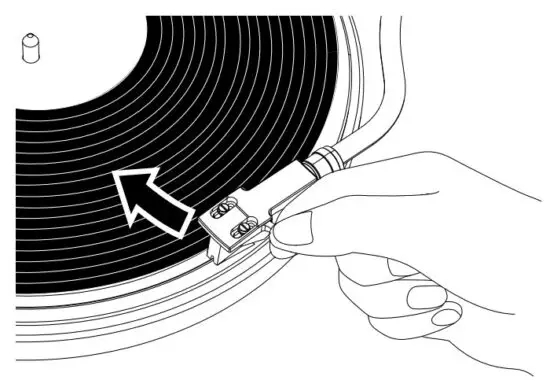
When playback finishes
![]() Note:
Note:
- PLATINUM is a manual record player. It will not automatically stop!
- Please always lift the tonearm at the end of a record to prevent damage to the stylus and record.
- Raise the tonearm lifter.
- Return the tonearm
• Holding the finger lift of the headshell, move the tone arm toward its original position.
• Lock the tonearm rest clamp. - Rotate the Speed / STOP rotatory switch knob to the STOP position.

- When the turntable stops, the platter will not rotate.
- Press the ON/OFF button on the back of the turntable to turn it off if no longer used.
Connecting with a Bluetooth device
PLATINUM can connect to Bluetooth-enabled devices (e.g. Bluetooth speakers and Bluetooth headphones).
Note:
- The operating distance is within a range of approximately 10 meters (30 feet).
- Refer to the operation manual of the Bluetooth devices for information on how to use it.
- The pairing might take some time depending on the connected device.
- If there are playback devices, which support Bluetooth wireless technology nearby, that have the Bluetooth function enabled, but some of them are not the devices with which you want to pair, disable their Bluetooth function and try pairing again.
- Do not connect to Bluetooth speakers or headphones for which you cannot adjust the volume. Audio tracks may be played at very loud volumes.
- You cannot pair the turntable with smartphones, TVs, or computers, etc. 1. First time pairing Bluetooth device
- Press the BT button on the turntable to start Bluetooth connection mode. The indicator will become blue and blink slowly.
- Press the BT button again for at least two seconds to start pairing mode. The blue indicator will flash rapidly.

- After the turntable enters pairing mode, put the Bluetooth device into paring mode.
- Pairing is automatically done. When the turntable and the Bluetooth device are connected, the indicator will stay lit without flashing.
2. Connecting the paired Bluetooth device PLATINUM can register information for up to 8 paired devices, you do not have to pair the next or subsequent times you connect the device to the turntable. - Press the BT button on the turntable to start connection mode. The indicator will become blue and blink slowly.
- Make the Bluetooth device ready to connect.
- Pairing is automatically done. When the turntable and the Bluetooth device are connected, the pairing lamp will stay lit without flashing.
3. Disconnecting the paired Bluetooth device - Press the BT button for at least 2 seconds to disconnect the paired Bluetooth device to the turntable. The indicator will become blue and flash rapidly.
- Press the BT button in Bluetooth connection mode, it will switch off the Bluetooth function.
- If no Bluetooth device is found for five minutes, the Bluetooth indicator will become unlit.
- Below is the BT indicator status for different operating statuses.
| Operating status | BT indicator (blue) | |
| Pairing | Searching for device | Fast blinking |
| Connection | Waiting to be connected | Slow blinking |
| Connected | Lit |
Connecting to a computer
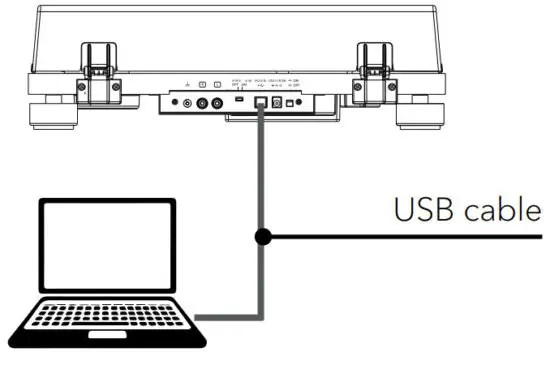
The sound of a record can be digitally recorded on a computer by using the provided USB cable to connect the turntable (type B) to a USB port (type A) of the computer.
![]() Note:
Note:
- The USB output signals can be used only for recording, not for playback.
- The turntable will run with the standard Windows or Mac driver so there is no need to install a special driver.
- The computer will automatically detect the turntable’s USB port and identify as USB Audio CODEC.
- You must first install software that can be used for audio recording on the computer.
- You may purchase the audio recording software that you prefer separately or download free software such as Audacity (https://www.audacityteam.org/), from the Internet.
- If the application does not work successfully, please contact your computer administrator for help.
- When recording with a computer, do not disconnect the USB cable and put the turntable on standby.
- The recorded music is limited to private use only. Use of the music beyond this limit requires the permission of the copyright holders.
- Connect a computer to your turntable with provided USB cable.

- Rotate the Speed rotatory switch knob to start playing of a record.
- Use your recording application to record audio tracks onto the computer.
• For detail instructions on using the application and transferring audio tracks, refer to the application user guide.
Maintenance
- Attaching the stylus protective cover
- Hold the stylus protective cover from it front and back, align it with the front of the cartridge, and slowly lift it.

- Cleaning turntable
- Use a dry, soft cloth to clean the dust cover and the turntable body.
- When it is hard to wipe off the soil, use a slightly damp cloth and then dry the turntable with a soft and dry cloth.
- Do not use any chemical solution such as alcohol, benzine, or paint thinner, that damages the finish.
3. Remove the dust cover
- To remove the dust cover from the turntable, fully open the dust cover, grasp both sides near the bottom of the cover, and then gently pull it out in the upward direction.

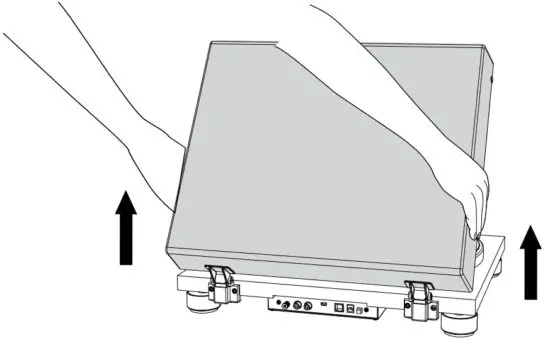
4. Moving turntable![]() Note:
Note:
- Lock the tonearm rest clamp.
- Switch off the turntable and unplug the AC adapter.
- Disconnect all the connecting cables from the turntable.
- Attach the stylus cover.
- When you move the turntable, make sure that you firmly hold the bottom of the turntable.

- Re-adjust the tracking force and the anti-skating force if necessary.
5. Transport or shipping turntable![]() Precaution:
Precaution:
- In case the turntable needs to be returned for repair or transport to other places, original packing provides better protection for the product during transportation and handling.
- If you lose the original packing, please use a sufficiently stable and protective packing that prevents damage to the PLATINUM.
- Take off the dust cover and carefully wrap them.
- Take off the platter and mat and carefully wrap them.
- Attach the stylus cover and remove the headshell and counterweight from the tonearm and carefully wrap them.
- Lock the tonearm rest clamp and tape it in place.
- Carefully wrap the turntable in a bubble wrap or similar soft and protecting material.
6. Cleaning the tip of the stylus![]() Note:
Note:
- Record styluses are precision parts, so handle them carefully to avoid bending or damaging their tips. If a stylus becomes bent or damaged, it might not be able to follow the audio groove precisely and could damage records or cause another malfunction.
- Do not rub the stylus tip with thinner or other chemicals.
- Use a small brush (not included) if the stylus tip is considered dirty. Clean the stylus tip by moving the brush from the rear to the front of the stylus tip.

7. Replacing the stylus
If the tip of the stylus becomes worn, not only will it worsen the sound quality, it could also damage records. After about 1000 hours of playback time, replace the stylus with one that we specify.
- Please use Ortofon 2M RED / 2M Blue replacement stylus.
- Follow the replacement instructions in the manual of the replacement stylus. To remove the old stylus
- Keep attaching the stylus protective cover to the cartridge.
- Release the headshell from the tonearm.
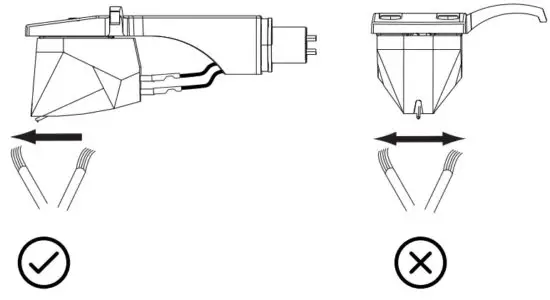
- Hold the cartridge in one hand, grasp the plastic stylus housing with your thumb and forefinger, and pull away from the cartridge.
 Installing a new replacement stylus
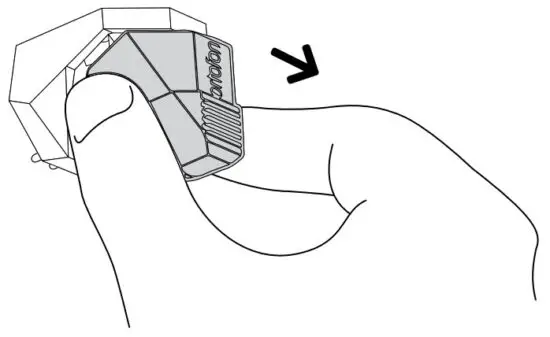
 - To install a replacement stylus, insert the new stylus assembly into the cartridge.

- The stylus assembly should be fully seated in the cartridge.
- Mount the headshell onto the tonearm.
 Installing a new replacement stylus
8. Replacing the cartridge![]() Note:
Note:
- The cartridge installed in this unit is equivalent to Ortofon 2M Red.
- If you use another cartridge than Ortofon 2M Red, you might need to adjust overhang and weight, as well as the height of your tonearm. If in doubt, please ask your dealer.
- Keep attaching the stylus protective cover on the cartridge.
- First, remove the headshell from the tonearm.
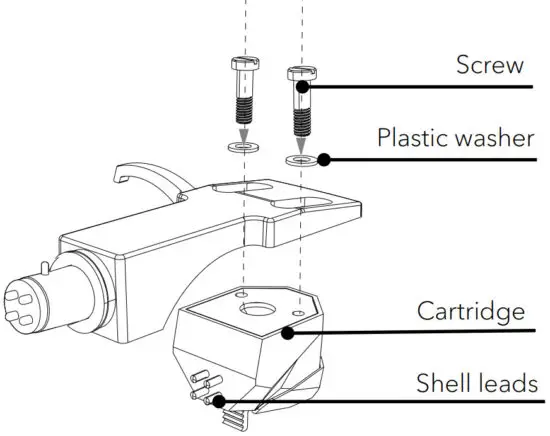
- Use a non-metallic slotted screwdriver to remove the installation screws and washers, and then remove the cartridge from the headshell.

- Refer to the user manual for a new cartridge for mounting instructions and connecting to the shell leads.
- The signals and colors of the shell leads are shown below.
| Signal | Color |
| Left channel + | White |
| Left channel – | Blue |
| Right channel + | Red |
| Right channel – | Green |
- Use a non-metallic slotted screwdriver to tighten the screws in both places, and then adjust the overhang.
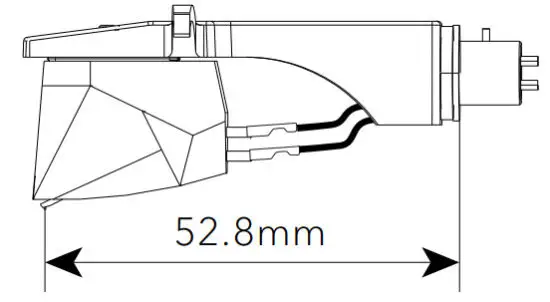
9. Adjust the overhang
- Move the cartridge to adjust the overhang in such a way the stylus tip is at 52.8mm from the headshell mounting end.

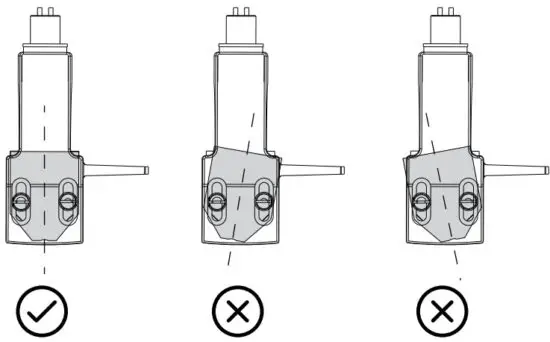
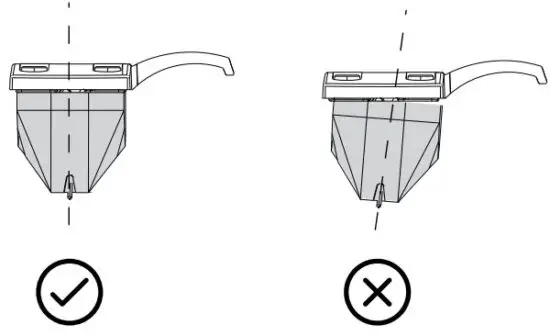
- The cartridge should be parallel on the headshell when viewed from the top.

- The cartridge should also not tilt when viewed from the side.

- After the adjustments are complete, tighten the screws securely.
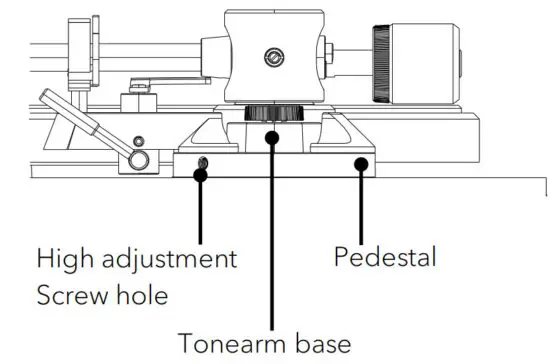
- Attach the headshell to the tonearm. 10. Adjust the tonearm height
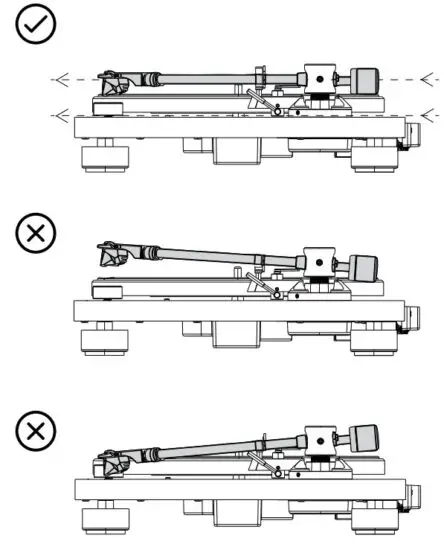
- Place a record on the turntable.
- Place the stylus tip on a record and check that the tonearm is parallel to the record.
- Insert the 2mm hex wrench (not included) into the height adjustment screw hole and turn it counterclockwise to unlock the tonearm base.
- Hold the tonearm base, and adjust the height to make the tonearm level.

- Turn the hex wrench clockwise to lock the tonearm base.
- Adjust the tonearm balance and tracking force.
11. Replacing the drive belt
The drive belt will wear or may even break over time. In such a case, replace it with a new one. To obtain a spare drive belt, contact your dealer or customer support.
- Turn off your turntable and the connected audio device and unplug the AC adapter from the AC inlet.
- Remove the meat of the platter.
- Turn the platter to the position where you can see the motor pulley through the circle hole on the platter.
- Unhook the drive belt from the motor pulley.
- Put your finger and thumb into the platter’s round holes to hold the platter and remove the platter.
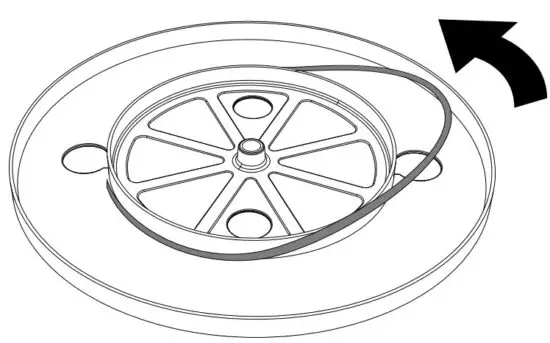
- Turn the platter upside down and remove the drive belt.

- Wind a new drive belt around the platter while keeping it untwisted.
- Follow the steps in “Attaching the drive belt” to finish the assembly.
Troubleshooting
Malfunctions can occur with any electrical equipment. This is not necessarily due to a defect. As such, you should check the following table to see if you can eliminate the problem yourself.
| Malfunction | Possible cause | Solution |
| The platter does not spin. | The AC adapter is not properly connected. | Plug the AC adapter into the AC inlet socket. |
| The turntable does not switch on. | Check the power switch in rear side of the turntable and it should be in a pressed down position. | |
| The platter spins, but there is no sound or the volume is not loud enough. | Cartridge’s protective cover is still close. | Remove the cartridge’s protective cover. |
| The tonearm is in a lift position. | Lower the tonearm. | |
| Wrong setting and input for the connected equipment (amplifier, etc.) | Check the setting for the connected equipment are correct. | |
| The stylus is damaged. | Check the stylus and replace it, if necessary | |
| The stylus is not placed correctly on the cartridge. | Check the cartridge and adjust it, if necessary. | |
| Wrong setting for the PRE AMP selector switch. | Select the correct setting for the pre-amplifier. If using an amplifier with a PHONO input jack, set this switch to the OFF position. If connecting to the AUX jack of an amplifier, set this switch to the ON position. | |
| The tracking force is set too heavy. | Adjust the tracking force. | |
| The stylus skips. | The tracking force is set too light or too heavy. | Adjust the tracking force. |
| Improperly set the anti-skating value. | Set the anti-skating value the same for the cartridge tracking force. | |
| The record is warped. | Change the record. | |
| The record is scratched. | Change the record. | |
| There is noise when the record is playing. | There is dust on the cartridge’s stylus tip. | Clean the stylus’s tip with a commercial brush and stylus cleaner. . |
| Malfunction | Possible cause | Solution |
| There is a howling sound. | The turntable is picking up excessive vibrations from the floor, the surface of the walls, or nearby speakers. | Decrease the vibrations or put the turntable on a surface that is not subject to the effects of vibration. |
| The sound when the record is playing is either too fast or too slow. | The tuning speed is incorrect set. | Rotate the tuning speed knob to correct speed for the type of record being played. |
| There is a humming noise during playback. | The ground terminal is not properly connected. | Check the ground terminal, and it should properly connect. |
| Depending on the audio system, connecting to the ground may lead to a humming noise. | Disconnect the ground terminal. | |
| Bluetooth connection is not possible with the Bluetooth devices | The bluetooth device has not paired with the turntable. | Turn off and on both Bluetooth device and turntable and try pairing again. |
| It is not possible to connect with a smartphone. | It is not supportive. | Connect with a Bluetooth speaker or headphones. |
Warranty
When submitting warranty claims, the following applies without restricting your legal rights:
- Warranty claims can only be asserted within a period of max. 2 years (1 year in North America and Australia), calculated from the date of purchase.
- sonoro audio GmbH shall, at its own discretion, repair or replace PLATINUM free of charge any defects caused by material or manufacturing defects within the warranty period.
- In case of a complaint, please contact our customer service department. You can find contact details under “Contact data” or at www.sonoro.de.
- No new warranty period begins following repair or replacement of PLATINUM. The warranty period of 2 years (1 year in North America and Australia) from the date of purchase remains applicable.
- Excluded from the warranty is damage caused by improper use, normal wear, and tear, as well as defects that only minimally affect the value or usability of PLATINUM. The warranty also expires in case of any modifications not made by our authorized service center.
WE THANK YOU FOR YOUR TRUST
At sonoro we are putting the utmost effort into developing state-of-the-art products with impeccable quality standards. It is very important to us that you stay satisfied with your sonoro product for the lifetime of the unit. If for any reason you need assistance or have a warranty claim, please do not hesitate to get in touch with our Service Team.
DEUTSCHLAND – HQ
sonoro audio GmbH
Nordkanalallee 94, D-41464 Neuss, Deutschland
Phone +49 2131 8834-141
Fax +49 2131 7517-599
E-mail [email protected]
Internet www.sonoro.de
UNITED KINGDOM
[email protected]


