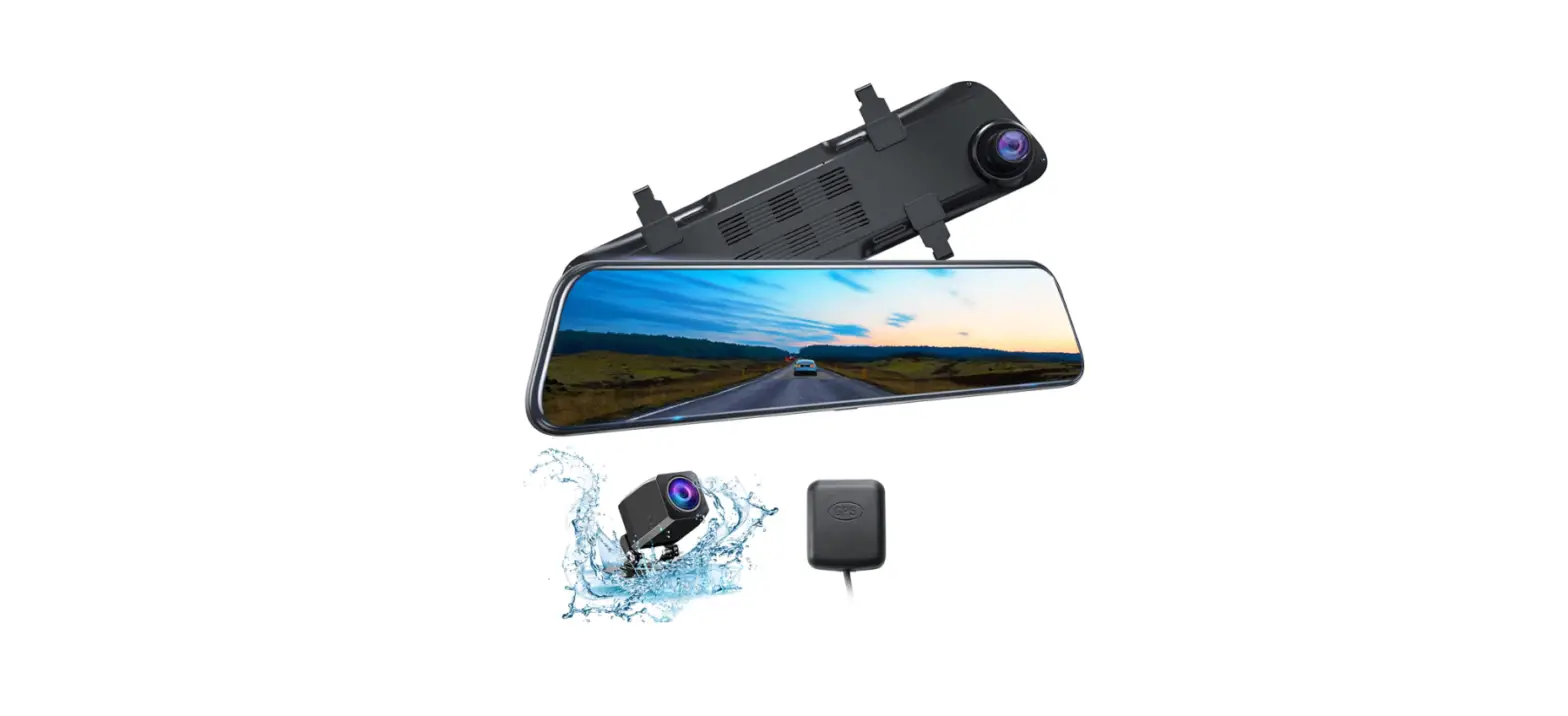
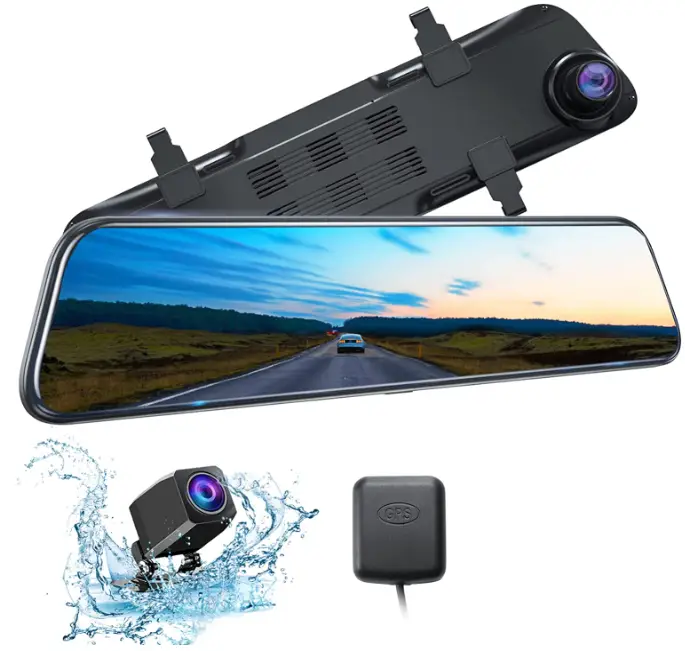
Kingslim DL12 Pro 4K Mirror Dash Cam
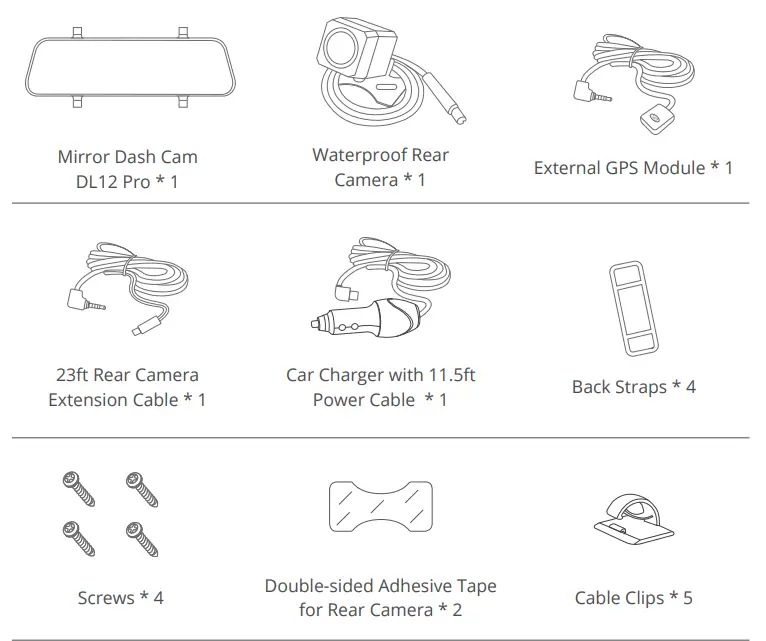
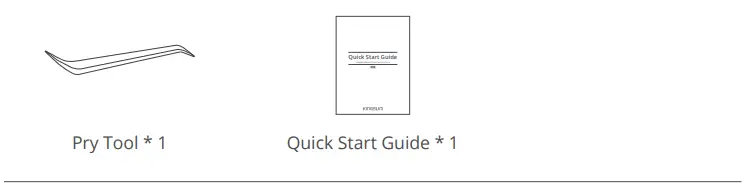
WHAT’S IN THE BOX

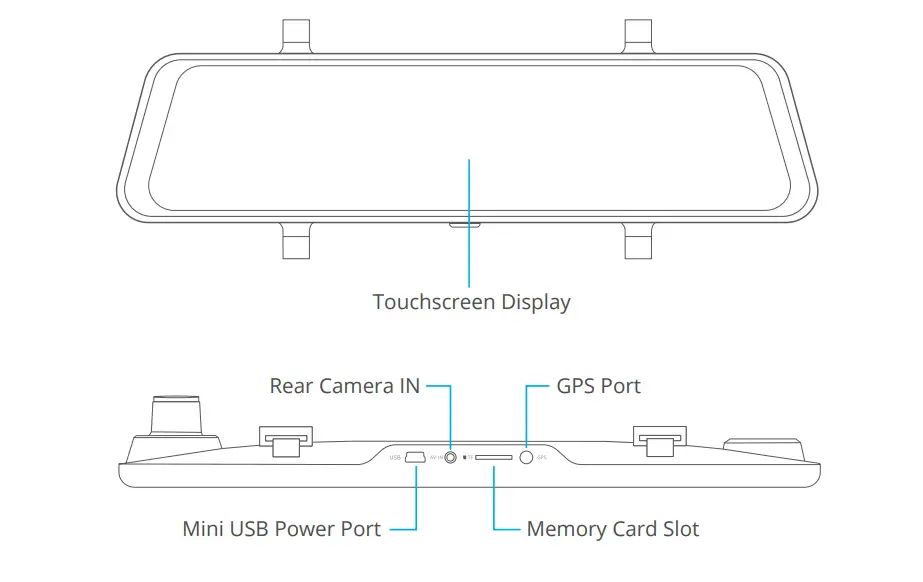
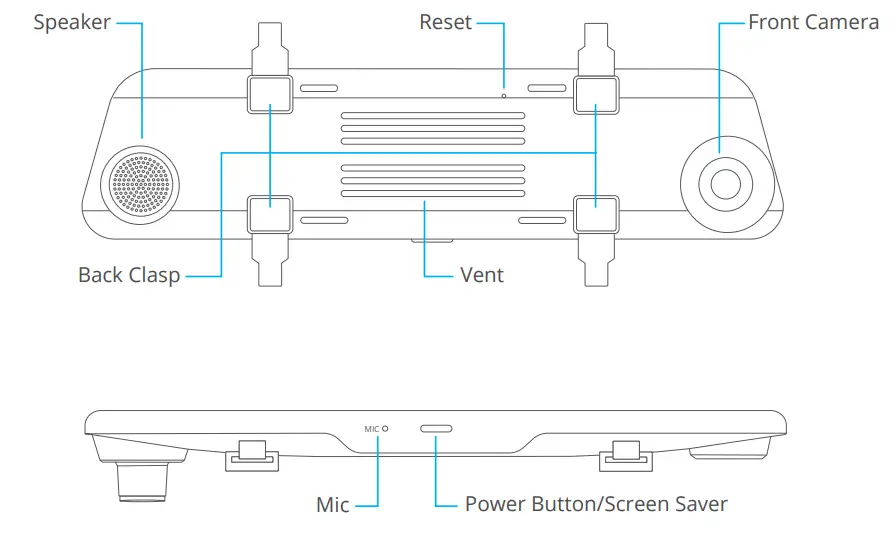
CAMERA OVERVIEW

INSTALLATION
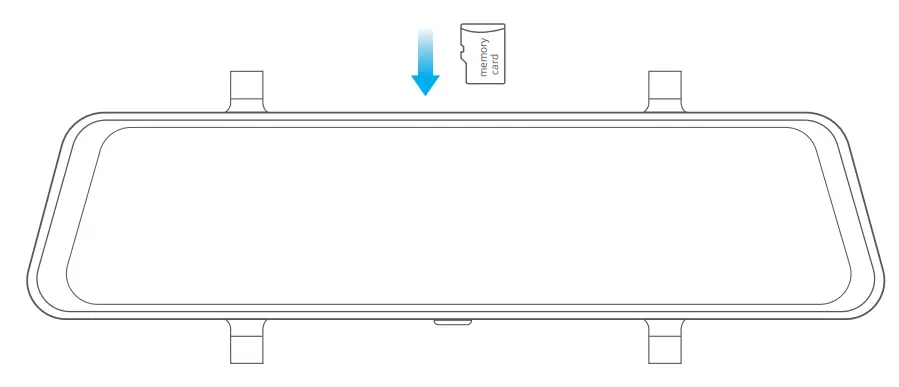
- Insert the memory card.
Warm Tips: A Class 10 or above memory card is highly recommended for the DL12 Pro dash cam (memory card is not included). DL12 Pro dash cam supports an up to 128GB memory card. Please format your card in the camera before using this dash cam. Do not remove or insert the memory card when the dash cam is turned on. This may damage the memory card.
- Install the mirror dash cam
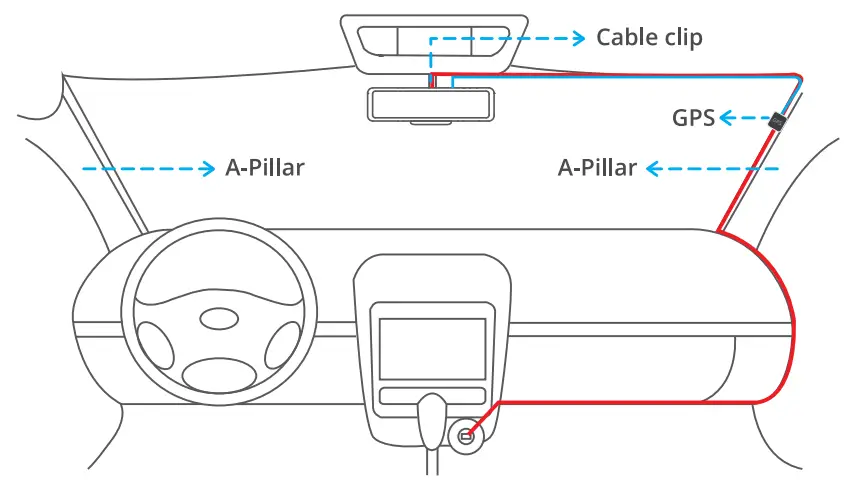
Mount the DL12 Pro over the original rearview mirror of the car with the provided strap, then adjust the angle of the front camera.
- Connect the USB power cable to the USB power port of the DL12 Pro Dash Cam, then plug the car charger into the cigarette lighter of your car.
- Connect the GPS module to the dash cam and attach it to the A-Pillar.

- Install the rear camera.
- Connect the rear camera with the extension cable into DL12 Pro Dash Cam to check whether the rear camera works well.
- Installation position options.
Position 1: Install the rear camera on the rear windshield. Position 1 is designed for live stream rear review only, not for reversing guide. This installation is much easier than other products
Position 2: Install the rear camera near the license plate. Position 2 is highly recommended. The back image is crisp and clear for both the rear viewing and reversing guide.
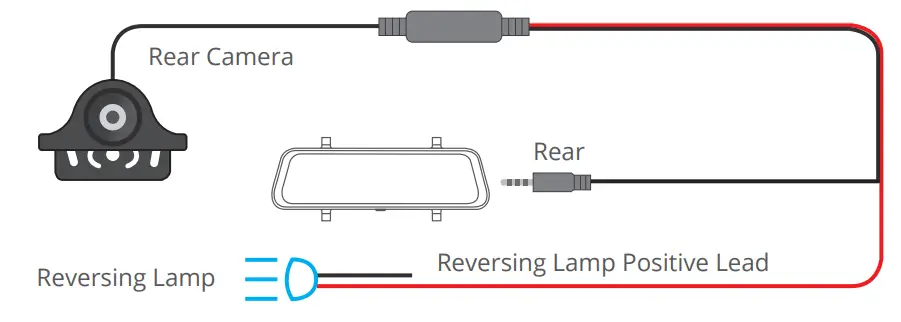
To use the reversing function, please install the rear camera in position 2, then connect the red trigger wire of the rear camera extension cable to the positive lead of the vehicle reversing lamp.
- Note:
- Pay attention to the connector position when connecting the rear camera with the extension cable. Please refer to the below details:

- Please clean the position to ensure the adhesive quality before installing the rear camera.
- Please clean the rear windshield regularly to ensure the image quality if you choose position 1.
- If you choose position 2, you can install the rear camera with the included adhesive stickers or screws.
- Pay attention to the connector position when connecting the rear camera with the extension cable. Please refer to the below details:
- Use the pry tool to hide the cables.


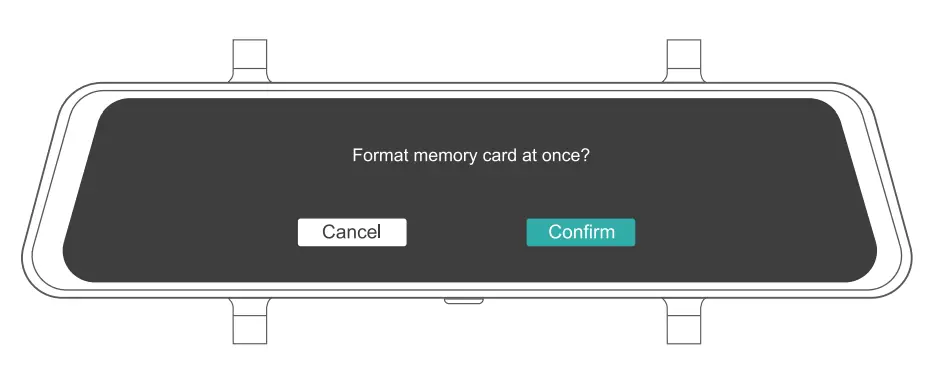
FORMAT THE MEMORY CARD
- Tap the setting icon to enter the Settings page.
- Select “Format SD” then tap the “Confirm” icon. Wait a few seconds to finish the formatting, and the system will exit automatically.

START VIDEO RECORDING
- After finishing formatting, connect a car charger and start the car engine. The device will automatically turn on and begin recording.
- Loop recording is already enabled on the DL12 Pro dash cam. The default setting is “1 MIN”.
- G-sensor is already enabled on the dash cam. The default setting is Low. If an impact or sudden braking is detected, it will automatically start recording and save footage to either the “Front urgent video” or “Rear urgent video” folder.
ICON INTRODUCTION
The Main Interface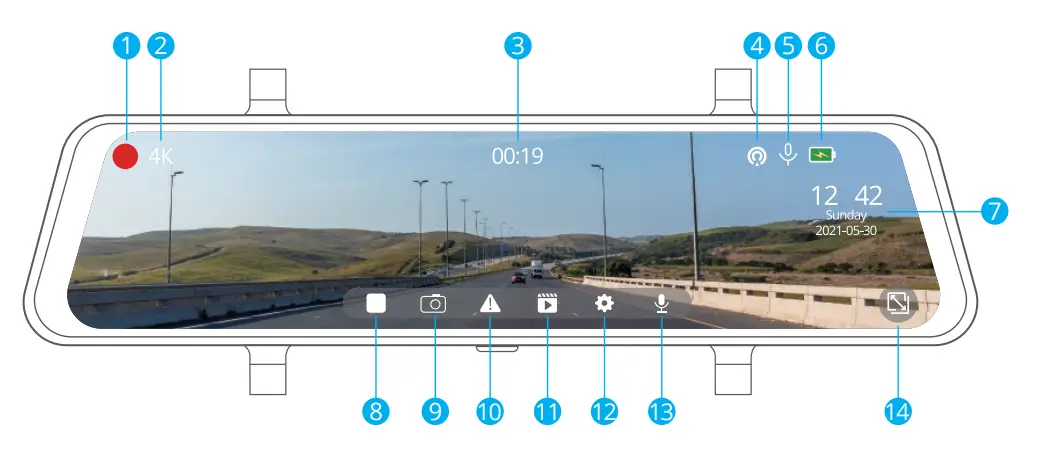
- Recording Indicator
- Video Time
- Microphone Indicator
- Date/Time
- Recording Resolution
- Taking Photo
When taking photos, click the icon ” ” to save the photo. - Emergency Recording
When DL12 begins to work, click the icon ” ” to lock the current video - Audio Record (Mute/Unmute)
- Microphone Indicator
- GPS
- Power Status
- Stop/Start Recording
- Setting
- Zoom out
- Resolution
Choose a recording resolution.
Options: 4K(3840*2160)/ 2K(3840*2160)
Default Setting: 4K+1080P - Split time
Files will be saved every 3 minutes if you choose the 3 MINS option. When the memory card is full, the new file will cover the existing one if the loop recording is on.
Options: 1 MIN/3 MINS/5 MINS
Default Setting: 1MIN - Video Encode
H.265 minimizes the footage size, so you can store more video files on the memory card. H.264 has better compatibility.
Options: H.264 / H.265
Default Setting: H.265 - Audio
Sound will be recorded simultaneously with video.
Options: On/Off
Default Setting: On - Sensitivity
When the G-Sensor is turned on, it will automatically start recording and save content if an impact or sudden braking is detected. The videos will be locked and will never be overwritten by new files. The higher the sensitivity level, the easier it is to trigger the emergency recording.
Options: Off / Low / Middle / High
Default Setting: Low - Parking Guard
The camera will automatically turn on, begin the 20s recording, and lock if there is an impact to the car during parking. The higher the level you select, the easier it is to trigger the recording.
Options: Off / Low / Middle / High
Default Setting: Off
Note: In parking mode, the screen will not display, and the working indicator will be flickering while recording is in progress. When the dash cam is on, the message box is shown on the screen. - Frequency
Choose the right frequency to avoid flickering. This should be based on your local
AC parameters.
Options: 60Hz / 50Hz
Default Setting: 60Hz - Screen Dormant
The screen will turn off automatically after the time you set. When the screen turns off, power consumption will be reduced. The camera still works while the display screen is turned off. Just click the screen, and it will turn on.
Options: Off / 1MIN / 3MINS
Default Setting: 1MIN - Screen Brightness
Slide the icon to the left or right to dimming the screen light. - Keypad tone
- Volume
Adjust the volume in the playback video. - Intelligent voice
Option: ON and OFF
Default Setting: ON
Ture on the intelligent vice feature, user can operate the device by saying key command while driving.
- Rear Mirror
This function is for the rear camera. The rear camera video is flipped horizontally and vertically in the main recording interface, as if you are looking in a mirror.
Options: ON and OFF
Default Setting: ON
- Perspective
Option: Full Screen and Full Frame
Default Setting: Full Screen The device can set High/Middle/Low which three types views of reversing assistance while reversing a car.
 - Fatigue reminder
Option: ON and OFF
The device will remind you to rest every 2 hours when you have been driving. - Time Setting
Set date and time format. - OSD
Option: ON and OFF
Recording video with or without a watermark. - USB Mode
Storage: The device can be connected to a computer via a USB cable to copy and transfer files to/from a computer.
UVC: USB video class. The device can be connected to a computer via a USB cable as a computer camera.
CHARGE: Charging the dash cam. - Language
English / 简体中文 / 繁體中文 / 日本語 / русский / ไทย / Deutsch / Le Français /
Español / Polskie / Italiano
Default Setting: English - Time format
Three types of date formats can be set. - Format
Format the memory card.
Note:- All data will be deleted. Before formatting your memory card, please remember to back up your important data on another device.
- Before the memory card is inserted for the first time, please format it in the camera to ensure that the card is compatible with the camera.
- Default
The dash cam will be restored to factory settings. - Version
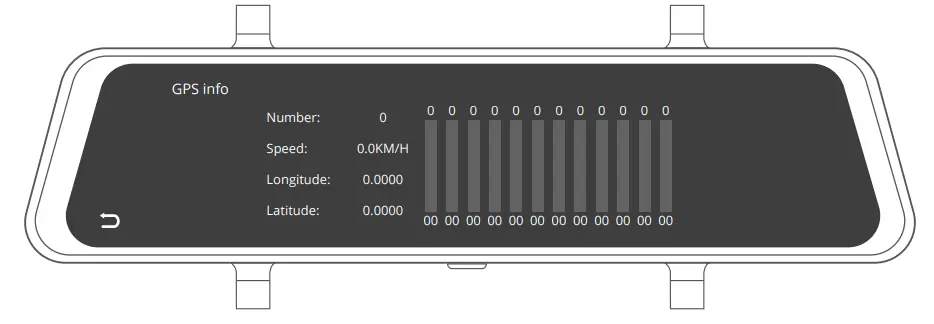
Use this to check the version of the dash camera. - GPS info
Check the GPS information. - Time Zone
Choose the time zone manually.
The device will then display the time of the selected time zone.
Default Setting: OFF - Speed Unit
You can set the speed unit that you prefer.
Options: KM/H and MP/H
Default Setting: KM/H
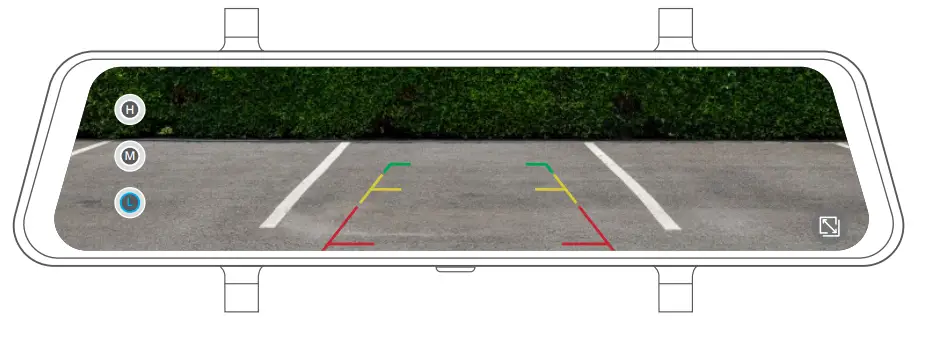
 The device can set High/Middle/Low which three types views of reversing assistance while reversing a car.
GESTURES
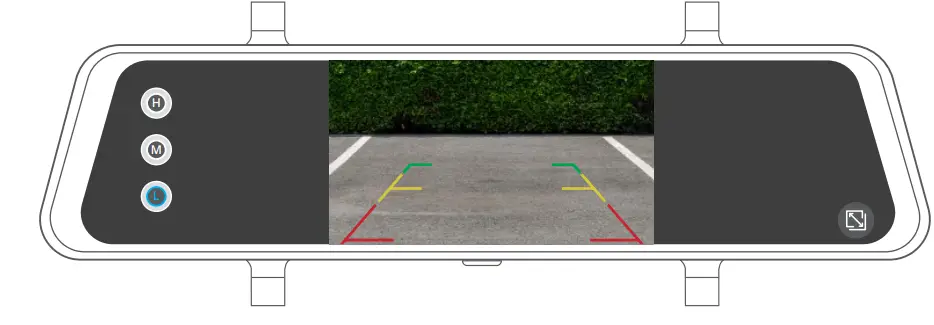
- SWITCH RECORDING DISPLAY MODES
On the screen, slide from right to left to switch the view modes among front view only, back view only, and both front and back views.
- ENTER THE PLAYBACK MENU
On the screen, slide from left to right to enter the playback menu. Tap the folder name to choose a folder.
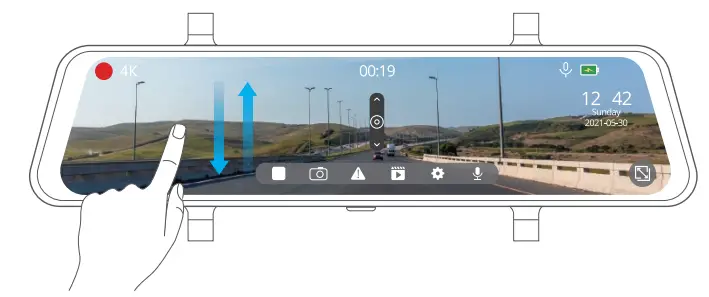
- ADJUST THE VIEWING ANGLE OF THE CAMERA
On the left side of the screen, slide your finger up or down to adjust the viewing angle.
Note: If you choose the view mode that displays both views of the front and rear cameras, the view angle adjustment feature is disabled.
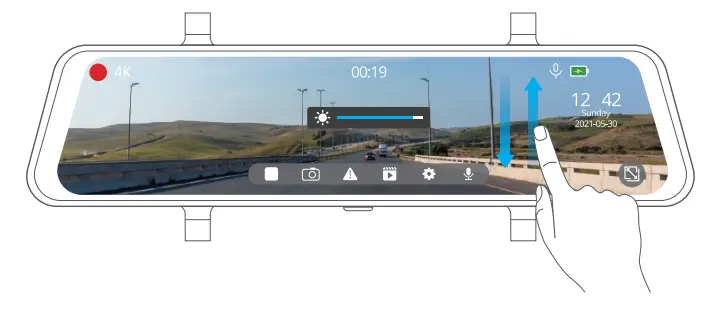
- ADJUST THE SCREEN BRIGHTNESS
On the right side of the screen, slide your finger up or down to adjust the screen brightness.


DOWNLOAD THE GPS PLAYER
Download the GPS player: www.kingslim.net/player
SPECIFICATIONS
| Front Camera | f/1.8, 170° FOV |
| Rear Camera | f/1.8, 160° FOV |
| Video | 4K+1080P/2.5k+1080P |
| Screen | 12-inch IPS touchscreen |
| Video Coding | H.264/H.265 |
| Input | 5V DC |
| Memory Card | support up to 128GB |
| Battery | 500mAh |
| Working Temperature | -20°C~60°C (-4°F~140°F) |
TROUBLESHOOTING
- The dash cam is not recording.
Check whether your memory card has enough space. Back up any important data to another device first, and then format the memory card. - The dash cam stops during recording.
During recording, a large amount of high-definition video data is processed. Please use a high-speed memory card of Class 10 or higher. - A “File Error” prompt appears when playing back pictures and videos. Use a legal copy memory card, and be sure to format it.
- The image is misty.
Ensure there are no fingerprints or other marks on the camera lens. Use a soft and dry cloth to clean the lens. Clean the front windshield. - Crashing
If your device crashes, use a sharp object to press the reset button to restart the device. - No sound on the video.
Ensure the audio recording mode is on. - The camera keeps turning on and off automatically.
Please charge the camera with the included car charger. Do not charge the battery via the USB data cable with other adapters.
CAUTION!
- Please place your device in a secure location and protect the lens from scratches and dirt.
- Do not expose the device to rain, moisture, or water under any circumstance.
Only the rear camera is waterproof. - Avoid leaving the device in direct sunlight for extended periods of time.
- Do not remove or expose the internal battery.
FAQS
Can you save videos?
Yes. Just make sure you get a big enough SD card.
Does the mirror go completely dark while driving? My current one does not and you can see faint lights in the mirror…Bugs the crap out of mr
It becomes a regular mirror unless the camera is activated to come through the mirror. When driving with my convertible top down during the day I shut off the camera view so as not to get shadows. Otherwise, due to the small back window on my car, I use the camera view.
You can mount the rear camera on the outside of the car near the license plate because it is waterproof, correct?
24ft
Is there anyway to supply 12V to the mirror directly not thru cigar-jack? I would like to connect the power from the fuse box via 12v line.
yes
Which hardware kit can I buy for this?
Yes; there is a kit available.
Is this just a re-branded VanTop?
It comes with everything you need
The button on the bottom is labeled power/screensaver. Does it stop recording or turn off the screen or both?
Probably. Most off-brand electronics are made in the same factory and just have the marketer’s name slapped on it.
How many pins does the video cable have? 4? 5?
It wont stop recording, just turn off the screen
Would I be able to use the mirror as a normal mirror not digitally?
To be honest I’m not sure. It has a cable with a headphone Jack. But I’m not exactly sure how many pins it has.
how long is the rear camera cable?
Yes you can. I have not used the camera yet coz I don’t have an SD card yet so it’s on my car as an upgrade to my stock mirror.


