AMPTRON P750 Portable Power Supply
Included
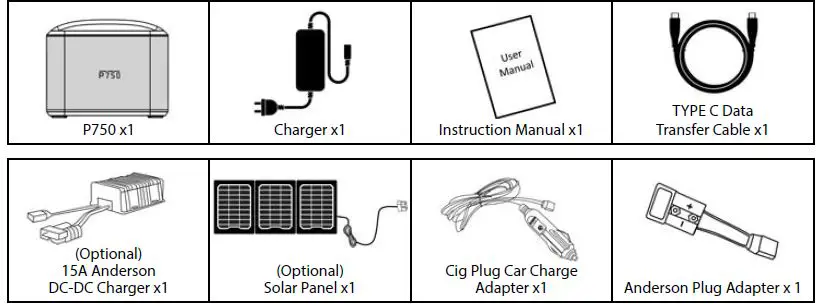
- After opening the P750 packaging, check that all accessories are included as listed on page 2 (noting the solar panel and 15A Anderson DC-DC charger will only be present if purchased as additional options). If any parts are missing or damaged, report the missing or damaged items directly to AMPTRON®.
- Do not use this product until you have read this instruction manual in full.
- This manual is subject to change without notice due to updates and upgrades. for various current loads.
Product Description
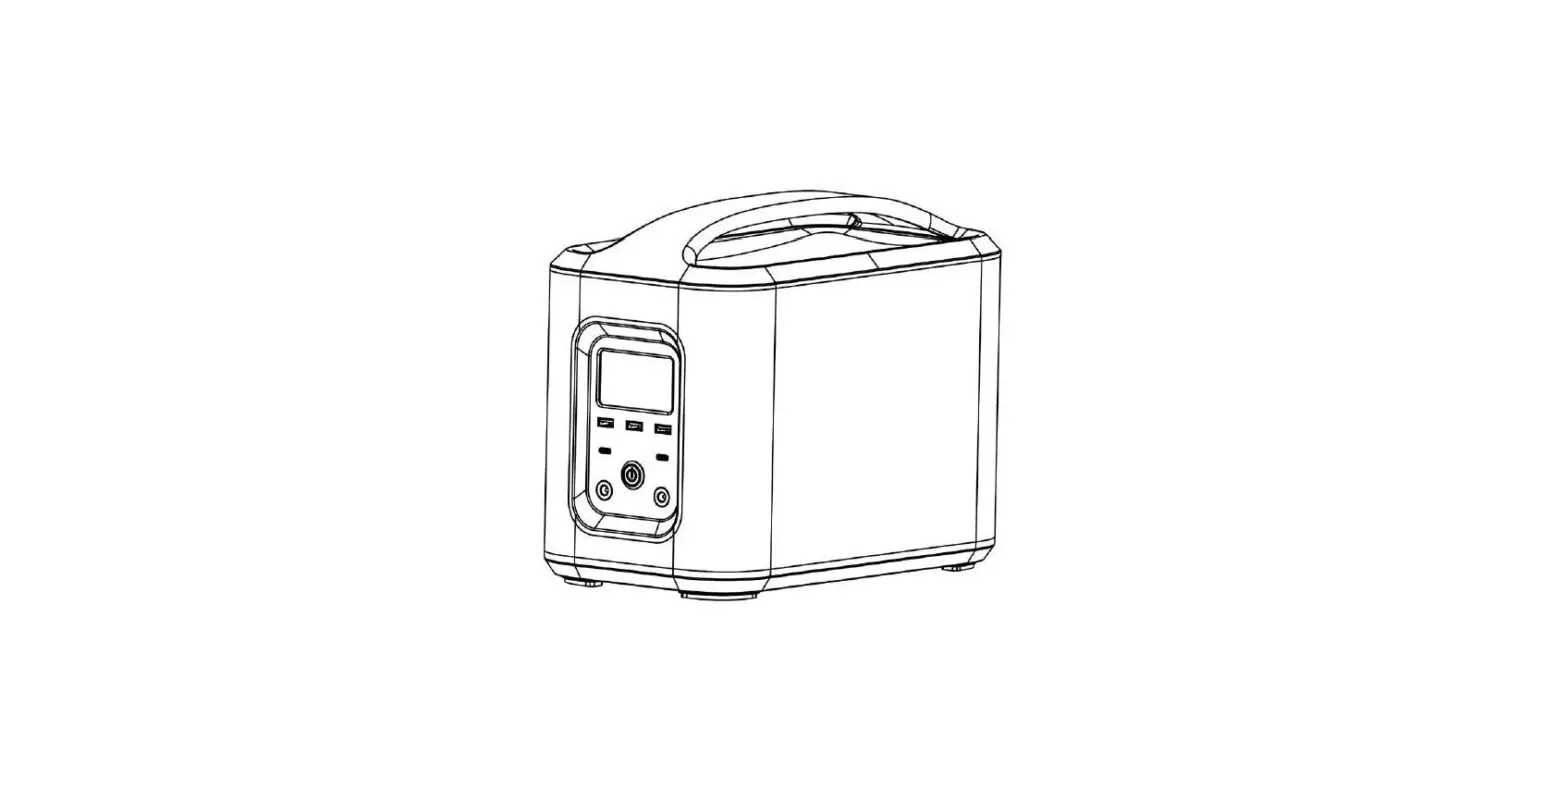
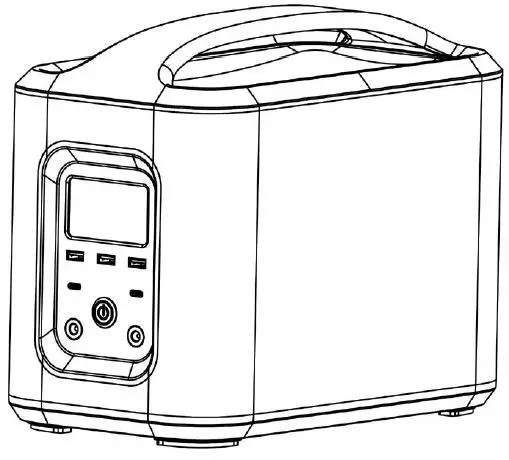
The Amptron® P750 is an extremely compact yet safe and powerful Lithium portable power solution. It stores 750Wh of energy, which provides the equivalent usable energy of about a 12V 100Ah AGM battery. With its convenient carrying handle the P750 provides a convenient portable energy solution for activities like camping, outdoor photography, mobile workstations, charging of batteries, a mobile option to power equipment and much more.
The P750 can also be used as a dual battery system alternative, with its capability of being charged from multiple charge sources including mains charging, solar, and DC-DC charging through either the Cig plug adapter or compatible 15A Anderson DC-DC charger (*** sold separately).
The P750 has a rich set of output interfaces. It provides an AC output port powered by a 300W pure sinewave inverter, 2 x USB TYPE-A and 3 x USB TYPE-C ports, and a 12V Cig plug.
Product Structure Diagram
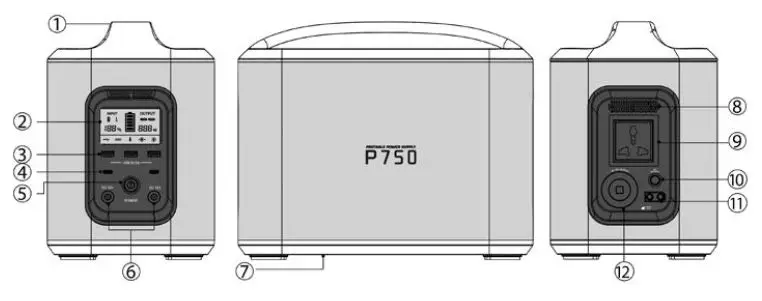
- Handle
- LED Screen
- USB TYPE A Output Port
- USB TYPE C Output Port
- Master Power Switch
- 2V DC Output Port
- Label
- Vents
- AC Output Port
- AC Output Switch
- Charging Port
- Cigar Lighter Output
LED Screen Guide

Input
When a charge source is connected this icon will show up. Input sources include mains, solar, car cig plug and the DC-DC adapter chargers.
Battery
Battery remaining capacity icon
Fault Warning
When an error occurs, disconnect the charging device and load, then press and hold the power switch, and release power switch when the display flashes to reset the unit.
Output
When P750 is on and functionally normally it will display the following icons:
- When load is connected to P750.
- On startup, the P750 will run a test sequence to check that the output interfaces are functioning safely.
- The following icons will light up when the test of its output circuit is successful:
- USB TYPE A Output
- USB TYPE C Output
- Cigarette Lighter Output
- 12V DC Output
- AC Output
- 110V output, indicating the current device AC output voltage is 110V 220V output, indicating the current device AC output voltage is 220V
ALARM FUNCTION
| No. | Alarm | Icon | Display alarm | Reason |
| 1 | 3 seconds apart |  | This icon remains blinking until the battery state of charge reaches 20% | Battery power less than 10% |
|
2 | Constantly on |  | This icon remains blinking until the fault is released | Charge fault |
| DC output fault | ||||
| AC output fault | ||||
| 3 | 2 seconds apart |  | This icon flashes when the alarm occurs and is remains on while under protection | Temperature is too high or too low |
Specifications
| Model | P750 |
| Capacity | 750Wh |
| Solar panel charging | 16.8V Current: <30A |
| Mains supply charging | 16.8V Current: <4A |
| Car charging | 16.8V Current: <30A (Cig plug adapter: 3A) |
|
AC output *1 | Maximum continuous output power: 300W |
| Output waveform: pure sine wave Output voltage: AC 220V ±10% Output frequency:50Hz AC 110V ±10% Output frequency: 60Hz | |
| Cigarette lighter output*1 | Output voltage range: 11.2V ~ 16.8V, Output current range: 0A ~ 10A |
| DC12V output*2 | Output voltage: DC12V ± 5% |
| Output maximum current (IMAX): 2A | |
| USB TYPE A output*3 | Output voltage: DC5V ± 5% |
| Output maximum current (IMAX): 2A | |
| USB TYPE C output*2 | 3.6V ~ 12V. Maximum output current 3A |
| Overheating protection | >65oC |
| Cooling method | Force Air Cooling |
| Protection type | Over current protection, under voltage protection,over voltage protection, overload protection, overheat protection, short circuit protection |
| Size | L300: Width170mm – Height 233mm |
| N.W. | 8kg |
| Operating temperature range | -10oC to -55oC |
| Storage temperature range | 0oC to -55oC |
| Enclosure rating | Working state: IP30 |
Charging methods
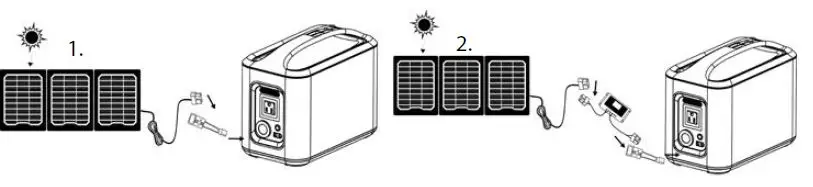
How to use a solar panel to charge?
- Using a compatible solar panel purchased from AMPTRON® (optional accessory), unfold the solar panel and face it towards the sun. Then connect the Anderson plug adapter cable to the input port on the P750, and the solar panel to the Anderson plug adapter.
- Using a solar panel purchased from a third party, a solar charge controller with an output of about 16.8V should be connected. Alternatively, contact Amptron to check if your solar panel is compatible to be connected directly without a charge controller, or Amptron can provide you with a compatible solar charge controller. The maximum supported solar power is 500W. Place the solar panel and face it towards the sun, then connect the solar charge controller to your solar panel as well as the one side of the Anderson plug adapter, and connect the other end of the adapter to the input port on the P750. * Please pay attention to the +/- poles.
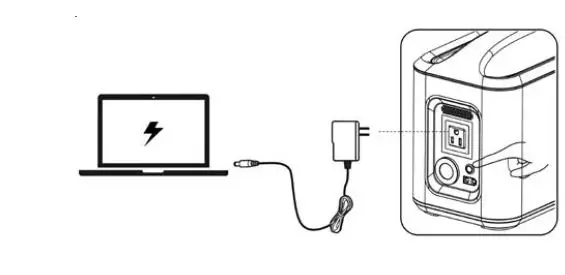
How to use the mains supply to charge?
Follow the steps as shown below:

- Plug the one end of the adapter into the charging port on the P750.
- Plug the other end of the adapter plug into the mains supply socket to start charging.
- It is recommended to remove the charging cable after the battery is fully charged.
Do not use a 3rd party adapter to charge this product.
How to use a motor vehicle to charge?
Follow the steps as shown below:
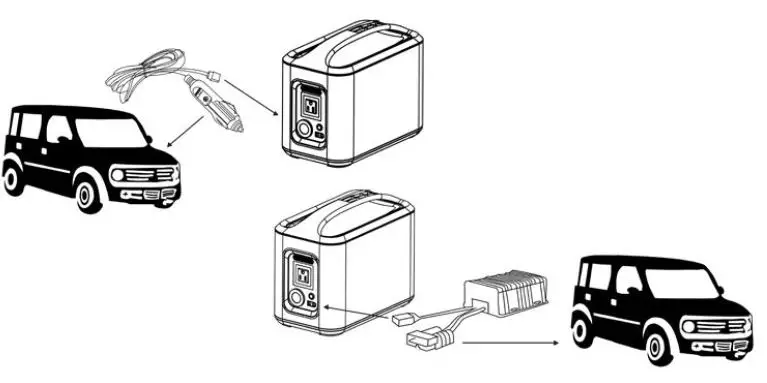
- Using the car cig charging adapter, plug one end of the cable into the
charging port on the P750. Plug the other end of the car cig charging cable into the car cigarette lighter socket, then run the vehicle to start charging. - Using the optional 15A Anderson plug DC-DC charger, plug the one end of the cable into the charging port on the P750. Plug the Anderson end of the cable into an Anderson plug in the vehicle, then run the vehicle to start charging.
Note: It is recommended to install a voltage sensitive relay (VSR) to prevent the Anderson plug DC-DC adapter from draining the starter battery.
| Estimated Charging Times | |
| Charging method | Estimated charging times |
| Mains supply charging (67W) | 11 Hours |
| Car charging (50W) | 15 Hours |
| 60W solar panel | 12-20 Hours |
| 100W solar panel | 7-13 Hours |
| 500W solar panel | 1.5-3 Hours |
| 15A Anderson DC-DC charger (250W) | 3 Hours |
Instructions
How to use P750 to provide AC output?
- Turn the P750 power switch on.
- Connect the AC load device into the 230V AC output interface. (The power load must not exceed 300W).
- Click the AC output switch to turn on the AC output. Electrical equipment connected to P750 can then be used as normal.
- Click the AC output switch again to turn the AC power off. It is recommended to keep the AC output power switched off when not in use, since there a small amount of power will be consumed while it is left on.
- Disconnect after use and turn off the main switch.
How to use P750 to provide DC output?
- Turn the P750 power switch on.
- Connect the DC load device to the corresponding DC output socket. (Please refer to the specifications table for the maximum loads allowed on each socket).
- Disconnect after use and turn the main power switch off. You can use both AC and DC at the same time, but the load should not exceed the upper output limits.
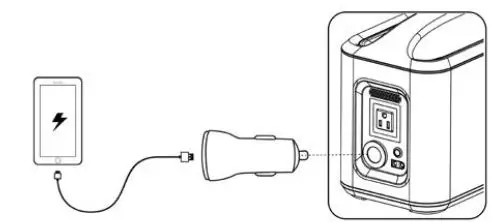
Cigar lighter output
- Connect a cigarette lighter cable from the P750 to your device.
- The OUTPUT icon on the right side of the display will illuminate.
DC 12V output The device has two DC 12V pin outputs. Connect the DC 12V pin connector, such as an LED light, to one of the two outputs. Both DC outputs are the same. Both outputs can be used at the same time to provide additional power.
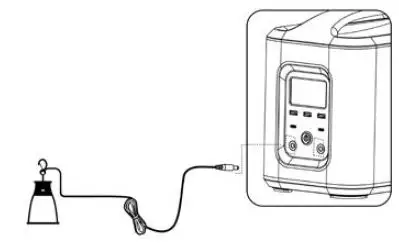
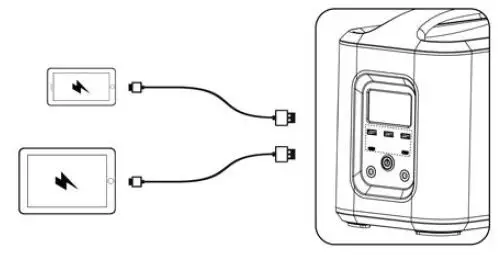
The OUTPUT icon on the right side of the display will illuminate. USB 5V output Connect one end of the USB cable to the USB output connector and the other end to the corresponding phone or digital device for charging. The P750 has three independent USB TYPE A outputs, each with an output current of 2A, plus 2 independent USB TYPE C outputs with 3.6V ~ 20V voltage, a maximum output current of 3A. The OUTPUT icon on the right side of the display will illuminate.
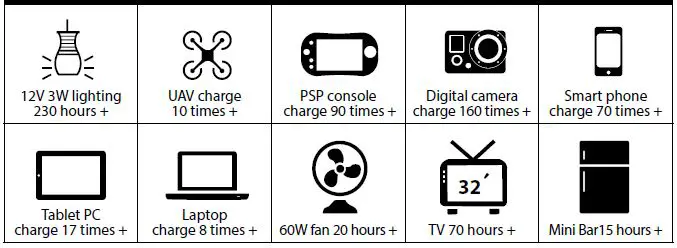
Estimated run times
BMS protection system
| Alarm Name Code Condition Treatment Measures | |||
| Cell low voltage protection | E02 | 1. Cell lowest voltage <3050mV, LOC=0 2. Cell lowest voltage <2910mV | Disconnect load |
| Charge overcurrent protection | E03 | Charge current >30A | Disconnect charger |
| Discharge overcurrent protection | E04 | Discharge current >35A | Disconnect load |
| Short circuit protection | E05 | Output side short circuit | Disconnect load, restart |
| Cell charge high temperature | E06 | Cell charge temp. >62oC | Stop charging |
| Cell discharge high temperature | E07 | Cell discharge temp. >62oC | Stop discharging |
| Cell charge low temperature | E08 | Cell charge temp. <-15oC | Stop charging |
| Cell discharge low temperature | E09 | Cell discharge temp. <-20oC | Stop discharging |
| MOS over temperature protection | E10 | MOS temperature >110oC | Stop charge or discharge |
| Environment over temperature protection | E11 | Environment temp. <-20oC or >65oC | Stop charge or discharge |
| Discharge FET failure | E12 | Still output after discharge protection | Reset or return factory |
| Charge FET failure | E13 | Still input after charge protection | Reset or return factory |
| Cell damage | E14 | Cell voltage <100mV | Reset or return factory |
| NTC failure | E15 | NTC not connected | Reset or return factory |
| Voltage collection failure | E16 | Voltage collection not connected | Reset or return factory |
| The new alarm screen flashes 5 times | E17 | New alarm appears | Reset or return factory |
Precautions
Read the following carefully before using this product. Improper operation of this product may damage the P750, and the devices connected. Always check the power and voltage input of any device prior to charging with the P750.
- Make sure you fully charge the P750 before using for the first time.
- Do not connect a DC charging source via the cigarette outlet to charge the P750.
- Charge using ONLY the charger that comes with the P750.
- During charging, never touch the metal inside the output socket.
- Do not connect the P750 AC output to any AC mains connection.
- Never immerse the P750 in water. When not in use, kept in a cool and dry environment.
- Never place a P750 near a fire, heater or in a high temperature environment when in use or stored.
- Do not knock or throw the P750.
- Do not use the P750 in a strong electrostatic or strong magnetic field. This will damage the P750 safety protection device.
- Do not open the product or remove parts from the P750.
- Due to the large output power of the P750, when connecting a device, a slight spark may occur. Therefore, do not use the P750 in a flammable or explosive gas environment.
- The P750 AC output is a standard 220V sine wave voltage. This can be potentially dangerous, and/or fatal if used incorrectly. Treat with caution to prevent electric shock when using.
- If the P750 is not going to be used for a long period of time, turn the power switch off. It is recommended to charge the P750 every 3 months to prevent aging of the internal battery.
Fault Resolution
| No. Fault Status Emergent Reasons Cause Analysis / Solution | |||
| 1 | Cannot boot | Under voltage protection | Charge |
| Load exception protection | Disconnect the load and charge | ||
| Product damage | Repair | ||
|
2 |
Charger not charging | Charge over current protection | Use a charger that complies with product specifications |
| The charger is damaged | Replace the charger | ||
| Charger is not working properly | Charger power supply error or connection abnormality | ||
|
3 |
Solar panels cannot charge | Charge over current protection | Using solar panels that meet product specifications |
| The charge current is too low | Insufficient sunlight | ||
| Solar panels damaged | Replacement of solar panels | ||
| Solar panel connection damaged | Replace or repair wire harness | ||
|
4 |
No DC output | Battery under voltage protection | Charge |
| Discharge over current protection | Equipment power draw is too high | ||
| Over temperature protection | Check that the cooling fan is operational and unobstructed. Relocate to a cooler environment. | ||
| Harness quality is poor, harness voltage drop. | Use better quality wiring harness | ||
| Product damage | Repair | ||
|
5 |
No AC output | Battery under voltage protection | Charge |
| Discharge over current protection | Equipment power draw is too high | ||
| Over temperature protection | Check that the cooling fan is operational and unobstructed. Relocate to a cooler environment. | ||
| Product damage | Repair | ||
|
6 |
Icon constantly On | Load exception | Disconnect the load |
| Corresponding hardware failure | To replace the corresponding hardware | ||
| The display is damaged | To replace the corresponding hardware | ||
| 7 | Icon Exception Off | Load exception | Disconnect the load |
| Corresponding hardware failure | To replace the corresponding hardware | ||
| The display is damaged | Repair | ||
Environmental Conditions
- The product should only be used in a dry, clean and ventilated environment.
- Avoid exposure to direct sunlight, rain, moisture, dust, acid mist environments.
- Never use the P750 in a flammable or explosive gas environment due to the possibility of sparks!
- Ensure ambient temperature is in the range of -10oC to 55oC.
- Ensure air humidity is no more than 80% (25oC ± 5 oC).
After-Sales Service
- Warranty Cover:
Your P750 Portable Power Pack comes with a 2-year warranty, which starts from the date of purchase. If you lose your receipt, the 2-year warranty will be based on the battery code. Warranty covers failure due to defects in material or workmanship. Subject to any issues stated below AMPTRON® will repair or replace the P750 portable power pack and/or parts of the battery if components in question are defective in materials or workmanship. - Warranty Procedure:
The defective Portable Power Pack must be returned to our lab to determine the cause of the failure and if it is repairable. If it was damage caused by a manufacturers defect, it will be repaired or replaced at no cost to you. - Not Covered By Warranty:
Warranty will not honor defects caused by abuse/neglect or from items outside the manufacturers control. Please visit our website to see the full warranty breakdown: www.amptron.com.au/warranty—p750-power-pack.html - Disclaimer:
Customers must adhere to all AMPTRON® documentations and guidelines. The manufacture is not responsible for any expenses related to installation or removal, electrical system tests, battery charging, loss of time or other expenses which should be considered incidental damages, including all shipping charges after the first 30 days of warranty.
No returns or exchanges accepted. Our zero-return policy is effective at the time of purchase. As always, our commitment to excellent customer service is our top priority. Please contact us if you have further questions about our warranty and return policy.
PLEASE NOTE
Customers are responsible for all shipping fee’s following the first 30 days of purchases.
References
 AMPTRON - Sustainable Power Solutions, Lithium Batteries, Battery Chargers, Power Monitors, Power Packs, Solar Power - Lithium Batteries, Chargers, Battery Monitors, Portable Power Packs, Solar Panels in Australia - AMPTRON
-
Warranty - P750 Power Pack - AMPTRON - Sustainable Power Solutions, Lithium Batteries, Battery Chargers, Power Monitors, Power Packs, Solar Power


