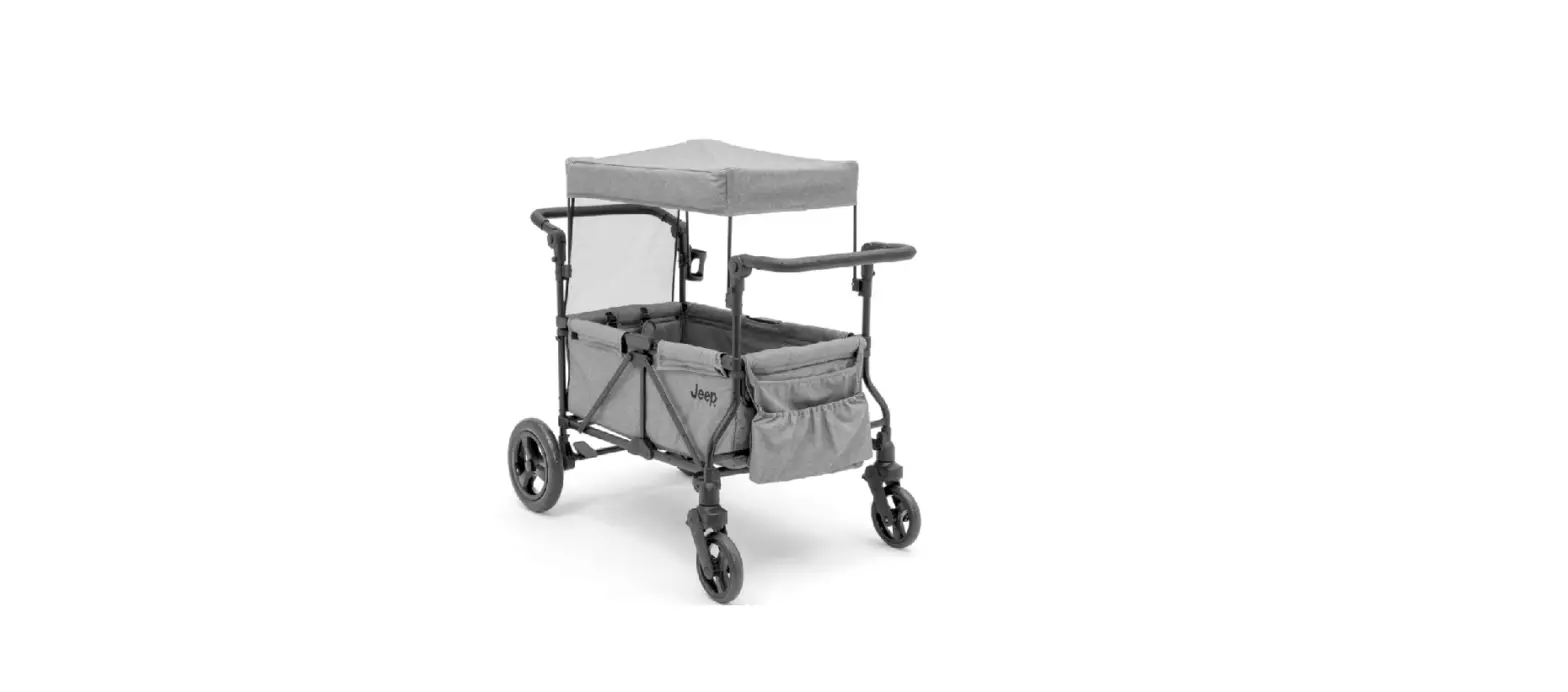
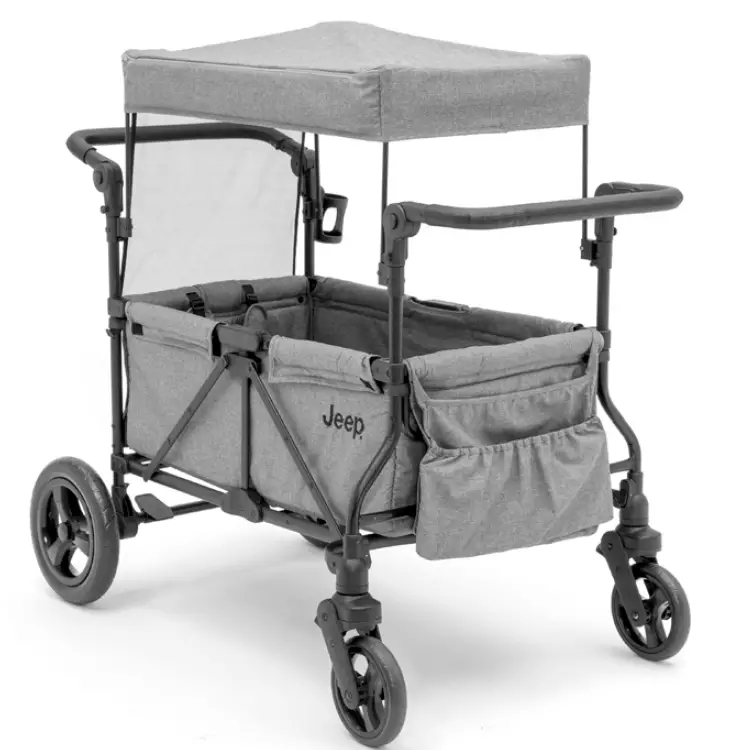
JEEP 60001 WRANGLER STROLLER WAGON
SAFETY WARNINGS
- WARNING: Please follow all of these instructions to ensure the safety of your child. Keep these instructions for future reference.
- WARNING: Failure to follow these instructions could result in serious injury or death.
- WARNING: Avoid serious injury from falling or sliding out. Always ensure that the child is properly positioned by using the safety harness according to these instructions.
- WARNING: Never leave children unattended.
- CAUTION: This is a double occupant stroller wagon for two children only. The use of more than two children may cause an unstable condition which can injure your child. Do not place parcels, diaper bags or accessory items on sides of wagon or handles as this can cause an unstable condition.
- The maximum weight that can be carried in rear & front storage bag is 5 pounds each.
- The maximum weight that can be carried in the wagon is 110 lbs combined. Any additional weight will cause a hazardous unstable condition.
- Use of the wagon with children weighing more than 55 pounds (24.92 kg) or over 42 inches (106.7
cm) tall, may cause a hazardous unstable condition to the wagon. - ALWAYS lift wagon from handlebars when going over curbs.
- ALWAYS remove canopy before folding.
- ALWAYS lock brakes when adding and removing children from wagon, or when parked.
- NEVER allow children to play with this product.
- NEVER allow children to play in or around the wagon. This wagon is not a toy.
- NEVER use the wagon on stairways, escalators, or moving walkways.
- NEVER use the wagon in conjunction with bicycles, skateboards, roller skates, or in-line skates.
- NEVER use on unstable or uneven terrain.
- NEVER put child inside wagon when using wagon as storage for other items.
- NEVER use second seat for child when using the infant car seat adapter.
- NEVER use near open flames or other sources of heat.
- NEVER sit on top rail or canopy, doing so may cause a hazardous unstable condition.
NEVER install mattresses or similar items for use in wagon. Doing so may cause a hazardous unstable condition. - NEVER allow children to stand up or place arms and legs outside of wagon while moving.
- NEVER leave wagon on sloped surface even if brakes are engaged.
- We recommend that the child occupant needs to be 6 months of age, at the minimum, before use of the wagon. NOTE: With the use of infant car seat adapter, the minimum age is newborn and up.
CARE AND MAINTENANCE
- To clean the wagon use a mild household soap with warm water on a sponge or clean cloth.
- Check your wagon for loose screws, worn parts, torn material or stitching on a regular basis. Replace or repair parts as needed.
- Discontinue use of wagon if it should become damaged or malfunctions. Please contact our customer service number 1-646-435-8726 to arrange for repair or obtain replacement parts.
- If you experience any difficulty with assembly, missing parts or use, please DO NOT return this item to the store. Retail stores are unable to properly assist you. Contact our Customer Service Department directly for assistance 1-646-435-8726.
Please DO NOT return this product to the store.
If you experience any difficulty with assembly, missing parts or use, please DO NOT return this item to the store. Retail stores are unable to properly assist you. Contact our Customer Service Department directly for assistance (646) 435-8726
www.DeltaChildren.com • [email protected]
©2019 Delta Children’s Products, Inc. New York, NY 10001
PARTS
IMPORTANT! Please remove all parts from the package and identify them before assembly.
IMPORTANT! Before assembly and each use, inspect this product for damaged hardware, loose joints, missing parts, or sharp edges. NEVER use if any parts are missing or broken. Contact manufacturer for replacement parts and instructions if needed. Never substitute parts. IMPORTANT! Adult assembly is required. 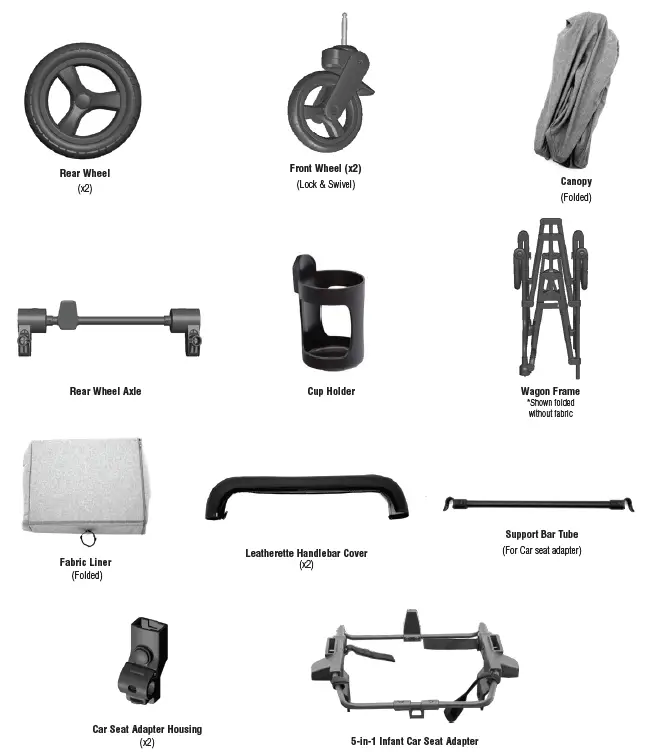
ASSEMBLY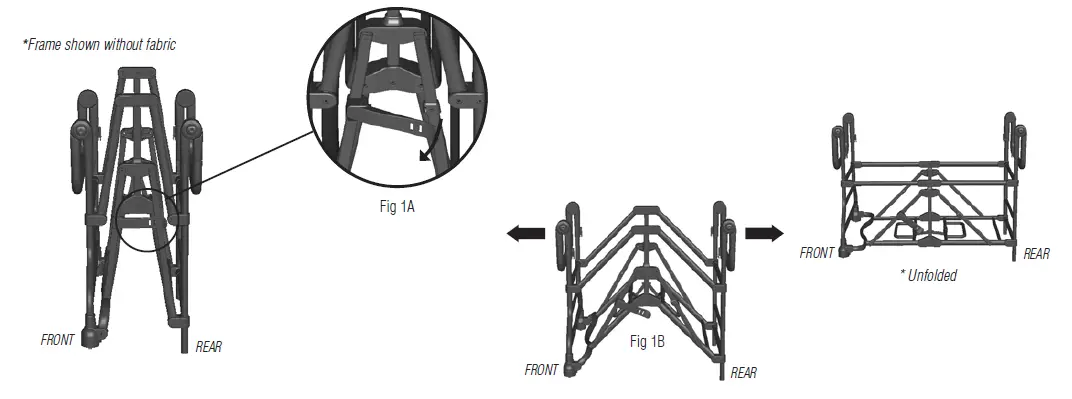
PREPARING WAGON
- Unfolding wagon: Unlatch wagon by pulling latch away from latch post (Fig. 1A).
- After latch is cleared, allow the wagon to unfold out, or manually pull the wagon apart (Fig. 1B)
Frame shown without fabric
Wagon frame shown upside-down 
ATTACHING & REMOVING REAR WHEELS
- To attach rear wheels to axle: Push each rear wheel into the axle housing as shown until they “CLICK” into a locked position (Fig. 2).
- Pull outward on wheel to ensure that the wheel is securely locked.
- To release rear wheels from axle: While pressing the release button located on the back of the wheel housing, remove wheel by pulling away from housing (Fig. 2A).
ATTACHING & REMOVING REAR WHEEL AXLE
- To attach rear wheel axle: Align axle with frame as shown and push in until both release pins “CLICK” (Fig. 2B).
NOTE: Make sure brake is closest to right rear wheel. - To detach rear wheel axle: Press in release pins on both sides of axle, and pull away from wagon frame (Fig. 2D).
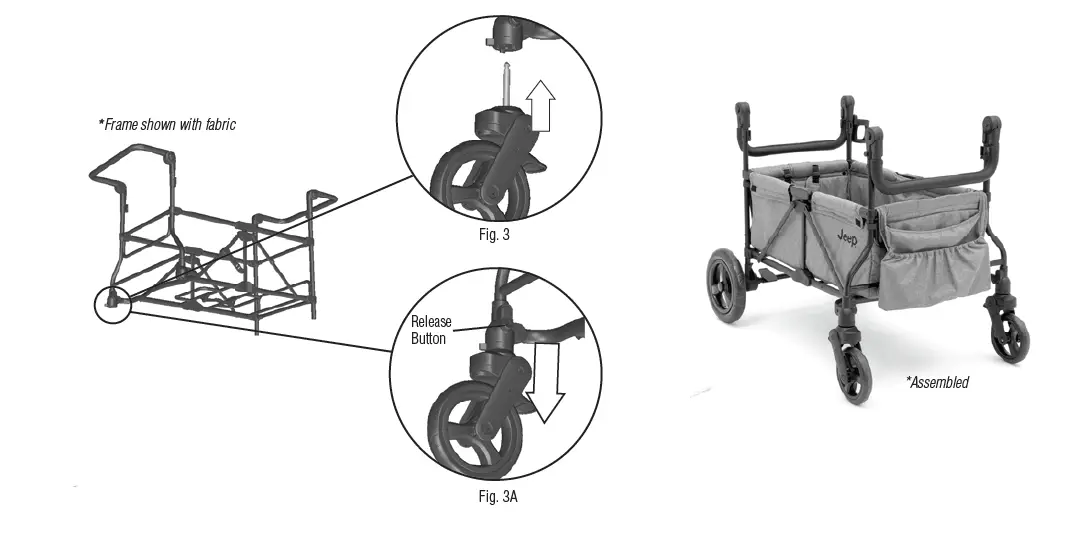
ATTACHING & REMOVING FRONT WHEEL
Note: Before attaching wheels, make sure the wagon is in a fully open position.
- To attach front wheel: Push front wheel post into the front wheel housing until it “CLICKS” into a fully locked position. (Fig. 3)
Note: Pull downward on wheel to ensure that the wheel is securely locked.
To release front wheel: Press the release button located on the side of the wheel housing and pull down on wheel to release (Fig. 3A). 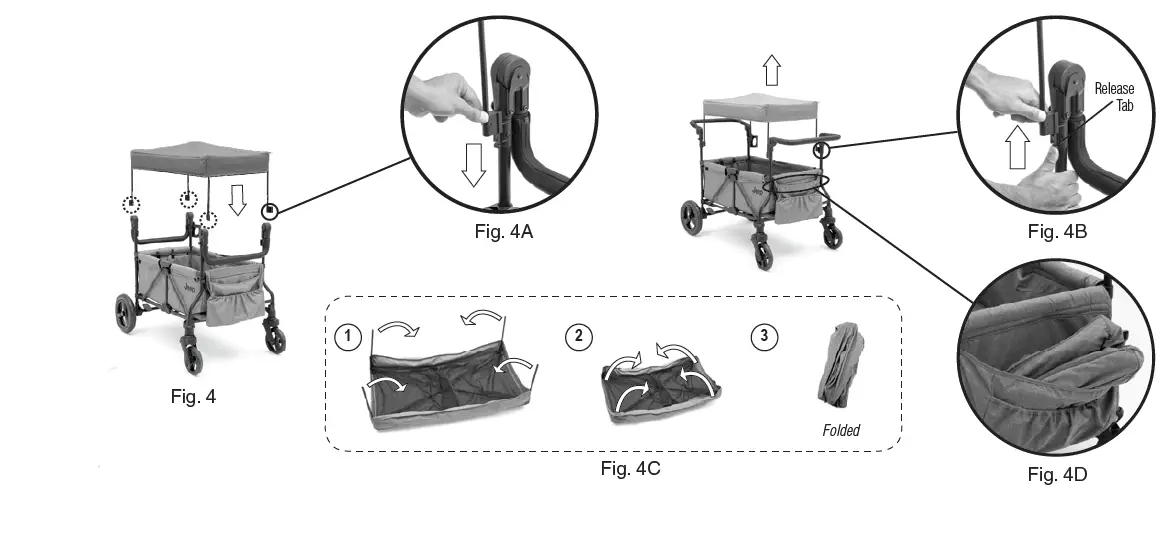
ATTACHING & REMOVING CANOPY
- To attach canopy: Align each of the 4 canopy rods with their corresponding posts (Fig. 4).
- Firmly insert each rod into its housing (Fig. 4A).
- To remove canopy: While release tab is pressed, pull up on each rod until it clears the wagon frame (Fig. 4B).
- Fold canopy by folding each rod, then folding canopy frame closed (Fig. 4C.)
- Canopy can be stored in front storage pocket (Fig. 4D)
SETUP AND USE
WARNING: Always lock brakes when the wagon is not being pushed so that the wagon will not roll away. Never leave wagon unattended on a hill or incline as the wagon may slide down the hill.
WARNING: NEVER leave children unattended in wagon.
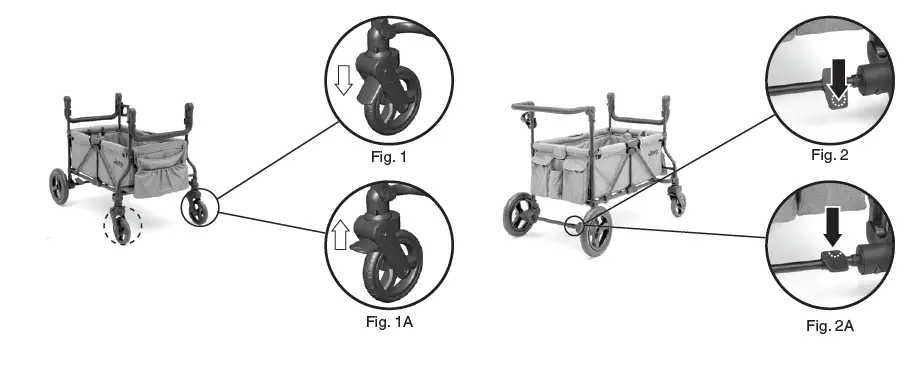
FRONT-WHEEL BRAKE LOCK
- To engage brakes: Apply light downward pressure to the brake lever located on the front of the wheel housing. (Fig. 1).
- Check to make sure the brakes are in a fully locked position, making sure stroller will not move when pushed.
- To release brakes: Gently lift the brake lever up. (Fig. 1A)
REAR WHEEL BRAKE LOCK
- To engage brakes: Apply light downward pressure to the FRONT of the brake lever located on the axle. (Fig. 2).
- Check to make sure the brakes are in a fully locked position, making sure stroller will not move when pushed.
- To release brakes: Apply light downward pressure to the BACK of the brake lever (Fig. 2A).
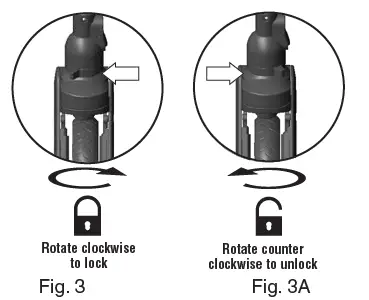
FRONT WHEEL SWIVEL LOCK
- To lock the front swivel wheel lock: Rotate the lever located on the top of the front wheel housing clockwise until it “CLICKS” into a fully locked position (Fig. 4).
- To unlock the front swivel wheel lock: Rotate the lever located on the top of the front wheel housing counter clockwise until it “CLICKS” into a fully locked position (Fig. 4A).
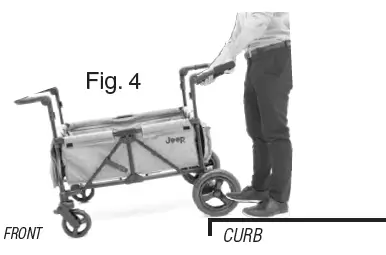
CLEARING WAGON OVER SIDEWALKS AND CURBS
- To clear wagon over sidewalks and curbs: Lift wheels using the REAR handlebars and PULL over the sidewalk or curb from a backwards position (Fig. 4).
WARNING: Please do not attempt to push down on rear handle-bars to lift front wheels.

ADJUSTING HANDLEBARS
- • To adjust handle: Press BOTH buttons (located on either side of handle bar) (Fig. 3).
• With both buttons pressed, rotate the handle up or down to desired position (Fig. 3A).
• The buttons will “CLICK” on both sides once it is in a fully locked position.
• Confirm both buttons are depressed and handlebars are in a locked position before use.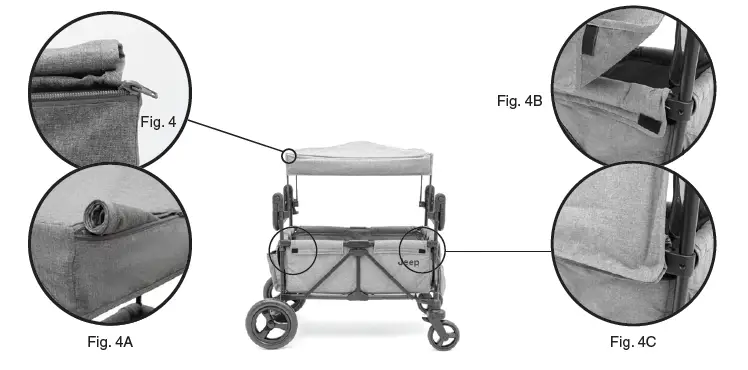
USING SUNSHADE
- To use sun shade: Locate zipper at the top of the canopy (Fig. 4)
- Unzip to reveal sunshade and carefully roll down (Fig. 4A.)
- Use velcro attachments to firmly secure to wagon (Fig. 4C)
- To store sun shade: Detach sunshade from velcro attachment points (Fig. 4B)
- Carefully roll the sun shade up so that it fits in storage compartment as originally stored, and zip to enclose (Fig. 4A).
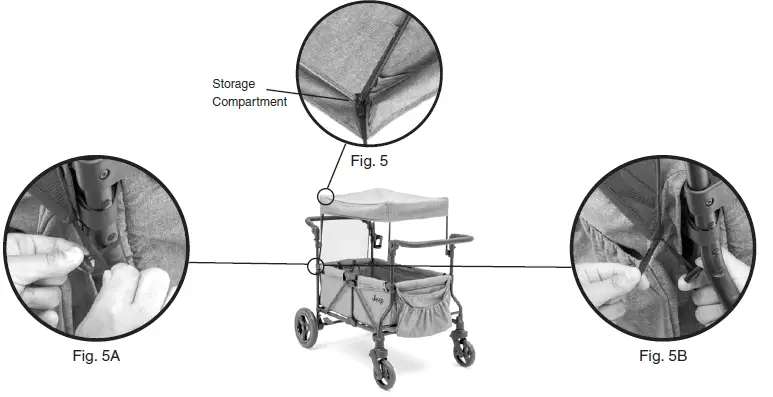
USING MESH NET
- To use Mesh Net: Locate the mesh net in the storage compartment directly underneath the canopy at the front and rear of the wagon (Fig. 5).
- Remove mesh from storage compartment and roll down.
- Secure mesh around the frame of the wagon using toggle & loop (Fig. 5A).
- To store mesh net: Unfasten toggle & loop from frame of wagon (Fig. 5B).
- Roll mesh net evenly towards the top of the wagon.
- Store in the storage compartment on the inside of the canopy (Fig. 5.)
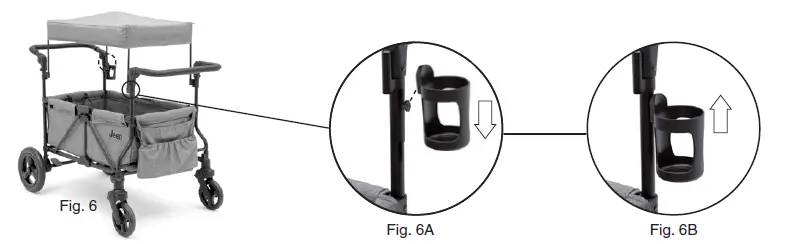
POSITIONING CUP HOLDER
Note: Cup holder can be positioned in one of the two posts on the wagon frame (Fig. 6).
- To install cup holder: Align clip on cup holder with frame post and apply downward pressure until it “SNAPS” into place (Fig. 6A).
- To remove cup holder: Apply upwards pressure until cup holder releases from post (Fig. 6B).
FOLDING WAGON FOR STORAGE
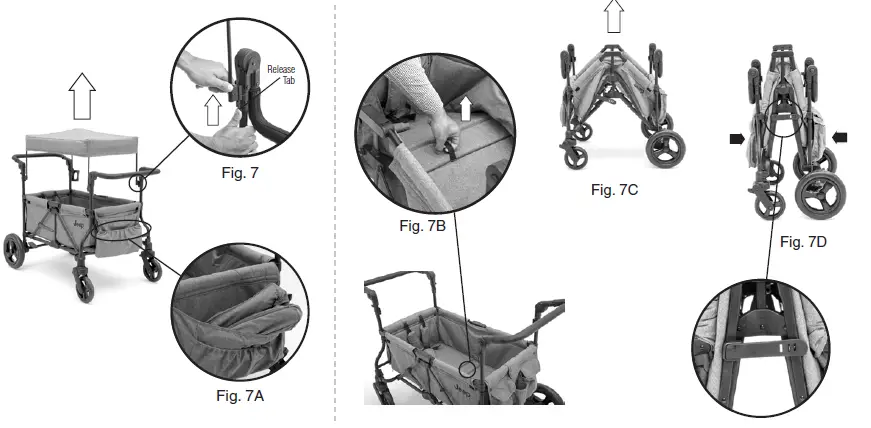
- If canopy is installed: Uninstall by pressing release tab and pulling up on each rod until it clears the wagon frame (Fig. 7).
Note: Folded canopy can be optionally stored in front storage compartment (Fig. 7A). - To fold wagon frame: Locate handle in center of wagon seat pad (Fig. 7B) and pull upward until wagon frame begins to fold (Fig. 7C).
- To finish the fold, apply pressure inwards until wagon is fully closed and auto latch “CLICKS” (Fig. 7D).
- Pull outwards on wagon to confirm latch is secured.
SECURING CHILD
Before Placing your Child in Wagon:
Make sure the brake pedals are pressed down completely.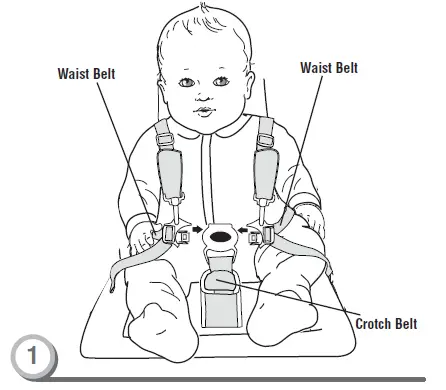
Securing Child
- Place your child in the wagon. Position the crotch belt between your child’s legs.
- Pull shoulder straps over child’s arm and shoulder and fasten both strap ends to the restraint system.
- Fasten both waist belts to the buckle on each side of the crotch belt. Make sure you hear a “click” on both sides.
- Check to be sure the restraint system is securely attached by pulling it away from your child. The restraint system should remain attached.
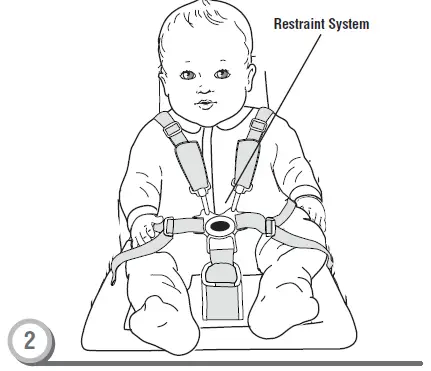
- Tighten each waist belt and shoulder strap so that the restraint system is snug against your child.
Please refer to the next section for instructions to tighten the waist belts.
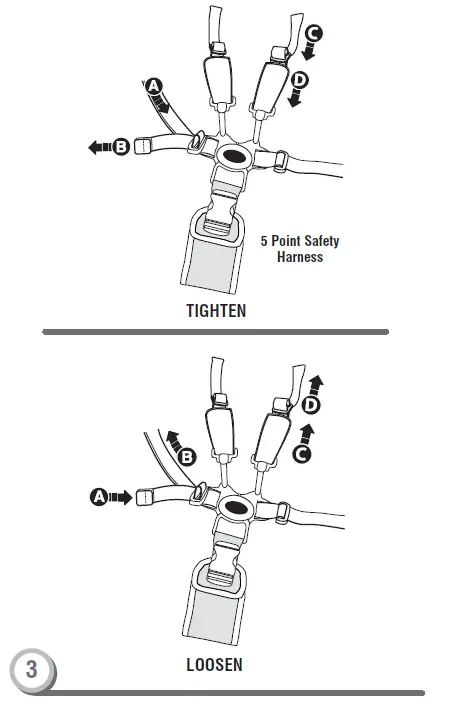
To tighten the waist belts and shoulder straps:
- Feed the anchored end of a waist belt up through the buckle to form a loop A . Pull the free end of the waist belt B .
- Repeat this procedure to tighten the other waist belt.
- Feed the top end of the shoulder strap through the plastic stay to form Coop . Pull the bottom end down to tighten the strap .D
- Repeat this procedure to tighten the other shoulder strap.
To loosen the waist belts and shoulder straps: - Feed the free end of the waist belt up through the buckle to form a
loop A . Enlarge the loop by pulling on the end of the loop toward the buckle. Pull the anchored end of the waist belt to shorten the free end of the waist belt B . - Repeat this procedure to loosen the other waist belt.
- Feed the bottom end of the shoulder strap through the plastic stay to form Ca loop. Pull the top end up to loosen the strap .D
- Repeat this procedure to loosen the other shoulder strap.
Please note: After adjusting the restraint system to fit your child, make sure you pull on it to be sure it is securely fastened.
CLEANING AND MAINTENANCE

INSTALLING & REMOVING FABRIC LINER FROM WAGON FRAME
- Installing fabric liner: Start by inserting fabric liner as shown with all flaps inside (Fig. 1).
- Attaching buckle straps: Locate the 4 buckle straps on the sides of fabric liner (Fig. 1A).
- Place each strap over wagon frame and use finger tip to pull buckle open. While buckle is open, feed strap through and release finger from clip to secure. Repeat for all 4 buckles (Fig. 1B).
- Attaching C-ring straps: Locate the 7 C-rings (3 front, 3 rear, 1 under) on front, rear and underside of fabric liner (Fig. 1C, Fig. 1F)).
- Place each strap over the wagon frame and secure by pulling strap through the slit at the bottom of the C-ring (Fig. 1D). Do the same for wagon underside but attach to center of frame (Fig. 1F)
- Attaching velcro straps: Locate the 4 velcro (2 front, 2 rear) straps on the front and rear of fabric liner (Fig. 1E).
- Secure velcro straps by placing around wagon frame as shown (Fig. 1E).
- Finish by securing fabric liner velcro attachments as shown (Fig. 1G).
- To remove fabric liner from wagon frame: Follow these steps in reverse.
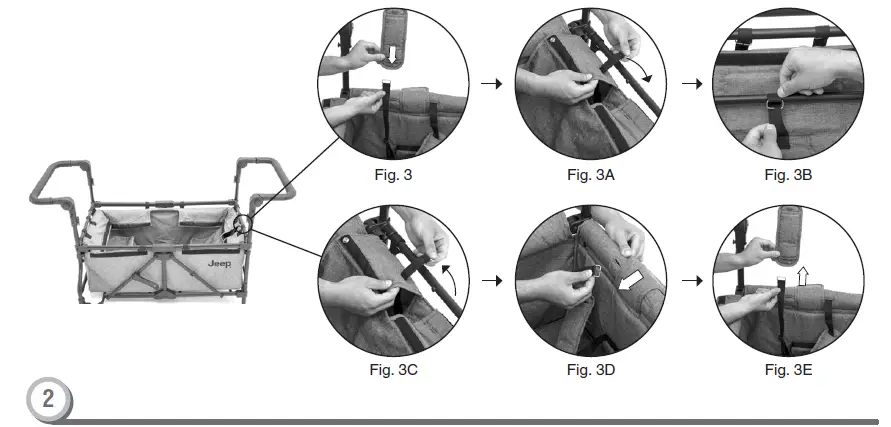
INSTALLING & REMOVING SHOULDER STRAPS FOR CLEANING
- To install shoulder straps: Slide shoulder strap fabric onto C-ring strap (Fig. 3)
- Slip C-ring strap through slit in fabric liner (Fig. 3A).
- Secure by placing strap over the wagon frame and pulling strap through the slit at the bottom of the C-ring (Fig. 3B).
- To remove shoulder straps: Remove C-ring strap by pulling strap through slit and removing it (Fig. 3C)
- Remove strap from fabric liner slit (Fig. 3D)
- Remove shoulder strap fabric from harness by sliding up and off (Fig. 3E)
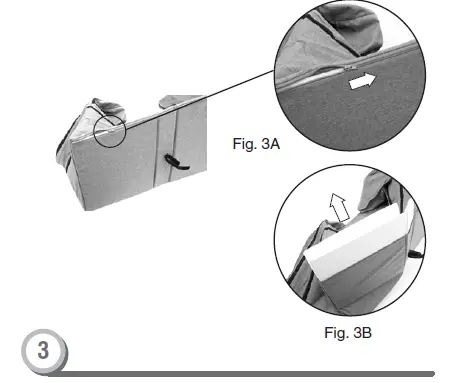
REMOVING SEAT PAD FOR CLEANING
- Use earlier instructions on pg. 12 to remove fabric liner from frame.
- Locate zipper at the bottom edge of fabric (Fig. 3A).
- Unzip to remove foam and board (Fig. 3B).
- To replace, follow these steps in reverse.
ATTACHING CAR SEAT ADAPTER
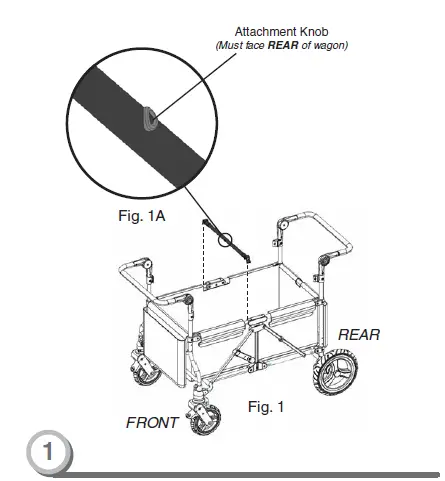
ATTACHING CAR SEAT SUPPORT BAR TUBE TO WAGON FRAME
- To attach car seat bar: Locate attachment points on both sides of the wagon frame and align support bar tube to frame (Fig. 1).
- Clip car seat bar to top frame, making sure the attachment knob in the center of support bar tube is facing the REAR of the wagon (Fig. 1A).

ATTACHING CAR SEAT ADAPTER HOUSING TO SUPPORT BAR TUBE
- To attach car seat adapter housing: Attach first adapter to the support bar tube by opening clip and closing it over the bar, ensuring the attachment knob in the center of the support bar tube is aligned with the hole in adapter housing (Fig. 2, Fig. 2A).
NOTE: The adapter housing can only attach in one direction. - Clip remaining adapter to the frame towards the REAR of the wagon (Fig. 2B).
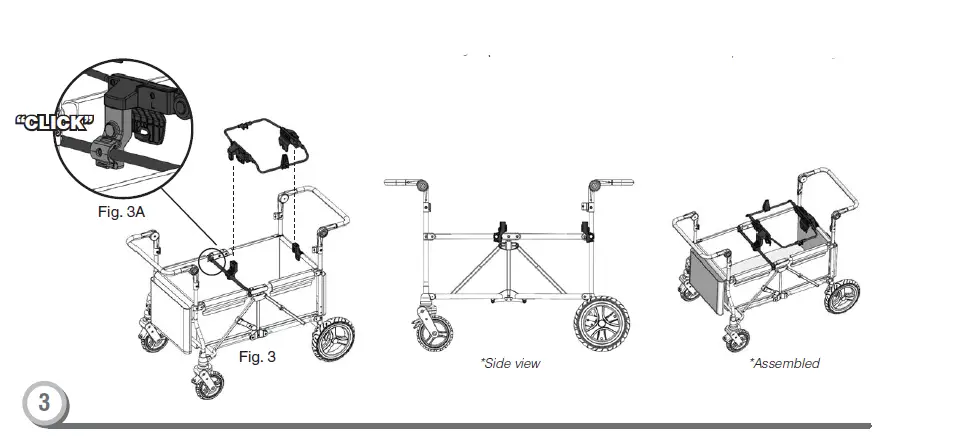
ATTACHING 5-IN-1 ADAPTER TO CAR SEAT ADAPTER
- To attach 5-in-1 adapter: Align adapter with connection points (Fig. 3).
- Attach 5-in-1 adapter by pushing down on connection points. When correctly locked in place you will hear a “CLICK” on both sides. (Fig. 3A) NOTE: The 5-in-1 adapter can attach to adapter housing in EITHER direction.
ATTACH GRACO® CAR SEATS
Graco SnugRide® Click Connect™ 30, 35, and 40
Lock The Rear Wheels: 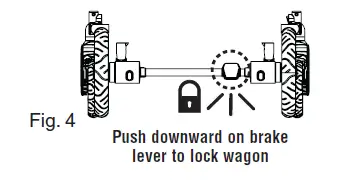
Attaching Car Seat Adapter: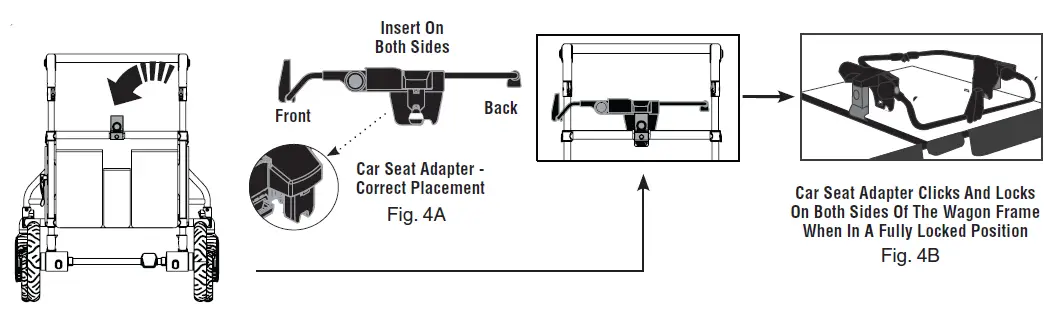
Attaching Graco Car Seats- SnugRide® Click Connect™ 30, 35 and 40:
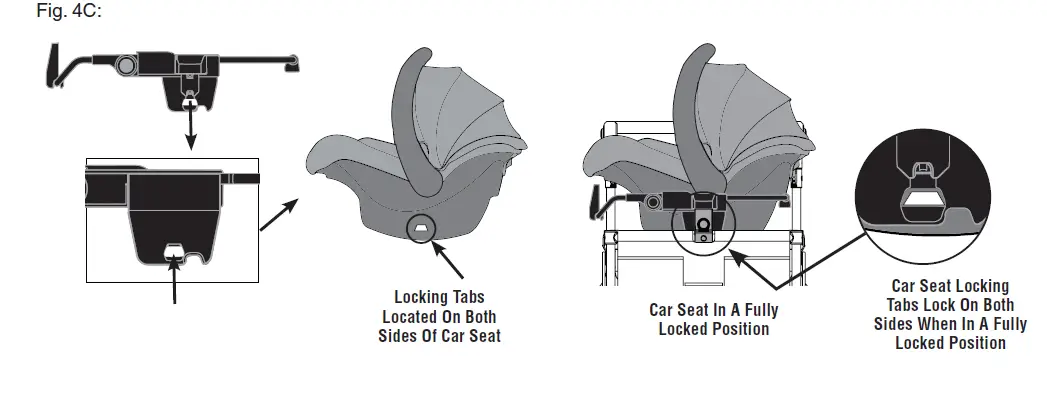
Lock the rear wheels (Fig. 4). Attach the car seat adapter to the stroller frame (Fig. 4A) until it clicks into a fully locked position (Fig. 4B). Place car seat into car seat adapter until it “CLICKS” into a fully locked position. Chicco car seats “CLICK” and lock on both sides of the adapter when in a fully locked position (Fig. 4C). Make sure car seat is fully fastened by pulling upward.
Securing Car Seat With Velcro Straps:
Securing Car Seat With Velcro Straps:
Final step to secure the footrest side of car seat onto stroller, use the straps with velcro to secure seat onto stroller. (Fig. 4D). Check that car seat is securely attached by pulling up on the car seat. To remove, undo latches and unlock car seat from adapter.
Removing Car Seat – To remove, squeeze release handle at back of infant restraint and lift upward out of adapter.
ATTACH CHICCO® CAR SEATS Chicco Keyfit 30™
Lock The Rear Wheels: 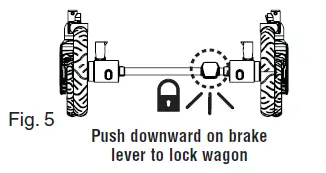
Attaching Car Seat Adapter: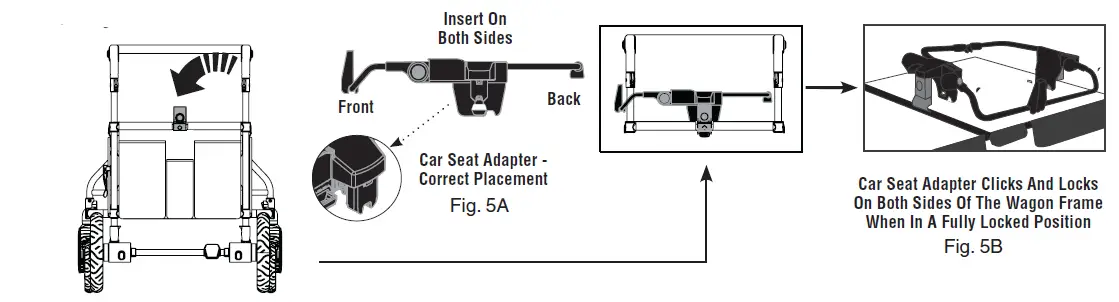
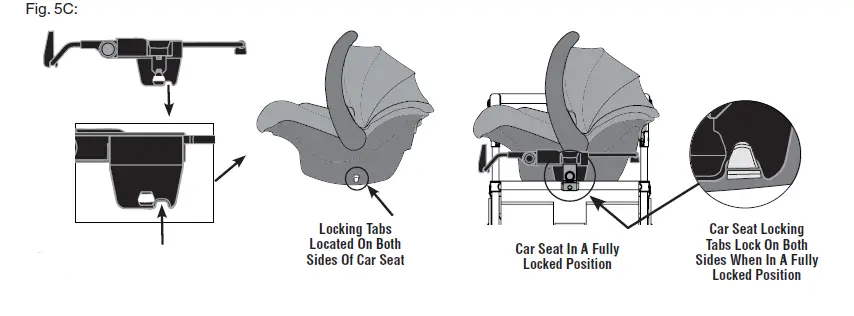
Attaching Chicco Car Seats – Keyfit 30™:
Lock the rear wheels (Fig. 5). Attach the car seat adapter to the stroller frame (Fig. 5A) until it clicks into a fully locked position (Fig. 5B). Place car seat into car seat adapter until it “CLICKS” into a fully locked position. Chicco car seats “CLICK” and lock on both sides of the adapter when in a fully locked position (Fig. 5C). Make sure car seat is fully fastened by pulling upward.
Securing Car Seat With Velcro Straps: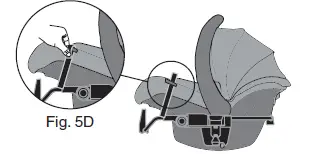
Securing Car Seat With Velcro Straps:
Final step to secure the footrest side of car seat onto stroller, use the straps with velcro to secure seat onto stroller. (Fig. 5D). Check that car seat is securely attached by pulling up on the car seat. To remove, undo latches and unlock car seat from adapter.
Removing Car Seat – To remove, squeeze release handle at back of infant restraint and lift upward out of adapter.
Evenflo Nurture™ and Embrace™
Lock The Rear Wheels: 
Attaching Car Seat Adapter:
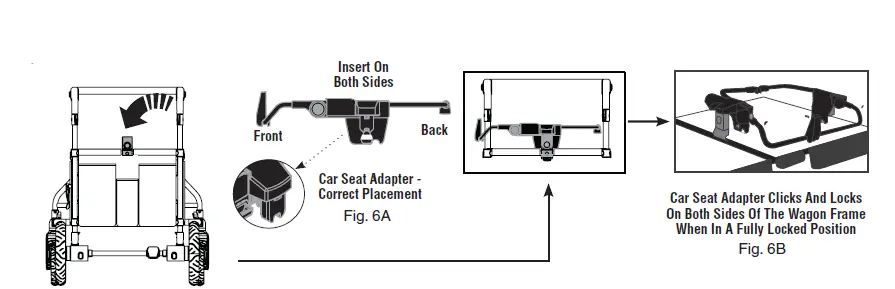

Attaching Evenflo Car Seats – Evenflo® Nurture™ and Embrace™:
Lock the rear wheels (Fig. 6). Press both buttons located on the front side of the adapter and rotate into a downward position (Fig. 6A). Attach the car seat adapter to the stroller frame (Fig. 6B) until it clicks into a fully locked position (Fig. 6C). Place car seat into car seat adapter until it “CLICKS” into a fully locked position. Evenflo car seats “CLICK” and lock on the back of the adapter when in a fully locked position (Fig. 6D). Make sure car seat is fully fastened by pulling upward.
Securing Car Seat With Velcro Straps: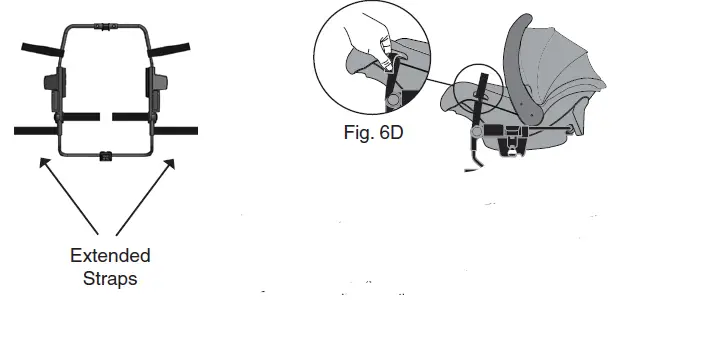
Securing Car Seat With Velcro Straps:
Final step to secure the footrest side of car seat onto wagon, use the straps with velcro to secure seat onto wagon. (Fig. 6D). Check that car seat is securely attached by pulling up on the car seat. To remove, undo latches and unlock car seat from adapter.
NOTE: For Evenflo car seats, use extended straps located on side of 5-in-1 infant car seat adapter.
Removing Car Seat – To remove, squeeze release handle at back of infant restraint and lift upward out of adapter.
Britax B-Safe 35™
Lock The Rear Wheels: 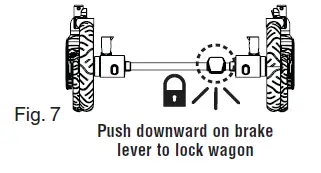
Attaching Britax Car Seats – B-Safe 35™ –
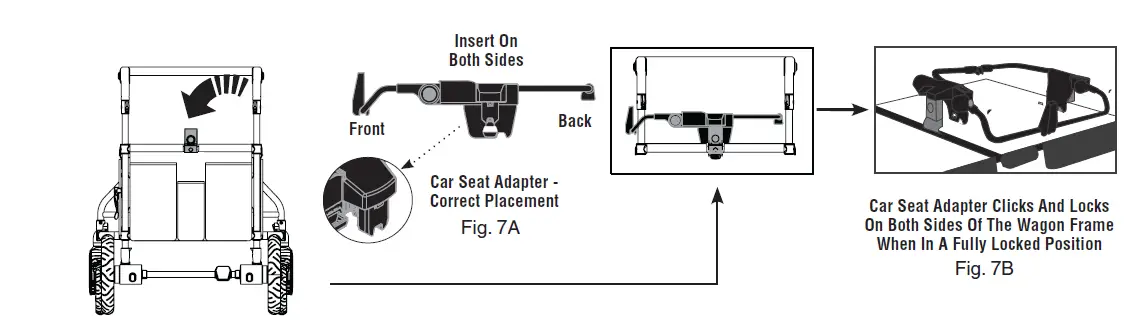
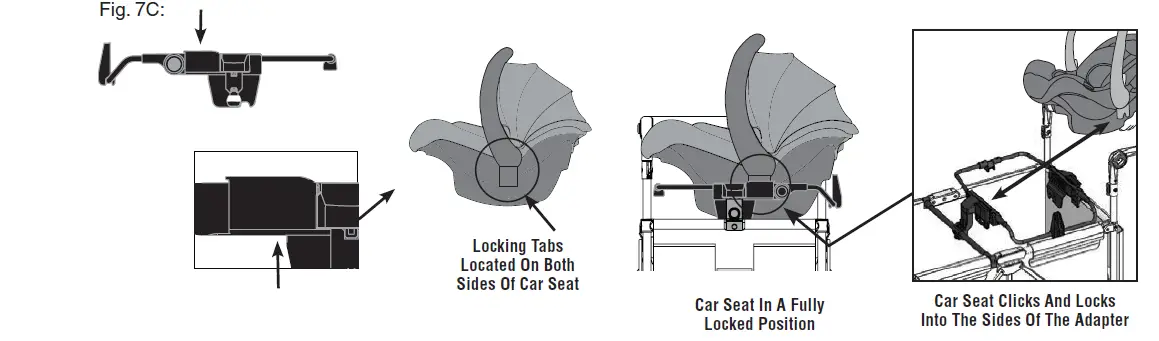
Lock the rear wheels (Fig. 7). Attach the car seat adapter to the wagon frame (Fig. 7A) until it clicks into a fully locked position (Fig. 7B). Place car seat into car seat adapter until it “CLICKS” into a fully locked position. Britax car seats “CLICK” and lock on the both sides of the adapter (Fig. 7C). Make sure car seat is fully fastened by pulling upward.
Securing Car Seat With Velcro Straps: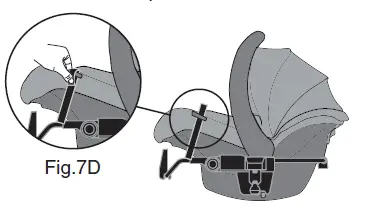
Securing Car Seats With Velcro Straps-
Final step to secure the footrest side of car seat onto stroller, use the straps with velcro to secure seat onto stroller. (Fig. 7D). Check that car seat is securely attached by pulling up on the car seat. To remove, undo latches and unlock car seat from the adapter.
Removing Car Seat – To remove, squeeze release handle at back of the infant restraint and lift upward out of the adapter.
EXTENDED WARRANTY
DON’T MISS YOUR CHANCE TO BE COVERED FOR ALL OF LIFE’S MISHAPS!
With Delta’s Extended Warranty, you’re covered for mechanical failure from normal use or if your item stops working due to normal wear and tear, plus all those unexpected surprises.
2 YEARS OF PROTECTION
For Additional Information:
Simply visit our Website, register your product, and add the Extended Warranty
https://www.deltachildren.com/pages/product-registration
Extended Warranty only available in the following States: Arkansas, Colorado, Delaware, District of Columbia, Georgia, Idaho, Illinois, Indiana, Iowa, Kansas, Kentucky, Louisiana, Maryland, Michigan, Mississippi, Missouri, Nebraska, Nevada, New Hampshire, New York, North Carolina, North Dakota, Pennsylvania, Rhode Island, South Dakota, Tennessee, Utah, West Virginia
Delta Children’s Products Corp. 114 West 26th Street
New York, NY 10001
646-435-8726
www.DeltaChildren.com


